Entries by admin

Collective #438

Original Source: http://feedproxy.google.com/~r/tympanus/~3/zfuMSJF18o8/

C438_WOTW

Inspirational Website of the Week: Volt By Drive

A great game-like design with some nice animations. Our pick this week.

Get inspired

C438_NW

Our Sponsor
Earn your master’s in Information Design and Strategy

Learn to blend digital skills like information architecture & experience design in Northwestern’s online master’s program for designers.

Apply now

C438_city

Little Big City

A fantastic project by Yi Shen: generating a real city on a little planet with the help of ClayGL.

Check it out

C438_game

Pyxel

Pyxel is a retro game development environment in Python.

Check it out

C438_fusionjs

Introducing Fusion.js: A Plugin-based Universal Web Framework

Leo Horie from Uber Engineering introduces Fusion.js, an open source web framework for building lightweight, high-performing apps.

Read it

C438_costjs

The Cost Of JavaScript In 2018

Addy Osmani covers some strategies you can use to deliver JavaScript efficiently while still giving users a valuable experience.

Read it

C438_doodles

theDoodleLibrary

A fantastic collection of free, reusable drawings and doodles in a vector (SVG) format.

Check it out

C438_css

CSS exclusions with Queen Bey

Chen Hui Jing writes about CSS Exclusions and new CSS features in general,? and why we should keep them out regardless of current browsers’ support.

Read it

C438_task

Taskbook

Taskbook enables you to effectively manage your tasks and notes across multiple boards from within your terminal.

Check it out

C438_clipboard

The Clipboard API Crashcourse

A practical guide to the Clipboard API by David East.

Check it out

C438_bullshitweb

The Bullshit Web

A very interesting article by Nick Heer on the course the web took concerning unnecessary page load for questionable purposes.

Read it

C438_network

Dynamic resources using the Network Information API and service workers

Learn about the new Network Information API that allows developers to determine the connection types and the underlying connection technology that the user agent is using. By Dean Hume.

Read it

C438_zen

CodeZen

With this tool you can generate shareable and elegant images from your source code.

Check it out

C438_betweenjs

Between.js

A lightweight JavaScript (ES6) tweening library by Alexander Buzin.

Check it out

C438_apps

UI Sources

Get real product insights from the best designed and top grossing apps on the App Store with this email newsletter.

Check it out

C438_native

Performance Techniques in 2017

A slide deck with lots of info on getting native performance with new Web APIs.

Check it out

C438_vunits

The trick to viewport units on mobile

Louis Hoebregts shows an interesting trick to get viewport units behave on mobile.

Read it

C438_reportingobs

ReportingObserver: know your code health

Eric Bidelman writes about the ReportingObserver, a new API that lets you know when your site uses a deprecated API or runs into a browser intervention.

Read it

C438_motion

Improve your motion

An article by Erick Leopoldo with practical tips on how to make animations better.

Read it

C438_font

Free Font: Bivona

A playful, energetic font by Dathan Boardman from Rocket Type.

Get it

C438_loader

Space Loader

A great space themed loader by Chris Gannon.

Check it out

Collective #438 was written by Pedro Botelho and published on Codrops.

Be Legendary. Nike Branding Concept for Tokyo 2020

Original Source: http://feedproxy.google.com/~r/abduzeedo/~3/4wQsSWfJdIg/be-legendary-nike-branding-concept-tokyo-2020

Be Legendary. Nike Branding Concept for Tokyo 2020

Be Legendary. Nike Branding Concept for Tokyo 2020

AoiroStudio
Aug 02, 2018

Daniele Caruso is a freelance illustrator based in Swindon, United Kingdom. He is working mainly in illustration, graphic design and branding. We are taking a look at his branding concept for Nike: Be Legendary, for the upcoming and anticipated Tokyo 2020. With the tagline “legendary”, Daniele included mythological creatures to create an artistic atmosphere alongside with the colour palette that totally reminds me of Dotonbori (the bright heart) from Osaka, Japan. What do you think? Would you like this kind of visual approach if it was from Nike.

More Links
danielecaruso.com
Behance
Be Legendary. Nike Branding Concept for Tokyo 2020Be Legendary. Nike Branding Concept for Tokyo 2020Be Legendary. Nike Branding Concept for Tokyo 2020Be Legendary. Nike Branding Concept for Tokyo 2020

nike
branding
concept
illustration
tokyo


The best colour tools for web designers

Original Source: http://feedproxy.google.com/~r/CreativeBloq/~3/XoqHAngN_VI/the-best-colour-tools-for-web-designers

As web designers, one of the most important choices we make has to do with our colour selections. Choose the wrong ones, and you might just lose out on an opportunity. It's true – the colours we choose can have a psychological impact on those who view them.

For example, red is generally viewed as a high-energy colour, while blue implies calmness and peace. To illustrate this point, consider the colours you might use on a website selling children's toys versus a site for a law firm. Chances are, you'll go with bright, vibrant colours for the former, and muted tones of blue and grey for the latter.

But how do you know which colours work well together? Luckily, you don't have to be a master at colour theory to put together a workable colour palette. To help you with the important task of colour selection, here are some of the best free colour web design tools (plus one special bonus at the end for Mac users).

01. HueSnap

hue snap colour tool

Snap inspiration on the go and turn it into colour palettes

Inspiration can strike at any time. It might be the decor of a hotel room or the light in the park one evening that sparks the inspiration for your next website colour scheme. For when that happens, HueSnap is here to help. You can snap a photo and use HueSnap to extract the colours from the image and make them into a palette. 

The app is tailored for mobile use, and you can save and share your palettes with others. There are plenty of features to help you modify a palette, such as options to choose complementary and compound colours, and your palettes can have up to six colours each.

02. Khroma

khroma colour tools

Khroma uses AI to suggest colours you’ll like

Khroma is an AI colour tool that aims to help you easily browse and compare original colour combinations. With it, users train an AI algorithm to act like an extension of their brain. Users start by picking 50 colours they like, and these colours are used to train a neural network that can recognise hundreds of thousands of other similar colours. Find out more about Khroma and how to use it here.

03. Coolors.co

Laptop, desktop and mobile screens displaying colour palettes

The Explore section includes hundreds – if not thousands – of palette options

Coolors offers a wide variety of tools for adjusting the palette just the way you want it. In addition, you can export your final creation in many different formats so you can use it virtually wherever you want. 

Coolors isn’t just a tool to create a colour palette, it also allows you to view other completed creations from other users so that you can draw inspiration. The Explore section has hundreds (if not thousands) of palettes you can view, save, and edit yourself. Even better, Coolors is available on desktop computers, and as an iOS application, an Adobe Photoshop and Illustrator add-on – and even a Google Chrome Extension for easy access.

04. Adobe Color CC

Colour wheel selection screen with adjustment tools

This has been around a while, but is still incredibly useful

Free tool Adobe Color CC has been around for a while, and it's one of the best colour tools out there for picking a colour palette. Not only can you create your own colour schemes, but you can also explore what others have created. 

Select a colour from the wheel or from an image and apply colour rules such as only using complementary colours, monochromatic colours or shades of the colour you select, to generate a colour palette. Or, click on each colour and explore the colour wheel to customise the selection. As an added bonus, you can save the themes you create to your Adobe library.

05. Colordot

Bars of colours with reference numbers

Use simple mouse gestures to build up your colour palette

Colordot by Hailpixel is an excellent free online tool for creating a colour palette. Using simple mouse gestures, you can select and save colours. Move your mouse back and forth for hue; up and down for lightness; scroll for saturation and click to save a colour to your palette. Click the tog icon to see each colours RGB and HSL values. It also has a $0.99/£0.99 iOS app that allows you to capture colours with your camera.

06. Eggradients

eggradients screen shot

Gradient inspiration and thought-provoking names

Eggradients offers ideas for beautiful gradients to use within your design work, put together by someone with both a great eye for colour and an interesting sense of humour. Each gradient, displayed in an egg shape, comes with its own thought-provoking name. Examples include 'Wozniak’s Broken Heart' for a pale blue and 'Merciful Enemy' for a yellow to green transition. 

07. 147 Colors

Grid of multicoloured swatches

This free tool includes the standard CSS colours

When you're responsible for generating easy-to-read CSS, sometimes using standard colours and colour names is the way to go. Thanks to 147 Colors by Brian Maier Jr, you can get a glimpse of all of them, and pick the ones that work for you. 

It contains the 17 standard colours, plus 130 other CSS colour names. Filter the results by shades of blue, green and so on, or choose from the full rainbow of 147 colours.

08. Canva Color Palette Generator

Canvas tool colour selection screen

Create a colour palette based on an image

The Color Palette Generator by Canva is perfect if you're looking to create a colour palette based around a particular image.  Although other tools offer similar options, Canva’s is super-simple to use: you upload an image and the generator will return a palette of the five main colours contained in it. You can click on the colours you like and copy the HEX value to your clipboard.

Unfortunately, this is where the usefulness of Canva’s offering ends, as this is all you can do with its palette generator – you cannot adjust the colours of the palette. The only other options you have are to copy the hex values provided or upload another photo.

09. Material Design Palette

Material Design Palette selection screen

Create a palette based on Google’s Material Design principles

With Material Design Palette you can select two colours, which are then converted into a full colour palette for you to download, complete with a preview. 

The company also offers Material Design Colors, which enables designers to see the different shades of a colour, along with their corresponding HEX values.

10. ColourCode

Bars of colours with HEX values

Save and export colour palettes as SCSS, LESS or PNG files

ColourCode by Tamino Martinius and Andreas Storm is similar to Colordot, but it offers a bit more guidance. This free tool hits you right in the face, showcasing a background that changes colours with your cursor movement. Besides that, this tool offers different categories for the palette (analogue, triad, quad, monochrome, monochrome light etc). 

With ColourCode, you can set different options along the colour wheel to create an original combination. You can also save your palette or export it as a SCSS or LESS file. You can even export to PNG, if you'd like.

11. Color Calculator

Colour Calculator instruction screen

Select a colour and a colour harmony, and this tool will generate a colour palette

The Color Calculator is straightforward: you select a colour and a colour harmony option. In return, you get back the results of your recommended colour scheme. 

What's nice about this site, however, is that it also goes into a little bit of detail about colour theory and how it relates to your colour choices.

12. HTML Color Code

HTML Color Code download screen

This suite of tools includes a list of standard colour names

This bulging free suite of tools by Dixon & Moe includes an in-depth colour picker with plenty of explanations of colour rules; a series of colour charts featuring flat design colours, Google's Material design scheme and the classic web safe colour palette; and a list of standard HTML colour names and codes. 

This site also offers tutorials and other resources for web designers, and options to export results from its tools as HEX codes, HTML, CSS and SCSS styles.

13. W3Schools: Colors Tutorial

Colors Tutorial naming examples screen

This free tutorial includes links to a number of handy colour tools

If you're looking for an all-in-one solution that includes a guide to colours, as well as a number of different tools, then the Colors Tutorial at W3Schools is the perfect choice.

Not only can you learn about colour theory, colour wheels, and colour hues, but you'll also be able to use the other tools it has, such as the Color Converter. With this tool, you're able to convert any colour to-and-from names, HEX codes, RGB, HSL, HWB and CMYK values.

14. Digital Color Meter (Mac)

Example of Digital Color Meter in action

Mac’s built-in tool lets you grab colours from your screen

OK, Mac users… this one's for you. With your machine's built-in Digital Color Meter tool, you can 'grab' a colour from anywhere on your screen, then get the values for that colour as a decimal, hexadecimal, or percentage. Plus, you can even 'copy' the selected colour as a text or image.

Read more:

If celebrities were Pantone colours3 huge colour trends for 2018How to pick the perfect colour palette every time

How to use Media Queries in JavaScript with matchMedia

Original Source: https://www.sitepoint.com/javascript-media-queries/

When it was first introduced, responsive design was one of the most exciting web layout concepts since CSS replaced tables. The underlying technology uses media queries to determine the viewing device type, width, height, orientation, resolution, aspect ratio, and color depth to serve different stylesheets.

If you thought responsive design was reserved for CSS layouts only, you’ll be pleased to hear media queries can also be used in JavaScript, as this article will explain.

Media Queries in CSS

In the following example, cssbasic.css is served to all devices. But, if it’s a screen with a horizontal width of 500 pixels or greater, csswide.css is also sent:

[code language=”html”]
<link rel="stylesheet" media="all" href="cssbasic.css" />
<link rel="stylesheet" media="(min-width: 500px)" href="csswide.css" />
[/code]

The possibilities are endless and the technique has long been exploited by most websites out there on the Internet. Resizing the width of your browser triggers changes in the layout of the webpage.

With media queries nowadays it’s easy to adapt the design or resize elements in CSS. But what if you need to change the content or functionality? For example, on smaller screens you might want to use a shorter headline, fewer JavaScript libraries, or modify the actions of a widget.

It’s possible to analyze the viewport size in JavaScript but it’s a little messy:

Most browsers support window.innerWidth and window.innerHeight. (IE before version 10 in quirks mode required document.body.clientWidth and document.body.clientHeight.)
window.onresize
All the main browsers support document.documentElement.clientWidth and document.documentElement.clientHeight but it’s inconsistent. Either the window or document dimensions will be returned depending on the browser and mode.

Even if you successfully detect viewport dimension changes, you must calculate factors such as orientation and aspect ratios yourself. There’s no guarantee it’ll match your browser’s assumptions when it applies media query rules in CSS.

The post How to use Media Queries in JavaScript with matchMedia appeared first on SitePoint.

User Experience Psychology And Performance: SmashingConf Videos

Original Source: https://www.smashingmagazine.com/2018/08/smashingconf-ux-videos/

User Experience Psychology And Performance: SmashingConf Videos

User Experience Psychology And Performance: SmashingConf Videos

The Smashing Editorial

2018-08-01T13:30:35+02:00
2018-08-01T15:01:09+00:00

Today, we’d like to shine a light on two videos from our archives as we explore two very different approaches to User Experience (UX). The first explores how we relate our websites to the needs and situations of our visitors, trying to meet them where they are emotionally. The second is a detailed technical exploration into how we measure and track the data around performance as it relates to user experience.

The second video may seem unrelated to the first video; however, while the collecting and analyzing of data might seem very impersonal, the improvements we can make based on the information makes a real difference to the experience of the people we build our sites to serve.

Designing Powerful User Experiences With Psychology

Recorded at the SmashingConf in San Francisco earlier this year, Joe Leech explains how psychology impacts user experience. Joe explains the frustrations people using our products face, and the things happening in their everyday lives and environment that can make interacting with our websites and applications difficult. He goes on to help us understand how we can design in a way to help these visitors rather than frustrate them.

How’s The UX On The Web, Really?

Once you have created a great user experience, how do you know that it is really working well? Especially in terms of site performance, we can track how people are using our sites and examine that data to see what is really happening.

At the SmashingConf in London, Ilya Grigorik was the Mystery Speaker and spoke about the ways to assess performance in real terms, and benchmark your application against other destinations on the web.

Enjoyed listening to these talks? There are many more SmashingConf videos on Vimeo. We’re also getting ready for the upcoming SmashingConf in New York — see you there? 😉

With so much happening on the web, what should we really pay attention to? At SmashingConf New York 2018 ?? we’ll explore everything from PWAs, font loading best practices, web performance and eCommerce UX optimization, to refactoring CSS, design workflows and convincing your clients. With Sarah Drasner, Dan Mall, Sara Soueidan, Jason Grigsby, and many other speakers. Oct 23–24.

Check the speakers →

SmashingConf New York 2018, with Dan Mall, Sara Soueidan, Sarah Drasner and many others.

Smashing Editorial
(ra, il)

Will SiriKit’s Intents Fit Your App? If So, Here’s How To Use Them

Original Source: https://www.smashingmagazine.com/2018/04/sirikit-intents-app-guide/

Will SiriKit’s Intents Fit Your App? If So, Here’s How To Use Them

Will SiriKit’s Intents Fit Your App? If So, Here’s How To Use Them

Lou Franco

2018-04-11T17:00:44+02:00
2018-04-11T15:22:34+00:00

Since iOS 5, Siri has helped iPhone users send messages, set reminders and look up restaurants with Apple’s apps. Starting in iOS 10, we have been able to use Siri in some of our own apps as well.

In order to use this functionality, your app must fit within Apple’s predefined Siri “domains and intents.” In this article, we’ll learn about what those are and see whether our apps can use them. We’ll take a simple app that is a to-do list manager and learn how to add Siri support. We’ll also go through the Apple developer website’s guidelines on configuration and Swift code for a new type of extension that was introduced with SiriKit: the Intents extension.

When you get to the coding part of this article, you will need Xcode (at least version 9.x), and it would be good if you are familiar with iOS development in Swift because we’re going to add Siri to a small working app. We’ll go through the steps of setting up a extension on Apple’s developer website and of adding the Siri extension code to the app.

“Hey Siri, Why Do I Need You?”

Sometimes I use my phone while on my couch, with both hands free, and I can give the screen my full attention. Maybe I’ll text my sister to plan our mom’s birthday or reply to a question in Trello. I can see the app. I can tap the screen. I can type.

But I might be walking around my town, listening to a podcast, when a text comes in on my watch. My phone is in my pocket, and I can’t easily answer while walking.

Getting the process just right ain’t an easy task. That’s why we’ve set up ‘this-is-how-I-work’-sessions — with smart cookies sharing what works really well for them. A part of the Smashing Membership, of course.

Explore features →

Smashing TV, with live sessions for professional designers and developers.

With Siri, I can hold down my headphone’s control button and say, “Text my sister that I’ll be there by two o’clock.” Siri is great when you are on the go and can’t give full attention to your phone or when the interaction is minor, but it requires several taps and a bunch of typing.

This is fine if I want to use Apple apps for these interactions. But some categories of apps, like messaging, have very popular alternatives. Other activities, such as booking a ride or reserving a table in a restaurant, are not even possible with Apple’s built-in apps but are perfect for Siri.

Apple’s Approach To Voice Assistants

To enable Siri in third-party apps, Apple had to decide on a mechanism to take the sound from the user’s voice and somehow get it to the app in a way that it could fulfill the request. To make this possible, Apple requires the user to mention the app’s name in the request, but they had several options of what to do with the rest of the request.

It could have sent a sound file to the app.
The benefit of this approach is that the app could try to handle literally any request the user might have for it. Amazon or Google might have liked this approach because they already have sophisticated voice-recognition services. But most apps would not be able to handle this very easily.
It could have turned the speech into text and sent that.
Because many apps don’t have sophisticated natural-language implementations, the user would usually have to stick to very particular phrases, and non-English support would be up to the app developer to implement.
It could have asked you to provide a list of phrases that you understand.
This mechanism is closer to what Amazon does with Alexa (in its “skills” framework), and it enables far more uses of Alexa than SiriKit can currently handle. In an Alexa skill, you provide phrases with placeholder variables that Alexa will fill in for you. For example, “Alexa, remind me at $TIME$ to $REMINDER$” — Alexa will run this phrase against what the user has said and tell you the values for TIME and REMINDER. As with the previous mechanism, the developer needs to do all of the translation, and there isn’t a lot of flexibility if the user says something slightly different.
It could define a list of requests with parameters and send the app a structured request.
This is actually what Apple does, and the benefit is that it can support a variety of languages, and it does all of the work to try to understand all of the ways a user might phrase a request. The big downside is that you can only implement handlers for requests that Apple defines. This is great if you have, for example, a messaging app, but if you have a music-streaming service or a podcast player, you have no way to use SiriKit right now.

Similarly, there are three ways for apps to talk back to the user: with sound, with text that gets converted, or by expressing the kind of thing you want to say and letting the system figure out the exact way to express it. The last solution (which is what Apple does) puts the burden of translation on Apple, but it gives you limited ways to use your own words to describe things.

The kinds of requests you can handle are defined in SiriKit’s domains and intents. An intent is a type of request that a user might make, like texting a contact or finding a photo. Each intent has a list of parameters — for example, texting requires a contact and a message.

A domain is just a group of related intents. Reading a text and sending a text are both in the messaging domain. Booking a ride and getting a location are in the ride-booking domain. There are domains for making VoIP calls, starting workouts, searching for photos and a few more things. SiriKit’s documentation contains a full list of domains and their intents.

A common criticism of Siri is that it seems unable to handle requests as well as Google and Alexa, and that the third-party voice ecosystem enabled by Apple’s competitors is richer.

I agree with those criticisms. If your app doesn’t fit within the current intents, then you can’t use SiriKit, and there’s nothing you can do. Even if your app does fit, you can’t control all of the words Siri says or understands; so, if you have a particular way of talking about things in your app, you can’t always teach that to Siri.

The hope of iOS developers is both that Apple will greatly expand its list of intents and that its natural language processing becomes much better. If it does that, then we will have a voice assistant that works without developers having to do translation or understand all of the ways of saying the same thing. And implementing support for structured requests is actually fairly simple to do — a lot easier than building a natural language parser.

Another big benefit of the intents framework is that it is not limited to Siri and voice requests. Even now, the Maps app can generate an intents-based request of your app (for example, a restaurant reservation). It does this programmatically (not from voice or natural language). If Apple allowed apps to discover each other’s exposed intents, we’d have a much better way for apps to work together, (as opposed to x-callback style URLs).

Finally, because an intent is a structured request with parameters, there is a simple way for an app to express that parameters are missing or that it needs help distinguishing between some options. Siri can then ask follow-up questions to resolve the parameters without the app needing to conduct the conversation.

The Ride-Booking Domain

To understand domains and intents, let’s look at the ride-booking domain. This is the domain that you would use to ask Siri to get you a Lyft car.

Apple defines how to ask for a ride and how to get information about it, but there is actually no built-in Apple app that can actually handle this request. This is one of the few domains where a SiriKit-enabled app is required.

You can invoke one of the intents via voice or directly from Maps. Some of the intents for this domain are:

Request a ride
Use this one to book a ride. You’ll need to provide a pick-up and drop-off location, and the app might also need to know your party’s size and what kind of ride you want. A sample phrase might be, “Book me a ride with <appname>.”
Get the ride’s status
Use this intent to find out whether your request was received and to get information about the vehicle and driver, including their location. The Maps app uses this intent to show an updated image of the car as it is approaching you.
Cancel a ride
Use this to cancel a ride that you have booked.

For any of this intents, Siri might need to know more information. As you’ll see when we implement an intent handler, your Intents extension can tell Siri that a required parameter is missing, and Siri will prompt the user for it.

The fact that intents can be invoked programmatically by Maps shows how intents might enable inter-app communication in the future.

Note: You can get a full list of domains and their intents on Apple’s developer website. There is also a sample Apple app with many domains and intents implemented, including ride-booking.

Adding Lists And Notes Domain Support To Your App

OK, now that we understand the basics of SiriKit, let’s look at how you would go about adding support for Siri in an app that involves a lot of configuration and a class for each intent you want to handle.

The rest of this article consists of the detailed steps to add Siri support to an app. There are five high-level things you need to do:

Prepare to add a new extension to the app by creating provisioning profiles with new entitlements for it on Apple’s developer website.
Configure your app (via its plist) to use the entitlements.
Use Xcode’s template to get started with some sample code.
Add the code to support your Siri intent.
Configure Siri’s vocabulary via plists.

Don’t worry: We’ll go through each of these, explaining extensions and entitlements along the way.

To focus on just the Siri parts, I’ve prepared a simple to-do list manager, List-o-Mat.

An animated GIF showing a demo of List-o-MatMaking lists in List-o-Mat (Large preview)

You can find the full source of the sample, List-o-Mat, on GitHub.

To create it, all I did was start with the Xcode Master-Detail app template and make both screens into a UITableView. I added a way to add and delete lists and items, and a way to check off items as done. All of the navigation is generated by the template.

To store the data, I used the Codable protocol, (introduced at WWDC 2017), which turns structs into JSON and saves it in a text file in the documents folder.

I’ve deliberately kept the code very simple. If you have any experience with Swift and making view controllers, then you should have no problem with it.

Now we can go through the steps of adding SiriKit support. The high-level steps would be the same for any app and whichever domain and intents you plan to implement. We’ll mostly be dealing with Apple’s developer website, editing plists and writing a bit of Swift.

For List-o-Mat, we’ll focus on the lists and notes domain, which is broadly applicable to things like note-taking apps and to-do lists.

In the lists and notes domain, we have the following intents that would make sense for our app.

Get a list of tasks.
Add a new task to a list.

Because the interactions with Siri actually happen outside of your app (maybe even when you app is not running), iOS uses an extension to implement this.

The Intents Extension

If you have not worked with extensions, you’ll need to know three main things:

An extension is a separate process. It is delivered inside of your app’s bundle, but it runs completely on its own, with its own sandbox.
Your app and extension can communicate with each other by being in the same app group. The easiest way is via the group’s shared sandbox folders (so, they can read and write to the same files if you put them there).
Extensions require their own app IDs, profiles and entitlements.

To add an extension to your app, start by logging into your developer account and going to the “Certificates, Identifiers, & Profiles” section.

Updating Your Apple Developer App Account Data

In our Apple developer account, the first thing we need to do is create an app group. Go to the “App Groups” section under “Identifiers” and add one.

A screenshot of the Apple developer website dialog for registering an app group
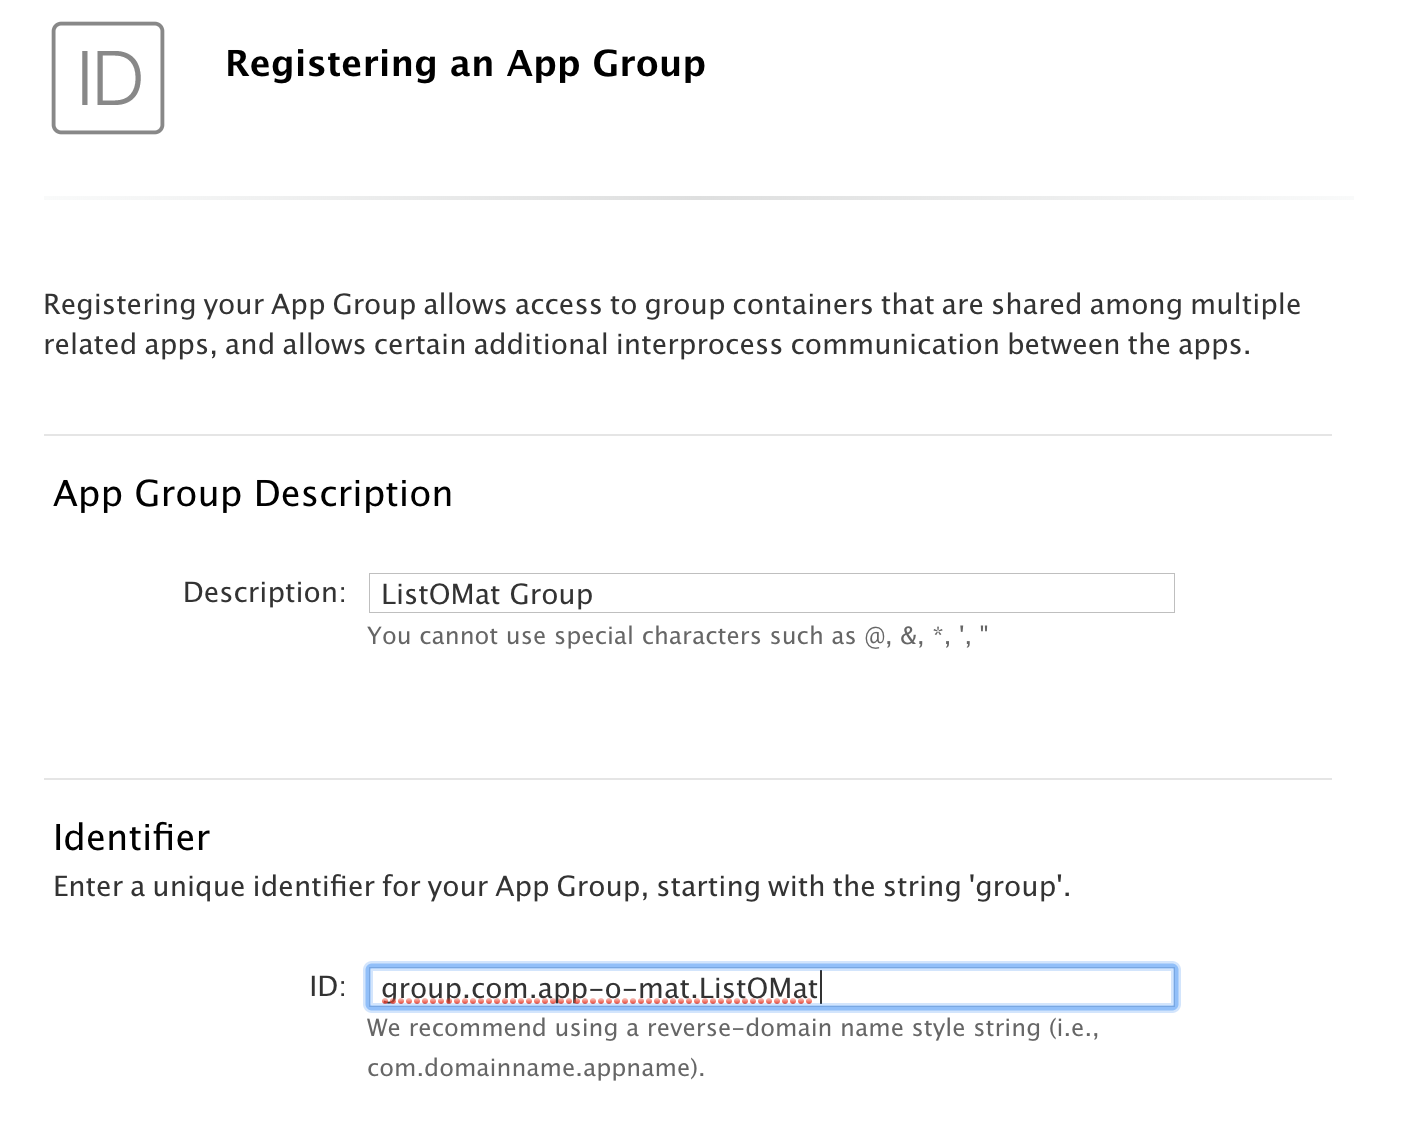
Registering an app group (Large preview)

It must start with group, followed by your usual reverse domain-based identifier. Because it has a prefix, you can use your app’s identifier for the rest.

Then, we need to update our app’s ID to use this group and to enable Siri:

Go to the “App IDs” section and click on your app’s ID;
Click the “Edit” button;
Enable app groups (if not enabled for another extension).
A screenshot of Apple developer website enabling app groups for an app IDEnable app groups (Large preview)

Then configure the app group by clicking the “Edit” button. Choose the app group from before.
A screenshot of the Apple developer website dialog to set the app group nameSet the name of the app group (Large preview)

Enable SiriKit.
A screenshot of SiriKit being enabledEnable SiriKit (Large preview)

Click “Done” to save it.

Now, we need to create a new app ID for our extension:

In the same “App IDs” section, add a new app ID. This will be your app’s identifier, with a suffix. Do not use just Intents as a suffix because this name will become your module’s name in Swift and would then conflict with the real Intents.
A screenshot of the Apple developer screen to create an app IDCreate an app ID for the Intents extension (Large preview)

Enable this app ID for app groups as well (and set up the group as we did before).

Now, create a development provisioning profile for the Intents extension, and regenerate your app’s provisioning profile. Download and install them as you would normally do.

Now that our profiles are installed, we need to go to Xcode and update the app’s entitlements.

Updating Your App’s Entitlements In Xcode

Back in Xcode, choose your project’s name in the project navigator. Then, choose your app’s main target, and go to the “Capabilities” tab. In there, you will see a switch to turn on Siri support.

A screenshot of Xcode’s entitlements screen showing SiriKit is enabled
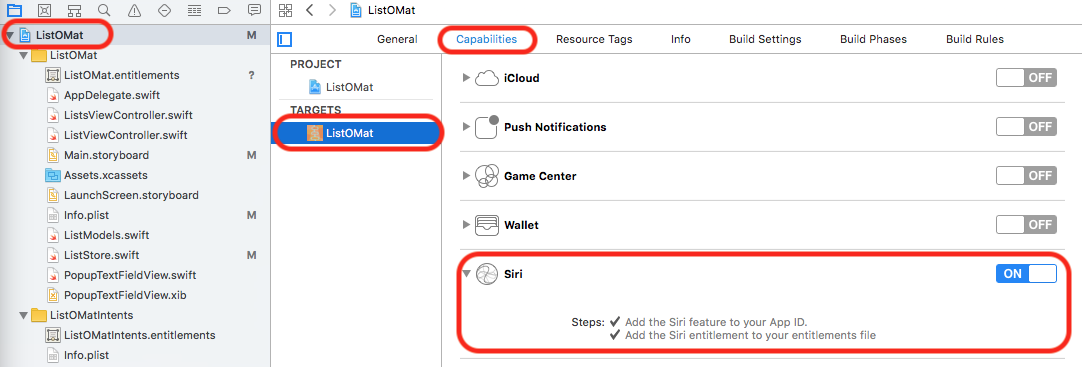
Enable SiriKit in your app’s entitlements. (Large preview)

Further down the list, you can turn on app groups and configure it.

A screenshot of Xcode's entitlements screen showing the app group is enabled and configuredConfigure the app’s app group (Large preview)

If you have set it up correctly, you’ll see this in your app’s .entitlements file:

A screenshot of the App's plist showing that the entitlements are set
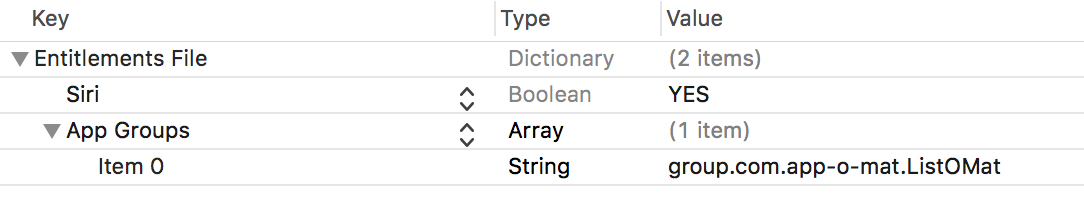
The plist shows the entitlements that you set (Large preview)

Now, we are finally ready to add the Intents extension target to our project.

Adding The Intents Extension

We’re finally ready to add the extension. In Xcode, choose “File” → “New Target.” This sheet will pop up:

A screenshot showing the Intents extension in the New Target dialog in Xcode
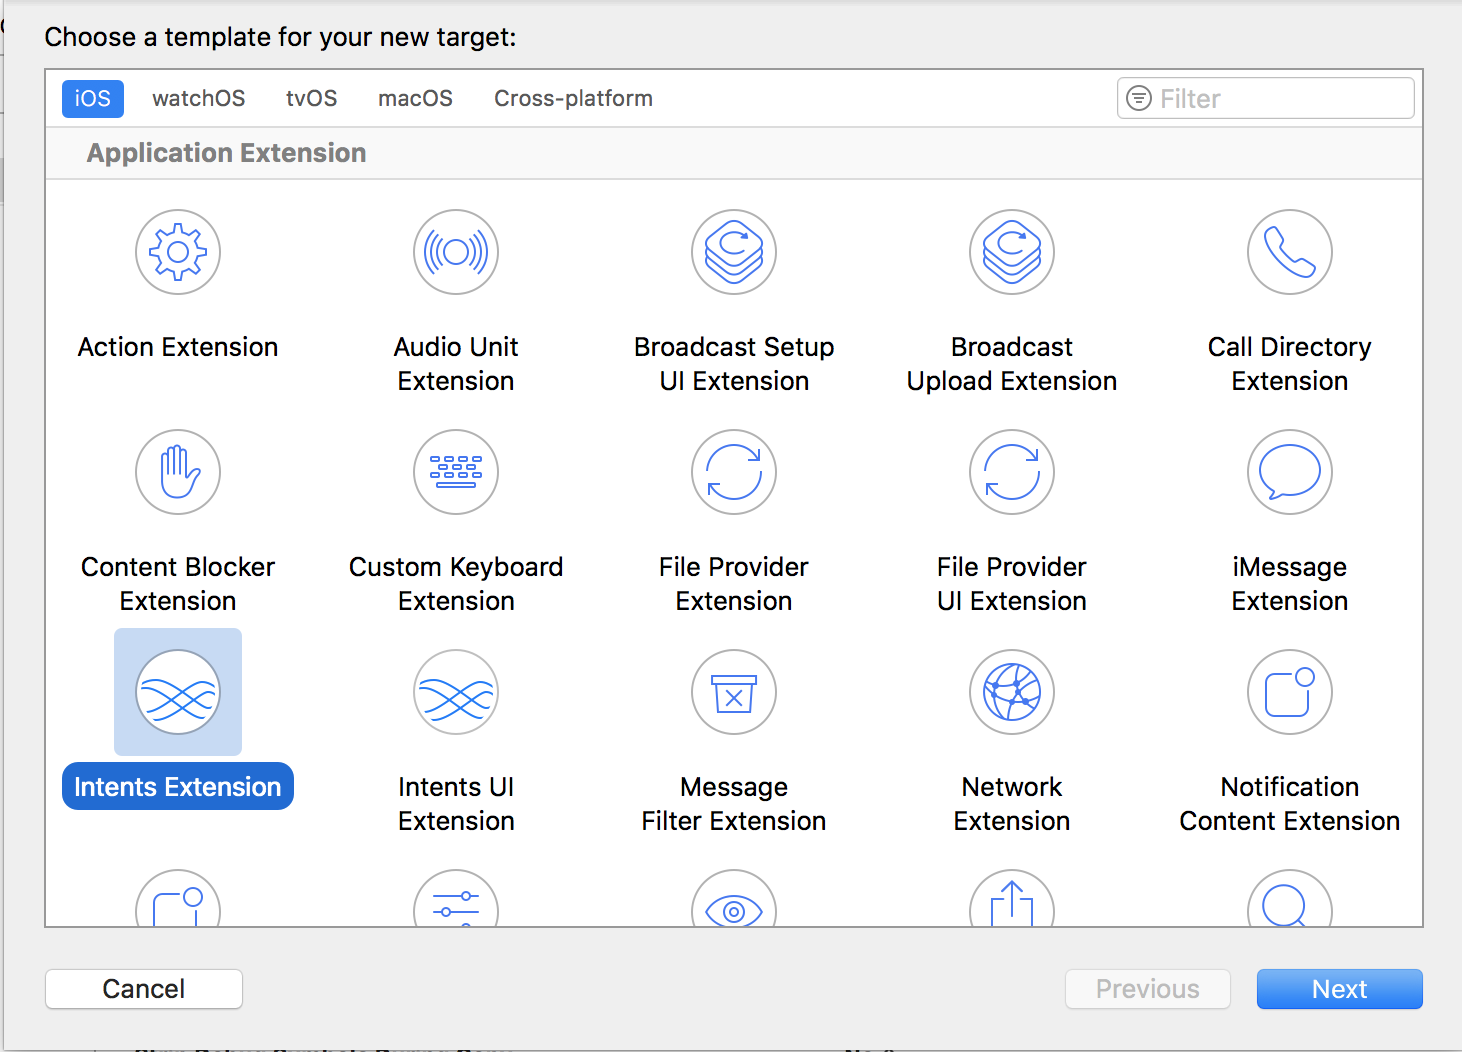
Add the Intents extension to your project (Large preview)

Choose “Intents Extension” and click the “Next” button. Fill out the following screen:

A screeenshot from Xcode showing how you configure the Intents extension
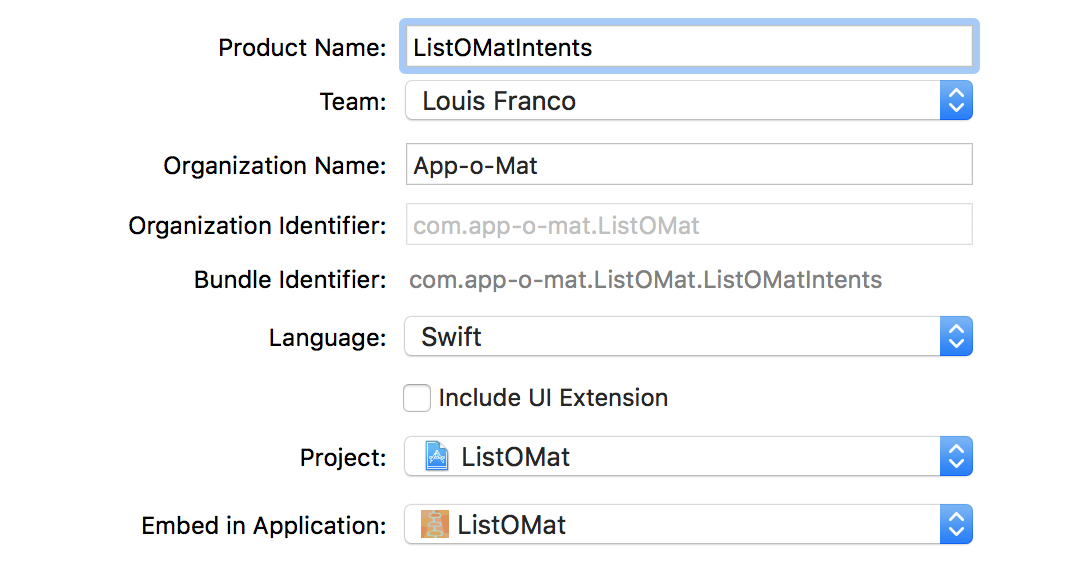
Configure the Intents extension (Large preview)

The product name needs to match whatever you made the suffix in the intents app ID on the Apple developer website.

We are choosing not to add an intents UI extension. This isn’t covered in this article, but you could add it later if you need one. Basically, it’s a way to put your own branding and display style into Siri’s visual results.

When you are done, Xcode will create an intents handler class that we can use as a starting part for our Siri implementation.

The Intents Handler: Resolve, Confirm And Handle

Xcode generated a new target that has a starting point for us.

The first thing you have to do is set up this new target to be in the same app group as the app. As before, go to the “Capabilities” tab of the target, and turn on app groups, and configure it with your group name. Remember, apps in the same group have a sandbox that they can use to share files with each other. We need this in order for Siri requests to get to our app.

List-o-Mat has a function that returns the group document folder. We should use it whenever we want to read or write to a shared file.

func documentsFolder() -> URL? {
return FileManager.default.containerURL(forSecurityApplicationGroupIdentifier: “group.com.app-o-mat.ListOMat”)
}

For example, when we save the lists, we use this:

func save(lists: Lists) {
guard let docsDir = documentsFolder() else {
fatalError(“no docs dir”)
}

let url = docsDir.appendingPathComponent(fileName, isDirectory: false)

// Encode lists as JSON and save to url
}

The Intents extension template created a file named IntentHandler.swift, with a class named IntentHandler. It also configured it to be the intents’ entry point in the extension’s plist.

A screenshot from Xcode showing how the IntentHandler is configured as an entry pointThe intent extension plist configures IntentHandler as the entry point

In this same plist, you will see a section to declare the intents we support. We’re going to start with the one that allows searching for lists, which is named INSearchForNotebookItemsIntent. Add it to the array under IntentsSupported.

A screenshot in Xcode showing that the extension plist should list the intents it handlesAdd the intent’s name to the intents plist (Large preview)

Now, go to IntentHandler.swift and replace its contents with this code:

import Intents

class IntentHandler: INExtension {
override func handler(for intent: INIntent) -> Any? {
switch intent {
case is INSearchForNotebookItemsIntent:
return SearchItemsIntentHandler()
default:
return nil
}
}
}

The handler function is called to get an object to handle a specific intent. You can just implement all of the protocols in this class and return self, but we’ll put each intent in its own class to keep it better organized.

Because we intend to have a few different classes, let’s give them a common base class for code that we need to share between them:

class ListOMatIntentsHandler: NSObject {
}

The intents framework requires us to inherit from NSObject. We’ll fill in some methods later.

We start our search implementation with this:

class SearchItemsIntentHandler: ListOMatIntentsHandler,
INSearchForNotebookItemsIntentHandling {
}

To set an intent handler, we need to implement three basic steps

Resolve the parameters.
Make sure required parameters are given, and disambiguate any you don’t fully understand.
Confirm that the request is doable.
This is often optional, but even if you know that each parameter is good, you might still need access to an outside resource or have other requirements.
Handle the request.
Do the thing that is being requested.

INSearchForNotebookItemsIntent, the first intent we’ll implement, can be used as a task search. The kinds of requests we can handle with this are, “In List-o-Mat, show the grocery store list” or “In List-o-Mat, show the store list.”

Aside: “List-o-Mat” is actually a bad name for a SiriKit app because Siri has a hard time with hyphens in apps. Luckily, SiriKit allows us to have alternate names and to provide pronunciation. In the app’s Info.plist, add this section:

A screenshot from Xcode showing that the app plist can add alternate app names and pronunciationsAdd alternate app name’s and pronunciation guides to the app plist

This allows the user to say “list oh mat” and for that to be understood as a single word (without hyphens). It doesn’t look ideal on the screen, but without it, Siri sometimes thinks “List” and “Mat” are separate words and gets very confused.

Resolve: Figuring Out The Parameters

For a search for notebook items, there are several parameters:

the item type (a task, a task list, or a note),
the title of the item,
the content of the item,
the completion status (whether the task is marked done or not),
the location it is associated with,
the date it is associated with.

We require only the first two, so we’ll need to write resolve functions for them. INSearchForNotebookItemsIntent has methods for us to implement.

Because we only care about showing task lists, we’ll hardcode that into the resolve for item type. In SearchItemsIntentHandler, add this:

func resolveItemType(for intent: INSearchForNotebookItemsIntent,
with completion: @escaping (INNotebookItemTypeResolutionResult) -> Void) {

completion(.success(with: .taskList))
}

So, no matter what the user says, we’ll be searching for task lists. If we wanted to expand our search support, we’d let Siri try to figure this out from the original phrase and then just use completion(.needsValue()) if the item type was missing. Alternatively, we could try to guess from the title by seeing what matches it. In this case, we would complete with success when Siri knows what it is, and we would use completion(.notRequired()) when we are going to try multiple possibilities.

Title resolution is a little trickier. What we want is for Siri to use a list if it finds one with an exact match for what you said. If it’s unsure or if there is more than one possibility, then we want Siri to ask us for help in figuring it out. To do this, SiriKit provides a set of resolution enums that let us express what we want to happen next.

So, if you say “Grocery Store,” then Siri would have an exact match. But if you say “Store,” then Siri would present a menu of matching lists.

We’ll start with this function to give the basic structure:

func resolveTitle(for intent: INSearchForNotebookItemsIntent, with completion: @escaping (INSpeakableStringResolutionResult) -> Void) {
guard let title = intent.title else {
completion(.needsValue())
return
}

let possibleLists = getPossibleLists(for: title)
completeResolveListName(with: possibleLists, for: title, with: completion)
}

We’ll implement getPossibleLists(for:) and completeResolveListName(with:for:with:) in the ListOMatIntentsHandler base class.

getPossibleLists(for:) needs to try to fuzzy match the title that Siri passes us with the actual list names.

public func getPossibleLists(for listName: INSpeakableString) -> [INSpeakableString] {
var possibleLists = [INSpeakableString]()
for l in loadLists() {
if l.name.lowercased() == listName.spokenPhrase.lowercased() {
return [INSpeakableString(spokenPhrase: l.name)]
}
if l.name.lowercased().contains(listName.spokenPhrase.lowercased()) || listName.spokenPhrase.lowercased() == “all” {
possibleLists.append(INSpeakableString(spokenPhrase: l.name))
}
}
return possibleLists
}

We loop through all of our lists. If we get an exact match, we’ll return it, and if not, we’ll return an array of possibilities. In this function, we’re simply checking to see whether the word the user said is contained in a list name (so, a pretty simple match). This lets “Grocery” match “Grocery Store.” A more advanced algorithm might try to match based on words that sound the same (for example, with the Soundex algorithm),

completeResolveListName(with:for:with:) is responsible for deciding what to do with this list of possibilities.

public func completeResolveListName(with possibleLists: [INSpeakableString], for listName: INSpeakableString, with completion: @escaping (INSpeakableStringResolutionResult) -> Void) {
switch possibleLists.count {
case 0:
completion(.unsupported())
case 1:
if possibleLists[0].spokenPhrase.lowercased() == listName.spokenPhrase.lowercased() {
completion(.success(with: possibleLists[0]))
} else {
completion(.confirmationRequired(with: possibleLists[0]))
}
default:
completion(.disambiguation(with: possibleLists))
}
}

If we got an exact match, we tell Siri that we succeeded. If we got one inexact match, we tell Siri to ask the user if we guessed it right.

If we got multiple matches, then we use completion(.disambiguation(with: possibleLists)) to tell Siri to show a list and let the user pick one.

Now that we know what the request is, we need to look at the whole thing and make sure we can handle it.

Confirm: Check All Of Your Dependencies

In this case, if we have resolved all of the parameters, we can always handle the request. Typical confirm() implementations might check the availability of external services or check authorization levels.

Because confirm() is optional, we could just do nothing, and Siri would assume we could handle any request with resolved parameters. To be explicit, we could use this:

func confirm(intent: INSearchForNotebookItemsIntent, completion: @escaping (INSearchForNotebookItemsIntentResponse) -> Void) {
completion(INSearchForNotebookItemsIntentResponse(code: .success, userActivity: nil))
}

This means we can handle anything.

Handle: Do It

The final step is to handle the request.

func handle(intent: INSearchForNotebookItemsIntent, completion: @escaping (INSearchForNotebookItemsIntentResponse) -> Void) {
guard
let title = intent.title,
let list = loadLists().filter({ $0.name.lowercased() == title.spokenPhrase.lowercased()}).first
else {
completion(INSearchForNotebookItemsIntentResponse(code: .failure, userActivity: nil))
return
}

let response = INSearchForNotebookItemsIntentResponse(code: .success, userActivity: nil)
response.tasks = list.items.map {
return INTask(title: INSpeakableString(spokenPhrase: $0.name),
status: $0.done ? INTaskStatus.completed : INTaskStatus.notCompleted,
taskType: INTaskType.notCompletable,
spatialEventTrigger: nil,
temporalEventTrigger: nil,
createdDateComponents: nil,
modifiedDateComponents: nil,
identifier: “(list.name)t($0.name)”)
}
completion(response)
}

First, we find the list based on the title. At this point, resolveTitle has already made sure that we’ll get an exact match. But if there’s an issue, we can still return a failure.

When we have a failure, we have the option of passing a user activity. If your app uses Handoff and has a way to handle this exact type of request, then Siri might try deferring to your app to try the request there. It will not do this when we are in a voice-only context (for example, you started with “Hey Siri”), and it doesn’t guarantee that it will do it in other cases, so don’t count on it.

This is now ready to test. Choose the intent extension in the target list in Xcode. But before you run it, edit the scheme.

A screenshot from Xcode showing how to edit a scheme
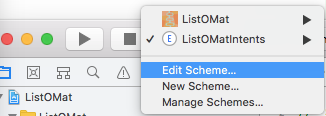
Edit the scheme of the the intent to add a sample phrase for debugging.

That brings up a way to provide a query directly:

A screenshot from Xcode showing the edit scheme dialog
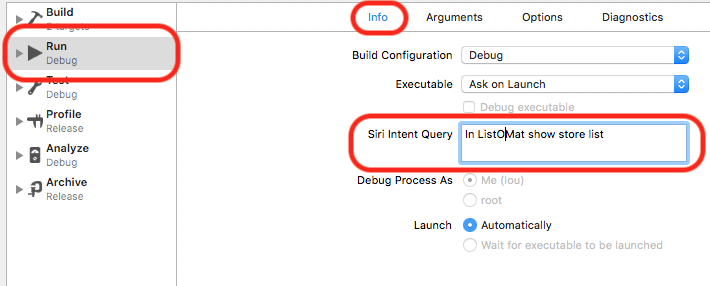
Add the sample phrase to the Run section of the scheme. (Large preview)

Notice, I am using “ListOMat” because of the hyphens issue mentioned above. Luckily, it’s pronounced the same as my app’s name, so it should not be much of an issue.

Back in the app, I made a “Grocery Store” list and a “Hardware Store” list. If I ask Siri for the “store” list, it will go through the disambiguation path, which looks like this:

An animated GIF showing Siri handling a request to show the Store listSiri handles the request by asking for clarification. (Large preview)

If you say “Grocery Store,” then you’ll get an exact match, which goes right to the results.

Adding Items Via Siri

Now that we know the basic concepts of resolve, confirm and handle, we can quickly add an intent to add an item to a list.

First, add INAddTasksIntent to the extension’s plist:

A screenshot in XCode showing the new intent being added to the plistAdd the INAddTasksIntent to the extension plist (Large preview)

Then, update our IntentHandler’s handle function.

override func handler(for intent: INIntent) -> Any? {
switch intent {
case is INSearchForNotebookItemsIntent:
return SearchItemsIntentHandler()
case is INAddTasksIntent:
return AddItemsIntentHandler()
default:
return nil
}
}

Add a stub for the new class:

class AddItemsIntentHandler: ListOMatIntentsHandler, INAddTasksIntentHandling {
}

Adding an item needs a similar resolve for searching, except with a target task list instead of a title.

func resolveTargetTaskList(for intent: INAddTasksIntent, with completion: @escaping (INTaskListResolutionResult) -> Void) {

guard let title = intent.targetTaskList?.title else {
completion(.needsValue())
return
}

let possibleLists = getPossibleLists(for: title)
completeResolveTaskList(with: possibleLists, for: title, with: completion)
}

completeResolveTaskList is just like completeResolveListName, but with slightly different types (a task list instead of the title of a task list).

public func completeResolveTaskList(with possibleLists: [INSpeakableString], for listName: INSpeakableString, with completion: @escaping (INTaskListResolutionResult) -> Void) {

let taskLists = possibleLists.map {
return INTaskList(title: $0, tasks: [], groupName: nil, createdDateComponents: nil, modifiedDateComponents: nil, identifier: nil)
}

switch possibleLists.count {
case 0:
completion(.unsupported())
case 1:
if possibleLists[0].spokenPhrase.lowercased() == listName.spokenPhrase.lowercased() {
completion(.success(with: taskLists[0]))
} else {
completion(.confirmationRequired(with: taskLists[0]))
}
default:
completion(.disambiguation(with: taskLists))
}
}

It has the same disambiguation logic and behaves in exactly the same way. Saying “Store” needs to be disambiguated, and saying “Grocery Store” would be an exact match.

We’ll leave confirm unimplemented and accept the default. For handle, we need to add an item to the list and save it.

func handle(intent: INAddTasksIntent, completion: @escaping (INAddTasksIntentResponse) -> Void) {
var lists = loadLists()
guard
let taskList = intent.targetTaskList,
let listIndex = lists.index(where: { $0.name.lowercased() == taskList.title.spokenPhrase.lowercased() }),
let itemNames = intent.taskTitles, itemNames.count > 0
else {
completion(INAddTasksIntentResponse(code: .failure, userActivity: nil))
return
}

// Get the list
var list = lists[listIndex]

// Add the items
var addedTasks = [INTask]()
for item in itemNames {
list.addItem(name: item.spokenPhrase, at: list.items.count)
addedTasks.append(INTask(title: item, status: .notCompleted, taskType: .notCompletable, spatialEventTrigger: nil, temporalEventTrigger: nil, createdDateComponents: nil, modifiedDateComponents: nil, identifier: nil))
}

// Save the new list
lists[listIndex] = list
save(lists: lists)

// Respond with the added items
let response = INAddTasksIntentResponse(code: .success, userActivity: nil)
response.addedTasks = addedTasks
completion(response)
}

We get a list of items and a target list. We look up the list and add the items. We also need to prepare a response for Siri to show with the added items and send it to the completion function.

This function can handle a phrase like, “In ListOMat, add apples to the grocery list.” It can also handle a list of items like, “rice, onions and olives.”

A screenshot of the simulator showing Siri adding items to the grocery store listSiri adds a few items to the grocery store list

Almost Done, Just A Few More Settings

All of this will work in your simulator or local device, but if you want to submit this, you’ll need to add a NSSiriUsageDescription key to your app’s plist, with a string that describes what you are using Siri for. Something like “Your requests about lists will be sent to Siri” is fine.

You should also add a call to:

INPreferences.requestSiriAuthorization { (status) in }

Put this in your main view controller’s viewDidLoad to ask the user for Siri access. This will show the message you configured above and also let the user know that they could be using Siri for this app.

A screenshot of the dialog that a device pops up when you ask for Siri permission
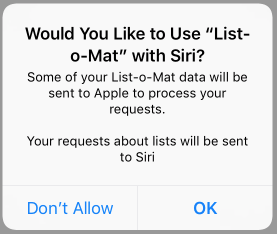
The device will ask for permission if you try to use Siri in the app.

Finally, you’ll need to tell Siri what to tell the user if the user asks what your app can do, by providing some sample phrases:

Create a plist file in your app (not the extension), named AppIntentVocabulary.plist.
Fill out the intents and phrases that you support.

A screenshot of the AppIntentVocabulary.plist showing sample phrases
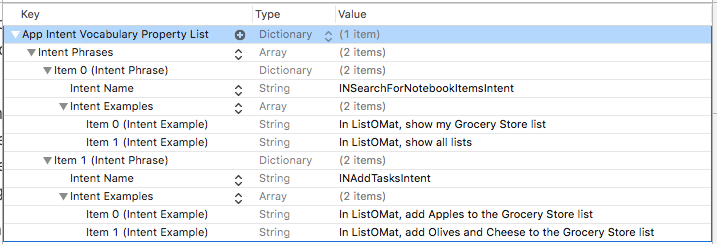
Add an AppIntentVocabulary.plist to list the sample phrases that will invoke the intent you handle. (Large preview)

There is no way to really know all of the phrases that Siri will use for an intent, but Apple does provide a few samples for each intent in its documentation. The sample phrases for task-list searching show us that Siri can understand “Show me all my notes on <appName>,” but I found other phrases by trial and error (for example, Siri understands what “lists” are too, not just notes).

Summary

As you can see, adding Siri support to an app has a lot of steps, with a lot of configuration. But the code needed to handle the requests was fairly simple.

There are a lot of steps, but each one is small, and you might be familiar with a few of them if you have used extensions before.

Here is what you’ll need to prepare for a new extension on Apple’s developer website:

Make an app ID for an Intents extension.
Make an app group if you don’t already have one.
Use the app group in the app ID for the app and extension.
Add Siri support to the app’s ID.
Regenerate the profiles and download them.

And here are the steps in Xcode for creating Siri’s Intents extension:

Add an Intents extension using the Xcode template.
Update the entitlements of the app and extension to match the profiles (groups and Siri support).
Add your intents to the extension’s plist.

And you’ll need to add code to do the following things:

Use the app group sandbox to communicate between the app and extension.
Add classes to support each intent with resolve, confirm and handle functions.
Update the generated IntentHandler to use those classes.
Ask for Siri access somewhere in your app.

Finally, there are some Siri-specific configuration settings:

Add the Siri support security string to your app’s plist.
Add sample phrases to an AppIntentVocabulary.plist file in your app.
Run the intent target to test; edit the scheme to provide the phrase.

OK, that is a lot, but if your app fits one of Siri’s domains, then users will expect that they can interact with it via voice. And because the competition for voice assistants is so good, we can only expect that WWDC 2018 will bring a bunch more domains and, hopefully, much better Siri.

Further Reading

“SiriKit,” Apple
The technical documentation contains the full list of domains and intents.
“Guides and Sample Code,” Apple
Includes code for many domains.
“Introducing SiriKit” (video, Safari only), WWDC 2016 Apple
“What’s New in SiriKit” (video, Safari only), WWDC 2017, Apple
Apple introduces lists and notes
“Lists and Notes,” Apple
The full list of lists and notes intents.

Smashing Editorial
(da, ra, al, il)

20 Free Plugins for WordPress Slideshows & Galleries

Original Source: http://feedproxy.google.com/~r/1stwebdesigner/~3/4mrsJPorDtw/

Image slideshows and galleries are pretty much a necessity these days. Good thing there are a ton of powerful, yet free WordPress plugins to choose from that can get the job done for you.

Because there are so many plugins to choose from, making the right choice is that much more difficult.

Here are our 20 choice picks for all of your gallery and slideshow needs. Not only are these plugins free, but we’ve also put some consideration into performance, as well. After all, speed matters just as much as functionality.

You might also like our collection of the Top 100 WordPress Plugins for 2017.

WordPress Slideshows Plugins

Soliloquy Lite

The free version of the popular slider plugin, Soliloquy Lite is an easy-to-use and flexible way to add great-looking slideshows to your WordPress website. Sliders you create are fully responsive and look great on any device.

Soliloquy Lite

Meta Slider

What makes Meta Slider so unique is that it utilizes four different types of slideshow scripts: Flex Slider 2, Nivo Slider, Responsive Slides and Coin Slider. Each has their own selection of transition effects. You have the ability to choose the one that works best for you.

Meta Slider

Smart Slider 3

Smart Slider 3 gives you features that are normally reserved for “pro” versions (even though there is a paid version available here as well). The top-shelf features in the free version include dynamic slides – which can be automatically created from your WordPress posts. Also featured are video slides from YouTube and Vimeo content.

Smart Slider 3

Ultimate Responsive Image Slider

Beyond its responsive namesake, Ultimate Responsive Image Slider sports a plethora of options to help you tailor a slideshow to your specific needs. For example, there’s now an option for Auto Height, which will allow slides of different heights to transition smoothly.

Ultimate Responsive Image Slider

WordPress Carousel Free

Carousel sliders are often a handy way to display sponsored logos. With WordPress Carousel Free, you’ll be able to create a responsive carousel with mobile touch support.

WordPress Carousel Free

WP Slick Slider and Image Carousel

Choose between an image carousel and a more traditional slideshow with WP Slick and Image Carousel. The plugin comes with pre-defined designs to ensure a great look.

WP Slick Slider and Image Carousel

Tribulant Slideshow Gallery

Tribulant Slideshow Gallery features a variety of styles – including the ability to display slide thumbnails above or below a slider. Through the use of WordPress Shortcodes, there are many customization options available.

Tribulant Slideshow Gallery

Genesis Responsive Slider

If you’re using the Genesis Framework for creating WordPress themes, then the Genesis Responsive Slider will fit right in. The plugin will take the featured image, title and excerpt from a page or post and create a simple slideshow.

Genesis Responsive Slider

Cyclone Slider 2

Cyclone Slider 2 is billed as being easy enough for beginners and powerful enough for hardcore developers. The ability to create custom templates speaks to its appeal for web professionals, while being able to choose from a ready-made template lends itself to the novice.

Cyclone Slider 2

Meteor Slides

If you’re into having a lot of choices when it comes to slide transition styles, Meteor Slides has you covered with over 20 of them. The mobile-friendly slideshows are also compatible with WordPress Multisite.

Meteor Slides

WordPress Galleries Plugins

Envira Gallery Lite

The cousin of Soliloquy (mentioned above), Envira Gallery Lite shares a very similar interface and feature set. Galleries are optimized for both speed and SEO.

Envira Gallery Lite

Gallery

Gallery features a number of ways to display photos on your site. You can use a traditional photo gallery, a photo album made up of several galleries, a slideshow or a single-image browser.

Gallery

Simple Lightbox

Simple Lightbox is a highly-customizable and lightweight plugin for displaying attractive lightboxes for your photos. Using themes, you’re able to customize the look and layout. Links can be automatically activated so that you won’t have to manually code them in.

Simple Lightbox

FooBox Image Lightbox

FooBox Image Lightbox is a bit unique in that it works in conjunction with an already existing WordPress gallery plugin (including their own FooGallery) and adds a slick, responsive lightbox. It also works directly with WordPress galleries and captioned images.

FooBox Image Lightbox

Gallery by BestWebSoft

Gallery by BestWebSoft helps you easily build an unlimited number of photo galleries and albums. You may custom sort galleries using a number of different criteria. And, everything you create will be responsive to ensure mobile compatibility.

Gallery by BestWebSoft

Easy FancyBox

Easy FancyBox will automatically link your .gif, .jpg and .png images inserted from the WordPress Media Library to open in a beautiful FancyBox lightbox. It also supports native WordPress Galleries and the popular NextGen Gallery plugin.

Easy FancyBox

Unite Gallery Lite

Aimed at being both a video and image gallery solution, Unite Gallery Lite is built for speed and power. It’s responsive, touch-enabled and even has a zoom feature.

Unite Gallery Lite

Instagram Gallery

Bring in images from your Instagram account and display them as either a photo gallery or slideshow. As you add images to Instagram, the plugin will automatically add them to your WordPress site as well.

Instagram Gallery

Awesome Flickr Gallery

If you’re using Flickr, Awesome Flickr Gallery is quite a flexible solution for displaying galleries and albums on your WordPress site. It’s compatible with both public and private photos, offers image size and cropping customization, and can be spiffed-up via CSS.

Awesome Flickr Gallery

Photoswipe Masonry Gallery

Using the PhotoSwipe JS gallery, Photoswipe Masonry Gallery turns standard WordPress Galleries into attractive masonry-style displays. Masonry is great for times when you want to display thumbnails of different sizes in a neat and orderly manner.

Photoswipe Masonry Gallery

Define Your Image

Now that we’ve found 20 of the top free slideshow and gallery plugins for WordPress, it’s time to put them to good use. Find the one(s) that best represent your vision and share it with the world!


10 Reasons to Love (and Use) Gradients in 2018

Original Source: https://www.webdesignerdepot.com/2018/04/10-reasons-to-love-and-use-gradients-in-2018/

After years of flat, material and completely minimal styles, the gradient has made a comeback. Everywhere you look, designers are using color fades to add visual interest, create user engagement and just design something that’s worth looking at.

If you aren’t a fan of gradients, maybe it’s time to rethink your stance on the issue. To help convince you, we’ve got 10 reasons to love and use gradients in your website design projects this year.

1. Backgrounds Create Interest

A gradient creates visual interest and helps move users through a design. The eye will land on one area of color and the change between hues and light and dark areas helps shift focus across the screen.

Gradients can be a highly useful and engaging design tool and add spark and intrigue to a multitude of projects. While there are plenty of ways to use gradients, one of the most popular options is as a background element with images, text and other elements layered on top of it.

The example below uses this exact technique. The gradient provides a resting place for the eye with soft colors that help more focus from the top of the screen to the bottom corner, where a “Discover More” direction is located.

The gradient carries through the rest of the page, below the scroll, so that the user always remembers where they are. It also provides a halo type area that highlights the main navigation.

2. Lettering Can Provide a Focal Point

Just as a gradient can be used in the background, it can be a foreground element as well. Color gradients are a rather versatile technique, which might contribute to their overall popularity.

Flip the usage and a foreground gradient can be used as the fill for lettering on a more plain background to highlight and bring attention to the words.

Color choice has to be intentional so that there’s always plenty of contrast and readability is maintained.

3. Overlays Can Spice Up a Bland Image

A color overlay can add extra interest to an image that is a little bland. A gradient overlay is not a fix for a low resolution or poorly composed image, but it can give a simple scene more pop.

Gradient overlays can help establish brand, as well as the voice, tone and personality of the website. Bright colors say something quite different from more muted options.

While this technique can look pretty neat, such as the portfolio example below, it is starting to get a little overused. Make sure to do something a little different with a full image, gradient overlay to set your design apart. The example below does this by completely fading the image away so that the bottom of the gradient creates a solid color bar across the bottom of the screen.

4. Help Move the Eye

A great gradient can help move the eye through a design in a way that helps create intent for users. Most users read in somewhat of an F-shaped pattern, starting at the top left and moving down and across the screen.

Use lighter and darker areas of a gradient color scheme to move the eye from a starting point, such as a logo or primary messaging, to the main call to action. The eye will go to the lightest areas of color first then move to darker spaces. Design and place the gradient color to reinforce this eye movement.

5. Create Something Memorable

While gradients are becoming more popular, the fact that every color combination is somewhat different makes them memorable to users. A killer color combination can stick out—and stick with—a user to help them remember your brand or messaging.

Design gradients with the purpose of helping create that connection. What’s cool about a good gradient is that it almost becomes a color onto itself. If you have a great gradient to work with, use it like you would any other color in your brand palette to establish a visual connection. (Or use multiple gradients as the color palette.)

6. Emphasize Brand Colors

Use a gradient if you have brand colors that lend themselves to being paired. For new brands or websites trying to establish themselves, this can be a solid way to build branding and connection with users.

Think about how to incorporate the same style of gradient into multiple uses – on the website, for social media messaging in print or ad campaigns. Seeing the same use of the same colors in the same gradient will start to stick with users, who will in turn associate those colors with you.

The example below, Community Sector Banking, does exactly this. The color choices are interesting and the gradient – on the photo and in the bottom navigation bar – reinforce the color palette and its relationship to the brand.

7. They Are Easy to Create (Or Generate)

Adding a gradient to an image or creating one from scratch can be as simple as picking two or three colors and then selecting a shape for the gradient and where colors should start, stop and overlap.

Gradients, in terms of shape are directional, from left to right or up or down; or radial, where color variations emanate from a single point in a circular fashion. A design can contain one or multiple styles of gradients.

Picking colors for the gradient might be the most difficult step. Using colors that are nearby on the color wheel will result in the most complementary and natural gradients. But that’s not always what you have to work with. In that case, you’ll want to play with colors so that you don’t end up with a nasty hue in the space where your primary color choices meet.

Need to make a gradient and don’t trust your skills? Try one of these tools:

WebGradients: Free collection of 180+ premade gradient swatches in CSS, PNG, Sketch and Photoshop.
Gradient Buttons: CSS for gradient buttons with animated hover states
Gradient Wave Generator: Pen to make a cool gradient wave using your own colors and starts and stops.

8. Color Fades Feel Natural

Even though it might not be your first thought, gradients often have colors and combinations that feel natural. Think about it, not everything in nature is a solid, single shade of green.

Gradients are a natural choice for this reason, particularly when you combine colors that would actually fade into each other in the natural world.

The illustration below is an overly obvious example with a sky that fades from day (orange) to night (blue).

9. Create Art When You Don’t Have a Dominant Visual

A good gradient can create visual interest and a visual display when you don’t have a whole lot to work with. Using a bright color, such as the example below, or brand colors can help establish your website’s presence.

Color changes are interesting enough that they can often stand alone as a design element. Think about how you use, and select colors so that they create the right emotional pull for users and help them find the right feelings to associate with the content.

Even a subtle gradient can go a long way to setting the tone for a design.

10. Gradients Are On-Trend

Gradients are an easy—and highly usable—element to add for a touch of something trendy without feeling overwhelming. With so many ways to use a gradient, it makes a lot of sense that this could be your go-to solution.

And while gradients have fallen out of favor from time to time, they tend to come back rather quickly because of an almost universal appeal.

Add Realistic Chalk and Sketch Lettering Effects with Sketch’it – only $5!

Source

p img {display:inline-block; margin-right:10px;}
.alignleft {float:left;}
p.showcase {clear:both;}
body#browserfriendly p, body#podcast p, div#emailbody p{margin:0;}

8 brilliant portfolios from young designers

Original Source: http://feedproxy.google.com/~r/CreativeBloq/~3/34aKFLCwIKA/8-brilliant-portfolios-from-young-designers

Thanks to the internet, age or location doesn't mean much for a graphic designer anymore. In fact, most creatives don't mention their age in their design portfolio, and work with clients far from their hometown. So it's always a delight when you're blown away by someone's work and realise they're fresh out of school.

As the co-founder of Semplice, a portfolio system for designers, I see creative portfolios and fresh design talent every day. Below are just a few of my favourite portfolios from exciting new designers – some are self-taught, some still working toward their degree, others a few years into their design careers. 

01. Ana Realmuto

Realmuto’s About page hits all the right notes

Ana Realmuto's portfolio features branding, web design and social media content for clients like Jameson Whiskey and Wristology Watches. But my favourite part is her About page with its hilarious baby photos – a unique and memorable personal touch. (To be clear, Ana graduated from college in 2015 and is older than these baby photos portray.) About pages can make or break a portfolio, and Realmuto's page hits all the right points. 

02. Jakub Had

Had has packed a lot of great work into a few short years

At 20 years old, Jakub Had has more experience than a lot of designers that are many years his senior. His portfolio features print, product and UI design projects for clients like Budweiser, Charles IV app and Swissionare. 

I only wish it included case studies detailing his project stories, as case studies are crucial to understanding who a designer is and how they think. But it is clear from Had's portfolio that he believes simplicity is key. 

03. Lucas Berghoef

An unsolicited redesign for FKA Twigs shows off Berghoef’s skills

Lucas Berghoef's portfolio features a carefully selected range of projects, each designed like a magazine spread with artistic layouts and full-screen images. As a 2018 college graduate, it's fitting for Berghoef to share a class project or two, like his unsolicited visual identity for artist FKA Twigs. This project is polished and detailed enough to feel like client work, showing what Berghoef can do given full creative freedom. 

Unsolicited designs are a great way to showcase your skill as a young designer, however I recommend against including more than one or two. Berghoef's portfolio strikes the perfect balance. For more tips for brand new designers, take a look at our article on how to start building up your design portfolio.

04. Liz Wells

Wells’ case studies are exemplary

Liz Wells graduated with a design degree in 2015. Between then and now, her work's been recognized by The Webbys, Awwwards, FWA, Communication Arts, Cannes Lions, The One Show's Young Gun awards and D&AD, to name a few. 

Wells' portfolio case studies are exemplary, especially given the added challenge of showcasing her conceptual user experience work. Each case study uses video, photos, notes and sketches to bring projects for clients like Google, Spotify and VICELAND to life. Read more about writing great case studies like Wells' right here.

05. Jason Yuan

Yuan’s custom grid helps his work shine

Jason Yuan is a graphic and UX designer pursuing a BFA at RISD. He received attention across the internet for his unsolicited Apple Music redesign after the company rejected him for an internship. Interestingly enough, his portfolio now boasts a 2018 internship at Apple. A lovely custom grid showcases his personal and professional work, including a poster design page I've browsed more than once. 

06. Petra Sitaru

Sitaru uses her portfolio as a landing page, showing a light overview of her work

Petra Sitaru uses her portfolio as a landing page of sorts, with offshoots to her Behance projects and social accounts. It's a light overview of her whimsical design and illustration work, an approach that could work well for designers on the job hunt wanting to quickly curate their work for each application.

07. Daniel Barkle

Barkle’s strong visuals and animations keep the visitor engaged

Daniel Barkle's portfolio dazzles with so many engaging visuals and animations you don't realise how far you've scrolled down his project pages. An emoji cursor, full-screen navigation and snappy page transitions (plus an entire section entitled 'Play') do as much to reveal his personality as his personable case studies do. Barkle graduated from college in 2015 and given the work he's done so far, I can't wait to see more.

08. Katja Alissa Mueller

Mueller’s folio is clean and streamlined

Katja Mueller's portfolio leads with a simple project grid showcasing her range of skills, from graphic design to art direction to project management. Her case study pages are equally streamlined with clean layouts and large visuals of her work. Since receiving her design degree in 2015, Katja's created work for clients like adidas, Saatchi & Saatchi and Victoria Beckham.

Read more:

How to curate a creative portfolio5 quick and easy ways to fix your portfolio7 organisations design students need to know

Exclusive Freebie: E-commerce Icon Set

Original Source: https://inspiredm.com/exclusive-freebie-e-commerce-icon-set/

Add a touch of class to your shopping site! This Flaticon E-Commerce Icon Collection has everything you could think of for both your personal and business needs. These icons are set in a range of attractive colours that can really liven up both your business and website endeavours.

Each icon is available to download in the SVG and PNG formats. Furthermore you can find more e-commerce styles on the Flaticon website. Free for personal and commercial use!

Download this awesome pack as SVG from here

For the PNG files check here

The post Exclusive Freebie: E-commerce Icon Set appeared first on Inspired Magazine.