This Week In Web Design – July 30, 2021
Original Source: http://feedproxy.google.com/~r/1stwebdesigner/~3/13L3saFgAqc/
…
Original Source: http://feedproxy.google.com/~r/1stwebdesigner/~3/13L3saFgAqc/
…
Original Source: https://www.hongkiat.com/blog/cryptocurrencies-backed-by-gold/
Many assets back cryptocurrencies. This diversity is part of what makes them so attractive. However, there’s been a recent surge in cryptocurrencies backed by gold, such as GoldCoin. In this…
Visit hongkiat.com for full content.
Original Source: http://feedproxy.google.com/~r/1stwebdesigner/~3/Egr_RR3AUsA/
Before we begin, we want to make one thing clear: this is not a sponsored post. We here at 1WD are simply excited about and impressed with this new platform that is a simple and affordable way for anyone to start selling digital products online, so we wanted to help our readers discover this new tool. The people over at Make Lemonade – a small team of makers, creators, movers, and shakers – have done it again, providing us with an easy, fast, and secure way to sell digital downloads, subscriptions, and software licenses. in this article we’re going to take a look at what Lemon Squeezy has to offer.
Overview
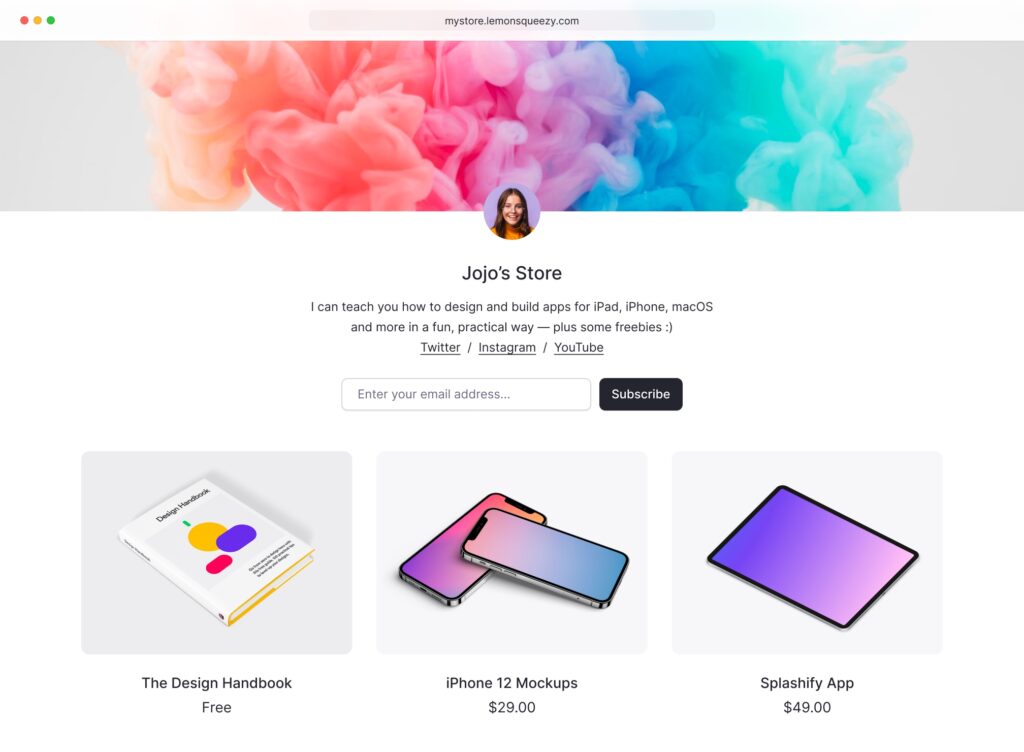
The concept is simple: easily create a beautiful “lemonade stand” for your digital products in minutes and start selling online. With pricing plans that range from free to $79 per month, anyone can take advantage of the platform and get started relatively quickly. No hosting fees, plugins, or any of the other hassles that typically come with setting up an e-commerce store. Whether you have one or one thousand products, you can get up and running with minimal elbow grease.
Getting Started
The sign up process is quick and painless. Fill out your name, email, desired store URL, and you’re good to go. Yes, it’s really that simple.
Once signed up, you’re greeted with the following screen:

From here you can add products, set up your account and payment details, and design your new store. It’s pretty simple and intuitive to accomplish each of these items, and no coding knowledge is needed. We only played around with the free version, so we don’t have any details or comparisons to offer details on what might be different about paid plans, but based on the feature differences they list on their pricing page (more below), we are guessing they are pretty similar.
Designing Your Store
The store design features are pretty limited. You’re not going to have a one-of-a-kind, stand out in the crowd lemonade stand, so if that’s a high priority then this may not be the best fit. But if you care more about getting your product(s) online and available for purchase as quickly as possible, then Lemon Squeezy is your answer.
The design capabilities are basically the choice of header image, showing your logo, store description and name, and product details. It looks like the yet-to-be-released “Juicy” plan – at $79 per month – will offer a drag and drop website builder and templates, but that option is not yet available. Still, the minimalist style of a store here is clean, crisp, and user friendly.
Payment Methods
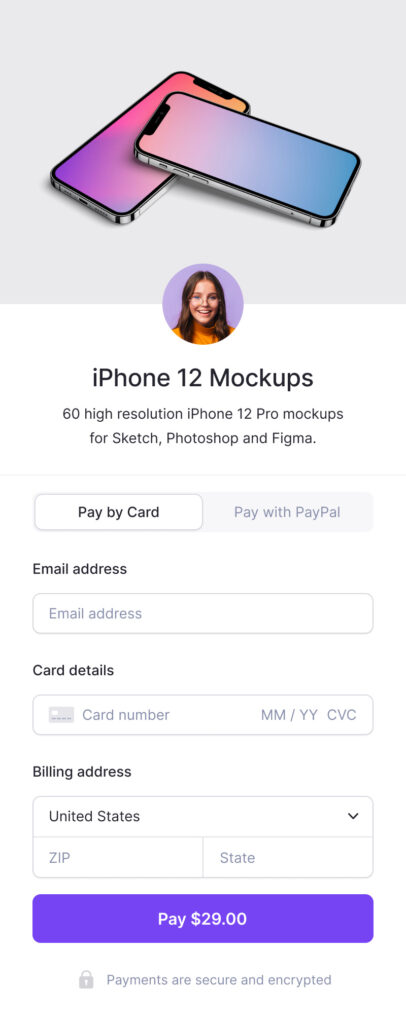
Straight out of the gate, Lemon Squeezy accepts credit cards and PayPal when your customers are paying for products. More payment methods are in the pipeline, but these basic methods make it easy for most users. one important note is that Lemon Squeezy acts as the Merchant of Record, meaning the store owner does not have the burden and legal responsibility of collecting and reporting Tax and EU VAT.
Marketing
One of the features we especially like is the built-in email marketing tools. Your customers and visitors can become email subscribers, which then gives you the ability to reach out to them for future, data-driven campaigns. You can also offer freebies for an email address to grow your mailing list. All of this is built in to the platform, so you don’t have to utilize third-party email platforms like you would in other e-commerce solutions. Unfortunately, the marketing features are currently “coming soon” as of this writing, but whenever they arrive this adds great value to the platform.

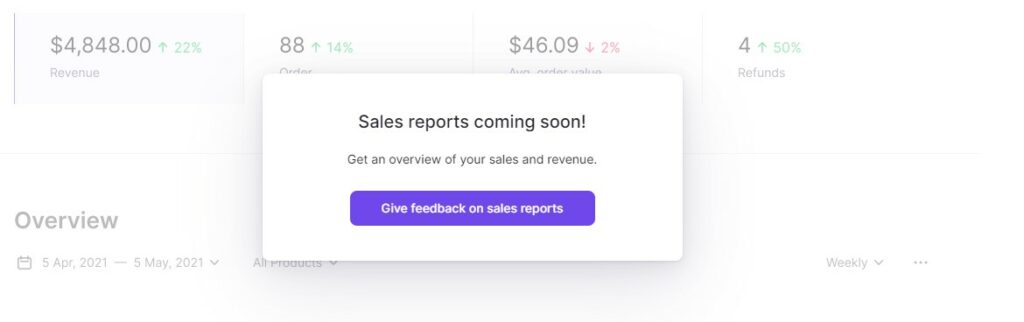
Reports
Sales, Audience, and Analytics reports are another feature that is showing as “coming soon”. Since this is a common useful element of any e-commerce platform, it is disappointing to see that it has not been offered at launch. In our opinion it may have been wiser to hide these “coming soon” features (along with marketing) until they are actually available.
Pricing
Compared to other e-commerce platforms, selling your digital products on Lemon Squeezy is extremely affordable. The “Fresh” plan is free and offers many of the same features as paid plans. The biggest difference is in the percentage fee: 8% per transaction vs. 3.5% for the paid plans. The “Sweet” plan is $29 per month and the “Juicy” plan is $79 per month. The most expensive plan is still listed as “coming soon”, but it looks like that plan will include a lot of extra features once it’s available. Both paid plans are even cheaper when you pay annually – they give you 2 months free with this option. Be sure to check out the full features comparison on their pricing page.
Conclusion: Lemon Squeezy Is A Great Way To Start Selling Your Digital Products Online
This exciting new e-commerce platform is impressive, although there are still a lot of features that will be coming soon to it. While it’s nice to see what will eventually be, we’d prefer those unavailable features to be hidden until we can use them. Otherwise, the platform has a lot of potential and lots of reasons to start using it now if you’re in the market for your own…uh…market!
Be sure to check out our other e-commerce related articles here on 1WD while you’re visiting.
Original Source: http://feedproxy.google.com/~r/abduzeedo/~3/xn_TkY9oEO8/branding-tfco
Branding for TFCO

abduzeedo07.29.21
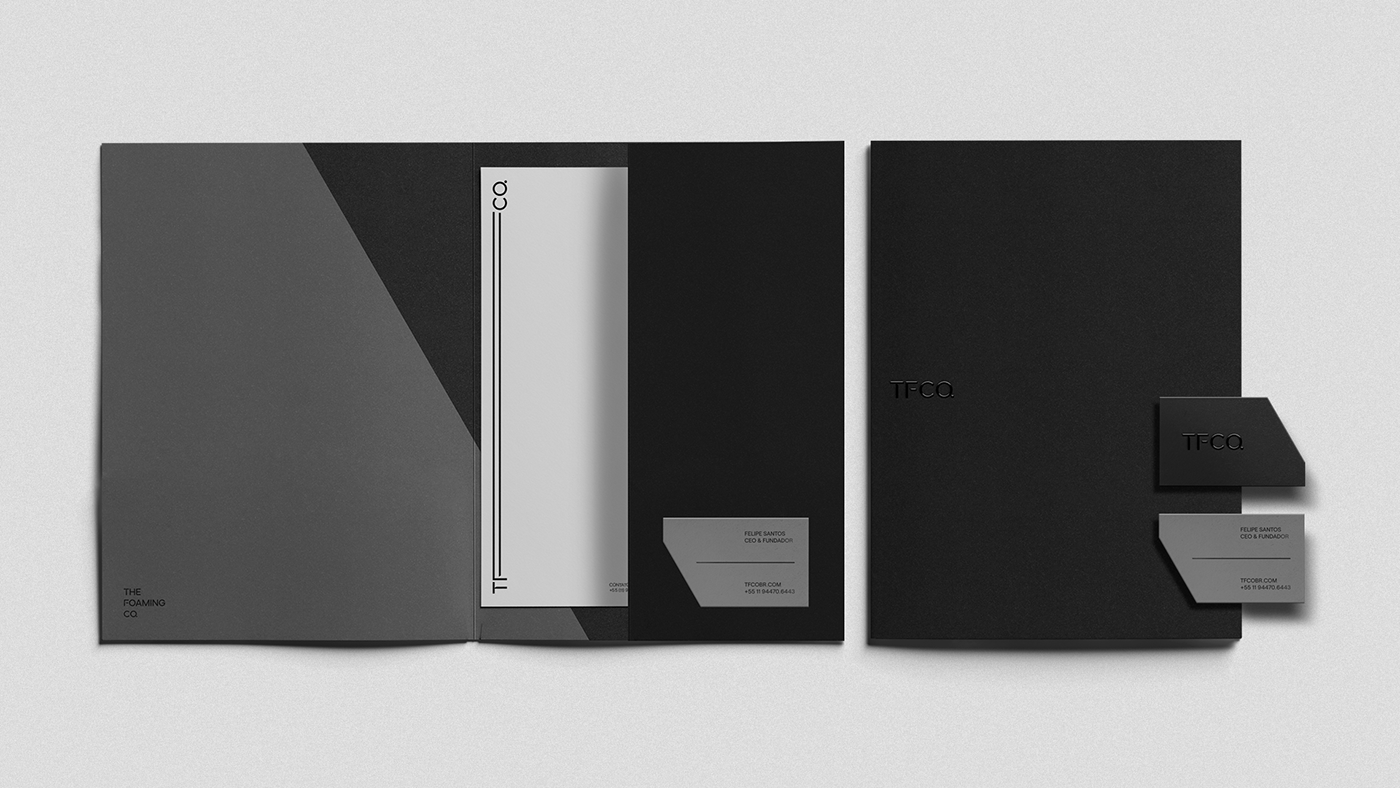
Ted Oliver shared a branding and visual identity project for TFCO. (The Foaming Co.). TFCO developed a self-levelling foamed cellular concrete, an extremely useful solution in the modernization of the Civil Construction sector, ensuring efficiency in the final result of flatness, leveling and adherence, in addition to optimizing construction time and cost.
Design
The visual identity developed for TFCO has solid forms with a notch in the 30º angle, giving personality and originality to the brand.
The notch symbolizes the shadow projected by the constructions, the stretched letter F, symbolizes the process of applying the cellular concrete to the surface.
For more information make sure to check out Ted on
Behance
Instagram
Website
Original Source: http://feedproxy.google.com/~r/1stwebdesigner/~3/cnA5si4nKAY/
…
Original Source: http://feedproxy.google.com/~r/CreativeBloq/~3/oLMTshDgSEg/wacom-twitter-storm
Warrantygate explained.
Original Source: http://feedproxy.google.com/~r/tympanus/~3/i4JkHBjvCYU/

Inspirational Website of the Week: Easy Green
A great combination of shapes, motion and animations. Our pick this week.
Get inspired

Our Sponsor
Instant websites for your clients with Divi Layout Packs
With the Divi Layout Packs you’ll get world-class designs ready to be used for your client projects.
Check it out

GradientArt
An advanced CSS gradient editor with layers, editing tools and free cloud storage.
Check it out

Building SDF fractal noise
Inigo Quilez wrote an article about natively building SDF fractal noise by iteratively blending spheres as opposed to traditional noise displacement.
Read it

A privacy war is raging inside the W3C
A very interesting article on how the World Wide Web Consortium has become a key battleground in the fight over web privacy and competition.
Read it

gridless.design
A thesis that describes the problems with traditional design techniques when used to prepare web experiences and why the design grid is fundamentally flawed for crafting responsive, reusable interfaces.
Read it

Christmas Collisions
Paul Henschel’s amazing implementation of BestServedBold’s Dribbble shot Christmas Collisions.
Check it out

Frustrating Design Patterns: Broken Filters
Vitaly Friedman writes about how filters can be frustrating and how we can get them right.
Read it

Inline text editor
A free WYSIWYG editor with a clean UI and easy-to-use features to provide a simple and modern JavaScript rich text editor.
Check it out

What’s the difference between the alignment values of start, flex-start, and self-start?
In this article you’ll learn about the difference between the alignment values of start, flex-start, and self-start in flexbox. By Rachel Andrew.
Read it

SVG Favicons in Action
Philippe Bernard’s article about creating an SVG favicon for real.
Read it

Glass UI
Generate CSS and HTML components using the glassmorphism design specifications based on the Glass UI library.
Check it out

Detecting media query support in CSS and JavaScript
Kilian Valkhof shows how to detect support for a media query in CSS and Javascript.
Read it

Average Page Load Time in 2021
In this article, you’ll learn about the average page load time in 2021 and importance of web vitals with additional web vital tips.
Read it

imaskjs
A vanilla JavaScript input mask without external dependencies.
Check it out

Create your first Figma plugin with Svelte
Learn how to setup your Figma plugin dev environment with rollup and svelte for reactive components.
Read it

MeisterNote
MeisterNote is a beautiful, intuitive documentation software that helps teams write and organize information collaboratively.
Check it out

Build Complex CSS Transitions using Custom Properties and cubic-bezier()
Temani Afif shows how to use the @property feature to build complex CSS transitions.
Read it

Building A Dynamic Header With Intersection Observer
Michelle Barker shows how to use Intersection Observer to build a fixed header component that changes when it intersects with different sections of the webpage.
Read it
![]()
Lineicons
5000+ essential line icons available in WebFont, SVG, PNG, React, PNG, and PDF Files.
Check it out

Goomics
Take a look behind Google’s corporate curtain with a former employee’s critical comics.
Check it out

WebGL carousel (OGL)
A really cool slideshow made with OGL by Francesco Michelini.
Check it out

76.
A very nice demo where an image gets assembled on scroll. By ycw.
Check it out

From Our Blog
Inspirational Websites Roundup #27
A special selection of the most creative and interesting websites from the last weeks.
Check it out

From Our Blog
Rock the Stage with a Smooth WebGL Shader Transformation on Scroll
A handy setup to create a smooth scroll based GLSL animation using Three.js and GSAP that you can use to create your own WebGL shader animations.
Check it out
The post Collective #670 appeared first on Codrops.
Original Source: https://www.webdesignerdepot.com/2021/07/collaborative-task-management-with-taskade/
 Productivity is a crowded space, with countless apps and services promising to make your life and business easier and more profitable. Of all the apps that make that promise, very few deliver, but we’ve found one that does: Taskade.
Flexible Planning With Taskade
Every problem is unique, and part of what defines us as creative professionals is the different ways we approach problems. What suits one person in one situation doesn’t suit another in another. This is where many planning apps fall down: they adopt one singular approach and expect users to fit around the app.
Taskade is different. Like the love-child of Trello, Notion, and Slack, Taskade uses a template approach to create a flexible planning system that you can use in whatever way you prefer.
When you open up Taskade, you’ll see some quick options: ‘blank,’ ‘weekly planner,’ ‘meeting agenda,’ and so forth. But there’s also a ‘more’ option that will give you access to the hundreds of templates Taskade supplies. There are dozens of template categories, and each category contains multiple templates that you can use to drive your planning process.

Whether you’re looking for a task list for launching on Product Hunt, a design system checklist, or a project scrum board, you’ll find the template ready and waiting for you.
If none of the predesigned options are right for the task at hand, Taskade gives you the option to create your own template from the basic building blocks of boards, actions, mind maps, charts, and lists.

Team Collaboration With Taskade
One of Taskade’s main strengths is its ability to work equally well for individuals and teams.
It makes sense when you’re evaluating a product that you do it on your own. But we encourage you to bring team members on board early in the trial because it’s when working with teams that Taskade really excels as a collaborative tool.
Once you’ve created a new planning project, you can invite your team, either by email or — if they’re already registered — by tagging them with their Taskade username.
You can assign tasks to individuals or multiple individuals (a much better option than the free-for-all you find in some to-do apps). You can also set deadlines for tasks so that everyone knows what the schedule is.
Team Chat on Taskade
Another area that Taskade excels for teams is the built-in real-time live chat. You can communicate with team members right in the project instead of jumping onto Slack or email.
For teams working remotely, or even just multi-tasking throughout the day, it’s a great way of ensuring that everyone has the information they need. As a result, mistakes are minimized, and best of all, there’s a written record that can be referred back to at any time.
Chat can be sent to the whole team, or direct messaged to an individual, so you don’t need to worry about filling up everyone’s notifications with messages that don’t apply to them.

Project Management With Taskade
If you’re working on a single project, then you probably know exactly where it is at all times. But for anyone working on multiple projects, it can be hard to keep track of everything. So Taskade has several different options for project managers.
The Mindmap section is one of the most useful parts of Taskade because it gives you a complete overview of everything in your project. You can see what has been completed and how much time it took — that way, you can assess how viable the timeline for your other tasks is.
Another great feature of Taskade is the activity feed. When one of your team makes a change to a project, it will pop up in your activity feed, and the next time you log in, you’ll see the status of your projects with a single glance.

Multi-Platform
One of our favorite aspects of Taskade is that it works equally well across different platforms. As well as the desktop web app, you’ll also find native apps in the iOS app store and the Android play store.
Syncing your account over different apps is awesome because ideas often occur at inconvenient times — on your commute, walking the dog. Even when you’re at your desk, it’s much handier to grab your phone and make notes than it is to switch to your browser and visit a site.

Easy Registration
If you’re feeling the pressure of a bulging inbox, or to-do lists on multiple post-its, then the last thing you need is another complex, confusing task to add to the pile.
Taskade is super-easy to get started with. Just click the ‘Sign up’ link in the top right of the site, and you’ll have three options: Sign up with Google, sign up with your email, or you can continue as a guest.
If you’re not sold yet, then continue as a guest — essentially a free trial — you can sign in properly later once your curiosity is satisfied.

Free to Use
Taskade is free to use on a limited basis. The free plan comes with 500Mb of storage and a maximum 25Mb file size. You can create individual tasks or whole projects, workflows, and custom templates and share tasks and projects with your team. That’s enough to help you make the most of Taskade for $0.
If you find that the generous free plan isn’t quite enough, paid plans start at just $5 per month. The paid plan gives you unlimited storage and bumps the maximum file size up to 250Mb. You have the same core features as the free plan; it’s just that they’re unlimited, which means you can do even more planning. In addition, the paid plan adds some handy extra features that are great time-savers, such as sorting tasks, creating repeat tasks, and bulk assigning tasks. Just look at how Taskade compares to similar tools.
Most professionals will get along with the free plan just fine, but $5 per month for unlimited storage is a great deal. On top of that, you have future premium features to look forward to, including a project revision history and a calendar view.
You can sign up to Taskade for free now, as a guest, with your email, or with Google.
[– This is a sponsored post on behalf of Taskade –]
Source
p img {display:inline-block; margin-right:10px;}
.alignleft {float:left;}
p.showcase {clear:both;}
body#browserfriendly p, body#podcast p, div#emailbody p{margin:0;}
The post Collaborative Task Management with Taskade first appeared on Webdesigner Depot.
Original Source: https://smashingmagazine.com/2021/07/global-local-styling-nextjs/
I have had a great experience using Next.js to manage complex front-end projects. Next.js is opinionated about how to organize JavaScript code, but it doesn’t have built-in opinions about how to organize CSS.
After working within the framework, I have found a series of organizational patterns that I believe both conform to the guiding philosophies of Next.js and exercise best CSS practices. In this article, we’ll build a website (a tea shop!) together to demonstrate these patterns.
Note: You probably will not need prior Next.js experience, although it would be good to have a basic understanding of React and to be open to learning some new CSS techniques.
Writing “Old-Fashioned” CSS
When first looking into Next.js, we may be tempted to consider using some kind of CSS-in-JS library. Though there may be benefits depending on the project, CSS-in-JS introduces many technical considerations. It requires using a new external library, which adds to the bundle size. CSS-in-JS can also have a performance impact by causing additional renders and dependencies on the global state.
Recommended reading: “The Unseen Performance Costs Of Modern CSS-in-JS Libraries In React Apps)” by Aggelos Arvanitakis
Furthermore, the whole point of using a library like Next.js is to statically render assets whenever possible, so it doesn’t make so much sense to write JS that needs to be run in the browser to generate CSS.
There are a couple of questions we have to consider when organizing style within Next.js:
How can we fit within the conventions/best practices of the framework?
How can we balance “global” styling concerns (fonts, colors, main layouts, and so on) with “local” ones (styles regarding individual components)?
The answer I have come up with for the first question is to simply write good ol’ fashioned CSS. Not only does Next.js support doing so with no additional setup; it also yields results that are performant and static.
To solve the second problem, I take an approach that can be summarized in four pieces:
Design tokens
Global styles
Utility classes
Component styles
I’m indebted to Andy Bell’s idea of CUBE CSS (“Composition, Utility, Block, Exception”) here. If you haven’t heard of this organizational principle before, I recommended checking out its official site or feature on the Smashing Podcast. One of the principles we will take from CUBE CSS is the idea that we should embrace rather than fear the CSS cascade. Let’s learn these techniques by applying them to a website project.
Getting Started
We’ll be building a tea store because, well, tea is tasty. We’ll start by running yarn create next-app to make a new Next.js project. Then, we’ll remove everything in the styles/ directory (it’s all sample code).
Note: If you want to follow along with the finished project, you can check it out here.
Design Tokens
In pretty much any CSS setup, there’s a clear benefit to storing all globally shared values in variables. If a client asks for a color to change, implementing the change is a one-liner rather than a massive find-and-replace mess. Consequently, a key part of our Next.js CSS setup will be storing all site-wide values as design tokens.
We’ll use inbuilt CSS Custom Properties to store these tokens. (If you’re not familiar with this syntax, you can check out “A Strategy Guide To CSS Custom Properties”.) I should mention that (in some projects) I’ve opted to use SASS/SCSS variables for this purpose. I haven’t found any real advantage, so I usually only include SASS in a project if I find I need other SASS features (mix-ins, iteration, importing files, and so on). CSS custom properties, by contrast, also work with the cascade and can be changed over time rather than statically compiling. So, for today, let’s stick with plain CSS.
In our styles/ directory, let’s make a new design_tokens.css file:
:root {
–green: #3FE79E;
–dark: #0F0235;
–off-white: #F5F5F3;
–space-sm: 0.5rem;
–space-md: 1rem;
–space-lg: 1.5rem;
–font-size-sm: 0.5rem;
–font-size-md: 1rem;
–font-size-lg: 2rem;
}
Of course, this list can and will grow over time. Once we add this file, we need to hop over to our pages/_app.jsx file, which is the main layout for all our pages, and add:
import ‘../styles/design_tokens.css’
I like to think of design tokens as the glue that maintains consistency across the project. We will reference these variables on a global scale, as well as within individual components, ensuring a unified design language.
Global Styles
Next up, let’s add a page to our website! Let’s hop into the pages/index.jsx file (this is our homepage). We’ll delete all the boilerplate and add something like:
export default function Home() {
return <main>
<h1>Soothing Teas</h1>
<p>Welcome to our wonderful tea shop.</p>
<p>We have been open since 1987 and serve customers with hand-picked oolong teas.</p>
</main>
}
Unfortunately, it will look quite plain, so let’s set some global styles for basic elements, e.g. <h1> tags. (I like to think of these styles as “reasonable global defaults”.) We may override them in specific cases, but they’re a good guess as to what we will want if we don’t.
I’ll put this in the styles/globals.css file (which comes by default from Next.js):
*,
*::before,
*::after {
box-sizing: border-box;
}
body {
color: var(–off-white);
background-color: var(–dark);
}
h1 {
color: var(–green);
font-size: var(–font-size-lg);
}
p {
font-size: var(–font-size-md);
}
p, article, section {
line-height: 1.5;
}
:focus {
outline: 0.15rem dashed var(–off-white);
outline-offset: 0.25rem;
}
main:focus {
outline: none;
}
img {
max-width: 100%;
}
Of course, this version is fairly basic, but my globals.css file doesn’t usually end up actually needing to get too large. Here, I style basic HTML elements (headings, body, links, and so on). There is no need to wrap these elements in React components or to constantly add classes just to provide basic style.
I also include any resets of default browser styles. Occasionally, I will have some site-wide layout style to provide a “sticky footer”, for example, but they only belong here if all pages share the same layout. Otherwise, it will need to be scoped inside individual components.
I always include some kind of :focus styling to clearly indicate interactive elements for keyboard users when focused. It’s best to make it an integral part of the site’s design DNA!
Now, our website is starting to shape up:

Utility Classes
One area where our homepage could certainly improve is that the text currently always extends to the sides of the screen, so let’s limit its width. We need this layout on this page, but I imagine that we might need it on other pages, too. This is a great use case for a utility class!
I try to use utility classes sparingly rather than as a replacement for just writing CSS. My personal criteria for when it makes sense to add one to a project are:
I need it repeatedly;
It does one thing well;
It applies across a range of different components or pages.
I think this case meets all three criteria, so let’s make a new CSS file styles/utilities.css and add:
.lockup {
max-width: 90ch;
margin: 0 auto;
}
Then let’s add import ‘../styles/utilities.css’ to our pages/_app.jsx. Finally, let’s change the <main> tag in our pages/index.jsx to <main className=”lockup”>.
Now, our page is coming together even more. Because we used the max-width property, we don’t need any media queries to make our layout mobile responsive. And, because we used the ch measurement unit — which equates to about the width of one character — our sizing is dynamic to the user’s browser font size.

As our website grows, we can continue adding more utility classes. I take a fairly utilitarian approach here: If I’m working and find I need another class for a color or something, I add it. I don’t add every possible class under the sun — it would bloat the CSS file size and make my code confusing. Sometimes, in larger projects, I like to break things up into a styles/utilities/ directory with a few different files; it’s up to the needs of the project.
We can think of utility classes as our toolkit of common, repeated styling commands that are shared globally. They help prevent us from constantly rewriting the same CSS between different components.
Component Styles
We’ve finished our homepage for the moment, but we still need to build a piece of our website: the online store. Our goal here will be to display a card grid of all the teas we want to sell, so we’ll need to add some components to our site.
Let’s start off by adding a new page at pages/shop.jsx:
export default function Shop() {
return <main>
<div className=”lockup”>
<h1>Shop Our Teas</h1>
</div>
</main>
}
Then, we’ll need some teas to display. We’ll include a name, description, and image (in the public/ directory) for each tea:
const teas = [
{ name: “Oolong”, description: “A partially fermented tea.”, image: “/oolong.jpg” },
// …
]
Note: This isn’t an article about data fetching, so we took the easy route and defined an array at the beginning of the file.
Next, we’ll need to define a component to display our teas. Let’s start by making a components/ directory (Next.js doesn’t make this by default). Then, let’s add a components/TeaList directory. For any component that ends up needing more than one file, I usually put all the related files inside a folder. Doing so prevents our components/ folder from getting unnavigable.
Now, let’s add our components/TeaList/TeaList.jsx file:
import TeaListItem from ‘./TeaListItem’
const TeaList = (props) => {
const { teas } = props
return <ul role=”list”>
{teas.map(tea =>
<TeaListItem tea={tea} key={tea.name} />)}
</ul>
}
export default TeaList
The purpose of this component is to iterate over our teas and to show a list item for each one, so now let’s define our components/TeaList/TeaListItem.jsx component:
import Image from ‘next/image’
const TeaListItem = (props) => {
const { tea } = props
return <li>
<div>
<Image src={tea.image} alt=”” objectFit=”cover” objectPosition=”center” layout=”fill” />
</div>
<div>
<h2>{tea.name}</h2>
<p>{tea.description}</p>
</div>
</li>
}
export default TeaListItem
Note that we’re using Next.js’s built-in image component. I set the alt attribute to an empty string because the images are purely decorative in this case; we want to avoid bogging screen reader users down with long image descriptions here.
Finally, let’s make a components/TeaList/index.js file, so that our components are easy to import externally:
import TeaList from ‘./TeaList’
import TeaListItem from ‘./TeaListItem’
export { TeaListItem }
export default TeaList
And then, let’s plug it all together by adding import TeaList from ../components/TeaList and a <TeaList teas={teas} /> element to our Shop page. Now, our teas will show up in a list, but it won’t be so pretty.
Colocating Style With Components Through CSS Modules
Let’s start off by styling our cards (the TeaListLitem component). Now, for the first time in our project, we’re going to want to add style that is specific to just one component. Let’s create a new file components/TeaList/TeaListItem.module.css.
You may be wondering about the module in the file extension. This is a CSS Module. Next.js supports CSS modules and includes some good documentation on them. When we write a class name from a CSS module such as .TeaListItem, it will automatically get transformed into something more like . TeaListItem_TeaListItem__TFOk_ with a bunch of extra characters tacked on. Consequently, we can use any class name we want without being concerned that it will conflict with other class names elsewhere in our site.
Another advantage to CSS modules is performance. Next.js includes a dynamic import feature. next/dynamic lets us lazy load components so that their code only gets loaded when needed, rather than adding to the whole bundle size. If we import the necessary local styles into individual components, then users can also lazy load the CSS for dynamically imported components. For large projects, we may choose to lazy load significant chunks of our code and only to load the most necessary JS/CSS upfront. As a result, I usually end up making a new CSS Module file for every new component that needs local styling.
Let’s start by adding some initial styles to our file:
.TeaListItem {
display: flex;
flex-direction: column;
gap: var(–space-sm);
background-color: var(–color, var(–off-white));
color: var(–dark);
border-radius: 3px;
box-shadow: 1px 1px 1px rgba(0, 0, 0, 0.1);
}
Then, we can import style from ./TeaListItem.module.css in our TeaListitem component. The style variable comes in like a JavaScript object, so we can access this class-like style.TeaListItem.
Note: Our class name doesn’t need to be capitalized. I’ve found that a convention of capitalized class names inside of modules (and lowercase ones outside) differentiates local vs. global class names visually.
So, let’s take our new local class and assign it to the <li> in our TeaListItem component:
<li className={style.TeaListComponent}>
You may be wondering about the background color line (i.e. var(–color, var(–off-white));). What this snippet means is that by default the background will be our –off-white value. But, if we set a –color custom property on a card, it will override and choose that value instead.
At first, we’ll want all our cards to be –off-white, but we may want to change the value for individual cards later. This works very similarly to props in React. We can set a default value but create a slot where we can choose other values in specific circumstances. So, I encourage us to think of CSS custom properties like CSS’s version of props.
The style still won’t look great because we want to make sure that the images stay within their containers. Next.js’s Image component with the layout=”fill” prop gets position: absolute; from the framework, so we can limit the size by putting in a container with position: relative;.
Let’s add a new class to our TeaListItem.module.css:
.ImageContainer {
position: relative;
width: 100%;
height: 10em;
overflow: hidden;
}
And then let’s add className={styles.ImageContainer} on the <div> that contains our <Image>. I use relatively “simple” names such as ImageContainer because we’re inside a CSS module, so we don’t have to worry about conflicting with the outside style.
Finally, we want to add a bit of padding on the sides of the text, so let’s add one last class and rely on the spacing variables we set up as design tokens:
.Title {
padding-left: var(–space-sm);
padding-right: var(–space-sm);
}
We can add this class to the <div> that contains our name and description. Now, our cards don’t look so bad:

Combining Global And Local Style
Next, we want to have our cards show in a grid layout. In this case, we’re just at the border between local and global styles. We could certainly code our layout directly on the TeaList component. But, I could also imagine that having a utility class that turns a list into a grid layout could be useful in several other places.
Let’s take the global approach here and add a new utility class in our styles/utilities.css:
.grid {
list-style: none;
display: grid;
grid-template-columns: repeat(auto-fill, minmax(var(–min-item-width, 30ch), 1fr));
gap: var(–space-md);
}
Now, we can add the .grid class on any list, and we’ll get an automatically responsive grid layout. We can also change the –min-item-width custom property (by default 30ch) to change the minimum width of each element.
Note: Remember to think of custom properties like props! If this syntax looks unfamiliar, you can check out “Intrinsically Responsive CSS Grid With minmax() And min()” by Chris Coyier.
As we’ve written this style globally, it doesn’t require any fanciness to add className=”grid” onto our TeaList component. But, let’s say we want to couple this global style with some additional local store. For example, we want to bring a bit more of the “tea aesthetic” in and to make every other card have a green background. All we’d need to do is make a new components/TeaList/TeaList.module.css file:
.TeaList > :nth-child(even) {
–color: var(–green);
}
Remember how we made a –color custom property on our TeaListItem component? Well, now we can set it under specific circumstances. Note that we can still use child selectors within CSS modules, and it doesn’t matter that we’re selecting an element that is styled inside a different module. So, we can also use our local component styles to affect child components. This is a feature rather than a bug, as it allows us to take advantage of the CSS cascade! If we tried to replicate this effect some other way, we’d likely end up with some kind of JavaScript soup rather than three lines of CSS.
Then, how can we keep the global .grid class on our TeaList component while also adding the local .TeaList class? This is where the syntax can get a bit funky because we have to access our .TeaList class out of the CSS module by doing something like style.TeaList.
One option would be to use string interpolation to get something like:
<ul role=”list” className={`${style.TeaList} grid`}>
In this small case, this might be good enough. If we’re mixing-and-matching more classes, I find that this syntax makes my brain explode a bit, so I will sometimes opt to use the classnames library. In this case, we end up with a more sensible-looking list:
<ul role=”list” className={classnames(style.TeaList, “grid”)}>
Now, we’ve finished up our Shop page, and we’ve made our TeaList component take advantage of both global and local styles.

A Balancing Act
We’ve now built our tea shop using only plain CSS to handle the styling. You may have noticed that we did not have to spend ages dealing with custom Webpack setups, installing external libraries, and so on. That’s because of the patterns that we’ve used work with Next.js out of the box. Furthermore, they encourage best CSS practices and fit naturally into the Next.js framework architecture.
Our CSS organization consisted of four key pieces:
Design tokens,
Global styles,
Utility classes,
Component styles.
As we continue building our site, our list of design tokens and utility classes will grow. Any styling that doesn’t make sense to add as a utility class, we can add into component styles using CSS modules. As a result, we can find a continuous balance between local and global styling concerns. We can also generate performant, intuitive CSS code that grows naturally alongside our Next.js site.
Original Source: https://www.hongkiat.com/blog/tools-to-coding-online/
Modern trends and webapps have dramatically changed the way web developers can build. Obviously you need some type of IDE to code new files and save them for deployment. But what about just testing…
Visit hongkiat.com for full content.