Collective #454

Original Source: http://feedproxy.google.com/~r/tympanus/~3/XP_FMUwAy0w/

C454_WOTW

Inspirational Website of the Week: Nagoya Estate

Super creative card animations make this design unique. Our pick this week.

Get inspired

API_Ads-2-factor-authentication-300×355

This content is sponsored via Syndicate Ads
HelloSign API: Everything IT Requires and Developers Love

HelloSign API’s robust SDK, amazing support, detailed documentation, and super clean dashboard is sure to make your entire team happy.

Check it out

C454_lazy

The Complete Guide to Lazy Loading Images

Rahul Nanwani’s deep dive into lazy loading images on websites.

Read it

C454_generativeart

Intro to Generative Art

A great practical introduction to generative art by Ali Spittel and James Reichard.

Read it

C454_logolab

Logo Lab

A testing tool for logos with some tips for improving the design.

Check it out

C454_power

How to Build a Low-tech Website?

Read about the making of a low-tech, self-hosted, and solar-powered version of Low-tech Magazine.

Read it

C454_icons

75+ Free Baseline Icons

Luboš Volkov created this fine set of icons.

Get it

C454_rover

JPL’s Open Source Build-It-Yourself Rover

A great web experience and a great project by NASA’s Jet Propulsion Laboratory.

Check it out

C454_fieldset

The State of Fieldset Interoperability

Read about Bocoup’s work and proposal to resolve the interoperability problems of fieldset.

Read it

C454_animationmoney

Visualizing money: how we explained a complex financial product using animation

Read the story of how the captivating animations and illustrations were done for bZx’s website. By Turischev Sasha.

Read it

C454_testing

How to Test React Components using Jest and Enzyme

Linh Nguyen My’s guide on testing React components using Jest and Enzyme.

Read it

C454_cors

Do You Really Know CORS?

In this article, Grzegorz Mirek explains what problem CORS really solves.

Read it

C454_table

Lissajous Table – Pannable

Jacob Foster created this fascinating demo.

Check it out

C454_templates

Free Startup Templates

Some great free landing page designs made by Pasquale Vitiello and Davide Pacilio.

Check it out

C454_candela

Candela Loader

Adam Kuhn coded this fantastic lava-like loader demo based on a design by Vitaly Silken.

Check it out

C454_layout

Accurately measuring layout on the web

Nolan Lawson shows some techniques for accurately measuring website rendering.

Read it

C454_gittweet

gitbird

Trun your git commits into tweets automatically with this tool.

Check it out

C454_gantt

React-gantt-timeline

A component built to display and manage calendar gantt charts with virtual rendering. By Guillermo Quiros.

Check it out

C454_oldlogos

If modern internet companies existed in 1970s – early 1990s

Fantastic retro style animated intros for today’s modern internet companies.

Watch it

C454_layoutmethods

New Tools for CSS Layout

Rachel Andrew’s presentation at a W3C Workshop in Tokyo, Japan.

Check it out

Collective #454 was written by Pedro Botelho and published on Codrops.

The Freelancer’s Guide to Paying Tax

Original Source: https://www.webdesignerdepot.com/2018/09/the-freelancers-guide-to-paying-tax/

When you take the leap into freelancing and self-employment, it’s really exciting at the start. Eventually, the honeymoon phase wears off and you comfortably adjust to life as a freelancer, which, in all honesty, is a really great deal.

You get to run your design business the way you want. Work with clients you like. Make as much money as your schedule allows for. Live and work from anywhere in the world (and move as frequently as you want!) This business is yours to shape and mold into whatever you want it to be and to support whatever sort of lifestyle you want to lead outside of it.

That said, while the structure of the business may fully be under your control, the income you make from it is not.

Every country holds its residents accountable for paying taxes. When you have an employer, they typically handle this for you. However, since you’re self-employed, the responsibility lies solely with you—which is no easy feat. In the following post, I’d like to first take a look at freelancer’s biggest concerns when it comes to taxation. Then, we can dig into best practices for managing and paying your taxes on time.

Biggest Concerns About Wages & Taxes

In a survey provided by QuickBooks Self-Employed, I discovered some frightening statistics regarding freelancers and taxation. The survey was conducted earlier this year and focused on the experiences of self-employed individuals in the U.S. Since tax code differs from country to country, I’m going to focus on the points most relevant to freelancers everywhere:

Top Tax-Related Challenges for Freelancers

30%: preparing tax forms correctly;
30%: keeping track of tax-related information;
23%: estimating tax payments;
20%: saving money to pay taxes;
17%: knowing what to deduct to reduce overall tax burden.

Most Common Reasons Freelancers Miss Tax Payments

42%: incorrectly estimated tax payments due and came up short at the deadline;
30%: didn’t make enough to pay off taxes in full;
16%: were unaware they had to pay taxes;
16%: forgot to pay their taxes;
10%: were unaware of how to pay for their taxes.

Reasons Why 36% of Freelancers Don’t Pay Their Taxes

9%: there was no reason for the failure to pay, they just didn’t do it;
17%: didn’t make enough to owe anything;
10%: business losses exceeded profits and so they didn’t owe taxes.

As you can see, there’s a lot going on here. Many freelancers worry about preparing tax payments correctly (which is a valid concern) while others simply don’t know they have to make them. Then there are the 32% of freelancers who choose not to report all of their income to the government.

Rather than be confused or misinformed about what taxes mean for your business, or improperly handle your taxes and put your business in danger as a result, let’s talk best practices.

Best Practices for Managing Your Taxes Throughout the Year

If you want to enjoy the rewards of running your own business and making money from said business, then you need to reduce any concerns or confusion you have around taxes. You can do that by becoming more mindful of these best practices when managing taxes:

1. Figure Out Who You Owe Taxes To

This will be different based on where you live as well as where your home country is (if different). Here are some things to consider:

In some countries, you have to pay a federal (national) tax as well as a state (regional) tax;
Goods and services taxes (also referred to as GST and VAT) come into play in some countries;
Different business structures are taxed at different rates as well;
If you work abroad, be sure to brush up on the rules for taxation. You can usually find these under a “taxes for expats” search. (This is especially important so that you don’t get doubly taxed by your home country and country of residence.)

2. Watch Your Income and Expenses

One of the reasons freelancers struggled to make tax payments on time, according to the QuickBooks survey, was because they hadn’t calculated estimates correctly. Now, that’s likely to happen anyway, but it usually works in favor of the freelancer… unless the error is because you made more money than expected.

To avoid this problem, pay closer attention to your income. Download reports every month that provide data on how much money you made (and by “made”, I mean actually collected from clients) compared to how much went out the door in expenses. By staying on top of your changing revenue stream, you can more accurately estimate how much you owe in taxes. You can also adjust your rates if you find that you’re not making enough to stay up on payments.

3. Mark Your Calendar

In some countries, taxes are owed to the government quarterly. In others, you only have to pay once a year. In my opinion, neither option is ideal as it can lead to a more lax attitude about saving up enough money to make payments on time.

Instead, I would suggest you mark your calendar once a month. Even if you don’t want to go through the hassle of submitting payments to the government every 30 days, you can at least do your calculations and put that money aside in a dedicated account. The dedicated account is crucial as it keeps that taxed income safe from other expenses and ensures you don’t have to face any late payment penalties later on.

4. Use Accounting Software to Automate

Hiring an accountant can be quite expensive, even if you only retain their services during tax season. Thankfully, accounting software can automate a lot of the work an accountant would otherwise do for you. It will also spare you the trouble of having to manually keep track of your finances on a regular basis.

Of course, you’ll still have to file your own taxes, but accounting software will:

Pull in data about business-related transactions (income and expenses);
Categorize those transactions for easier filing of taxes;
Estimate tax payments based on your earnings/losses for the month/quarter/year;
Alert you to upcoming tax deadlines.

Some accounting software may even integrate with your tax software, so the uploading of the year’s financial information can be streamlined as well.

Wrapping Up

It doesn’t matter if you’re working full-time or part-time as a web designer. If you’ve earned revenue for your business, and it exceeds the minimum taxable amount defined by your government, then you have to pay taxes. The matter of taxes can get complicated, though, if you wait too long to handle them, so have a plan in place that allows you to prepare for tax payments all year long.


Featured image via Depositphotos.

Add Realistic Chalk and Sketch Lettering Effects with Sketch’it – only $5!

Source

p img {display:inline-block; margin-right:10px;}
.alignleft {float:left;}
p.showcase {clear:both;}
body#browserfriendly p, body#podcast p, div#emailbody p{margin:0;}

Beautiful Surf & Soul illustrations by Lizzy

Original Source: http://feedproxy.google.com/~r/abduzeedo/~3/TPMQRpnBnE8/beautiful-surf-soul-illustrations-lizzy

Beautiful Surf & Soul illustrations by Lizzy

Beautiful Surf & Soul illustrations by Lizzy

GisMullr
Sep 28, 2018

I found Lizzy’s beautiful illustrations while looking for some surf related artworks for my daughter’s bedroom. We live at the beach and love the ocean. So I thought it would be a great idea to have an artwork reflecting that on my daughter’s wall. While browsing some surf related hashtags on Instagram I found Lizzy. And I’m really glad I did! Besides finding the perfect artwork for my daughter’s room, I also fell in love with her work. I started to follow her and got to admire the artist even more. Not only she is a super talented and creative person, but you can really feel her love for the ocean and for surfing in her pieces. Her illustrations are beautiful and are filled with style. Oh the style. She captures all the coolness of long boarders and puts it all on her pieces. Lizzy calls her art Soul & Surf illustration. And I totally agree. Her pieces have a Bohemian vibe that all ocean lovers will understand and love.

You can really see her passion for the ocean in her work. And as Lizzy says, the ocean is her master. That relationship is clear on her work. From hang tens to chilling by the beach. From casual surfing to resting in a hammock. Lizzy’s illustrations are simply fantastic. You better put your Beach Boys soundtrack on and take your time to enjoy these images. And make sure to visit the artist’s website for more.

Im Portuguese surfer girl living by the sea in Peniche, Portugal. Since 2013 I’m developing some illustration work inspired in my simple life by the Ocean, and what it represents for me. I see surf as a way for spiritual and self improvement, and the Ocean my great master. The ocean teaches me, and what I draw is a consequence of what I learned from it. Drawing is my way of sharing my truths. I like to call my art “Soul & Surf” illustration. A mix of Bohemian inspirations, ethnical colors and patterns, mandalas, american indian representations, feathers, birds, eyes, geometric figures, retro surf iconography and the classic surf movements are my main representations.

Beautiful Surf & Soul illustrations by LizzyBeautiful Surf & Soul illustrations by LizzyBeautiful Surf & Soul illustrations by LizzyBeautiful Surf & Soul illustrations by LizzyBeautiful Surf & Soul illustrations by LizzyBeautiful Surf & Soul illustrations by LizzyBeautiful Surf & Soul illustrations by LizzyBeautiful Surf & Soul illustrations by LizzyBeautiful Surf & Soul illustrations by LizzyBeautiful Surf & Soul illustrations by LizzyBeautiful Surf & Soul illustrations by LizzyBeautiful Surf & Soul illustrations by LizzyBeautiful Surf & Soul illustrations by LizzyBeautiful Surf & Soul illustrations by LizzyBeautiful Surf & Soul illustrations by LizzyBeautiful Surf & Soul illustrations by Lizzy
More links:
lizzyartworkshop.com
Instagram
cargocollective.com/lizzyartwork

illustration


Mailchimp Unveils Quirky Rebrand

Original Source: https://www.webdesignerdepot.com/2018/09/mailchimp-unveils-quirky-rebrand/

If any single tech company embodies the spirit of web-savvy, then it is Mailchimp. Since its beginnings as a side-project in the early-2000s the marketing service has walked the line between creative experiences, and simple usability. Mailchimp is one of those companies that saunters onto the court, lobs a shot over its shoulder, and gets nothing but net.

Now, with their latest rebrand courtesy of brand agency Collins (as ever, alongside an in-house team) Mailchimp has got almost everything right. Almost.

Chimp lovers will be relieved to discover that Freddie has survived the rebrand, and remains as the logomark, albeit redrawn in a simpler form. He’s lost his “M”, a bit of fur’s gone, the ear’s simpler. Essentially Freddie is more usable, more translatable, more international.

The most visually arresting element of the rebrand is the new brand color. Yellow is tough to design with, but it’s by far the most satisfying color when it’s got right, which in this case it is. It is used to tie the whole identity together in a way that wouldn’t work with anything less bold.

The most interesting—not necessarily in a good way—decision has been to abandon Jessica Hische’s much-loved redrawing of the original Mailchimp script. It’s been replaced with an oddly proportioned, retro-feel sans that lacks rhythm, and the syllables of which are crowbarred apart by an obnoxious “c”; strange given that the brand is keen to deemphasise that letter—it’s “Mailchimp” now, not “MailChimp”. There’s a half-baked explanation offered about the script’s incompatibility with the Freddie logomark. Initially I hated the new logotype; a hour later, I loved it; now I’m back to hating it again. The logotype seems destined to divide opinion, but at least it isn’t a geometric sans-serif.

Coupled with this logotype Mailchimp has adopted Cooper Light as its corporate typeface, giving everything a distinctly 1970s feel.

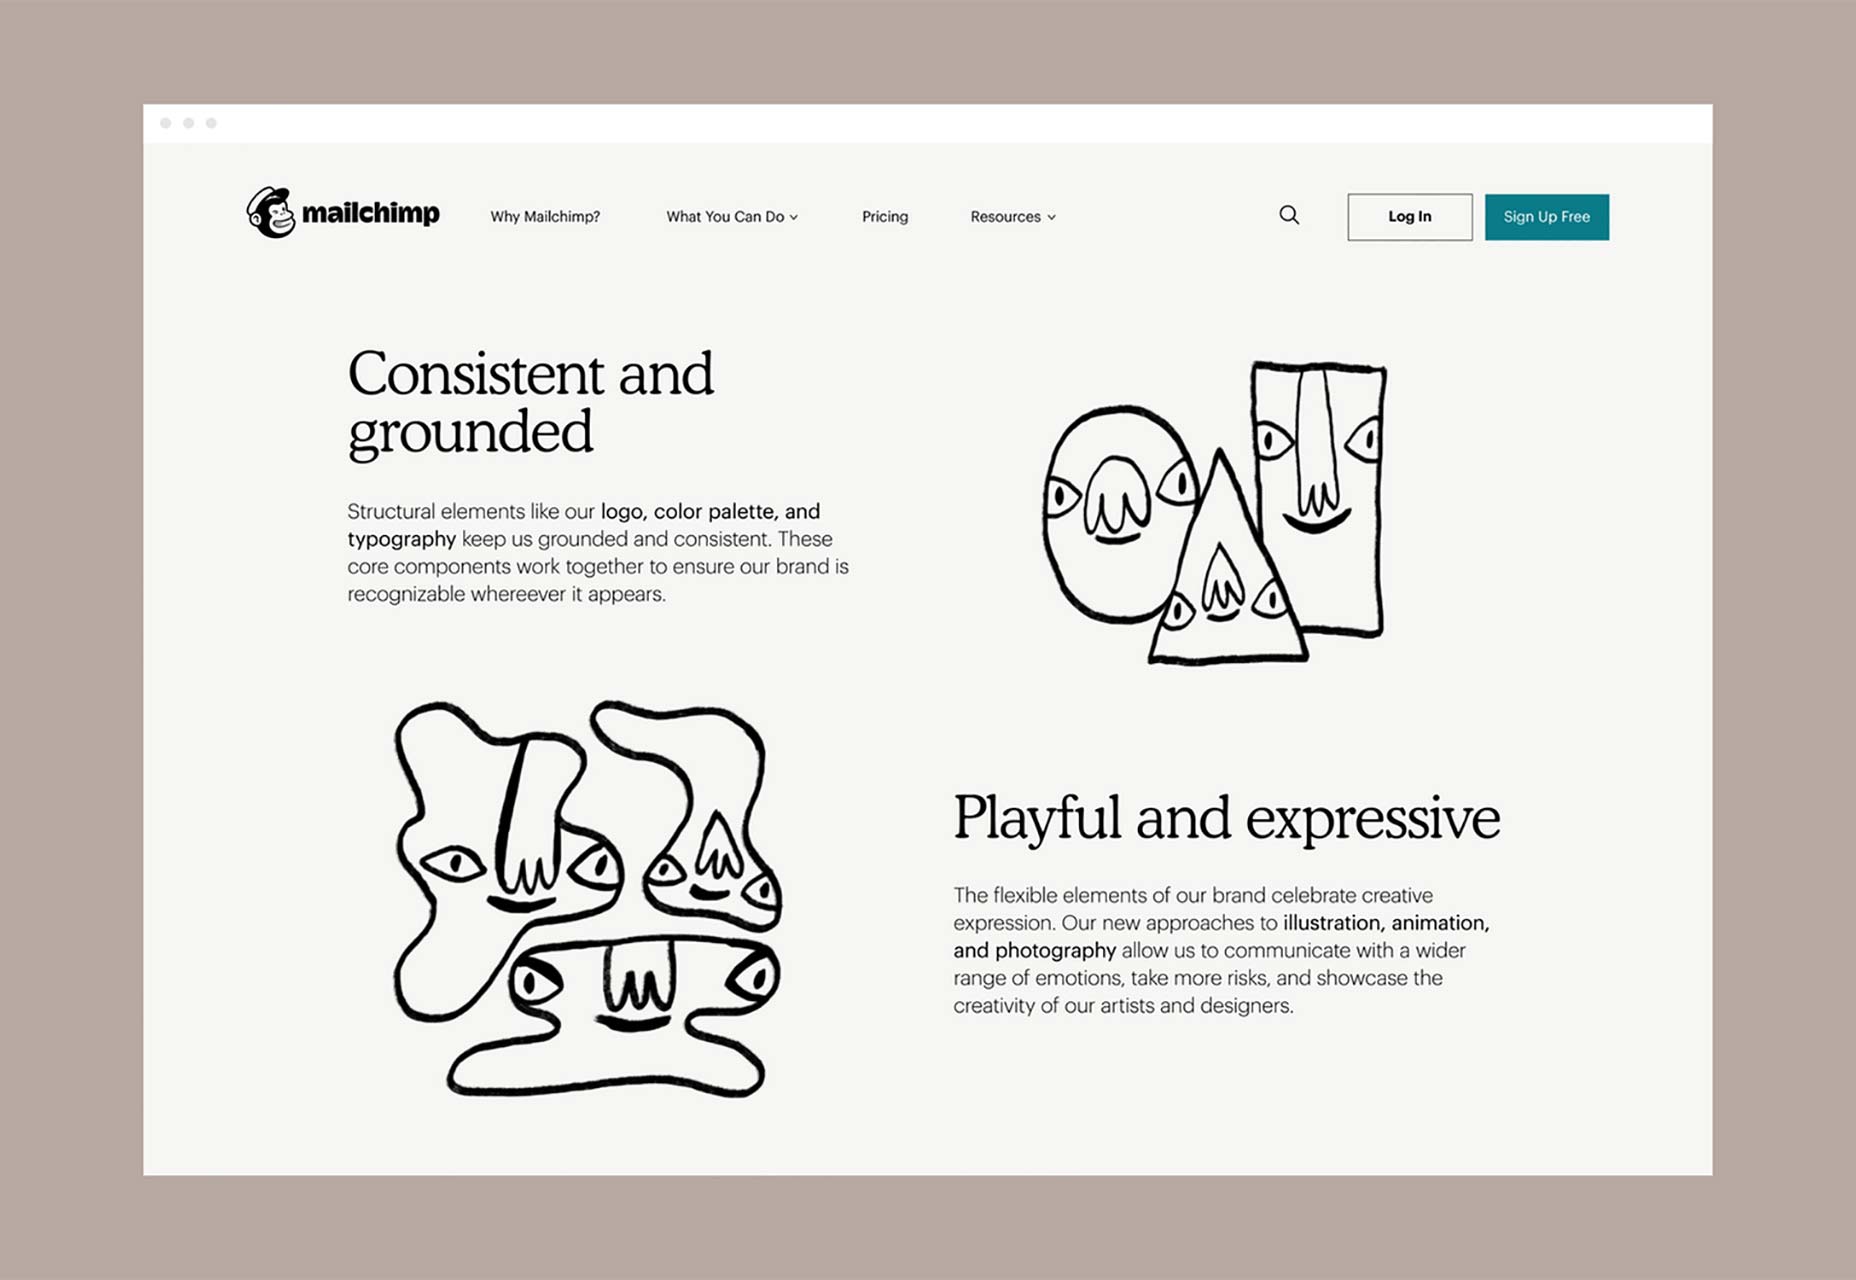
It’s not really any surprise that Mailchimp have labored to retain their quirky edge, it is after all what made them stand out (they have “chimp” in their name!) but what might come as a surprise is just how quirky Mailchimp have gone, particularly with their illustrations, which lie somewhere between Dr Seuss, and Quentin Blake, by way of Tove Jansson. The black and white illustrations with a strategic touch of brand yellow are sourced from illustrators around the world. (Although individual illustrations haven’t been attributed, several appear to be in the distinctive hand of Amber Vittoria.)

Mailchimp have also introduced a brand photography style that is easy to overlook amidst the joyful illustration. The photo examples themselves are well-taken, but their inclusion feels superfluous.

The rebrand is mostly excellent. The quirkiness is courageous and fitting. The color choice is striking. The type is debatable. The photography is questionable. But the whole is nothing if not fun. The biggest success is that despite growth—over 1 billion emails per day, 14,000 new users daily, $525m annual revenue—Mailchimp hasn’t lost sight of what made it a tool we wanted to use in the first place.

Add Realistic Chalk and Sketch Lettering Effects with Sketch’it – only $5!

Source

p img {display:inline-block; margin-right:10px;}
.alignleft {float:left;}
p.showcase {clear:both;}
body#browserfriendly p, body#podcast p, div#emailbody p{margin:0;}

7 tips for smashing Inktober 2018

Original Source: http://feedproxy.google.com/~r/CreativeBloq/~3/jwz4RM8qpG4/7-tips-for-completing-inktober-2017

Believe it or not it's October next week, and for illustrators that means it's time to pull out your pens for Inktober. If you're not familiar with Inktober, it's an annual challenge created by Jake Parker that calls on artists to create an ink-based drawing every day of the month and share their creations on Twitter and Instagram with the hashtag #inktober #inktober2018.

The best drawing tablets

Inktober might not sound too difficult on paper, but finding time to ink an image every day for 31 days can quickly become daunting. If you're like us, you'll soon find yourself asking how amazing artists like Lüleiya (who drew the breathtaking illustration above for day one of a previous year's challenge) keep up the pace.

We're still admiring the amazing Inktober 2017 artists who made the whole challenge look effortless, but if you're struggling to get going with Inktober, or if you need a creative pick-me-up, as well as reading our tips on how to get started with ink drawing, we've put together some tips to help you on your way.

01. Follow the prompts

Each day of the month is assigned a single word prompt to provide the starting point for an illustration. These include a range of ideas, such as swollen, gift, muddy. Of course you don't have to stick to these prompts, but they're there if you need them. You can also make your own list of prompts. If you're stuck, check out our article on 20 ways to overcome creative block  for inspiration.

02. Browse the hashtag

If the official prompts aren't working for you, there's always the hashtag to explore for inspiration. Simply type #Inktober or #Inktober2018 into the Twitter or Instagram search box and you'll instantly get a glimpse into how other illustrators are tackling the challenge.

Not only that, but you get to browse social media and not feel guilty that you're wasting time when you should be drawing. It's a win-win. Don't forget to comment on pieces you like with words of encouragement: the support goes a long way to helping other artists persevere.

03. Take your tools with you

You never know when you might grab a spare five minutes, or whether or not you're going to get struck by inspiration, so carrying your ink pens and a notebook with you wherever you go is another way to make Inktober more manageable.

Lugging your tools with you is also just good artistic practice. And seeing as Inktober is as much about refining your artistic discipline as it is about drawing a masterpiece day in day out, you might as well take the opportunity to start two good habits at the same time.

04. Ink from left to right

Time for some straight up technical advice that should save you some headaches further down the road. In this video by Kiara Lashay over on her YouTube channel Kiara's Studio, she recommends working from left to right to avoid smudging when illustrating with ink.

And for all you left handers out there, don't worry. Lashay recommends that you do the opposite and ink from right to left. (Speaking from personal experience as a lefty, I find fountain pens difficult to use in terms of pressure, so maybe markers are the way forward.)

05. Pick a theme

If you like the idea of using the Inktober prompts we mentioned earlier, another way to make the most of them is to pick a theme you can hang them around. We've seen lots of artists doing this over on the Inktober hashtag, and it looks like a genius way to narrow down your decision making over the coming weeks.

Not only that, but by picking a theme you're comfortable with, you get to play to your strengths by illustrating something you care about. This could be anything from Disney princesses to robots – or, as Twitter user Joey Hernandez demonstrates, the TV series Lost.

06. Get ahead

Bit of a controversial one, this. Given that life is busy and that it's hard to make the time for creative side projects, artists need all the help they can get to crank out an ink illustration every day for 31 days straight.

To this end, Windy Iris suggests in the video above that doing some groundwork in the form of preparatory drawing is fair game. As long as you're just sketching ideas in pencil and not actually inking your work it's not breaking the rules… is it?

We're sure that some Inktober purists out there will be marching on Creative Bloq towers with torches and pitchforks for suggesting such a thing, but give yourself a break. Inktober is a long challenge, so it makes sense to get ahead if you want to.

07. Have fun!

We've bleated on and on about how Inktober is great for polishing your artistic skills and discipline, but remember it's also a fantastic opportunity to simply have fun.

Be sure not to go too hard on yourself, and if you need to skip a few days it's not the end of the world. Nothing stalls a creative roll like unnecessary stress, and this pressure will definitely come across in your work. So keep your art looking good by relaxing.

Indeed, Parker says you can take it slower if you like: "You can do it daily, or go the half-marathon route and post every other day, or just do the 5K and post once a week. Whatever you decide, just be consistent with it. Inktober is about growing and improving and forming positive habits, so the more you’re consistent the better."

If you see illustrations you like on social media, make sure you share them with your followers. Hopefully you'll make some new friends along the way and discover exciting artists you've never heard of before.

Related articles:

How to draw a character in pen and inkAdd digital colours to pencil drawingsHow to draw: the best drawing tutorials

Build a Simple REST API with Node and OAuth 2.0

Original Source: https://www.sitepoint.com/build-a-simple-rest-api-with-node-and-oauth-2-0/

This article was originally published on the Okta developer blog. Thank you for supporting the partners who make SitePoint possible.

JavaScript is used everywhere on the web – nearly every web page will include at least some JavaScript, and even if it doesn’t, your browser probably has some sort of extension that injects bits of JavaScript code on to the page anyway. It’s hard to avoid in 2018.

JavaScript can also be used outside the context of a browser, for anything from hosting a web server to controlling an RC car or running a full-fledged operating system. Sometimes you want a couple of servers to talk to each other, whether on a local network or over the internet.

Today, I’ll show you how to create a REST API using Node.js, and secure it with OAuth 2.0 to prevent unwarranted requests. REST APIs are all over the web, but without the proper tools require a ton of boilerplate code. I’ll show you how to use a couple of amazing tools that make it all a breeze, including Okta to implement the Client Credentials Flow, which securely connects two machines together without the context of a user.

Build Your Node Server

Setting up a web server in Node is quite simple using the Express JavaScript library. Make a new folder that will contain your server.

$ mkdir rest-api

Node uses a package.json to manage dependencies and define your project. To create one, use npm init, which will ask you some questions to help you initialize the project. For now, you can use standard JS to enforce a coding standard, and use that as the tests.

$ cd rest-api

$ npm init
This utility will walk you through creating a package.json file.
It only covers the most common items, and tries to guess sensible defaults.

See `npm help json` for definitive documentation on these fields
and exactly what they do.

Use `npm install <pkg>` afterwards to install a package and
save it as a dependency in the package.json file.

Press ^C at any time to quit.
package name: (rest-api)
version: (1.0.0)
description: A parts catalog
entry point: (index.js)
test command: standard
git repository:
keywords:
author:
license: (ISC)
About to write to /Users/Braden/code/rest-api/package.json:

{
“name”: “rest-api”,
“version”: “1.0.0”,
“description”: “A parts catalog”,
“main”: “index.js”,
“scripts”: {
“test”: “standard”
},
“author”: “”,
“license”: “ISC”
}

Is this OK? (yes)

The default entry point is index.js, so you should create a new file by that name. The following code will get you a really basic server that doesn’t really do anything but listens on port 3000 by default.

index.js

const express = require(‘express’)
const bodyParser = require(‘body-parser’)
const { promisify } = require(‘util’)

const app = express()
app.use(bodyParser.json())

const startServer = async () => {
const port = process.env.SERVER_PORT || 3000
await promisify(app.listen).bind(app)(port)
console.log(`Listening on port ${port}`)
}

startServer()

The promisify function of util lets you take a function that expects a callback and instead will return a Promise, which is the new standard as far as handling asynchronous code. This also lets us use the relatively new async/await syntax and make our code look much prettier.

In order for this to work, you need to install the dependencies that you require at the top of the file. Add them using npm install. This will automatically save some metadata to your package.json file and install them locally in a node_modules folder.

Note: You should never commit node_modules to source control because it tends to become bloated quickly, and the package-lock.json file will keep track of the exact versions you used to that if you install this on another machine they get the same code.

$ npm install express@4.16.3 util@0.11.0

For some quick linting, install standard as a dev dependency, then run it to make sure your code is up to par.

$ npm install –save-dev standard@11.0.1
$ npm test

> rest-api@1.0.0 test /Users/bmk/code/okta/apps/rest-api
> standard

If all is well, you shouldn’t see any output past the > standard line. If there’s an error, it might look like this:

$ npm test

> rest-api@1.0.0 test /Users/bmk/code/okta/apps/rest-api
> standard

standard: Use JavaScript Standard Style (https://standardjs.com)
standard: Run `standard –fix` to automatically fix some problems.
/Users/Braden/code/rest-api/index.js:3:7: Expected consistent spacing
/Users/Braden/code/rest-api/index.js:3:18: Unexpected trailing comma.
/Users/Braden/code/rest-api/index.js:3:18: A space is required after ‘,’.
/Users/Braden/code/rest-api/index.js:3:38: Extra semicolon.
npm ERR! Test failed. See above for more details.

Now that your code is ready and you have installed your dependencies, you can run your server with node . (the . says to look at the current directory, and then checks your package.json file to see that the main file to use in this directory is index.js):

$ node .

Listening on port 3000

To test that it’s working, you can use the curl command. There are no endpoints yet, so express will return an error:

$ curl localhost:3000 -i
HTTP/1.1 404 Not Found
X-Powered-By: Express
Content-Security-Policy: default-src ‘self’
X-Content-Type-Options: nosniff
Content-Type: text/html; charset=utf-8
Content-Length: 139
Date: Thu, 16 Aug 2018 01:34:53 GMT
Connection: keep-alive

<!DOCTYPE html>
<html lang=”en”>
<head>
<meta charset=”utf-8″>
<title>Error</title>
</head>
<body>
<pre>Cannot GET /</pre>
</body>
</html>

Even though it says it’s an error, that’s good. You haven’t set up any endpoints yet, so the only thing for Express to return is a 404 error. If your server wasn’t running at all, you’d get an error like this:

$ curl localhost:3000 -i
curl: (7) Failed to connect to localhost port 3000: Connection refused

Build Your REST API with Express, Sequelize, and Epilogue

Now that you have a working Express server, you can add a REST API. This is actually much simpler than you might think. The easiest way I’ve seen is by using Sequelize to define your database schema, and Epilogue to create some REST API endpoints with near-zero boilerplate.

You’ll need to add those dependencies to your project. Sequelize also needs to know how to communicate with the database. For now, use SQLite as it will get us up and running quickly.

npm install sequelize@4.38.0 epilogue@0.7.1 sqlite3@4.0.2

Create a new file database.js with the following code. I’ll explain each part in more detail below.

database.js

const Sequelize = require(‘sequelize’)
const epilogue = require(‘epilogue’)

const database = new Sequelize({
dialect: ‘sqlite’,
storage: ‘./test.sqlite’,
operatorsAliases: false
})

const Part = database.define(‘parts’, {
partNumber: Sequelize.STRING,
modelNumber: Sequelize.STRING,
name: Sequelize.STRING,
description: Sequelize.TEXT
})

const initializeDatabase = async (app) => {
epilogue.initialize({ app, sequelize: database })

epilogue.resource({
model: Part,
endpoints: [‘/parts’, ‘/parts/:id’]
})

await database.sync()
}

module.exports = initializeDatabase

Now you just need to import that file into your main app and run the initialization function. Make the following additions to your index.js file.

index.js

@@ -2,10 +2,14 @@ const express = require(‘express’)
const bodyParser = require(‘body-parser’)
const { promisify } = require(‘util’)

+const initializeDatabase = require(‘./database’)
+
const app = express()
app.use(bodyParser.json())

const startServer = async () => {
+ await initializeDatabase(app)
+
const port = process.env.SERVER_PORT || 3000
await promisify(app.listen).bind(app)(port)
console.log(`Listening on port ${port}`)

You can now test for syntax errors and run the app if everything seems good:

$ npm test && node .

> rest-api@1.0.0 test /Users/bmk/code/okta/apps/rest-api
> standard

Executing (default): CREATE TABLE IF NOT EXISTS `parts` (`id` INTEGER PRIMARY KEY AUTOINCREMENT, `partNumber` VARCHAR(255), `modelNu
mber` VARCHAR(255), `name` VARCHAR(255), `description` TEXT, `createdAt` DATETIME NOT NULL, `updatedAt` DATETIME NOT NULL);
Executing (default): PRAGMA INDEX_LIST(`parts`)
Listening on port 3000

In another terminal, you can test that this is actually working (to format the JSON response I use a json CLI, installed globally using npm install –global json):

$ curl localhost:3000/parts
[]

$ curl localhost:3000/parts -X POST -d ‘{
“partNumber”: “abc-123”,
“modelNumber”: “xyz-789”,
“name”: “Alphabet Soup”,
“description”: “Soup with letters and numbers in it”
}’ -H ‘content-type: application/json’ -s0 | json
{
“id”: 1,
“partNumber”: “abc-123”,
“modelNumber”: “xyz-789”,
“name”: “Alphabet Soup”,
“description”: “Soup with letters and numbers in it”,
“updatedAt”: “2018-08-16T02:22:09.446Z”,
“createdAt”: “2018-08-16T02:22:09.446Z”
}

$ curl localhost:3000/parts -s0 | json
[
{
“id”: 1,
“partNumber”: “abc-123”,
“modelNumber”: “xyz-789”,
“name”: “Alphabet Soup”,
“description”: “Soup with letters and numbers in it”,
“createdAt”: “2018-08-16T02:22:09.446Z”,
“updatedAt”: “2018-08-16T02:22:09.446Z”
}
]

What’s Going On Here?

Feel free to skip this section if you followed along with all that, but I did promise an explanation.

The Sequelize function creates a database. This is where you configure details, such as what dialect of SQL to use. For now, use SQLite to get up and running quickly.

const database = new Sequelize({
dialect: ‘sqlite’,
storage: ‘./test.sqlite’,
operatorsAliases: false
})

Once you’ve created the database, you can define the schema for it using database.define for each table. Create a table called parts with a few useful fields to keep track of parts. By default, Sequelize also automatically creates and updates id, createdAt, and updatedAt fields when you create or update a row.

const Part = database.define(‘parts’, {
partNumber: Sequelize.STRING,
modelNumber: Sequelize.STRING,
name: Sequelize.STRING,
description: Sequelize.TEXT
})

Epilogue requires access to your Express app in order to add endpoints. However, app is defined in another file. One way to deal with this is to export a function that takes the app and does something with it. In the other file when we import this script, you would run it like initializeDatabase(app).

Epilogue needs to initialize with both the app and the database. You then define which REST endpoints you would like to use. The resource function will include endpoints for the GET, POST, PUT, and DELETE verbs, mostly automagically.

To actually create the database, you need to run database.sync(), which returns a Promise. You’ll want to wait until it’s finished before starting your server.

The module.exports command says that the initializeDatabase function can be imported from another file.

const initializeDatabase = async (app) => {
epilogue.initialize({ app, sequelize: database })

epilogue.resource({
model: Part,
endpoints: [‘/parts’, ‘/parts/:id’]
})

await database.sync()
}

module.exports = initializeDatabase

Secure Your Node + Express REST API with OAuth 2.0

Now that you have a REST API up and running, imagine you’d like a specific application to use this from a remote location. If you host this on the internet as is, then anybody can add, modify, or remove parts at their will.

To avoid this, you can use the OAuth 2.0 Client Credentials Flow. This is a way of letting two servers communicate with each other, without the context of a user. The two servers must agree ahead of time to use a third-party authorization server. Assume there are two servers, A and B, and an authorization server. Server A is hosting the REST API, and Server B would like to access the API.

Server B sends a secret key to the authorization server to prove who they are and asks for a temporary token.
Server B then consumes the REST API as usual but sends the token along with the request.
Server A asks the authorization server for some metadata that can be used to verify tokens.
Server A verifies the Server B’s request.

If it’s valid, a successful response is sent and Server B is happy.
If the token is invalid, an error message is sent instead, and no sensitive information is leaked.

Create an Authorization Server

This is where Okta comes into play. Okta can act as an authorization server to allow you to secure your data. You’re probably asking yourself “Why Okta? Well, it’s pretty cool to build a REST app, but it’s even cooler to build a secure one. To achieve that, you’ll want to add authentication so users have to log in before viewing/modifying groups. At Okta, our goal is to make identity management a lot easier, more secure, and more scalable than what you’re used to. Okta is a cloud service that allows developers to create, edit, and securely store user accounts and user account data, and connect them with one or multiple applications. Our API enables you to:

Authenticate and authorize your users
Store data about your users
Perform password-based and social login
Secure your application with multi-factor authentication
And much more! Check out our product documentation

If you don’t already have one, sign up for a forever-free developer account, and let’s get started!

After creating your account, log in to your developer console, navigate to API, then to the Authorization Servers tab. Click on the link to your default server.

From this Settings tab, copy the Issuer field. You’ll need to save this somewhere that your Node app can read. In your project, create a file named .env that looks like this:

.env

ISSUER=https://{yourOktaDomain}/oauth2/default

The value for ISSUER should be the value from the Settings page’s Issuer URI field.

Higlighting the issuer URL.

Note: As a general rule, you should not store this .env file in source control. This allows multiple projects to use the same source code without needing a separate fork. It also makes sure that your secure information is not public (especially if you’re publishing your code as open source).

Next, navigate to the Scopes tab. Click the Add Scope button and create a scope for your REST API. You’ll need to give it a name (e.g. parts_manager) and you can give it a description if you like.

Add scope screenshot.

You should add the scope name to your .env file as well so your code can access it.

.env

ISSUER=https://{yourOktaDomain}/oauth2/default
SCOPE=parts_manager

Now you need to create a client. Navigate to Applications, then click Add Application. Select Service, then click Next. Enter a name for your service, (e.g. Parts Manager), then click Done.

The post Build a Simple REST API with Node and OAuth 2.0 appeared first on SitePoint.

63 free Photoshop actions

Original Source: http://feedproxy.google.com/~r/CreativeBloq/~3/Du0sr5LXYvE/photoshop-actions-912784

Adobe's flagship image editing software Photoshop has a powerful programming language built in that allows you to record tasks as an 'action' and replay the steps to complete the task automatically. Not only can you record your own but you can also import actions, opening up a whole range of effects and time-saving options.

Get Adobe Creative Cloud now

So to add to our collections of Photoshop plugins and Photoshop brushes (not to mention our best laptops for Photoshop buying guide), here are some great Photoshop actions that are free to download and install, for photographers, graphic designers, game artists and more.

You can jump to the section you want right now from the drop-down menu above, but you should definitely bookmark the entire list to check out the rest later – who knows where inspiration will strike. 

Photo filters
01. Mystical Light

Free Photoshop actions: Mystical Light

‘scuse me while I kiss the sky

Give your photos an other-worldly air with this Photoshop action from Megan Joy. It'll infuse landscapes with a magical purple haze, enlivening any shot with an ethereal purple haze and giving any location the atmosphere of a mysterious fairy dell.

02. Instant Hipster

Free Photoshop actions: Instant Hipster

Get those trendy effects you love with one click

For those times you want to give your photos a one-click Instagram effect, Instant Hipster's the perfect solution. It comes with 10 ready-made filters – Amaro, Mayfair, Hudson, Valencia, X-Pro II, Willow, Sutro, Hefe, Nashville and 1977 – so you can find just the retro effect you need in seconds.

03. Nightmare

Free Photoshop actions: Nightmare

…and they were never seen again

If your photos just aren't sinister enough for your liking, this free action should make things a little more unsettling. It's designed to let you easily give your photos a dark, haunting effect. Perfect for creating the impression that you're permanently about to stumble into mortal danger.

04. Cold Nightmare

Free Photoshop actions: Cold Nightmare

Damn it, stand still when I’m trying to skewer you

This amusingly-titled action will transform a photo of a perfectly innocent scenario into a window into a dark world. In this example image, the archer probably shooting at a target takes on the look of someone who is definitely trying to kill a human. It’s amazing what some shadows can do.

05. Summer Haze

Free Photoshop actions: Summer Haze

Get that summer feeling again

If you'd prefer to cheer up your images, take a sunny shot and make it intensely summery with this great turquoise haze effect. Outdoor portraits taken in natural light are most suitable for this filter.

06. Hazy Afternoon

Free Photoshop actions: Hazy Afternoon

Hazy Afternoon adds a soft gradient colour layer

Perfect for outdoor pictures, the Hazy Afternoon action certainly lives up to its name by creating a soft gradient colour layer. You can use this free action on black and white or colour images, plus you can easily adjust the gradient until you get the exact look you're after.

07. Sun Kissed

Free Photoshop actions: Sun Kissed

Sun Kissed will brighten and tone even the drabbest landscape

Light up any image with this comprehensive collection of sunlight effects that'll brighten and tone even the drabbest landscape. Simply add a bit of a warm tone, or go the whole hog and throw in a setting sun complete with a lens flare effect; it's all there.

08. HDR Action

Free Photoshop actions: HDR action

Ramp up your HDR contrast with these actions

Remove the lack of contrast that comes with HDR photography with this set of four actions; HDR fix Light, Normal, Heavy, and Clicker.

09. Strong HDR Effect

Free Photoshop actions: Strong HDR Effect

Get vibrant colour effects with this free HDR filter

Alternatively, try getting vibrant colour effects with this free HDR filter from Shutter Pulse. If it works well for you but you’d like more options, it’s part of a set of 30 HDR actions that you can buy for $13.

10. Blue Evening

Free Photoshop actions: Blue Evening

Add a mysterious atmosphere to your shots with Blue Evening

Blue Evening is the free component of a paid-for set called Touch of Drama, which gives you various ways to add a mysterious atmosphere to your shots. The strength of the blue cast depends on your starting colours, so click through to see a good selection of examples.

11. Night to Twilight

Free Photoshop actions: Night to Twilight

Turn your nighttime images into twilight photos

This set of 11 actions convert your nighttime images into twilight photos by introducing a colour cast and lightening the sky. The effect is rendered using layers, so you can adjust the degree of twilight by reducing the layer’s opacity, making it nice and flexible.

12. Purple Contrast

Free Photoshop actions: Purple contrast

A bit of purple can give your photographs a dramatically downbeat look

This free Photoshop action washes out some of the colour from an image and gives it a purpley hue. It's a good way to give your photographs a dramatically downbeat look.

13. Bella

Free Photoshop actions: Bella action

Create a romantic, nostalgic feel with a pink cast

This action adds a beautiful warmth to your photographs, bringing out rich tones in hair and skin, and softening colours with a pink cast that creates a romantic, nostalgic feel.

14. Wedding Enhancers kit

Free Photoshop actions: wedding enhancers kit

These actions are ideal for fixing wedding photography

Photoshop actions are extremely useful for wedding photographers dealing with a huge number of shots. Here you get a set of 11 actions that automatically create common portrait effects, especially around the theme of wedding photography. The set includes skin smoothing and soft filter effects as well as black and white conversion.

15. Photoshop Color actions

Free Photoshop actions: Photoshop colour actions 2

Here’s a handy collection of colour treatments

A nice range of colour treatments including rich, grainy black-and-white, bleach bypass, and some heavy casting effects. Great for experimentation.

Next page: Vintage photo filters

16. Vintage Light Leak

Free Photoshop actions: Vintage Light Leaks

Get that knackered old Box Brownie look for free

Sometimes you don't want your photographs to look too good; a little imperfection can add to a shot's charm, and this vintage light leak action is one way to achieve that effect. Send it into action and you can turn any top-end DSLR shot into something that looks like it was taken on an antique camera.

17. Cross-processing ATN

Free Photoshop actions: Cross-processing ATN

This action lets you cross-process without all the mess

Cross-processing is a traditional photographic technique involving deliberate processing of one type of film in a chemical solution intended for another, resulting in oddly skewed colours and increased contrast and saturation. This free Photoshop action gives you a way to recreate the effect digitally, and is available free for personal use.

18. Cross Processed

Free Photoshop actions: Cross Processed

Add drama and vivid colour effects to your images

This action adds drama and vivid colour effects to your images by deepening shadows and making colours more saturated. It’s especially good for stormy skies, landscapes, buildings and ocean scenes.

19. Color 024

Free Photoshop actions: Color 024

Create rich, sun-bleached photos that still retain a high level of detail

Digital pictures are crisp and precise, but sometimes they can lack that nostalgic glow of a film photograph. By downloading this free action, you can adjust the colour saturation and create rich, sun-bleached photos that still retain a high level of detail.

20. 2-strip Technicolor

Free Photoshop actions: 2-Strip technicolor

This action simulates the 2-strip look without damaging the original image

Recreate the look of 2-strip Technicolor film by downloading this free action. Popular in the 20s and 30s, 2-strip technicolor film exposed black and white film behind a green filter and a red filter. By merging the green and blue channels in different layers, this action simulates the 2-strip look without damaging the original image.

21. Light Leaks

Free Photoshop actions: Light Leaks

These gradients are ideal for adding non-destructive vintage effects to your images

This handy selection of light leaks has been created using gradients, making it very flexible for adding non-destructive vintage effects to your images. The free version includes five high-quality leaks, all featuring support for 16-bit colour so you can achieve brighter-than-white highlights. And they work with video, too!

22. Hard Lomo

Free Photoshop actions Hard Lomo Action

If you like your lomo action hard, look no further

Deviant Art is a great place to find Photoshop actions, as this example from BlackLaceStock demonstrates. Included here is a set of actions that add a classic lomo-look to your images, akin to applying an Instagram effect.

23. Retro Style filters

Free Photoshop actions RetroFilters

These 35mm-inspired effects include some lovely gritty options as well as colour treatments

Chris Spooner is well known for his excellent Photoshop tutorials and giveaways, and he doesn’t disappoint with this new selection of 10 free retro-style Photoshop actions. Each of the effects is inspired by 35mm film and processing techniques, and includes some lovely gritty options as well as colour treatments.

24. Polanoid Generator

Free Photoshop actions: Polanoid Generator 3

Polanoid’s one of those Photoshop actions you’ll use again and again

Turn any image into a Polaroid instantly with one of 10 different effects. It includes colour treatments and shadows automatically, and it's one of those Photoshop actions you'll use again and again.

25. The Mini Collection

Free Photoshop actions: The Mini Collection

There’s plenty to play with in this taster selection

Featuring some impressive retro Photoshop actions, plus a kit of light leaks and some vintage Photoshop brushes, the Mini Collection from FilterGrade is a free taster of its larger $49 FilterGrade bundle.

26. Old Photo

Free Photoshop actions: old photo action

Add colour and contrast with this old photo action

Want to make your images look like they’ve through a time warp? Then get experimenting with this old photo action, which adds colour and contrast.

27. Portrait

Free Photoshop actions: portrait action

Create a vintage effect with a spot of desaturation

Desaturate the colour in your photography with this portrait action, which creates a gorgeous vintage effect.

28. Split Toning

Free Photoshop actions: split toning action

Make those ransom notes really pop!

The area between greyscale and colour is split toning, and adding this slight change to your photos can have a dramatic effect. You can also create retro and abstract images with this technique.

29. Amatorka

Free Photoshop actions: Amatorka action 2

Get the action movie look with Amatorka

Create an instant action movie-style colour treatment with a blue-green cast, rich saturation and increased contrast.

30. Set14

Free Photoshop actions: Set14

Fill your boots with these vintage actions

If you're after a vintage effect for your photography but you're not entirely sure what, nab this collection from DeviantArt user Yeonseb. It contains 14 assorted vintage actions, so you're bound to find something to your liking.

31. Thinking of You

Free Photoshop actions: Thinking of you

Add a filmic, green-cast and heavily saturated shadow effect

This is another stylised photographic treatment that adds a filmic, green-cast and heavily saturated shadow effect. The end result feels very fashion-orientated.

32. Unspoken

Free Photoshop actions: Unspoken

Use Unspoken to heighten details and increase contrast

This simple action creates a beautiful blockbuster film look, heightening details in your photographs and increasing contrast, while introducing a blue/green tint.

33. Vintage

Free Photoshop actions: Vintage

Turn lowlights into colourful highlights with this Vintage action

This simple filter give your photos a tinted, washed-out look with an extra neon touch that'll turn lowlights into colourful highlights.

34. HipstaRev

Free Photoshop actions: HipstaRev pack 1

Get the Hipstamatic look in Photoshop

This set of actions creates Hipstamatic-style images inside Photoshop. The download includes three actions, each of which creates a recognisable treatment including borders and noise.

Next page: Monochrome photo filters

35. Bold B&W HDR

Free Photoshop actions: Bold B&W HDR

Why should colour pictures get all the HDR fun?

It's not just colour photos that you can apply the HDR treatment to. With this free action you can give any photo a bold, black and white, HDR-style look that'll make it really stand out.

36. Infrared Photography

Free Photoshop actions: InfraRed Photography

Add some infrared chill to your pictures

Add the eerie touch of a cool infrared chill to your pictures with this free Photoshop action. This action creates two adjustment layers inside a layer group, allowing you to change the red and blue balance, as well as the contrast.

37. High Key

Free Photoshop actions: High key

Turn any photo into a stunning high-key portrait

This action requires a credit if you use it, but offers a very simple way to convert a regular photograph into a stunning high-key portrait with clean lines and an almost dreamy finish, without compromising essential areas of contrast.

38. Lithprint

Free Photoshop actions: Lithprint

Lithprint turns photographs into striking lithograph-style images

Create a lithograph-style image from your raw photos. This works best on larger images that have already been given a medium-contrast treatment.

39. Gum Bichromate Print

Free Photoshop actions: gum bichromatic print

Emulate the early days of photography with this action

Emulate 19th century gum bichromate prints with this straightforward action that produces beautiful textured effects.

40. Black and White

Free Photoshop actions: Black and White

Get a grainy black and white look that’s heavy on the black

This action adds a punchy, high-contrast black and white effect to your photographs. It produces a nice grittiness with heavy grain and over-saturated blacks. Great for creating a stylised image.

41. Dramatic Sepia

Free Photoshop actions: Dramatic Sepia

Dramatic Sepia’s contrast curve gives a slightly more refined version of the standard sepia effect

This superb action offers a slightly more refined version of the standard sepia effect by adding a contrast curve to age the final result so that it feels like a faded photograph. Dramatic Sepia offers a great way to communicate a sense of age.

Next page: Touch-up techniques

42. 5 Skin Retouching actions

Free Photoshop actions: 5 Skin Retouching Actions

Sort out your skin the easy way

Want to retouch skin like a boss? This set of retouching actions will give you a head-start, enabling you to heal, mattify and airbrush skin with one click, and also enabling you to brighten eyes and increase their contrast.

43. Express Eye Bright 

Free Photoshop actions: Express Eye Bright

Brighten up dull eyes with this quick and easy enhancement

Quickly put a bit of sparkle into dull, dark eyes with this easy eye enhancement action. Simply click on the background layer (or the layer with the eyes you want to sharpen), run the action, and paint on the layer mask to sharpen and brighten the eyes. 

44. Teeth Whitening

Free Photoshop actions: Teeth whitening

Alternatively, just brush your teeth properly, for pity’s sake

Teeth aren't naturally a dazzling white, but sometimes they can appear grey or yellow in photographs, depending on the lighting. This useful action can easily brighten up the smiles of family and friends by giving their teeth a clean, white finish.

45. Bright Eyes

Free Photoshop actions: Bright eyes

Another way to bring dull eyes to life

This free Photoshop action gives an intense look to blue eyes, as shown above. A great effect for extreme closeups.

46. High Definition Sharpening

Free Photoshop actions: High definition sharpening

This action offers a simple one-click solution to sharpening

The final stage of image preparation should be to sharpen your images according to the final delivery method (you sharpen differently for print or screen). This free action from MCP Actions offers a simple one-click solution to sharpening, with the ability to control the degree of sharpening that’s been applied after the fact by adjusting the opacity and masking of layers.

47. Soft Skin Tones

Free Photoshop actions: soften skin effect

Smooth skin while retaining textures and colouring

Used in combination with an existing selection or mask, this smooths skin while retaining textures and colouring, saving clean-up time.

48. Remove White Background
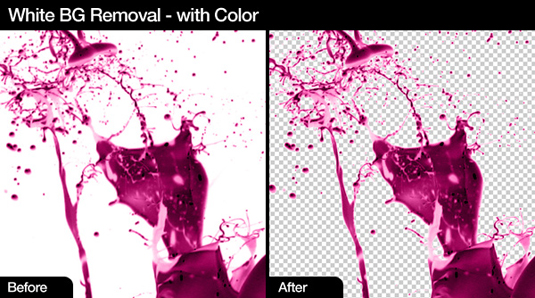
Free Photoshop actions: remove white background

Get rid of white backgrounds with these actions

Automatically remove white backgrounds with this suite of three actions that allow for different automated processes to strip out the background of your isolated images.

Next page: Special effects

49. Vectorize Me Babe

Free Photoshop actions: Vectorize Me Babe

Get a vector look without Live Trace

Giving photos a vector look can be hard work; the obvious thing to do is paste them into Ilustrator and use Live Trace, but getting the effect you want can take a lot of fiddling with settings. Instead, use Vectorize Me Babe; put it into action and you'll get an instant vector effect, which you can amplify by simply running the action again.

50. Glitch Effect

Free Photoshop actions: Glitch Effect

Get your glitch on with this fabulous free action

You can't beat the look of stuff recorded onto a knackered old VHS tape, and this free action by Syed Faraz Ahmad does a pretty good job of recreating it, with plenty of glitches and colour smearing.

51. Plexiglass

Free Photoshop actions: Plexiglass

Plexiglass makes it a doddle to add abstract effects to your photos

Transform your photos into posters, covers or backgrounds for text with Plexiglass, a set of Photoshop actions that make it easy to add abstract effects and borders to any image with a single click.

52. 3D Isometric Map

Free Photoshop actions 3D Map

Why bother with flat maps when you could have an isometric 3D map?

A brilliant action that converts a flat vector map into an isometric 3D map mockup. There are three different styles of map available: sand, ice and grass, and the action also allows you to drop in your choice of buildings, trees, landscape elements and signs.

53. Pencil Draw

Free Photoshop actions: pencil draw

Quickly turn a colour photo into a pencil sketch

This action uses contrast to find the edges in your image and automatically render a pencil sketch effect. Start from a full-colour image with no need to convert to black and white first.

54. Stickers and Tapes

Free Photoshop actions: stickers n tape

Stickers and tape in one package!

Create round stickers with a curl in the corner, or polaroid-style images with clear sticky tape holding them in place. This site requires you to register for free before you can download the action.

55. 1930s Glitter Text

Free Photoshop actions: 1930s glitter text

Get a bit of glam with this snazzy effect

Automatically convert your text into a snazzy 1930s-style retro treatment with shiny sequins and a nice 3D effect. It’s also easy to adjust after running the action, as all the layers are retained.

56. Stamp Generator

Free Photoshop actions: stamp generator

Please don’t use this to forge postage stamps

Turn an image into a stamp automatically using an included Photoshop brush to define how the frill will sit along the edge of the final artwork.

57. Denim & Leather

Free Photoshop actions: denim and leather

If you’re planning your own range of jeans, this is a must

This Photoshop action automatically generates a blue denim texture, 'sews' on a leather patch and embosses your own artwork onto the leather. The nice, simple and effective output could be adapted for a variety of purposes.

58. Spotlight

Free Photoshop actions: Spotlight

Make details stand out with this virtual spotlight

Make the focal point of an image really stand out with this action from Christopher Fowler, which will train a virtual spotlight on your picture.

59. Fold Paper

Free Photoshop actions: paper fold

Turn artwork into a virtual mockup with this neat effect

Automatically render your artwork onto a trifold paper design in pseudo-3D, complete with shadows and shading on the image. Ideal for rendering paper designs ahead of presenting them on-screen to clients.

60. Long Shadow

free photoshop actions: Long shadow

Still doing flat design? Here’s the cherry for your flat cake

This free Photoshop action allows you to create a long shadow from your text content, and you can tweak the shadow’s opacity.

61. Triptych Generator

free photoshop actions: Triptych Generator

Create standard triptych panels for print

Generate standard triptych panels for print, with a 3D effect visual triptych generator also available. Print sizes include 1000x600mm, 1300×800, 1600×1000 with 50mm depth at 288dpi.

62. Action 3D

Free Photoshop actions: Action 3D

Get a fake 3D effect with this channel-juggling action

This quirky action from JonasFan93 creates a pseudo 3D anaglyphic image by separating out colour channels within your image and offsetting them. This freebie offers a number of different styles that are more suitable for use in printed brochures and website design where you’re aiming for a stylised effect.

63. Outer space

Free Photoshop actions: outer space

Finally! The final frontier

Create an outer space background automatically complete with space dust and nebulous gases. This action randomly colours the scene to produce a different effect every time.

Related posts:

The 60 best free Photoshop brushesBest free fonts for designersTop Photoshop tutorials

Seven Steps for Growth Hacking Your Business with Data

Original Source: https://www.sitepoint.com/growth-hacking-data/

No data? No problem. You can growth hack your way to success in seven steps.

Whether you’re pre-launch or ready to scale, data can hold the key to your business’ growth. Even if you don’t have much data about your customers or product yet, you can still use data to growth hack your business by following these seven steps.

1. Define your business objectives

Before you can shoot for the stars you need to be clear about what you’re trying to achieve. While this is often easier than it sounds, it’s a crucial step because your goal will drive your strategy.

According to Simon Mathonnet, Chief of Digital Strategy for Splashbox, it’s important to translate your objective into something practical. For example, rather than saying your goal is to grow your business, it should be more specific — like you want to quit your job so you can focus full-time on the company, or you want to raise a Series A investment round.

2. Make your objectives measurable

Once you’ve defined your objective, it then needs to be translated into something that you can track. A good way to do this is to make it SMART. This stands for:

Specific: Make the objective clear and easy to grasp.
Measurable: Set a quantitative goal that can be measured.
Achievable: Get buy-in from your team and give them (and yourself) an incentive by having an objective that’s within reach.
Relevant: Your goal needs to make sense and be in line with what the business is trying to achieve.
Time: Be clear about when the objective needs to be achieved. This will give you something to look forward to.

The SMART objective for the two objectives above may be:

Quit your job to focus on your startup = Generate $X of revenue per month for three consecutive months.
Series A capital raising = Retain Y active users for three months before approaching investors.

3. Create a hypothesis

Once you’ve defined your goal you need to find a way to get closer to achieving it. One way to do this is to create a hypothesis that you can implement and test quickly. The hypothesis is essentially an educated guess or hunch based on what you know about your product or service and customers.

For example, if your objective is to grow revenue, then your hypothesis might be that people who look at three or more products on your website are more likely to purchase. This means you need to find a way to get people who visit your site to look at three or more products because you believe this will increase your revenue.

4. Collect data

To be able to test and measure your hypothesis you need to have data. The data sets a baseline — so you know your starting point — and measures your results. The type of data that you need will depend on your hypothesis.

If you’re pre-launch, you probably don’t have much customer data yet. Most startups also struggle with data because of their uniqueness — traditional, quantifiable data sources like market research may not have insights for your product or market segment. While it can be expensive to commission market research, thankfully there’s a plethora of technology that’s relatively inexpensive that can help you mine information and generate new data.

Some ways you can collect data include:

Google Analytics: This is useful if you have had many visitors to your site. It collects data on what interactions people have on your website, like how long they spent on your site, what pages are the most popular, what search terms they used and what links they clicked.
PoweredLocal: If you have a brick and mortar shopfront, this platform lets you collect information about your customers by offering them complimentary Wi-Fi access. When customers use social media or email to sign onto your network, you can find out who they are, what they like, and potentially sign them up to your newsletter or offers.
Online reviews: Review sites like Yelp or TripAdvisor serve two purposes. They let people who are looking for your product or service hear what you’re like directly from your customers, and they provide a way for customers to give you feedback. This feedback is data that you can use to identify opportunities to improve your customer experience.
HotJar: This heatmap tool lets you see how people use and respond to messages on your site by showing what they engage with. Unlike Google Analytics, you don’t need too many visitors to your site to start seeing what is attracting or repelling your customers.
Social Media: Research social media channels to see what customers are talking about. This may be either on your own social media pages or your competitors’. Social media platforms like Facebook and Twitter also have analytics tools that are often available for free. These can show you demographic and engagement information about your audience.
LeadChat: Use a live chat function on your website to get direct input from your customers. Find out your customer demographic and see what questions they ask to determine what they’re interested in or are struggling with.
Events and pitch nights: Collect anecdotal data by talking to potential customers, peers and competitors. You can find them at industry events, pitch nights and conferences.

The post Seven Steps for Growth Hacking Your Business with Data appeared first on SitePoint.

How to Set Up a Reverse NGINX Proxy on Alibaba Cloud

Original Source: https://www.sitepoint.com/how-to-set-up-a-reverse-nginx-proxy-on-alibaba-cloud/

This article was created in partnership with Alibaba Cloud. Thank you for supporting the partners who make SitePoint possible.

Think you got a better tip for making the best use of Alibaba Cloud services? Tell us about it and go in for your chance to win a Macbook Pro (plus other cool stuff). Find out more here.

Need to serve many websites from a single Linux box, optimizing resources, and automating the site launch process? Let’s get serious then, and set up a production-ready environment using Ubuntu, NGINX, and Docker — all of it on Alibaba Cloud.

This is a somewhat advanced tutorial, and we’ll assume some knowledge of networking, server administration, and software containers.

Understanding the Scenario

If you are looking at this guide, chances are that you need to manage a cluster of servers, or an increasing number of websites — if not both — and are looking at what your options are for a secure, performant, and flexible environment. Well then, you came to the right place!

Why a Reverse Proxy

In a nutshell, a reverse proxy takes a request from a client (normally from the Internet), forwards it to a server that can fulfill it (normally on an Intranet), and finally returns the server’s response back to the client.

Reverse proxy

Those making requests to the proxy may not be aware of the internal network.

It is, in a way, similar to a load balancer — but implementing a load balancer only makes sense when you have multiple servers. You can deploy a reverse proxy with just one web server, and this can be particularly useful when there are different configuration requirements behind those end servers. So the reverse proxy is the “public face” sitting at the edge of the app’s network, handling all of the requests.

There are some benefits to this approach:

Performance. A number of web acceleration techniques that can be implemented, including:

Compression: server responses can be compressed before returning them to the client to reduce bandwidth.
SSL termination: decrypting requests and encrypting responses can free up resources on the back-end, while securing the connection.
Caching: returning stores copies of content for when the same request is placed by another client, can decrease response time and load on the back-end server.

Security. Malicious clients cannot directly access your web servers, with the proxy effectively acting as an additional defense; and the number of connections can be limited, minimizing the impact of distributed denial-of-service (DDoS) attacks.
Flexibility. A single URL can be the access point to multiple servers, regardless of the structure of the network behind them. This also allows requests to be distributed, maximizing speed and preventing overload. Clients also only get to know the reverse proxy’s IP address, so you can transparently change the configuration for your back-end as it better suits your traffic or architecture needs.

Why NGINX

NGINX logo

NGINX Plus and NGINX are the best-in-class reverse-proxy solutions used by high-traffic websites such as Dropbox, Netflix, and Zynga. More than 287 million websites worldwide, including the majority of the 100,000 busiest websites, rely on NGINX Plus and NGINX to deliver their content quickly, reliably, and securely.

What Is a Reverse Proxy Server? by NGINX.

Apache is great and probably best for what it’s for — a multi-purpose web server, all batteries included. But because of this very reason, it can be more resource hungry as well. Also, Apache is multi-threaded even for single websites, which is not a bad thing in and of itself, especially for multi-core systems, but this can add a lot of overhead to CPU and memory usage when hosting multiple sites.

Tweaking Apache for performance is possible, but it takes savvy and time. NGINX takes the opposite approach in its design — a minimalist web server that you need to tweak in order to add more features in, which to be fair, also takes some savvy. If the topic interests you, a well-established hosting company wrote an interesting piece comparing the two: Apache vs NGINX: Practical Considerations.

In short, NGINX beats Apache big time out-of-the-box performance and resource consumption-wise. For a single site you can chose not to even care, on a cluster or when hosting a many sites, NGINX will surely make a difference.

Why Alibaba Cloud

Alibaba Cloud logo

Part of the Alibaba Group (Alibaba.com, AliExpress), Alibaba Cloud has been around for nearly a decade at the time of this writing. It is China’s largest public cloud service provider, and the third of the world; so it isn’t exactly a “new player” in the cloud services arena.

However, it hasn’t been until somewhat recently that Alibaba rebranded its Aliyun cloud services company and put together a fully comprehensive set of products and services, and decidedly stepped out of the Chinese and Asian markets to dive into the “Western world”.

On a Side-by-Side Comparison of AWS, Google Cloud and Azure, we did a full review of what you can do in the cloud — elastic computing, database services, storage and CDN, application service, domain and website, security, networking, analytics, … and yes, Alibaba Cloud covers it all.

Deploying to Alibaba Cloud

You’ll need an Alibaba Cloud account before you can set up your Linux box. And the good news is that you can get one for free! For the full details see How to Sign Up and Get Started.

For this guide will use Ubuntu Linux, so you can see the How to Set Up Your First Ubuntu 16.04 Server on Alibaba Cloud) guide. Mind you, you could use Debian, CentOS, and in fact, you can go ahead and check 3 Ways to Set Up a Linux Server on Alibaba Cloud.

Once you get your Alibaba Cloud account and your Linux box is up and running, you’re good to go.

Hands On!
Installing NGINX

If we wanted to use the whole process ourselves, we would first need to install NGINX.

On Ubuntu we’d use the following commands:

$ sudo apt-get update
$ sudo apt-get install nginx

And you can check the status of the web server with systemctl:

$ systemctl status nginx

With systemctl you can also stop/start/restart the server, and enable/disable the launch of NGINX at boot time.

These are the two main directories of interest for us:

/var/www/html NGINX default website location.
/etc/nginx NGINX configuration directory.

Now, setting a reverse proxy can be a somewhat cumbersome enterprise (and there are several guides that cover this process), as there are a number of network settings we need to go through, and files we need to update as we add sites/nodes behind our proxy.

That is, of course, unless we automate the whole thing using software containers…

Docker to the Rescue

Before we can start using software containers to automate our workflow, we first we need to install Docker, which for Ubuntu is a fairly straight forward process.

Uninstall any old version:

$ sudo apt-get remove docker docker-engine docker.io

Install the latest Docker CE version:

$ sudo apt-get update
$ sudo apt-get install docker-ce

If you want to install a specific Docker version, or set up the Docker repository, see Get Docker CE for Ubuntu.

Setting the Network

Part of setting a reverse proxy infrastructure is properly setting networking rules.

So let’s create a network with Docker:

$ docker network create nginx-proxy

And believe or not, the network is set!

NGINX-Proxy!

Now that we have Docker running on our Ubuntu server, we can streamline the process of installing, setting up the reverse proxy, and launching new sites.

Jason Wilder did an awesome job putting together a Docker image that does exactly that–jwilder/nginx-proxy, a automated NGINX proxy for Docker containers using docker-gen, that works perfectly out-of-the-box.

Here’s how you can run the proxy:

$ docker run -d -p 80:80 -p 443:443 –name nginx-proxy –net nginx-proxy -v /var/run/docker.sock:/tmp/docker.sock:ro jwilder/nginx-proxy

Essentially:

we told Docker to run NGINX as a daemon/service (-d),
mapped the proxy’s HTTP and HTTPS ports (80 and 443) the web server(s) ports behind it (-p 80:80 -p 443:443),
named the NGINX proxy for future reference (–name nginx-proxy),
used the network we previously set (–net nginx-proxy),
mapped the UNIX socket that Docker daemon is listening to, to use it across the network (-v /var/run/docker.sock:/tmp/docker.sock:ro).

And believe or not, the NGINX reverse proxy is up and running!

Launching Sites, Lots of Sites

Normally when using Docker you would launch a “containerized” application, being a standard WordPress site, a specific Moodle configuration, or your own images with your own custom apps.

Launching a proxied container now is as easy as specifying the virtual your domain with VIRTUAL_HOST=subdomain.yourdomain.com:

The post How to Set Up a Reverse NGINX Proxy on Alibaba Cloud appeared first on SitePoint.

Collective #453

Original Source: http://feedproxy.google.com/~r/tympanus/~3/fq3B2HXo4oM/

C453_Connect

Our Sponsor
CONNECT TECH Atlanta’s web/mobile dev conference

October 17-19 Atlanta. A World Class JavaScript, React, Angular, Vue, Web, Design Conference. 1200 attendees, 120 sessions, 12 workshops.

Learn more

C453_modular

What is Modular CSS?

An in-depth exploration of Modular CSS. By Scott Vandehey.

Read it

C453_img

Responsive Images

Mat Marquis takes a look back at how responsive images evolved.

Read it

C453_browser

Inside look at modern web browser (part 4)

Mariko Kosaka concludes her article series on how Chrome handles code to display a website.

Read it

C453_graphql

GraphQLEditor

With GraphQLEditor you can create visual diagrams without writing any code.

Check it out

C453_traffic

The 9am Rush Hour

The first article in a series where Paul Lewis and Surma think out loud about the challenges they see in modern web development.

Read it

C453_colors

ColorBox

Colorbox is a tool to produce color sets. Made by the Lyft design team.

Check it out

C453_Chrome

Why I’m done with Chrome

Read why Matthew Green has had enough of Google Chrome’s violation of user privacy. Read the Hacker News discussion here.

Read it

C453_game

Interplanetary Postal Service

A lunar lander type game with complex fluid dynamics as an entry to the 2018 js13kgames competition.

Check it out

C453_darkpatterns

Dark Patterns And Other Design No-Nos For Mobile

Suzanne Scacca warns against using dark patterns on mobile sites.

Read it

C453_icons

Freebie: Autumn Kawaii Icon Set

A set of 50 gorgeous looking autumn themed icons.

Get it

C453_proto

Understanding JavaScript’s Prototypal Inheritance

An article by Rajat S on how prototypal inheritance works in JavaScript.

Read it

C453_font

Free Font: Marker Mark

Vlad Cristea designed this handwritten SVG font.

Check it out

C453_webglgame

Underrun – Making of

Read about he making of Underrun, a twin stick shooter using WebGL.

Read it

C453_variablefonts

Variable Font Experiments

Mark Frömberg’s fantastic animated variable font experiments.

Check it out

C453_progress

Responsive animated progress bar to donut

These progress bars will animate to doughnuts when the screen gets smaller. By Mikael Ainalem.

Check it out

C453_colornames

Werner’s Nomenclature of Colours

A recreation of the original 1821 color guidebook with new cross references, photographic examples, and posters designed by Nicholas Rougeux.

Check it out

C453_500

#CodePenChallenge: HTTP Status 500

Check out all the great demos of Codepen’s HTTP Status 500 challenge.

Check it out

C453_mouseripple

Ripple Mouse (with plasma)

A great demo of interactive plasma by Liam Egan.

Check it out

C453_grid

From Our Blog
Grid Layout with Scrollable Content View

A Masonry-powered grid layout with a motion hover effect on the grid items and a scrollable content view.

Check it out

Collective #453 was written by Pedro Botelho and published on Codrops.