10 of the best creative resumés

Original Source: http://feedproxy.google.com/~r/CreativeBloq/~3/mrkOVZWjrh4/creative-resumes-11121419

We all know finding work in the design industry is an extremely competitive process, even if you do have a killer design portfolio. With so many talented people around, just getting noticed is a job in itself. 

Designers and illustrators around the world have long been coming up with unusual creative strategies to give their resumés an edge in the hunt for employment. If you're in need of inspiration for your own CV, here are some of the best creative resumés out there to help get the creative juices flowing.

01. Victor Rodriguez

Victor Rodriguez cereal box themed resume

This cereal-themed resume is high in fibre and work history details

Colombian art director and designer Victor Rodriguez, also known as Vimarovi, has an appreciation for lots of different aspects of graphic design, including corporate identity, packaging and product design. So what better way to showcase all these interests than with a resume that brings together all these elements?

That's just what Rodriguez has done with the innovative VICK cereal box. Designed to look like an everyday cereal box, this CV humorously weaves his work history and creative skills into the design. Instead of ingredients, hungry clients will find information about his personality, strengths and previous employment, and if anyone needed any proof of Rodriguez's claims, the packaging speaks for itself.

02. Andy Morris

Andy Morris creative resume

Andy Morris thought small when it came to his new CV

Art director, artist and designer Andy Morris caught the design industry's attention for all the right reasons with this fantastically creative resume. Rather than sticking with the traditional paper, Morris commissioned a LEGO minifigure in his own likeness, complete with a tiny laptop in one hand and a mini-CV in the other. To update prospective clients with the information they need, the packaging features a bitesized run-down of Morris' skills, plus contact details.

03. Pierre-Marie Postel

Click the image to see the full CV

Graphic designer and illustrator Pierre-Marie Postel – also known as Paiheme – decided to use his CV to show off exactly what he's best at. His creative resume displays his impressive illustration style, and mimics a Japanese print advert. 

It's not style at the expense of substance, however – this CV includes plenty of key information, plus some quirky additions such as character designs to show off Postel's personality. The monochrome colour palette ensures it doesn't become overwhelming.

04. Brennan Gleason

creative resume

Brennan Gleason decided to combine two passions

Interaction designer Brennan Gleason was nearing the end of university and needed to get his name known by potential employers. To do so in style he brewed up a batch of blonde ale, packaged it up in a neat cardboard carrier, and printed his CV on the back. The idea being that prospective employers could sit down for a quick drink and peruse Gleason's design skills at the same time.

05. Curriculum 3D

Benjamin Benhaim’s 3D CV really stands out

Inspired by this great-looking flat CV from Jimmy Raheriarisoa, Paris-based art director and motion designer Benjamin Benhaim set to work and made this stunning 3D rendered resumé. Created using Cinema 4D, Octane and After Effects, it covers all the bases and features plenty of playful touches, and each image took around seven minutes to render. Time well spent!

06. Robynne Redgrave

creative resume

You’d be all over this if it turned up in the post

This portfolio mail package created by Robynne Redgrave, a Canadian graphic designer based in Helsinki, is a real attention-grabber. It contains not only her CV but a whole load of stuff including a hand-bound portfolio book, a letter of intent, application form and certificates.

07. Robby Leonardi

robby leonardi creative resume

Robby Leonardi’s interactive CV caused a real stir when he launched it

Robby Leonardi is a multidisciplinary designer based in New York City. Specialising in illustration, graphic design, animation, and front end development, he has worked with the likes of Fox, Speed TV, FX Networks, myNetworkTV and G4. His incredibly fun interactive design resumé will have you scrolling for hours!

08. Julia Miceli

Julia Miceli’s CV is testament that creativity can also be practical

Julia Miceli – a graphic designer based in Buenos Aires, Argentina – managed to hit all the right notes with her creative resume. It's simple compared to many of the other in this list, but still oozes personality. The bold orange colour is unusual and eye-catching, and there isn't an element that hasn't been carefully art directed. 

Miceli has also considered practical aspects: the CV is a standard A4 size, but sits in a wallet that shows it off to its full potential, and there's a neat slot that holds a business card the viewer can pop out and keep. 

09. Zhi Liang

A simple and inventive approach to the résumé design

Singapore-based student Chen Zhi Liang was set a task by his graphic design tutor to create an inventive résumé that would make him stand out from the crowd. The semester-end assignment was to create an infographic résumé and we think he's come up trumps with this design.

Showcasing the all-important qualifications and skills, the résumé is eye-catching without being overwhelming. Liang's minimal approach is perfect for an overcrowded job market. We'd definitely hire him!

10. Ed Hamilton

creative resume

Ed Hamilton’s Google Map resumé uses personalised placemarkers to highlight his skills

When London-based copywriter Ed Hamilton was out of work, he decided to put his time to good use and develop a creative way to stand out to prospective employers.

Using Google Maps' My Maps feature, Hamilton mapped his resumé, using different coloured pins to create personalised placemarkers, each accompanied by explanatory text. The brilliant design includes pins for where Hamilton lives, his interests and his previous employment.

Related articles:

20 tips for design interview successHow to be the designer every agency wants to hire14 free resume templates

Tips On How To Create Your Next Typographic Posters Project

Original Source: http://feedproxy.google.com/~r/Designrfix/~3/TRuzvAYIaj0/typographic-posters-project

We all need a bit of inspiration every now and then to motivate us to tackle a difficult task, or simply to get out of bed. Images have always had that power. As they say, one picture can say more than a thousand words ever could. In addition, the correct application of graphic images and fonts […]

The post Tips On How To Create Your Next Typographic Posters Project appeared first on designrfix.com.

JotForm PDF Editor: Your Questions Answered

Original Source: https://inspiredm.com/jotform-pdf-editor/

Here at Inspired Magazine, we’re always looking for tools that make the lives of our readers easier- which is why we love JotForm PDF Editor.

JotForm listened to the concerns of their customers and responded with new features and benefits.

Prior to JotForm’s PDF Editor, users had to sift through the information collated in their online forms manually. Usually, copying and pasting each response into a Word Doc and arranging the data into a professional looking PDF document.

Luckily for you, this long and tedious process isn’t necessary anymore.

This is what Aytekin Tank, JotForm founder, and CEO had to say about their PDF Editor;

“Our users told us about wanting a better way to present and distribute their form data,”

“Our new PDF Editor makes the entire process significantly easier. The best part — anyone can use it, even without any technical skills.”

How awesome is that? With all that in mind, let’s delve into meat and potatoes of this review.

Jotform PDF Editor

What’s Jotform PDF Editor?

As you may have already guessed, PDF Editor is a tool that makes editing PDF documents online, easier.

Simple right?

JotForm is an industry leader for creating easy-to-use online forms for business owners.

Their simple drag-and-drop customizing tool is part of what’s helped make them so popular. Within a matter of minutes, you can have an interactive form up and running- without having to write any code yourself!

What’s JotForm Used For?

These online forms are great for:

Collecting payments online
Customer contact forms
Job applications
Invoices
Lead collection
Client/ Staff surveys
Registration forms
Online booking forms
Event registration

You get the idea!

Just name the online form you need, and JotForm probably has a template with your name on it.

Jotform PDF Editor

Where Does JotForm PDF Editor Factor In?

JotForm’s taken things further by adding PDF Editor into the mix. You can now combine their fabulous online forms and integrate your responses to form one comprehensive PDF file- with incredible ease.

When Does This Come In Handy?

This is just one of many situations you might resonate with:

You launch a customer survey using a JotForm. However, you want to collate all your responses in one place. Not an email, not a copy and pasted Word Doc, or an Exel file- but a stylish PDF that reflects your brand.

Typically this requires a lot of time and effort on your behalf. This is where JotForm PDF Editor comes into its own. In no time at all, you can create numerous PDFs displaying all the data you’ve collected from your interactive forms.

Each document presents the information in a uniform design that exudes professionalism.

It’s safe to say, JotForm has officially taken this burden off your shoulders.

Jotform PDF Editor

Why Do Teachers Love This Tool?

Here’s another quick situation to consider.

All teachers have to edit PDFs at some point or another. Whether its a hand out for the class, or a complicated parental form- teachers are always utilizing PDF documents.

However, it’s time-consuming editing all these kinds of files. This is why teachers love JotForom PDF Editor; they can create a professional looking PDF document from scratch or modify an existing doc without needing any coding or tech skills- how cool is that? JotForm also has a nifty guide on editing PDFs, which is a helpful resource for educators.

Jotform PDF Editor

What Features Come With JotForm PDF Editor?

JotForm provides all the fields you need to customize your PDF. You’ll be hard pressed not to be able to create a document to suit your needs.

It doesn’t matter which payment package you opt for; you can insert as many fields as you like (even in the free Starter package)! You can also have the option of allowing users to add their electronic signature- how neat is that?

Any signature you receive via a JotForm form can be neatly displayed on your PDF doc. If your business involves a lot of contract signing, this feature’s a godsend. Users can even send an online signature using their smartphone!

Plus, you have the ability to edit each individual element to ensure that every inch of your finished product exudes the voice of your brand.

You can:

Add new sections,
Edit colors,
Upload photo and logos,
Choose fonts,

Jotform PDF Editor

If you’re unsure where to begin in terms of design, not to worry, JotForm provides hundreds of PDF templates for you to choose from.

Then, once you’ve set up your PDF template, it’ll automatically update each time you get a response through from your digital form. It really is as simple as that!

Then, once you’ve collated all your data, you can easily share the info with your team. Or, you can pick individual team members to send the PDF to (it’s entirely down to you).

This ensures your staff’s notified as soon as they’re able to access the information they need to complete their tasks- eradicating the need to continue forwarding emails to the relevant parties.

If you’re handling personal information, you can increase your privacy settings by password protecting your PDF documents. This works wonders for ensuring you don’t accidentally leak any of your customer’s private details- not cool!

Plus, PDF Editor integrates seamlessly with other major programs such as Google Drive, and Dropbox. Once you’ve set up these integrations, any new PDFs you create will automatically save onto these online storage services.

Again, this is another handy feature that enables your team to stay informed with all the latest info you’ve pulled from your online forms and gives them access to the most updated documents, immediately.

Are There Any Drawbacks to JotForm PDF Editor?

There are a couple of improvements JotForm PDF Editor could make.

For example, some users complain that JotForm could do a better job organizing survey responses.

For example, you can create a graph displaying the results of your digital form. However, it looks a little distorted. We’re sure this just a bug that needs ironing out, but for now, this is an area that certainly needs improving.

This means if you need to conduct extensive surveys that require you to plot graphs displaying your results- this might not be the best software (at the moment).

Jotform PDF Editor

Customers also said JotForm Editor could improve by offering users the option to create default email formats. Presently, you have to select an email template for each form you create.

This involves manually adding your logo and other defining features. To be fair, this doesn’t take up a lot of time, and it’s still pretty easy to customize- however, this update would still be much appreciated (really and truly, at this stage, we’re just nit-picking!)

Last but not least, if you own a Shopify store, you might be trying to get feedback from your customers. At the moment, users can’t integrate their JotForms with a Shopify popup plugin to get feedback after someone’s made a purchase.

What Are Other People Saying About JotForm PDF Editor?

On the whole, we think this software’s pretty awesome.

However, you don’t have to take our word for it. I took the liberty of scouring the internet to get the opinions of those who frequently use this tool.

This is a small snapshot of what customers had to say:

‘This is a so much wanted feature by many of us who are regular Jotform users. I appreciate the effort to make it so easy and intuitive to use, that is why I say: Way to go! Just another awesome product from the Jotform gurus!
Jeanette BM has used this product for one week.‘- Jeanette BM, Multitask manager

‘I think this product will enable especially small and medium businesses to send beautifully designed, automated PDFs both internally and to their customers.’– Çağrı Sarıgöz, Digital Marketing & Analytics Consultant

Final Thoughts

All in all, JotForm PDF Editor‘s super simple to use. If you’re a business owner, you should definitely try their free Starter package. You have nothing to lose and everything to gain by giving it a try- especially if your team’s wasting hours copying and pasting data into PDF documents!

Like most products, there are a few things that could be improved. However, on the whole, this tool provides a comprehensive solution to a genuine problem.

If you have any questions, comments, or direct experience with JotForm PDF, please feel free to leave us your thoughts in the comment box below; we always love hearing from our readers!

The post JotForm PDF Editor: Your Questions Answered appeared first on Inspired Magazine.

The Top 3D JavaScript Libraries For Web Designers

Original Source: http://feedproxy.google.com/~r/1stwebdesigner/~3/h7-qJQXMYPk/

Modern JavaScript is surprisingly powerful. Especially with support from WebGL libraries and SVG/Canvas elements.

With the right tools you can build pretty much anything for the web including browser-based games and native applications. Many of the newest groundbreaking features run on 3D, and in this post I’ve curated my list of the best 3D JS libraries currently available for web developers.

Three.js

three.js homepage

There is no doubt that Three.js deserves to be at the top of this list. It can be somewhat complex to learn from scratch but it’s also one of the better 3D libraries out there.

It’s managed by a core group and released for free on GitHub. ThreeJS primarily works on canvas elements, SVG elements, and the WebGL library for rendering.

Learning the ropes is a challenge and will require at least mid-level JavaScript knowledge. But you can find the complete setup in the Three.js documentation.

If you’re serious about doing 3D on the web, this library is for you. It’s not the only choice, but it’s probably the most popular choice for a beginner to start building stuff fast.

Babylon.js

babylonjs script

Another powerful library I like is Babylon.js. This one again relies on WebGL and runs solely in JavaScript.

It’s a bit more popular than other libraries but doesn’t have the same reach as Three.js.

Still it’s widely regarded as a powerful choice for web developers who want to create browser-based web games. On the homepage you can find a ton of demo previews and tips on how to get started with 3D game design.

There’s also a bunch of important links to resources like the GitHub repo and the Babylon JS tutorials.

All of those tutorials were designed by the Babylon team, so they’re an excellent place to start learning this library.

Cannon.js

cannonjs homepage

For something a little off the beaten path check out Cannon.js. This doesn’t push the usual 3D concepts but instead works as a JavaScript-based physics engine for gaming.

Canon is meant to load fast so you can render elements quickly on the page. It supports most modern browsers and comes with a powerful API for building your own physics ideas off of this.

It works great with Canvas elements and with WebGL apps. The only tricky part is studying the library and getting over the initial learning curve.

Take a peek at the GitHub demos page to see how Cannon.js looks in the browser and why it’s so great.

CopperLicht

copperlicht homepage

With a name like CopperLicht you might not know what to expect. But this is a powerful 3D JavaScript rendering engine built solely for web-based JS games.

Again it’s 100% open source and free to use for any project. The company that built CopperLicht does have some premium software & tools but these are not necessary for learning the CopperLicht library.

In fact, learning all the features will be tough since it supports an array of 3D functions like shadows/lighting, special effects, and 3D page element interactions.

The tutorials page is the best place to start and if you take this route be willing to take it slowly. There is a steep learning curve to get CopperLicht under your belt, although the payoff is well worth it.

Phoria.js

phoria.js script

For web-based motion and 3D effects on the screen you might try Phoria.js. It’s really more of a graphics library but Phoria is rooted in 3D rendering inside HTML5 canvas elements.

The main site runs a bunch of demos and it’s a pretty reasonable library for creating 3D graphics. The learning curve isn’t too tough, and you’ll find a bunch of code snippets on the site that you can copy/paste.

Plus it doesn’t even use WebGL, so you don’t need to worry about that library. Although you will need to be comfortable working on the canvas element, but that just comes with practice.

Scene.js

scenejs 3d javascript

For something that does run on WebGL check out Scene.js. Currently in version 4.2 this massive open source library lets you render elements in 3D for any modern browser.

It’s supported by a large team of developers and has years of major updates making it one of the best 3D rendering scripts you can use. However, this calls itself more of a visualization library, so it’s not just for rendering basic graphics.

Instead this could be used for much more complex tasks like designing multiple views of objects from different angles, or even creating basic 3D game graphics.

The homepage has a bunch of links to great examples if you’re curious to see how this works.

D3.js

d3.js javascript

While surfing the web you’ll often find charts and graphs that rely on 3D effects. Many of these run on D3.js which is a powerful JavaScript library for rendering data in 3D.

It’s also a totally free open source project with a very helpful GitHub page. The goal is to use SVG & canvas elements inside HTML to create dynamic data that can animate, rotate, and ultimately display information visually.

Take a look at the wiki entry on the GitHub page for more info. This includes some basic setup details along with documentation for anyone willing to dive into the D3 library.

LightGL.js

lightgl.js script

I don’t see much mention of LightGL.js around the web but it’s an excellent choice for 3D rendering in the browser.

This free open source library runs on the WebGL framework, and it’s meant to be the fastest, lightest library you can use. This works at a lower level than most abstraction libraries so it does require a stronger understanding of JavaScript.

Most developers just want simplicity so that could be why fewer people are sharing it around the water cooler.

But if you’re comfortable working in JavaScript then LightGL will give you a lot more control over your codebase.

Seen.js

seen.js open source

For its complete lack of dependencies I had to include Seen.js in this list. Again this runs on the HTML5 canvas element but it works in vanilla JavaScript without any other required libraries.

It’s totally free for all developers and free to customize under the Apache 2.0 license. Some of the demos are pretty crazy considering they’re built solely in JavaScript.

Anyone who’s willing to push the boundaries of basic 3D visualization might take a look at Seen. It may not have a large following like Three.js but it’s a great canvas/SVG alternative that doesn’t rely heavily on WebGL.

If you are curious to start with WebGL then take a peek at our example gallery of 30 awesome WebGL experiments.


Best Free Software for Designers and Developers for 2019

Original Source: https://inspiredm.com/best-free-software-for-designers-and-developers-for-2019/

When getting ready for the year ahead, it’s a good idea to fill in the gaps in your software collection, especially when there is so much good software you can now get online for free.

Beware however – not all “free” things are really free. First, of course, you should avoid cracked versions of payware, because that can get you into trouble in more ways than one. Another thing to watch for is that some free software is supported by ads, while other software may have undesirable behaviors such as tracking what you do online.

In this guide, we’ve focused exclusively on titles that are 100 percent free, easy to find, useful, productivity boosting, and devoid of any malicious or annoying “extra” content. You may not need all of these applications, but this list is sure to include some titles that will help you work better in some way.

1. Portable Apps

 For users of Microsoft Windows, this is a great piece of software. It’s a platform application launcher that allows you to use portable applications instead of installing software on your PC. It’s excellent because this means:

Less chance of registry corruption and registry bloat
Fewer vectors for viruses to get into your system
Applications you can take with you and use on any Windows machine
No wasted space on your HDD or SSD. Everything can be installed on a thumb drive
Applications can be updated when a new version becomes available
All your portable applications are grouped together in a categorized list

Portable Apps is a tiny application itself, and is very easy to use. You can download it straight to a USB drive and have all your applications always with you anywhere you go, and configured just the way you like. 

Over 100 applications are available for instant download through the interface, and you can easily create your own portable applications as well. Designers will also appreciate the feature that allows you to add all your fonts to the platform, which also means you can uninstall them from your PC to save even more space.

Overall, what makes the portable apps concept so good, apart from the obvious factor of portability, is that it’s much more organized and tidy than the traditional system of installing software.

You can get it from here and it’s 100 percent free to download and use anywhere you want, as much as you want, and you can also share it with anyone you want. It’s not necessary for Linux, as all Linux applications are portable by default, and not yet available for Mac.

2. Blender

 For a free application, Blender is huge on features. Most users will put it to work for what it was originally designed for, which is 3D modeling. However there is another important thing you can do with Blender. It provides a full-featured non-linear video editing system which supports all kinds of features normally found in expensive stand-alone video editing software.

It’s even good enough that it has been used to make feature length movies by major studios. The main competitor in the free of charge video editing space is DaVinci Resolve from Black Magic Design, but that has much steeper hardware requirements, is built with proprietary code, and has more restrictions on what you’re allowed to do.

Blender makes it easy to do all your 3D modeling, 3D and 2D animation, video editing, and more. It’s free, open source, easy to use, portable (on Linux and Windows), and works like a charm. On the negative side, there’s a steep learning curve, but you’ll get that with almost any professional 3D modeling software. The big difference here is the $0 price tag, huge support community, and total freedom to install it any way you want.

You can get your copy from the official Blender website or download it through Portable Apps. Blender is also included with most Linux distros. There’s an OSX version, too.

3. GIMP

 GIMP is almost a replacement for PhotoShop, and it’s certainly a lot more affordable at $0. The two applications are often compared side by side, but this isn’t really fair to either one, since they’re designed for different purposes.

PhotoShop is primarily intended for using in the CMYK color space, although you can wrangle it into saving images in RGB. GIMP on the other hand is designed for the RGB color space from the outset, and needs a lot of push and shove to get it to co-operate with saving anything in a CMYK color profile.

That difference aside, the only real drawback to GIMP is that it doesn’t currently provide native support for creating primitives. You can do it, but nowhere near as easily as it can be done in PhotoShop. Then again, there are many things that seem to be much easier to achieve in GIMP.

Deciding which of these two giants will suit your needs best is not an easy choice. To make it a bit easier, the biggest factors to consider are learning curve, support, and cost. That last factor is easy to assess because GIMP is free and PhotoShop requires a monthly subscription.

When it comes to learning curve, PhotoShop may be ahead because most online photo editing tutorials are written with PhotoShop users in mind. Take int account that most PhotoShop plug-ins will work in GIMP, but it’s not a certain thing that many GIMP plug-ins will work in PhotoShop. Thus a tutorial aimed at PhotoShop users may still be relevant to GIMP users (with a few adjustments), but a GIMP tutorial will often be unhelpful for PhotoShop users.

Finally there is the matter of support. As paying subscribers, PhotoShop users can expect to get instant support for all kinds of problems. 

GIMP support is really different. As it’s free, there’s no dedicated hotline you can call to get help with every little problem you face. You’ll need to depend on what’s called “community support”, which basically means using forums to seek answers to your questions.

GIMP is available as a web application, for download from the official GIMP site, and through portable apps. It is included by default in nearly every Linux distro, and is always available in every Linux repository. For OSX, you need to download an installer and copy the launcher into your Applications folder.

4. Inkscape

 InkScape is a competitor to Adobe Illustrator and other similar vector drawing programs. It doesn’t yet come close to the level of Illustrator, but it is way cheaper at $0 and the learning curve is far less steep. InkScape can create browser compatible SVG graphics, including animations.

SVG animation can be used for teaching, special effects, games, and simply for making more impressive images on websites (small footprint and almost infinitely scalable). An often cited example of what can be done with SVG animation and interactivity is the MCDU Emulator Project. This demonstrates that complex systems can be built simply with SVG, and no plug-ins or special players are required.

Inkscape still trails behind Illustrator, but the gap is closing as the Inkscape development community continues to expand. We may some day even see Inkscape take the lead, especially since it is such an easy application to get started with and doesn’t cost anything. It’s available as an installed application on all platforms, and as a portable application on Windows and Linux.

Inkscape is available at the official Inkscape website and also through Portable Apps. It is included in all major Linux distros and will be found in the repositories of others. An installer can be downloaded for OSX.

5. Dia

 Drawing technical charts and diagrams is made easier with Dia. It’s quite easy to use and has all the tools you need to make complex technical diagrams quickly. There are basic drawing shapes in the top left corner of the toolbox. The center of the tool box is where all the special items are located for the selected diagram type you’re currently working on. The list of types includes:

assorted shapes
flowchart symbols
UML diagrams
electric / electronic circuits
BPMN diagrams
chemical & engineering symbols
Cicso computer and networking diagrams
civil engineering diagrams
cybernetics diagrams
database design diagrams
entity-relationship (ER) diagrams
function structure (FS) diagrams
Grane & Sarson symbols
GRAFCET diagrams
jigsaw charts
ladder diagrams
lighting charts
logic charts
isometric map elements
MSE diagrams
common network symbols
pneumatic / hydraulic charts
SADT/IDEF0 charts
specification and description language (SDL) chart
Sybase symbols

To create any kind of diagram, simply place elements on the drawing area and then use connectors to join them together. You can get your copy from the official Dia website, or download it from Portable Apps. The software is also available for OSX.

6. Pencil2D

 Pencil2D takes over from Inkscape when you need longer and more complex 2D animations. It fills a similar role to Adobe Flash, but is considerably better for making feature length 2D animated films. 

It contains all the tools you need to create professional quality animated cartoons. Paired with a decent graphics tablet, or even hand drawn images scanned in, you can bring your images to life with Pencil2D.

You can find out more about it at the official Pencil2D website, and you can download it either from that site (for all platforms) or from the Portable Apps site if you’re a Windows user.

7. Greenfish Icon Editor Pro

 This is both an icon editor and icon extractor. It only works on Windows (but may run on Linux with WINE or POL). It is able to extract and create Windows icons and Mac icons. 

There are plenty of different ways to create and edit icons, but this simple tool makes the whole process a breeze. Depending on your skill in operating it, the software is capable of producing icons with a crispness and vibrancy that is rare in icon editing software.

The best way to get this software is through Portable Apps. The official site for the software has been down for a long while.

Concluding remarks

You don’t have to spend a fortune to have access to software that will give you truly professional results. In the end, your skill as a user is far more important than the software tools that you use for the job. What can be said is that using the right tools for the job will always make it easier than using the wrong tools.

Traditionally people have held the view that free software can never be as good as paid software, but the quality of free software is improving all the time, and because they’re free, you can experiment with them at no financial risk. So why not give some of these free software applications a try? You may be surprised at the quality, and you can potentially save yourself some money if they manage to meet all your requirements.

header image courtesy of Ilona Rybak

The post Best Free Software for Designers and Developers for 2019 appeared first on Inspired Magazine.

Getting Started With DOMmy.Js

Original Source: https://www.webdesignerdepot.com/2018/11/getting-started-with-dommy-js/

DOMmy.js is a super-lightweight, standalone Javascript library, designed to work easily with the DOM and produce powerful CSS3 animations via JS.

Full disclosure: I developed DOMmy.js. And in this tutorial I want to demonstrate how it can be used to keep your webpages nice and light.

DOMmy.js has a very shallow learning curve; it’s even shallower if you have ever used an old-generation style framework such as jQuery or Prototype.

DOMmy.js isn’t a next-generation framework like Vue.js, React, or Angular; these are tools which use new technologies such as the virtual DOM, dynamic templating, and data binding; you use next-generation tools to build asyncronous applications.

DOMmy.js is a Javascript frame work for writing “classic” Javascript code, working with the DOM at the core level. A Javascript framework like jQuery does a similar task, with three big differences:

jQuery uses a proprietary, internal engine to work with selectors and to produce animations. This engine is entirely Javascript-based. Conversely, DOMmy.js allows you to select any element in the DOM and create powerful animations, by using the modern and super-powerful specifics of both Javascript and CSS3. I didn’t need to write a Javascript engine to work with DOM and animations. The cross-browser, flexible and powerful tools that allow you to do it are already available. I just wanted a Javascript structure that would assists developers in writing DOM controls and CSS3 animations using the Javascript language.
DOMmy.js is a Javascript structure that looks at the future. It is written to be compatible with some of the latest versions of the major browsers, but I don’t want my code to be compatible with very old software like IE6/7 and similar.
jQuery and Prototype both have complete APIs based on an internal engine, DOMmy.js provides controls for just two main things: DOM operations and animations; other tasks can easily be accomplished with vanilla Javascript or by extending the DOMmy.js central structure.

So, DOMmy.js is a cross-browser, super-lightweight (the minified version weights only 4kb), super-easy to learn, super-fast to execute, Javascript library. In a nutshell, with DOMmy.js you can:

navigate throughout the DOM, by selecting and working with HTML elements and collections of elements;
create powerful CSS3 animations and collections of animations;
add (multiple) events, CSS properties and attributes to elements;
use an element storage to store and retrieve specific content;
work with a coherent this structure;
have a cross-browser DOMReady fashion, with which you do not need to wait for resources (like images and videos) to completely load in order to work with DOM.

Installing DOMmy.js

Implementing DOMmy.js into your web page is simple. You only need to include the script through the script tag, and you’ll be ready to start. You can download the script and use it locally or load it through the project’s website:

<script src=”https://www.riccardodegni.com/projects/dommy/dommy-min.js”></script>
<script>
// use dommy.js
$$$(function() {
// …
});
</script>
The DOM is Ready!

Like I said on before, with DOMmy.js we don’t need to wait for the resources of the page to load in order to work with DOM. To do this, we use the $$$ function. The content placed inside this handy function will be executed when the DOM structure (and not the “page”) is ready. Writing code with DOMmy.js is super-fast. I wanted to create a snippet that allowed me to write as less code as possible, so I guess that nothing is faster than writing:

$$$(function() {
// when DOM is ready do this
});

…in a standalone fashion. Of course, you can use as many DOMReady blocks as you want or need:

// block 1
$$$(function() {
// when DOM is ready do this
});

// block 2
$$$(function() {
// when DOM is ready do this
});

// block 3
$$$(function() {
// when DOM is ready do this
});
Select DOM Elements

So now we can start to work with our DOM structure. You can select the element you want by using an HTML “id”. This is done with the $ function:

// select an element by ID.
// In this case you select the element with ID “myElement”
$(‘myElement’);

And you can select the collection/list of elements you want by using a CSS selector. This is done with the $$ function:

// select a collection of elements by CSS selector
$$(‘#myid div.myclass p’)

Of course you can select multiple elements by using multiple selectors, too:

// a selection of HTML elements
$$(‘#myfirstelement, #mysecondelement’)

// another selection of HTML elements
$$(‘#myfirstelement div.myclass a, #mysecondelement span’)

There are no limits to DOM selection. The elements will be included in the final collection with which you can work with the DOMmy.js methods.

Adding Events

Adding events to elements (in a cross-browser fashion) is very simple. Just use to the on method on the collection of element you want to attach the event(s) to with the specific event:

// add an event to an element that fires when you click the element
$(‘myElement’).on(‘click’, function() {
log(‘Hey! You clicked on me!’);
});

Note: the function log is a built-in function that works as a global-cross-browser shortcut for console.log. If the browser does not support the console object the result will be printed in a global alert box.

You can add multiple events at once, of course:

// add a events to an element
$$(‘#myElement p’).on({
// CLICK event
‘click’: function() {
log(‘Hey, you clicked here!’);
},

// MOUSEOUT event
‘mouseout’: function() {
log(‘Hey you mouseovered here!’);
}
});

As you can see, you don’t need to apply the DOMmy.js methods to each element. You apply the methods directly to the result of the DOM selection and the internal engine will properly iterate through the HTML elements.

You can access the “current” element in the iteration simpy by using the this keyword:

$(‘demo’).on({
‘click’: function() {
this.css({‘width’: ‘300px’})
.html(‘Done!’);
}
});
Working With Attributes

In the same way, you can add, edit and retrieve the values of HTML attributes:

// get an attribute
var title = $(‘myElement’).attr(‘title’);

// set an attribute
$(‘myElement’).attr(‘title’, ‘my title’);

// set multiple attributes
$(‘myElement’).attr({‘title’: ‘my title’, ‘alt’: ‘alternate text’});

The attr method works in three different ways:

it returns the value of the specified attribute if the argument you provided is a string;
it sets an HTML attribute to a new value if you pass two arguments;
it sets a collection of HTML attributes if you pass an object of key/value pairs representing the element’s attributes.

Setting CSS Styles

Just like HTML attributes, you can set and get CSS values by means of the css method:

// set single CSS
$(‘myElement’).css(‘display’, ‘block’);

// set multiple CSS
$(‘myElement’).css({‘display’: ‘block’, ‘color’: ‘white’});

// get single CSS
$(‘myElement’).css(‘display’);

// get multiple CSS
$(‘myElement’).css([‘display’, ‘color’]);

As you can see, with the powerful css method you can:

set a single CSS property to a new value, if you pass two strings;
get the value of a CSS property, if you pass one string;
set multiple CSS properties, if you pass an object of key/value pairs;
get an array of values, if you pass an array of strings representing CSS properties.

Getting and Setting HTML Content

With the html method you can set and get the element’s HTML value:

// set html
$(‘myElement’).html(‘new content’);

// get html
var content = $(‘myElement’).html();

// logs ‘new content’
log ( content );

Iteration

If you select more than one element, you can apply a DOMmy.js method to every element just in one call.
However, when you want to work with each element manually, like when you are getting contents (i.e. HTML content or stored content). In this case, you can use the handy forEach function in the following way:

// get all divs
var myels = $$(‘div’);

// set a stored content
myels.set(‘val’, 10);

// ITERATE through each single div and print its attributes
myels.forEach(function(el, i) {
log(el.attr(‘id’) + el.get(‘val’) + ‘ n’);
});

The forEach funtion is the preferred way to iterate through HTML collections of elements using DOMmy.js. When applied on a DOMmy.js element, it uses two parameters:

element: the DOMmy.js element you are selecting. You can apply every DOMmy.js method to it;
index: an index representing the position of the element in the collections of elements.

Storage

The storage is a place, that belongs to elements, where you can store as many values as you want and retrieve them at the desired moment. You can work with the storage by using the set and get methods:

// set storage
var myVal = “hello”;
$(‘myElement’).set(‘myVal’, myVal);

// multiple storage
var mySecondVal = “everybody”;
$(‘myElement’).set({‘myVal’: myVal, ‘mySecondVal’: mySecondVal});

// get
$(‘myElement’).get(‘myVal’) + $(‘myel’).get(‘mySecondVal’);
// “hello everybody”

As you can see, you can store single item or multple items at once. The items you store belong to the element that you are selecting.
Note: remember that if you are selecting multiple elements, the item will be stored in each of these elements, even if the CSS is slightly different, because DOMmy.js recognizes each specific element:

// set an item to div#a and div#b
$$(‘div#a, div#b’).set(‘myStoredValue’, 10);

// get from #a, that of course is the same as div#a
$(‘a’).get(‘myStoredValue’); // 10

Of course DOMmy.js internal mechanics identify “div#a” and “a” / “#a” as the same pointer to the same element, so you can safely work with storage and others DOMmy.js methods in a coherent way.

If you store the DOM element in a single variable, which is the best way to work with HTML elements, you can bypass concurrent calls and earn memory space:

const myEl = $(“div#a div”);

// store data
myEl.set(‘myStoredValue’, 10);

// get data
myEl.get(‘myStoredValue’); // 10
CSS3 Animations

The crown jewel of DOMmy.js is its animation engine. This is based on CSS3 animations engine, so it works with all the major browsers. Animations are generated through the fx method, that accepts the following arguments:

an object, representing the CSS property to animate;
a number, representing the duration of the animation, in seconds. Default value is 5 seconds;
a function, representing a callback that will be called once the animation is done;
a boolean, representing whether to chain concurrent animations or not. Default is false.

Let’s see how to use the fx method, by creating two simple animations.

// simple animation
$(‘myel’).fx({‘width’: ‘300px’, ‘height’: ‘300px’}, 2);

Here we simply alter the CSS properties width and height of #myel in 2 seconds. In the following example we create the same animation with a duration of 1 second and with a callback function that will edit the HTML content of the element with the “Completed!” string.

You can access the current element by using the this keyword:

// simple animation with callback
$(‘myel’).fx({‘width’: ‘300px’, ‘height’: ‘300px’}, 1, function() {
this.html(‘Completed!’);
});
Chaining

You can create magic with “animation chaining”: by using true as a value of the fourth parameter, you can chain as many animation as you want. To do this, simple use the fx method more than once on a specific selector. In the following example we change the width of all HTML elements that match the “.myel” selector on multiple times:

var callBack = function() {
// do something cool
};

// queue animations
$$(‘.myel’).fx({‘width’: ‘400px’}, 2, callBack, true);
.fx({‘width’: ‘100px’}, 4, callBack, true);
.fx({‘width’: ’50px’}, 6, callBack, true);
.fx({‘width’: ‘600px’}, 8, callBack, true);

Of course you can chain everything. DOMmy.js’s structure allows you to set concurrent calls to elements:

// multiple calls
$$(‘div#e, #d’)
.fx({‘font-size’: ’40px’, ‘color’: ‘yellow’}, 1)
.fx({‘font-size’: ’10px’, ‘color’: ‘red’}, 1)
.attr(‘title’, ‘thediv’)
.attr(‘class’, ‘thediv’)
.attr({‘lang’: ‘en’, ‘dir’: ‘ltr’});

Remember that the chained calls will be executed immediately. If you want to chain something at the end of a specific animation you have to set a callback for that animation.

Create an Event Handler That Fires Animations

Now, we want to set up a snippet that produces an animation on a specific element. This animation will fire when the user moves the mouse over the element itself and when he leaves back the mouse. At the end of each step, a proper HTML content will be set:

$(‘myElement’).on({
‘mouseover’: function() {
this.fx({‘width’: ‘300px’}, 1, function() {
this.html(‘Completed!’);
});
},
‘mouseout’: function() {
this.fx({‘width’: ‘100px’}, 1, function() {
this.html(‘Back again!’);
});
}
});

As you can see, with DOMmy.js is super-easy to work with CSS3 animations. Always remember that this refers to the current element.

Now, we want to produce a chained animation that alters the CSS style of an element in four different steps, using four different callbacks and fire this animation when the user clicks the element:

var clicked = false;

$(‘myElement’).on({
‘click’: function() {
if( !clicked ) {
clicked = true;
this.fx({‘width’: ‘300px’, ‘height’: ‘300px’, ‘background-color’: ‘red’, ‘border-width’: ’10px’}, 1, function() {
this.html(‘1’);
}, true)
.fx({‘height’: ’50px’, ‘background-color’: ‘yellow’, ‘border-width’: ‘4px’}, 1, function() {
this.html(‘2’);
}, true)
.fx({‘width’: ‘100px’, ‘background-color’: ‘blue’, ‘border-width’: ’10px’}, 1, function() {
this.html(‘3’);
}, true)
.fx({‘height’: ‘100px’, ‘background-color’: ‘#3dac5f’, ‘border-width’: ‘2px’}, 1, function() {
this.html(‘4’);
clicked = false;
}, true);
}
}
});

You can see these snippets in action directly in the Demo section of the DOMmy.js project.

Add Realistic Chalk and Sketch Lettering Effects with Sketch’it – only $5!

Source

p img {display:inline-block; margin-right:10px;}
.alignleft {float:left;}
p.showcase {clear:both;}
body#browserfriendly p, body#podcast p, div#emailbody p{margin:0;}

Happy First Anniversary, Smashing Members!

Original Source: https://www.smashingmagazine.com/2018/11/smashing-membership-first-anniversary/

Happy First Anniversary, Smashing Members!

Happy First Anniversary, Smashing Members!

Bruce Lawson

2018-11-21T14:00:59+01:00
2018-11-28T09:44:08+00:00

Doesn’t time fly? And don’t ships sail? A year ago, we launched our Smashing Membership programme so that members of the Smashing readership could support us for a small amount of money (most people pay $5 or $9 a month, and can cancel at any time). In return get access to our ebooks, members-only webinars, discounts on printed books and conferences, and other benefits.

We did this because we wanted to reduce advertising on the site; ad revenues were declining, and the tech-savvy Smashing audience was becoming increasingly aware of the security and privacy implications of ads. And we were inspired by the example of The Guardian, a British newspaper that decided to keep its content outside a paywall but ask readers for support. Just last week, the Guardian’s editor-in-chief revealed that they have the financal support of 1 million people.

Smashing Memeber’s Ship

Welcome aboard — we’re celebrating! It’s the first year of Smashing Membership (or Smashing Members’ Ship… get it?)!

Into Year Two

We recently welcomed Bruce Lawson to the team as our Membership Commissioning Editor. Bruce is well known for his work on accessibility and web standards, as well as his fashion blog and world-class jokes.

So now that the team is larger, we’ll be bringing you more content — going up to three webinars a month. The price stays the same. And, of course, we’d love your input on subjects or speakers — let us know on Slack.

When we set up Membership, we promised that it would be an inclusive place where lesser-heard voices (in addition to big names) would be beamed straight to your living room/ home office/ sauna over Smashing TV. Next month, for example, Bruce is pleased to host a webinar by Eka, Jing, and Sophia from Indonesia, Singapore, and the Philippines to tell us about the state of the web in South East Asia. Perhaps you’d like to join us?

Please consider becoming a Smashing Member. Your support allows us to bring you great content, pay all our contributors fairly, and reduce advertising on the site.

Thank you so much to all who have helped to make it happen! We sincerely appreciate it.

Smashing Editorial
(bl, sw, il)

Image Reveal Hover Effects

Original Source: http://feedproxy.google.com/~r/tympanus/~3/0VgRsK13dTU/

Today we’d like to share a set of link hover effects with you. The main idea is to reveal a thumbnail image with a special effect when hovering a link. The inspiration for this idea comes from the effect seen on Fuge’s website where you can see a thumbnail showing when hovering the underlined links. More effect inspiration comes from Louis Ansa’s portfolio and Zhenya Rynzhuk’s Dribbble shot “Blown Art Works and News Platform”.

HoverImageReveal_featured

The animations are made using TweenMax.

Attention: Note that we use modern CSS properties that might not be supported in older browsers.

Have a look at some of the effects:

Hoverreveal01

Hoverreveal02

Hoverreveal03

We hope you like this little effects and find them inspirational!

References and Credits

Images from Unsplash.com
TweenMax by Greensock
imagesLoaded by Dave DeSandro

Image Reveal Hover Effects was written by Mary Lou and published on Codrops.

An Extensive Guide To Progressive Web Applications

Original Source: https://www.smashingmagazine.com/2018/11/guide-pwa-progressive-web-applications/

An Extensive Guide To Progressive Web Applications

An Extensive Guide To Progressive Web Applications

Ankita Masand

2018-11-27T14:00:29+01:00
2018-11-27T14:10:54+00:00

It was my dad’s birthday, and I wanted to order a chocolate cake and a shirt for him. I headed over to Google to search for chocolate cakes and clicked on the first link in the search results. There was a blank screen for a few seconds; I didn’t understand what was happening. After a few seconds of staring patiently, my mobile screen filled with delicious-looking cakes. As soon as I clicked on one of them to check its details, I got an ugly fat popup, asking me to install an Android application so that I could get a silky smooth experience while ordering a cake.

That was disappointing. My conscience didn’t allow me to click on the “Install” button. All I wanted to do was order a small cake and be on my way.

I clicked on the cross icon at the very right of the popup to get out of it as soon as I could. But then the installation popup sat at the bottom of the screen, occupying one-fourth of the space. And with the flaky UI, scrolling down was a challenge. I somehow managed to order a Dutch cake.

After this terrible experience, my next challenge was to order a shirt for my dad. As before, I search Google for shirts. I clicked on the first link, and in a blink, the entire content was right in front of me. Scrolling was smooth. No installation banner. I felt as if I was browsing a native application. There was a moment when my terrible internet connection gave up, but I was still able to see the content instead of a dinosaur game. Even with my janky internet, I managed to order a shirt and jeans for my dad. Most surprising of all, I was getting notifications about my order.

I would call this a silky smooth experience. These people were doing something right. Every website should do it for their users. It’s called a progressive web app.

As Alex Russell states in one of his blog posts:

“It happens on the web from time to time that powerful technologies come to exist without the benefit of marketing departments or slick packaging. They linger and grow at the peripheries, becoming old-hat to a tiny group while remaining nearly invisible to everyone else. Until someone names them.”

A Silky Smooth Experience On The Web, Sometimes Known As A Progressive Web Application

Progressive web applications (PWAs) are more of a methodology that involves a combination of technologies to make powerful web applications. With an improved user experience, people will spend more time on websites and see more advertisements. They tend to buy more, and with notification updates, they are more likely to visit often. The Financial Times abandoned its native apps in 2011 and built a web app using the best technologies available at the time. Now, the product has grown into a full-fledged PWA.

But why, after all this time, would you build a web app when a native app does the job well enough?

Let’s look into some of the metrics shared in Google IO 17.

Our new book, in which Alla Kholmatova explores
how to create effective and maintainable design systems to design great digital products. Meet Design Systems, with common traps, gotchas and the lessons Alla has learned over the years.

Table of Contents →

Five billion devices are connected to the web, making the web the biggest platform in the history of computing. On the mobile web, 11.4 million monthly unique visitors go to the top 1000 web properties, and 4 million go to the top thousand apps. The mobile web garners around four times as many users as native applications. But this number drops sharply when it comes to engagement.

A user spends an average of 188.6 minutes in native apps and only 9.3 minutes on the mobile web. Native applications leverage the power of operating systems to send push notifications to give users important updates. They deliver a better user experience and boot more quickly than websites in a browser. Instead of typing a URL in the web browser, users just have to tap an app’s icon on the home screen.

Most visitors on the web are unlikely to come back, so developers came up with the workaround of showing them banners to install native applications, in an attempt to keep them deeply engaged. But then, users would have to go through the tiresome procedure of installing the binary of a native application. Forcing users to install an application is annoying and reduces further the chance that they will install it in the first place. The opportunity for the web is clear.

Recommended reading: Native And PWA: Choices, Not Challengers!

If web applications come with a rich user experience, push notifications, offline support and instant loading, they can conquer the world. This is what a progressive web application does.

A PWA delivers a rich user experience because it has several strengths:

Fast
The UI is not flaky. Scrolling is smooth. And the app responds quickly to user interaction.

Reliable
A normal website forces users to wait, doing nothing, while it is busy making rides to the server. A PWA, meanwhile, loads data instantaneously from the cache. A PWA works seamlessly, even on a 2G connection. Every network request to fetch an asset or piece of data goes through a service worker (more on that later), which first verifies whether the response for a particular request is already in the cache. When users get real content almost instantly, even on a poor connection, they trust the app more and view it as more reliable.

Engaging
A PWA can earn a place on the user’s home screen. It offers a native app-like experience by providing a full-screen work area. It makes use of push notifications to keep users engaged.

Now that we know what PWAs bring to the table, let’s get into the details of what gives PWAs an edge over native applications. PWAs are built with technologies such as service workers, web app manifests, push notifications and IndexedDB/local data structure for caching. Let’s look into each in detail.

Service Workers

A service worker is a JavaScript file that runs in the background without interfering with the user’s interactions. All GET requests to the server go through a service worker. It acts like a client-side proxy. By intercepting network requests, it takes complete control over the response being sent back to the client. A PWA loads instantly because service workers eliminate the dependency on the network by responding with data from the cache.

A service worker can only intercept a network request that is in its scope. For example, a root-scoped service worker can intercept all of the fetch requests coming from a web page. A service worker operates as an event-driven system. It goes into a dormant state when it is not needed, thereby conserving memory. To use a service worker in a web application, we first have to register it on the page with JavaScript.

(function main () {

/* navigator is a WEB API that allows scripts to register themselves and carry out their activities. */
if (‘serviceWorker’ in navigator) {
console.log(‘Service Worker is supported in your browser’)
/* register method takes in the path of service worker file and returns a promises, which returns the registration object */
navigator.serviceWorker.register(‘./service-worker.js’).then (registration => {
console.log(‘Service Worker is registered!’)
})
} else {
console.log(‘Service Worker is not supported in your browser’)
}

})()

We first check whether the browser supports service workers. To register a service worker in a web application, we provide its URL as a parameter to the register function, available in navigator.serviceWorker (navigator is a web API that allows scripts to register themselves and carry out their activities). A service worker is registered only once. Registration does not happen on every page load. The browser downloads the service worker file (./service-worker.js) only if there is a byte difference between the existing activated service worker and the newer one or if its URL has changed.

The above service worker will intercept all requests coming from the root (/). To limit the scope of a service worker, we would pass an optional parameter with one of the keys as the scope.

if (‘serviceWorker’ in navigator) {
/* register method takes in an optional second parameter as an object. To restrict the scope of a service worker, the scope should be provided.
scope: ‘/books’ will intercept requests with ‘/books’ in the url. */
navigator.serviceWorker.register(‘./service-worker.js’, { scope: ‘/books’ }).then(registration => {
console.log(‘Service Worker for scope /books is registered’, registration)
})
}

The service worker above will intercept requests that have /books in the URL. For example, it will not intercept request with /products, but it could very well intercept requests with /books/products.

As mentioned, a service worker operates as an event-driven system. It listens for events (install, activate, fetch, push) and accordingly calls the respective event handler. Some of these events are a part of the life cycle of a service worker, which goes through these events in sequence to get activated.

Installation

Once a service worker has been registered successfully, an installation event is fired. This is a good place to do the initialization work, like setting up the cache or creating object stores in IndexedDB. (IndexedDB will make more sense to you once we get into its details. For now, we can just say that it’s a key-value pair structure.)

self.addEventListener(‘install’, (event) => {
let CACHE_NAME = ‘xyz-cache’
let urlsToCache = [
‘/’,
‘/styles/main.css’,
‘/scripts/bundle.js’
]
event.waitUntil(
/* open method available on caches, takes in the name of cache as the first parameter. It returns a promise that resolves to the instance of cache
All the URLS above can be added to cache using the addAll method. */
caches.open(CACHE_NAME)
.then (cache => cache.addAll(urlsToCache))
)
})

Here, we’re caching some of the files so that the next load is instant. self refers to the service worker instance. event.waitUntil makes the service worker wait until all of the code inside it has finished execution.

Activation

Once a service worker has been installed, it cannot yet listen for fetch requests. Rather, an activate event is fired. If no active service worker is operating on the website in the same scope, then the installed service worker gets activated immediately. However, if a website already has an active service worker, then the activation of a new service worker is delayed until all of the tabs operating on the old service worker are closed. This makes sense because the old service worker might be using the instance of the cache that is now modified in the newer one. So, the activation step is a good place to get rid of old caches.

self.addEventListener(‘activate’, (event) => {
let cacheWhitelist = [‘products-v2’] // products-v2 is the name of the new cache

event.waitUntil(
caches.keys().then (cacheNames => {
return Promise.all(
cacheNames.map( cacheName => {
/* Deleting all the caches except the ones that are in cacheWhitelist array */
if (cacheWhitelist.indexOf(cacheName) === -1) {
return caches.delete(cacheName)
}
})
)
})
)
})

In the code above, we’re deleting the old cache. If the name of a cache doesn’t match with the cacheWhitelist, then it is deleted. To skip the waiting phase and immediately activate the service worker, we use skip.waiting().

self.addEventListener(‘activate’, (event) => {
self.skipWaiting()
// The usual stuff
})

Once service worker is activated, it can listen for fetch requests and push events.

Fetch Event Handler

Whenever a web page fires a fetch request for a resource over the network, the fetch event from the service worker gets called. The fetch event handler first looks for the requested resource in the cache. If it is present in the cache, then it returns the response with the cached resource. Otherwise, it initiates a fetch request to the server, and when the server sends back the response with the requested resource, it puts it to the cache for subsequent requests.

/* Fetch event handler for responding to GET requests with the cached assets */
self.addEventListener(‘fetch’, (event) => {
event.respondWith(
caches.open(‘products-v2’)
.then (cache => {
/* Checking if the request is already present in the cache. If it is present, sending it directly to the client */
return cache.match(event.request).then (response => {
if (response) {
console.log(‘Cache hit! Fetching response from cache’, event.request.url)
return response
}
/* If the request is not present in the cache, we fetch it from the server and then put it in cache for subsequent requests. */
fetch(event.request).then (response => {
cache.put(event.request, response.clone())
return response
})
})
})
)
})

event.respondWith lets the service worker send a customized response to the client.

Offline-first is now a thing. For any non-critical request, we must serve the response from the cache, instead of making a ride to the server. If any asset is not present in the cache, we get it from the server and then cache it for subsequent requests.

Service workers only work on HTTPS websites because they have the power to manipulate the response of any fetch request. Someone with malicious intent might tamper the response for a request on an HTTP website. So, hosting a PWA on HTTPS is mandatory. Service workers do not interrupt the normal functioning of the DOM. They cannot communicate directly with the web page. To send any message to a web page, it makes use of post messages.

Web Push Notifications

Let’s suppose you’re busy playing a game on your mobile, and a notification pops up telling you of a 30% discount on your favorite brand. Without any further ado, you click on the notification and shop your breath out. Getting live updates on, say, a cricket or football match or getting important emails and reminders as notifications is a big deal when it comes to engaging users with a product. This feature was only available in native applications until PWA came along. A PWA makes use of web push notifications to compete with this powerful feature that native apps provide out of the box. A user would still receive a web push notification even if the PWA is not open in any of the browser tabs and even if the browser is not open.

A web application has to ask permission of the user to send them push notifications.

Browser Prompt for asking permission for Web Push notifications

Browser Prompt for asking permission for Web Push notifications. (Large preview)

Once the user confirms by clicking the “Allow” button, a unique subscription token is generated by the browser. This token is unique for this device. The format of the subscription token generated by Chrome is as follows:

{
“endpoint”: “https://fcm.googleapis.com/fcm/send/c7Veb8VpyM0:APA91bGnMFx8GIxf__UVy6vJ-n9i728CUJSR1UHBPAKOCE_SrwgyP2N8jL4MBXf8NxIqW6NCCBg01u8c5fcY0kIZvxpDjSBA75sVz64OocQ-DisAWoW7PpTge3SwvQAx5zl_45aAXuvS”,
“expirationTime”: null,
“keys”: {
“p256dh”: “BJsj63kz8RPZe8Lv1uu-6VSzT12RjxtWyWCzfa18RZ0-8sc5j80pmSF1YXAj0HnnrkyIimRgLo8ohhkzNA7lX4w”,
“auth”: “TJXqKozSJxcWvtQasEUZpQ”
}
}

The endpoint contained in the token above will be unique for every subscription. On an average website, thousands of users would agree to receive push notifications, and for each of them, this endpoint would be unique. So, with the help of this endpoint, the application is able to target these users in the future by sending them push notifications. The expirationTime is the amount of time that the subscription is valid for a particular device. If the expirationTime is 20 days, it means that the push subscription of the user will expire after 20 days and the user won’t be able to receive push notifications on the older subscription. In this case, the browser will generate a new subscription token for that device. The auth and p256dh keys are used for encryption.

Now, to send push notifications to these thousands of users in the future, we first have to save their respective subscription tokens. It’s the job of the application server (the back-end server, maybe a Node.js script) to send push notifications to these users. This might sound as simple as making a POST request to the endpoint URL with the notification data in the request payload. However, it should be noted that if a user is not online when a push notification intended for them is triggered by the server, they should still get that notification once they come back online. The server would have to take care of such scenarios, along with sending thousands of requests to the users. A server keeping track of the user’s connection sounds complicated. So, something in the middle would be responsible for routing web push notifications from the server to the client. This is called a push service, and every browser has its own implementation of a push service. The browser has to tell the following information to the push service in order to send any notification:

The time to live
This is how long a message should be queued, in case it is not delivered to the user. Once this time has elapsed, the message will be removed from the queue.
Urgency of the message
This is so that the push service preserves the user’s battery by sending only high-priority messages.

The push service routes the messages to the client. Because push has to be received by the client even if its respective web application is not open in the browser, push events have to be listened to by something that continuously monitors in the background. You guessed it: That’s the job of the service worker. The service worker listens for push events and does the job of showing notifications to the user.

So, now we know that the browser, push service, service worker and application server work in harmony to send push notifications to the user. Let’s look into the implementation details.

Web Push Client

Asking permission of the user is a one-time thing. If a user has already granted permission to receive push notifications, we shouldn’t ask again. The permission value is saved in Notification.permission.

/* Notification.permission can have one of these three values: default, granted or denied. */
if (Notification.permission === ‘default’) {
/* The Notification.requestPermission() method shows a notification permission prompt to the user. It returns a promise that resolves to the value of permission*/
Notification.requestPermission().then (result => {
if (result === ‘denied’) {
console.log(‘Permission denied’)
return
}

if (result === ‘granted’) {
console.log(‘Permission granted’)
/* This means the user has clicked the Allow button. We’re to get the subscription token generated by the browser and store it in our database.

The subscription token can be fetched using the getSubscription method available on pushManager of the serviceWorkerRegistration object. If subscription is not available, we subscribe using the subscribe method available on pushManager. The subscribe method takes in an object.
*/

serviceWorkerRegistration.pushManager.getSubscription()
.then (subscription => {
if (!subscription) {
const applicationServerKey = ”
serviceWorkerRegistration.pushManager.subscribe({
userVisibleOnly: true, // All push notifications from server should be displayed to the user
applicationServerKey // VAPID Public key
})
} else {
saveSubscriptionInDB(subscription, userId) // A method to save subscription token in the database
}
})
}
})
}

In the subscribe method above, we’re passing userVisibleOnly and applicationServerKey to generate a subscription token. The userVisibleOnly property should always be true because it tells the browser that any push notification sent by the server will be shown to the client. To understand the purpose of applicationServerKey, let’s consider a scenario.

If some person gets ahold of your thousands of subscription tokens, they could very well send notifications to the endpoints contained in these subscriptions. There is no way for the endpoint to be linked to your unique identity. To provide a unique identity to the subscription tokens generated on your web application, we make use of the VAPID protocol. With VAPID, the application server voluntarily identifies itself to the push service while sending push notifications. We generate two keys like so:

const webpush = require(‘web-push’)
const vapidKeys = webpush.generateVAPIDKeys()

web-push is an npm module. vapidKeys will have one public key and one private key. The application server key used above is the public key.

Web Push Server

The job of the web push server (application server) is straightforward. It sends a notification payload to the subscription tokens.

const options = {
TTL: 24*60*60, //TTL is the time to live, the time that the notification will be queued in the push service
vapidDetails: {
subject: ’email@example.com’,
publicKey: ”,
privateKey: ”
}
}
const data = {
title: ‘Update’,
body: ‘Notification sent by the server’
}
webpush.sendNotification(subscription, data, options)

It uses the sendNotification method from the web push library.

Service Workers

The service worker shows the notification to the user as such:

self.addEventListener(‘push’, (event) => {
let options = {
body: event.data.body,
icon: ‘images/example.png’,
}
event.waitUntil(
/* The showNotification method is available on the registration object of the service worker.
The first parameter to showNotification method is the title of notification, and the second parameter is an object */
self.registration.showNotification(event.data.title, options)
)
})

Till now, we’ve seen how a service worker makes use of the cache to store requests and makes a PWA fast and reliable, and we’ve seen how web push notifications keep users engaged.

To store a bunch of data on the client side for offline support, we need a giant data structure. Let’s look into the Financial Times PWA. You’ve got to witness the power of this data structure for yourself. Load the URL in your browser, and then switch off your internet connection. Reload the page. Gah! Is it still working? It is. (Like I said, offline is the new black.) Data is not coming from the wires. It is being served from the house. Head over to the “Applications” tab of Chrome Developer Tools. Under “Storage”, you’ll find “IndexedDB”.

IndexedDB stores the articles data in Financial Times PWA

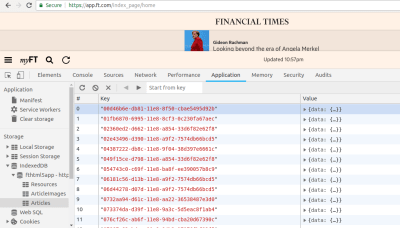
IndexedDB on Financial Times PWA. (Large preview)

Check out the “Articles” object store, and expand any of the items to see the magic for yourself. The Financial Times has stored this data for offline support. This data structure that lets us store a massive amount of data is called IndexedDB. IndexedDB is a JavaScript-based object-oriented database for storing structured data. We can create different object stores in this database for various purposes. For example, as we can see in the image above that “Resources”, “ArticleImages” and “Articles” are called as object stores. Each record in an object store is uniquely identified with a key. IndexedDB can even be used to store files and blobs.

Let’s try to understand IndexedDB by creating a database for storing books.

let openIdbRequest = window.indexedDB.open(‘booksdb’, 1)

If the database booksdb doesn’t already exist, the code above will create a booksdb database. The second parameter to the open method is the version of the database. Specifying a version takes care of the schema-related changes that might happen in future. For example, booksdb now has only one table, but when the application grows, we intend to add two more tables to it. To make sure our database is in sync with the updated schema, we’ll specify a higher version than the previous one.

Calling the open method doesn’t open the database right away. It’s an asynchronous request that returns an IDBOpenDBRequest object. This object has success and error properties; we’ll have to write appropriate handlers for these properties to manage the state of our connection.

let dbInstance
openIdbRequest.onsuccess = (event) => {
dbInstance = event.target.result
console.log(‘booksdb is opened successfully’)
}

openIdbRequest.onerror = (event) => {
console.log(’There was an error in opening booksdb database’)
}

openIdbRequest.onupgradeneeded = (event) => {
let db = event.target.result
let objectstore = db.createObjectStore(‘books’, { keyPath: ‘id’ })
}

To manage the creation or modification of object stores (object stores are analogous to SQL-based tables — they have a key-value structure), the onupgradeneeded method is called on the openIdbRequest object. The onupgradeneeded method will be invoked whenever the version changes. In the code snippet above, we’re creating a books object store with unique key as the ID.

Let’s say that, after deploying this piece of code, we have to create one more object store, called as users. So, now the version of our database will be 2.

let openIdbRequest = window.indexedDB.open(‘booksdb’, 2) // New Version – 2

/* Success and error event handlers remain the same.
The onupgradeneeded method gets called when the version of the database changes. */
openIdbRequest.onupgradeneeded = (event) => {
let db = event.target.result
if (!db.objectStoreNames.contains(‘books’)) {
let objectstore = db.createObjectStore(‘books’, { keyPath: ‘id’ })
}

let oldVersion = event.oldVersion
let newVersion = event.newVersion

/* The users tables should be added for version 2. If the existing version is 1, it will be upgraded to 2, and the users object store will be created. */
if (oldVersion === 1) {
db.createObjectStore(‘users’, { keyPath: ‘id’ })
}
}

We’ve cached dbInstance in the success event handler of the open request. To retrieve or add data in IndexedDB, we’ll make use of dbInstance. Lets add some book records in our books object store.

let transaction = dbInstance.transaction(‘books’)
let objectstore = dbInstance.objectstore(‘books’)

let bookRecord = {
id: ‘1’,
name: ’The Alchemist’,
author: ‘Paulo Coelho’
}
let addBookRequest = objectstore.add(bookRecord)

addBookRequest.onsuccess = (event) => {
console.log(‘Book record added successfully’)
}

addBookRequest.onerror = (event) => {
console.log(’There was an error in adding book record’)
}

We make use of transactions, especially while writing records on object stores. A transaction is simply a wrapper around an operation to ensure data integrity. If any of the actions in a transaction fails, then no action is performed on the database.

Let’s modify a book record with the put method:

let modifyBookRequest = objectstore.put(bookRecord) // put method takes in an object as the parameter
modifyBookRequest.onsuccess = (event) => {
console.log(‘Book record updated successfully’)
}

Let’s retrieve a book record with the get method:

let transaction = dbInstance.transaction(‘books’)
let objectstore = dbInstance.objectstore(‘books’)

/* get method takes in the id of the record */
let getBookRequest = objectstore.get(1)

getBookRequest.onsuccess = (event) => {
/* event.target.result contains the matched record */
console.log(‘Book record’, event.target.result)
}

getBookRequest.onerror = (event) => {
console.log(‘Error while retrieving the book record.’)
}

Adding Icon On Home Screen

Now that there is hardly any distinction between a PWA and a native application, it makes sense to offer a prime position to the PWA. If your website fulfills the basic criteria of a PWA (hosted on HTTPS, integrates with service workers and has a manifest.json) and after the user has spent some time on the web page, the browser will invoke a prompt at the bottom, asking the user to add the app to their home screen, as shown below:

Prompt to add Financial Times PWA on home screen

Prompt to add Financial Times PWA on home screen. (Large preview)

When a user clicks on “Add FT to Home screen”, the PWA gets to set its foot on the home screen, as well as in the app drawer. When a user searches for any application on their phone, any PWAs that match the search query will be listed. They will also be seen in the system settings, which makes it easy for users to manage them. In this sense, a PWA behaves like a native application.

PWAs make use of manifest.json to provide this feature. Let’s look into a simple manifest.json file.

{
“name”: “Demo PWA”,
“short_name”: “Demo”,
“start_url”: “/?standalone”,
“background_color”: “#9F0C3F”,
“theme_color”: “#fff1e0”,
“display”: “standalone”,
“icons”: [{
“src”: “/lib/img/icons/xxhdpi.png?v2”,
“sizes”: “192×192”
}]
}

The short_name appears on the user’s home screen and in the system settings. The name appears in the chrome prompt and on the splash screen. The splash screen is what the user sees when the app is getting ready to launch. The start_url is the main screen of your app. It’s what users get when they tap an icon on the home screen. The background_color is used on the splash screen. The theme_color sets the color of the toolbar. The standalone value for display mode says that the app is to be operated in full-screen mode (hiding the browser’s toolbar). When a user installs a PWA, its size is merely in kilobytes, rather than the megabytes of native applications.

Service workers, web push notifications, IndexedDB, and the home screen position make up for offline support, reliability, and engagement. It should be noted that a service worker doesn’t come to life and start doing its work on the very first load. The first load will still be slow until all of the static assets and other resources have been cached. We can implement some strategies to optimize the first load.

Bundling Assets

All of the resources, including the HTML, style sheets, images and JavaScript, are to be fetched from the server. The more files, the more HTTPS requests needed to fetch them. We can use bundlers like WebPack to bundle our static assets, hence reducing the number of HTTP requests to the server. WebPack does a great job of further optimizing the bundle by using techniques such as code-splitting (i.e. bundling only those files that are required for the current page load, instead of bundling all of them together) and tree shaking (i.e. removing duplicate dependencies or dependencies that are imported but not used in the code).

Reducing Round Trips

One of the main reasons for slowness on the web is network latency. The time it takes for a byte to travel from A to B varies with the network connection. For example, a particular round trip over Wi-Fi takes 50 milliseconds and 500 milliseconds on a 3G connection, but 2500 milliseconds on a 2G connection. These requests are sent using the HTTP protocol, which means that while a particular connection is being used for a request, it cannot be used for any other requests until the response of the previous request is served. A website can make six asynchronous HTTP requests at a time because six connections are available to a website to make HTTP requests. An average website makes roughly 100 requests; so, with a maximum of six connections available, a user might end up spending around 833 milliseconds in a single round trip. (The calculation is 833 milliseconds – 100⁄6 = 1666. We have to divide 1666 by 2 because we’re calculating the time spend on a round trip.) With HTTP2 in place, the turnaround time is drastically reduced. HTTP2 doesn’t block the connection head, so multiple requests can be sent simultaneously.

Most HTTP responses contain last-modified and etag headers. The last-modified header is the date when the file was last modified, and an etag is a unique value based on the contents of the file. It will only be changed when the contents of a file are changed. Both of these headers can be used to avoid downloading the file again if a cached version is already locally available. If the browser has a version of this file locally available, it can add any of these two headers in the request as such:

Add ETag and Last-Modified Headers to prevent downloading of valid cached assets

ETag and Last-Modified Headers. (Large preview)

The server can check whether the contents of the file have changed. If the contents of the file have not changed, then it responds with a status code of 304 (not modified).

If-None-Match Header to prevent downloading of valid cached assets

If-None-Match Header. (Large preview)

This indicates to the browser to use the locally available cached version of the file. By doing all of this, we’ve prevented the file from being downloaded.

Faster responses are in now place, but our job is not done yet. We still have to parse the HTML, load the style sheets and make the web page interactive. It makes sense to show some empty boxes with a loader to the user, instead of a blank screen. While the HTML document is getting parsed, when it comes across <script src=’asset.js’></script>, it will make a synchronous HTTP request to the server to fetch asset.js, and the whole parsing process will be paused until the response comes back. Imagine having a dozen of synchronous static asset references. These could very well be managed just by making use of the async keyword in script references, like <script src=’asset.js’ async></script>. With the introduction of the async keyword here, the browser will make an asynchronous request to fetch asset.js without hindering the parsing of the HTML. If a script file is required at a later stage, we can defer the downloading of that file until the entire HTML has been parsed. A script file can be deferred by using the defer keyword, like <script src=’asset.js’ defer></script>.

Conclusion

We’ve learned a lot of many new things that make for a cool web application. Here’s a summary of all of the things we’ve explored in this article:

Service workers make good use of the cache to speed up the loading of assets.
Web push notifications work under the hood.
We use IndexedDB to store a massive amount of data.
Some of the optimizations for instant first load, like using HTTP2 and adding headers like Etag, last-modified and If-None-Match, prevent the downloading of valid cached assets.

That’s all, folks!

Smashing Editorial
(rb, ra, al, yk, il)

OptinMonster Black Friday / Cyber Monday – 35% OFF all plans

Original Source: https://inspiredm.com/optinmonster-black-friday-cyber-monday-35-off-all-plans/

Here’s a quick one. Guess what digital marketers consider to be the most difficult part of their job.

Ok, the fact is 65% of businesses believe that generating site visitors and subsequently leads is exceptionally difficult. It’s undoubtedly that one task you don’t want to be assigned to you.

But then again, generating leads is oddly satisfying. Especially when you systematically source them from your site’s organic traffic.

And you know what? Believe it or not, the most challenging bit is arguably attracting a consistent flow of traffic. That’s why it would be extremely painful if you end up losing your visitors without converting a substantial fraction of them.

Interestingly, however, many marketers consider that a real possibility because of the simple fact that 96% of a website’s visitors are usually not ready to purchase yet.

And then there’s a special group of marketers who’ve managed to overcome that by strategically leveraging lead generation tools. I’m talking about the elite squad that powers onsite lead generation with effective opt-in lead generation solutions- like OptinMonster and the likes.

Astonishing, isn’t it? I guess that’s why I’m particularly fond of seeking ways to beat the system. And this time around, I’ll let you in on a juicy one I stumbled upon. It just so happens that OptinMonster is offering an exclusive 35% discount on all its plans this Black Friday and Cyber Monday- from November the 19th to 26th.

To top it off, it turns out the discount is applicable for more than one month. So, let’s find out more about this, starting with the features;

Feature Highlights of OptinMonster Lead Generation
Drag-and-Drop Builder

OptinMonster, for starters, provides a dynamic drag-and-drop builder for creating your own uniquely striking customized optin forms.

Then get this. It’s entirely manipulated without any form of programming.  The tool basically allows users to build from scratch using the canvas, or proceed with pre-designed templates that can be customized further. In the end, you’re able to combine various eye-catching forms with a wide selection of sound effects and animations.

Multiple Campaign Types

Businesses often use varying approaches when it comes to lead generation and marketing. OptinMonster makes a good attempt at facilitating all the possible strategies through an extensively flexible optin framework. In essence, it comes with the following campaigns:

·         Content Locker- For changing articles into gated elements to facilitate opt-ins.

·         Inline Forms- For attaching forms to your webpage’s content.

·         Sidebar Forms- For placing forms on either side of your site’s pages.

·         Countdown Timer- For encouraging visitors to urgently submit their optin information.

·         Floating Bar- For flexible forms that follow visitors around as they surf through a page.

·         Slide-In Scroll Box- For special forms that shoot up from one of the screen’s corners.

·         Fullscreen Welcome Mat- For momentarily displaying forms that take up the entire screen.

·         Lightbox Popup- For standard forms that pop up on the screen.

Campaign Triggers

OptinMonster heavily uses artificial intelligence to analyze visitor behavior, and subsequently display forms at the right time- based on pre-set trigger parameters. The triggering systems are:

·         Campaign Scheduling- Establish periods for showing selected campaigns.

·         Timed Display Control- Define specific times for displaying campaigns.

·         InactivitySensor- Use special campaigns that specifically show up when visitors are inactive.

·         MonsterLinks 2-Step Optins- Use ideal images and links as pathways to optin forms.

·         Scroll Trigger- Unleash selected optin forms as soon as visitors scroll to a certain point on the web page.

·         Exit-Intent Technology- Drop campaign forms on surfers exiting your web page.

Targeted Campaigns

The AI also comes in handy for when you need to engage a defined set of visitors based on their exact demographics. The systems used to target them include:

·         AdBlock Detection- For engaging visitors who are locking out potential ad income with their AdBlockers.

·         Device-Based Targeting- For reaching out to surfers based on their respective devices.

·         Cookie Retargeting- For unleashing forms aligned to visitors’ cookies.

·         Geo-location Targeting- For showing forms according to visitors’ geographical positions.

·         Onsite Retargeting- For engaging traffic that has visited your site before.

·         Onsite Follow Up Campaigns- For launching systematic messages aligned with actions taken by visitors.

·         Page-Level Targeting- For determining forms as they apply to special site zones accessed by visitors.

·         Referrer Detection- For displaying forms based on the traffic source.

Seamless Integrations

Lead generation is only the first stage of the conversion pipeline. There’s still a long way to go to successfully trigger purchases. And the bulk of it involves a thorough conversion process, complete with the relevant engagement tools. But since OptinMonster is not capable of facilitating all that, it chooses to conveniently integrate with a wide array of third-party email marketing services plus website and ecommerce platforms.

Actionable Insights

All things considered, lead generation is a holistic operation with multiple interconnected variables. Their collective impact depends on the complex set of decisions made at every stage, regarding each distinct parameter. And to help you with that, OptinMonster will keep you informed through its system of actionable insights- involving conversion analytics, A/B testing, and real-time behavior automation.

Normal OptinMonster Pricing

OptinMonster user subscription plans usually cost:

·         $19 per month or alternatively $108 per year for the Basic Plan.

·         $39 per month or alternatively $228 per year for the Plus Plan.

·         $59 per month or alternatively $348 per year for the Pro Plan.

·         $99 per month or alternatively, $588 per year for the Growth Plan.

Special OptinMonster Black Friday/Cyber Monday Discount Pricing

This good news? Well, at a 35% all-year discount, you get to pay:

·         $70.20 instead of $108 for Basic

·         $148.20 instead of $228 for Plus

·         $226.20 instead of $348 for Pro

·         $382.20 instead of $588 for Growth

That essentially translates to 12 discounted months. Quite a hack, right?

What To Do

And now for the revelation…

Just proceed to OptinMonster’s main site and enter BF2018 as the discount code.  Then have all the fun generating leads at a substantially reduced price.

The post OptinMonster Black Friday / Cyber Monday – 35% OFF all plans appeared first on Inspired Magazine.