How to start a blog: 11 pro tips

Original Source: http://feedproxy.google.com/~r/CreativeBloq/~3/pdQQv7U8JIY/how-to-start-a-blog-1131726

So you've decided to start your own blog. Maybe you want to share your expert drawing tips or drum up a bit of interest in your design portfolio, but before you rush into anything, consider this: the web (and in particular the blogosphere) is a crowded place.

Why your business should be blogging

There are plenty of blogs out there, all clamouring for people's attention, so you'll need to stand out from the crowd if you want to stand a chance of being noticed, and you'll need to stick with it; there's nothing quite so off-putting as a blog that was last updated in 2015.

Your blog needs to be attractive, creative and clever, and it needs to speak to your readers. It needs to tell them why you're different, what you're offering, and why they should take the time to read on. Ready to get started? Here are 11 tips that will get you going and help you take your offering from interesting to inspirational… 

01. Choose a blogging platform

You’re spoiled for choice when it comes to platforms, and most are free

There are several blogging platforms out there, from Blogger and WordPress to Tumblr, Squarespace and Ghost. Or if you're feeling bold and know your code, you can create your blog from scratch. Which platform you choose will very much depend on what you're most comfortable using, how involved you want to be with the creation process, and what you plan to put on it.

The good news is that most of these are either free blog platforms or offer a trial session so you can give it a whirl and see if it suits you.

02. Get a good domain name

How to start a blog - domain

Most platforms make it easy to buy a custom URL for your blog

Most blogging platforms will set you up on a subdomain by default, but if you want to be taken seriously then you should really buy your own domain name. You'll want something short, memorable and above all easy to spell, and take care when it comes to the top level domain. There are all manner of fancy TLDs available these days such as .blog or .agency, but there's a lot to be said for the classics; if you can get the domain you want with a good old-fashioned .com then go for it.

03. Decide on the blog's content

How to start a blog - content

Sort out your content plan or you’ll be heading for yet another abandoned blog of shame

You want to learn how to start a blog, but do you know what you want a blog for in the first place? Blogging for the sake of blogging is pointless – you'll soon get bored and your carefully crafted site will soon be home to nothing but tumbleweed.

Sometimes it is a good idea to grab a notepad and pen before you even start. Jot down the types of blog posts you'd like to publish so you always have a reference point you can come back to if the ideas seem to have dried up.

Only then should you move on – you know how to start a blog, now it's time to design and populate it…

04. Keep your blog design simple

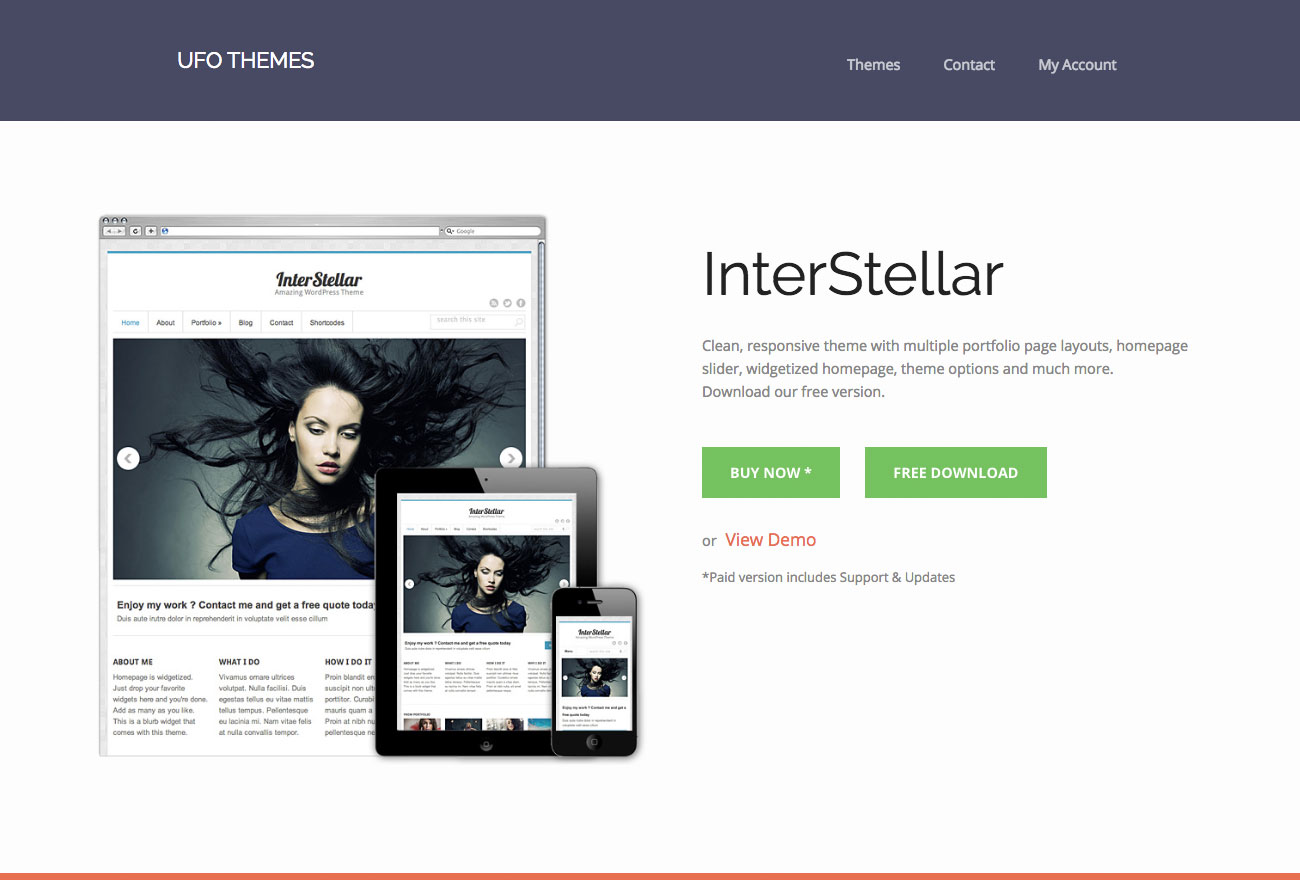
Free WordPress themes such as InterStellar offer simple design

When creating a design blog, it can be tempting to go crazy. After all, you want your blog to stand out and for people to remember you. How harmful can a rainbow of colours and a plethora of fonts be? The answer is: Very.

Keep your blog design simple. Stick to no more than three colours, and three fonts. With fonts; you need a heading, subheading and body copy font. Your main text font can then be enhanced by different weights or attributes, but keep these to a minimum.

05. Use contrasting colours

The design of The Fox is Black is based on a simple black and fluoro yellow colour scheme

Don't go crazy, and keep to a simple colour scheme. Contrasting colours can work well in the right design. It's a good rule of thumb that your blog features a main primary colour, a shade of grey, and a colour for your call-to-action.

06. Embrace white space

How to start a blog - white space

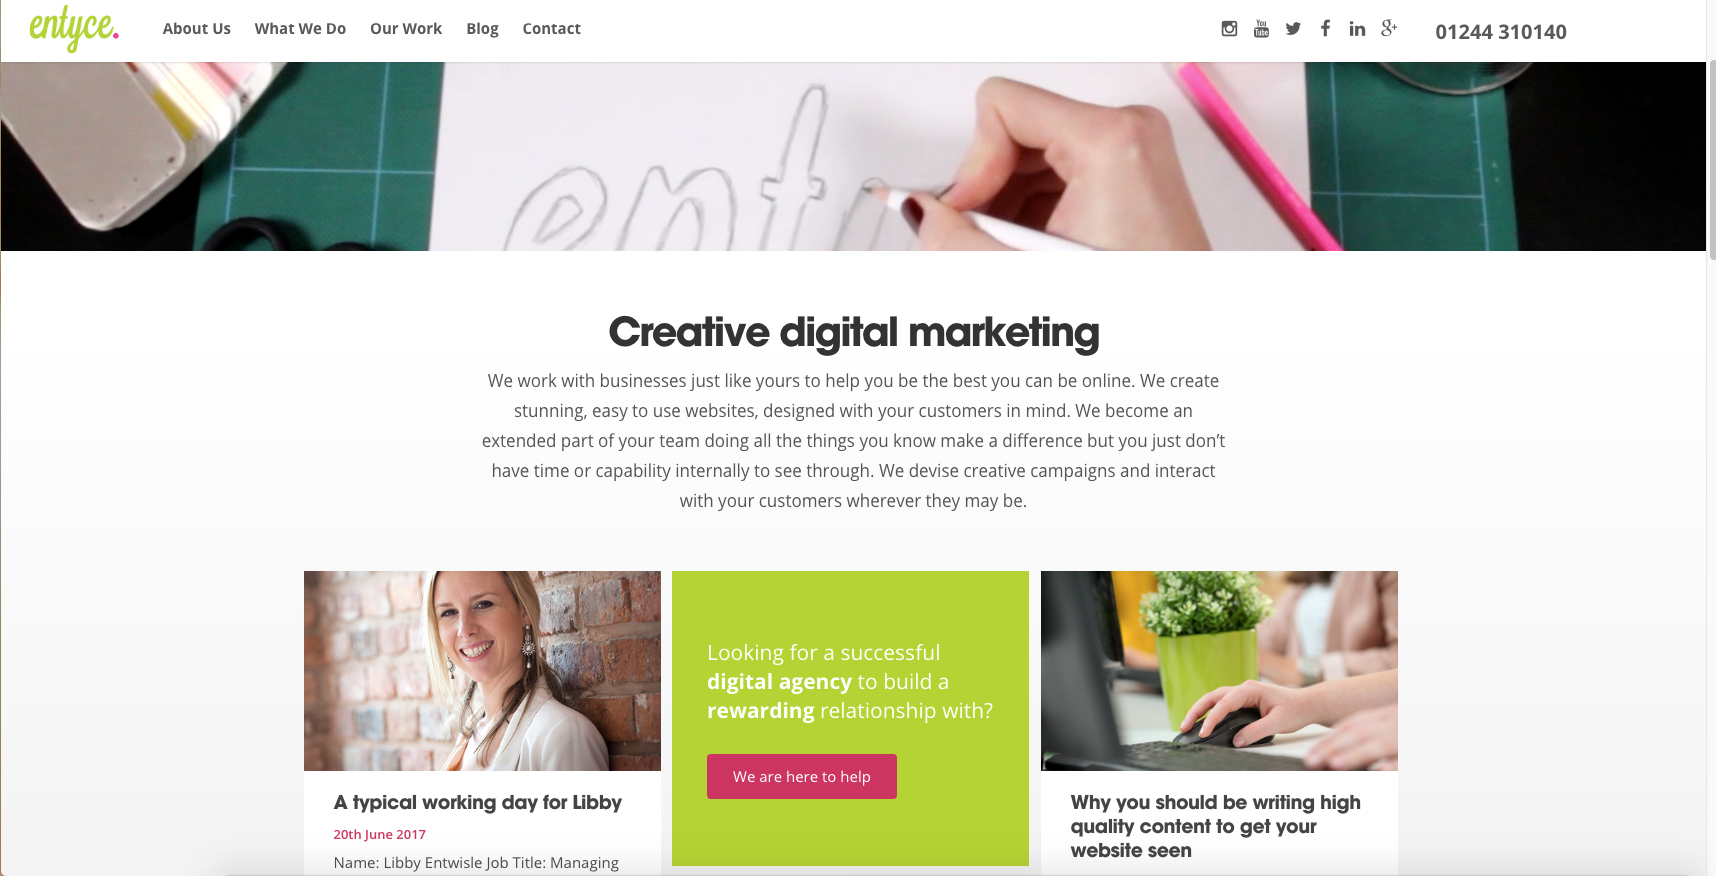
The Entyce site isn’t afraid to make use of white space

When finding inspiration before you create a design blog, don't be afraid of white space – it can really enhance your design and keep it looking professional.

Don't be afraid to leave some parts of the design empty where it warrants it. You should also use white space as borders to help highlight key parts of the blog. Remember, sometimes less really is more.

07. Keep your design goal-driven

How to start a blog - goal driven

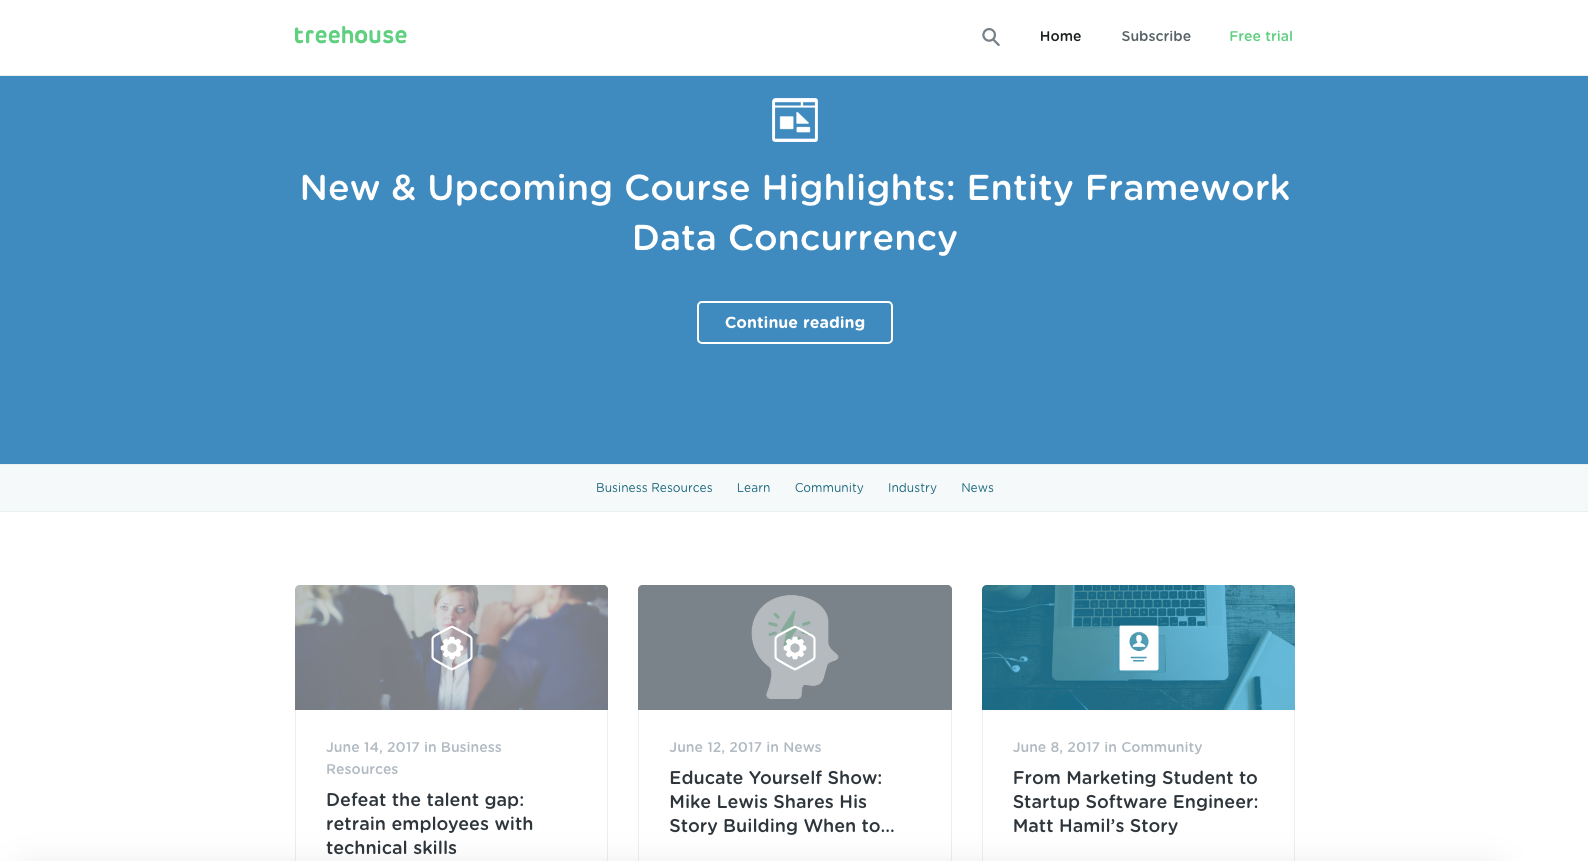
Web design resource Treehouse uses its blog to promote its courses

If the purpose of your blog is to get conversions – whether that's sales, signups, or enquires – then everything else comes second. This means you should create a design blog that is designed with three things in mind:

Topic: What is your blog about?Value proposition: What makes it unique?Audience: Who is your main target audience?

To get conversions, your design blog needs a strong call-to-action in its design, be that headlines, prominent buttons, or even arrows. A goal-driven design will help your blog convert, and keep visitors coming back time and time again.

08. Follow conventions

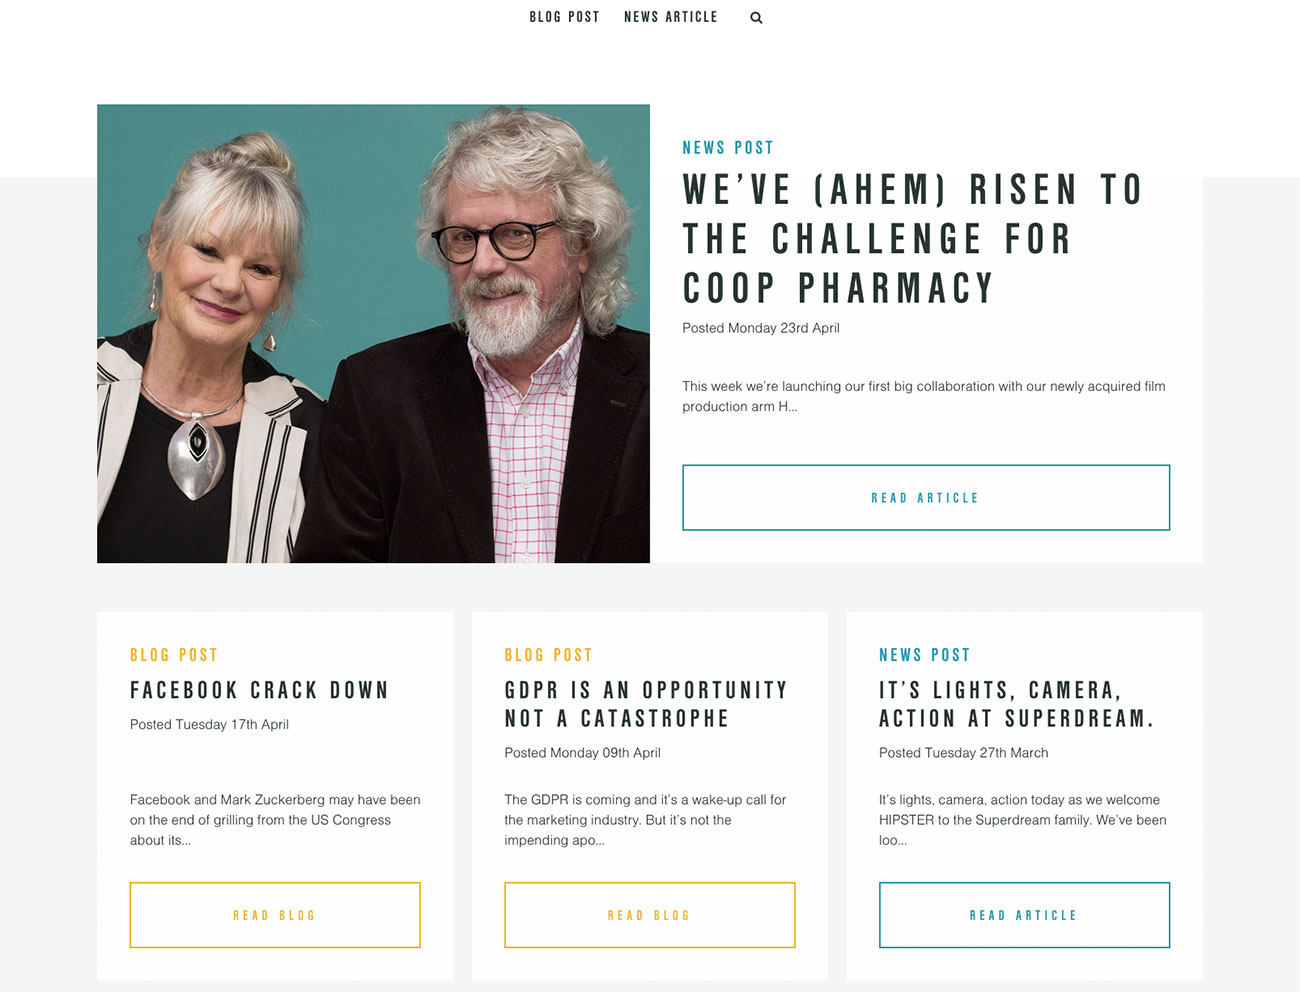
Superdream makes its posts easy to navigate

It can be easy to forget about the important features of a blog when getting creative with the design. Whatever your blog ends up looking like, make sure you keep the main conventions of a blog in place. 

These include:

SidebarsHeadersSubscription optionsAuthor attributionSearch bars

These all make your design blog easy to navigate, which is a highly important feature. Keeping these elements in place will make your content easy to find, and keep your visitors on the blog for longer. Together, all this adds up to a goal-driven design.

09. Experiment

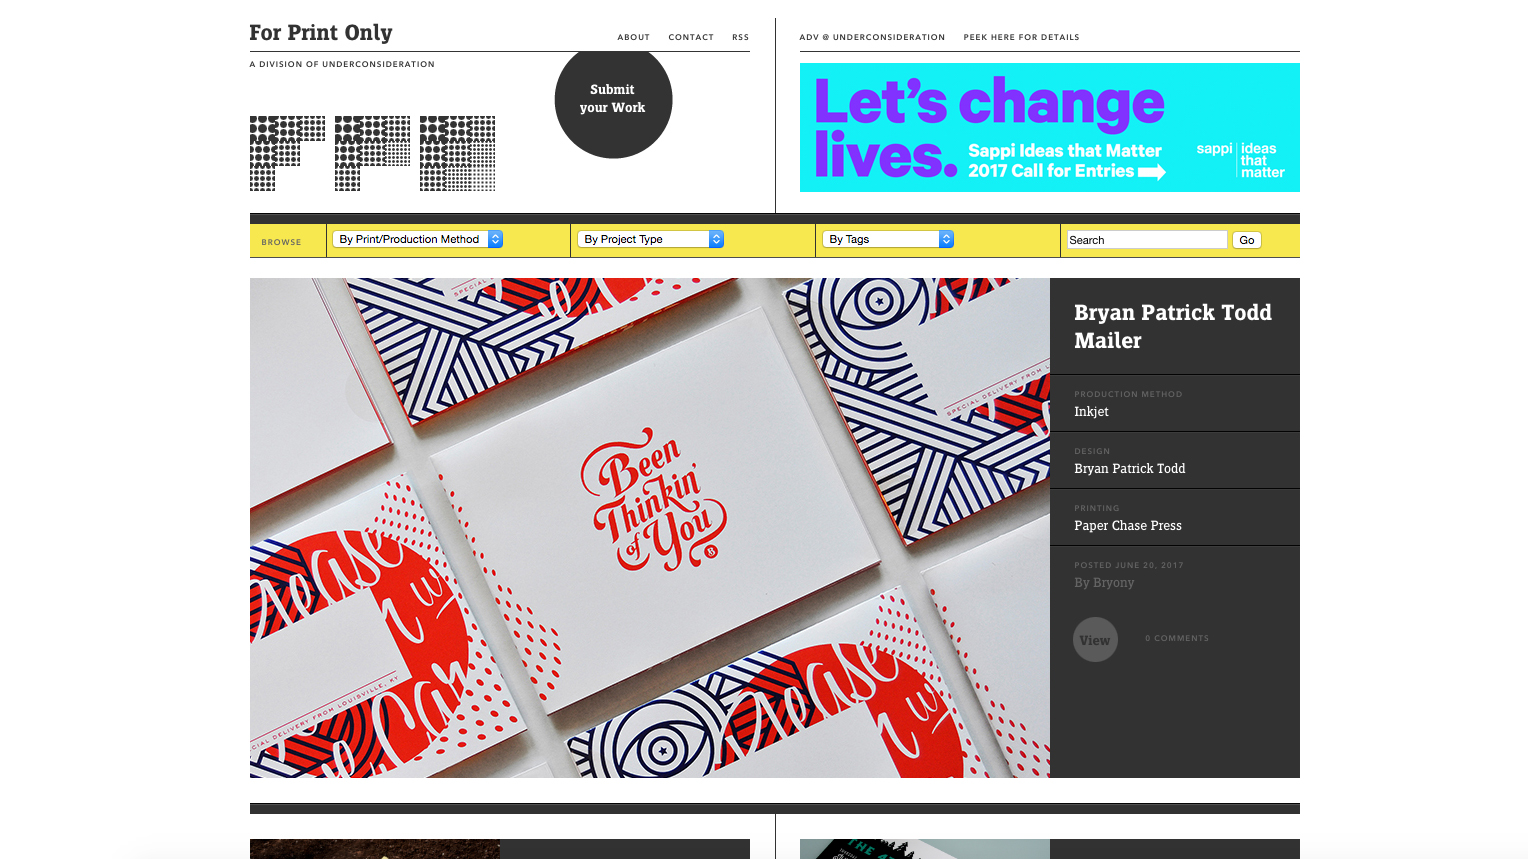
For Print Only uses bold graphics and grids

Although for the most part it's important to follow conventions, that doesn't mean you shouldn't break the rules from time to time!

Try a few new elements, and experiment with colours, fonts, and placement. By mixing things up, you create a visually exciting experience for your audience. Just make sure that your readers can always find your posts, and exactly what they're looking for.

10. Make it responsive

How to start a blog - Responsive

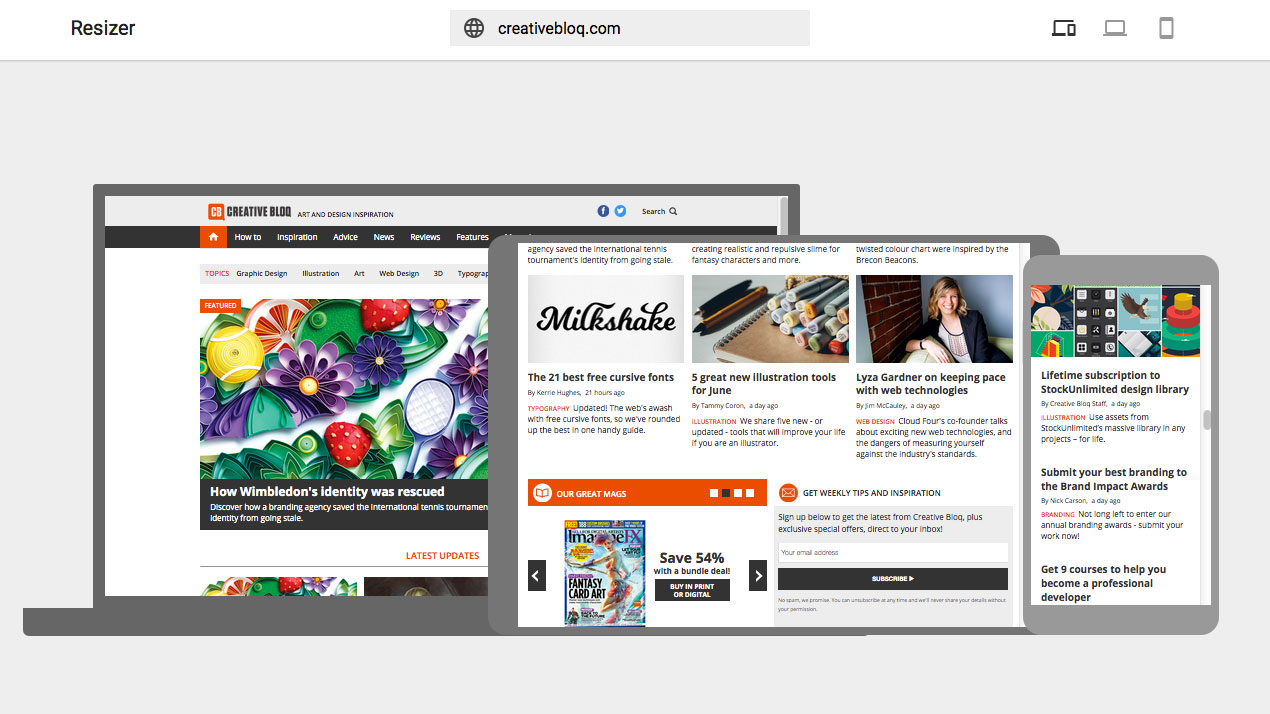
Test your design with a tool like Google’s Resizer

Nowadays, responsive web design is a prerequisite for any respectable design blog. Work closely with a designer and developer to help produce a design that is both eye-catching and functional.

11. Promote it!

How to start a blog - Social

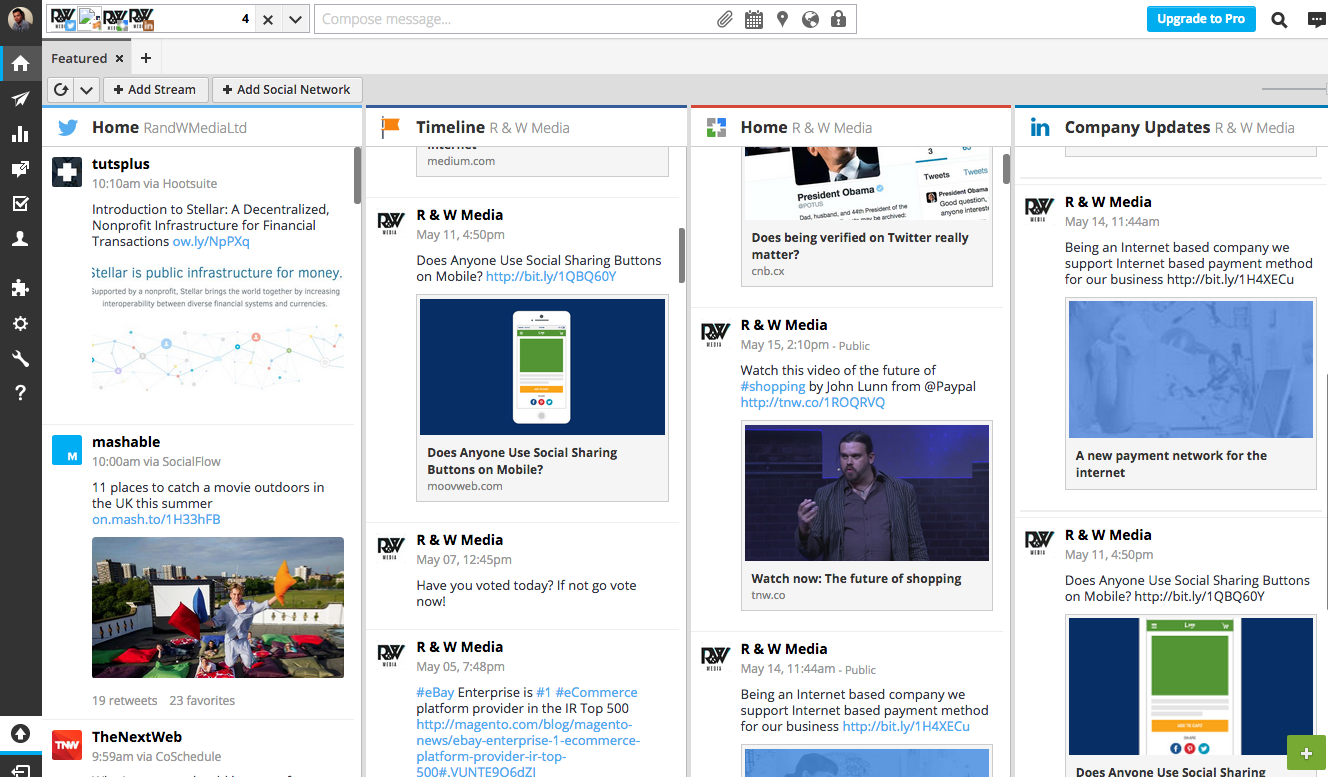
WIth a tool such as Hootsuite you can easily do most of your social shizzle in one go

There is no point in knowing how to start a blog without learning how to promote it too… This is where social media comes into its own. Create Facebook and Twitter pages for your blog, or use existing accounts to shout about it. If you are involving a lot of images in your blog, why not set up Pinterest and Instagram accounts, too?

Most modern blogging platforms such as Squarespace provide integration for everything from Twitter and Instagram to Tumblr and Dribbble, so you can spread the message quickly and effectively.

Related articles:

The 14 best free blogging platforms12 must-have code testing toolsThe 34 best free WordPress themes

Particle Effects for Buttons

Original Source: http://feedproxy.google.com/~r/tympanus/~3/FCCHhng3mvw/

Today we’d like to share a little effect library with you that can be used to create bursting particle effects. The idea is to desintegrate an element into particles and making it disappear (and vice versa). This effect looks really interesting on buttons, so we’ve created a little collection that showcases a bunch of different styles for the effect.

The inspiration for this idea came from Cuberto’s Hyperloop interface shot, Route Selection UI.

particleeffects_featured

The demo is kindly sponsored by Segment: One API, 200+ tools, no more integrations.
If you would like to sponsor one of our demos, find out more here.

The animations are powered by anime.js. Here’s an example of how you can use it:

<!– Normal HTML element to disintegrate –>
<button class=”button”>Button</button>

<script src=”anime.min.js”></script>
<script src=”dist/particles.min.js”></script>
<script>
// Initialize a new instance of Particles to disintegrate/integrate the button
var particles = new Particles(‘.button’);

// Disintegrate the button into particles
particles.disintegrate();

// particles.integrate(); // would do the opposite
</script>

The following options are available:

Name
Type
Default
Description

canvasPadding

Integer

150

Padding for the generated canvas that will be positioned right behind the target element. A canvasPadding = 0 will cause the canvas and the target element to have the same dimensions.

duration

Integer

1000

Duration (ms) to perform the animations of target element and particles.

easing

String or Function

easeInOutCubic

Easing function to perform the animation of target element. It will be passed directly to anime.js.

type

String

circle

Type of particle. Could be any of the following values: circle, rectangle, triangle

style

String

fill

Style of particle. Could be any of the following values: fill, stroke.

direction

String

left

Direction to start disintegrating the element. Could be any of the following values: left, right top, bottom. The opposite direction will be used to perform the integrate operation.

size

Float or Function

Random from 1 to 4

Size (px) for particles.

speed

Float or Function

Random from -2 to 2

Pixels per frame that a particle will be moved. It could be a function to set it randomly per particle (as default value).

color

String

Target’s background-color

Color used to fill the particles.

particlesAmount
Coefficient

Float

3

A coefficient to calculate the amount of particles to animate. A particlesAmountCoefficient = 0 will result in 0 particles, while bigger values will increase the amount of particles.

oscillation
Coefficient

Float

20

A coefficient to calculate the oscilation of particles while animating. A oscilationCoefficient = 0 will result in no oscilation (straight movements), while bigger values will increase the oscilation, resulting in
a kind of randomness.

begin

Function

undefined

Execute a function at the beginning of the animation.

complete

Function

undefined

Execute a function at the end of the animation.

We hope you enjoy this and find it useful!

References and Credits

anime.js

Particle Effects for Buttons was written by Luis Manuel and published on Codrops.

Deploy Fault Tolerant, Load Balanced Web Apps on Alibaba Cloud

Original Source: https://www.sitepoint.com/deploy-fault-tolerant-load-balanced-web-apps-on-alibaba-cloud/

This article was originally published on Alibaba Cloud. Thank you for supporting the partners who make SitePoint possible.

High Availability (HA), Fault Tolerance (FT), and Horizontal Scale Friendly (HSF) are equally important to functionality for web applications to run and succeed today. Existing or new web applications should be designed and provisioned with such underlying architecture. Fortunately, you can easily and promptly deploy the aforementioned architecture in the Cloud era today (compared to the on-premises bare-metal machine era)!

However, this flexibility comes with a caveat – how do you choose the right cloud provider? We are spoiled for choice and it can be really challenging (and hectic!) when evaluating and choosing the right one.

This post is intended to discuss and provide a walkthrough on deploying web applications on Alibaba Cloud from the ground up, including HA, FT, and HSF. Throughout this post, I will briefly introduce several services and tools provided in Alibaba Cloud. Yes, briefly! If you wish to learn more about particular services or tools, please visit the Documentation Center. In addition, this post will highlight the concerns and considerations when deploying such services.

WordPress is used as the demo web application that would be deployed on Alibaba Cloud in this post. The same deploying principle shall apply to many other web applications. This post is not intended to discuss on WordPress configuration at all. It shall not (and not able to) serves as reference for WordPress configuration. There are tons and tons of good resources out there regarding best practices on WordPress administrative.

1. High-level Architecture

Like many other web applications, the demo web application consists of an application layer (WordPress) and a database layer (MySQL).

Goal: Ultimately, we want an always-on web application (WordPress)!

In order to achieve such a “simple” goal, the demo web application must be deployed with the following minimum requirements:

A single main site.
A minimum of two physically separate WordPress instances on each site for redundancy and load balancing purposes.
Auto-spawning the other WordPress instance when the existing instance stops or experiences a failure.
The database instance (MySQL) must also be running in redundancy mode. It should automatically failover to the active standby instance when necessary.
Centralized dataspace. Shared resources must be accessible and available to all running WordPress instances. For example, a document uploaded by a user via WordPress should be synced across all running WordPress instances.

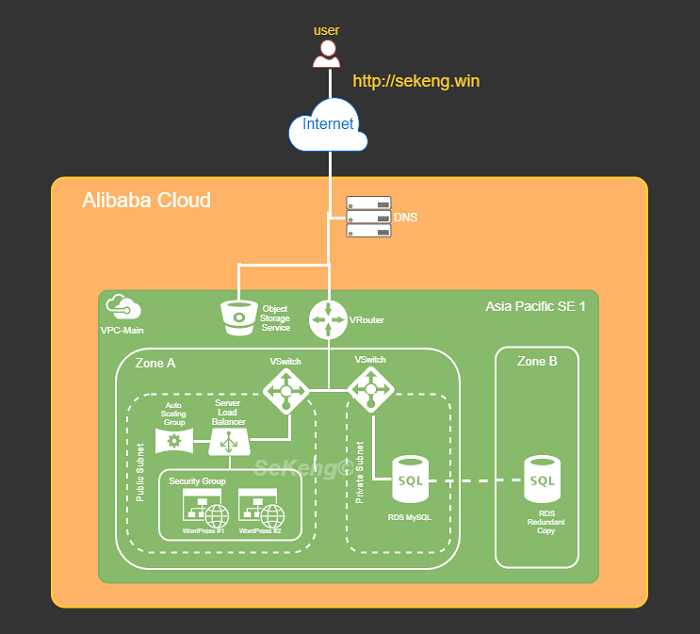
Fortunately, Alibaba Cloud provides a list of services and tools for us to fulfil these requirements. In this post specifically, we’ll utilize Cloud DNS (DNS), Auto Scaling Group (ASG), Server Load Balancer (SLB), Elastic Compute Service (ECS), Relational Database System (RDS), Object Storage Service (OSS), and Object Storage File System (OSSFS) tools to achieve our goal. The high-level architecture diagram for the deployed WordPress would be as following:

2. Deployment Procedures

We’ll briefly introduce the components shown in Figure 1.0 before diving into each individual configuration. As stated earlier, you would have to refer to other sources such as Alibaba Cloud online documentation for detailed explanation. The following table summarizes the description and usage of such components according to our deployment context:

Table 1: Cloud Components in Demo Deployments

Site / Region
Geographical area of the data center
1. Site for deployments

Zone
Physically isolated data center within a region
2. Used for redundancy purpose for Database

Cloud DNS
Domain name resolution and management service
3. Purchase new Domain Name4. Route traffic to WordPress instance

VPC (Virtual Private Cloud)
Virtual isolated network built for private usage
5. To group and separate resources6. To setup security control7. Assign network IP range

VRouter
Virtual routing table
8. To configure network route for provisioned resources

VSwitch
Segment virtual networks into subnets
9. To separate resources into group within specify Zone via subnet

Server Load Balancer
Distribute traffic to instances according to configured profile
10. To load balance (round robin) request among provisioned WordPress instances

Auto Scaling Group
Automatically adjust computing resources based on scaling configuration
11. Serves as watchdog to maintain the defined healthy running WordPress instances

Elastics Computing Service (WordPress instance)
Compute and process unit provided by Alibaba Cloud
12. To install and run WordPress. This is the application layer of demo deployment

Relational Database Service (MySQL)
On-demand managed database service
13. The DB for WordPress application

Object Storage Service
High availability and fault tolerance object storage
14. Centralized storage for files/objects uploaded by user via WordPress application

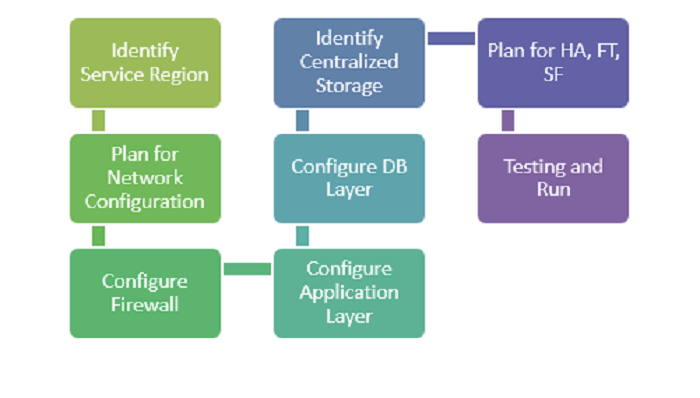
The workflow below describes the general steps involved in deploying a web application on Alibaba Cloud.

2.1. Identify Service Region

It’s important to decide on the region where an application should be deployed. The general considerations shall include the following:

Cost: The mother of all considerations. Yes, the cost may vary according region.
Service availability in the region? It’s not uncommon that some regions provide additional services that aren’t available in another region — you have to test to find out!
Main target users’ geographical location. It’s definitely better for user experience if the application is physically closer to the customer, resulting in shorter latency.
Rules & Regulations. Is it legally OK for the application to be hosted in the selected region?
Number of Availability Zonez. Occasionally, we need to improve application availability by deploying redundant applications in a different zone. Since I’m based in Southeast Asia, I will be looking at the Singapore and Kuala Lumpur data centers. At the time of writing, “Asia Pacific SE 3 (Kuala Lumpur)” has only a single zone while “Asia Pacific SE 1 (Singapore)” has dual zones.

After consideration, we’ve decided “Asia Pacific SE 1 (Singapore)” will be the main region for our demo deployment.`

2.2. Plan for Network Configuration
I. VPC

We have to consider the number of nodes that might potentially be running in the deployment. Each running node is subject to one private IP, and we don’t want to end up running out of private IPs for nodes in the future!

There are three type of CIDR blocks allowed by Alibaba Cloud for a VPC: 10.0.0.0/8, 172.16.0.0/12, 192.168.0.0/16. According to Alibaba Cloud documentation, the first & last three IPs of CIDR block would be reserved by system usage, and hence the maximum number of private IPs for each CIDR block are:

10.0.0.0/8 = 16777212 (16777216 – 4)
172.16.0.0/12 1048572 (1048576 – 4)
192.168.0.0/16 = 65532 (65536 – 4)

You may also wonder, why don’t we just use the biggest CIDR block allowed to avoid potentially running out of private IP in future? The following might help you to reconsider that thought:

Bigger CIDR block may increase the complexity when dealing with IP-related configuration, such as subnet creation, route configuration, security group configuration, and etc.
If the above is not a valid show-stopper for you, then consider this: “VPC peering (interconnect)” with other VPCs doesn’t allow overlapping CIDR block. In other words, it’s not possible to peer with other VPC once you using 10.0.0.0/8 as CIDR block!

After consideration, we’ll use “192.168.0.0/16” for our demo deployment as there will only be a few running nodes within the VPC.

II. Subnet

In Alibaba Cloud, VSwitch could be used to further segment the VPC CIDR block into a subnet with a smaller CIDR block. The general consideration for segmenting subnets includes the following:

Logical grouping of instances according to functionality. E.g. grouping the application in one group and RDS in another group for easier maintainability. For example, disabling a group of instances by deleting VSwitch attached to the group.
Simplify security group profile configuration. Security rules based on the subnet CIDR block level rather than the individual instance’s IP are cleaner.
Enable Auto-scaling and Server Load Balancer monitoring and actions on a specific subnet.
Redundancy on resources. It’s possible to seamlessly failover to a different subnet that’s based in a different zone when the existing subnet’s zone encounters failure.

After consideration, we’re grouping WordPress in one subnet (192.168.1.0/24) and the RDS instance in another subnet (192.168.2.0/24).

2.3. Configure Firewall (Security Group)

Network access at the instance level could be limited via Security Group in Alibaba Cloud. The Security Group Rule configuration could be very granular, up to the per-protocol, per-port, per-client IP level. Hence, to avoid unauthorized access to the instance, we need to consider the following:

Always comply with least privilege practice. Restrict access to the required client only.
Intranet or/and internet connectivity. You can use Security Group to create a “private subnet” (no internet usage) by only allowing access for inbound intranet. In addition, a NAT gateway could be used to allow the instance in the private network to access outbound internet services.

Since we are running WordPress on Linux instances, we would at least allow an inbound rule for Port 80 (HTTP) and 22 (SSH) in Security Group. Besides that, all outbound traffic would be allowed since there’s no specific requirement on that.

2.4. Configure the Application Layer

This could be the trickiest and most uncertain decision we have to make when deploying web applications. As stated earlier, this post will not discuss an application’s capacity requirements and hence, choosing a proper instance type is out of scope of this post. Anyhow, the following considerations may assist in deciding on an instance type generally:

Always start with the Pay-As-You-Go model if you have no idea on the instance type performance nor the actual capacity requirement. This pricing model allows you to experiment with different instance types freely without a lock-in period.
You have to understand the nature of the to-be deployed application’s constraint. Is the application CPU-bound or IO-bound? You have to answer that in order to determine a proper instance type with the best cost efficiency.
Deploy with one step down instance whenever possible. If an application’s capacity requirement could be satisfied with a ‘X’ instance of a instance family type Y, it might be better if we deploy the application with two one step down instances (e.g. X/2) from the same family type for the same amount of workload. This will increase the availability of the application. For example, we can still process 50% of the workload if any the X/2 instance goes down compared with 100% downtime if the X instance is down. Of course, this approach is subject to the design and usage of the application.
Decide on other usage parameters e.g. network type, network bandwidth, operating system image, and etc. accordingly.

Since this is a demo deployment without any real production usage, we’ll go for the lowest (cheapest) ECS instance configuration. For example: General Type n1: 1-core, 1GB, Ubuntu 16.04 OS, Ultra Cloud Disk 40GB, and 1Mbps network bandwidth.

2.5. Configure the Database Layer

Generally, we have to decide between using self-managed DB instances (self-install DB at ECS instance) like what we usually do for on-premises solutions, or using fully managed RDS DB services like ApsaraDB. Again, it’s out of this post’s scope in comparing or benchmarking the two variants of database services. These guidelines may assist in choosing database variants generally:

Do you have available resources for managing and operating database instances? The management and operational tasks may include backing up data files, OS/DB patching, access control on the host machine, etc. If the answer is no, then maybe a fully managed RDS DB is preferable.
Do you need a dedicated database instance? If your database is small and the workload is minimal and able to co-exist with the application (e.g. in the development environment), perhaps the self-managed variant is preferable due to cost efficiency.
Do you need access to the underlying host for the database instance? For example, if you need to perform specific OS/DB configuration for performance-tuning purposes, then the self-managed variant shall be employed.
Does the fully-managed database service provide the DB type that you required? If no, then the answer is straightforward, go for a self-managed DB variant.
If you are concerned about possible cloud vendor lock-in, then you might want to avoid the fully-managed variant as some RDS implementations could be cloud vendor specific.

Since there is neither manpower to maintain the demo database nor any specify DB configuration, we’ll deploy the demo DB with ApsaraDB RDS – MySQL. In addition, this variant allows us to make a redundancy (active standby) database easily (with just a click!).

2.6. Identify Centralized Storage

Eventually, there could be multiple concurrent WordPress applications running on physically separate ECS instances. Each instance might generate and store certain files/image/media resulting from users’ operations. Obviously, objects that are generated by any instance would have to be synchronized across all other running application instances. One of the approaches to achieve this mentioned synchronization is through centralized storage. Objects generated shall be synchronzied to centralized storage and followed by synchronization between centralized objects and other running instances. Additionally, the centralized storage must always be available and any failure of any instance shouldn’t impact the availability and durability of centralized storage.

Alibaba Cloud provides a couple of fully managed services which could serve as centralized storage:

Object Storage Service for objects: It’s ideal as centralized object storage due to the guaranteed high availability (99.9%), scalability, and fully-managed nature. Specifically to this demo deployment, each running WordPress instance shall sync with a dedicated common Object Storage Service’s bucket. By employing such a syncing mechanism, all the running WordPress instances would have an identical set of created objects.
ApsaraDB Redis for application state: Sharing state (e.g. shared value, parameter) among running instances is possible via fully-managed ApsaraDB Redis.

A dedicated bucket in Object Storage Service would be created and used to store objects created as a result of user operations. All running WordPress instances shall sync with the relevant bucket for the list of created objects.

2.7. Plan for HA, FT, and HSF

To achieve HA, FT, and HSF in Alibaba Cloud, a web application shall be fundamentally designed as stateless and horizontally scalable. Any dependent application’s state or data shall be decoupled from the web application and migrated to centralized storage as discussed in the earlier section.

Services listed below could be employed for deploying a HA, FT, and HSF web application:

Cloud DNS: It’s possible to configure ‘A’ record types for instances hosted in different regions. It’s really useful during failover scenarios whereby an ‘A’ record of a standby instance could be enabled with one click, resulting in network traffic diversion to the standby instance.
Auto Scaling: It can be used to auto-spawn instances in a desired Zone when running instances go down or become unhealthy.
Server Load Balancer: This service would provide a health check on configured instances and report their status to the Auto Scaling service for further action. Besides that, this service would also load balance workload among running instances.
ApsaraDB RDS: RDS MySQL provides the multi-zone availability feature with just a click. It will really ease the effort required to provide HA and FT for the database.

The demo deployment will utilize DNS to route traffic to WordPress instances, Auto Scaling to ensure a minimum of two running instances in each region, and Server Load Balancer to provide a health check as well as to load balance workload. Last but not least, the Multi-Zone availability feature on RDS MySQL is enabled to provide HA and FT for the database.

2.8. Testing and Run

To test the HA and FT behavior, we may stop a running ECS manually and observe the action triggers by the auto-scaling service. If the auto-scaling has been configured properly, a new instance would be spawned automatically. Besides that, we may also manually turn off the RDS DB instance to observe the Multi-Zone redundancy failover happening. The best thing is that these actions are automatically handled by the respective services without any manual intervention. Shown below is our deployed WordPress:

Continue reading %Deploy Fault Tolerant, Load Balanced Web Apps on Alibaba Cloud%

Costly Freelance Design Mistakes (and How to Avoid Them)

Original Source: http://feedproxy.google.com/~r/1stwebdesigner/~3/S5kuOVUc_iY/

While being a freelance designer can be an incredibly fun and fulfilling career, it’s not without its downsides. Chief among them is that it can place those of us who aren’t experienced businesspeople into a position of having to make critical decisions. Worse yet, it’s very possible to make the exact wrong choice in any given situation.

Making the wrong choice could be as harmless as ordering the wrong paper stock on your new business cards. Or, it could be serious enough to cost you a small fortune in money, reputation or both.

Truth be told, I have made costly mistakes over my time in business (their depths go far beyond this list). I can tell you from experience that it’s not very fun. But thankfully each mistake has provided me with a learning experience. So now I’m going to pass those lessons on to you. Hopefully, they save you from having to learn the hard way.

Unauthorized Use of a Copyrighted Image

There was a time when the use of images on the web was just a matter of saving one and then doing whatever you wanted with it. It probably wasn’t smart then, but it’s really not a good idea now. With copyright trolls looking for literally the slightest excuse to send you a hefty bill for unauthorized use of an image – you’d better make sure that you have clear rights to use it (including ones that clients provide).

It’s bad enough if this happens with your own website. But it’s a whole other kind of terrible when it happens to a client’s site – and it was you who posted the image. It puts you on the hook financially and makes you look the fool (I won’t comment on any personal involvement on this one).

The Solution
Scrutinize any image you download from the web. If it’s from a stock photo site (free or premium) ensure that the license allows you to use the image for your intended purpose (commercial, for example). Some license agreements even include limits as to the image’s size when used on a website. With free images, look for the CC0 type of license. That allows you the freedom to use the image in both personal and commercial projects.

Failure to Put Agreements in Writing

Knowing that you are running a business, working without at least some form of a contract is an invitation to get stiffed on payment. For your consideration, a personal anecdote:

For a long time, I relied on the goodness of people when starting new projects. Amazingly, it worked out quite well for a number of years. Then I got burned. I started a project without getting the standard deposit – even though I knew better. And when the relationship soured, I lost out on that check. While I could have gone through the legal process to get it straightened out, in this case it was good enough just to be able to walk away from a bad situation.

The Solution
When a new client wants you to work on a project – get the terms agreed to in writing. If you usually require that a client provide a deposit, you’ll want to make sure that they know you won’t start work until you have it in your hands. It doesn’t mean that you’ll never have an issue with payment or other related troubles, but at least you’ll have it down on paper.

Taking Responsibility for Things You Shouldn’t

This one will come back to bite you over and over. And it’s especially difficult because we so often say yes to things (out loud or in our heads) in the early part of our freelancing career. But usually, the pain really starts later – well after you’ve decided that you no longer want to do a specific task.

I can share an example of this from my own experience. Over a decade ago, I had agreed to administer a promotional app on a client’s website. Essentially, it was there to send a birthday coupon out to folks who signed up to their mailing list. Sounds simple enough, right? Well, not the way I did it.

Since I didn’t have anything to tie directly into their email list that would trigger the sending of a message, I instead rigged up this ridiculous system for manually adding users to an app that would send out those coupons. Because of my foolishness, I manually checked the mailing list for new subscribers and added them to a separate coupon app – for years.

This, along with a sprinkling of other short-sighted decisions took up a great deal of time that really could have been better spent. The frustration was compounded by the less-than-ideal setup.

The Solution
Think long and hard about taking on things you really don’t want to do before saying yes. You could be living with the consequences long after. Oh, and automate everything you can!

Failure to do Your Homework

The last costly mistake in our roundup can really cost you – as in tons of time and lost revenue. It’s the failure to do enough research to provide an accurate cost estimate for a project. And the real kicker is that this sin is just as easy to commit when quoting a from-scratch website or a redesign.

So often, we see cases of “scope creep” work their way into our projects. It’s those seemingly little things that turn into a huge mess. But part of that might be because we didn’t ask enough probing questions at the beginning of the process. If we’re not on the same page with our client, we might be in for a surprise.

When it comes to redesigns, we might do a cursory scan of an old site thinking that there’s nothing major lurking underneath (especially so if a prospective client hasn’t mentioned it). So, instead of clicking through a bunch of content – we assume it’s all the same. Only when we begin working on the project do we find that key element we missed. At this point, it’s probably too late (or at least too awkward) to go back to the client and ask for more money.

The Solution
The key here is to be as thorough as possible when reviewing an existing website or going over project requirements with your client. Reviewing a website should be simple enough. It’s a matter of clicking through each and every link to see what’s there. If there’s something you don’t quite understand – ask questions. And, when going over project requirements, it’s not enough to just know what functionality the client needs. It’s also important to find out how they expect the whole process to work and any data portability needs they may have. The more information you collect, the more accurate your estimate will be.

Learning as You Go

If you’ve never been in business before and all-of-the-sudden find yourself running one, you’re bound to have some missteps. That’s a natural part of the process. As a designer or developer, we’re often focused on what we do best. Sometimes the other job requirements aren’t as apparent until something goes wrong.

The good news is that most mistakes are correctable – if not outright preventable. The best way to avoid these situations is to really think things through. Take time and review the pros and cons. Think about how a decision may impact you a year or two down the road. Over time, you may find that doing things this way will become easier. And both your bank account and sanity will be the better for it.


Collective #412

Original Source: http://feedproxy.google.com/~r/tympanus/~3/izmYPZ0PNj4/

C412_WOTW

Inspirational Website of the Week: Fazeta Producciones

Some interesting interaction details and a unique design. Our pick this week.

Get inspired

C412_francine

Pure CSS Francine

A piece of HTML/CSS art made by Diana Smith.

Check it out

C412_curtain

Curtains.js

Curtains.js is a light-weight WebGL JavaScript library that turns HTML elements into interactive textured planes.

Check it out

C412_Divi

Our Sponsor
Divi: A Web Designer’s Dream

Divi is the ultimate tool for web designers. Hundreds of thousands of WordPress freelancers and agencies are empowered by Divi to help run their growing businesses.

Try it now

C412_knockout

Responsive Knockout Text With Looping Video

A tutorial by Giulio Mainardi where he shows how to pull off a video text effect.

Read it

C412_githubcont

GitHub Contributions Chart Generator

Visualize your GitHub contributions with differently themed images.

Check it out

C412_bigint

BigInt: arbitrary-precision integers in JavaScript

Read all about the new numeric primitive in JavaScript that can represent integers with arbitrary precision. By Mathias Bynens.

Read it

C412_displaycontents

Display: Contents Is Not a CSS Reset

Adrian Roselli explains why using display: contents as a quick and dirty CSS reset is a terrible idea.

Read it

C412_subgrids

Grid Level 2 and Subgrid

An article by Rachel Andrew where she explains subgrids and why they’d make a good addition to the Grid specification.

Read it

C412_cards

Cards Webflow UI Kit

A clonable Webflow Style UI Kit fully developed in Webflow Designer and also available as Sketch file. By Jan Losert.

Check it out

C412_print

A Guide To The State Of Print Stylesheets In 2018

Rachel Andrew’s guide to modern print stylesheets.

Read it

C412_dropdown

Solved With CSS! Dropdown Menus

Una Kravets shows how to create CSS powered dropdown menus.

Read it

C412_lobe

Lobe

Build, train, and ship custom deep learning models using a simple visual interface. Available for beta invitations.

Check it out

C412_wireframe

Priority Guides: A Content-First Alternative to Wireframes

Heleen van Nues and Lennart Overkamp write about the drawbacks of wireframes and suggest the “priority guide” as alternative.

Read it

C412_minmax

CSS Grid: More flexibility with minmax()

Michelle Barker explores the minmax() function and shows why it’s so powerful.

Read it

C412_color

The Surprising Science Behind Color Codes

Patrick Woodhead shares some interesting facts on color codes.

Read it

C412_relaxed

ReLaXed

ReLaXed is a tool which creates PDF documents interactively using HTML or Pug.

Check it out

C412_grid

Smart CSS Grid

Smart CSS Grid is a minimal CSS Grid based responsive layout system with 12 columns.

Check it out

C412_selection

Selection

A simple and light-weight library for visual DOM selection.

Check it out

C412_flocking

Starling Simulation

A flocking simulation of starling murmuration using WebGL.

Check it out

C412_v8bigint

Adding BigInts to V8

The interesting story behind implementing support for BigInts in V8.

Read it

C412_sslgithubpages

Custom domains on GitHub Pages gain support for HTTPS

Read about how GitHub Pages are gaining support for HTTPS.

Read it

Collective #412 was written by Pedro Botelho and published on Codrops.

Sketchbook 4.0 for Android review

Original Source: http://feedproxy.google.com/~r/CreativeBloq/~3/2qLAjvb44Fo/sketchbook-40-for-android-review

Any Android owners who feel a sense of competition with their iPad-wielding counterparts may be slightly irked that SketchBook 4.0 is only appearing on their platform months after it launched on iOS. But set any irritation aside, and you’ll discover a compelling update with features artists looking for Android apps will appreciate.

Chief among these is a revamped user interface that stays out of your way as you work. It vanishes if your brushstrokes veers near one of its tool panels, and many interface elements are reduced in scale. This makes some controls, like the drawers for adjusting Brush size and Opacity, a little fiddly to access, however. Tap near the centre-bottom of the screen, meanwhile, and a menu with shortcuts appears.

Complicated pricing

When you first install SketchBook, it’s the Free edition, with limited functionality but no time limit on how long you can use it. To unlock the full toolset, you have two options: you can either spend £4.09 on the Pro Tools in-app purchase, which gives you the tools only within the Android app; or get an annual SketchBook subscription (£4.09 a month or £24.99 a year). The subscription must be renewed each year, unlike the in-app purchase, but you get access to the full tools on the versions of SketchBook for Windows, Mac and iOS as well as Android. 

Shibuya Race was created by artist Ryohei Yamashita using SketchBook

Bear in mind that the desktop computer editions don’t offer the one-off purchase option, only the subscription, so if you plan to use SketchBook on either Windows or Mac as well as Android, you may as well forget the in-app purchase and commit to the subscription instead.

With all these complicated buying options, it’s worth mentioning first that the Android app smoothly recognises your subscription when you first log in on the app; and second that once you’ve logged in, the app keeps all the Pro Tools active even if your tablet isn’t connected to the internet.

New features

The main differences your upgrade awards are customisable canvas sizes; dozens more brushes, including a Inking brush with a pleasing line quality; a limit to the number of layers dictated by your device’s memory rather than the Free version’s miserly three layers; the ability to make selections and masks; and unlimited Undos. You also get access to more drawing tools, including rulers and fills.

SketchBook’s user interface is much improved

We also like the Predictive Stroke mode, which tidies up your line after you draw it. It’s a real boon for digital inkers, and you can adjust the extent to which your lines will be altered.

This release brings SketchBook for Android up to speed with other versions and maintains the software’s reputation as a quality, unobtrusive drawing tool. Perhaps more importantly for patient Android owners, the under-the-bonnet changes should see more contemporaneous updates across all SketchBook versions in the future. 

This article was originally published in ImagineFX issue 158, the world's best-selling magazine for digital artists. Subscribe now.

Read more: 95 tutorials on how to draw

The Keys to Advertising Your Web Design Business

Original Source: http://feedproxy.google.com/~r/1stwebdesigner/~3/kBaw0miLtno/

If you’ve just started a new business, congratulations! Once you have your site up and running, now comes the real challenge: advertising. You may not even know where to begin, so here’s a quick guide on how to spread the word and get your name out there.

Advertisement Banners

One of the easiest ways to advertise your business is with an online banner. These little rectangles don’t pull in many clicks, but they’re cheap. It can help immensely to advertise on relevant websites, and people may remember a good ad even if they don’t click right then.

You can use a service like Google Adwords, Facebook Ads or BlogAds. Just make sure to design a banner that’s memorable – not annoying or distracting. You are a designer, after all!

Advertisement Banners

Social Media

Want to know the best part of social media advertising? It’s free, assuming you don’t hire someone to do it for you! It’s also surprisingly effective. Generic social media accounts may fail, but if you put a bit of personality behind it, you‘ll find your business soaring. Interact first, promote your business second.

Take time to share curated content, partner with other businesses, share fun but relevant videos and images, give a behind-the-scenes look into web design life and use personal branding; people trust the individual more than the business.

Social Media

Directories

Get your business listed in a directory. Yelp, White Pages, Foursquare and any other relevant site you think will help. Many of these are free, so do your research. Don’t forget Google My Business, which adds a helpful little box on the right of search results that lists relevant information.

Email Marketing

Email marketing is highly effective – when done correctly. If done incorrectly, the only place you’ll be marketing to is the spam folder.

So grow your email list in legal ways, not by purchasing lists, but by offering an incentive for people to give you their info. Coupons, tips, eBooks, the list goes on. Personalize your emails so they get sent to the right people. Customers who’ve used your services before could get special rewards, while you can focus on converting those who haven’t. Autoresponders can automate the whole process.

Here’s a more in-depth guide if you’re confused. Email marketing services include Campaign Monitor, MailChimp and AWeber.

Email Marketing

Create a Portfolio

Of course your website itself should show off your skills, but you may wish to create a portfolio page or even a separate site. This can display the extent of your creativity, or use testimonials from past clients and examples of your work. Visitors will be hooked.

In Person

The last way to directly market your business is in-person – get your business cards ready and get out there! Attend seminars, conferences, events and try to secure a chance to participate if you can. Otherwise, it’s a learning experience.

Just remember business card etiquette. Don’t run around throwing cards at people; wait until you’re asked for it. Make sure to follow up with any businesses you exchange cards with. You might just end up with a partnership!

In Person

Say No

While not exactly a marketing tip, this is very important for designers to understand. Sometimes, you need to turn down a client. If you’re not comfortable, they’re overly demanding, or they aren’t paying their invoices, professionally turn them down and swallow the negative review. (Some review sites may allow you to respond with your side of the story, but be civil and calm.)

A new business, of course, often doesn’t have this luxury. You may need to deal with a few unpleasant clients. However, always be firm about getting paid – don’t work for free or get scammed out of money!

Getting the Word Out

Whether you have no advertising budget or are willing to spare any expense, you should have at least a few options. Social media, directories, portfolios and email marketing are often free – so start there if you don’t know what to do. Now that you know how to advertise your design business, which of these methods will you use?


Awaken Akira pays tribute to an animated classic

Original Source: http://feedproxy.google.com/~r/CreativeBloq/~3/LTNE124JLkA/awaken-akira-pays-tribute-to-an-animated-classic

It's almost 30 years since Katsuhiro Otomo's Akira was released in Japan on 16 July 1988. Otomo's epic animated tale of teenage biker gangs and rampant genetic mutations in post-apocalyptic Neo-Tokyo took another three years to make it to the West, but once it arrived it quickly became a cult hit and is largely responsible for bringing the word 'manga' to Western vocabularies.

How to colour your manga art like a pro

Akira's notable for its insanely smooth and detailed hand-drawn animation, giving it an almost CG look years before actual CG animation became the norm. And while talk of a live action remake of Akira keeps cropping up, so far it's yet to materialise.

So for now we'll just have to make do with Awaken Akira, an amazing CG tribute created by a couple of dedicated Akira fans, Ash Thorp and Zaoeyo (XiaoLin Zeng).

Awaken Akira only lasts a minute – and that's including the credits – but it's a glorious taster of a dream Akira remake that we'd love to see in full. It took Thorp and Zaoeyo a year to make, fitting in work on it between other commitments, and demonstrates a similar attention to detail to that which you'll see in the original animated film.

Tetsuo!

Awaken Akira comes across like a teaser trailer or taster reel; rather than replicate action from the film, it instead recreates a selection of key shots from the film in CG, focusing on locations and items rather than the characters. It does an incredible job of conjuring up the flavour and atmosphere of Otomo's iconic original, and the enterprise is lent further impact with a score by Pilotpriest that echoes the original soundtrack superbly.

If you're keen to see how Thorp and Zaoeyo did it, they've thoughtfully collected a number of their processes into a YouTube playlist, showcasing and explaining their techniques over the course of 26 in-depth videos.

Kaneda!

The sheer amount of work that's gone into creating this minute of video gives you a whole new appreciation of the effort that Katsuhiro Otomo and his team must have put into animating the original film. 

It's a beautiful love letter to an animated classic, and even if it's all over just a little too quickly, it's just the incentive to dig out your DVD or Blu-Ray and watch the original again. Enjoy!

How to draw manga charactersThe 27 greatest animated music videos6 manga artists to watch out for

Building A Serverless Contact Form For Your Static Site

Original Source: https://www.smashingmagazine.com/2018/05/building-serverless-contact-form-static-website/

Building A Serverless Contact Form For Your Static Site

Building A Serverless Contact Form For Your Static Site

Brian Holt

2018-05-02T18:30:17+02:00
2018-05-02T17:49:19+00:00

Static site generators provide a fast and simple alternative to Content Management Systems (CMS) like WordPress. There’s no server or database setup, just a build process and simple HTML, CSS, and JavaScript. Unfortunately, without a server, it’s easy to hit their limits quickly. For instance, in adding a contact form.

With the rise of serverless architecture adding a contact form to your static site doesn’t need to be the reason to switch to a CMS anymore. It’s possible to get the best of both worlds: a static site with a serverless back-end for the contact form (that you don’t need to maintain). Maybe best of all, in low-traffic sites, like portfolios, the high limits of many serverless providers make these services completely free!

In this article, you’ll learn the basics of Amazon Web Services (AWS) Lambda and Simple Email Service (SES) APIs to build your own static site mailer on the Serverless Framework. The full service will take form data submitted from an AJAX request, hit the Lambda endpoint, parse the data to build the SES parameters, send the email address, and return a response for our users. I’ll guide you through getting Serverless set up for the first time through deployment. It should take under an hour to complete, so let’s get started!
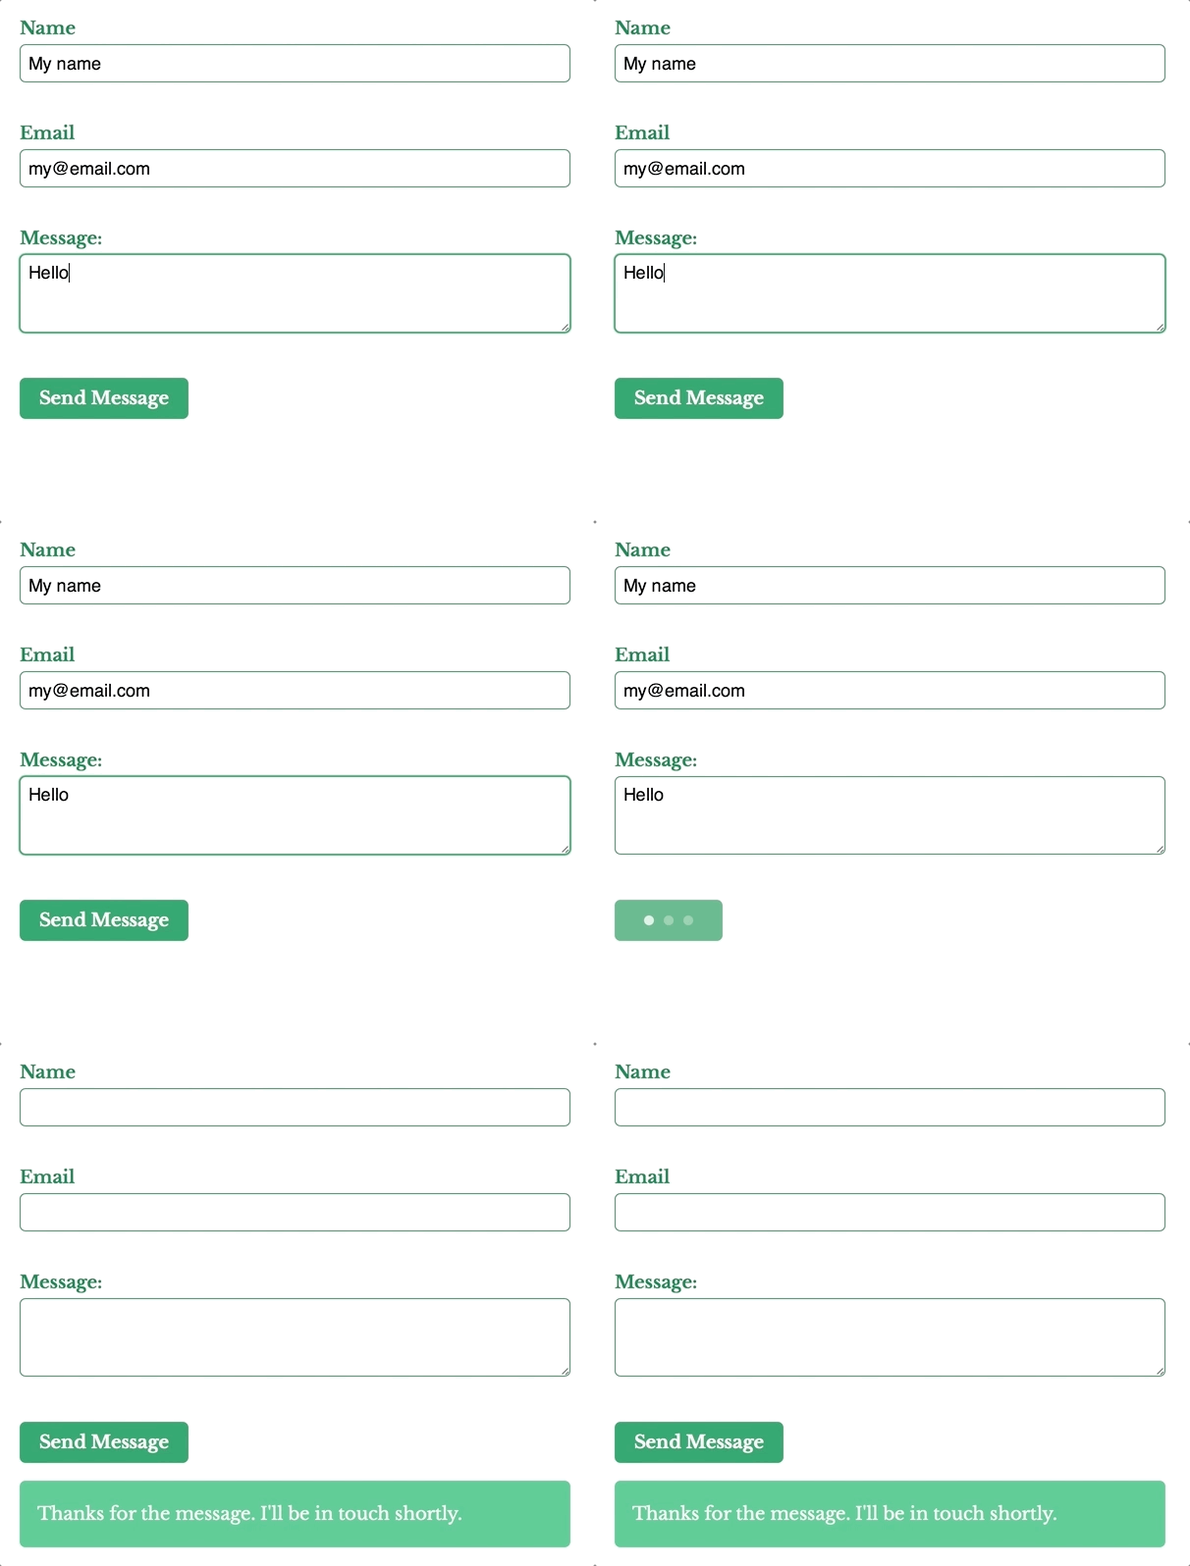
The static site form, sending the message to the Lambda endpoint and returning a response to the user.The static site form, sending the message to the Lambda endpoint and returning a response to the user.

Nope, we can’t do any magic tricks, but we have articles, books and webinars featuring techniques we all can use to improve our work. Smashing Members get a seasoned selection of magic front-end tricks — e.g. live designing sessions and perf audits, too. Just sayin’! 😉

Explore Smashing Wizardry →

Smashing Cat, just preparing to do some magic stuff.

Setting Up

There are minimal prerequisites in getting started with Serverless technology. For our purposes, it’s simply a Node Environment with Yarn, the Serverless Framework, and an AWS account.

Setting Up The Project
The Serverless Framework web site. Useful for installation and documentation.

The Serverless Framework web site. Useful for installation and documentation.

We use Yarn to install the Serverless Framework to a local directory.

Create a new directory to host the project.
Navigate to the directory in your command line interface.
Run yarn init to create a package.json file for this project.
Run yarn add serverless to install the framework locally.
Run yarn serverless create –template aws-nodejs –name static-site-mailer to create a Node service template and name it static-site-mailer.

Our project is setup but we won’t be able to do anything until we set up our AWS services.

Setting Up An Amazon Web Services Account, Credentials, And Simple Email Service

The Amazon Web Services sign up page, which includes a generous free tier, enabling our project to be entirely free.

The Amazon Web Services sign up page, which includes a generous free tier, enabling our project to be entirely free.

The Serverless Framework has recorded a video walk-through for setting up AWS credentials, but I’ve listed the steps here as well.

Sign Up for an AWS account or log in if you already have one.
In the AWS search bar, search for “IAM”.
On the IAM page, click on “Users” on the sidebar, then the “Add user” button.
On the Add user page, give the user a name – something like “serverless” is appropriate. Check “Programmatic access” under Access type then click next.
On the permissions screen, click on the “Attach existing policies directly” tab, search for “AdministratorAccess” in the list, check it, and click next.
On the review screen you should see your user name, with “Programmatic access”, and “AdministratorAccess”, then create the user.
The confirmation screen shows the user “Access key ID” and “Secret access key”, you’ll need these to provide the Serverless Framework with access. In your CLI, type yarn sls config credentials –provider aws –key YOUR_ACCESS_KEY_ID –secret YOUR_SECRET_ACCESS_KEY, replacing YOUR_ACCESS_KEY_ID and YOUR_SECRET_ACCESS_KEY with the keys on the confirmation screen.

Your credentials are configured now, but while we’re in the AWS console let’s set up Simple Email Service.

Click Console Home in the top left corner to go home.
On the home page, in the AWS search bar, search for “Simple Email Service”.
On the SES Home page, click on “Email Addresses” in the sidebar.
On the Email Addresses listing page, click the “Verify a New Email Address” button.
In the dialog window, type your email address then click “Verify This Email Address”.
You’ll receive an email in moments containing a link to verify the address. Click on the link to complete the process.

Now that our accounts are made, let’s take a peek at the Serverless template files.

Setting Up The Serverless Framework

Running serverless create creates two files: handler.js which contains the Lambda function, and serverless.yml which is the configuration file for the entire Serverless Architecture. Within the configuration file, you can specify as many handlers as you’d like, and each one will map to a new function that can interact with other functions. In this project, we’ll only create a single handler, but in a full Serverless Architecture, you’d have several of the various functions of the service.
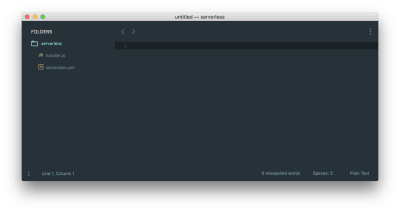
The default file structure generated from the Serverless Framework containing handler.js and serverless.yml.

The default file structure generated from the Serverless Framework containing handler.js and serverless.yml.

In handler.js, you’ll see a single exported function named hello. This is currently the main (and only) function. It, along with all Node handlers, take three parameters:

event
This can be thought of as the input data for the function.
context object
This contains the runtime information of the Lambda function.
callback
An optional parameter to return information to the caller.

// handler.js

‘use strict’;

module.exports.hello = (event, context, callback) => {
const response = {
statusCode: 200,
body: JSON.stringify({
message: ‘Go Serverless v1.0! Your function executed successfully!’,
input: event,
}),
};

callback(null, response);
};

At the bottom of hello, there’s a callback. It’s an optional argument to return a response, but if it’s not explicitly called, it will implicitly return with null. The callback takes two parameters:

Error error
For providing error information for when the Lambda itself fails. When the Lambda succeeds, null should be passed into this parameter.
Object result
For providing a response object. It must be JSON.stringify compatible. If there’s a parameter in the error field, this field is ignored.

Our static site will send our form data in the event body and the callback will return a response for our user to see.

In serverless.yml you’ll see the name of the service, provider information, and the functions.

# serverless.yml

service: static-site-mailer

provider:
name: aws
runtime: nodejs6.10

functions:
hello:
handler: handler.hello

How the function names in serverless.yml map to handler.js.

How the function names in serverless.yml map to handler.js.

Notice the mapping between the hello function and the handler? We can name our file and function anything and as long as it maps to the configuration it will work. Let’s rename our function to staticSiteMailer.

# serverless.yml

functions:
staticSiteMailer:
handler: handler.staticSiteMailer

// handler.js

module.exports.staticSiteMailer = (event, context, callback) => {

};

Lambda functions need permission to interact with other AWS infrastructure. Before we can send an email, we need to allow SES to do so. In serverless.yml, under provider.iamRoleStatements add the permission.

# serverless.yml

provider:
name: aws
runtime: nodejs6.10
iamRoleStatements:
– Effect: “Allow”
Action:
– “ses:SendEmail”
Resource: [“*”]

Since we need a URL for our form action, we need to add HTTP events to our function. In serverless.yml we create a path, specify the method as post, and set CORS to true for security.

functions:
staticSiteMailer:
handler: handler.staticSiteMailer
events:
– http:
method: post
path: static-site-mailer
cors: true

Our updated serverless.yml and handler.js files should look like:

# serverless.yml

service: static-site-mailer

provider:
name: aws
runtime: nodejs6.10

functions:
staticSiteMailer:
handler: handler.staticSiteMailer
events:
– http:
method: post
path: static-site-mailer
cors: true

provider:
name: aws
runtime: nodejs6.10
iamRoleStatements:
– Effect: “Allow”
Action:
– “ses:SendEmail”
Resource: [“*”]

// handler.js

‘use strict’;

module.exports.staticSiteMailer = (event, context, callback) => {
const response = {
statusCode: 200,
body: JSON.stringify({
message: ‘Go Serverless v1.0! Your function executed successfully!’,
input: event,
}),
};

callback(null, response);
};

Our Serverless Architecture is setup, so let’s deploy it and test it. You’ll get a simple JSON response.

yarn sls deploy –verbose
yarn sls invoke –function staticSiteMailer

{
“statusCode”: 200,
“body”: “{“message”:”Go Serverless v1.0! Your function executed successfully!”,”input”:{}}”
}

The return response from invoking our brand new serverless function.

The return response from invoking our brand new serverless function.

Creating The HTML Form

Our Lambda function input and form output need to match, so before we build the function we’ll build the form and capture its output. We keep it simple with name, email, and message fields. We’ll add the form action once we’ve deployed our serverless architecture and got our URL, but we know it will be a POST request so we can add that in. At the end of the form, we add a paragraph tag for displaying response messages to the user which we’ll update on the submission callback.

<form action=”{{ SERVICE URL }}” method=”POST”>
<label>
Name
<input type=”text” name=”name” required>
</label>
<label>
Email
<input type=”email” name=”reply_to” required>
</label>
<label>
Message:
<textarea name=”message” required></textarea>
</label>
<button type=”submit”>Send Message</button>
</form>
<p id=”js-form-response”></p>

To capture the output we add a submit handler to the form, turn our form parameters into an object, and send stringified JSON to our Lambda function. In the Lambda function we use JSON.parse() to read our data. Alternatively, you could use jQuery’s Serialize or query-string to send and parse the form parameters as a query string but JSON.stringify() and JSON.parse() are native.

(() => {
const form = document.querySelector(‘form’);
const formResponse = document.querySelector(‘js-form-response’);

form.onsubmit = e => {
e.preventDefault();

// Prepare data to send
const data = {};
const formElements = Array.from(form);
formElements.map(input => (data[input.name] = input.value));

// Log what our lambda function will receive
console.log(JSON.stringify(data));
};
})();

Go ahead and submit your form then capture the console output. We’ll use it in our Lambda function next.
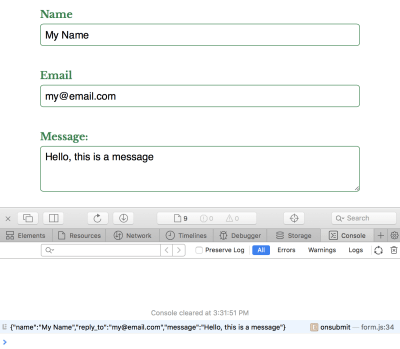
Capturing the form data in a console log.

Capturing the form data in a console log.

Invoking Lambda Functions

Especially during development, we need to test our function does what we expect. The Serverless Framework provides the invoke and invoke local command to trigger your function from live and development environments respectively. Both commands require the function name passed through, in our case staticSiteMailer.

yarn sls invoke local –function staticSiteMailer

To pass mock data into our function, create a new file named data.json with the captured console output under a body key within a JSON object. It should look something like:

// data.json

{
“body”: “{“name”: “Sender Name”,”reply_to”: “sender@email.com”,”message”: “Sender message”}”
}

To invoke the function with the local data, pass the –path argument along with the path to the file.

yarn sls invoke local –function staticSiteMailer –path data.json

An updated return response from our serverless function when we pass it JSON data.

An updated return response from our serverless function when we pass it JSON data.

You’ll see a similar response to before, but the input key will contain the event we mocked. Let’s use our mock data to send an email using Simple Email Service!

Sending An Email With Simple Email Service

We’re going to replace the staticSiteMailer function with a call to a private sendEmail function. For now you can comment out or remove the template code and replace it with:

// hander.js

function sendEmail(formData, callback) {
// Build the SES parameters
// Send the email
}

module.exports.staticSiteMailer = (event, context, callback) => {
const formData = JSON.parse(event.body);

sendEmail(formData, function(err, data) {
if (err) {
console.log(err, err.stack);
} else {
console.log(data);
}
});
};

First, we parse the event.body to capture the form data, then we pass it to a private sendEmail function. sendEmail is responsible for sending the email, and the callback function will return a failure or success response with err or data. In our case, we can simply log the error or data since we’ll be replacing this with the Lambda callback in a moment.

Amazon provides a convenient SDK, aws-sdk, for connecting their services with Lambda functions. Many of their services, including SES, are part of it. We add it to the project with yarn add aws-sdk and import it into the top the handler file.

// handler.js

const AWS = require(‘aws-sdk’);
const SES = new AWS.SES();

In our private sendEmail function, we build the SES.sendEmail parameters from the parsed form data and use the callback to return a response to the caller. The parameters require the following as an object:

Source
The email address SES is sending from.
ReplyToAddresses
An array of email addresses added to the reply to the field in the email.
Destination
An object that must contain at least one ToAddresses, CcAddresses, or BccAddresses. Each field takes an array of email addresses that correspond to the to, cc, and bcc fields respectively.
Message
An object which contains the Body and Subject.

Is your pattern library up to date today? Alla Kholmatova has just finished a fully fledged book on Design Systems and how to get them right. With common traps, gotchas and the lessons she learned. Hardcover, eBook. Just sayin’.

Table of Contents →

Since formData is an object we can call our form fields directly like formData.message, build our parameters, and send it. We pass your SES-verified email to Source and Destination.ToAddresses. As long as the email is verified you can pass anything here, including different email addresses. We pluck our reply_to, message, and name off our formData object to fill in the ReplyToAddresses and Message.Body.Text.Data fields.

// handler.js
function sendEmail(formData, callback) {
const emailParams = {
Source: ‘your_email@example.com’, // SES SENDING EMAIL
ReplyToAddresses: [formData.reply_to],
Destination: {
ToAddresses: [‘your_email@example.com’], // SES RECEIVING EMAIL
},
Message: {
Body: {
Text: {
Charset: ‘UTF-8’,
Data: `${formData.message}nnName: ${formData.name}nEmail: ${formData.reply_to}`,
},
},
Subject: {
Charset: ‘UTF-8’,
Data: ‘New message from your_site.com’,
},
},
};

SES.sendEmail(emailParams, callback);
}

SES.sendEmail will send the email and our callback will return a response. Invoking the local function will send an email to your verified address.

yarn sls invoke local –function testMailer –path data.json

The return response from SES.sendEmail when it succeeds.

The return response from SES.sendEmail when it succeeds.

Returning A Response From The Handler

Our function sends an email using the command line, but that’s not how our users will interact with it. We need to return a response to our AJAX form submission. If it fails, we should return an appropriate statusCode as well as the err.message. When it succeeds, the 200 statusCode is sufficient, but we’ll return the mailer response in the body as well. In staticSiteMailer we build our response data and replace our sendEmail callback function with the Lambda callback.

// handler.js

module.exports.staticSiteMailer = (event, context, callback) => {
const formData = JSON.parse(event.body);

sendEmail(formData, function(err, data) {
const response = {
statusCode: err ? 500 : 200,
headers: {
‘Content-Type’: ‘application/json’,
‘Access-Control-Allow-Origin’: ‘https://your-domain.com’,
},
body: JSON.stringify({
message: err ? err.message : data,
}),
};

callback(null, response);
});
};

Our Lambda callback now returns both success and failure messages from SES.sendEmail. We build the response with checks if err is present so our response is consistent. The Lambda callback function itself passes null in the error argument field and the response as the second. We want to pass errors onwards, but if the Lambda itself fails, its callback will be implicitly called with the error response.

In the headers, you’ll need to replace Access-Control-Allow-Origin with your own domain. This will prevent any other domains from using your service and potentially racking up an AWS bill in your name! And I don’t cover it in this article, but it’s possible to set-up Lambda to use your own domain. You’ll need to have an SSL/TLS certificate uploaded to Amazon. The Serverless Framework team wrote a fantastic tutorial on how to do so.

Invoking the local function will now send an email and return the appropriate response.

yarn sls invoke local –function testMailer –path data.json

The return response from our serverless function, containing the SES.sendEmail return response in the body.

The return response from our serverless function, containing the SES.sendEmail return response in the body.

Calling The Lambda Function From The Form

Our service is complete! To deploy it run yarn sls deploy -v. Once it’s deployed you’ll get a URL that looks something like https://r4nd0mh45h.execute-api.us-east-1.amazonaws.com/dev/static-site-mailer which you can add to the form action. Next, we create the AJAX request and return the response to the user.

(() => {
const form = document.querySelector(‘form’);
const formResponse = document.querySelector(‘js-form-response’);

form.onsubmit = e => {
e.preventDefault();

// Prepare data to send
const data = {};
const formElements = Array.from(form);
formElements.map(input => (data[input.name] = input.value));

// Log what our lambda function will receive
console.log(JSON.stringify(data));

// Construct an HTTP request
var xhr = new XMLHttpRequest();
xhr.open(form.method, form.action, true);
xhr.setRequestHeader(‘Accept’, ‘application/json; charset=utf-8’);
xhr.setRequestHeader(‘Content-Type’, ‘application/json; charset=UTF-8’);

// Send the collected data as JSON
xhr.send(JSON.stringify(data));

// Callback function
xhr.onloadend = response => {
if (response.target.status === 200) {
// The form submission was successful
form.reset();
formResponse.innerHTML = ‘Thanks for the message. I’ll be in touch shortly.’;
} else {
// The form submission failed
formResponse.innerHTML = ‘Something went wrong’;
console.error(JSON.parse(response.target.response).message);
}
};
};
})();

In the AJAX callback, we check the status code with response.target.status. If it’s anything other than 200 we can show an error message to the user, otherwise let them know the message was sent. Since our Lambda returns stringified JSON we can parse the body message with JSON.parse(response.target.response).message. It’s especially useful to log the error.

You should be able to submit your form entirely from your static site!

The static site form, sending the message to the Lambda endpoint and returning a response to the user.The static site form, sending the message to the Lambda endpoint and returning a response to the user.

Next Steps

Adding a contact form to your static is easy with the Serverless Framework and AWS. There’s room for improvement in our code, like adding form validation with a honeypot, preventing AJAX calls for invalid forms and improving the UX if the response, but this is enough to get started. You can see some of these improvements within the static site mailer repo I’ve created. I hope I’ve inspired you to try out Serverless yourself!

Smashing Editorial
(lf, ra, il)

Is The Tor Browser Illegal?: What You Need to Know

Original Source: http://feedproxy.google.com/~r/Designrfix/~3/6FXF-P7m1oU/is-the-tor-browser-illegal-what-you-need-to-know

The Tor Browser has been in the news for the past few weeks with people looking for reassurance that Tor Browser lets them browse anonymously and safely. The biggest question on everyone’s mind right now – is Tor illegal? Could we be in trouble if we use Tor Browser to access the dark web links? […]

The post Is The Tor Browser Illegal?: What You Need to Know appeared first on designrfix.com.