Coronavirus-Olympics mash-up sparks outrage

Original Source: http://feedproxy.google.com/~r/CreativeBloq/~3/syAPJhNoqZw/tokyo-2020-parody-magazine-cover

It's been a tough year for the Olympic Games, with Tokyo 2020 becoming the first in history to be postponed. And now adding insult to injury is a magazine cover which, with a few minor tweaks, has turned the Tokyo 2020 emblem into the structure of coronavirus. 

The image appears on the cover of the April edition of the Foreign Correspondents Club of Japan's (FCCP) magazine, Number 1 Shimbun. And while subversive images are mainstay of magazine covers (many of our best print ads will make you double take), the Tokyo 2020 team believe the FCCP has gone too far.

Number 1 Shimbun cover

The offending design

"It is very disappointing to see the games emblem being distorted and associated with the novel coronavirus," Tokyo 2020, spokesman Masa Takaya told insidethegames, "The design is clearly using the design of the Olympic emblem."

The cover is the work of British designer Andrew Pothecary, the magazine's art director. According to The Asahi Shimbun, Pothecary refers to the design as a parody, which was intended "to make a powerful statement about the situation in Japan in light of the fact information related to the coronavirus pandemic keeps changing daily."

If you ask us, Pothecary's "powerful statement" isn't particularly apparent in the design, which leaves it looking rather crass. We're no strangers to controversial magazine covers, but the most successful efforts tend to get away with said controversy by balancing it with a clear message. Without one, Number 1 Shimbun's cover seems a little flippant – not a great look during a global pandemic.

Logos for Tokyo Olympics and Paralympics

The official Tokyo 2020 emblems were chosen from thousands of submissions

Tokyo 2020 has called the cover an infringement on its "legally secured copyright to the Tokyo 2020 Olympic emblem," although it isn't clear whether it is seeking legal action. Interestingly, it seems the FCCP will be addressing the controversy in an online press conference tomorrow. Perhaps we'll even hear an apology then. 

As well as the unenviable organisational headache caused by the postponement of the games, the marketing and design repercussions have led to some confusing messaging, such as the decision not to design a new logo despite the new 2021 date. NBC then decided to update its own, turning it into a real head-scratcher. Hopefully the games will go ahead as planned next year, putting an end to Tokyo 2020's woes.

Read more:

New Olympic museum logo is pure design goldTokyo 2020 Olympic posters are a delightfully eclectic mixWhere to find logo design inspiration

FRISKA – Fresh Packaging Design for your Digestive Health

Original Source: http://feedproxy.google.com/~r/abduzeedo/~3/n47xUNoEWHQ/friska-fresh-packaging-design-your-digestive-health

FRISKA – Fresh Packaging Design for your Digestive Health
FRISKA - Fresh Packaging Design for your Digestive Health

abduzeedo05.19.20

Today we want to talk about your wellbeing. You’ve heard me talk about breathing techniques in the past but today I want to focus on another trending topic known as your gut health and a new brand that just launched called FRISKA. FRISKA is a family of breakthrough digestive enzymes aimed at achieving better overall health through improved gut health, something we could all use a little more of these days! FRISKA founder John Peine spent over a decade in the retail industry, most recently leading the Healthcare division at Target so he knows how critically important it is for products to have high quality and FRISKA is poised to be the best in the market. The modern design is complemented with best-in-class content creation from Finn & Gray

We were able to grab a few moments with Sally Clarke, the creative jedi-master behind FRISKA. Sally has played a key role in some of the most relevant brands in the consumer landscape, most notably as creative director at method.

“The digestive dietary supplement category is a sea of white bottles, complicated terms, and an arms race of CFU numbers, a unit used in microbiology to estimate the number of viable bacteria or fungal cells in a sample,” said Clarke. “We wanted to create a brand that communicates simply but smartly, focuses on the end benefits, and fits in with a busy, modern lifestyle.”

According to Clarke, the packaging design was inspired by beauty and personal care products. Each product is a rich, bright matte single color with a streamlined gold FRISKA logo and simple messaging. We’ve used a deep cobalt blue as the primary brand color, inspired by the beautiful blue of the glass bottles the capsules are contained in and minimized the use of plastics by using a paperboard tube as the exterior. 

“We want FRISKA to live alongside your beauty products instead of being relegated to the medicine cabinet.” – Sally Clarke, FRISKA Creative Director 

The modern design is complemented with best-in-class content creation from Finn & Gray, a Minnesota creative design studio focusing on brand identities, web design, and photography. Finn & Gray was founded by marketing veterans Ami Kochendorfer and Amanda Nagy and is making its foray onto the scene with the launch of FRISKA. You can get a little behind-the-scenes peak into their process for FRISKA via their Instagram here. 

FRISKA is available in the US at CVS Pharmacy, CVS.com, Whole Foods stores nationwide  as well as Amazon. To learn more about the brand check their site here or give the brand a follow here @get_friska.


How to Use jQuery’s $.ajax() for Asynchronous HTTP Requests

Original Source: https://www.sitepoint.com/use-jquerys-ajax-function/?utm_source=rss

How to Use jQuery's $.ajax() for Asynchronous HTTP Requests

Nowadays, developers tend to move away from jQuery and its handy methods for DOM manipulation and Ajax requests that made it hugely popular. Regarding the Ajax requests, the Fetch API, or alternatively, the Axios library, are now more popular tools for performing asynchronous operations. That said, jQuery is still very much alive and powers almost 70,000 websites worldwide. This means that knowing how to use jQuery is still valuable in the day-to-day work of developers, like supporting legacy codebases or maintaining projects that use jQuery as an important dependency.

Ajax is a technology that allows developers to make asynchronous HTTP requests without the need for a full page refresh. To make the process less cumbersome than it would be in pure JavaScript, devs have been using the jQuery library for years. In my article An Introduction to jQuery’s Shorthand Ajax Methods, I discussed some of jQuery’s most-used Ajax shorthand methods: $.get(), $.post(), and $.load(). They are convenient methods for making Ajax requests in a few lines of code.

Sometimes, we need more control over the Ajax calls we want to make. For example, we want to specify what should happen in case an Ajax call fails or we need to perform an Ajax request but its result is only needed if retrieved within a certain amount of time. In such situations, we can rely on another function provided by jQuery, called $.ajax(), that is the topic of this tutorial.

The $.ajax() Function

The jQuery $.ajax() function is used to perform an asynchronous HTTP request. It was added to the library a long time ago, existing since version 1.0. The $.ajax() function is what every function discussed in the previously mentioned article calls behind the scene using a preset configuration. The signatures of this function are shown below:

$.ajax(url[, settings])
$.ajax([settings])

The url parameter is a string containing the URL you want to reach with the Ajax call, while settings is an object literal containing the configuration for the Ajax request.

In its first form, this function performs an Ajax request using the url parameter and the options specified in settings. In the second form, the URL is specified in the settings parameter, or can be omitted, in which case the request is made to the current page.

The list of the options accepted by this function, described in the next section, is very long, so I’ll keep their description short. In case you want to study their meaning in depth, you can refer to the official documentation of $.ajax().

The settings Parameter

There are a lot of different options you can specify to bend $.ajax() to your needs. In the list below you can find their names and their description sorted in alphabetic order:

accepts: The content type sent in the request header that tells the server what kind of response it will accept in return.
async: Set this option to false to perform a synchronous request.
beforeSend: A pre-request callback function that can be used to modify the jqXHR object before it is sent.
cache: Set this option to false to force requested pages not to be cached by the browser.
complete: A function to be called when the request finishes (after success and error callbacks are executed).
contents: An object that determines how the library will parse the response.
contentType: The content type of the data sent to the server.
context: An object to use as the context (this) of all Ajax-related callbacks.
converters: An object containing dataType-to-dataType converters.
crossDomain: Set this property to true to force a cross-domain request (such as JSONP) on the same domain.
data: The data to send to the server when performing the Ajax request.
dataFilter: A function to be used to handle the raw response data of XMLHttpRequest.
dataType: The type of data expected back from the server.
error: A function to be called if the request fails.
global: Whether to trigger global Ajax event handlers for this request.
headers: An object of additional headers to send to the server.
ifModified: Set this option to true if you want to force the request to be successful only if the response has changed since the last request.
isLocal: Set this option to true if you want to force jQuery to recognize the current environment as “local”.
jsonp: A string to override the callback function name in a JSONP request.
jsonpCallback: Specifies the callback function name for a JSONP request.
mimeType: A string that specifies the mime type to override the XHR mime type.
password: A password to be used with XMLHttpRequest in response to an HTTP access authentication request.
processData: Set this option to false if you don’t want the data passed in to the data option (if not a string already) to be processed and transformed into a query string.
scriptAttrs: Defines an object with additional attributes to be used in a “script” or “jsonp” request.
scriptCharset: Sets the charset attribute on the script tag used in the request but only applies when the “script” transport is used.
statusCode: An object of numeric HTTP codes and functions to be called when the response has the corresponding code.
success: A function to be called if the request succeeds.
timeout: A number that specifies a timeout (in milliseconds) for the request.
traditional: Set this to true if you wish to use the traditional style of param serialization.
type: The type of request to make, which can be either “POST” or “GET”.
url: A string containing the URL to which the request is sent.
username: A username to be used with XMLHttpRequest in response to an HTTP access authentication request.
xhr: A callback for creating the XMLHttpRequest object.
xhrFields: An object to set on the native XHR object.

That’s a pretty long list, isn’t it? Well, as a developer, you probably stopped reading this list at the fifth or sixth element I guess, but that’s fine. The next section will be more exciting, because we’ll put the $.ajax() function and some of these options into action.

Continue reading
How to Use jQuery’s $.ajax() for Asynchronous HTTP Requests
on SitePoint.

Simple Strategies for Winning the Positions Other Developers Want

Original Source: https://www.sitepoint.com/getting-jobs-other-web-developers-want/?utm_source=rss

Simple strategies for getting positions other developers want

How do they do it?

“How is [insert developer name] able to attract the promotions and job offers they’re getting? Their work is trash; I’m a much better developer! I work twice as hard, write better code, and produce 2x more work than they do? This is completely unfair.”

You’re right, it is unfair.

This is a serious career problem, assuming that you’ve made an accurate assumption about your skills and performance. Seriously, what gives?

Why most developers optimize for the wrong goal

It’s a common mistake made by many employees in general. Here’s a quote from Reddit user Myidiotbox that encapsulates both the attitude of many employees and the response they receive in return.

Card

This is the unspoken attitude lurking beneath for many people.

“I’m working really hard so I deserve X. I did my job well so I want Y.”

Here’s the problem with this attitude.

It takes you further away from the goals you want (such as being treated well, making more money, achieving significance, and so on). This perception is the primary reason so many developers fail to achieve the career goals they aspire to.

Here are the goals (if you can call them that) a healthy employer looks for.

Can I count on this developer to deliver amazing work consistently?
Is this developer loyal or will he betray me and jump ship as soon as he gets the chance?
How easy is it to replace these developers?
Could I replace them if they left?
How long would it take and how much would it cost me?
This developer is killing it, how do I help them produce more amazing work?

See the problem?

There’s a mismatch here. The vast majority of people are struggling with Dunning-Kruger effect and are prone to overestimate their competence. They believe they’re doing a better job relative to their peers.

But they’re not.

Here’s why this is an issue. This mismatched thinking puts you at odds with your employer. This creates significant problems down the line, too, because it turns employees (you) in to mercenaries over time.

If this sounds harsh, it’s not intended to be.

Here are some simple strategies web developers can use to attract the positions other developers want with minimal effort.

Strategy #1: Become a patriot, stay a patriot

In 2013, Gallup worked with then Nationwide CEO Steve Rasmussen to improve employee engagement. In the course of their relationship, Rasmussen shared a surprising observation.

Employees are either patriots or mercenaries.

Not because they want to be but because they have to be.

Patriots totally identify with their company, and mercenaries are more likely to focus on personal outcomes.

Patriot employees are engaged. They have ownership, they believe in their firm and their firm believes in them. Instead of looking out for themselves, they’re focused on looking out for their firm.

On the other hand, mercenaries are focused on themselves. They tend to rely on serial job-hopping, power hoarding, and social climbing to get what they want. Mercenaries are focused on getting as much value as they can for themselves; they don’t care much about their company.

It’s no surprise then that they’re disengaged.

If the interests of the firm happen to align with their own interests, they’ll do what’s best for the firm. But they’re not really focused on putting their firm ahead of themselves.

Most of the time they can’t.

Why? Because their employer is a mercenary: these employers are focused on squeezing as much value as they can out of their employees. Then, they’re tossed aside once they’re burned out and used up.

You’ll want to stay a patriot.

This means you continue to buy in to your company’s vision. You continue to believe in your employer or co-workers and you look out for them. The instant you can’t do that, you start looking for another job. Here’s why it’s important to remain a patriot.

Intention has a smell.

The exceptional opportunities, benefits, and rewards go overwhelmingly to people who like, trust, and believe in you. These people can smell your intentions, partially due to the fact that humans communicate chemically.

Additionally, there’s a certain kind of tone, inflection, attention, and posture that’s communicated when we’re actually interested and engaged in something. If you’re like most humans on planet Earth, you know what that looks like. The better you are at remaining invested in your employer and co-workers — helping them solve tough problems, sticking with them through bad times — the easier it is win these coveted positions.

Continue reading
Simple Strategies for Winning the Positions Other Developers Want
on SitePoint.

This Week In Web Design – May 1, 2020

Original Source: http://feedproxy.google.com/~r/1stwebdesigner/~3/X8JwIud60Fc/

Can you believe it’s May already? Not only is it a new month, but it’s the first Friday of the new calendar page, and Fridays around here mean it’s time for another edition of “This Week In Web Design”! Every week we scan the internet for newly published articles related to web design and development, then bring them here to you all in one spot. This week in web design and development we’ve found new articles about various CSS tricks and tutorials, WordPress, fonts, React, some JavaScript frameworks, and more. Let’s dive in!

The UX Designer Toolbox

Unlimited Downloads: 500,000+ Wireframe & UX Templates, UI Kits & Design Assets
Starting at only $16.50 per month!


DOWNLOAD NOW


SVG, Favicons, and All the Fun Things We Can Do With Them

One very new trick is the ability to use SVG as a favicon. It’s something that most modern browsers support, with more support on the way.

How to Make a CSS-Only Carousel

There’s no JavaScript here, whatsoever! No jQuery plugins. No trickiness. Just a couple of new-ish CSS properties.

Best of the web for Design and Web Development April 2020

This is another great roundup certainly worth reading through to conclude April.

How to Pick a Font (For Any Design): 10 Tips & Principles

Some timeless rules you can follow when deciding how to pick a font.

Spread the Word: Beautiful Testimonial UI Examples

Take a look at some examples that will give your testimonials a place to shine.

Latest Research for Web Designers April 2020

A variety of topics, from 2020 holiday shopping predictions to missed opportunities in SEO.

Speed Up WordPress With a Free Performance Plugin

How to install and configure the WP-Optimize plugin and explain how it will help speed up your WordPress website.

Getting Started With Nuxt

Learn how to create server-side rendered applications by using Nuxt.js, how to configure your application for development, and how to deploy to Heroku.

18 Free & Premium Business Icon Sets

Free & premium business icon sets that take the guesswork out of what collections are best and allows you to focus more on building an effective site.

Variable Fonts: A 101 Introduction (+ Free Variable Fonts to Try)

If you’re still wondering what these variable fonts really are, we’ll help you get a basic understanding of it.

30 Stunning Examples of Drop-Down Menu Design

This drop down menu design inspiration will hopefully help your brainstorming process speed up.

Morphing Gooey Text Hover Effect

Three gooey morphing hover effects using SVG filters for menu links based on a demo by Graham Pyne.

How To Change The Excerpt Length In WordPress (With And Without A Plugin)

In certain situations you may wish to have more control of how your WordPress posts are displayed, such as changing the excerpt length. Here is how to change the excerpt length with or without a plugin.

The Most Popular List Of 30+ Web Tools And Services

We spent good time during COVID-19 to create the most popular list of 30+ web tools and services.

Implementing Dark Mode In React Apps Using styled-components

Learn how to efficiently implement dark mode in a React app on a simple web page, using the styled-components library and leveraging some React features like hooks.

Using Formik to Handle Forms in React

Start with a React component then integrate Formik while demonstrating the way it handles state, validation, and submissions.

Using Git Subtree for WordPress Projects

Why Git Subtree was necessary for my (much loved) Git Push to WP Engine deployment system.

Supercharge Your Facebook Ads: How to Add Facebook Pixel to WordPress

In this article, we’ll be exploring exactly what Facebook Pixel has to offer you.

How to Build a Simple Toggle Switch Component With the CSS Checkbox Hack

Learn how to build a CSS-only switch component by taking advantage of the “CSS checkbox hack technique”.

How to Determine a Target Market for Your Web Design Business

In today’s post we look at some items to consider when deciding where you want your web design business to go.

18 Tips to Improve Website Design Legibility

Let us see the factors that contribute to good looking and readable content.

Alpine.js: The JavaScript Framework That’s Used Like jQuery, Written Like Vue, and Inspired by TailwindCSS

It’s like a replacement for jQuery and JavaScript, but with declarative rendering.

How to Contribute to Open Source TypeScript Projects

Practical ways for you to get involved in open source TypeScript projects. We’ll first cover assessing your level then jump into how you can find opportunities.

12 Home Office Setup Ideas for Web Designers and Developers

Some of the cleanest, most comfortable, and most unique home office setup ideas for you while you work from home.

Using CSS to Control Text Selection

CSS lets you control how text selection behaves and appears on your pages.

Learn CSS min(), max(), and clamp()

Set a min and max font-size in seconds!

35 Nice Examples of Flat Web Design

For your inspiration we’ve assembled a beautiful collection of flat web designs.

Mirage JS Deep Dive: Understanding Mirage JS Models And Associations (Part 1)

Take a closer look at what Mirage JS models and associations are and the roles they play in crafting out production-ready frontend without an actual backend with Mirage JS.

How To Succeed In Wireframe Design

Learn what wireframes are, why we need to design them, how to get the most out of the designs, and how to take it to the next level.

Immersive Transition Effect

In this tutorial, we will show you how to create an immersive transition effect between sections.

The Hero Generator
How To Create Customized WordPress HTTP Error Pages

Creating a custom error page will leave a visitor fulfilled, returning later, and (hopefully) keep their shirt on.


10 Top Ecommerce Themes For WordPress In 2020

Original Source: http://feedproxy.google.com/~r/1stwebdesigner/~3/zczkWKA9Tm0/

In this collection of top ecommerce themes for WordPress we have selected 10 of the best we could find. Each theme in this list is part of the massive collection of assets on Envato Elements, so instead of having to buy each theme separately at a price of anywhere from $20-$100 apiece, you can get these themes and thousands more for a low subscription price starting at only $16.50 per month! This is just a small sample size of what’s available, so be sure to go check out the full selection to get a grasp of what a huge savings subscribing to Envato Elements can bring you.

All of these WordPress themes are responsive, easily customizable, and ready for you to quickly build your ecommerce business website. So let’s have a look!

UNLIMITED DOWNLOADS: 500,000+ WordPress & Design Assets

Sign up for Envato Elements and get unlimited downloads starting at only $16.50 per month!

DOWNLOAD NOW

Adiva – eCommerce WordPress Theme

Adiva is a unique and modern looking eCommerce Theme. It is an extremely Flexible WordPress Theme with powerful Shop functionality. All these amazing features are blended together in Adiva – a powerful, stylish and attractive responsive WordPress Theme. Compatible With Visual Composer, WooCommerce, Bootstrap.

Adiva - Best Ecommerce Themes For WordPress

GET ADIVA

Seese – Responsive eCommerce Theme

Seese offers a modern and minimal design fully focused on the products you are selling. With 5 different shop layouts (including the masonry option shown below), this ecommerce theme for WordPress is compatible with Visual Composer, WooCommerce, Bootstrap, and more.

Seese - Ecommerce Themes For WordPress

GET SEESE

EOVO – Creative & eCommerce WordPress Theme

With 3 Shop page variations and 11 Home page layouts, EOVO provides a unique and modern aesthetic in an ecommerce theme for WordPress. This responsive theme is compatible with WPML, WooCommerce, Visual Composer, Bootstrap, and more.

EOVO - Ecommerce Themes for WordPress

GET EOVO

Gem — Luxury eCommerce Responsive WordPress Theme

Gem is a clear, easy to customize template built on Warp 7 Framework with many features. This template is suitable for selling all things, such as: fashion, furniture, electronics, cosmetics, accessories. This clean and fresh looking responsive theme is compatible with WooCommerce and WPML.

Gem - Ecommerce Themes for WordPress

GET GEM

Maison – Minimalist eCommerce WordPress Theme

Maison is a modern and minimalist theme with a proper attention to the details. It was built for your furniture store, clothing store, digital store, watch store, men store, women store, accessories store, cosmetics shop, bookstore, hi-tech store, and more. With 5 home page layouts, this flexible and responsive theme is compatible with Bootstrap, Gutenberg, Visual Composer, WPBakery Page Builder, WPML, and WooCommerce.

Maison - Ecommerce Theme for WordPress

GET MAISON

Raboda – eCommerce Responsive WordPress Theme

With many great features like product quick view, ajax shopping cart, wishlist, compare, zoom, and fancybox, Raboda is a robust theme. Raboda includes 7 pre-defined home page layouts, multiple blog layouts, is powered by the Redux framework, and is compatible with Visual Composer, WPML, WooCommerce, and Bootstrap.

Raboda - Ecommerce Theme for WordPress

GET RABODA

Javenist – Multipurpose eCommerce WordPress Theme

Javenist is a bright and colorful option with 7 pre-defined home page layouts, powered by the Redux framework, multiple blog layouts, mega menu options, and much more. It is compatible with Visual Composer, WooCommerce, WPML, and Bootstrap.

Javenist - Ecommerce Theme for WordPress

GET JAVENIST

Stylista

Stylista is a clean & minimal Fashion WooCommerce WordPress Theme for online fashion stores with minimal design and focused on products. Stylista is an outstanding contemporary solution if you want to build more than just a simple WooCommerce store. Stylista is customizable and easy to use, fully responsive, Retina ready, with powerful theme options, good support and much more. This theme is well suited for a lot of e-commerce websites such as a fashion store, a clothing boutique, and more! It is compatible with Bootstrap, Gutenberg, WPBakery Page Builder, WPML, and WooCommerce.

Stylista

GET STYLISTA

Evon – Bag Store WooCommerce WordPress Theme

Evon is big, bold, modern, and completely focused on your products. With 16 home page layouts, you’re sure to find the look you’re going for in your ecommerce website. Evon is compatible with WPBakery Page Builder, WooCommerce, WPML, and Bootstrap.

Evon

GET EVON

June – Fashion WooCommerce WordPress Theme

June is a Shop Builder with Drag & Drop functionality and Front-end Editing as Live as it gets! With Premade Demos, hundreds of Blocks & Elements and a Tested & Practical Design, Build, Edit & Launch your Online Shop on the go with far fewer efforts. June comes with Best in Class UI/UX and Unmatched Shop Making Experience. Loaded with the juicy features & Best Practices of a combination of 50+ topmost Big & Small eCommerce Platforms, June is the winner when your search comes to a performing, detailed, well researched, user-friendly & intuitive Shop Building Solution. It is compatible with WPBakery Page Builder, WooCommerce, and WPML.

June

GET JUNE


Learning Resources In Challenging Times: Online Workshops, Meetups And Events

Original Source: https://www.smashingmagazine.com/2020/05/monthly-roundup-05-2020/

Learning Resources In Challenging Times: Online Workshops, Meetups And Events

Learning Resources In Challenging Times: Online Workshops, Meetups And Events

Iris Lješnjanin

2020-05-15T14:30:00+00:00
2020-05-18T19:37:39+00:00

In these current strange times of isolation and social distancing (with almost all events and conferences being cancelled), it can be quite difficult to feel connected to family, friends and colleagues. Here at Smashing, we believe that is is now more important than ever to stay in touch and support each other. Behind the scenes, the team is working tirelessly on ways to keep the community connected, and oh boy do we have a lot of things in store for you! You didn’t really think we’d give up that easily, did you?

Your workplace may look a lot like Topple’s, but even if it isn’t, make yourself comfortable! We’ll help you boost your skills online and learn practical, actionable insights from experts in the industry.

We’ve been busy over the last few weeks, and we’re not stopping yet! We have online workshops, SmashingConf Live, Smashing Meets and last but not least, Smashing TV coming right at your fingertips! But first, let’s see what else we’ve been up to…

Look What’s Cookin’!

Exciting times! Click!, our latest Smashing book, is available for pre-order with a friendly discount — you can already start reading the eBook until your printed copy arrives at your doorstep. Written by Paul Boag and beautifully designed by Veerle Pieters, the book is split into 11 chapters: from exploring the psychology of decision making and how to measure conversion to exploring ways of how to encourage users to act without alienating them.

There is no shortage of books on marketing and UX, but when it comes to bridging the gap between the two, many of us struggle to find the right balance. Pre-order today →

Of course, if you’re feeling smashing today, we’d like to invite you join the Smashing family and get the eBook for free (among with many other eBooks and a few fancy cats!).

Learning And Networking, The Smashing Way

Despite the current circumstances, we’re keen to find ways in which we can offer Smashing experiences to anyone interested in learning from experts in our industry — without needing to leave your desk! We’ve been asking what type of resources you’d like to have, and so all of the following online events is what has landed in our Smashing wishing well. Thank you to everyone who has shared their thoughts and feedback — we’ve been all ears!

1. Online Workshops (May–July)

Topple the Cat ready for the new adventureOur friendly online front-end/UX workshops are bound to boost your skills and help you gain practical, actionable insights from experts in the industry — live. There will be plenty of insightful takeaways, exercises, slides, recordings and friendly Q&A time. Of course, we’re happy to provide discounts for large groups and students.

We already have you covered for the next three months — make sure to save your spot as soon as you can:

When?
What?
Who?

May 7–22
Advanced CSS/Sass
Miriam Suzanne

May 12–26
Smart Interface Design Patterns
Vitaly Friedman

May 28 – June 12
Web Performance Masterclass
Harry Roberts

June 11–12
The CSS Layout Masterclass
Rachel Andrew

June 16–30
Front-End Accessibility Masterclass
Marcy Sutton

June 18–26
Building Modern HTML Emails
Rémi Parmentier

July 2–17
Buy! The eCommerce UX Workshop
Vitaly Friedman

July 7–21
Design Systems
Brad Frost

Note: If you’re also interested in how you too can run online workshops, listen to Smashing Podcast episode 14 with Rachel Andrew in which she talks about running online workshops and how a traditional event can adapt when participants can’t attend in person.

2. SmashingConf Live (June 9–10)

Topple the Cat sitting on a comfortable couch with a laptop on its lapMeet SmashingConf Live (June 9–10), a truly smashing, friendly online conference on front-end & UX. With interactive live sessions, practical insights, accessible speakers, collaborative notes and fireplace chats with like-minded folks. Jump to first confirmed speakers. Check schedule  →

Both days start at 8 AM PDT (check your time), with interactive sessions, followed up with a time for Q&As and discussion zones.

Ah, and the best bit: a conference in which you play an active role — taking part in live sessions, Q&As, discussion zones and challenges. To the schedule. But of course that’s not all! Be prepared for design & coding challenges, scavenger hunt and fireplace sessions with mystery guests. And to keep in style, of course we’ll throw a Smashing Party.

Do you like what you see, but are worried about getting some time off from work? Well, you surely didn’t think we would leave your hanging? We know how difficult it can sometimes be, and so we’ve prepared a neat lil’ Convince-Your-Boss template to help you out. Good luck!

3. Smashing Meets (Free)

Topple sitting next to a campfireWe’re super excited to run our very first Smashing meetup next week! We will focus on front-end and UX, but also cover all sorts of topics from performance to accessibility. Smashing Meets wouldn’t be possible without some amazing communities from around the world, so another Thank You to everyone involved!

4. Smashing TV (Free Webinar on May 19th)

Photo of Carie Fisher and Harris SchneidermanLooking for ways to help you expand your accessibility test coverage beyond automation? With very little resources, you can make a meaningful difference. Join us with Carie Fisher and Harris Schneiderman at 7:00 PM CET/1:00 PM EDT who will demonstrate the basics of automated testing and share key lessons on on maximizing your accessibility impact.

Sharing Personal Experiences And Stories

Smashing Podcast moderated by Drew McLellanWe’re moving onto our 16th episode of the Smashing Podcast next week! The Smashing Podcast is the perfect way to take a little bit of Smashing along with you on your morning walks, while washing the dishes, or anytime you like really. You can subscribe in your favorite app to get new episodes as soon as they’re ready.

Previous Smashing Podcast episodes (including transcripts)
Follow @SmashingPod on Twitter

Your Design Work Deserves Attention

Do you have artwork you’d love to share with the design community? If so, please do! We are always looking for creative talent, so if you have an idea for a wallpaper design, please don’t hesitate to submit it. Join in! →

Trending Topics On Smashing Magazine

We publish a new article every day on various topics that are current in the web industry. Here are some that our readers seemed to enjoy the most and have recommended further:

“Setting TypeScript For Modern React Projects Using Webpack And Babel”
by Blessing Krofegha
This article introduces Typescript, a superscript of JavaScript that presents the static type feature for spotting common errors as developers codes, which enhances performance, hence results in robust enterprise applications. You’ll also learn how to efficiently set up TypeScript in a React Project as we build a Money Heist Episode Picker App, exploring TypeScript, React hooks such as useReducer, useContext and Reach Router.
“A Complete Guide To Mechanical Keyboards”
by Ben Frain
How much thought have you put into your primary input device? Ever considered how much better your interface with your computer might be? In this article, we dive into the possibilities of mechanical keyboards. The different layouts, switch types and even keycap material. Strap yourself in — this will be a deep dive!
“Micro-Typography: How To Space And Kern Punctuation Marks And Other Symbols”
by Thomas Bohm
For hundreds of years, we have been using white space in typography. Today, in 2020, how do we add spacing to punctuation marks and other symbols, and how do we adjust the space on the left and right side in an easy and consistent way? It is actually not as easy and quick as it should be.
“How To Pass Data Between Components In Vue.js”
by Matt Maribojoc
With so many different ways to share data across components, you should know which technique is best for your situation. Let’s analyze three of the most common ways to pass data in VueJS.
“Reducing Design Risk”
by Eric Olive
The pressure to rush market and usability research carries risk. We’ll offer four practical techniques to mitigate this risk and create designs that better serve customers and the company: context over convenience, compromise, better design decisions, design reduction.

Best Picks From Our Newsletter

We’ll be honest: Every second week, we struggle with keeping the Smashing Newsletter issues at a moderate length — there are just so many talented folks out there working on brilliant projects! Kudos to everyone involved!

Interested in sponsoring? Feel free to check out our partnership options and get in touch with the team anytime — they’ll be sure to get back to you right away.

P.S. A huge thank you to Cosima Mielke for writing and preparing these posts!

Creating Accessible Color Palettes

Finding the perfect tint or shade of a color is not only a matter of taste but also accessibility. After all, if color contrast is lacking, a product could, in the worst case, even become unusable for people with vision impairments. A very detailed contrast checker to help you detect potential pitfalls ahead of time comes from Gianluca Gini: Geenes.

Geenes

The tool lets you tinker with hue ranges and saturation and apply the color palettes to one of three selectable UI mockups. Once applied, you can trigger different kinds of vision impairments to see how affected people see the colors and, finally, make an informed decision on the best tones for your palette. To use the colors right away, just copy and paste their code or export them to Sketch.

Command Line Love

It’s not uncommon for technical documentation to be dry and feel intimidating, especially for people who are just getting started with a new tool. That can get quite frustrating especially when a manual is difficult to read or follow, or the explanations are verbose and lack examples.

Dash Dash

Dash Dash takes the Unix (Linux, BSD, macOS) open source manual pages and sets the content in a beautiful type and layout. It provides not only explanations of all commands, but also search, examples and TL;DR sections. Also, The Art of Command Line takes you on a journey to Command Line from basics to system debugging.

And if you are up for advanced command line techniques, cmdchallenge prompts you to solve tasks with a single line of bash. (vf)

Accessible Component Libraries

While many of the component libraries we create are trying to cover all the usual suspects (the accordions, the tables, the carousels, the drop-downs, along with typography, colors and box shadows), No Style Design System by Adam Silver is focused primarily around accessibility and web forms.

Accessible Component Libraries

As a system created for and used in his book on Form Design Patterns, Adam’s library provides a set of accessible components for everything from autocomplete, checkboxes and password reveal to radios, select boxes and steppers. Most of them have a minimal CSS styling with clean, accessible markup. And if you need slightly more advanced components, Heydon Pickering’s Inclusive Components has got your back: with comprehensive tutorials on accessible cards, data tables, notifications, sliders, tabbed inerfaces, tooltips, menus and toggles. (vf)

Custom CSS Cascades

Miriam Suzanne built a demo to illustrate a very clever way to define a cascade of custom properties. One that allows you to determine which intent should take priority, without worrying about the specificity of how the value is defined.

See the Pen [Custom Cascades](https://codepen.io/smashingmag/pen/JjYawPP) by Miriam Suzanne.

See the Pen Custom Cascades by Miriam Suzanne.

Miriam shows how it works at the example of a button. Due to how the cascade is arranged, the default button is always falling back to –btn-bg–default. Adding the disabled attribute, always overrides any other button colors, no matter where they are defined, and, when new button types are created, –btn-bg–type ensures that only the defaults are overridden but not the state. The approach also lets you set these values contextually. A smart solution to avoid the usual dangers that highly-specified inline styles usually bring along.

Front-End Bookmarks

Some of us save all the useful articles and talks they come across in one ever-growing bookmark folder (which can make finding what you’re looking for quite a challenge at times), others have a more organized approach. Like Manuel Matuzović.

Front-End Bookmarks

Manuel collects articles and talks about HTML, CSS, and JavaScript on his site Front-End Bookmarks, grouped alphabetically by elements, attributes, properties, selectors, methods, and expressions. No matter if you’re looking for information on how to correctly use aria-labelledby or what the ::marker pseudo-element is all about, chances are good that Manuel already compiled helpful resources on the topic. By the way, if you feel that a resource is missing in the collection, don’t hesitate to contribute to it on GitHub.

GitHub Tips And Tricks

Do you know how to automatically squash commits on GitHub when merging pull requests? Or how to open a repo in the browser using GitHub CLI? If not, Joe Previte’s collection of GitHub tips and tricks might be for you.

GitHub Tips And Tricks

In bite-sized videos, Joe shares small but powerful tips to take your GitHub workflow to the next level. And for those of you who prefer to learn by reading, most tips are also available as short blog posts. Handy little timesavers.

The Sound Of Colleagues

Working from home can have some real advantages over working from an office, but let’s be honest, it can be a rather lonely experience, too, when there are no colleagues around. If you feel your home office is getting too quiet and you need some bustle in the background to stay focused, The Sound of Colleagues has got your back.

The Sound Of Colleagues

The Sound of Colleagues lets you mix office noises to create your custom office ambient noise. People typing and talking, phones ringing, the coffee machine, the printer — all of these little things add up to bring a bit of office feeling to your home. Maybe it’ll even help you boost your productivity, who knows?

A Minimalist And Modern Media Player Library

If you want to embed a media player on your site, Vime might be worth taking a closer look at. Built around the idea that you control the player, not the other way around, the open-source library provides an alternative to Videojs and Plyr and supports HTML5, HLS, Dash, YouTube, Vimeo, and Dailymotion.

Vime

Vime does not only shine with a minimalist, sleek look, but it is responsive, accessible, modular, and lightweight, too. It gets by without any external dependencies and comes in different packages tailored to different needs so that you can pick just what’s required for your use case. And since minimalist doesn’t mean bland, Vime is backed up by a plugin system that offers a lot of room for customization — think custom controls, settings, tooltips, and more. The last two versions of all modern browsers as well as IE11 are supported.

With Smashing Newsletter, it always feels like home. A cat with slippers reading the newsletter edition.

Smashing Newsletter

Every second Tuesday, we send a newsletter with useful techniques on front-end and UX. Subscribe and get Smart Interface Design Checklists PDF in your inbox.

Your (smashing) email

Subscribe →

Front-end, design and UX. Sent 2× a month.
You can always unsubscribe with just one click.

Smashing Editorial
(cm, vf, ra)

IKEA wants us all to make forts (and we're 100% IN)

Original Source: http://feedproxy.google.com/~r/CreativeBloq/~3/zg-Se0h_Wu0/ikea-forts

If isolating in your house isn't enough for you, IKEA has come up with a way for you to take being on your own one step further – by using your furniture to create your own fort. Note: you could invite the family in, if you felt like it.

In a bid to encourage people to stay at home, IKEA Russia has released a set of six instruction manuals that'll turn a variety of furniture types into impressive play structures – a pretty fun way to while away a lockdown afternoon.

Want more ways to pass an afternoon? Try our collection of how to draw tutorials, or our pick of the best graphic design books. 

Fort

A fort is just one of the six structures you can create

Ad agency Instinct teamed up with IKEA to design the instruction sheets, which are in the style of a typical IKEA flat pack guide with simple black-and-white images. Choose from building a wigwam, castle, playhouse, tent, cave or fortress (all of which are branded with the Swedish vowels Ö and Å). Or why not make them all?

IKEA recommends using products from its own stores, but does advise that you can sub in alternatives where needed. Most of the furniture included are basics that you'll almost-definitely have, like dining chairs, sofas, cushions and sheets – fort staples, really. Though you might need to do an online order if you want to build an accurate wigwam as you'll require a Tjusig (no, we don't know either – you can see it below in the gallery of guides – click the arrows to see the images).

We think it's an inspired piece of marketing that people can get hands-on with, and it'll certainly be more harmonious than the usual flat-pack projects. Brands have approached the lockdown situation in different ways (some more successful than others, eh McDonald's?), but this whimsical, boredom-busting angle is definitely one of the best. IKEA has struck just the right tone with this creative project (see here for more projects to get involved with). 

And if you do make a fort, share your creations on social media with the hashtag #явдомикеикеа, which loosely translates as #IAmInAnIkeaHouse.

Read more:

Has branding become boring?The 6 best branding books in 20208 brands that rule at social media

How To Create A Mobile App In Expo And Firebase (For iOS And Android)

Original Source: https://www.smashingmagazine.com/2020/05/mobile-app-expo-react-native-firebase-ios-android/

How To Create A Mobile App In Expo And Firebase (For iOS And Android)

How To Create A Mobile App In Expo And Firebase (For iOS And Android)

Chafik Gharbi

2020-05-18T13:00:00+00:00
2020-05-18T17:08:46+00:00

Maybe you’ve heard of or worked with React, the JavaScript framework developed by Facebook. The social media company took it even further by releasing React Native, which quickly became the most popular framework for building mobile apps with JavaScript. Many companies embraced the idea and started building their apps with it.

In this article, we’ll get an idea of how to develop an application for Android and iOS using Expo and Firebase, based on my own experience of creating an application with these technologies. If you haven’t worked with Firebase before, please look at its guide to JavaScript projects before we dive in.

If you are new to JavaScript, make sure you’re clear on the basics of ECMAScript 6’s features, such as class importing and arrow functions. You can learn React Native from the official documentation, which has a section on React fundamentals, in case you haven’t worked with React. Don’t worry about how to build an app with Android Studio or Xcode, because we will be using the Expo framework.

Recommended reading on SmashingMag:

Styling Components In React
Best Practices With React Hooks
Creating Sortable Tables With React
Implementing Skeleton Screens In React

Brief Description of Project

We can describe our project as an on-demand transporter — you could say Uber for merchandise transportation. The user will choose transportation information, such as the type of vehicle and loading and unloading locations, and then nearby transportation vehicles will appear on the map. The user confirms their request, and the drivers receive notifications one by one. Each driver’s notification is active for 25 seconds. If they ignore or decline the request, the system selects another driver, and so on. When a driver accepts the request, the user can monitor the entire transportation process on the map, including via the web application.

Expo Installation And Configuration

First, we need to install the command line interface (CLI) for Expo, which will help us test to the app in a simulator or on real devices and to build our app in the cloud.

npm install -g expo-cli

Let’s create our Expo project.

expo init

The cool part is that all of your app’s configurations can be done in a single JSON file, app.json. Below are some tips I learned that could increase your chances of being accepted in the App Store and Google Play and to help you avoid some common problems.

If you are using Google Maps in your app, be sure to provide the API in the app.json configuration file, in order to make it work properly. Google won’t charge you for native map rendering unless you’re rendering directions or using other paid API services.


“ios”: {

“config”: {
“googleMapsApiKey”: “YOUR_API_KEY”
}
},
“android”: {

“config”: {
“googleMaps”: {
“apiKey”: “YOUR_API_KEY”
}
}
}

To make location updates, or any other background tasks, work in the background in iOS, add the following keys under ios.infoPlist:


“ios”: {

“infoPlist”: {

“UIBackgroundModes”: [
“location”,
“fetch”
]
}
}

If you don’t define which permissions your app will use, then Expo’s generated app will use all available authorizations by default. As a result, Google Play will reject your app. So, specify your required permissions.


“android”: {

“permissions”: […],
}

Apple requires you to provide a message that tells the user why the app is requesting this access, or else you will be rejected.


“ios”: {

“infoPlist”: {

“NSCameraUsageDescription”: “Why are you requesting access to the device’s camera?”,
“NSLocationWhenInUseUsageDescription”: “Why are you requesting access to the device’s camera?”
}
}

Make sure to increment the android.versionCode key before you publish a new version to Google Play.

All updates can be done with Expo over the air, without passing by Google Play or the App Store, unless you make the following changes:

upgrade the Expo SDK version;
change anything under the ios, android, or notification keys;
change the app’s splash;
change the app’s icon;
change the app’s name;
change the app’s owner;
change the app’s scheme;
change the facebookScheme;
change your bundled assets under assetBundlePatterns.

I prefer not to interpret the user experience by setting fallbackToCacheTimeout to 0 under the updates key. This will allow your app to start immediately with a cached bundle, while downloading a newer one in the background for future use.

And here is a complete example of the configuration in app.json:

{
“expo”: {
“name”: “Transportili”,
“slug”: “transportili”,
“scheme”: “transportili”,
“privacy”: “public”,
“sdkVersion”: “36.0.0”,
“notification”: {
“icon”: “./assets/notification-icon.png”,
“androidMode”: “default”
},
“platforms”: [
“ios”,
“android”,
“web”
],
“version”: “0.3.2”,
“orientation”: “portrait”,
“icon”: “./assets/icon.png”,
“splash”: {
“image”: “./assets/splash.png”,
“resizeMode”: “contain”,
“backgroundColor”: “#ffffff”
},
“updates”: {
“fallbackToCacheTimeout”: 0
},
“assetBundlePatterns”: [
“**/*”
],
“ios”: {
“bundleIdentifier”: “com.transportili.driver”,
“supportsTablet”: false,
“infoPlist”: {
“UIBackgroundModes”: [
“location”,
“fetch”
],
“LSApplicationQueriesSchemes”: [
“transportili”
],
“NSCameraUsageDescription”: “L’application utilise l’appareil photo pour prendre une photo ou numériser vos documents.”,
“NSLocationWhenInUseUsageDescription”: “L’application utilise votre position pour aider les chauffeurs ou les transporteurs à vous trouver sur la carte.”
},
“config”: {
“googleMapsApiKey”: “AIzaSyA8Wcik6dTuxBKolLSm5ONBvXNz8Z0T-6c”
}
},
“android”: {
“googleServicesFile”: “./google-services.json”,
“package”: “com.transportili.driver”,
“versionCode”: 6,
“permissions”: [
“ACCESS_COARSE_LOCATION”,
“ACCESS_FINE_LOCATION”
],
“config”: {
“googleMaps”: {
“apiKey”: “AIzaSyA8Wcik6dTuxBKolLSm5ONBvXNz8Z0T-6c”
}
}
},
“description”: “”,
“githubUrl”: “https://github.com/chafikgharbi/transportili-native.git”
}
}

Let’s move on to installing Firebase, using the following command:

expo install firebase

I prefer to create a firebase.js file in the app’s root folder that contains all Firebase configurations. In this case, I’m using only the Firestore and Storage services.

const firebaseConfig = {
apiKey: “api-key”,
authDomain: “project-id.firebaseapp.com”,
databaseURL: “https://project-id.firebaseio.com”,
projectId: “project-id”,
storageBucket: “project-id.appspot.com”,
messagingSenderId: “sender-id”,
appId: “app-id”,
measurementId: “G-measurement-id”
};

Now, whenever we want to use Firebase, we just import this file, as follows:

import { firebase, firestore, storage } from “./firebase”;

The documentation has a more detailed explanation of using Firebase with Expo.

The Application’s Database

You can store your data directly in the cloud using Firebase, which offers two types of databases. One is the real-time database, and the other is Firestore, which is considered to be the improved version of the real-time database, with more advanced functionality. Both are NoSQL databases with data sync and instant changes listeners. They have different mechanisms: The real-time database stores data as a JSON object, whereas Firestore stores data as documents in collections. They also calculate usage and cost differently: The former is based on the quantity of data exchanged, and the latter is based on the number of operations in the documents (reads, writes, and deletes).

In my case, I used the Firestore database to store users, requests, vehicles, and other application data. (I was trying to be smart by putting all of my data in one document to decrease operation usage, but then I discovered that each document can store only 1 MB.)

In addition to storing strings, numbers, objects, and so on in Firebase, you can also store a geoPoint, which is an object that contains the coordinates of geographic points (latitude and longitude). Despite this, unfortunately, you cannot make geographic queries, such as retrieving nearby users.

To do that, we can use GeoFirestore. But we have to take into account that this package restricts the document structure of the user to this:

User: {
d: {all user data here}
g: (location geohash)
l: {firstore location geopoint}
}

So, if you’re going to implement it directly in your user collection, like I did, then you’ll need to put all of the user’s data in the d key.

Last but not least, don’t forget to optimize your code to avoid unexpected operations:

Use offline persistence. On the web, offline persistence is disabled; be sure to enable it.
Use cursor pagination in Firestore queries. Don’t get all data at once.
Always unsubscribe listeners, when done, or unmounted components.

The Application’s Back End

You can manage the Firestore database, send notifications with Expo, and perform certain operations directly from the front end or the mobile application, but there are other operations that we cannot do without a back end and a server. This is why Firebase offers functions — a cloud back end that allows you to execute Node.js code on a scalable server. I’ve used the Firebase functions for the following:

Send notifications (see example below)
To send notifications, we will use push notifications, a tool that helps an app’s owner send messages to their users. It appear in the notifications section of the device, even if the application is not active. We don’t want this process to be stopped by a sudden interruption in connectivity, so we’ll have to use a server.

Run cron jobs
Using cron jobs helps me to manage scheduled requests and notifications.

Sanitize the database
This includes removing useless and ignored requests.

Run sensitive, expensive, or continuous tasks
This includes registering, retrieving users, and scheduling orders. All of these are sensitive operations. If you make them directly from your app or front end, there is a risk of security vulnerability and broken tasks.

Joaquin Cid’s article “How to Build a Role-based API With Firebase Authentication” will give you details on how to get started with Firebase functions and how to create a back-end API using Express. It uses TypeScript, but converting TypeScript to JavaScript is not hard.

Push Notifications

Expo sends a notification to the user’s device from its servers. It identifies the user’s device with a token. When someone uses the application, the app would execute code to obtain the device’s token, and then store this token on the server. I’ve used Firestore as usual to store the token and compare incoming tokens to check whether the user has logged in from another device.

Storing Expo push token

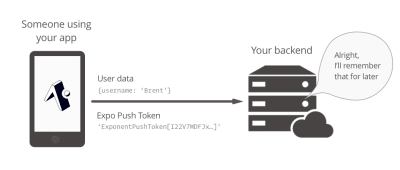
Data to be stored for subsequent push-notification requests. (Large preview)

We get our token using the following function:

token = await Notifications.getExpoPushTokenAsync();

Don’t forget to request permission to push notifications. The documentation has example usage.

Whenever you want to send a notification to this user, you would make a request to Expo’s server, which contains the user’s device token already stored on your server.

curl -H “Content-Type: application/json” -X POST “https://exp.host/–/api/v2/push/send” -d ‘{ “to”: “ExponentPushToken[xxxxxxxxxxxxxxxxxxxxxx]”, “title”:”hello”, “body”: “world” }’

The following is a simple example that sends notifications to all users using Firebase functions. This example is not secure. If you want to implement authorization and authentication, please follow Cid’s article mentioned above.

After initializing our project using the Firebase CLI, let’s install the Express framework to handle our API.

npm install express

We need to support CORS and add JSON body-parser middleware. This way, we can make requests from any URL and parse JSON-formatted requests.

npm install –save cors body-parser
npm install –save-dev @types/cors

This is the main index.js file of our functions directory:

const express = require(“express”);
const cors = require(“cors”);
const bodyParser = require(“body-parser”);
const admin = require(“firebase-admin”);
const functions = require(“firebase-functions”);

// Initialize the firebase-admin SDK module
admin.initializeApp(functions.config().firebase);

// Set the Express app
const app = express();
app.use(bodyParser.json());
app.use(cors({ origin: true }));

// Handle push notifications request
app.post(“/pushNotifications”, require(“./controllers/pushNotifications”));

// Handle another request
// app.post(“/anotherRoute”, require(“./controllers/anotherController”));

// Export the https endpoint API handled by the Express app
export const api = functions.https.onRequest(app);

And this is the pushNotifications.js controller, located in the controllers folder.

const admin = require(“firebase-admin”);
const axios = require(“axios”);
const chunkArray = require(“./chunkArray”);
const firestore = admin.firestore();

async function pushNotifications(req, res) {
try {
const data = req.body;

// Get users from Firestore, then build notifications array
await firestore
.collection(“users”).get()
.then((querySnapshot) => {
if (querySnapshot.size) {

// This array will contain each user’s notification
let notificationsArray = [];

querySnapshot.forEach((doc) => {
let docData = doc.data();
if (docData && docData.d) {
let userData = docData.d;

// The pushNotificationsToken retrieved from the app and stored in Firestore
if (userData.pushNotificationsToken) {
notificationsArray.push({
to: userData.pushNotificationsToken,
…data,
});
}
}
});

// Send notifications to 100 users at a time (the maximum number that one Expo push request supports)
let notificationsChunks = chunkArray(notificationsArray, 100);
notificationsChunks.map((chunk) => {
axios({
method: “post”,
url: “https://exp.host/–/api/v2/push/send”,
data: chunk,
headers: {
“Content-Type”: “application/json”,
},
});
});
return res.status(200).send({ message: “Notifications sent!” });
} else {
return res.status(404).send({ message: “No users found” });
}
})
.catch((error) => {
return res
.status(500)
.send({ message: `${error.code} – ${error.message}` });
});
} catch (error) {
return res
.status(500)
.send({ message: `${error.code} – ${error.message}` });
}
}

module.exports = pushNotifications;

In the controller above, we got all of the app’s users from Firestore. Each user has a push token. We divided this list into sets of 100 users, because a single request to Expo can hold only 100 notifications. Then, we sent these notifications using Axios.

The following is the chunkArray function:

function chunkArray(myArray, chunk_size) {
var index = 0;
var arrayLength = myArray.length;
var tempArray = [];

for (index = 0; index < arrayLength; index += chunk_size) {
myChunk = myArray.slice(index, index + chunk_size);
tempArray.push(myChunk);
}

return tempArray;
}

This is an example of how to send notifications via our API using Axios.

axios({
method: “post”,
url: “https://…cloudfunctions.net/api/pushNotifications”,
data: {
title: “Notification title”,
body: “Notification body”,
},
});

Maps and Geolocation

Render Native Google Maps in React Native

To render Google Maps in the mobile application, I used react-native-maps, and to render directions, I used the react-native-maps-directions package. For a web application, I would use pure JavaScript.

npm install react-native-maps react-native-maps-directions

Then, import these packages:

import MapView, { Marker, PROVIDER_GOOGLE } from “react-native-maps”;
import MapViewDirections from “react-native-maps-directions”;

We’ll render the map with markers and directions:

<MapView
style={mapStyle}
// Reference is useful for controlling the map like mapView.fitToCoordinates(…)
ref={(ref) => (mapView = ref)}
// For better performance, avoid using default map on iOS
provider={PROVIDER_GOOGLE}
// Show the blue dot that represents the current location on the map
showsUserLocation={true}
initialRegion={{
…this.state.currentLocation,
latitudeDelta: LATITUDE_DELTA,
longitudeDelta: LONGITUDE_DELTA,
}}
/*
* Watch region change when the user moves the map
* for example, to get the address with reverse geocoding.
*/
onRegionChangeComplete={(region) => {
console.log(
`Map center: latitude: ${region.latitude}${region.latitude}
longitude: ${region.latitude}${region.longitude}`
);
}}
// Map edge paddings
mapPadding={{
top: 20,
right: 20,
bottom: 20,
left: 20,
}}
>
{/* Render marker with custom icon */}
{this.state.marker && (
<Marker
title={this.state.marker.title}
coordinate={{
latitude: this.state.marker.latitude,
longitude: this.state.marker.longitude,
}}
>
<MaterialIcons name=”place” size={40} color=”green” />
</Marker>
)}

{/* Render multiple markers */}
{this.state.markers.map((marker, index) => {
return (
<Marker
key={index}
title={marker.address}
coordinate={{
latitude: marker.latitude,
longitude: marker.longitude,
}}
>
<MaterialIcons name=”place” size={40} color=”green” />
</Marker>
);
})}

{/* Render directions from array of points */}
{this.state.directions.length >= 2 && (
<MapViewDirections
origin={this.state.directions[0]}
destination={
this.state.directions[this.state.directions.length – 1]
}
waypoints={
this.state.directions.length > 2
? this.state.directions.slice(1, -1)
: null
}
optimizeWaypoints={true}
apikey={GOOGLE_MAPS_APIKEY}
strokeWidth={5}
strokeColor=”green”
onReady={(result) => {
console.log(
`Distance “${result.distance} km”, “${result.duration} min”`
);
}}
onError={(errorMessage) => {
console.log(errorMessage);
}}
/>
)}
</MapView>

Watch User’s Location in Foreground and Background

The Expo framework supports background location updates, I want to use this feature to get the user’s position. Even if the app is not in the foreground or the phone is locked, the application should always send the location to the server.

import * as Location from “expo-location”;
import * as TaskManager from “expo-task-manager”;
import geohash from “ngeohash”;
import { firebase, firestore } from “../firebase”;

let USER_ID = null;
let LOCATION_TASK = “background-location”;

let updateLocation = (location) => {
if (USER_ID) {
firestore
.collection(“users”)
.doc(USER_ID)
.update({
“d.location”: new firebase.firestore.GeoPoint(
location.latitude,
location.longitude
),
g: geohash.encode(location.latitude, location.longitude, 10),
l: new firebase.firestore.GeoPoint(
location.latitude,
location.longitude
),
});
}
};

TaskManager.defineTask(LOCATION_TASK, ({ data, error }) => {
if (error) {
// Error occurred – check `error.message` for more details.
return;
}
if (data) {
const { locations } = data;

// Current position with latitude and longitude
currentLocation = {
latitude: locations[0].coords.latitude,
longitude: locations[0].coords.longitude,
};
updateLocation(currentLocation);
}
});

export default async function watchPosition(userid) {
// Set user ID
USER_ID = userid;

// Ask permissions for using GPS
const { status } = await Location.requestPermissionsAsync();
if (status === “granted”) {
// watch position in background
await Location.startLocationUpdatesAsync(LOCATION_TASK, {
accuracy: Location.Accuracy.BestForNavigation,
distanceInterval: 10,
showsBackgroundLocationIndicator: true,
foregroundService: {
notificationTitle: “Title”,
notificationBody: “Explanation”,
notificationColor: “#FF650D”,
},
});
// Watch position in foreground
await Location.watchPositionAsync(
{
accuracy: Location.Accuracy.BestForNavigation,
distanceInterval: 10,
},
(location) => {
let currentLocation = {
latitude: location.coords.latitude,
longitude: location.coords.longitude,
};
updateLocation(currentLocation);
}
);
} else {
// Location permission denied
}
}

If you’ll notice, I’ve used different structures when updating the location to Firestore. That’s because I’m using the GeoFirestore package to query nearby users.

Using WebView in React Native

The application is not only for mobile users, but also for desktop users. So, let’s not spend time developing another application that shares much of the same functionality, such as login and registration, profiles and settings, and orders history.

On the app website, we check whether the user came from a desktop browser or the mobile application. We then redirect them to the corresponding application.

For a mobile application, we have to implement some sort of communication between the native app and WebView app, thanks to the JavaScript injection of postMessage and onMessage in WebView. But be careful when and how you use it:

Security Warning: Currently, onMessage and postMessage do not allow specifying an origin. This can lead to cross-site scripting attacks if an unexpected document is loaded within a WebView instance. Please refer to the MDN documentation for Window.postMessage() for more details on the security implications of this.

— React Native documentation

We’ll send data from web JavaScript to React Native. Here is an example of sending a user ID:

window.ReactNativeWebView.postMessage(
JSON.stringify({
action: “setUserID”,
data: user.uid
})
);

We’ll listen to data coming from the web in WebView.

<WebView
ref={(reference) => (webview = reference)}
onMessage={(event) => {
let message = JSON.parse(event.nativeEvent.data);
switch (message.action) {
case “setUserID”:
let id = message.data;
break;
case “anotherAction”:
//
break;
}
}}
/>;

Let’s send data from React Native to the web. The following example sends a location retrieved from React Native.

let location = JSON.stringify({ latitude: 36.742022, longitude: 3.103771 });
webview.injectJavaScript(`
window.injectData({
action: “setLocation”,
data: JSON.stringify(${location})
})
`);

We’ll read the location on the web:

window.injectData = (message) => {
switch (message.action) {
case “setLocation”:
let location = JSON.parse(message.data);
break;
case “anotherAction”:
//
break;
}
};

The Web Application and Website

All web-related parts, from the website to the web application, were made with Next.js and hosted on Netlify for three main raisons:

cost-effectiveness
There is no server to maintain, and Netlify’s free plan is more than enough for my needs. Unlimited private repositories are now free on GitHub, so nothing to worry about there.

effortless development
Commit, push, and let Netlify do the rest. Is anything simpler than that?

speed
The websites are static and all hosted on a content delivery network (CDN). When a user requests these websites, the CDN directs them to the nearest copy in order to minimize latency. So, the websites are extremely fast.

Limitations of Expo

There are two approaches to building an app with Expo: the managed workflow, where you write only JavaScript, and Expo tools and services do the rest for you, and the bare workflow, where you have full control over all aspects of the native project, and where Expo tools can’t help as much. If you plan to follow the first approach, then consider Expo’s limitations, because some functionality that exists in major apps, such as Spotify (for example, music playing in the background) and Messenger (call notifications), cannot be done yet.

Conclusion

Expo is an excellent choice if you are not familiar with native development and you want to avoid all of the headaches associated with creating and regularly deploying an application. Firebase can save you a lot of time and work, because of its scalability and variety of services. However, both are third-party services, over which you have no control, and Firestore is not designed for complex queries and data relationships.

Thanks for your attention. I hope you’ve enjoyed this article and learned something new.

Smashing Editorial
(ra, yk, il, al)

Creating Custom WordPress Gutenberg Blocks Without JavaScript

Original Source: http://feedproxy.google.com/~r/1stwebdesigner/~3/bAoQRfYq_f0/

When the Gutenberg block editor was released as part of WordPress 5.0, it launched a new era of content creation. No longer would seemingly-simple tasks like creating multi-column layouts or adding embedded media require a page builder plugin or custom code.

Gutenberg breaks content down into “blocks”, or little sections that can be rearranged with ease. By default, WordPress comes with a nice selection of blocks. But it also allows developers to build their own custom blocks as well.

Custom Gutenberg blocks can be a game-changer for theme developers. Rather than relying on workarounds or rigid page templates, a custom block can place specialized content anywhere within a page. Elements such as testimonials, accordion menus and pricing tables are just a few examples of what can be achieved.

As great as custom Gutenberg blocks sound, there was some initial concern about the barrier to entry. Building blocks natively requires knowledge of React, which could leave out a lot of developers.

Thankfully, the WordPress developer community has stepped up with tools that get around the React/JavaScript requirement. They allow you to create your own custom blocks in a visual manner and implement them into your existing WordPress theme.

Today, we’ll introduce you to a few of these tools and show you how easy it is to get started.

UNLIMITED DOWNLOADS: 500,000+ WordPress & Design Assets

Sign up for Envato Elements and get unlimited downloads starting at only $16.50 per month!

DOWNLOAD NOW

Custom Gutenberg Blocks: Tools

A number of tools have hit the market that allow web designers to create custom Gutenberg blocks without JavaScript. Mind you, they still require at least some knowledge of code (HTML, CSS and PHP) – or at least how a WordPress theme works. That’s because each option requires you to create a PHP file of block code and optionally add some styling to match your website.

That said, each of the WordPress plugins below leverages custom fields in order to create content. Custom fields existed well before Gutenberg came along. In fact, it’s long been common practice to utilize them as a way to get around the limitations of the old Classic Editor.

The nice thing about this sort of configuration is that custom fields offer flexibility in the types of content you can create. Mix that in with the portability of a Gutenberg block and you have a powerful new tool.

Advanced Custom Fields PRO

Advanced Custom Fields has been around for years. It started out as a handy UI for building complex custom field sets and now boasts over 1 million active users of its free version.

The commercially-available PRO version of the plugin (pricing starts at $49 per year) has evolved to allow for custom Gutenberg block creation. The ACF Blocks feature lets developers create a field set and assign it to a custom block.

More than the other plugins in this category, you’ll need to know PHP to get the most out of ACF Pro. However, existing users of the plugin will find the process for block creation very familiar.

Advanced Custom Fields PRO

Lazy Blocks – Gutenberg Blocks Constructor

Lazy Blocks is a free WordPress plugin that offers a visual way to create custom blocks. Like ACF, the plugin includes a number of custom field types (referred to as “controls”) for your block. Text, image, file, Classic Editor, color picker and repeater fields are just some of what’s available. There’s also an API for creating your own custom controls.

Other handy features include the ability to restrict your blocks to specific posts types, import/export via JSON and custom templates.

Lazy Blocks

Block Lab

With Block Lab, custom block creation is a 3-step process. First is adding a block within the admin – which is similar to adding any other page or post. Next, add in the desired mix of custom fields (text, image, radio buttons/checkboxes, URLs, etc.) and configure settings like a custom icon. Third, create a block template for your theme and style it to your liking. From there, your custom block is ready for use.

The plugin is well-documented and even offers tutorials for creating specific block types.

Block Lab

A Simple Custom Block Using Block Lab

For simplicity’s sake, we’ll take a test drive using Block Lab. However, don’t let that stop you from trying out the other options as they have plenty to offer.

Now, on to our example. We’ll assume you have a WordPress website with the Block Lab plugin installed and activated.

In our project, we’ll create a simple notification block that we can use to display important information to visitors. It won’t be much, just a colored background and some text. But it will hopefully provide a glimpse into what’s possible with a custom Gutenberg block.

1. Navigate to Block Lab > Add New to create our new block.

2. We’ll start by adding a title (Notification Bar) and three fields:

Background Color – A Color field that will let us choose the background for our notification bar. We’ll assign it to display in the Inspector area of the block editor, which is in the right sidebar.
Text Color – Another Color field, this time for our text. This one will also display in the Inspector.
Message – A Text field that will display our custom message. This field will be housed in the main Editor area of Gutenberg.

A custom field in Block Lab.

Note the field names assigned to each block, as we’ll need those in just a bit.

We should also mention that the plugin allows us to choose a custom icon and categorize our block. This will help us find it when we want to add it to a page.

3. With our fields and settings in place, it’s time to click the Publish button to save our block. Doing so will trigger a notification message, telling us where to place our custom block template within our theme:

/wp-content/themes/YOURTHEME/blocks/block-notification-bar.php

A notification in Block Lab.

4. Next, we’ll need to create a block template. So, fire up the code editor of your choice and create a new file called block-notification-bar.php and save it into a new /blocks/ folder within your theme.

Block templates have to be written from scratch. But don’t worry, it’s not too difficult! Block Lab has documented how to do this, with plenty of examples.

In our case, we have just two block types: Color (background-color; text-color) and Text (message). Using the documentation as our guide, we’ll add this code to our custom block template:

Make sure to save the file and upload to your web server when done.

5. Our custom block has now been created! That’s really all there is to it. Now, we can add it to a page.

The Notification Bar block within Gutenberg.

Editing the Notification Bar block.

6. On the front end, we have a basic notification bar that’s sure to grab the user’s attention.

The Notification Bar block on the front end of a website.

Going Further

Even in this very simple use case, there is a real value in the notification bar we’ve created. It can be placed on any page or post within our website and can be customized each time.

If we wanted to expand upon what we’ve built, there are plenty of options. Adding things like icons, buttons and the ability to link to another page or post come to mind. These things are all possible within Block Lab, as well as the other plugins mentioned above. And, the use of CSS can greatly enhance the look as well.

Now that you’ve had a taste of the custom block creation process, it’s time to experiment! Install one of the plugins above and see how you can enhance your WordPress website.