Shapes&Forms: A Seamless Fusion of Branding, Visual Identity, and UI/UX

Original Source: https://abduzeedo.com/shapesforms-seamless-fusion-branding-visual-identity-and-uiux

Shapes&Forms: A Seamless Fusion of Branding, Visual Identity, and UI/UX

abduzeedo0925—23

In the bustling design hubs of Los Angeles, New York, and Medellín, Shapes & Forms emerges as a beacon of multidisciplinary motion design and creativity. Entrusted with the task of encapsulating the essence of this dynamic company, the creative direction aimed to weave the brand’s collaborations with giants like NFL, SuperBowl, Netflix, and Stiiizy into its branding and visual identity.

The challenge? To craft a visual identity that’s both simple and impactful. The solution lay in the strategic use of typography and a modular grid. This approach not only accentuated the diverse content but also ensured a cohesive and recognizable graphic universe. The result is a brand identity that resonates with Shapes & Forms’ ethos and its global collaborations with designers and motion artists.

The case study, spanning March to June 2023, delves deep into the design intricacies. From the brandbook and stationery to website design and social media posts, every touchpoint reflects meticulous attention to detail. The environmental design, clothing, objects, and signage further amplify the brand’s presence, making it a force to reckon with in the design world.

Behind this transformative journey were the creative minds of Florian Cornut, who led the direction, supported by Brand Director Byron Regej and Creative Talent Director Casey Leigh Jordan. The synergy of Partner Associate & Senior Producer duo, Thomas Knight and Katelin Perry, further enriched the project.

A nod to the fonts, Vinila by @plaudesign and GT Alpina Fine by @grillytype, for adding depth and character to the designs. The impeccable shooting/mockup by Bendito and the animations by Loic Losco @losco.gif brought the vision to life.

In conclusion, Shapes & Forms stands as a testament to the power of design when it’s rooted in clarity, collaboration, and creativity.

Branding and visual identity artifacts

Branding and graphic design for Shapes&Forms: A Seamless Fusion of Branding, Visual Identity, and UI/UX artiocleBranding and graphic design for Shapes&Forms: A Seamless Fusion of Branding, Visual Identity, and UI/UX artiocleBranding and graphic design for Shapes&Forms: A Seamless Fusion of Branding, Visual Identity, and UI/UX artiocleBranding and graphic design for Shapes&Forms: A Seamless Fusion of Branding, Visual Identity, and UI/UX artiocleBranding and graphic design for Shapes&Forms: A Seamless Fusion of Branding, Visual Identity, and UI/UX artiocleBranding and graphic design for Shapes&Forms: A Seamless Fusion of Branding, Visual Identity, and UI/UX artiocleBranding and graphic design for Shapes&Forms: A Seamless Fusion of Branding, Visual Identity, and UI/UX artiocleBranding and graphic design for Shapes&Forms: A Seamless Fusion of Branding, Visual Identity, and UI/UX artiocleBranding and graphic design for Shapes&Forms: A Seamless Fusion of Branding, Visual Identity, and UI/UX artiocleBranding and graphic design for Shapes&Forms: A Seamless Fusion of Branding, Visual Identity, and UI/UX artiocleBranding and graphic design for Shapes&Forms: A Seamless Fusion of Branding, Visual Identity, and UI/UX artiocleBranding and graphic design for Shapes&Forms: A Seamless Fusion of Branding, Visual Identity, and UI/UX artiocleBranding and graphic design for Shapes&Forms: A Seamless Fusion of Branding, Visual Identity, and UI/UX artiocleBranding and graphic design for Shapes&Forms: A Seamless Fusion of Branding, Visual Identity, and UI/UX artiocleBranding and graphic design for Shapes&Forms: A Seamless Fusion of Branding, Visual Identity, and UI/UX artiocleBranding and graphic design for Shapes&Forms: A Seamless Fusion of Branding, Visual Identity, and UI/UX artiocleBranding and graphic design for Shapes&Forms: A Seamless Fusion of Branding, Visual Identity, and UI/UX artiocleBranding and graphic design for Shapes&Forms: A Seamless Fusion of Branding, Visual Identity, and UI/UX artiocleBranding and graphic design for Shapes&Forms: A Seamless Fusion of Branding, Visual Identity, and UI/UX artiocleBranding and graphic design for Shapes&Forms: A Seamless Fusion of Branding, Visual Identity, and UI/UX artiocleBranding and graphic design for Shapes&Forms: A Seamless Fusion of Branding, Visual Identity, and UI/UX artiocleBranding and graphic design for Shapes&Forms: A Seamless Fusion of Branding, Visual Identity, and UI/UX artiocleBranding and graphic design for Shapes&Forms: A Seamless Fusion of Branding, Visual Identity, and UI/UX artiocleBranding and graphic design for Shapes&Forms: A Seamless Fusion of Branding, Visual Identity, and UI/UX artiocleBranding and graphic design for Shapes&Forms: A Seamless Fusion of Branding, Visual Identity, and UI/UX artiocleBranding and graphic design for Shapes&Forms: A Seamless Fusion of Branding, Visual Identity, and UI/UX artiocleBranding and graphic design for Shapes&Forms: A Seamless Fusion of Branding, Visual Identity, and UI/UX artiocleBranding and graphic design for Shapes&Forms: A Seamless Fusion of Branding, Visual Identity, and UI/UX artiocleBranding and graphic design for Shapes&Forms: A Seamless Fusion of Branding, Visual Identity, and UI/UX artiocleBranding and graphic design for Shapes&Forms: A Seamless Fusion of Branding, Visual Identity, and UI/UX artiocleBranding and graphic design for Shapes&Forms: A Seamless Fusion of Branding, Visual Identity, and UI/UX artiocleBranding and graphic design for Shapes&Forms: A Seamless Fusion of Branding, Visual Identity, and UI/UX artiocleBranding and graphic design for Shapes&Forms: A Seamless Fusion of Branding, Visual Identity, and UI/UX artiocle

Credits

Case study: March-June 2023
Creative Direction: Florian Cornut @habillage.graphique
Brand Director: Byron Regej
Creative Talent Director: Casey Leigh Jordan
Partner Associate & Senior Producer: Thomas Knight & Katelin Perry
Client: Shapes & Forms
Fonts: Vinila @plaudesign / GT Alpina Fine @grillytype
Shooting/Mockup: Bendito / Art Directed
Animation: Loic Losco @losco.gif

WOMBO Dream AI Art Generator (Review)

Original Source: https://www.hongkiat.com/blog/wombo-dream-ai-art-generator/

WOMBO Dream is another app that enables you to create art using AI, and it functions directly on your iPad. It’s important to clarify that this app, which appears as “Dream” on your iPad once installed, is not the same as UniDream, another AI image-generating app we’ve previously discussed.

We’ve invested a considerable amount of time playing with WOMBO Dream to provide you with an in-depth analysis of its capabilities. Continue reading to discover what Dream has to offer and whether it’s worth installing to create your next AI artwork.

Download WOMBO Dream for:

iPhone
iPad
Android

How to Use WOMBO Dream

The WOMBO Dream app is quite simple and straightforward to use. To start, simply tap the ‘+‘ icon located at the bottom center of the app’s home screen.

Home screen with plus buttonHome screen with plus button

Next, select the artwork size. Options include various aspect ratios such as 9:16, 1:1, 16:9, 3:4, and 4:3.

Artwork size optionsArtwork size options

After that, input the prompt for your artwork. Alternatively, you can choose from the available suggestions located right below the prompt text field.

Inserting prompt fieldInserting prompt field

Now, select an art style that aligns with your vision. WOMBO Dream offers a diverse range of art styles, including but not limited to Dreamland, Warped, Realistic, Figure, Cartoonist, Illustrated, Watercolor, Simple Design, Abstract, Unrealistic, Poster Art, and Retro.

Note: Some of these styles are premium and require a subscription for access.

Choosing art styleChoosing art style

Finally, press the ‘Create’ button and wait for your artwork to materialize.

Create buttonCreate button
Post-Creation Options

Once your artwork is ready, you have several ways to fine-tune or save it:

Download: If you’re happy with your artwork, simply tap the download button at the bottom left to save it to your device.
Regenerate: If the result isn’t what you hoped for, tap the ‘Regenerate’ button for a new version.
Create Variation: Want to see different takes on your initial idea? Use the ‘Create Variation‘ option.
Edit with Text: Add extra flair to your piece by using this option to include additional prompts like ‘make it snow‘ for a wintry effect.

Community Feed

The WOMBO Dream app features a vibrant section called the ‘Community Feed‘, where you can browse through a variety of AI-generated art made by other users. This feed serves as a great source of inspiration for your own creations.

Community FeedCommunity Feed
Interact with Artworks

If you come across an artwork that catches your eye, you have a couple of options:

Download: Save the artwork directly to your device.
Remix: Use the ‘Remix button to incorporate elements of that artwork into your own creation.

Sharing Your Creations

By default, any artwork you create will be displayed in the community feed for others to see. If you prefer to keep your art private, you can easily do so. Just go to ‘Settings’ and select the ‘Private Account‘ option.

Important Notes:

Here are some key points to keep in mind:

Free accounts can generate one artwork at a time.
Prompts are capped at 305 characters.
You can also revisit and reuse old prompts via the ‘Prompt History‘ section.
The app offers a variety of pre-made prompt suggestions that you can use with a single tap.
Optionally, you can blend in an existing image to create a unique final piece.

Download WOMBO Dream for:

iPhone
iPad
Android

WOMBO Dream’s Prices:

The subscription for the WOMBO Dream app costs $14.98 per month or $134.98 per year.

With a subscription, you receive:

The ability to generate 4 images at once
Faster processing times
No watermarks on your artwork
An ad-free experience

Pros

Variety of art styles
User-friendly interface

Cons

Some styles need a paid subscription
Free users limited to one image

The post WOMBO Dream AI Art Generator (Review) appeared first on Hongkiat.

Teelaunch vs Teespring (2023): Which Platform is Best?

Original Source: https://ecommerce-platforms.com/articles/teelaunch-vs-teespring

Teelaunch vs Teespring, which platform should you use for your print on demand business?

At a glance, these solutions seem pretty similar. They’re both designed to support entrepreneurs and creatives in the print-on-demand market, with a range of customizable products to choose from, and excellent fulfilment services. Both tools also allow you to sell your products on a range of platforms.

Even the names of the two platforms were nearly exactly the same, until Teespring officially updated its name to just “Spring”.

However, there are some slight differences between the two services you’ll need to be aware of as a budding business owner.

Here’s everything you need to know to make the right choice between Teelaunch and Teespring.

What is Teelaunch?

teelaunch homepage - teelaunch vs teespring

Let’s start with the basics. Teelaunch is a print on demand solution provider, which uses technology to connect your ecommerce store to third-party fulfilment and production companies worldwide.

The platform allows business owners to add their own designs to a host of different products, from wall art and drinkware, to apparel, and home goods.

Teelaunch works with worldwide fulfilment centers, so you can easily sell products to customers anywhere in the world. Plus, it integrates with a handful of marketplaces and ecommerce platforms, ranging from WooCommerce and Shopify, to Etsy and BigCommerce.

What is Teespring?

teespring homepage - teelaunch vs teespring

Teespring (Spring) is similar in a lot of ways to Teelaunch. The platform allows any creator to sign up for an account, and add their own unique designs to about 50 different types of products. Options range from phone cases and tote bags, to stickers, and home décor.

Spring’s fulfillment teams handle the creation of quality products on your behalf, and ship items directly to your customers, so you don’t have to worry about any logistics yourself.

Teespring also offers access to a range of tools to improve your chances of sales, such as a Boosted Network for advertising, and a dedicated customer support team for your buyers.

Go to the top

Teespring: Features and Functionality

Both Teelaunch and Teespring take a relatively straightforward approach to online selling.

When you create an account with Teespring, you’ll get access to various design tools you can use to customize the white label products in Teespring’s collection. You can add your own designs, adjust text and images, and experiment with colors in a mockup generator.

Once you’re happy with your designs, you can then list your products on your ecommerce website, or create your own storefront on the Teespring platform. Teespring storefronts come with access to easy-to-use product listings, promotional tools, analytics, and integrations.

Teespring handles all of the production and shipping process for you, so all you need to do is focus on promoting and growing your store. Key features of the platform include:

Comprehensive dashboard: Teespring includes a comprehensive dashboard where you can check your sales performance, see hot streak challenges, manage your product listings, and create storefronts, all in one place.

Order management and analytics: You can monitor all of your personal orders in the “orders” section of your dashboard, and gain valuable insights with sales analytics. Teespring offers useful insights into your most profitable products and sales channels.

Integrations: With Teespring, you can connect your storefront directly to YouTube, Twitch, and Streamlabs, to boost your promotional strategy. There’s also the handy “Boosted Network” option, which allows you to showcase products on Amazon, Ebay, Etsy, Walmart, and various other online marketplaces.

Marketing tools: Teespring allows users to connect with buyers through email and message-based marketing. You can also use the promotions tool to create custom promo codes and gift cards for buyers, to increase your chances of sales. Plus, you can add tracking pixels for platforms like Facebook, Google, and Twitter.

Design resources: Teespring comes with a host of design resources and tutorials, to help you make the most impressive products possible. The company also offers a wide range of specialty items to customize, such as pop sockets, backpacks, and pins.

TeespringGo also provides access to a variety of other services. For instance, you can purchase inventory outside of the POD world and ship it to Teespring’s warehouse, to take advantage of their fulfillment services. You can also access product sourcing support from Teespring directly.

Go to the top

Teelaunch: Features and Functionality

One of the major differences between Teelaunch and Teespring, is that while “Spring” gives you the option to create your own storefront directly, Teelaunch is an app designed to integrate with other sales platforms and tools.

The print-on-demand app gives users instant access to a variety of products you can customize and sell. Once you integrate Teelaunch with your chosen ecommerce platform (or Etsy), you can create a product using the simple mock-up generator tools included within the app.

When you’re ready to start designing a product, you can click on an item, and start adding your own customizations to color, sizing, print sizes, and designs. Teelaunch will show you the potential production and shipping costs for each product as you work.

When you’re happy with your design, you can simply add it to your store, and Teelaunch will handle fulfilment whenever a customer places an order. Key features of the platform include:

Simple design tools: Teelaunch makes it easy to create custom-designed products and add them straight to your store. The user-friendly solution allows entrepreneurs to experiment with all kinds of designs and patterns, using an integrated mockup generator.

Integrations: As a POD app, Teelaunch integrates directly with a variety of ecommerce platforms, including Etsy, Shopify, BigCommerce, and WooCommerce. There’s also a custom API option for creating your own automated workflows.

Shipping services: Teelaunch ships products through a variety of well-known shipment companies, and provides access to shipping costs throughout the creation process. You can also access tracking features with Teelaunch to keep customers up to date on their orders.

Unfortunately, Teelaunch does lack a lot of the “bonus” features you can access with Spring, such as marketing tools, the Boosted Network (for marketplace integrations), and comprehensive analytics.

You’ll need to rely on the tools of your ecommerce platform to handle these aspects of your POD business. Fortunately, since Teelaunch can integrate directly with your Shopify store, it should be relatively easy to create your own email marketing and social media campaigns.

Go to the top

Teelaunch vs Teespring: Pricing

Pricing can be a little difficult to get your head around with print-on-demand companies. Both Teespring and Teelaunch allow users to start using their services for free, with no monthly subscription costs. However, there are other fees to consider, such as:

Ecommerce store subscriptions: If you want to integrate your POD tools with an online store, you’ll need to pay a monthly fee for solutions like Shopify or Wix. You don’t necessarily need to create your own store with Spring, but having multiple platforms for sales can be a good way to increase your sales.

Production costs: The cost of each item you create with Teespring and Teelaunch can vary, depending on your choice of product, and your customization needs. You’ll be able to see the base cost of your DTG, and custom products as you create each item on either platform’s mockup generator tools. Remember, a high-quality print on a premium product, such as all-over print leggings can cost a little more.

Shipping costs: With most POD services, you’re responsible for paying for the cost of shipping your items to customers. You should be able to see the shipping costs offered by each print-on-demand platform when creating your items. Just remember your costs can vary based on the shipping options and shipping times you choose, and the location of your customers.

There may be other fees to consider with each solution too. For instance, if you want to use the TeespringGo service to sell a wide range of products with the help of the Teespring fulfillment company, you’ll need to pay for warehousing and storage costs.

Go to the top

Teelaunch vs Teespring: The Main Differences

There are a lot of similarities between Teelaunch and Teespring. Both options will allow you to sell a range of items, ranging from t-shirts and hoodies to tank tops and other unique products.

Both options also offer excellent printing options for their product selection, such as direct-to-garment and screen printing. Plus, you should be able to expect excellent print quality from both vendors. Teespring and Teelaunch have both earned some excellent reviews over the years.

However, there are some core differences to consider:

Integrations: Teelaunch integrates with a range of ecommerce platforms, so you can add your print-on-demand products to your existing store. Spring, on the other hand, allows you to create your own storefront within the Spring platform. You can also use the company’s Boosted Network solution to sell your merch on online marketplaces.

Marketing tools: Teelaunch doesn’t have any integrated tools available to help you with marketing. Although there are branding options to make your products stand out. Alternatively, Spring can help you boost your profit margins with integrated marketing tools.

Unique products: Teespring has more unique products available in their product selection than Teelaunch. However, some of these items can be a little more expensive than the common print-on-demand products available from Teelaunch.

Go to the top

Teelaunch vs Teespring: Pros and Cons

For influencers, creators, and entrepreneurs looking to start their own online business, both Teelaunch and Teespring are excellent tools. These solutions allow you to outsource your in-house fulfilment and garment printing needs to a third-party network of dedicated suppliers.

You can use each platform to sell to customers all over the world, from the USA, to Europe and Australia, and you’ll even be able to choose your own product pricing strategy.

However, Teespring is a slightly more comprehensive solution for print on demand sites than Teelaunch. With Spring, beginners can create a storefront, sell through social media, and connect to a wide network of marketplaces.

Plus, there are tons of value-added services on offer from the Teespring brand, helping you to manage customer service, increase turnaround time, and minimize the upfront costs of running your business.

Alternatively, Teelaunch is a slightly more beginner-friendly solution, designed for people who already have their own ecommerce store. While the product catalog is a little basic in comparison to Teespring, you’ll still find plenty of great items to sell.

Remember, if neither Teelaunch nor Teespring is right for you, you can always consider a handful of other POD options, such as:

Gooten

Printify

Redbubble

Customcat

Spreadshirt

Zazzle

The post Teelaunch vs Teespring (2023): Which Platform is Best? appeared first on Ecommerce Platforms.

Facilitating Inclusive Online Workshops (Part 2)

Original Source: https://smashingmagazine.com/2023/09/facilitating-inclusive-online-workshops-part2/

Earlier in the first part of the series, we defined inclusivity and how it contributes to enriching the workshop experience. We established that inclusivity is about ensuring everyone has an equal opportunity to participate and contribute, regardless of their background or identity. It goes beyond merely having diversity in attendance. It’s about creating an environment where different perspectives are valued and used to drive innovative outcomes.

In the second part, I will introduce you to the principle of the inclusive workshop through the acronym P.A.R.T.S. (which stands for Promote, Acknowledge, Respect, Transparency, and Share). After the principle is explained, we will dive into what you can do during and after the workshop to implement this principle.

The P.A.R.T.S. Principle

Often, we fall into the trap of thinking, “I’ve got a mixed group of folks here. My inclusivity job is done!”

Yes, having a diverse set of individuals is often an essential first step. But it’s just that — a first step. It’s like opening the door and inviting people in. However, the real task begins after the guests have arrived. That’s when you need to ensure they feel welcome, heard, and valued.

As a facilitator, how can you make sure that people feel safe to express their ideas and participate actively during the workshop? Here’s where the P.A.R.T.S. principle comes in.

The P.A.R.T.S. principle is an acronym that encapsulates five key principles that can form the foundation of any inclusive workshop: Promote, Acknowledge, Respect, Transparency, and Share.

P — Promote
Promote active participation from all attendees.

This begins with creating an environment where participants feel at ease sharing their ideas, opinions, and experiences. As a facilitator, your role is to set this tone from the beginning. One practical way to promote participation is by establishing some ground rules that encourage everyone to contribute. Another approach is to use different facilitation techniques to draw out quieter participants, such as having a quiet brainstorming session where participants can spend more time on their own to contribute their ideas or having round-robin techniques where everyone gets a turn to speak.

A — Acknowledge
Acknowledging participants’ contributions validates their input and makes them feel heard and valued.

This can be as simple as saying, “Thank you for sharing,” or “That’s an interesting perspective.” It’s also about demonstrating that you’ve understood their input by summarizing or paraphrasing what they’ve said. By doing this, you not only confirm their feelings of being heard but also model listening behavior for other participants.

R — Respect
Respect for all ideas, experiences, and perspectives is fundamental to an inclusive workshop.

This starts with setting expectations that all ideas are welcome, no matter how outside-the-box they may seem. It also means respecting the varied communication styles, personalities, and cultural backgrounds of the participants. As a facilitator, you should encourage respect by addressing any inappropriate comments or behaviors immediately and decisively.

T — Transparency

Transparency involves clear and open communication.

As a facilitator, it’s essential to articulate the workshop’s goals and processes clearly, address questions and concerns promptly, and keep channels for feedback open and responsive. This can be done by stating the agenda upfront, explaining the purpose of each activity, and regularly checking in with participants to ensure they’re following along.

S — Share
Share the workshop’s objectives, expectations, and agenda with all participants.

This shared understanding guides the workshop process and provides a sense of direction. It also empowers participants to take ownership of their contributions and the workshop outcomes.

The P.A.R.T.S. principle is a high-level principle you can try to implement in your workshop to make sure that all voices are heard, but to guide you further into how the principle can be used, here are some practical steps you can follow before, during, and after the workshop.

Applying The P.A.R.T.S. Principle: Before And During The Workshop
Step 1. Set The Stage

Setting the stage for your workshop goes beyond just a simple introduction. This is the point at which you establish the environment and set the tone for the entire event. For example, you can set rules like: “One person speaks at a time,” “Respect all ideas,” “Challenge the idea, not the person,” and so on. Clearly stating these rules before you start will help create an environment conducive to open and productive discussions.

It’s important to let participants know that every workshop has its “highs” and “lows.” Make it clear at the outset that these fluctuations in pace and energy are normal and are part of the process. Encourage participants to be patient and stay engaged through the lows, as these can often lead to breakthroughs and moments of high productivity later, during the highs.

Step 2. Observe The Participants

As a facilitator, it’s essential for you to observe and understand the dynamics of the group — to ensure everyone is engaged and participating effectively. Below, I’ve outlined a simpler approach to participant observation that involves looking for non-verbal cues, tracking participation levels, and paying attention to reactions to the content.

Here are a few things you should be paying attention to:

Non-verbal cues
Non-verbal cues can be quite telling and often communicate more than words. Pay attention to participants’ body language as captured by their cameras, such as their posture, facial expressions, and eye contact. This also applies to in-person workshops where it is, in fact, much easier to keep track of the body language of participants. For instance, leaning back or crossing arms might suggest disengagement, while constant eye contact and active note-taking might indicate interest and engagement. When you’re facilitating a remote workshop (and there is no video connection, so you won’t have access to the usual body language indicators), pay attention to the use of emojis, reactions, and the frequency of chat activity. Also, look for signals that people want to speak; they might be unmuting themselves, using the “raise hand” button, or physically raising their hands.
Participation levels
Keep track of how often and who is contributing to the discussion. If you notice a participant hasn’t contributed in a while, you might want to encourage them to share their thoughts. You could ask, “We haven’t heard from you yet. Would you like to add something to the discussion?”. Conversely, if someone seems to be dominating the conversation, you could say, “Let’s hear from someone who hasn’t had a chance to speak yet.” It’s all about ensuring a balanced participation where every voice is heard.
Reactions to content
Observe participants’ reactions to the topics which are being discussed. Nods of agreement, looks of surprise, or expressions of confusion can all be very revealing. If you notice a reaction that suggests confusion or disagreement, don’t hesitate to pause and address it. You could ask the participant to share their thoughts or provide further explanations to clarify any possible misunderstandings.
Managing conflict
At times, disagreements or conflicts may arise during the workshop. As a facilitator, it’s your role to manage these situations and ensure a safe and respectful environment. If a conflict arises, acknowledge it openly and encourage constructive dialogue. Remind participants of the ground rules, focusing on the importance of respecting each others’ opinions and perspectives. If necessary, you could use conflict resolution techniques, such as active listening and meditating or even taking a short break to cool down the tension.

Another helpful tip is to have a space for extra ideas. This could be a whiteboard in a physical setting or a shared digital document in a virtual one. Encourage participants to write down any thoughts or ideas that come up, even if they are not immediately relevant to the current discussion. These can be revisited later and may spur new insights or discussions.

Another tip is to use workshop-specific tools such as Butter, where participants can express their emotions through the emoji reaction features and be queued to ask their questions without interrupting the speakers. Lastly, if you have a group larger than 5-6 people, consider dividing them into sub-groups and using co-facilitators to assist in managing these sub-groups. This will make the workshop experience much better for individual participants.

Observing others through laptop cameras can be difficult when there are more than 5-6 people in the virtual room. That’s a big reason why you’ll need to set the stage and establish a few ground rules at the beginning. Rules such as “Speak one person at a time,” “Use the ‘Raise Hand’ button to speak,” and “Leave questions in the chat space” can really improve the experience.

Remote workshops might not be able to replace the full experience of in-person workshops, where we can clearly see people’s body language and interact with each other more easily. However, with the right combination of tools and facilitation tips, remote workshops can probably match very closely the in-person experience and make the participants happy.

Step 3. Respect Your Schedule

As you go about your workshop, respecting your agenda is essential. This is all about sticking to your plan, staying on track, and communicating clearly with the participants about what stage you’re at and what’s coming next.

Scheduled breaks are equally as important. Let’s say you’ve planned for a 10-minute break every 45 minutes, then stick to this plan. It offers participants time to rest, grab a quick snack (or coffee/tea), refresh their minds, and prepare for the next part. This is particularly significant during online workshops where screen fatigue is a common problem.

We know workshops don’t always go as planned — disruptions are often part of the package. These could range from a technical glitch during a virtual workshop, a sudden question sparking a lengthy discussion, or just starting a bit late due to late arrivals. This is where your “buffer time” will come in handy!

Respecting the buffer time allows you to handle any disruption that may come up without compromising on the workshop content or rushing through sections to recover the lost time. If there are no disruptions, this time can be used for additional discussions or exercises or even finishing the workshop earlier — something that participants usually appreciate.

Remember to stay focused. As the facilitator, you should keep discussions on track and aligned with the workshop’s goals. If the conversation veers off-topic, gently guide it back to the main point.

Applying The P.A.R.T.S. Principle: After The Workshop
Step 1. Follow Up

A critical part of concluding your workshop is following up with participants. This not only helps solidify the decisions and actions that were agreed upon but also maintains the collaborative momentum even after the workshop ends.

Meeting Minutes
Send out a concise summary of the workshop, including the key points of discussion, decisions made, and next steps. This serves as a reference document for participants and ensures everyone is on the same page.
Action Plan
Detail the agreed-upon action items, the person responsible for each, and the deadlines. This provides clarity on the tasks to be accomplished post-workshop.
Next Steps
Clearly communicate the next steps, whether that’s a follow-up meeting, a deadline for tasks, or further resources to explore. This ensures that the momentum from the workshop continues.

Step 2. Celebrate

Completing a workshop is no small feat. It takes dedication, focus, and collaborative effort from all participants. So, don’t let this moment pass uncelebrated. Recognizing everyone’s contributions and celebrating the completion of the workshop is an essential concluding step.

This not only serves as a token of gratitude for the participant’s time and effort but also reinforces the sense of achievement, promoting a positive and inclusive culture. Reflect on the journey you all undertook together, emphasizing the progress made, the skills developed, and the insights gained.

In your closing remarks or a follow-up communication, highlight specific achievements or breakthrough moments from the workshop. You might also share key takeaways or outcomes that align with the workshop’s objectives. This helps to not only recap the learning but also underscore the value each participant brought to the workshop.

Consider personalized gestures to commemorate the workshop — certificates of completion, digital badges, or even just a special mention can make participants feel recognized and appreciated. Celebrations, no matter how small, can build camaraderie, boost morale, and leave everyone looking forward to the next workshop.

Conclusion

Let me conclude Part 2 by quoting Simon Raybould, who wonderfully encapsulates the art of facilitation, by saying:

“The secret of facilitating is to make it easy for people to learn. If you’re not making it easy, you’re not doing it right.”
— Simon Raybould

I couldn’t agree more. The inclusive workshop is not just about getting things done; it represents the symphony of diverse voices coming together, the exploration of ideas, and the collective journey toward shared objectives. Embracing this essence of inclusivity and embedding it into your workshop design and delivery makes for an environment where everyone feels respected, collaboration is enhanced, and innovative thinking flourishes.

As a facilitator, you have the power to make the workshop experience memorable and inspiring. The influence of your efforts can extend beyond the workshop, cultivating an atmosphere of respect, diversity, and inclusivity that spills over into all collaborative activities. This is the true impact and potential of well-executed, inclusive workshops.

Further Reading & References

Here are a few additional resources on the topic of workshops. I hope you will find something useful there, too.

Gamestorming: A Playbook for Innovators, Rulebreakers, and Changemakers, by Dave Gray, Sunni Brown, and James Macanufo
This well-known playbook provides a wide range of strategies and activities for designing workshops that encourage a creative, productive thinking environment. If you’re leading workshops and wish to encourage more out-of-the-box thinking, this book is a perfect source of inspiration.
Sprint, by Jake Knapp, John Zeratsky, and Braden Kowitz
This is another well-known book in the workshop space. The book focuses on mastering the facilitation of Design Sprint, a workshop method by Google aimed at solving business problems and fostering collaboration. If you’re keen on leading tech teams or startups, this book is a great pick.
The Workshop Survival Guide, by Devin Hunt and Rob Fitzpatrick
This guide navigates you through the end-to-end process of designing and conducting successful workshops. Whether you’re a newbie or an experienced facilitator, this resource gives comprehensive support to facilitate workshops confidently.
Invent To Learn: Making, Tinkering, and Engineering in the Classroom, by Sylvia Libow Martinez and Gary S. Stager
Even though it is primarily for school educators, the book shares a wide range of methods and techniques that you can adapt to any workshop setting to create inclusive, creative, and hands-on learning environments. Highly recommended for those interested in creating an inclusive environment in any setting.
No Hard Feelings: The Secret Power of Embracing Emotions at Work, by Liz Fosslien and Mollie West Duffy
Although it doesn’t focus on workshops specifically, the book gives useful insights on managing emotions at work from both participant and facilitator perspectives. It offers a broad overview of different personalities at work and how to foster emotional inclusivity, which can be valuable when facilitating workshops.
“A Comprehensive Checklist For Running Design Workshops,” by Slava Shestopalov
Slava’s article is a thorough guide to designing and conducting a successful workshop. This is a highly recommended read for designers, product managers, or even engineers looking to understand the nuances of running a design-centric workshop.
“The Workshopper Playbook — A Summary” (AJ&Smart)
The summary of “The Workshop Playbook” discusses the 4C technique that AJ&Smart developed for constructing any workshop. The 4C’s — Collect, Choose, Create, and Commit — form an exceptional workshop framework that adheres to the double-diamond method of workshop creation. If you’re interested in gaining a more profound understanding of the 4C framework, consider reading the full book by AJ&Smart.
“The Secret To Healthy Remote Work: Fewer Meetings, More Workshops,” by Mehdi En-Naizi
The article promotes the shift from traditional meetings to workshops in remote work settings to boost productivity and decrease stress. It highlights the workshops’ effectiveness, enhanced focus, and their role in promoting team unity and social interactions.
“10 Tips On Running An Online Meeting Your Team Won’t Hate (And Free Templates To Try!),” Anamaria Dorgo and Cheska Teresa
This guide provides a detailed approach to overcoming the fatigue and frustration often associated with online meetings. The tips include clearly defining the meeting’s purpose, sticking to an agenda, creating an inclusive space for active participation, scheduling regular breaks, and using breakout rooms for more focused discussions.
“How Silent Brainstorming Easily Engages Introverts On The Project Team,” by Annie MacLeod (DPM)
Try out this brainstorming technique next time you need to get the team’s input on a problem or solution or if you’re working on a team with a lot of introverts.
“Dot Voting: A Simple Decision-Making and Prioritizing Technique in UX,” Sarah Gibbons (NN/g Nielsen Norman Group)
A few UX workshop activities work well in any situation, and dot voting is one of them. Dot voting is a simple tool used to democratically prioritize items or make decisions in a group setting. It is an easy, straightforward way to narrow down alternatives and converge on a set of concepts or ideas.
“How Do You Encourage Introverts And Quiet Participants To Share Their Ideas In A Meeting?” (LinkedIn — Meeting Facilitation)
Meetings are essential for collaboration, creativity, and innovation. But not everyone feels comfortable speaking up in a group setting. Some people may be introverted, shy, or simply prefer to listen and process information before sharing their thoughts. How do you encourage these quiet participants to contribute their valuable ideas in a meeting?
“Teacher Toolkit: Think-Pair-Share” — YouTube, (Think-Pair-Share webpage)
This versatile tool can be used in any classroom. The discussion technique gives students the opportunity to respond to questions in written form before engaging in meaningful conversation with other students. Asking students to write and discuss ideas with a partner before sharing with the larger group builds confidence, encourages greater participation, and results in more thoughtful discussions.
(Editor’s Note: The Teacher Toolkit webpage is temporarily down. Until their server is restored, you can use a full webpage copy preserved by the WayBack Machine. — MB)
“Fishbowl Conversation”
Fishbowl Conversation is great for keeping a focused conversation when you have a large group of people. At any time, only a few people have a conversation (the fish in the fishbowl). The remaining people are listeners (the ones watching the fishbowl). The caveat is that the listeners can join the discussion at any moment.
“Lightning Talks” (Design sprints by Google)
Lightning Talks are a core Design Sprint method and a powerful opportunity to build ownership in the Design Sprint challenge. Plan and set up Lightning Talks before your Design Sprint begins. After all the Lightning Talks are finished, hold an HMW sharing session to capture and share all the opportunities your team has come up with.
“AJ&Smart’s Remote Design Sprint”
The lightning demo activity from Design Sprint is a perfect example of the “Idea Gallery” type of activity. Participants work individually to create a visual or written representation of their ideas (like a poster), and then everyone walks around to view the “gallery” and people discuss the ideas.
“Poster Session” (Gamestorming)
The goal of a poster session is to create a set of compelling images that summarize a challenge or topic for further discussion. Creating this set might be an “opening act,” which then sets the stage for choosing an idea to pursue, or it might be a way to get indexed on a large topic.
“Jigsaw Activities” (The Bell Foundation)
Jigsaw activities are a specific type of information gap activity that works best when used with the whole class. The class is first divided into groups of four to six learners who are then given some information on a particular aspect of the topic, which they later become experts in.
“Disney Brainstorming Method”
The Disney method was developed in 1994 by Robert Dilts based on Walt Disney’s creative approach. It’s a good mix of creativity and concreteness as it’s not only about generating ideas but also looking at them with a critical eye and, eventually, having a few of them ready to be further explored and implemented.
“Support Extroverted Students in Remote Environment — Group Discussions”
Several video platforms have options for small group discussions. If you’re using one of these, breaking into small groups can be a great opportunity to help your extroverted students feel fulfilled (and for your more introverted students to “warm up” for group discussion).
“37 brainstorming techniques to unlock team creativity,” by James Smart (SessionLab)
It’s important to find a framework and idea-generation process that empowers your group to generate meaningful results, as finding new and innovative ideas is a vital part of the growth and success of any team or organization. In this article, several effective brainstorming techniques are explored in detail in categories such as creative exercises and visual idea-generation games.
“Round-Robin Brainstorming” (MindTools blog)
It’s all too easy to start a brainstorming session with good intentions but then overlook or miss potentially great ideas simply because one assertive person sets the tone for the entire meeting. This is why a tool like Round-Robin Brainstorming is so valuable. This method allows team members to generate ideas without being influenced by any one person, and you can then take these ideas into the next stages of the problem-solving process.
“Eysenck’s Personality Theory” (TutorialsPoint)
What is Eysenck’s Personality Theory? This theory has been influential in personality psychology and used to explain various phenomena, including individual differences in behavior and mental health.
Meeting Design: For Managers, Makers, and Everyone, a book by Kevin Hoffman
Meetings don’t have to be painfully inefficient “snoozefests” — if you design them well. Meeting Design will teach you the design principles and innovative approaches you’ll need to transform meetings from boring to creative, from wasteful to productive.
“State of Meetings Report 2021”
How did meetings actually change in 2020? What will the long-term impact of this change be? And could 2020 have changed the way we meet for good? These are questions that will be answered in this detailed report.
Social Identity Theory (Science Direct)
Social identity theory defines a group as a collection of people who categorize themselves as belonging to the same social category and internalize the category’s social identity-defining attributes to define and evaluate themselves — attributes that capture and accentuate intragroup similarities and intergroup differences.
“Clarizen Survey Pins Falling Productivity Levels on Communication Overload” (Bloomberg)
A new survey by Clarizen, the global leader in collaborative work management, finds that companies’ efforts to improve collaboration among employees by opening new lines of communication can have the opposite effect.
“Conflict Resolution Skills: What They Are and How to Use Them” (Coursera)
Handling conflict in any context is never fun. Often, issues become more complicated than needed if the people involved need more conflict resolution and general communication skills. In this article, you’ll learn more about conflict resolution and, more specifically, how different conflict resolution skills may be useful in various situations.
“Meeting Parking Lot” (The Facilitator’s School)
A free template for handling off-topic questions, topics, and discussions. Available in Miro Template and Mural Template format.
SmashingConf Online Workshops
Finally, do meet the friendly Smashing Magazine front-end & UX workshops! These remote workshops aim to give the same experience and access to experts that you would have in an in-person workshop without needing to leave your desk or couch. You can follow along with practical examples and interactive exercises, ask questions during the Q&A sessions, and use workshop recordings and materials to study at your own pace, at your own time.

Transforming Weaknesses into Strengths: A Guide to Personal and Professional Growth

Original Source: https://www.hongkiat.com/blog/marketing-yourself-leverage-weak-points/

We all have flaws, but these imperfections can serve as catalysts for our growth. Throughout history, human innovation has been driven by the need to overcome weaknesses. For example, the invention of the spear enabled us to hunt faster animals, compensating for our own lack of speed.

In the modern era, technological advancements like airplanes have given us the ability to travel faster than the fastest bird. Similarly, strategic planning allows us to explore even the most inaccessible parts of the ocean. The aim is not perfection, but rather, continuous improvement. In the business world, this principle is key to effective marketing.

How to Balance Marketing Yourself With Getting Work Done

.no-js #ref-block-post-19238 .ref-block__thumbnail { background-image: url(“https://assets.hongkiat.com/uploads/thumbs/250×160/balance-market-getting-work-done.jpg”); }

How to Balance Marketing Yourself With Getting Work Done

We all know that marketing is vital to any freelancer’s career. Freelancing is a business, and if you’re… Read more

Why Marketing Is Crucial

Marketing plays a pivotal role in business success. Traditional marketing strategies focused on showcasing a product’s strengths and benefits to attract potential clients. However, in today’s saturated market, this approach is no longer sufficient.

Nowadays, everyone is both a consumer and a provider. What distinguishes you is your ability to subtly showcase your expertise without overtly stating it. This nuanced method not only captures attention but also elicits emotional engagement, thereby drawing clients to you.

Weakness 1: Time Constraints

Expertise is highly valued by clients. I’ve started to delegate some coding tasks to platforms like oDesk and Fiverr, where there is fierce competition in various freelance fields such as coding, design, and video editing.

Despite this, clients are often willing to pay more for genuine expertise. Being an expert implies that your time is limited, which can actually work in your favor. Use your part-time freelancing and limited availability as a unique selling proposition.

Time is of the essenceTime is of the essence

When you apply for a job, highlight that your time is a valuable asset. Stress that you are committed to efficiency and will not squander either your time or the client’s. By working diligently and swiftly within the scope of the job, you can turn what may seem like a limitation into a compelling advantage.

Weakness 2: Deficiency in Specific Skills

Confidence is often mistaken for arrogance, especially among experts. However, a balanced mix of confidence, honesty, and self-assurance can be advantageous. For instance, if you lack expertise in a particular skill, you can turn this into a strength by being forthright yet confident.

Web designer skillsWeb designer skills

Consider the following example:

“While my Java skills are limited, I believe I can develop a streamlined, robust app. My experience with VB Studio equips me to create innovative solutions, such as unique coding patterns, that a specialized Java programmer might overlook. Are you open to a non-traditional approach for your app?”

Would you consider hiring someone who presents themselves in this manner? I certainly would.

Belief in your own capabilities is crucial for convincing others. In today’s digital age, acquiring specific skills is easier than ever. Platforms like Udemy offer a plethora of courses to help you become an expert in almost any field.

9 Best Websites For Online Courses & Open Courseware

.no-js #ref-block-post-19403 .ref-block__thumbnail { background-image: url(“https://assets.hongkiat.com/uploads/thumbs/250×160/free-online-courses.jpg”); }

9 Best Websites For Online Courses & Open Courseware

Nowadays, education is not limited to the classroom anymore. The advancements of technology and the Internet have granted… Read more

Weakness 3: Inexperience

Recognizing your lack of experience in a specific area is the first step towards improvement. If you’re new to a freelance platform and have no ratings or job history, it’s crucial not to underestimate your capabilities.

If you’re applying for a job where you lack direct experience but understand the objectives, try to relate your other work experiences to the task at hand.

For instance, if you’re a freelance writer venturing into Photoshop design, you can discuss how your writing skills are transferable to design. Be candid about your lack of ratings, but emphasize your strengths.

Here’s a sample letter of intent:

“I’m eager to design your website using Photoshop. Although I don’t have job experience or ratings on this platform, I possess the necessary skills for this project. My fresh perspective will enable me to create a custom site that meets your business needs.”

“Being new to this platform, I bring a fresh approach without the constraints of rigid thinking. I’m adaptable and willing to meet your specific needs.”

“Here’s why I’m qualified: I have previously worked as a writer for… and completed…”

Proceed to list your writing achievements to further bolster your case.

Weakness 4: Operating as a Small Entity

Being a small company or even a solo entrepreneur is not a drawback; it’s an opportunity. As a smaller operation, you have unique advantages, such as:

Providing individualized attention to each client
Delivering faster and more personalized customer service
Offering competitive pricing due to lower overhead costs
Being agile and innovative

Advantages of being a small companyAdvantages of being a small company

Make sure to highlight these benefits when communicating with potential clients. Many people today prefer smaller companies because they often feel overlooked by larger organizations that can’t offer personalized service.

How to Work Better with Clients

.no-js #ref-block-post-14615 .ref-block__thumbnail { background-image: url(“https://assets.hongkiat.com/uploads/thumbs/250×160/work-better-with-freelance-clients.jpg”); }

How to Work Better with Clients

Working with clients all day long may sometimes lead to stress in a freelance schedule. Long working hours,… Read more

When you’re a small operation personally managing client relationships, these issues are mitigated. Make your clients feel valued and special. However, be cautious as your company grows; rapid expansion could lead to a decline in the personalized service your clients have come to expect.

Conclusion

In summary, your online presence – be it your profile on freelancing platforms, your personal website, or your mobile app – should be meticulously crafted. Any perceived weaknesses can be repositioned as unique benefits. Adopting this strategy is crucial for effective marketing and personal growth.

The post Transforming Weaknesses into Strengths: A Guide to Personal and Professional Growth appeared first on Hongkiat.

Studio Oker: Crafting the vision for Field – Bridging geospatial technologies and design

Original Source: https://abduzeedo.com/studio-oker-crafting-vision-field-bridging-geospatial-technologies-design

Studio Oker: Crafting the vision for Field – Bridging geospatial technologies and design
Studio Oker: Crafting the vision for Field - Bridging geospatial technologies and design

AoiroStudio0918—23

In the picturesque landscapes of Norway, where fjords meet mountains and innovation thrives, Studio Oker has emerged as a creative force in the world of design. Their latest venture led them to collaborate with Field, a pioneering tech company with a mission to revolutionize the geospatial industry. Together, they embarked on a journey to shape the visual identity of Field, a project that showcases the power of design in conveying complex ideas and fostering innovation. Field is not just any tech company; it’s a trailblazer in leveraging geodata competence, proprietary software, and geospatial technologies to develop critical solutions. They provide invaluable data and insights that empower the builders of tomorrow, from urban planners to infrastructure developers. To convey this vision effectively, a strong visual identity was paramount, and Studio Oker was the perfect collaborator for the job. What sets Studio Oker apart is their ability to grasp the essence of a brand and translate it into visuals that resonate with the target audience. For Field, this meant encapsulating the ideas of innovation, precision, and connectivity. Studio Oker’s expertise in design strategy was the catalyst that brought these concepts to life. The resulting visual identity for Field is a testament to Studio Oker’s creative prowess.


The logo, a stylized representation of a compass rose, evokes a sense of direction and purpose. It symbolizes Field’s commitment to guiding clients through the complexities of geospatial data, much like a compass guiding travelers through uncharted territory. The color palette, a harmonious blend of deep blues and vibrant greens, mirrors the earth’s natural hues, reaffirming Field’s connection to geospatial technologies and environmental sustainability. These colors create a visual landscape that is both calming and inspiring. Typography, often an unsung hero in design, plays a crucial role in Field’s visual identity. Studio Oker selected a typeface that exudes modernity and clarity, enhancing the readability of complex data-driven content—a vital consideration in the tech industry. But Studio Oker’s contribution goes beyond aesthetics. Their collaboration with Field extends to the development of a comprehensive design system that covers everything from marketing materials to user interfaces. This consistency ensures that Field’s message remains cohesive and impactful across all touchpoints.


Visual identity

3D identity logo drone Website typography   field brand identity

3D identity logo drone Website typography   field brand identity

3D identity logo drone Website typography   field brand identity

3D identity logo drone Website typography   field brand identity


Studio Oker is a design agency based in Stavanger, Norway. You can check out more of their works via the links below:

Behance
Instagram
Studio site

All product photos are used only for presentation for non-commercial purposes only. All rights reserved.

Inspirational Websites Roundup #49

Original Source: https://tympanus.net/codrops/2023/09/08/inspirational-websites-roundup-49/

A thoughtfully curated collection of websites showcasing exceptional web designs.

Los Kalakos Tequila Blanco: Minimalist Packaging Design

Original Source: https://abduzeedo.com/los-kalakos-tequila-blanco-minimalist-packaging-design

Los Kalakos Tequila Blanco: Minimalist Packaging Design

abduzeedo0913—23

Los Kalakos’ Tequila Blanco 2023 isn’t just another beverage in the spirits aisle – it’s a masterclass in brandjng and packaging design presented on a bottle. Commissioned by the illustrious Ernesto Serna, known to many as Sr. Brander, this project had its visual DNA mapped out by the artful hands of Moisés Guillén.

What is immediately striking is the deceptive simplicity of the design. Guillén doesn’t just do minimalism. He *owns* it. His minimalistic approach allows the beauty of the white label to shine, painting a canvas of purity and refinement. But do not mistake this simplicity for lack of depth. With the faintest of strokes, Guillén ensures that every element sings, even in its subtlety.

The custom logotype, for instance, is a feat in itself. While many might marvel at the clean lines, the cognoscenti will appreciate the cunning use of negative space that gives the letters an illusion of depth. It’s reminiscent of the agave leaves folding in on themselves – a delightful nod to the very heart of tequila. This is not just a logotype; it’s Guillén’s witty tip of the hat to the spirit’s origins.

Perhaps the true hallmark of great design is scalability. And this branding identity doesn’t falter, whether it’s embossed on glass, stamped on cork, or imprinted on paper. Guillén has crafted an identity for Los Kalakos that seamlessly adapts, echoing a consistent narrative irrespective of the medium.

In a world overflowing with loud designs clamoring for attention, Los Kalakos’ Tequila Blanco reminds us of the power of restraint. It isn’t just about being seen; it’s about being remembered. Guillén’s work isn’t just about branding; it’s about leaving an indelible impression.

For those who understand design, Los Kalakos isn’t just another tequila. It’s a visual narrative, bottled. Cheers to Guillén, for serving us design perfection with a hint of agave.

Branding, packaging design and visual identity 

Packaging Design Tequila branding  ILLUSTRATION  mexico Guadalajara liquor Packaging visual identity Brand Design Graphic DesignerPackaging Design Tequila branding  ILLUSTRATION  mexico Guadalajara liquor Packaging visual identity Brand Design Graphic DesignerPackaging Design Tequila branding  ILLUSTRATION  mexico Guadalajara liquor Packaging visual identity Brand Design Graphic DesignerPackaging Design Tequila branding  ILLUSTRATION  mexico Guadalajara liquor Packaging visual identity Brand Design Graphic Designer

Credits

Project Concept, Art Direction, Graphic Identity, Illustration & Packaging: Moisés Guillén.
Commissioned by: Ernesto Serna (Sr. Brander).

Facilitating Inclusive Online Workshops (Part 1)

Original Source: https://smashingmagazine.com/2023/09/facilitating-inclusive-online-workshops-part1/

Have you ever found yourself trapped in an hour-long meeting, listening to someone’s endless talk without understanding their main point? Or sat through a discussion where everyone speaks, but no actions are decided upon in the end? Or perhaps felt like the meeting you’re participating in is simply a waste of time?

If you have, you’re not alone.

According to a survey conducted by Clarizen and Harris Poll (2017), three in five employed adults reported that preparing for a meeting “takes longer than the meeting itself,” and 35% of those who attend status meetings called them a waste of time. In fact, 46% of employed Americans would rather engage in any unpleasant activity than sit in a meeting.

Meetings, when organized well, can serve as an effective way to share information and make decisions. The harsh reality, however, is that many meetings are poorly structured, ending up as a drain of resources.

One of the possible ways to replace meetings with something better and more effective is the implementation of workshops. But while workshops can be a highly effective way to foster collaboration and generate innovative solutions, they often require active participation from everyone involved. Yet, not everyone feels comfortable voicing their thoughts or taking the lead in a group setting, even though these quieter voices can be just as valuable and insightful. This is what led to the concept of an “inclusive” workshop — a workshop that ensures everyone feels heard, connected, and comfortable expressing their ideas.

What’s Inclusivity, And What’s Its Impact?

Before we dive into the concept of an inclusive workshop, let’s first talk about the foundation. At its core, inclusivity means recognizing, appreciating, and respecting the diverse tapestry of human individuality. It’s about valuing the uniqueness everyone brings to the table, from attributes like ethnicity, gender, age, and religion to less apparent characteristics such as cognitive style or socioeconomic background.

Inclusivity is deeply rooted in the social identity theory, introduced by Tajfel & Turner in 1979. This theory suggests that our identities — who we think we are — are partly defined by the social groups we feel part of. It’s human nature to seek acceptance and to want to belong to a group that appreciates us for who we are. This need for social acceptance influences how we view ourselves and how we interact with others.

An inclusive environment embraces this diversity and uses this as an advantage to create a collaborative environment. Think of an orchestra, for example. Every instrument, whether it’s a violin, a trumpet, a cello, or a drum, brings with it its unique sound. Some may play a melody, others a harmony, and some keep the rhythm. Each of these sounds is different, but when combined, they create a harmonious symphony. In an inclusive setting, each person, with their distinct qualities, comes together with others to form a symphony of collaboration and understanding.

However, people are beautifully complex, and although this complexity is what often breathes life into a workshop, it can also introduce an element of unpredictability, which, if not managed well, can potentially lead to discord among the participants.

The only thing we can do is acknowledge the fact that not everyone will be comfortable speaking up, particularly in group settings. There could be various reasons for this, including individual personality traits, cultural backgrounds, past experiences, or simply the fear of judgment. As a facilitator, it is your responsibility to ensure that every individual in the room feels comfortable expressing their opinions and ideas. In the remainder of this article, I will be introducing some practical principles and techniques that could guide you in facilitating an inclusive workshop.

Preparing For An Inclusive Workshop

If you are familiar with design thinking and design in general, you’ll find similarities between the design process and structuring an inclusive workshop. In design, we start by trying to understand our users, identifying their goals, and then crafting an effective user experience to guide them from start to finish. The same principles apply to designing an inclusive workshop:

Understand the participants,
Recognize their goals,
Plan an engaging experience to achieve these goals.

Here are some “pre-works” you can do to better prepare for your workshop.

Step 1. Make Sure You Include The Right People

The most important thing in any meeting or workshop is including the right participants. Failing to do so could prevent you from guiding the team in order to reach the goals of the workshop.

If you are facilitating a workshop for your own team (or within your company, which you know well), ask yourself the following questions so as to decide if a person should be included:

Is the meeting relevant to this person’s work and core responsibilities?
Can this person provide critical information, aid in the decision-making, or contribute meaningfully to the conversation?
Is this person’s presence necessary to achieve the meeting’s goals?

On the other hand, if you’re facilitating a workshop with an external team, provide a list of criteria that outlines what the ideal participant looks like and ask your client to include all the relevant individuals.

At this stage, bear in mind that adding a new participant not only means that you are bringing in a new viewpoint but you’re also increasing the number of necessary agreements among the members of the group. This could potentially lead to more disagreements and conflicts among different parties. Have a look at the points of agreement graph (below) to better understand how this mechanism works.

Step 2. Know Your Participants Well

Once your participant wish list is set, it’s important to invite all the participants to the workshop in a manner that is welcoming and inclusive — for example, not just sending a calendar invite and expecting them to show up. If it’s feasible, try to arrange a pre-workshop call or meeting with each participant to gain a better understanding of them. Building these personal connections before the workshop is important in ensuring your workshop activities are inclusive and productive.

Here are some more detailed steps to consider.

Personalize The Invitation

Instead of a generic invite, personalize your invitations. Clearly outline the workshop’s purpose and activities and why you think they would be a valuable addition. Be open to participant’s opinions and concerns about attendance. If there’s uncertainty about their availability or relevance to the workshop, offer them an option to contribute asynchronously if they can’t participate in real-time.

An example message could be crafted along these lines:

“Hey Lewis, I am reaching out as I am planning to run a workshop with Max to brainstorm around how we can build the AI dashboard (which is the next initiative on our roadmap), and I would love to invite you to the workshop as I believe your front-end knowledge will help us a lot to understand the tech limitations. How does that sound to you? The workshop will be approximately two hours long and is scheduled for next week. Here’s the high-level agenda…”

A message like this — where you can explain what the workshop will be about, who will be involved, and how they can contribute to the workshop — will help the participant decide whether their involvement will be useful or not.

Schedule Pre-Workshop Conversations

If possible, have a brief, informal chat with the participants, especially if you’re unfamiliar with them. This could be as simple as a quick coffee chat where you just talk about your hobbies and favorite movies. Such interactions can help build rapport before the workshop and provide insights into the participant’s goals and expectations.

Identify Personality Types And Preferences

The personality traits of your workshop participants can be grouped along two main axes: their preference for group work (individualistic vs. collaborative) and their communication style (introverted vs. extroverted). By understanding and accommodating these preferences, you can create a workshop environment that truly values and harnesses the benefits of diversity.

Individualistic participants
They may prefer tasks they can work on independently and discussions in smaller groups. Designing certain portions of the workshop that allow for individual thinking and ideation can help engage these participants.
Collaborative participants
They enjoy large group discussions and team activities. Incorporating collaborative tasks where everyone can contribute can keep these participants involved and motivated.
Introverted participants
They might feel more comfortable with structured turn-taking or with written contributions. They might not voice their thoughts as readily in a group setting, but that doesn’t make their ideas any less valuable. Establishing clear turn-taking rules or offering opportunities for written input can help ensure their voices are heard, too.
Extroverted participants
They might be more engaged in free-flowing discussions or roles that involve presenting to the group. Ensuring that the workshop format has room for open discussions can cater to their preference.

Step 3. Plan The Workshop Steps

Once you have defined your participant list and understand the participants well, the next step is to plan the workshop accordingly to meet their needs.

In the next section, I will share some high-level tips relevant in particular to inclusivity.

The specifics of planning an entire workshop is another topic altogether — I recommend reading a few books on this topic, such as Gamestorming by Dave Gray, Sunni Brown, and James Macanufo and Facilitator’s Guide to Participatory Decision-Making by Sam Kaner, as well as Smashing Magazine articles that will help you dive deeper into the specifics of crafting a workshop. You might also want to look at the 4C framework developed by AJ & Smart, which can guide you in structuring your workshop logically.

Start By Defining The Break Time

No matter the nature of your workshop, it’s important to plan regular breaks which will promote an inclusive environment.

Catering to individuals’ unique needs, be they physical or cognitive, is very important. Breaks help counter the “Zoom fatigue” prevalent in virtual workshops and respect cultural sensitivities by allowing time for personal and cultural practices.

Numerous studies indicate that people can generally focus effectively for about 45 to 50 minutes at a time. Hence, consider scheduling a 5–10 minute break every hour. These intervals offer participants time to relax, regroup, and reset their mental focus, thereby maintaining engagement and productivity throughout the session.

“Excessive focus exhausts the focus circuits in your brain. It can drain your energy and make you lose self-control. This energy drain can also make you more impulsive and less helpful. As a result, decisions are poorly thought out, and you become less collaborative. So what do we do then? Focus or unfocus? In keeping with recent research, both focus and unfocus are vital. The brain operates optimally when it toggles between focus and unfocus, allowing you to develop resilience, enhance creativity, and make better decisions too.”

— Srini Pillay, “Your Brain Can Only Take So Much Focus” (Harvard Business Review)

Choose The Right Tools

The selection of tools in a remote environment can substantially influence participants’ experience. Complex or unfamiliar tools can affect the effectiveness of even the most well-planned workshop. Thus, it’s important to select tools that can help with collaboration, address diverse participants’ needs, and are accessible and straightforward to use.

Below, you’ll find a list of some popular tools for facilitating workshops, including their advantages, disadvantages, and best-suited participant types.

Whiteboard Tools

Miro
Miro is a popular and user-friendly digital whiteboard tool known for its intuitive interface and collaborative features. It’s great for visual learners and those who thrive on a free-form canvas. Additionally, for facilitators, a wide range of workshop templates is provided so that you don’t need to start from scratch. However, this tool can be overwhelming for those who prefer more structured interfaces. In addition, in Miroverse, there are more than 1000+ templates for you to get inspired by and to better plan your workshop.
Mural
Another alternative digital whiteboard platform, Mural, is known for its ability to onboard new users easily. People can join and edit your Mural board without the need to create an account, which reduces friction. However, for facilitators who wish to have more powerful features such as AI, tables, charts, and integrations, Mural might not completely satisfy their needs.
FigJam
FigJam is a top choice for designers and those familiar with Figma. It combines the flexibility of a digital whiteboard and design-focused features. This tool suits visually oriented and design-minded participants alike but may feel less intuitive to those unfamiliar with design software in general.

Video Conferencing Tools

Microsoft Teams, Zoom, and Google Meet
These are the “traditional” tools that almost everyone knows how to use. While their interfaces may lack extensive interactive features (which leads to a somewhat basic look and feel), their key strength lies in their consistent performance and accessibility. Their familiarity among users ensures a low learning curve, contributing to smooth and efficient workshop sessions.
Butter
This tool is purpose-built for running interactive workshops, offering creative features specifically focused on workshops and collaborative meetings. Butter can cater to a broad range of personality types. For extroverted participants, it enables easy active engagement in discussions, while it also allows more introverted participants to express themselves using reactions, emojis, or GIFs in a less confrontational manner.

Group Discussion Tools

Mixerchat
This platform facilitates interactive group discussions. Participants can freely navigate different breakout rooms, engaging in breakout sessions or world café-style activities.

Choose The Activities And Communication Methods

The next and perhaps most critical step is to carefully choose activities that cater to the diversity of your participants. Use the personality types and goals you identified in Step 2 to guide your decisions. Here are some suggestions to help you get started.

If most of your participants are Introverted & Individualistic.
These participants prefer to think through ideas independently before sharing them, and they may be more comfortable in a quieter setting. A few activities for this group of people could be:

Silent Brainstorming: Each participant works individually to generate ideas and write them down. After a set period, everyone shares their ideas one by one. This approach gives introverted participants time to think and formulate their ideas before sharing them.
Silent Dot-Voting: These tools allow participants to share their views or vote on ideas anonymously, which can be less intimidating than speaking up in a group.

If most of your participants are Introverted & Collaborative.
These participants may enjoy working in groups, but they prefer quieter, more thoughtful discussions. A few activities for this group of people could be:

Small Group Discussions: Divide participants into smaller groups of 3-4 people to discuss a topic or question. This setup can feel less overwhelming than large group discussions.

Think-Pair-Share: In this activity, participants first consider a question or problem individually, then they pair up to discuss their thoughts, and finally, they share their ideas with the larger group.
Fishbowl Conversation: A small group sits in a circle (the fishbowl) to discuss a topic while the rest of the participants observe. After a while, allow participants to switch places, ensuring everyone gets a chance to contribute.

If most of your participants are Extroverted & Individualistic.
These participants enjoy expressing their ideas and might prefer to work independently. A few activities for this group of people could be:

Lightning Talks: Each participant prepares a short presentation on a topic related to the workshop’s theme. This activity allows participants to express their ideas and share their expertise.
Idea Gallery/Lightning Demo: Participants work individually to create a visual or written representation of their ideas (like a poster), then everyone walks around to view the “gallery” and discuss the ideas.
Note: The idea is not new and is also known as a “Poster Session.” The goal of a poster session is to create a set of compelling images that summarize a challenge or topic for further discussion. Creating this set might be an “opening act,” which then sets the stage for choosing an idea to pursue, or it might be a way to get indexed on a large topic. The act of creating a poster forces experts and otherwise passionate people to stop and think about the best way to communicate the core concepts of their material.

Jigsaw Activity: In this exercise, each participant becomes an “expert” in a specific aspect of a larger topic. They then share their knowledge with the group, allowing for individual exploration and public speaking.

If most of your participants are Extroverted & Collaborative.
These participants enjoy the energy of group discussions and collaborative work. A few activities suitable for this group of people could be:

Open Discussions: Provide a topic or question and allow the conversation to flow naturally. Extroverted participants typically thrive in this open format.
Group Projects: Split participants into teams and assign a project related to the workshop’s theme. This could be anything from creating a mock-up for a new product to brainstorming strategies for overcoming a business challenge.
Role-play: This group activity allows participants to act out different scenarios or perspectives related to the workshop theme, encouraging dynamic discussion and cooperative problem-solving.

Step 4. Estimate The Right Time And Allocate An Extra “Buffer”

Once you have completed planning the workshop activities, if possible, try to conduct a pilot run so that you can decide the appropriate duration for each activity.

Time management is critical for inclusivity since participants may have other engagements, and if time management is out of control, both the facilitator and the participants may feel uncomfortable as they may need to shift focus to other commitments. Therefore, it is crucial to estimate the appropriate time and allocate extra “buffer” time to avoid rushing participants during engaging discussions.

I usually like to add a 20% buffer to each activity to ensure there is always some time to spare in case some people are slower. For instance, if you have set a 10-minute brainstorming session, schedule it to be 12 minutes so that you can have some extra buffer.

Step 5. Send A Pre-note Out

Inclusion often starts before the workshop even begins. A pre-workshop note can make a significant difference in setting the stage for inclusivity. It allows all participants, regardless of their background or understanding of the key topic, to start from a common ground.

For example, if you’re conducting a workshop on project management, your pre-note could include an outline of the topics to be covered, such as agile methodology, risk management, or team leadership. You could also include a brief case study for participants to review before the workshop.

The pre-note can also include logistical details such as the workshop date, time, location (or virtual meeting link), any software they need to install (like Zoom or Microsoft Teams), and what they should bring with them (like a laptop or a notebook). By sending a pre-note, you ensure that all participants come prepared and are aligned with the workshop’s objectives right from the start.

Step 6. Bonus Tip: Personalize The Experience

Once you’ve established the framework of your workshop, it’s time to season it with some personal flair. This “secret sauce” could be a unique icebreaker or an element of surprise that sparks laughter and lightens up the atmosphere.

For instance, I’ve often incorporated the pets of my colleagues into the Miro board during my workshops. The sight of familiar furry friends not only brings a smile but also fosters a sense of community and connection within the team.

Conclusion

This was the first half of our journey exploring inclusive remote workshops where we’ve “peeled back” the layers of their essence and highlighted some critical techniques and approaches to lay out the groundwork. Remember, the key to running a successful inclusive workshop is to know your participants well and to create a space where they feel at ease. Take the time to understand them and shape the workshop activities in such a way that they match participant’s personal preferences. The most important bit, perhaps, is that every attendee should feel valued and heard.

In the second part of this two-part series, I will dive deeper into what you can do during and after the workshop in order to better tailor the experience to the workshop attendees, and I will also introduce you to the P.A.R.T.S. principle, which stands for Promote, Acknowledge, Respect, Transparency, and Share.

Shopify vs Custom Website: How Should You Build an Online Store?

Original Source: https://ecommerce-platforms.com/articles/shopify-vs-custom-website

For ecommerce web design, two paths stand before you, each promising unique experiences for building an online store.

On one side, there’s Shopify, the renowned platform that offers a seamless and user-friendly experience for ecommerce web design.

On the other side, there’s the allure of a custom website, crafted by a skilled developer, offering limitless possibilities and complete control over your digital kingdom.

But which path should you choose?

In this blog post, we compare Shopify vs custom website builds.

We highlight the pros and cons of each path, helping you make an informed decision that aligns with your unique vision and goals.

We should mention: Shopify is just about the polar opposite of a custom website build. It’s not quite as “rudimentary” as a solution like Wix, but the whole idea behind Shopify is for merchants to create an online store on their own, without the need for a college degree in web design.

A custom website build, on the other hand, requires web development knowledge from you, or the person you hire. In short, Shopify is a more clean, packaged, off-the-shelf platform for launching an ecommerce site within minutes (if you’re really fast).

A custom website, although pricey and complicated and more time-consuming, provides significantly more flexibility and control over the final product that is your site.

They both have advantages, and significant downsides. So, we’ve done the work to break down a detailed comparison of Shopify vs custom website builds.

This way, you’re equipped with knowledge. The knowledge needed to launch a website with confidence, with the control or convenience you want from an ecommerce website. Now that you’re prepped, keep reading to learn all about the differences between Shopify vs custom website builds. 

The Main Differences Between Using Shopify vs Custom Website

When it comes to creating an online store, merchants have various options, two of which are: using Shopify or building a custom website.

The differences between these two approaches are significant and can greatly impact the success of an online business. In this section, we detail the main differences between the two approaches to ecommerce website development.

These are the basic, surface-level elements that make them unique. 

Shopify: A SaaS Solution for Ecommerce

Shopify is a Software-as-a-Service (SaaS) solution that allows anyone to build an online store thanks to templates, apps, and built-in tools for marketing, inventory management, and product sourcing. It is designed specifically for ecommerce and provides a seamless experience for merchants.

Shopify vs custom website

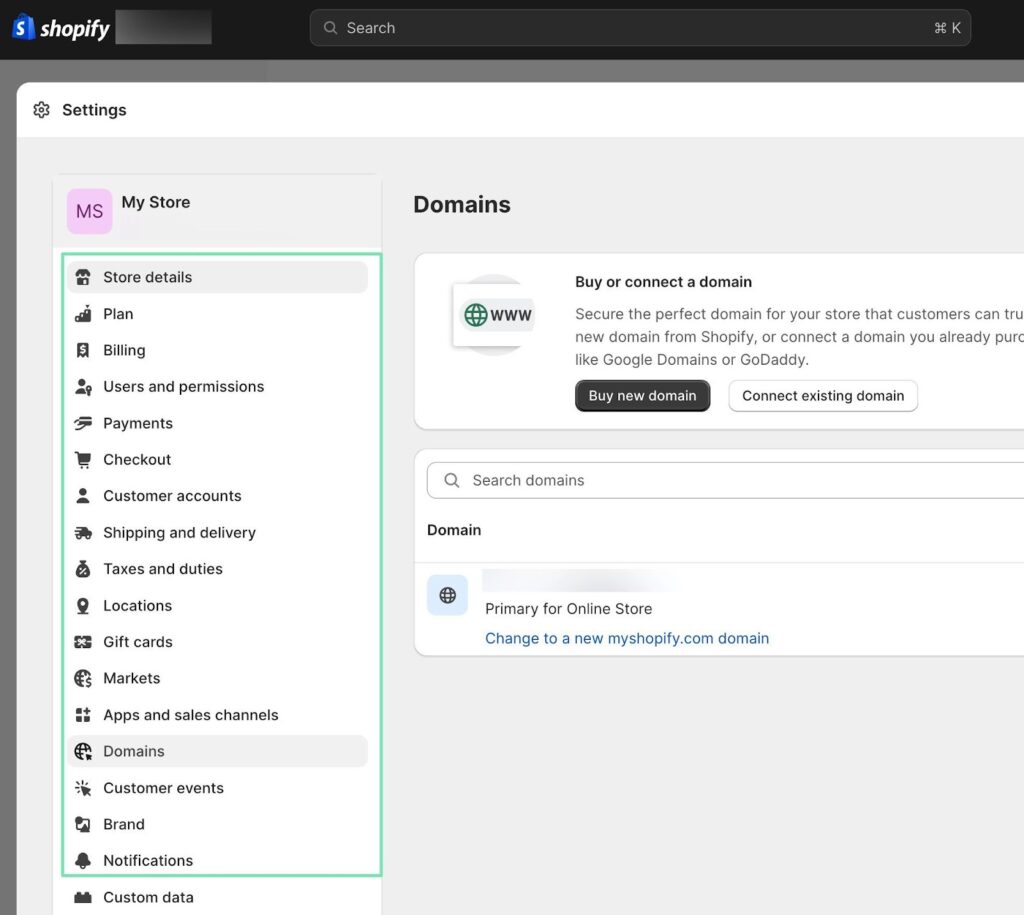
On Shopify, you don’t have to worry about getting your own hosting, domain name, or additional tools to make your site run well. All of this is managed by Shopify, which also takes care of site security, performance, and overall maintenance. This makes it incredibly easy for anyone to get started with their online store.

One advantage of using Shopify is that it offers a wide range of themes and apps to choose from, allowing merchants to customize their store to some extent. However, the flexibility is limited compared to a custom website.

Custom Website: More Control, More Responsibility

A custom website is generally built using an open-source system like WordPress, Drupal, Joomla, or Adobe Commerce (formerly Magento). In some cases, a custom ecommerce site may be generated without an open-source site builder or content management system. Instead, the developer would produce site files from scratch.

WooCommerce is an option for Shopify vs custom website

With a custom website, you have full control over the visuals and functionality of your site. You can build anything you want, but this also means you have to piece together multiple elements like hosting, a domain name, custom plugins, and site files.

All of this is managed by your developer. As is site security, performance, and overall maintenance, which could get expensive or end up falling onto your shoulders.

While a custom website offers advanced control, it requires more technical knowledge and can be time-consuming and expensive to set up and maintain.

There you have it. On the surface, Shopify is a neatly packaged software. It’s affordable and easy to use, but without the infinite control of a custom website.

A custom site promises nothing. It’s a surprise depending on your developer. However, you can communicate as much as possible to get exactly what your brand needs. For an in-depth comparison of areas like ease of use, pricing, and features, take a look at the sections below. 

Try Shopify with $1 per month for the first 3 months!

Shopify has begun offering a special deal for sellers who sign up for a new Shopify plan. That deal? Pay Shopify $1/month for 3 months of full access to the platform! Learn more about the trial here.

This offer is is now available on all standard plans: Starter, Basic, Shopify, and Advanced.

» Start your free trial here «

A Complete Comparison of Shopify vs Custom Website Builds

When deciding between Shopify and a custom website, it’s important to consider various aspects of the site building process and the maintenance that comes along with it. Let’s compare these two options in detail.

Ease of Use: Shopify vs a Custom Website

Shopify is known for its user-friendly interface and intuitive dashboard. It provides a smooth experience for both the launch and management of an online store. Anyone can learn how to use Shopify, even without technical knowledge.

Shopify vs custom website dashboard

On the other hand, building a custom website may require you to learn a content management system that is more complex. This can be a steep learning curve for those who are not familiar with web development.

Shopify Ease of Use:

User-friendly interface

Intuitive dashboard

No technical knowledge required

You still get access to custom file areas for advanced customization

Apps help extend the functionality of your site

Custom Website Ease of Use:

Full control over the website

Ability to customize every aspect

Total freedom to hire whomever you want to design and develop the site

You may have to learn a new content management system, but many of the usuals—like WordPress and Joomla—are simple enough

Limited to how much you can do yourself; you’re almost always going to be reliant on the developer, sometimes even for simple changes on the site (depending on the platform

As you can see, the ease of use from Shopify is unmatched. Yet, that’s because a custom website isn’t meant to be user-friendly for the business owner. It’s an option that you go with when you’d rather not pick a template (that many other businesses have used) from Shopify. It’s an option for gaining complete control of the design of your site. That calls for a professional developer/designer, and a more robust platform. 

With some clarity on the overall ease of use from each option, let’s dive into the amount of time it takes to launch a website with Shopify vs custom website builds. 

Launch Time: Shopify vs Custom Website

Shopify allows for an incredibly quick launch of an ecommerce store. With its pre-built templates and easy-to-use tools, you can have your store up and running in minutes—at least for a smaller store without much content. Realistically, you can launch a Shopify site within a few hours, and have it completely filled with product content, marketing elements, and apps within about a week.

Creating a website, after all, is a continuous process, so you technically never really finish when it comes to development and maintenance. Launching (publishing the site for the world to see, and buy products) actually only takes a few seconds with Shopify.

Though, we’d argue a truly professional website, with solid content and media, will take anyone a few days to complete. 

Building a custom website, on the other hand, can take longer. It involves designing the website from scratch, integrating various features, and ensuring everything works seamlessly.

Not to mention, you may need to hire a developer, or even a team of developers and designers, to work on everything from the wireframes to the media elements and site infrastructure.

With such an undertaking—one that’s highly customized and involving so many moving parts— we would expect to spend at least a month on a small ecommerce website, one that’s custom made.

For a website considered medium or large (with hundreds or thousands of products) budget anywhere from 3 to 6 months to launch a custom online store. 

Shopify Launch Time:

Quick and easy

You can technically launch a website within seconds or minutes

To realistically complete all your content and optimization, expect to spend a few days or weeks

Custom Website Launch Time:

Longer and more time-consuming

Small websites may take anywhere from a few weeks to several months to launch

Medium and large websites have longer timeframes, often ranging between 3 to 6 months for a complete site launch

Design Potential and Control: Shopify vs A Custom Website

There’s something to be said about the ability to design a beautiful online store without touching any code. That’s what Shopify offers its users. With that, however, comes various restrictions due to the simplicity of it all. 

Shopify offers a wide range of themes and a drag-and-drop builder, allowing you to create a beautiful website without any coding knowledge. 

Shopify themes

You can, however, utilize custom coding to add specific features or designs. So, there’s always the option to hire a professional Shopify developer, or try your hand if you have the experience.

But to be clear, the main focus of Shopify is to generally eliminate that requirement. It’s a platform built on simplicity, helping merchants sell more, without spending too much on web development. 

That said, Shopify has limitations when it comes to the control over your website. It uses proprietary code, making it harder to transfer to another platform, and you have less access of your site files. Again, you’re still able to access many of the site files for customization, but it’s not quite as “open” of a platform as you would get from the likes of WordPress or Joomla. 

With a custom website, you have granular control over the site’s design and functionality. You can build anything you want, but this requires technical expertise and can be more expensive.

Shopify Design Potential and Control:

Quick and seamless design with templates and a drag-and-drop builder

Beautiful templates for a wide range of industries

Yet, you’re never getting something entirely custom; you always know that there’s another (if not thousands) of other companies using the same template as yours

Less control over site files

Proprietary coding language makes for complicated customizations (even if you hire someone)

It’s nearly impossible to migrate away from Shopify to another platform, thanks to the proprietary coding languages and its theme system

Custom Website Design Potential and Control:

Complete control over design and functionality

Requires technical expertise

You can ask your developer to create anything on your website, or integrate with any app or plugin 

There’s still the potential to utilize simpler elements like templates and apps, as long as your developer opts for a platform like WordPress or Joomla

Custom sites generally use well known coding languages like HTML, CSS, and Javascript, allowing you to turn to a different developer in the future if the previous one doesn’t pan out

Features: Shopify vs Custom Website Builds

Shopify covers the vast majority of required ecommerce features you would expect to run a viable online store. It supports:

Physical and digital products

Payment processing

Professional reports

Product sourcing 

Shipping management 

Abandoned cart recovery

A point of sale

And much more

Features

With a custom website, you have the flexibility to add any feature you desire. However, this can often lead to clutter and unnecessary complexity. It can also be expensive to create custom features.

Shopify Features:

Built in features like payment processing, reports, shipping, abandoned cart recovery, POS, product sourcing, and

Access to apps help obtain functionality for anything that’s not built into Shopify, like for advanced marketing tools or accounting apps

There’s still the potential for adding your own integrations with access to the Shopify API and its site files (though this isn’t nearly as common)

Custom Website Features:

Flexibility to add any feature, as long as your budget allows

Potential for clutter and unnecessary complexity, considering it’s tempting to add every feature that comes to mind

Perfect for extremely unique feature building, like if you need a specialty ordering system for a monthly box subscription

Customer Support: Shopify vs Custom Website Builds

Shopify provides excellent customer support through various channels, including live chat, email, and phone support. 

Help center

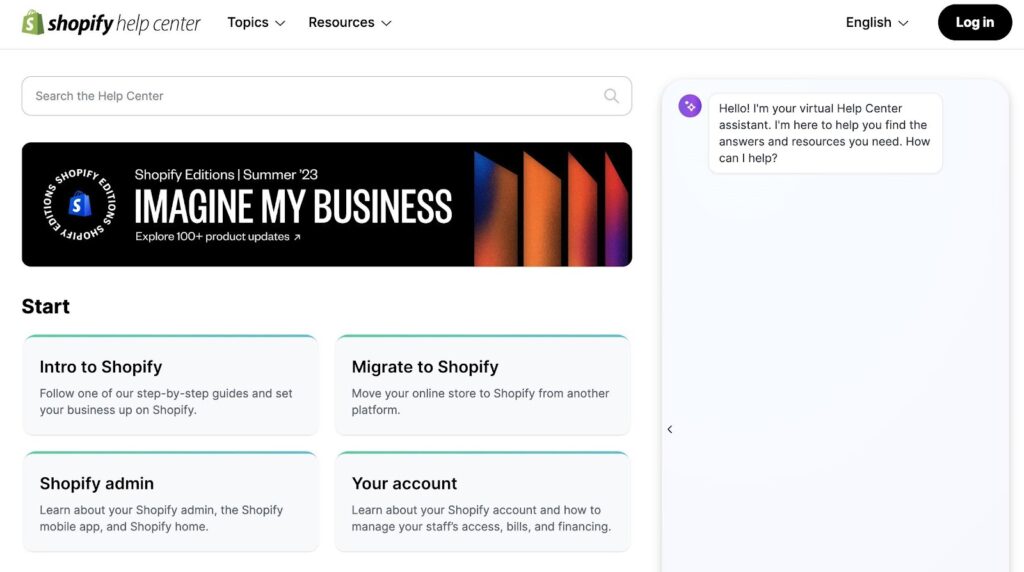
They also have extensive documentation and a vibrant community of users. As a large company, Shopify is more likely to remain as a customer support option when compared to a developer who works on a custom website build. After all, Shopify is more likely to be around in ten years than a random guy who created your website. 

Customer support for a custom website depends on the developer or agency you hire. There is a risk that the developer may disappear or stop providing support, leaving you with a website that is difficult to maintain. Luckily, you’re able to call up another developer if that happens. For your own online documentation and support, it’s simply not possible for a merchant to just call up WooCommerce or someone from Joomla to assist with a downed website. Instead, you must browse the sea of online articles to locate the information needed. 

WooCommerce help

Shopify Customer Support:

Live chat, email, and phone support

Extensive documentation

Large community of users

All of this is included with your monthly subscription 

When you stop paying for your subscription, that customer support comes to a halt

Custom Website Customer Support:

Depends on the developer or agency hired

You most likely have to pay a steep fee for customer support from the original developer of your site

Risk of disappearing support

You can still always hire a new developer for customer support

Some companies offer small monthly subscriptions to handle customer support and minor maintenance of WordPress and Joomla sites 

There’s a significant amount of documentation online about content management systems like WordPress and Joomla online; yet, that makes for daunting research when you need to resolve your own issues

Pricing of Shopify vs Custom Website

Shopify offers various pricing plans to suit different business needs. The plans range from basic to advanced, with different features and transaction fees. The costs include hosting, security, updates, and customer support, all wrapped into one simple subscription fee.

Shopify Pricing Plans:

Basic: $29/month

Shopify: $79/month

Advanced: $299/month

Building a custom website can be more expensive. Scratch that. It will almost always be more expensive in the short term, but not necessarily the long term (depending on your site). The costs include custom development work, domains, themes, plugins, apps, hosting, transaction fees, shipping labels, payment processing, marketing, SEO, and more. Fees vary depending on the complexity of the website and the expertise of the developer.

You may be able to find a developer who offers packages for website building and maintenance. For instance, some agencies and freelance developers charge several hundred dollars per month for the entire package of building the site and running it into the future. 

Estimated Costs for a Custom Website:

Development work: $5,000 – $50,000+

Domains: $10 – $50/year

Themes: $0 – $200+

Apps and plugins: $0 – $500+

Hosting: $5 – $500+/month

Transaction fees: Varied, but often starting around 2.9% + $0.30 per transaction 

Shipping labels: Varies

Payment processing: Sometimes you must pay a monthly or setup fee

As such, a custom website is likely going to cost you more money than using Shopify. Having said that, a small site, with a reasonably priced developer, may end up saving you money compared to one of the higher priced Shopify pricing plans. That’s especially true if you end up installing a handful of pricey apps in Shopify. 

Maintenance, Security, and Updates

Shopify takes care of all maintenance, security, and updates in the background. This is included in the subscription fee, allowing you to focus on running your business. You don’t have to worry about hiring a developer or relying on one person to keep your website secure and up to date.

With a custom website, maintenance, security, and updates are handled by the developer or yourself. This means additional payments and potential reliance on one person for ongoing support. While this often results in personalized customer experience, it can also mean in a website that is rarely maintained.

Shopify Maintenance, Security, and Updates:

Handled by Shopify

Included in subscription fee

You never have to think about any of these elements

Shopify is constantly improving its approach toward security and optimization

Custom Website Maintenance, Security, and Updates:

Handled by the developer or yourself

Additional payments required

This could actually be a good thing, since you may get very personalized customer support, as opposed to the generic support from Shopify

Third-party Extensions, Apps, and Services

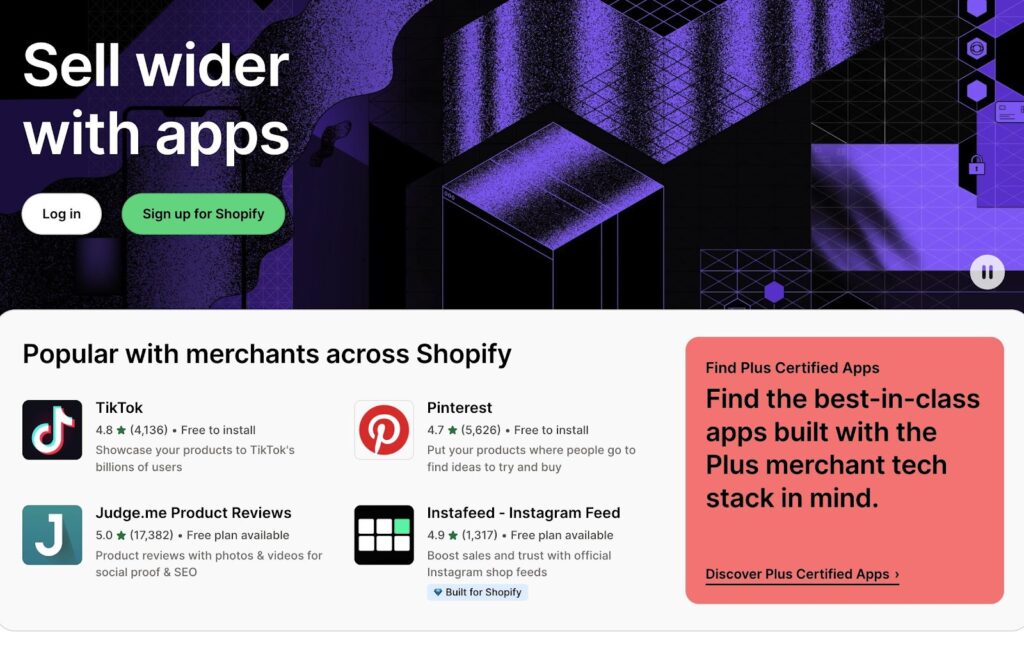
Shopify has a large app store with thousands of apps to extend your store’s functionality. These apps cover various categories, including marketing, inventory management, customer support, and more.

Shopify vs custom website apps

It’s impossible to predict which third-party services and apps will be used when launching a custom website. The developer may choose the extensions they prefer, which could come with a steep learning curve for you. These extensions are often paid for by the developer and included in the maintenance fees. This means you won’t end up saving money; the costs are just wrapped up into your maintenance charges. 

Shopify Third-party Extensions, Apps, and Services:

Marketing apps

Inventory management apps

Customer support apps

And hundreds of other categories

Custom Website Third-party Extensions, Apps, and Services:

Depends on the developer’s choices

Potential for a steep learning curve

Costs included in maintenance fees

There’s the possibility of the developer utilizing extensions in an efficient manner, resulting in lower costs and a highly optimized website

Our Conclusion on Shopify vs Custom Website Builds

Both Shopify and custom websites have their advantages and disadvantages. Shopify is a user-friendly and comprehensive solution for ecommerce, offering ease of use, a quick launch time, and a wide range of features. It provides excellent customer support and takes care of maintenance, security, and updates.

On the other hand, a custom website offers more control and flexibility in design and functionality. It allows for any feature you want, but requires technical expertise and can be more expensive to set up and maintain. Customer support and ongoing maintenance can also be less reliable.

Ultimately, the choice between Shopify and a custom website depends on your specific needs, budget, and technical expertise. 

If you’re looking for a hassle-free and comprehensive ecommerce solution, Shopify is a great choice. 

If you require complete control and customization, a custom website may be the better option.

For those with questions about Shopify, or building a custom website, feel free to leave a comment below. We’re here to help!

The post Shopify vs Custom Website: How Should You Build an Online Store? appeared first on Ecommerce Platforms.