Increase Customer Centricity With Workshops
Original Source: https://www.smashingmagazine.com/2019/06/customer-centricity-workshops/
Increase Customer Centricity With Workshops
Increase Customer Centricity With Workshops
Claire Mason
2019-06-04T14:00:34+02:00
2019-06-04T21:08:12+00:00
Workshops are interactive group activities and exercises cohesively designed to meet a goal. Generally, workshops are in-person with a facilitator guiding participants. They take people out of their normal day-to-day environment and laser focus them on the task at hand.
In this distraction-free zone, what normally takes weeks or months to accomplish takes just a few days. You can harness this efficiency to build and nurture a customer-centric culture by introducing participants to thinking tools that they can apply to everyday decision-making and that can be shared with their teams.
During my time as a customer experience manager, I have designed, facilitated, and made speeches about workshops that do just that. In this article, I have distilled key components from these workshops and documented the process around four types of workshops that you (“you” as the facilitator or organizer of a workshop) can use to drive customer-centricity in your own companies.
For discussion purposes, I have broken the workshops into two categories: “general” and “project-specific”. General refers to workshops that are designed for anyone to participate. They introduce many basic customer-centric concepts with the end-goal of equipping participants to think about the customer differently and more often.
This article will cover two types of general workshops:
Customer Bowl
Customer Canvas
Project-specific workshops are best run with a particular, actionable outcome in mind. They are designed to be run in the context of a broader project or effort. Therefore, they are best suited for participants involved in the project (more specifics later).
Project-specific workshops are the most powerful because they contextually apply customer-centric tools to the project at hand, minimizing the mental leap participants have to make between the tools they gain and how to apply them first-hand.
I discuss two types of project-specific workshops:
Journey Mapping
Google Design Sprints
Workshop Decision Table: When To Use Which Workshop
Workshop
Who
Time
Goal
Outcome
Name of workshop
Who can participate
Time commitment
Increase customer centricity by…
After the workshop, participants will have learned how to…
Customer Bowl
Anyone
3 days
Introducing customer centric principles in a fun, interactive competition
Empathize to understand customer needsApply design thinking principlesInnovate based on needsSketch/visualize ideasUse customer feedback to iterate
Customer Canvas
Anyone (but particularly good for product and sales)
½-1 day
Teaching a customer centric mindset rather than a product-first mindset
Empathize to understand customer needsHave meaningful conversations with customers based on what is important to them (and recommend relevant solutions)Create and design products and services that provide value for customers
Journey Mapping
Project-Specific
2 days
Taking the customer’s perspective to identify experience improvements
Be empathetic towards customers’ experience and interaction with brandUse research insights to uncover pain points and opportunitiesDesign experience improvements to address pain points and opportunities
Google Design Sprints
Project-Specific
5 days
Rapidly designing and testing ideas to address customer needs
Empathize to understand customer needsApply design thinking principlesMake decisions based on customer feedbackSketch/visualize ideas
Customer Bowl
Workshop type: General
Who should participate: Anyone
In summary: This introduction workshop gamifies basic customer-centric concepts by having participants compete in the Customer Bowl, a contest to see who can innovate a solution that best meets customer needs.
Why it drives customer-centricity: It introduces thinking tools and methods that encourage participants to think differently and more often about customers.
Outcome: After the workshop, participants will learn how to empathize to understand customer needs, apply design thinking principles, innovate based on needs, sketch/visualize ideas, and use customer feedback to iterate.
Context: The Customer Bowl splits participants into groups. Each group is assigned a customer for whom they will be designing a solution. Groups will follow a basic design thinking framework, using tools such as personas, journey mapping, sketching, and testing in the hopes of having the customer-sanctioned “best” innovation at the end of the workshop.
Along the way, participants can also receive individual points for showcasing customer-centric behavior, such as stepping into the customer’s shoes, talking about value to the customer rather than features, and encouraging other group members to put on their customer hats.
This is my favorite comment from a participant after facilitating this workshop:
“Wow, customers are real people!”
The CX Bowl can be modified for any industry and context, but because I work at a travel company, the workshop example I outline focuses on travelers as customers with participants acting as travel agents or experience providers.
Agenda
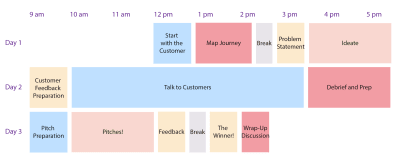
Customer Bowl agenda (Large preview)
Start With The Customer (1 Hour)
The Customer Bowl starts with an explanation of the contest and end-goal. To stoke the competitive spirit, break participants into groups, have them name themselves, and showcase the amazing prizes they stand to gain by winning the contest or earning the most individual points (amazing prizes generally means cheap candy).
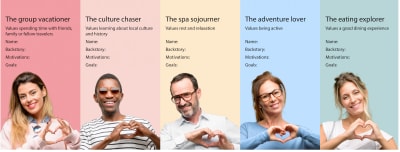
Introduce each group to their customer, the person they are designing for and who ultimately decides their fate. If you can get actual customers to join the workshop and play along, great! If not, use personas to represent customers. If using personas, explain the concept of them, when you use them and why, and assign a different one to each group.
For fun, let’s use Pinterest’s newly released high-level traveler personas based on data from their 250 million monthly users:
The Group Vacationer
Values spending time with friends, family or fellow travelers.
The Culture Chaser
Values learning about local culture and history.
The Spa Sojourner
Values rest and relaxation
The Adventure Lover
Values being active.
The Eating Explorer
Values a good dining experience.
Get groups to name their personas and add context around the persona’s goals and motivations. Encourage teams to make the personas their own and really step into their shoes.
Tip:
Your goal in this activity is to teach participants how to empathize with a persona, so it is ok if you create proto-personas not 100% based on data and research
Print off persona sheets and let teams fill them in. (Large preview)
Map Journey (1 Hour 30 Minutes)
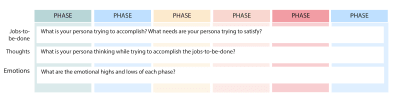
The groups will put themselves in the mind of a traveler and map the journey of their persona going on a trip: from research to shopping, booking, pre-trip, traveling, on trip, and post-trip.
Journey map: visualization of the process a persona goes through as they try to accomplish a goal.
Tip:
I like to use journey maps in the Customer Bowl workshop as the method to uncover opportunities for innovations, but there are many other approaches you can use as well, particularly if you are able to secure a real customer to participate.
Provide a simple journey mapping template for participants to use with the journey phases running horizontally on top and the customer jobs-to-be done, thoughts, and emotions running vertically on the side.
Journey map snapshot (Large preview)
Note that the first row in each phase is titled “jobs-to-be-done.” This refers to the things that a person is trying to get done or accomplish — problems they are trying to solve or needs that are trying to satisfy. This is a more powerful lens than focusing on “actions” or “steps” typically used in journey maps. Jobs-to-be-done encourages participants to consider not only the functional actions but also social as well as the emotional components to an experience (more on jobs-to-be-done later).
After groups complete their persona’s journey map, they vote on the most important or compelling jobs-to-be-done, thoughts, and emotions, paying attention to areas in the journey where there are pain points, opportunities and/or gaps.
With the journey map in mind, participants put on their traveler agent hats. For the rest of the workshop, they will use the journey map as the foundation for an innovation exercise in which they ideate solutions to address a need they uncovered in the journey.
Create A Problem Statement (30 Minutes)
Based on the top voted jobs, thoughts, and/or emotions, participants pick the area that they think travel agents could add the most value and articulate this by writing a problem statement.
This may sound basic, but this activity is important. It directs participants to define what problem they are trying to solve from their customer’s point of view. There is not one right format for problem statements. The key is to focus the statement on customer need.
I like this template from the Interactive Design Foundation:
User… (descriptive)] needs [need… verb)] because [insight… (compelling)]
Tip:
Encourage participants to find the right level of detail for a problem statement. Too broad and you won’t be able to narrow in on any solutions. Too narrow and you are limiting the potential solutions you could come up with.
For example, a group that mapped the journey of Ellen (the “Adventure Lover”) may have highlighted a pain point related to Ellen’s wardrobe. As a busy on-the-go adventure lover, Ellen might not have the time or money to wash her clothes while she is traveling. Therefore, a group could focus their problem statement on this aspect of Ellen’s journey.
Too broad: Ellen, the adventure lover, needs to be able to travel cheaply…
Too narrow: Ellen, the adventure lover, needs to be able to clean her clothing while traveling…
Just right: Ellen, the adventure lover, needs access to clean clothing while traveling…
Ideate Solutions To Address Problem Statement (Approx. 2 Hours)
Now that participants know what problem they want to solve, walk them through a process to ideate potential solutions to the problem. I like the Google Design Sprint process for ideating (check out the Google Sprint workshop section about sketching), which starts with individual brainstorming and ends with a collective vote.
Step
Description
Time
1
Participants review their persona, journey map, and problem statement, taking notes and reminding themselves of the problem they are trying to solve. and who they’re trying to solve it for.
20 minutes
2
Sketch out rough ideas or solutions.
20 minutes
3
Crazy 8s! Picking the best idea, participants draw 8 iterations to explore the solution from all angles).
8 minutes
4
Solution sketch. Participants create a shareable visualization that represents their idea.
45 minutes
5
Participants vote on the top sketches to create final solution sketch.
5 minutes
Tip:
A lot of people will be intimidated by the sketch and drawing portion of ideation. Let them know if they can draw boxes and circles, they can sketch!
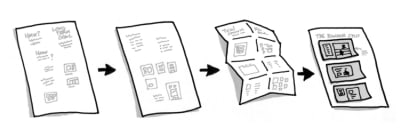
Sketch process outlined in Google Venture’s Sprint book (Large preview)
Show Sketch To Customers For Feedback (1 Hour For Preparation, Half A Day For Interviews)
Now that participants have a solution sketch, they will prepare to share their ideas with customers (travelers) for feedback. As preparation, encourage participants to do a role-playing exercise in which one participant pretends to be the traveler and the other an interviewer. The goal of the interviewer is twofold.
First, the interviewer should learn what is important to the traveler, what their biggest pain points are, and where their opportunities for improvements are along with their travel experience. This will be validated against the assumptions made in the journey mapping exercise.
Second, the interviewer should validate the idea or solution they designed in order to gauge the traveler’s interest in the idea. Does it address a pain point? Is it useful? Would you buy it?
Tip:
Keep looking for customer-centric behavior to reward. A fun way to do this is to design your own Customer Bowl money to give out.
A couple of useful guidelines for interviewers:
Listen more than you talk;
Don’t be afraid of silence;
Keep asking why — dig into emotions and motivations;
Don’t ask leading questions;
Do ask open-ended questions.
With participants feeling confident in their interviewing abilities, get them out of the building! Encourage participants to find out what it is like to talk to customers or potential customers in the real world. They can go to airports, train stations, bus stops (really wherever as most people have traveled before, there aren’t any limitations of who participants can talk to or where to find them). Each group should talk to at least five people. After groups talk to customers, they should debrief and prepare for their pitches.
Wrap-Up (2 Hours Pitch Prep, 5 Minutes Each Per Group To Pitch, 15 Minutes Judge Feedback, 30 Minute Wrap-Up Discussion)
To wrap it all together, give participants a chance to “pitch” their innovations to the group. Give them prompts to answer as part of their presentation, such as:
What were the emotional highs and lows of your persona on their journey?
What needs does your solution address?
How did input from real travelers change your idea?
After each group has pitched, it’s time to pick a winner!
If you were able to secure real customers to participate, these will be your judges. If not, you can recruit a panel of impartial judges (it always helps if these folks are more senior, not only so participants will take the judging seriously but also so more senior executives are exposed to customer-centric principles).
Regardless of who judges, give them a scorecard to fill in after each group has presented, assessing things such as: familiarity of who customer is and what is important to them, extent to which solution maps to customer needs and an indication that customer feedback was incorporated into solution. Once the votes are tallied, announce the winners and celebrate*!
* By “celebrate”, I mean have a discussion on how to apply the principles from the workshop to their roles.
Customer Canvas
Workshop type: General.
Who should participate: Anyone but particularly good for sales and product people.
In summary: Introduction to the value proposition canvas as a tool to build empathy and understand products and services in terms of customer needs.
Why it drives customer centricity: Gives participants framework they can use in conversations with customers and product decisions.
Outcome: After the workshop, participants will learn how to empathize to understand customer needs, have meaningful conversations with customers based on what is important to them (and recommend relevant solutions), and create and design products and services that create value for customers.
Context: The Customer Canvas workshop introduces the concept of value proposition design based on Stategzyer’s Value Proposition Design book by lan Smith, Alexander Osterwalder, Gregory Bernarda, Trish Papadakos, and Yves Pigneur. It focuses on customer profiles which represent the “who” that a company serves with the “what” of products and services. This exercise is typically used as a way to innovate new offerings or act as a check that new ideas for products and services map to customer needs. However, I find that the workshop also works well as a way to teach customer-centric thinking rather than product-first thinking.
Though suited for anyone looking to become more customer-centric, the Customer Canvas workshop is particularly good for sales and product people.
For salespeople, it teaches how to speak the customers’ language, and better equips them to recommend solutions based on a deeper understanding of what customers are trying to accomplish. For product people, it provides a simple and practical framework for creating and improving products and services that map to customer needs.
Tip:
This is another good workshop to gamify with points for customer centricity (and candy)!
Agenda

Customer Canvas workshop agenda (Large preview)
Start With The Customer (1 Hour 30 Minutes)
Like with Customer Bowl, start with a discussion of personas and assign one to each group. Have participants familiarize themselves with their personas and modify as needed to make them feel real.
Introduce Stategyzer’s value proposition canvas, and give an overview explanation of the intent of the canvas. As Strategyzer summarizes:
“A simple way to understand your customers’ needs, and design products and services they want.”
Explain that they will be leveraging this framework in order to move from a product-first mindset to a customer-centric mindset.
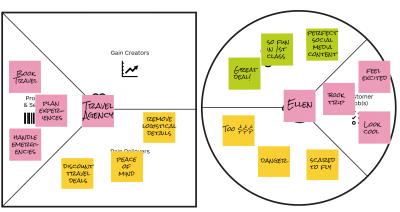
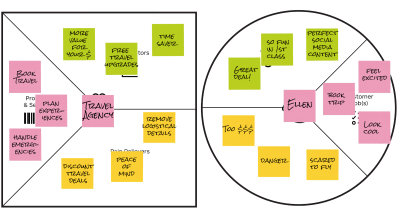
There are two sides to the value proposition canvas. The right side is called the customer profile. It represents the observed or assumed set of characteristics that represent one of the customers.* It is comprised of three components: customer jobs-to-be-done, pains, and gains.

Stategyzer’s Value Proposition canvas (Large preview)
Note: Strategyzer calls the right side of the canvas the “customer (segment) profile” and focuses on customer segments. However, I find that using a persona and choosing a context for the persona is a much stronger training tool to build customer centricity. For example, focus on Ellen, the adventure traveler, who is planning her next trip (persona and context based) rather than focusing on millennial travelers living in Atlanta, GA (customer segment based). Therefore, I refer to the right side of the canvas as just “customer profile”.
Groups will stick their persona onto their customer profile. They will then proceed to fill in the jobs-to-be done, pains, and gains segments of the profile.
Jobs-To-Be-Done (20 Minutes)
As mentioned earlier, the jobs-to-be-done framework is a great way to understand what is truly important to customers from the perspective of what they are trying to accomplish in a given circumstance. This brings customers to life in a way that big data about customers and buyer segments correlations cannot.
Tip:
If you are tight on time and can only focus on one thing, focus on jobs-to-be-done!
Jobs-to-be done can be functional, emotional, or social. They represent the things customers are trying to get done in a given circumstance. Here are a few sample prompt questions:
What is your customer trying to accomplish?
What emotional and/or social needs are they trying to satisfy?
How do they want to feel and what do they need to do to make this happen?
For the persona Ellen in a travel scenario, a few examples of her jobs-to-be done could be: functional — book a trip, social — go to a cool place to get Instagram likes; and emotional — feel a sense of adventure or excitement.
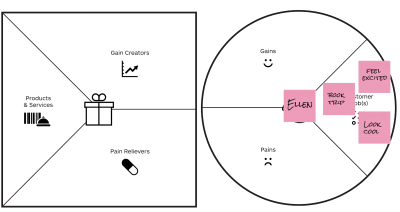
A few examples of customer jobs. A proper profile should be more filled out. (Large preview)
Pains (20 Minutes)
Customer pains are the things that prevent customers from accomplishing their jobs to be done, are risks, or are simply annoying. They also can be functional, emotional, or social. A few sample prompt questions:
What is keeping your customer awake at night? What are their big issues, concerns, and worries?
What makes them feel bad? What are their frustrations, annoyances, or things that give them a headache?
What negative social consequences do they encounter or fear? Are they afraid of a loss of face, power, trust, or status?
Pains for Ellen could be: travel costs too much; as a single female, I don’t want to travel to dangerous places; I don’t have that much money, but I want to be perceived as glamorous and adventurous.
Tip:
Really drive empathy for the pains and gains that travelers experience. It helps to frame statements from a first-person point of view “I’m scared of flying!”
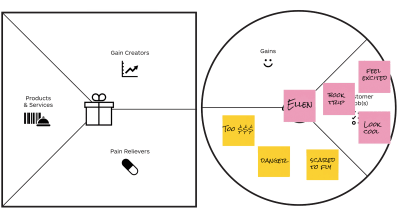
A few examples of customer pains (Large preview)
Gains (20 Minutes)
The last section of the customer profile centers around Customer Gains. These represent the functional, social, and emotional benefits a customer might need, expect or desire (or be unexpected positive outcomes).
A few sample prompt questions:
What would be a dream come true for them?
What would make their jobs easier?
What savings in terms of time, money, or effort would be beneficial?
Gains for Ellen could be: I found a really great deal on this flight!; wow, I am going to look so cool for my Instagram followers; getting to fly 1st class is a dream come true.
Tip:
People can have a hard time coming up with gains. Encourage them to think about the opposite of the pains they defined. For example, if a pain is “travel is so expensive”, then a gain could be “I found a really great deal on this flight!” It may seem repetitive, but it will be important later on when participants think of ways to address pains.
Time permitting, have participants rank each segment of the profile in terms of importance to highlight the most important jobs-to-be done, pains, and gains.
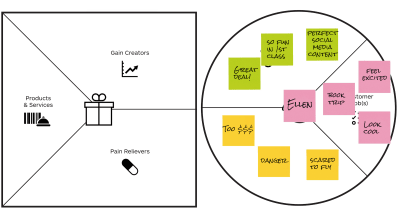
A few examples of customer gains (Large preview)
Profile Wrap-Up And Intro To Value Proposition
The last section of the exercise fills out the left side of the canvas, called the value proposition. The value proposition represents the value that a company offers in terms of its products and services, pain relievers, and gain creators.
When mapping the left side of the canvas (the value proposition) to the right side of the canvas (the customer profile), participants assess how well the products and services enable customer jobs-to-be done, relieve pains, and create gains. This mapping teaches participants how to frame the company’s products and services in terms of customer needs (stop leading the conversation with product features, and instead, talk about the jobs they enable and the value they provide!).
Tip:
As a takeaway, encourage participants to post their customer profiles around their offices to be a constant reminder of who their customer is and what is important to them. They can also print off the full list of jobs-to-be done, pains, and gains prompt questions to help focus future customer conversations.
Products And Services (20 Minutes)
Participants start filling out the left side of the canvas by listing out the products and services that their company offers. These could be physical products (i.e. the iPhone), or more intangible services (i.e. offer training on the iPhone), digital (i.e. online photo storage for your iPhone), and so on. Simply list offerings — this should be the easiest part of the exercise!
Tip:
Products and services may or may not enable your jobs-to-be-done. That’s ok, a good value proposition doesn’t need to address everything, but knowing where the gaps are can help facilitate more effective conversations with customers and lay the groundwork for future innovation and product improvements.
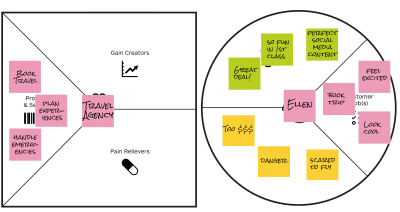
A few examples of products and services (Large preview)
Pain Relievers (20 Minutes)
Next is the pain relievers section. Here, participants outline how products and services reduce or remove pains or things that annoy customers. This section helps participants see products and services in terms of how they are eliminating pains.
A few sample prompt questions:
How does your product or service help your customer sleep better at night? Or address issues or concerns?
How does it make your customer feel better?
How does it remove barriers and obstacles?
A few examples of pain relievers (Large preview)
Gain Creators (20 Minutes)
Gain Creators describe how products and services create customer gains or positive outcomes for customers to enjoy.
Sample prompts questions:
How do your products and services save time, money, or effort for your customers?
How do they outperform other related products or services customers could be using?
How do they create positive emotional or social reactions?
Tip:
This section of the workshop can be tricky. People really struggle with this area of the canvas feeling redundant, and it is a little tedious after filling out five other sections of the value canvas already. It might be a good idea to take a little break here or do a quick exercise to get people’s energy up.
A few examples of gain creators (Large preview)
Assessing Fit (1 Hour 30 Min Including Wrap-Up Discussion)
The last activity in the workshop is assessing how well the value proposition offerings map to the needs uncovered in the participant’s customer profiles.
Are there major jobs to be done that your products and services aren’t enabling?
Are there important pains and gain opportunities that are being left on the table?
Have participants discuss the “fit” and what they learned. Some great questions here:
How will this impact the way you think about customers?
How will this impact the way you talk to customers?
How can you use this framework to ensure you are designing and building the right things?
As an ideal after-workshop-activity, participants should test the assumptions they’ve made with real customers. This really brings customers to life.
Wrap-Up And Alternative Approaches
Tailored For Sales Training
Another way to run the workshop which is especially helpful for salespeople is to do the same exercise, but this time, have one person role play as the customer. And the other can only fill out the customer profile based on asking the “customer” questions about what is important to them, what jobs they are trying to accomplish, what their pains are, and so on. This not only gives salespeople a more customer-centric way to think about their products, but it also trains them to be able to talk (and listen!) to customers.
Tailor For Product Innovation
The canvas is intended to be used to design products and services that customers want. It acts as a gut check to ensure time and money isn’t wasted on designing something that doesn’t enable customer jobs-to-be done, relieve pains, or create gains. If this sort of innovation is your goal, simply have participants fill in the left side, or value proposition canvas, with their new product or service ideas and assess fit to see if the idea is worthwhile.
Journey Mapping
Workshop type: Project-specific.
Who should participate: Participants should be specific to a project and represent different business units supporting the relevant phases of the journey you are mapping.
In summary: Workshop to map specific phases of a customer’s journey, uncover pains/gaps/opportunities, and (end-goal) provide a more seamless end-to-end experience for customers. While the Customer Bowl taught journey mapping as an introduction to customer-centric tools (and innovation), this method is more geared towards experience improvements of existing products and services.
Why it drives customer centricity: encourages participants to step into the customer’s shoes and understand how the customer sees their business.
Outcome: After the workshop, participants will learn how to be empathetic towards the customer’s experience and interaction with the company brand, use research insights to uncover pain points and opportunities, and design experience improvements to address pain points and opportunities.
Context: Journey mapping is a critical activity that scales to any business size and a particular element of a journey. For example, people can map the customers’ end-to-end experience with a business, from the moment they discover it, sign up for a product or services, install and use it, get support, and so on. This high-level view ensures that the customer experience is seamless across each phase in their journey. This end-to-end view is especially important as so much focus can be given how the customer uses a product or service (the “use” phase), that other components of the customer journey are ignored.
People can also focus on one area of the journey in more detail. For example, people can map customers’ support journey from when they first encounter an issue, to seeking help, to waiting for a response, and issue resolution (or not). This secondary-level view is equally useful to ensure every aspect of the customer experience is understood because even seemingly inconsequential experiences can have a big impact on the customer’s perception of a business.
Agenda
Journey mapping agenda (Large preview)
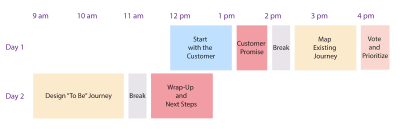
Start With The Customer (1 Hour Readout, 30 Min Discussion)
Start the Journey Mapping workshop with a review of customer research that has been conducted prior to the session. For example, during a workshop focused on the customers’ support experience, do a readout of the qualitative and quantitative research conducted — customers talked to, survey results, and operational data analyzed. Your job here is to bring customer experiences to life. Have participants take notes because these will be useful when mapping the journey later on.
Tips:
If possible, record and play audio clips of customer conversations.
It can get a little sensitive when participants in the workshop are directly responsible for the negative experiences customers are sharing. Be sure to start the session by explaining that the feedback is not a commentary on anyone in the room but is an opportunity to improve.
Create A Customer Promise (30 Minutes)
After a discussion of the customer research, have participants create something called a “customer promise.” This is a statement written from the customer’s point of view that represents the ideal experience that they want, expect, and desire. It then becomes the participants’ promise to try to provide this experience for them.
As a customer, I want/expect/deserve:
To have easy access to useful help (without being made to feel stupid).
To have the impact to my business understood.
A response at the pace that I have to respond to my own customers.
An answer (either a solution or at least honest and frequent communication around my issue).
You will point back to (and update if needed) this promise throughout the workshop to ensure that the decisions being made support the promise.
Map The Existing Journey (1 Hour, 30 Minutes)
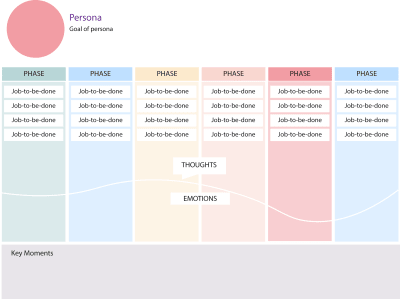
Journey maps are most effective when they tell a story. Therefore, focus on one customer in one specific scenario and map the corresponding jobs-to-be done, thoughts, and emotions (high and lows of the journey). Use examples from research to select a persona and scenario that best represent a typical customer and situation.
As an example, a scenario could be: Bonnie Jones, a travel agent, receives an error while using travel booking software and wants resolution quickly in order to be able to support a client’s travel schedule:
Sample template for journey map (Large preview)
Tips:
Generally, selecting a persona and scenario that represent the typical experience of a customer is representative enough of most customers’ experience and thus one journey map is sufficient. However, if a different persona and corresponding set of behaviors change the outcome of the journey in significant ways, or a different scenario would uncover key insights, you may choose to do another journey map.
You can modify what components of the journey you want to map depending on how you want to tell the customer story. For example, you can add additional components, such as touch points, images, and expectations.
Come prepared with the phases of your journey already defined, i.e. for a support journey map: experience an issue, analyze, seek help, wait for an update, and issue resolution (or not). This is easier than starting from scratch — you can always update if needed.
Start by mapping the customer’s jobs-to-be done along with the scenario. What are they trying to accomplish? What functional, emotional, or social tasks do they need to do? Then, capture the corresponding thoughts they have while trying to accomplish the jobs-to-be-done using actual verbatims from research. Last, plot a line to represent the emotional highs and lows the customer feels as their story progresses.
Tip:
Throughout the journey map, add notes from the customer research.
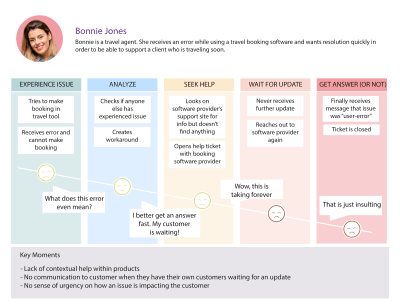
Simplified sample existing support journey map (Large preview)
Vote And Prioritize (10 Minutes)
Once the group has filled in the journey map, take a step back and walk through the journey again, telling the customer’s story from their perspective. Hopefully, what emerges is a rich narrative based on real customer insight. Discuss as a group — what surprised people? What did they learn?
Now it’s time to pinpoint the areas of the journey that could be improved. An easy and fast way to do this and build consensus is to give each participants dots or stickers that represent votes. They each have a number of votes they can use to indicate where the pain points/gaps/opportunities are along the journey. Give people infinite votes; this will create a sort of heat map and make sure that smaller, potentially easier-to-address areas are captured as well as the big and obvious issues.
Also, let people vote on the biggest or most important areas. Here, limit dots to around three in order to force people to prioritize. These big areas will serve as a gut check, making sure the group addresses the things that matter in the “to be” journey.
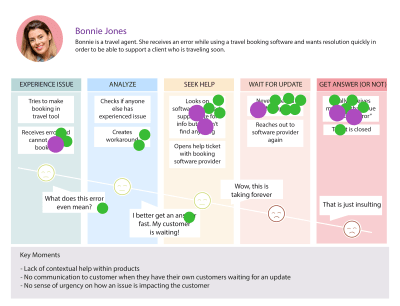
Simplified sample of dot voting with heat map effect and priority items identified (Large preview)
Design The “To Be” Journey (2 Hours)
Now that the group has mapped the existing journey, it is time to design what they want that journey to look like in the future, or what the “to be” journey is. The “to be” aspect of journey mapping is often overlooked but critically important to drive improvements for the customer. It is not enough to identify the pains, gaps, and opportunities associated with the existing journey. Take it one step further, and design the end-to-end journey that customers desire. This also ensures that any improvements flagged are executed in the context of the full journey, supporting a more seamless experience.
Before designing the “to be” journey, revisit the customer promise for inspiration and guidance. Also review the top voted pains, gaps, and opportunities to make sure the future journey addresses these.
The easiest way to create a new journey is to overlay new aspects of the experience on top of the old journey. Retell the narrative, but this time, tell it from the perspective of someone who has just had a really good experience. For example, if the existing journey tells the story of a travel agent who has to wait weeks for an answer to a support ticket (in the meantime, making their own client upset), then the “to be” journey should tell the story of an agent who not only receives an immediate answer to their issue but receives it contextually without ever having to leave their workflow. And even better if they never experienced an issue at all.
After completing the “to be” journey, check it against the top voted pains, gaps, and opportunities of the existing journey. Are they addressed? Would the experience that the group designed enable them to deliver on the customer promise?
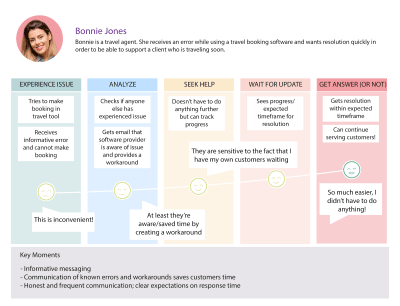
Simplified sample “to be” support journey map (Large preview)
Wrap-Up And Next Steps (1 Hour)
If the group has time during the workshop, it is ideal to look at the internal actions and processes (the backstage and offstage) accompanying the customer journey (front stage). This helps the group pinpoint exactly what needs to change internally to be able to support the improved experiences designed in the “to be” journey. At a minimum, the workshop needs to wrap with a strategy of how to execute this journey. Ideally, the workshop will be run as part of a fuller program to drive change. The actions and recommendations uncovered in the workshop can be integrated into the overall program plan.
As a post-workshop activity, convert the existing and “to be” journey maps into nice visualizations, with the jobs-to-be-done, thoughts, and emotions clearly articulated. This is easy to share and consume and will serve as a reminder to participants of what it is like to be a customer and interact with their brand, and what participants can do to deliver improved experiences at every phase of the customer journey.
Tip:
Start every PowerPoint, presentation, readout, with following the workshop with the customer promise. Don’t let people forget what they promised and why. Everything they do should map back to this!
Tip:
For more journey mapping and workshop resources, Oracle’s Designing CX website is useful.
Google Design Sprints
Workshop type: Project-specific
Who should participate: Individuals supporting the ideation and validation of a new value proposition. In general, a technical person, product person, designer, and decision-maker.
In summary: Google Design Sprints enable participants to understand quickly if a new idea resonates with (potential) customers.
Why it drives customer centricity: Encourages decision-making based off of customer understanding and feedback.
Outcome: After the workshop, participants will learn how to apply design thinking principles in action: learn about customer need, define the problem to solve, ideate ideas to address the problem, create a prototype to represent the idea, and test with customers.
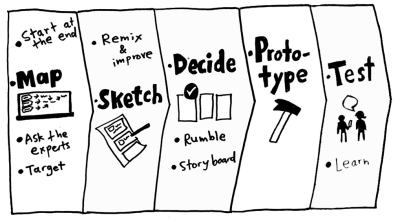
Context: The Google Sprint process was introduced by Google Ventures and documented in the book Sprint: How to Solve Big Problems and Test New Ideas in Just Five Days by Jake Knapp with John Zeratsky and Braden Kowitz. Designed to “solve big problems,” the Sprint can be run in 5 days or less. It is a great, hands-on way to introduce participants to the customer-centric design thinking framework in a way that is fun and results-driven.
There are many resources you can reference if you are interested in learning about Sprints in more detail, such as the Sprint book, newsletter, and an overview article that I wrote a couple of years ago. With these available, I will only summarize salient points below.
Agenda
Google Design “Sprint” agenda for the five days (Image source: Sprint) (Large preview)
Overview Of The Process
Day 1
Participants have to come into the Sprint process with a high-level understanding of the problem they are trying to solve or at least a general idea of what to focus on. Day 1 acts as a way to gather the information necessary to narrow focus enough to target the area of the problem to solve.
Tip:
Make sure to start the workshop with the customer — either a readout of research or interview actual customers in addition to the recommended customer experts.
Day 2
Day 2 starts with a review of existing products and services that each participant “lightning demos” to see if any ideas can be leveraged. I’ve never found this activity to be particularly helpful. While it makes sense from a design perspective not to have to “reinvent the wheel,” most designers already have tool kits and templates to draw from, so it’s not the best use of everyone’s time.
It is also not a useful exercise in uncovering potential ideas or value propositions. Rather, it is better to start with customer needs and ideate solutions that address those needs without relying on preconceived notions of what those solutions should be. So, if you’re looking to shorten a Sprint workshop, you might want to cut the lightning demos.
A more worthwhile exercise on day 2 is the ideate and sketch process. Participants use this process to come up with different ideas of solutions that may address customer needs. The Sprint book suggests a great step-by-step process to accomplish this.
Rather than group brainstorming, the process centers around individual ideating and sketching — resulting in more varied and diverse ideas. The process is also repetitive and iterative, encouraging participants to push past the most basic ideas and think of truly innovative ones.
Tips for ideation and sketching:
Visualize
Sketch out different ideas. Asking people to capture ideas visually gets their creative juices flowing. It also helps frame solutions from the perspective of how a customer might interact with and obtain value from an idea.
Individual Brainstorming
“Group think” does not encourage ideas that are out-of-the box. Instead, create as many individual divergent ideas as possible before converging as a group.
Everything Goes
Ideation needs to be a criticism-free zone to allow creativity to emerge.
The More The Better
As more and more ideas are generated, people start to push past the obvious answers and start thinking of new and innovative ideas.
For more ideas, check out Slava Shestopalov’s article on brainstorming workshops.
Crazy 8s, one method in the Sprint process, involves rapid iterations of ideas from different angles encourages people to think outside of the box. (Large preview)
Day 3
Participants review the sketches, vote on the top ideas, and create a storyboard to represent how a customer will interact with the winning idea.
Tip:
Some people are intimidated with the idea of drawing a storyboard. Don’t sweat it! The most important aspect of a storyboard is to communicate and tell a story in a customer-centered way. Do this by thinking about what the customer is trying to accomplish and how a solution might enable them to do so.
Day 4
After storyboarding, create a visual and interactive representation of an idea called a prototype. A prototype allows someone to interact with an idea to give a realistic picture of the value offered. A prototype can be a physical object, a clickable website, app — whatever best represents the idea.
Tip:
Participants often feel like they need to create an entire prototype to test ideas. This is generally not necessary. All that is needed is a representation of the value proposition to validate with potential customers. One easy way to do this is to create a fake landing page with an overview of what the idea is and why it is useful. For solutions further down the validation process, more complex prototypes may be more useful.
Day 5
After creating a prototype to represent the idea, participants conduct customer testing sessions. These sessions allow the group to see how customers will react to the idea before making expensive commitments. This initial round of testing should be aimed at understanding if the idea resonates with customers. Would they use it? Would they buy it?
Tips:
Create a test script ahead of time: this helps keep the flow of conversation going and standardizes feedback results for easier analysis. But be sure to still leave room for organic conversation and flexibility to go off script.
Ask open-ended questions: this encourages customers to talk more and gives more information about their reaction to an idea. Get them talking!
Be comfortable with silence: people have a tendency to want to fill silence to avoid awkwardness, resist the temptation and customers will talk more.
Turn questions back on the customer: when customers are interacting with a prototype for the first time, they’ll naturally have some questions. When they ask something like, “What does this do?” then turn it back on them and ask, “What do you think it does?” Again, get them talking.
Use the feedback heard from customers as a way to decide how to move forward (or don’t) with the idea. Maybe customers loved everything about it and can’t wait to see more. Maybe customers didn’t think it was entirely useful, or maybe customer feedback was somewhere in between. Whatever the outcome, remind participants that they learned something they didn’t know before.
In addition, even if customers hated the idea, think of all the money potentially saved by not further investing in the idea. As icing on the cake, the sprint outlines a formulaic approach that participants can use again and again for more customer-centric decision making.
General Facilitation Tips And Tricks
Rapid-fire facilitation tips and tricks for any workshop!
Before The Workshop
Understand the objective, define the scope (drive stakeholders to narrow focus and create clear definitions).
What is the problem you are trying to solve?
Define your desired end-state. What would make your workshop a success?
Identify and execute pre-work needed to make the workshop a success .
Design high-level workshop to drive towards desired end-state.
Break down into more detail (define timings, breaks, lunch, and so on) for you to follow as a guideline.
Create and share a high-level agenda with participants to let them know what to expect.
Day Of Workshop Prep
Hang up area for next steps/action items and parking lot.
Setup supplies (paper, snacks, etc.).
During The Workshop
Kick-off with a high-level intro (project sponsor, why are we here, what are we trying to accomplish, and so on).
Team intros & icebreakers.
Housekeeping: set expectations that you will be keeping people on track.
Document high-level goal, get team agreement.
Continue into the flow of the workshop.
Best Practices
Set clear expectations with stakeholders and participants.
Stay neutral.
Keep people on track (“Great feedback, I’m going to capture that in our parking lot and move on…”).
Individual brainstorming and sketching.
Dot voting as a quick way to prioritize.
Get people to take notes during presentations to stay engaged, use during later exercises.
Delegate other people to help facilitate or run different sessions.
Visualize as much as possible.
Breaks every 1.5-2 hours.
Define clear next steps and ownership.
Elicit participant feedback after the workshop.

Use participant feedback to design more effective and engaging workshops. (Large preview)
In Conclusion
The list of general and project-specific workshops discussed is neither exhaustive nor static. There is great flexibility to add, modify, or remove workshops and elements depending on what works, doesn’t work, or is missing.
It is my hope that we can create a collective bag of tools to enable us and our colleagues to think about things differently — about the customer more often — and ultimately make decisions that are first filtered through the customer lens. So the next time you want to jolt your organization with a good dose of customer centricity, run a workshop (and tell us about it!).
![]()
(cc, il)


Leave a Reply
Want to join the discussion?Feel free to contribute!