Understand Web Development in Less than 1 Hour

Original Source: https://www.sitepoint.com/understand-web-development-less-1-hour/

This article was created in partnership with KTree. Thank you for supporting the partners who make SitePoint possible.

This article explains what web development is, by exploring how it started and how it evolved. This is not an exact chronicle of the web’s evolution, but focuses more on what the needs for this evolution were, so we can understand the technology.

It all started with information. Humans have always needed to find ways to share information with others. As you are aware, before the internet, information was shared via letters, newspapers, radio and television. Each had its own disadvantages, which allowed the internet’s information highway to come to the forefront.

1. What is the Web?

What if you can publish information in a place where whoever is interested can go and read that information? That’s exactly what the web does. You keep the information on a web server, and people can read that information using clients (browsers). This architecture is called ‘server-client architecture’.

Why HTTP?

Initially, this information was all stored as text — that’s why the name hyper-text transfer protocol has stuck even though now text, media and files are all exchanged via this protocol.

2. How Is Information Kept, Retrieved and Saved?

The most basic and long-lived way of storing information on the web is in HTML files. To better understand, let's take a simple example of company publishing its price information so its vendors can download and view the list, which consists of products with a price and effective date. This was kept as a HTML file on the server, which can be viewed using a web browser. The browser requests the file from the sever, and the server serves it up and closes the connection.

HTML is a standard markup language used to create web pages. In other words, it’s a simple text file with tags that help the browser figure out how to display the information.

<!DOCTYPE html>
<html>
<body>

<h2>Price List</h2>

<hr>

<table>
<tr>
<td>Product Name</td>
<td>Sku</td>
<td>Price</td>
</tr>
<tr>
<td>KTree Web Service</td>
<td>1234566</td>
<td>60.USD Per Hr</td>
</tr>
<tr>
<td>KTree Web Service</td>
<td>1234566</td>
<td>60.USD Per Hr</td>
</tr>
</table>

<hr>

</body>
</html>

CSS

Cascading Style Sheets (CSS) is a style sheet language used for describing the presentation of a document written in a markup language. Basic formatting and styling can be done via HTML, but it’s better to use CSS for this.

A web application contains many pages, either dynamic or static. If we use HTML tags for styling the information we have to repeat this information in every page. Suppose we want to change the background color — we have to edit the HTML for every page that is part of the site.

Instead, we can use CSS to store our style definitions in one location, and refer each HTML page to that location. By changing the CSS file, we can change the background color on every page that looks to the stylesheet for style defintions.

CSS does more than just setting the background color, of course: it allows us to set colors for all sorts of elements, fonts, page layouts, and much more.

We have styled our previous example using CSS. Let’s say we are using tables on different pages, but using the same CSS styles. We can move all this style information out to its own file.

<!DOCTYPE html>
<html>
<head>

<!–– for simplicity we have kept the CSS in inline in the HTML – you can keep the css in any file with a .css extension and include it using <link rel=”stylesheet” href=”styles.css”> –>

<style>
table {
font-family: arial, sans-serif;
border-collapse: collapse;
width: 100%;
}

td, th {
border: 1px solid #dddddd;
text-align: left;
padding: 8px;
}

tr:nth-child(even) {
background-color: #dddddd;
}
</style>

</head>
<body>
<h2>Price List</h2>

<table>
<tr>
<td>Product Name</td>
<td>Sku</td>
<td>Price</td>
</tr>
<tr>
<td>KTree Web Service</td>
<td>1234564</td>
<td>60.USD Per Hr</td>
</tr>
<tr>
<td>KTree Web Service</td>
<td>1234565</td>
<td>40.USD Per Hr</td>
</tr>
<tr>
<td>KTree Web Service</td>
<td>1234566</td>
<td>50.USD Per Hr</td>
</tr>
</table>
</body>
</html>

JavaScript

JavaScript is the third pillar of the web, alongside HTML and CSS, and it is normally used to make web pages interactive. To understand JavaScript (JS), we need to know what the DOM is.

The Document Object Model (DOM) is a language-independent application programming interface that turns the HTML document into a tree structure. The nodes of every document are organized in that tree structure, called the DOM tree, with the topmost node called the “Document Object.”

Sample DOM Tree (Source: Wikimedia Commons)

When an HTML page is rendered in the browser, the browser downloads the HTML into local memory and creates a DOM tree to display the page on screen.

Using JS, we can manipulate the DOM tree in several ways:

JS can modify the DOM tree by adding, changing, and removing all of the HTML elements and attributes in the page.
JS can change all of the CSS styles on the page.
JS can react to all of the existing events on the page.
JS can create new events within the page and then react to all of those events.

In our JavaScript example, we continue with our price list example by adding another column — Special Price — which is hidden by default. We’ll show it once the user clicks on it. In technical terms, we use a click event attached to the web element (anchor tag) and change the existing text of the web element, in other words manipulating the DOM. To do this, we have to use the browser’s accepted scripting language, which is always JavaScript.

<!DOCTYPE html>
<html>
<head>
<!–– for simplicity we have kept the CSS in inline in the HTML – you can keep the css in any file with a .css extension and include it using <link rel=”stylesheet” href=”styles.css”> –>

<style>
table {
font-family: arial, sans-serif;
border-collapse: collapse;
width: 100%;
}

td, th {
border: 1px solid #dddddd;
text-align: left;
padding: 8px;
}

tr:nth-child(even) {
background-color: #dddddd;
}

#specialprice {

}

</style>

</head>

<body>
<h2>Price List</h2>

<table>
<tr>
<td>Product Name</td>
<td>Sku</td>
<td>Price</td>
<td>Special Price</td>
</tr>
<tr>
<td>KTree Web Service</td>
<td>1234564</td>
<td>60.USD Per Hr</td>
<td id=”specialprice”> <a href=”” onclick=”return false;”> Click Here </a> </td>
</tr>
<tr>
<td>KTree Web Service</td>
<td>1234565</td>
<td>40.USD Per Hr</td>
<td id=”specialprice2″> <a href=”” onclick=”return false;”> Click Here </a> </td>
</tr>
<tr>
<td>KTree Web Service</td>
<td>1234566</td>
<td>50.USD Per Hr</td>
<td id=”specialprice3″> <a href=”” onclick=”return false;”> Click Here </a> </td>
</tr>
</table>

<script>
document.getElementById(“specialprice”).onclick = function() {myFunction()};

function myFunction() {
document.getElementById(“specialprice”).innerHTML = “20% Off”;
}
</script>

</body>
</html>

Forms

Up til now, we’ve only discussed getting data from the server. Forms are the other side of HTML, which allows us to send information to the server. We can use forms to either update existing information or add new information. The most commonly used methods in HTML forms are GET and POST.

Continue reading %Understand Web Development in Less than 1 Hour%

Photography: Hong Kong Ballet Campaign

Original Source: http://feedproxy.google.com/~r/abduzeedo/~3/5X65xpStTfQ/photography-hong-kong-ballet-campaign

Photography: Hong Kong Ballet Campaign

Photography: Hong Kong Ballet Campaign

AoiroStudio
May 28, 2018

Let’s tackle this Memorial Day with a colourful campaign for the Hong Kong Ballet, photography by Dean Alexander. Dean is working in the field of advertising/fashion photographer and film director/cinematographer. His work has taken him to over 50 countries and has won over 150 International Awards worldwide. What an accomplishment, the quality of this campaign is totally upscale. It looks like it was a fun client! It’s like the one thing they did care about was to give the creative a full “Carte Blanche” experience which judging by the results. It really paid off, beautifully!

Learn more about Dean Alexander
Photography
Photography: Hong Kong Ballet CampaignPhotography: Hong Kong Ballet CampaignPhotography: Hong Kong Ballet CampaignPhotography: Hong Kong Ballet CampaignPhotography: Hong Kong Ballet CampaignPhotography: Hong Kong Ballet CampaignPhotography: Hong Kong Ballet Campaign

photography
hong kong
dean alexander


20 Useful Firefox Sidebar Add-ons

Original Source: https://www.hongkiat.com/blog/20-useful-web-applications-for-firefox-sidebar/

Useful sidebar add-ons for Firefox browser that give you quick access to your most-used apps and service.

The post 20 Useful Firefox Sidebar Add-ons appeared first on Hongkiat.

Visit hongkiat.com for full content.

Collective #419

Original Source: http://feedproxy.google.com/~r/tympanus/~3/Rgq9JlCzzQA/

C419_HelloSign

This content is sponsored via Syndicate Ads
HelloSign API: Everything IT requires and Developers love

With a robust SDK, amazing support, detailed documentation, and super clean dashboard, HelloSign API is sure to make your team happy.

Try it free today

C419_layout

Getting Started With CSS Layout

A guide by Rachel Andrew to the various layout methods of CSS.

Read it

C419_nanojs

nanoJS

A very minimal standalone JavaScript library for DOM manipulation with a jQuery-like syntax.

Check it out

C419_oceanic

Oceanic Overlays

Watch David Khourshid and Stephen Shaw code a lovely page design. See the demo here.

Watch it

C419_saber

Saber.js

Saber.js is a minimalistic framework for building static website using Vue.js.

Check it out

C419_games

Progressive Web Games

Andrzej Mazur explores the concept of Progressive Web Games to see if it is practical and viable in a modern web development environment, using PWA features built with Web APIs.

Read it

C419_theme

Dark theme in a day

Read how Marcin Wichary used a bunch of modern CSS to create a night mode for an app.

Read it

C419_servicework

The Service Worker Cookbook

A collection of working, practical examples of using service workers in modern web sites.

Check it out

C419_mint

Mint

A front-end programming language, aiming to solve the most common issues of Single Page Applications (SPAs) at a language level.

Check it out

C419_editor

Text editing techniques every Front-End developer should know

Ben Frain collects some of the most useful and underused techniques for text editing.

Read it

C419_wire

Wired Elements

A set of common UI elements with a hand-drawn, sketchy look.

Check it out

C419_testing

My Struggle with Testing Code

Dave Rupert shares some insights on knowing what to test, how to test, and how to decouple efficiently.

Read it

C419_chaining

How to decide whether you should chain or extend CSS classes

Sarah Dayan compares the chaining and extending techniques of modular CSS.

Read it

C419_static

Incremental Rebuilds and Hot Reloading: 60 Lines of Literate Code for Static Blogging

Adam Pearce shares the few lines of code he built his blog with.

Read it

C419_ai

Elements of AI

A free online course on Artificial Intelligence from Helsinki University and Reaktor.

Check it out

C419_wordpress15

WordPress: The 15 Year Revolution

An article by Morten Rand-Hendriksen on the beginnings and outlook of WordPress.

Read it

C419_gdpr

GDPR terminology in plain English

Alex Ewerlöf explains the most important aspects of GDPR in an easy to understand way.

Read it

C419_crypto

Beginner’s Guide to Cryptocurrency and Blockchain

The ultimate beginner’s guide to understanding cryptocurrency.

Check it out

C419_asteroid

AsteroidOS

AsteroidOS is an open-source operating system for smartwatches.

Check it out

C419_django

Building Modern Applications with Django and Vue.js

An AuthO tutorial on how to create a full-stack application with Django and Vue.js.

Read it

C419_font

Free Font: Saucy_AF™

Arby’s sauce calligraphy as free font.

Get it

C419_retrogrid

From Our Blog
Grid Layout with Motion Hover Effect and Content Preview

A retro-style grid layout with a playful motion hover effect on the grid items. When clicking on a grid item, a content preview opens.

Check it out

Collective #419 was written by Pedro Botelho and published on Codrops.

Ucraft Review: Building Creative Websites With Strong eCommerce Support

Original Source: https://inspiredm.com/ucraft-review-building-creative-websites-with-strong-ecommerce-support/

Creatives need to look creative online.  Unfortunately, this often means a trade-off in the eCommerce department. You may be able to make a beautiful, visual website, but that awesome portfolio is nothing without the ability to sell your merchandise, prints, and other products. That’s where Ucraft comes into play. This Ucraft review will outline the stunning website templates provided by the page builder and walk you through some of the excellent selling tools you need in order to make money as a creative.

Overall, Ucraft is dedicated to building better websites in a faster manner. Therefore, it delivers a true drag and drop builder so that you don’t have to learn about coding or much website development. You’re able to craft stunning, professional websites for photography, web design, writing, and art. Sure, others can take advantage of the Ucraft tools, but the company has focused quite a bit on helping out creatives with its strong media support.

Ucraft Review: The Best Features
An Awesome Free Landing Page Creator

The landing page creator is free, and you’re able to make your one landing page within minutes. You start the design process by choosing from a template. After that, all the changes are automatically saved and published in Ucraft.

Designer Tools with Drag and Drop Functionality

The designer tools make sure that you can add a designer touch to your website even if you’re not that into design. From a full UIKit for advanced modifications, to simple tools for adjusting headings, colors, and sizes, the Ucraft design end is as simple as they come.

Strong eCommerce Support for Regular Businesses and Creatives

The eCommerce plan (outlined below,) is pretty much what most smaller and mid-sized businesses will need. However, you can also upgrade to get extremely advanced tools for selling your products.

In short, Ucraft has social eCommerce options for selling on places like Facebook and Amazon. You also receive product SEO features, over 70 payment and shipping solutions, and secure transactions. What’s more is that Ucraft takes nothing in terms of transaction fees.

I like the fact that you can integrate with dozens of apps and eCommerce platforms. For instance, you may want to sell on a place like eBay or connect your store to Zendesk. Both are possible, along with several other integrations.

As mentioned, the eCommerce plan is pretty powerful, with support for 50 products, unlimited storage, payment and order management, and multi-currency support.

However, you can upgrade to higher plans to get things like more products available,  invoices, favorite lists, VAT support, tax exemptions, eBay selling, real-time tracking, and more.

A Free Logo Maker

The free logo maker from Ucraft is a huge advantage for small businesses and creatives. Logos of svg and png formats can be created.  Not only does it have some interesting designs for you to start off with, but you can get creative yourself and brand your website the way you want. What’s great is that after you design your logo it goes on your website and you also receive a file to use it elsewhere for your business.

Insert the logo into all marketing materials, include it in your email newsletter, and print it on your business cards. This is a truly free logo maker, which is not always the case when you sign up for something like this. Sometimes you get forced to pay or you don’t get to remove the logo maker’s branding. That’s not the case with Ucraft.

Ucraft Review: The Pricing

You can pay for Ucraft on a monthly or yearly basis. The yearly plans save you extra money over the long run and you get a custom domain, but you still have the option to pay per month if you’re still not up for the commitment.

One of the best parts about Ucraft is that you can go with the free plan to gain access to some wonderful landing page tools and more. After that, you have to start paying, but the plans are less expensive than much of the competition, and you get that coveted eCommerce support.

Here are the pricing plans on a yearly subscription to see what you receive:

Landing Page – Free forever. You get one landing page, customizable content, the option to connect your own domain, an SEO app, the option to invite team members, customer support from Ucraft, and free hosting. The only downside is that you have to live with the Ucraft watermark on landing pages.
Website – $6 per month gets you a custom domain, one website (unlimited pages,) a drag and drop builder, the removal of the Ucraft watermark, 24/7 customer support, over 15 integrations, free hosting, an SEO app, unlimited articles, multilingual tools, and more.
eCommerce – This plan costs $13 per month and it provides everything from the previous plans, a custom domain, support for 50 products, no transaction fees, over 70 payment and shipping methods, multi-currency support, SEP for products, payment and order management, real-time tracking, unlimited storage.

As you can see, these pricing models are pretty impressive. Most website builders cost more than $6 per month, and you’ll be hardpressed to locate many eCommerce builders for less than $13 per month.

What’s cool is that several other plans are provided if you want to upgrade past that $13 per month eCommerce package. For instance, a Pro plan is sold for $31 per month and an Unlimited plan is set at $60 per month. In short, if you want to expand your eCommerce store and get the best tools possible, that’s when you would upgrade.

Finally, all Ucraft users get the following for free:

Templates
SEO tools
Designer tools
A logo maker
Articles

Who is Ucraft Best Suited For?

As I talked about a few times in this article, Ucraft makes the most sense for creatives and small businesses. It’s less expensive than so many other website and eCommerce builders on the market, and the company does a great job with its modern, beautiful templates.

The features are still robust enough for you to scale up in the future, and you get the bonuses of the free logo maker, SEO tools, and templates.

If you have any questions about this Ucraft review, let us know in the comments.

The post Ucraft Review: Building Creative Websites With Strong eCommerce Support appeared first on Inspired Magazine.

Collective #420

Original Source: http://feedproxy.google.com/~r/tympanus/~3/7ZFEUgHU6OI/

C420_WOTW

Inspirational Website of the Week: Studio Regale

A very different kind of web experience with lots of interesting goodies. Our pick this week.

Get inspired

C420_Udemy

Our Sponsor
How far will $10.99 take you?

Find out with Udemy’s best of the best online courses in programming, design or app dev. Take top-rated courses from our master instructors, now at a special discount.

Pick your next course today

C420_time

UTC is Enough for Everyone, Right?

A brilliant write-up on time for programmers by Zach Holman.

Read it

C420_maps

From Beautiful Maps to Actionable Insights: Introducing kepler.gl, Uber’s Open Source Geospatial Toolbox

Shan He from Uber Engineering introduces kepler.gl for creating beautiful maps.

Check it out

C420_animations

Sculpting Software Animation

Pasquale D’Silva’s interesting guide to designing animations.

Read it

C420_proppy

Proppy

ProppyJS is a small JavaScript library for composing props (objects that components receive to render themselves) which can then be used in a components-based UI framework like React or Vue.js.

Check it out

C420_critters

Critters

A Webpack plugin to inline your critical CSS and lazy-load the rest.

Check it out

C420_wireframes

Whimsical Wireframes

Whimsical includes a rich library of configurable elements for fast mockup creation with collaboration in real-time.

Check it out

C420_goat

Goat

A private URL shortener just for your team.

Check it out

C420_frontend

Why is Front-End Development So Unstable?

Jimmy Breck-McKye analyses why front-end technology changes so quickly.

Read it

C420_deep

Jeeliz Face Filter

A face detection and tracking library in JavaScript based on WebGL deep learning.

Check it out

C420_uikit

Pawtastic UI Kit for Adobe XD

A beautiful UI Kit to get you started with Adobe XD.

Get it

C420_logo

Building a responsive image

A step-by-step guide for creating a responsive logo by Nils Binder.

Read it

C420_font

Free Font: Bedebah

A unique looking display typeface designed by Holis Majid.

Get it

C420_francine

Solving Life’s Problems with CSS

A great article where Diana Smith shares a nifty CSS technique she used for creating Francine.

Read it

C420_grid

Scantron Answer Sheet

A realistic looking Scantron answer sheet replication powered by CSS grid by Jon Kantner.

Check it out

C420_loader

Prerender-loader

Pre-rendering describes the process of rendering a client-side application at build time, producing useful static HTML that can be sent to the browser instead of an empty bootstrapping page.

Check it out

C420_buttons

Buttons falling apart

A playful shattering button demo by Mikael Ainalem.

Check it out

C420_code

code.xyz

An embeddable development environment for easily building APIs, webhooks, and workflow automation tasks that run atop StdLib infrastructure. Read more about it here.

Check it out

C420_deno

Deno

A secure TypeScript runtime on V8 that supports TypeScript 2.8 out of the box. By Ryan Dahl.

Check it out

C420_grids

Grid System Library

KK UI Store’s library of grid systems for iOS, Android and Bootstrap.

Check it out

C420_Bolsters

Bolsters Design Project

Some wonderful and inspiring UI design work by Tai Chen.

Check it out

C420_36

36 Days of Type Video

In case you missed it: Ben Huynh’s amazing compilation of this year’s creative type challenge.

Watch it

Collective #420 was written by Pedro Botelho and published on Codrops.

Exclusive Freebie: WORLD CUP FOOTBALL TEMPLATES by BrandPacks

Original Source: https://inspiredm.com/exclusive-freebie-world-cup-football-templates/

Score a hat trick with this trio of free World Cup football/soccer templates designed by BrandPacks. This collection features a free soccer flyer template, a rack card template (in two styles) and a poster template (in two styles). Each template boasts a sporty theme with vibrant colors and exciting photography, perfect for promoting football and soccer tournaments and related events!

The World Cup Football Brand Pack templates come in both Photoshop (PSD) and Illustrator (AI) formats, and all stock photos are included and free to use with the templates! More free templates like these can be found on the BrandPacks website. Free for personal and commercial use!

Download this awesome collection of football templates in PSD and AI here!

The post Exclusive Freebie: WORLD CUP FOOTBALL TEMPLATES by BrandPacks appeared first on Inspired Magazine.

Overflow – Turn Your Designs into Playable User Flow Diagrams That Tell a Story

Original Source: https://www.webdesignerdepot.com/2018/05/overflow-turn-your-designs-into-playable-user-flow-diagrams-that-tell-a-story/

Designing the best user flow for your product is definitely not an easy task. It requires several iterations before getting it right. Creating and updating user flow diagrams has largely been considered a painful process for designers, with many of them skipping it entirely because of this. Presenting user flows to stakeholders and actually getting them to understand and follow the user’s journey might actually be the most challenging part.

Overflow helps you do exactly that. It empowers you to effectively communicate your work, while fully engaging your audience with an interactive user flow presentation.

Create User Flows in Minutes

Creating user flow diagrams with Overflow is a quick and enjoyable experience. You can connect and sync Overflow with your favorite design tool, maintaining all your layers and artboards. Easily drag magnets to create your connectors, add text, shapes and images to enrich your presentation. Customize the look using styles and themes to create a fully custom branded presentation that fits your designs and audience.

Present Your Designs

Presenting your designs with Overflow, will always make you look good. You can present your designs with an interactive flow presentation, navigating through your entire flow using arrow keys or clicking on the connectors. Show the big picture with a bird’s eye view of your flow, or zoom in to focus on specific details. If you want to present your flow screen by screen you can easily switch to the out of the box rapid prototype mode.

Share to Get Valuable Feedback

Share your user flow diagrams on Overflow Cloud and let your audience experience a magical journey on their web browser or mobile device. Export in PDF, PNG, or print your user flows and stick on walls.

So far more than 35,000 designers have tried Overflow, and they loved it. Overflow is currently in public beta and available to download, for free.

Add Realistic Chalk and Sketch Lettering Effects with Sketch’it – only $5!

Source

p img {display:inline-block; margin-right:10px;}
.alignleft {float:left;}
p.showcase {clear:both;}
body#browserfriendly p, body#podcast p, div#emailbody p{margin:0;}

A Reference Guide For Typography In Mobile Web Design

Original Source: https://www.smashingmagazine.com/2018/06/reference-guide-typography-mobile-web-design/

A Reference Guide For Typography In Mobile Web Design

A Reference Guide For Typography In Mobile Web Design

Suzanna Scacca

2018-06-01T13:17:42+02:00
2018-06-01T11:47:07+00:00

With mobile taking a front seat in search, it’s important that websites are designed in a way that prioritize the best experience possible for their users. While Google has brought attention to elements like pop-ups that might disrupt the mobile experience, what about something as seemingly simple as choice of typography?

The answer to the typography question might seem simple enough: what works on desktop should work on mobile so long as it scales well. Right?

While that would definitely make it a lot easier on web designers, that’s not necessarily the case. The problem in making that statement a decisive one is that there haven’t been a lot of studies done on the subject of mobile typography in recent years. So, what I intend to do today is give a brief summary of what it is we know about typography in web design, and then see what UX experts and tests have been able to reveal about using typography for mobile.

Understanding The Basics Of Typography In Modern Web Design

Look, I know typography isn’t the most glamorous of subjects. And, being a web designer, it might not be something you spend too much time thinking about, especially if clients bring their own style guides to you prior to beginning a project.

That said, with mobile-first now here, typography requires additional consideration.

Nope, we can’t do any magic tricks, but we have articles, books and webinars featuring techniques we all can use to improve our work. Smashing Members get a seasoned selection of magic front-end tricks — e.g. live designing sessions and perf audits, too. Just sayin’! 😉

Explore Smashing Wizardry →

Smashing Cat, just preparing to do some magic stuff.

Typography Terminology

Let’s start with the basics: terminology you’ll need to know before digging into mobile typography best practices.

Typography: This term refers to the technique used in styling, formatting, and arranging “printed” (as opposed to handwritten) text.

Typeface: This is the classification system used to label a family of characters. So, this would be something like Arial, Times New Roman, Calibri, Comic Sans, etc.

Typefaces in Office 365

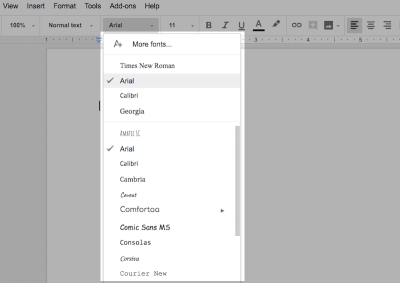
A typical offering of typefaces in word processing applications. (Source: Google Docs) (Large preview)

Font: This drills down further into a website’s typeface. The font details the typeface family, point size, and any special stylizations applied. For instance, 11-point Arial in bold.

3 essential elements to define a font

An example of the three elements that define a font. (Source: Google Docs) (Large preview)

Size: There are two ways in which to refer to the size (or height) of a font: the word processing size in points or the web design size in pixels. For the purposes of talking about mobile web design, we use pixels.

Here is a line-by-line comparison of various font sizes:

An example of font sizes

An example of how the same string of text appears at different sizes. (Source: Google Docs) (Large preview)

As you can see in WordPress, font sizes are important when it comes to establishing hierarchy in header text:

An example of font size choices in WordPress

Header size defaults available with a WordPress theme. (Source: WordPress) (Large preview)

Weight: This is the other part of defining a typeface as a font. Weight refers to any special styles applied to the face to make it appear heavier or lighter. In web design, weight comes into play in header fonts that complement the typically weightless body text.

Here is an example of options you could choose from in the WordPress theme customizer:

An example of font weight choices

Sample font weights available with a WordPress theme. (Source: WordPress) (Large preview)

Kerning: This pertains to the space between two letters. It can be adjusted in order to create a more aesthetically pleasing result while also enhancing readability. You will need a design software like Photoshop to make these types of adjustments.

Tracking: Tracking, or letter-spacing, is often confused with kerning as it too relates to adding space in between letters. However, whereas kerning adjusts spacing between two letters in order to improve appearances, tracking is used to adjust spacing across a line. This is used more for the purposes of fixing density issues while reading.

To give you a sense for how this differs, here’s an example from Mozilla on how to use tracking to change letter-spacing:

Normal tracking example

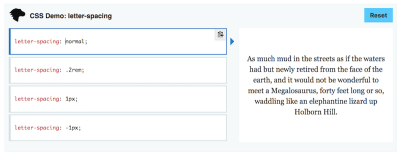
This is what normal tracking looks like. (Source: Mozilla) (Large preview)

-1px tracking example

This is what (tighter) -1px tracking looks like. (Source: Mozilla) (Large preview)

1px tracking example

This is what (looser) 1px tracking looks like. (Source: Mozilla) (Large preview)

Leading: Leading, or line spacing, is the amount of distance granted between the baselines of text (the bottom line upon which a font rests). Like tracking, this can be adjusted to fix density issues.

If you’ve been using word processing software for a while, you’re already familiar with leading. Single-spaced text. Double-spaced text. Even 1.5-spaced text. That’s leading.

The Role Of Typography In Modern Web Design

As for why we care about typography and each of the defining characteristics of it in modern web design, there’s a good reason for it. While it would be great if a well-written blog post or super convincing sales jargon on a landing page were enough to keep visitors happy, that’s not always the case. The choices you make in terms of typography can have major ramifications on whether or not people even give your site’s copy a read.

These are some of the ways in which typography affects your end users:

Reinforce Branding
Typography is another way in which you create a specific style for your web design. If images all contain clean lines and serious faces, you would want to use an equally buttoned-up typeface.

Set the Mood
It helps establish a mood or emotion. For instance, a more frivolous and light-bodied typeface would signal to users that the brand is fun, young and doesn’t take itself seriously.

Give It a Voice
It conveys a sense of personality and voice. While the actual message in the copy will be able to dictate this well, using a font that reinforces the tone would be a powerful choice.

Encourage Reading
As you can see, there are a number of ways in which you can adjust how type appears on a screen. If you can give it the right sense of speed and ease, you can encourage more users to read through it all.

Allow for Scanning
Scanning or glancing (which I’ll talk about shortly) is becoming more and more common as people engage with the web on their smart devices. Because of this, we need ways to format text to improve scannability and this usually involves lots of headers, pull quotes and in-line lists (bulleted, numbered, etc.).

Improve Accessibility
There is a lot to be done in order to design for accessibility. Your choice of font plays a big part in that, especially as the mobile experience has to rely less on big, bold designs and swatches of color and more on how quickly and well you can get visitors to your message.

Because typography has such a diverse role in the user experience, it’s a matter that needs to be taken seriously when strategizing new designs. So, let’s look at what the experts and tests have to say about handling it for mobile.

Typography For Mobile Web Design: What You Need To Know

Too small, too light, too fancy, too close together… You can run into a lot of problems if you don’t strike the perfect balance with your choice of typography in design. On mobile, however, it’s a bit of a different story.

I don’t want to say that playing it safe and using the system default from Google or Apple is the way to go. After all, you work so hard to develop unique, creative and eye-catching designs for your users. Why would you throw in the towel at this point and just slap Roboto all over your mobile website?

We know what the key elements are in defining and shaping a typeface and we also know how powerful fonts are within the context of a website. So, let’s drill down and see what exactly you need to do to make your typography play well with mobile.

1. Size

In general, the rule of thumb is that font size needs to be 16 pixels for mobile websites. Anything smaller than that could compromise readability for visually impaired readers. Anything too much larger could also make reading more difficult. You want to find that perfect Goldilocks formula and, time and time again, it comes back to 16 pixels.

In general, that rule is a safe one to play by when it comes to the main body text of your mobile website. However, what exactly are you allowed to do for header text? After all, you need to be able to distinguish your main headlines from the rest of the text. Not just for the sake of calling attention to bigger messages, but also for the purposes of increasing scannability of a mobile web page.

The Nielsen Norman Group reported on a study from MIT that covered this exact question. What can you do about text that users only have to glance at? In other words, what sort of sizing can you use for short strings of header text?

Here is what they found:

Short, glanceable strings of text lead to faster reading and greater comprehension when:

They are larger in size (specifically, 4mm as opposed to 3mm).
They are in all caps.
Lettering width is regular (and not condensed).

In sum:

Lowercase lettering required 26% more time for accurate reading than uppercase, and condensed text required 11.2% more time than regular. There were also significant interaction effects between case and size, suggesting that the negative effects of lowercase letters are exacerbated with small font sizes.

I’d be interested to see how the NerdWallet website does, in that case. While I do love the look of this, they have violated a number of these sizing and styling suggestions:

The NerdWallet home page

NerdWallet’s use of all-caps and smaller font sizes on mobile. (Source: NerdWallet) (Large preview)

Having looked at this a few times now, I do think the choice of a smaller-sized font for the all-caps header is an odd choice. My eyes are instantly drawn to the larger, bolder text beneath the main header. So, I think there is something to MIT’s research.

Flywheel Sports, on the other hand, does a great job of exemplifying this point.

The Flywheel Sports home page

Flywheel Sports’ smart font choices for mobile. (Source: Flywheel Sports) (Large preview)

There’s absolutely no doubt where the visitors’ attention needs to go: to the eye-catching header. It’s in all caps, it’s larger than all the other text on the page, and, although the font is incredibly basic, its infusion with a custom handwritten-style type looks really freaking cool here. I think the only thing I would fix here is the contrast between the white and yellow fonts and the blue background.

Just remember: this only applies to the sizing (and styling) of header text. If you want to keep large bodies of text readable, stick to the aforementioned sizing best practices.

2. Color and Contrast

Color, in general, is an important element in web design. There’s a lot you can convey to visitors by choosing the right color palette for designs, images and, yes, your text. But it’s not just the base color of the font that matters, it’s also the contrast between it and the background on which it sits (as evidenced by my note above about Flywheel Sports).

For some users, a white font on top of a busy photo or a lighter background may not pose too much of an issue. But “too much” isn’t really acceptable in web design. There should be no issues users encounter when they read text on a website, especially from an already compromised view of it on mobile.

Which is why color and contrast are top considerations you have to make when styling typography for mobile.

The Web Content Accessibility Guidelines (WCAG) has clear recommendations regarding how to address color contrast in section 1.4.3. At a minimum, the WCAG suggests that a contrast of 4.5 to 1 should be established between the text and background for optimal readability. There are a few exceptions to the rule:

Text sized using 18-point or a bold 14-point only needs a contrast of 3 to 1.
Text that doesn’t appear in an active part of the web page doesn’t need to abide by this rule.
The contrast of text within a logo can be set at the designer’s discretion.

If you’re unsure of how to establish that ratio between your font’s color and the background upon which it sits, use a color contrast checking tool like WebAIM.

WebAIM color contrast checker

An example of how to use the WebAIM color contrast checker tool. (Source: WebAIM) (Large preview)

The one thing I would ask you to be mindful of, however, is using opacity or other color settings that may compromise the color you’ve chosen. While the HEX color code will check out just fine in the tool, it may not be an accurate representation of how the color actually displays on a mobile device (or any screen, really).

To solve this problem and ensure you have a high enough contrast for your fonts, use a color eyedropper tool built into your browser like the ones for Firefox or Chrome. Simply hover the eyedropper over the color of the background (or font) on your web page, and let it tell you what the actual color code is now.

Here is an example of this in action: Dollar Shave Club.

This website has a rotation of images in the top banner of the home page. The font always remains white, but the background rotates.

Dollar Shave Club grey banner

Dollar Shave Club’s home page banner with a grey background. (Source: Dollar Shave Club) (Large preview)

Dollar Shave Club beige banner

Dollar Shave Club’s home page banner with a beige/taupe background. (Source: Dollar Shave Club) (Large preview)

Dollar Shave Club purple banner

Dollar Shave Club’s home page banner with a purple background. (Source: Dollar Shave Club) (Large preview)

Based on what we know now, the purple is probably the only one that will pass with flying colors. However, for the purposes of showing you how to work through this exercise, here is what the eyedropper tool says about the HEX color codes for each of the backgrounds:

Grey: #9a9a9a
Beige/taupe: #ffd0a8
Purple: #4c2c59.

Here is the contrast between these colors and the white font:

Grey: 2.81 to 1
Beige/taupe: 1.42 to 1
Purple: 11.59 to 1.

Clearly, the grey and beige backgrounds are going to lend themselves to a very poor experience for mobile visitors.

Also, if I had to guess, I’d say that “Try a risk-free Starter Set now.” is only a 10-point font (which is only about 13 pixels). So, the size of the font is also working against the readability factor, not to mention the poor choice of colors used with the lighter backgrounds.

The lesson here is that you should really make some time to think about how color and contrast of typography will work for the benefit of your readers. Without these additional steps, you may unintentionally be preventing visitors from moving forward on your site.

3. Tracking

Plain and simple: tracking in mobile web design needs to be used in order to control density. The standard recommendation is that there be no more than between 30 and 40 characters to a line. Anything more or less could affect readability adversely.

While it does appear that Dove is pushing the boundaries of that 40-character limit, I think this is nicely done.

The Dove home page

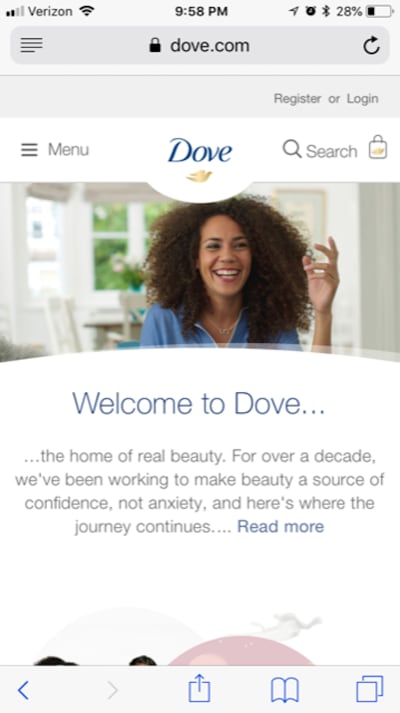
Dove’s use of even tracking and (mostly) staying within the 40-character limit. (Source: Dove) (Large preview)

The font is so simple and clean, and the tracking is evenly spaced. You can see that, by keeping the amount of words on a line relegated to the recommended limits, it gives this segment of the page the appearance that it will be easy to read. And that’s exactly what you want your typography choices to do: to welcome visitors to stop for a brief moment, read the non-threatening amount of text, and then go on their way (which, hopefully, is to conversion).

4. Leading

According to the NNG, content that appears above the fold on a 30-inch desktop monitor equates to five swipes on a 4-inch mobile device. Granted, this data is a bit old as most smartphones are now between five and six inches:

Average smartphone screen sizes

Average smartphone screen sizes from 2015 to 2021. (Source: TechCrunch) (Large preview)

Even so, let’s say that equates to three or four good swipes of the smartphone screen to get to the tip of the fold on desktop. That’s a lot of work your mobile visitors have to do to get to the good stuff. It also means that their patience will already be wearing thin by the time they get there. As the NNG pointed out, a mobile session, on average, usually lasts about only 72 seconds. Compare that to desktop at 150 seconds and you can see why this is a big deal.

This means two things for you:

You absolutely need to cut out the excess on mobile. If this means creating a completely separate and shorter set of content for mobile, do it.
Be very careful with leading.

You’ve already taken care to keep optimize your font size and width, which is good. However, too much leading and you could unintentionally be asking users to scroll even more than they might have to. And with every scroll comes the possibility of fatigue, boredom, frustration, or distraction getting in the way.

So, you need to strike a good balance here between using line spacing to enhance readability while also reigning in how much work they need to do to get to the bottom of the page.

The Hill Holliday website isn’t just awesome inspiration on how to get a little “crazy” with mobile typography, but it also has done a fantastic job in using leading to make larger bodies of text easier to read:

The Hill Holliday home page

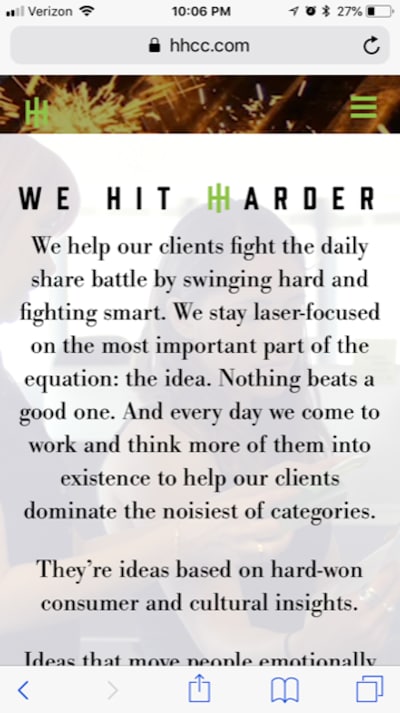
Hill Holliday uses the perfect ratio of leading between lines and paragraphs. (Source: Hill Holliday) (Large preview)

Different resources will give you different guidelines on how to create spacing for mobile devices. I’ve seen suggestions for anywhere between 120% to 150% of the font’s point size. Since you also need to consider accessibility when designing for mobile, I’m going to suggest you follow WCAG’s guidelines:

Spacing between lines needs to be 1.5 (or 150%, whichever ratio works for you).
Spacing between paragraphs then needs to be 2.5 (or 250%).

At the end of the day, this is about making smart decisions with the space you’re given to work with. If you only have a minute to hook them, don’t waste it with too much vertical space. And don’t turn them off with too little.

5. Acceptable Fonts

Before I break down what makes for an acceptable font, I want to first look at what Android’s and Apple’s typeface defaults are. I think there’s a lot we can learn just by looking at these choices:

Android
Google uses two typefaces for its platforms (both desktop and mobile): Roboto and Noto. Roboto is the primary default. If a user visits a website in a language that doesn’t accept Roboto, then Noto is the secondary backup.

This is Roboto:

The Roboto character set

A snapshot of the Roboto character set. (Source: Roboto) (Large preview)

It’s also important to note that Roboto has a number of font families to choose from:

The Roboto families

Other options of Roboto fonts to choose from. (Source: Roboto) (Large preview)

As you can see, there are versions of Roboto with condensed kerning, a heavier and serifed face as well as a looser, serif-like option. Overall, though, this is just a really clean and simply stylized typeface. You’re not likely to stir up any real emotions when using this on a website, and it may not convey much of a personality, but it’s a safe, smart choice.

Apple
Apple has its own set of typography guidelines for iOS along with its own system typeface: San Francisco.

The San Francisco font

The San Francisco font for Apple devices. (Source: San Francisco) (Large preview)

For the most part, what you see is what you get with San Francisco. It’s just a basic sans serif font. If you look at Apple’s recommended suggestions on default settings for the font, you’ll also find it doesn’t even recommend using bold stylization or outlandish sizing, leading or tracking rules:

San Francisco default settings

Default settings and suggestions for the San Francisco typeface. (Source: San Francisco) (Large preview)

Like with pretty much everything else Apple does, the typography formula is very basic. And, you know what? It really works. Here it is in action on the Apple website:

The Apple home page

Apple makes use of its own typography best practices. (Source: Apple) (Large preview)

Much like Google’s system typeface, Apple has gone with a simple and classic typeface. While it may not help your site stand out from the competition, it will never do anything to impair the legibility or readability of your text. It also would be a good choice if you want your visuals to leave a greater impact.

Is your pattern library up to date today? Alla Kholmatova has just finished a fully fledged book on Design Systems and how to get them right. With common traps, gotchas and the lessons she learned. Hardcover, eBook. Just sayin’.

Table of Contents →

My Recommendations

And, so, this now brings me to my own recommendations on what you should use in terms of type for mobile websites. Here’s the verdict:

Don’t be afraid to start with a system default font. They’re going to be your safest choices until you get a handle on how far you can push the limits of mobile typography.

Use only a sans serif or serif font. If your desktop website uses a decorative or handwritten font, ditch it for something more traditional on mobile.

That said, you don’t have to ignore decorative typefaces altogether. In the examples from Hill Holliday or Flywheel Sports (as shown above), you can see how small touches of custom, non-traditional type can add a little flavor.

Never use more than two typefaces on mobile. There just isn’t enough room for visitors to handle that many options visually.

Make sure your two typefaces complement one another. Specifically, look for faces that utilize a similar character width. The design of each face may be unique and contrast well with the other, but there should still be some uniformity in what you present to mobile visitors’ eyes.

Avoid typefaces that don’t have a distinct set of characters. For instance, compare how the uppercase “i”, lowercase “l” and the number “1” appear beside one another. Here’s an example of the Myriad Pro typeface from the Typekit website:

Myriad Pro characters

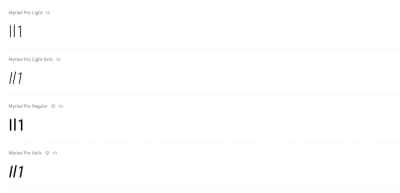
Myriad Pro’s typeface in action. (Source: Typekit) (Large preview)

While the number “1” isn’t too problematic, the uppercase “i” (the first letter in this sequence) and the lowercase “l (the second) are just too similar. This can create some unwanted slowdowns in reading on mobile.

Also, be sure to review how your font handles the conjunction of “r” and “n” beside one another. Can you differentiate each letter or do they smoosh together as one indistinguishable unit? Mobile visitors don’t have time to stop and figure out what those characters are, so make sure you use a typeface that gives each character its own space.

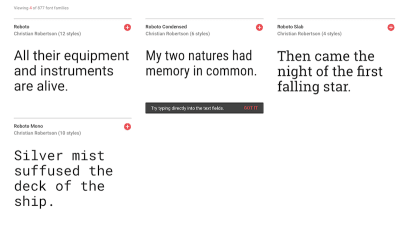
Use fonts that are compatible across as many devices as possible. Your best bets will be: Arial, Courier New, Georgia, Tahoma, Times New Roman, Trebuchet MS and Verdana.

Default typefaces on mobile

A list of system default typefaces for various mobile devices. (Source: tinytype) (Large preview)

Android-supported typefaces

Another view of the table that includes some Android-supported typefaces. (Source: tinytype) (Large preview)

I think the Typeform website is a good example of one that uses a “safe” typeface choice, but doesn’t prevent them from wowing visitors with their message or design.

The Typeform home page

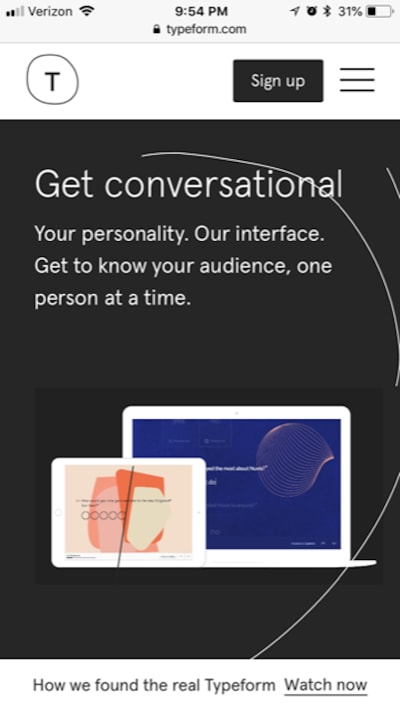
Typeform’s striking typeface has nothing to do with the actual font. (Source: Typeform) (Large preview)

It’s short, to the point, perfectly sized, well-positioned, and overall a solid choice if they’re trying to demonstrate stability and professionalism (which I think they are).

When you’re feeling comfortable with mobile typography and want to branch out a little more, take a look at this list of the best web-safe typefaces from WebsiteSetup. You’ll find here that most of the choices are your basic serif and sans serif types. It’s definitely nothing exciting or earth-shattering, but it will give you some variation to play with if you want to add a little more flavor to your mobile type.

Wrapping Up

I know, I know. Mobile typography is no fun. But web design isn’t always about creating something exciting and cutting edge. Sometimes sticking to practical and safe choices is what will guarantee you the best user experience in the end. And that’s what we’re seeing when it comes to mobile typography.

The reduced amount of real estate and the shorter times-on-site just don’t lend themselves well to the experimental typography choices (or design choices, in general) you can use on desktop. So, moving forward, your approach will have to be more about learning how to reign it in while still creating a strong and consistent look for your website.

Smashing Editorial
(lf, ra, yk, il)

Using ES Modules in the Browser Today

Original Source: https://www.sitepoint.com/using-es-modules/

This article will show you how you can use ES modules in the browser today.

Until recently, JavaScript had no concept of modules. It wasn’t possible to directly reference or include one JavaScript file in another. And as applications grew in size and complexity, this made writing JavaScript for the browser tricky.

One common solution is to load arbitrary scripts in a web page using <script> tags. However, this brings its own problems. For example, each script initiates a render-blocking HTTP request, which can make JS-heavy pages feel sluggish and slow. Dependency management also becomes complicated, as load order matters.

ES6 (ES2015) went some way to addressing this situation by introducing a single, native module standard. (You can read more about ES6 modules here.) However, as browser support for ES6 modules was initially poor, people started using module loaders to bundle dependencies into a single ES5 cross-browser compatible file. This process introduces its own issues and degree of complexity.

But good news is at hand. Browser support is getting ever better, so let’s look at how you can use ES6 modules in today’s browsers.

The Current ES Modules Landscape

Safari, Chrome, Firefox and Edge all support the ES6 Modules import syntax (Firefox behind a flag), here’s what they look like.

<script type=”module”>
import { tag } from ‘./html.js’

const h1 = tag(‘h1’, ‘? Hello Modules!’)
document.body.appendChild(h1)
</script>

// html.js
export function tag (tag, text) {
const el = document.createElement(tag)
el.textContent = text

return el
}

Or as an external script:

<script type=”module” src=”app.js”></script>

// app.js
import { tag } from ‘./html.js’

const h1 = tag(‘h1’, ‘? Hello Modules!’)
document.body.appendChild(h1)

Simply add type=”module” to your script tags and the browser will load them as ES Modules. The browser will follow all import paths, downloading and executing each module only once.

ES modules: Network graph showing loading

Older browsers won’t execute scripts with an unknown “type”, but you can define fallback scripts with the nomodule attribute:

<script type=”module” src=”module.js”></script>
<script nomodule src=”fallback.js”></script>

Continue reading %Using ES Modules in the Browser Today%