Collective #557

Original Source: http://feedproxy.google.com/~r/tympanus/~3/1HB37HJYcA4/

C557_Darkui

How to design delightful dark themes

In this article Teresa Man shares how to design dark themes that are readable, balanced, and delightful.

Read it

C557_viz

roughViz

A reusable JavaScript library for creating sketchy/hand-drawn styled charts in the browser.

Check it out

C555_divi

Our Sponsor
You’ve never built a WordPress website like this before

Divi is more than just a WordPress theme, it’s a completely new website building platform that replaces the standard WordPress post editor with a vastly superior visual editor.

Try it

C557_spotify

Spotify TUI

A Spotify client for the terminal written in Rust. By Alexander Keliris.

Check it out

C557_designsys

Design System Playground

Play with typography, colors and themeable components in your design system. By John Polacek.

Check it out

C557_tokyo

Mini Tokyo 3D

A real-time 3D digital map of Tokyo’s public transport system. By Akihiko Kusanagi.

Check it out

C557_counters

The wondrous world of CSS counters

An in-depth look at CSS counters, how they’ve expanded with better support for internationalization and how it’s possible to implement a pure CSS Fizzbuzz solution with them.

Read it

C557_git

GitSheet

GitSheet is a simple git cheat sheet reference for common git commands.

Check it out

C557_mario

100% CSS Mario Kart

Stephen Cook creates an interactive version of Mario Kart using only CSS.

Watch it

C557_component

Dynamic CSS Components Without JavaScript

Learn how pure CSS components are achievable with custom properties.

Read it

C557_converter

Clip-path converter

A very useful tool if you want to prepare SVG paths to be used with CSS clip-path. By Yoksel.

Check it out

C557_cssisawesome

CSS is Awesome – Variable fonts Edition

A fun demo by Mandy Michael that shows how variable fonts can fix CSS 😜

Check it out

C557_progressive

The “P” in Progressive Enhancement stands for “Pragmatism”

Andy Bell explains progressive enhancement in a more practical way.

Read it

C557_promise

Advanced JavaScript Node.js Promises chaining collections

Learn how to use advanced features of JavaScript Promises using Node.js with this programming tutorial.

Read it

C557_spinner

Intro to SVG for React Developers

A tutorial by Daniel Matarazzo where you’ll build a colorful spinning loading indicator as a React component, using some very simple SVG markup.

Read it

C557_w3c

The W3C At Twenty-Five

In this article, Rachel Andrew explains how the W3C works and shares her “Web Story” to explain why the Web Standards process is so vitally important for everyone to have an open web platform where they can share their stories and build awesome things for the web together.

Read it

C557_openbook

The Open Book Project

Joey Castillo is on a mission to create a simple book reading device that anyone with a soldering iron can build for themselves.

Check it out

Screen-Shot-2019-10-14-at-15.36.53

Able

Able is a bootstrapped community for people to read and write about software.

Check it out

C557_customprop

Patterns for Practical CSS Custom Properties Use

Tyler Childs shows some examples of patterns for Custom Properties from his Cutestrap framework.

Read it

C557_patterns

1 element card background patterns (see description)

A pure CSS technique for creating patterns that doesn’t use SVGs or images other than CSS gradients. By Ana Tudor.

Check it out

C557_sql

The SQL Murder Mystery

Use SQL queries to solve the murder mystery. Suitable for beginners or experienced SQL sleuths.

Check it out

C557_winners

js13kGames Winners

Check out the winners of this year’s Js13kGames competition.

Check it out

C557_UI

Blocke: Social web UI kit

A free social UI kit from Blocke that includes 3 ready-made screens with 30+ components that might come in handy for building a social feed.

Check it out

C557_webgltext

From Our Blog
Create Text in Three.js with Three-bmfont-text

A short tutorial on how to create animated text in Three.js with three-bmfont-text and give it a nice look using shaders.

Read it

Collective #557 was written by Pedro Botelho and published on Codrops.

9 of the Best Animation Libraries for UI Designers

Original Source: https://www.sitepoint.com/our-top-9-animation-libraries/?utm_source=rss

This is the latest update to our guide to helping you choose the right animation library for each task. We’re going to run-through 9 free, well-coded animation libraries best-suited to UI design work — covering their strengths and weaknesses, and when to choose each one.

Take your CSS animations to the next level with our Animating with CSS course by Donovan Hutchinson, the man behind CSS Animation Rocks.

Front-end web design has been through a revolution in the last decade. In the late naughties, most of us were still designing static magazine layouts. Nowadays, we’re building “digital machines” with thousands of resizing, coordinated, moving parts.

Quite simply, great UI designers need to be great animators too — with a solid working understanding of web animation techniques.

Keep in mind that we’re looking at each library from the perspective of a code-savvy UI designer, not as a “code guru” developer. Some of these libraries are pure CSS. Others are JavaScript, but none require anything more than basic HTML/CSS understanding to be useful. Link the library; add a CSS class.

Quite simply, great UI designers need to be great animators with a rock-solid understanding of the underlying tech.

This is the latest update to our guide to helping you choose the right animation library for each task. We’re going to run-through 9 free, well-coded animation libraries best-suited to UI design work – their strengths and weaknesses and when to choose each one.

Some are pure CSS. Others are JavaScript, but none require anything more than basic HTML/CSS understanding to be used.

Enjoy.

The 2017 Top 9 Animation Libraries List

Animate.css

Bounce.js

AnimeJS

Magic Animations

DynCSS

CSShake

Hover.CSS

Velocity.js

AniJS

Animate.css

Animate.css is one of the smallest and most easy-to-use CSS animation libraries available. Applying the Animate library to your project is as simple as adding the required CSS classes to your HTML elements. You can also use jQuery to call the animations on a particular event.

Animate.css

Creators: Daniel Eden

Released: 2013
Current Version: 3.5.2
Most Recent Update: April 2017
Popularity: 41,000+ stars on GitHub
Description: “A cross-browser library of CSS animations. As easy to use as an easy thing.”
Library Size: 43 kB

GitHub: https://github.com/daneden/animate.css

License: MIT

As of mid-2017, it still one of the most popular and widely-used CSS animation libraries and its minified file is small enough (16.6kb) for inclusion in mobile websites as well. It has 41,000 stars on Github and is used as a component in many larger projects.

Animate.css is still under active development after 4 years. We feel that this is one of the simplest and most robust animation libraries and would definitely recommend you to use this in your next project.

Bounce.js

Bounce.js is a tool and javascript library that focusses on providing a selection of unique bouncy CSS animations to your website.

Bounce.js

This project is open-source with its code on GitHub.

Creators: Tictail

Released: 2014
Current Version: 0.8.2
Most Recent Update: Feb 2015
Popularity: 4,967+ stars on GitHub
Description: “Create beautiful CSS3 powered animations in no time.”
Library Size: 16 kB

GitHub: https://github.com/tictail/bounce.js

License: MIT

Bounce.js is a neat animation library shipped with about ten animation ‘pre-sets’ – hence the small size of the library. As with animate.css, the animations are smooth and flawless. You might want to consider using this library if your needs focus on ‘pop and bubble’ animation types and could benefit from a lower file size overhead.

AnimeJS

AnimeJS is described as a lightweight JavaScript animation library that ‘works with any CSS Properties, individual CSS transforms, SVG or any DOM attributes, and JavaScript Objects’. It’s pretty awesome – so awesome in fact, that the GIF capture I took below can’t do justice to how smooth and buttery the motion is.

Bounce.js

This project is available on GitHub.

Creator: Julian Garnier

Released: 2016
Current Version: 2.0.2
Most Recent Update: March 2017
Popularity: 12,222+ stars on GitHub
Description: “JavaScript Animation Engine.”
Library Size: 10.9kB

GitHub: https://github.com/juliangarnier/anime

License: MIT

AnimeJS is only newcomer to our list but has won a lot of converts in the 12 months since it’s creation. It’s incredibly versatile and powerful and wouldn’t be out of place being used within HTML games. The only real question is ‘is it overkill for simple web apps’?

Maybe, but as its fast, small and relatively easy to learn, it’s hard to find fault with it.

Magic Animations

Magic Animations has been one impressive animation libraries available. It has many different animations, many of which are quite unique to this library. As with Animate.css, you can implement Magic by simply importing the CSS file. You can also make use of the animations from jQuery. This project offers a particularly cool demo application.

Magic Animations

The post 9 of the Best Animation Libraries for UI Designers appeared first on SitePoint.

Getting Started with GraphQL and React Native

Original Source: https://www.sitepoint.com/graphql-react-native-getting-started/?utm_source=rss

In 2012, Facebook engineer Nick Schrock started work on a small prototype to facilitate moving away from an old, unsupported partner API that powered the current Facebook News Feed. At the time, this was called “SuperGraph”. Fast forward to today and SuperGraph has helped shape the open-source query language GraphQL, which has been much of the buzzword in recent times.

Facebook describes GraphQL as a “query language for APIs and a runtime for fulfilling those queries with your existing data”. Put simply, GraphQL is an alternative to REST that has been steadily gaining popularity since its release. Whereas with REST a developer would usually collate data from a series of endpoint requests, GraphQL allows the developer to send a single query to the server that describes the exact data requirement.

Prerequisites

For this tutorial, you’ll need a basic knowledge of React Native and some familiarity with the Expo environment. You’ll also need the Expo client installed on your mobile device or a compatible simulator installed on your computer. Instructions on how to do this can be found here.

Project Overview

In this tutorial, we’re going to demostrate the power of GraphQL in a React Native setting by creating a simple coffee bean comparison app. So that you can focus on all of the great things GraphQL has to offer, I’ve put together the base template for the application using Expo.

A mockup of our coffee comparison app

To get started, you can clone this repo and navigate to the “getting-started” branch, which includes all of our basic views to start adding our GraphQL data to, as well as all of our initial dependencies, which at this stage are:

{
"expo": "^32.0.0",
"react": "16.5.0",
"react-native": "https://github.com/expo/react-native/archive/sdk-32.0.0.tar.gz",
"react-navigation": "^3.6.1"
}

To clone this branch, you’ll need to open up terminal and run this command:

git clone https://github.com/jamiemaison/graphql-coffee-comparison.git

To then navigate to the getting-started branch, you move into the newly cloned repo with cd graphql-coffee-comparison and run git checkout getting-started.

The next stage is to install our dependencies. To do this, make sure you’re on Node v11.10.1 and run npm install in the root directory of the project. This will add all of the dependencies listed above to your node_modules folder.

To start adding GraphQL to our React Native app, we’re going to need to install a few more dependencies that help us perform a few simple GraphQL functions. As is common with modern JavaScript development, you don’t need all of these dependencies to complete the data request, but they certainly help in giving the developer a better chance of structuring some clean, easy-to-read code. The dependencies you’ll need can be installed by running npm install –save apollo-boost react-apollo graphql-tag graphql.

Here’s an overview of what these dependencies are:

apollo-boost: a zero-configuration way of getting started with GraphQL in React/React Native
react-apollo: this provides an integration between GraphQL and the Apollo client
graphql-tag: a template literal tag that parses GraphQL queries
graphql: the JavaScript reference implementation for GraphQL

Once all of the necessary dependencies have finished installing, run npm start. You should now see your familiar Expo window, and if you launch the app (either via a simulator or on a device) then you should see a screen similar to this:

A mockup of our getting started page

In basic terms, this application has two screens that are managed by react-navigation, Home.js and CoffeePage.js. The Home screen contains a simple FlatList that renders all of the coffee beans supplied to its data field. When clicked on, the user is navigated to the CoffeePage for that item, which displays more information about the product. It’s our job to now populate these views with interesting data from GraphQL.

The complete coffee page

Apollo Server Playground

There are two main elements to any successful GraphQL transaction: the server holding the data, and the front-end query making the request. For the purposes of this tutorial, we aren’t going to start delving into the wonderful world of server-side code, so I’ve created our server for us ready to go. All you need to do is navigate to yq42lj36m9.sse.codesandbox.io in your favorite browser and leave it running throughout the course of development. For those interested, the server itself is running using apollo-server and contains just enough code to hold the data we need and serve it upon receiving an appropriate query. For further reading, you can head over to apollographql.com to read more about apollo-server.

GraphQL Query Basics

Before we get into writing the actual code that’s going to request the data we need for our coffee bean comparison app, we should understand just how GraphQL queries work. If you already know how queries work or just want to get started with coding, you can skip ahead to the next section.

Note: these queries won’t work with our codesandbox server, but feel free to create your own at codesandbox.io if you’d like to test out the queries.

At its simplest level, we can use a flat structure for our queries when we know the shape of the data we’re requesting:

QUERY: RESPONSE:
{ {
coffee { "coffee": {
blend "blend": "rich"
} }
} }

On the left, we see the GraphQL query requesting the blend field from coffee. This works well when we know exactly what our data structure is, but what about when things are less transparent? In this example, blend returns us a string, but queries can be used to request objects as well:

QUERY: RESPONSE:
{ {
coffee { "coffee": {
beans { "beans": [
blend {
} blend: "rich"
} },
} {
blend: "smooth"
}
]
}
}

Here you can see we are simply requesting the beans object, with only the field blend being returned from that object. Each object in the beans array may very well contain other data other than blend, but GraphQL queries help us request only the data we need, cutting out any extra information that’s not necessary for our application.

So what about when we need to be more specific than this? GraphQL provides the capability for many things, but something that allows for extremely powerful data requests is the ability to pass arguments in your query. Take the following example:

QUERY: RESPONSE:
{ {
coffee(companyId: "2") { "coffee": {
beans { "beans": [
blend {
} blend: "rich"
} },
} {
blend: "smooth"
}
]
}
}

What we see is that we can pass an argument — in this case, the companyId — which ensures that we are only returned beans from one particular company. With REST, you can pass a single set of arguments via query params and URL segments, but with GraphQL querying every single field, it can get its own set of arguments. This allows GraphQL to be a dynamic solution for making multiple API fetches per request.

The post Getting Started with GraphQL and React Native appeared first on SitePoint.

Brand Identity for Bente Tattoo Studio in Norway

Original Source: http://feedproxy.google.com/~r/abduzeedo/~3/1z1vrLpv1Jg/brand-identity-bente-tattoo-studio-norway

Brand Identity for Bente Tattoo Studio in Norway

AoiroStudioOct 13, 2019

We would like to feature the work from Matheus Gomes who is a graphic designer and art director based in São Paulo, Brazil. We are showcasing more specifically his project for Bente Tattoo Studio. Founded in July 2018 by Bente Berg, a tattoo artist where the studio is based in Bergenhus, Bergen, Norway. Combined with photography, the graphic design is clean with an introductory serif font which is pretty unique for a tattoo artist. I must admit the photography really sets the tone really well.

Therefore, all visual elements combined with photography art direction create a result brought up in a classic visual communication. As for the materials used in stationery, (torn) cardboard is employed to represent the imperfection part, and put together with its texture, it is an abstract representation of Norway’s hills and nature setting. Moreover, for the visual identity, the typeface designed by Dreams Office was opted to bring to life to the whole identity system for its precise lines, classic aesthetics, and slightly imperfect curves. Everything folding and unfolding what, why, and who the studio is.

Credits

Photos by by Jake Davies, Alexa Mazzarello, and Ezgi Polat.
More Links

Personal Site
Behance
Brand Identity

Brand Identity for Bente Tattoo Studio in NorwayBrand Identity for Bente Tattoo Studio in NorwayBrand Identity for Bente Tattoo Studio in NorwayBrand Identity for Bente Tattoo Studio in NorwayBrand Identity for Bente Tattoo Studio in NorwayBrand Identity for Bente Tattoo Studio in NorwayBrand Identity for Bente Tattoo Studio in NorwayBrand Identity for Bente Tattoo Studio in NorwayBrand Identity for Bente Tattoo Studio in NorwayBrand Identity for Bente Tattoo Studio in NorwayBrand Identity for Bente Tattoo Studio in Norway


Collective #556

Original Source: http://feedproxy.google.com/~r/tympanus/~3/8W9Ozg2qIGc/

Screen-Shot-2019-10-10-at-17.38.40

Inspirational Website of the Week: Lafaurie Paris

A super-slick and smooth scroll experience with sharp typography and excellent color choices. Our pick this week.

Get inspired

C553_accent

Our Sponsor
Accentuate Custom Fields for Shopify

The professional solution to extend Shopify with checkboxes, selection lists, images and 15 other field types. Cross-reference objects to create anything you need.

Check it out

C556_cache

Cascading Cache Invalidation

Philip Walton discusses how some caching best practices can actually backfire, and presents some techniques for solving the problem.

Read it

C556_devtools

A Guide To New And Experimental CSS DevTools In Firefox

In this article by Victoria Wang you’ll learn about all the CSS DevTools in Firefox.

Read it

C556_clip

Clipping, Clipping, and More Clipping!

Some great new techniques for using CSS clip-path to create interesting effects. By Mikael Ainalem.

Read it

C556_v8

Top-level await

Read about top-level await that makes it possible to use the await keyword outside of async functions in JavaScript modules.

Read it

C556_khan

The Khan Academy 2018 Annual Report Case Study

Sara Soueidan’s case study on a recent micro-site project for Khan Academy.

Read it

C556_sass

Introducing Sass Modules

Read all about the new module system feature of Sass in this article by Miriam Suzanne.

Read it

C556_bestui

The Obvious UI is Often the Best UI

Some useful insights on which mobile navigation pattern works best.

Read it

C556_darkmode

Dark mode

Jeremy Keith shares how he implemented a dark mode for his website.

Read it

C556_focus

Designing a focus style

Zell Liew shares his thoughts on default focus styles and collects some focus styling ideas from around the web.

Read it

C556_boxmodel

Why the Box Model is Integral to Web Design

In this article David Leger explains how the box model works.

Read it

C556_dashdash

dashdash

Dashdash is a new spreadsheet tool with access to business data and APIs through integrations with Crunchbase, LinkedIn, Mailchimp, Google Maps data, easily usable with the fresh templates feature.

Check it out

C556_stencil

Image to Orange and Blue Stencil

With this little tool by Jon Kantner you can turn images into stencil art of orange and blue.

Check it out

C556_movable

Moveable

In case you didn’t know about it: Moveable is draggable, resizable, scalable, rotatable, warpable, pinchable, groupable and snappable. A super useful script.

Check it out

C556_game

JavaScript Broughlike Tutorial

A tutorial about writing a broughlike (a small roguelike game similar to 868-HACK or Cinco Paus) from scratch in JavaScript.

Read it

C556_note

TakeNote

Tania Rascia’s plain text notes app in progress. Built with React, Redux and TypeScript.

Check it out

C556_sh

Announcing WebAssembly.sh

After the release of Wasmer-JS, Aaron Turner now introduces WebAssembly.sh, an online WebAssembly Terminal to run WASI modules directly in your browser.

Read it

C556_cssgrid

Layout-Fun with CSS Grid

Some fun demos made with CSS Grid by Tobi Reif.

Read it

C556_images

Images done right: Web graphics, good to the last byte

Learn the essentials of image formats in this article by the folks of Evil Martians.

Read it

C556_boxmodellayout

The box model is not layout

Kilian Valkhof argues that if we keep referring to our imaginary perfect layout system in design tools as “box model”, we risk getting the wrong thing.

Read it

C556_cursors

cursorOS

A Figma-ready collection of original macOS cursors to be used in design projects.

Check it out

C556_water

From Our Blog
Creating a Water-like Distortion Effect with Three.js

Learn how to achieve a water-like ripple distortion effect with Three.js and postprocessing.

Read it

C556_roundup

From Our Blog
Inspirational Websites Roundup #9

A hand-picked selection of outstanding website designs from September 2019 for your inspiration.

Check it out

Collective #556 was written by Pedro Botelho and published on Codrops.

Harry Styles' new site will give you a personalised compliment

Original Source: http://feedproxy.google.com/~r/CreativeBloq/~3/t3h9H8uAL9g/harry-styles-dykwya-site

Do You Know Who You Are? Well – do you? If not, there's only one place you should be heading, and that is Harry Styles' new website. Type your name in, and you'll get a personalised message from the 1D teenybopper heartthrob turned flamboyant soloist (or perhaps his marketing team). The message is rounded off with TPWK ('Treat people with kindness' – one of Styles' trademark phrases), Love H (Harry).

You can see some of the Creative Bloq team's messages below. We think they're very accurate, although one of our freelancers got 'You're a bit needy, but it's OK', which he was less pleased with. He declined to screengrab. 

Visit the site yourself for your own personalised message, and find out a deep truth about yourself that you never knew. 

The site is entitled DYKWYA (Do You Know Who You Are? – HS sure loves an acronym), and speculation is raging amongst fans that it's a sign a new album is about to drop. It forms part of a wider campaign that began with some cryptic billboard advertising – a number of signs bearing the message 'Do You Know Who You Are? TPWK' began popping up. 

There was also this thought-provoking Tweet. 

So while we're partly writing this because it's Friday and it's a bit of fun, the campaign is actually pretty smart. The absence of overt branding, coupled with a drip-feed of cryptic information is a great promotional strategy that makes the most of the truly fanatical nature of Styles' fans. (Rosie would like to point out that she does not know enough about Harry Styles to say whether or not she's a fan. But that's probably because she's just so intellectual.)

Read more: 

VW 'fixes' iconic Beatles album coverLife comes at you fast with these hilarious Spotify adsThe surprising story behind the Joker logo

A Guide To New And Experimental CSS DevTools In Firefox

Original Source: https://www.smashingmagazine.com/2019/10/guide-new-experimental-css-devtools-firefox/

A Guide To New And Experimental CSS DevTools In Firefox

A Guide To New And Experimental CSS DevTools In Firefox

Victoria Wang

2019-10-10T14:30:59+02:00
2019-10-10T14:36:30+00:00

Over the last few years, our team at Firefox has been working on new CSS tools that address both cutting-edge techniques and age-old frustrations. We’re the Layout Tools team, a subset of Firefox Developer Tools, and our quest is to improve the modern web design workflow.

The web has seen an incredible evolution in the last decade: new HTML/CSS features, browser improvements, and design techniques. Our team is devoted to building tools that match that innovation so that designers and developers can harness more of the efficiency and creativity that’s now possible.

In this guide, we’ll share an overview of our seven new tools, with stories from the design process and practical steps for trying out each tool.

Editorial Design Patterns

By naming lines when setting up our CSS Grid layouts, we can tap into some interesting and useful features of Grid — features that become even more powerful when we introduce subgrids. Read related article →

1. Grid Inspector

It all started three years ago when our CSS layout expert and dev advocate, Jen Simmons, worked with members of Firefox DevTools to build a tool that would aid users in examining CSS Grid layouts.

As one of the most powerful new features of the modern web, CSS Grid had quickly gained decent browser adoption, but it still had low website adoption. There’s a steep learning curve, and you still need fallbacks for certain browsers. Thus, part of our goal was to help popularize Grid by giving developers a more hands-on way to learn it.

An example of the Grid Inspector displaying an outline of the grid layout

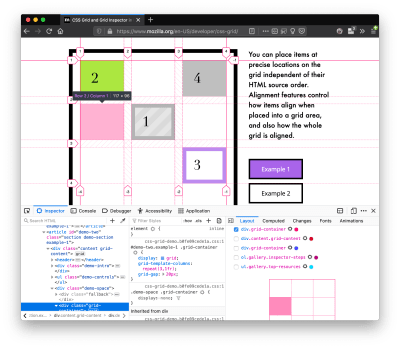
Grid Inspector (Large preview)

The core of the tool is a grid outline, overlaid on the page, which helps devs visualize how the grid is positioning their elements, and how the layout changes when they tweak their styles. We added numbered labels to identify each grid line, the ability to view up to three grids at once, and color customization for the overlays. Recently, we also added support for subgrid, a brand new CSS specification implemented in Firefox and hopefully in more browsers soon.

Grid Inspector was an inspiration for all the tools that followed. It was even an inspiration for a new team: Layout Tools! Formed in late 2017, we’re spread across four time zones and collaborate with many others in Mozilla, like our rendering engine developers and the good folks at MDN.

Try Out The Grid Inspector

In Firefox, visit our Grid example site.
Open the Inspector with Cmd + Shift + C.
Turn on Grid overlay via one of three ways:

Layout Panel:
In the Grid section, check the checkbox next to .content.grid-content;
Markup View:
Toggle the “grid” badge next to <div class=”content grid-content”>;
Rules View:
Click the button next to display:grid; inside #page-intro .grid-content;

Experiment with the Grid Inspector:

Change the purple overlay color to red;
Toggle “Line numbers” or “Extend lines infinitely”;
Turn on more grid overlays;
See what happens when you disable grid-gap: 15px in Rules.

Since Grid, we’ve been seeking to expand on the possibilities of what a browser CSS tool can be.

2. Shape Path Editor

The next project we worked on was the Shape Path Editor: our first visual editing tool.

CSS Shapes allows you to define shapes for text to flow around: a circle, a triangle, or a many-sided polygon. It can be used with the clip-path property which allows you to trim elements to any of those same shapes. These two techniques together open the possibility for some very unique graphic design-inspired layouts.

However, creating these sometimes complex shapes can be difficult. Typing all of the coordinates manually and using the right CSS units is error-prone and far removed from the creative mindset that Shapes allows. Therefore, we made a tool that allows you to edit your code by directly clicking and dragging shapes on the page.

This type of feature—visual editing—was new for us and browser tools in general. It’s an example of how we can go beyond inspecting and debugging and into the realm of design.

Try Out The Shape Path Editor

In Firefox, visit this page on the An Event Apart website.
Open the Inspector with Cmd + Shift + C and select the first circular image.
In Rules, click on the icon next to the shape-outside property.
On the page, click on the points of the shape and see what happens when you drag to make the shape huge or tiny. Change it to a size that looks good to you.

Visual editing is an example of how we can go beyond inspecting and debugging and into the realm of design.

3. Fonts Editor

For years, we’ve had a Fonts panel in Firefox that shows an informative list of all the fonts used in a website. In continuing our theme of designing in the browser, we decided to turn this into a Font Editor for fine-tuning a font’s properties.

An example of the Fonts Editor index of fonts and variable fonts editing

Fonts Editor (Large preview)

A driving force behind this project was our goal to support Variable Fonts at the same time that the Firefox rendering engine team was adding support for it. Variable Fonts gives font designers a way to offer fine-grained variations along axes, like weight, within one font file. It also supports custom axes, which give both font creators and web designers an amazing amount of flexibility. Our tool automatically detects these custom axes and gives you a way to adjust and visualize them. This would otherwise require specialized websites like Axis-Praxis.

Additionally, we added a feature that provides the ability to hover over a font name to highlight where that particular font is being used on the page. This is helpful because the way browsers select the font used to render a piece of text can be complex and depend on one’s computer. Some characters may be unexpectedly swapped out for a different font due to font subsetting.

Try Out The Fonts Editor

In Firefox, visit this variable fonts demo site.
Open the Inspector with Cmd + Shift + C and select the word “variable” in the title (the element’s selector is .title__variable-web__variable).
In the third pane of the Inspector, navigate to the Fonts panel:

Hover over the font name Output Sans Regular to see what gets highlighted;
Try out the weight and slant sliders;
Take a look at the preset font variations in the Instances dropdown menu.

4. Flexbox Inspector

Our Grid, Shapes, and Variable Fonts tools can together power some very advanced graphic design on the web, but they’re still somewhat cutting-edge based on browser support. (They’re almost there, but still require fallbacks.) We didn’t want to work only on new features—we were drawn to the problems that most web developers face on a daily basis.

So we started work on the Flexbox Inspector. Design-wise, this has been our most ambitious project, and it sprouted some new user research strategies for our team.

Like Grid, CSS Flexbox has a fairly steep learning curve when you first get started. It takes time to really understand it, and many of us resort to trial and error to achieve the layouts we want. At the beginning of the project, our team wasn’t even sure if we understood Flexbox ourselves, and we didn’t know what the main challenges were. So we leveled up our understanding, and we ran a survey to discover what people needed the most when it came to Flexbox.

The results had a big effect on our plans, making the case for complicated visualizations like grow/shrink and min/max. We continued working with the community throughout the project by incorporating feedback into evolving visual prototypes and Nightly builds.

The tool includes two major parts: a highlighter that works much like the Grid Inspector’s, and a detailed Flexbox tool inside the Inspector. The core of the tool is a flex item diagram with sizing info.

An example of the flex item diagram and sizing table

Flex item diagram and sizing (Large preview)

With help from Gecko layout engineers, we were able to show the step-by-step size decisions of the rendering engine to give users a full picture of why and how a flex item ended up with a certain size.

Note: Learn the full story of our design process in “Designing the Flexbox Inspector”.

Try Out The Flexbox Inspector

In Firefox, visit Mozilla’s Bugzilla.
Open the Inspector with Cmd + Shift + C and select the element div.inner (just inside the header bar).
Turn on the Flexbox overlay via one of three ways:

Layout Panel:
In the Flex Container section, turn on the switch;
Markup View:
Toggle the “flex” badge next to <div class=”inner”>;
Rules View:
Click the button next to display:flex.

Use the Flex Container panel to navigate to a Flex Item called nav#header-nav.

Note the sizes shown in the diagram and size chart;
Increase and decrease your browser’s width and see how the diagram changes.

Interlude: Doubling Down on Research

As a small team with no formal user research support, we’ve often resorted to design-by-dogfooding: basing our opinions on our own experiences in using the tools. But after our success with the Flexbox survey, we knew we wanted to be better at collecting data to guide us. We ran a new survey to help inform our next steps.

We crowdsourced a list of the 20 biggest challenges faced by web devs and asked our community to rank them using a max-diff format.

When we found that the big winner of the challenges was CSS Layout Debugging, we ran a follow-up survey on specific CSS bugs to discover the biggest pain points. We supplemented these surveys with user interviews and user testing.

We also asked folks to rank their frustrations with browser developer tools. The clear top issue was moving CSS changes back to the editor. This became our next project.

5. Changes Panel

The difficulty in transferring one’s work from a browser developer tool to the editor is one of those age-old issues that we all just got used to. We were excited to make a simple and immediately usable solution.

An example of the diff view provided by the Changes Panel

Changes Panel (Large preview)

Edge and Chrome DevTools came out with variants of this tool first. Ours is focused on assisting a wide range of CSS workflows: Launch DevTools, change any styles you want, and then export your changes by either copying the full set of changes (for collaboration) or just one changed rule (for pasting into code).

This improves the robustness of the entire workflow, including our other layout tools. And this is just a start: We know accidental refreshing and navigation from the page is a big source of data loss, so a way to bring persistence to the tool will be an important next step.

Try Out The Changes Panel

In Firefox, navigate to any website.
Open the Inspector with Cmd + Shift + C and select an element.
Make some changes to the CSS:

Modify styles in the Rules pane;
Adjust fonts in the Fonts pane.

In the right pane of the Inspector, navigate to the Changes tab and do the following:

Click Copy All Changes, then paste it in a text editor to view the output;
Hover over the selector name and click Copy Rule, then paste it to view the output.

6. Inactive CSS

Our Inactive CSS feature solves one of the top issues from our layout debugging survey on specific CSS bugs:

“Why is this CSS property not doing anything?”

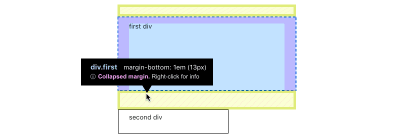
Design-wise, this feature is very simple—it grays out CSS that doesn’t affect the page, and shows a tooltip to explain why the property doesn’t have an effect. But we know this can boost efficiency and cut down on frustration. We were bolstered by research from Sarah Lim and her colleagues who built a similar tool. In their studies, they found that novice developers were 50% faster at building with CSS when they used a tool that allowed them to ignore irrelevant code.

An example of an inactive CSS tooltip warning

Inactive CSS tooltip (Large preview)

In a way, this is our favorite kind of feature: A low-hanging UX fruit that barely registers as a feature, but improves the whole workflow without really needing to be discovered or learned.

Inactive CSS launches in Firefox 70 but can be used now in prerelease versions of Firefox, including Developer Edition, Beta, and Nightly.

Try Out Inactive CSS

Download Firefox Developer Edition;
Open Firefox and navigate to wikipedia.org;
Open the Inspector with Cmd + Shift + C and select the center content area, called central-featured;
Note the grayed out vertical-align declaration;
Hover over the info icon, and click “Learn more” if you’re interested.

7. Accessibility Panel

Along the way we’ve had accessibility features developed by a separate team that’s mostly one person — Yura Zenevich, this year with his intern Maliha Islam.

Together they’ve turned the new Accessibility panel in Firefox into a powerful inspection and auditing tool. Besides displaying the accessibility tree and properties, you can now run different types of checks on a page. So far the checks include color contrast, text labels, and keyboard focus styling.

An example of the Accessibility Panel’s auditing feature

Auditing in the Accessibility Panel (Large preview)

Now in Nightly, you can try the new color blindness simulator which harnesses our upcoming WebRender tech.

Try Out The Accessibility Panel

Download Firefox Developer Edition;
Navigate to meetup.com;
In the developer tools, navigate to the Accessibility tab, and click the “Turn on Accessibility Features” button;
Click the drop-down menu next to “Check for issues” and select “All Issues”;
Take a look at the various contrast, keyboard, and text label issues, and click the “Learn more” links if you’re interested.

Next Up

We’re currently hard at work on a browser compatibility tool that uses information from MDN to show browser-specific issues for a selected element. You can follow along on GitHub to learn more.

The Future

We’re committed to supporting the modern web, and that means continuously changing and growing.

New specifications get implemented by browser vendors all the time. Guidelines and best practices around progressive enhancement, responsiveness, and accessibility evolve constantly. Us tool makers need to keep evolving too.

And what of the long-lived, ever-present problems in creating the web? What everyday user interfaces need to be rethought? These are some of the questions that keep us going!

What about a better way to navigate the DOM tree of a page? That part of DevTools has gone essentially unchanged since the Firebug days.

We’ve been experimenting with features like back and forward buttons that would ease navigation between recently visited elements.

A more dramatic change we’re discussing is adding a compact DOM view that uses a syntax similar to HTML templating engines. The focus would be on the most common use case—navigating to CSS—rather than viewing/editing the source.

A mockup of the simplified HTML Outline View

HTML Outline View (Large preview)

We’ve also been thinking about a better element selector. We know how it can be more productive to work inside the page, with less jumping back and forth into DevTools. We could make the element selector more powerful and more persistent. Perhaps it could select whitespace on a page and tell you what causes that space, or it could shed light on the relationships between different elements.

A mockup of element overlay with collapsed margin

Visual Element Selector (Large preview)

These are just two of the many ideas we hope to explore further with the help of the community.

We Need Your Input!

We want to keep making awesome tools that make your life easier as a developer or designer.

Here’s an easy way to help: Download Firefox Developer Edition and try using it for some of your work next week.

Then, tell us what you think by taking our 1-page survey.

We’re always interested in hearing ideas for improvements, particularly any low-hanging fruit that could save us all from some regular frustration. We do our work in the open, so you can follow along and chime in. We’ll keep you updated at @FirefoxDevTools.

Thanks to Patrick Brosset for his contributions to this article.

Smashing Editorial
(dm, il)

Is Emerging AI Too Smart to Design for Me and You?

Original Source: https://www.webdesignerdepot.com/2019/10/is-emerging-ai-too-smart-to-design-for-me-and-you/

Currently, the answer is a resounding, “What? No… why would you even ask?” But this article isn’t about current AIs. True artificial intelligence is a long, long way off; and frankly, if we run face-first into the singularity, I doubt that our digital progeny will be interested in building interfaces for us.

Learning algorithms are getting a lot smarter, and the number of things we can do with them is rapidly expanding. Current implementations have massive flaws: facial recognition produces an uncomfortable number of false positives; AI-based recruiting means that resumes have to be built around keywords; YouTube’s algorithm is a dumpster fire. But the overall trend is toward smarter and smarter AI.

But can that AI ever design for regular people? Let’s get speculative, baby!

The Big Problem for AI Designers

I mean, can regular people even truly design things for other people? Well yes, but we collectively get it wrong about as often as we get it right. If we can instill in an AI a very cynical view of our human cognitive abilities, then we can probably teach them to design for us.

If we can instill in an AI a very cynical view of our human cognitive abilities, then we can probably teach them to design for us

It’s not because “people are dummies, hurr hurr”, although that’s a part of the issue. Mostly, though, our cognitive and reasoning skills just get impaired all the time, by dozens of different things. The human brain is a marvel in pretty much every sense of the word. We don’t currently have computers with anything like the brain’s capacity for adaptation, and few server warehouses that even approach the brain’s estimated.. well… capacity (as in storage) at least not according to the higher estimates.

The problem with our brains is that they’re being used by every part of our body, all the time. Then bits of them are constantly dying off and being reborn. And then the rest is being used to worry about things you did ten years ago, so you don’t have to worry so much about what’s going on right now.

Compared to computers, even people who don’t have ADHD are easily distracted.

AI, on the other hand, is focused like a laser. You tell it to look for keywords, and it finds them. You tell it to look for x, y, and z, and adapt itself based on what it finds, and it will do that. That’s one reason why Microsoft’s AI, Tay, got real racist, real fast, when exposed to Twitter.

Set an AI to find the “Buy” button on a web page, and so long as it has somewhat flexible criteria of what constitutes a “Buy” button, it will probably find that button quickly. Set the world’s smartest human to perform the same task, and they just might get lost on the way because they don’t navigate through raw code, keywords in hand, like a bot does. They might get distracted by a shiny ad, a knock at the door, or the existential dread that they usually manage to ignore.

Bringing real people to the point of sale, or at least to the point of your website, is a bit like herding cats, even at the best of times. Teaching an AI to provide multiple paths to multiple objectives, which objectives to prioritize, and how to do it without alienating the human users is a complex endeavor to say the least. It would literally have to be programmed to account for the fact that, for the species that invented computers, sometimes we’re not all that bright, or logical, or efficient, or focused, or driven… you get the picture.

Even the best of us have many moments of intellectual prowess that can be most charitably described as “interesting”. Uncharitable descriptions of those moments may contain lots of four-letter words.

The Project Specs

So we have to teach an AI all of the things that humans have been doing for millennia: We have to teach them about what humans consider beautiful, and how to adapt to those constantly-changing aesthetic standards. We have to teach them to be efficient, but not so efficient that it makes people uncomfortable. We have to teach them to account for our distractibility, our sense of whimsy, and every other factor that we can possibly imagine.

even the most accomplished anthropologists would never claim to understand the whole human experience

Someone even posited that we might have to train them to “think dumber” in order to design for us. I personally think it’s going to be a lot more complex than that. We’re going to have to train AIs in one discipline that we’ve had trouble teaching to people: empathy.

Designer AIs of the future—if we want them to be as good as or better than us—aren’t just going to have to factor in all the potential issues we can think of; we’ll have to teach them to recognize new and unfamiliar human circumstances (and sometimes new and unfamiliar human failings) in order to adapt and design a workaround. We can’t possibly train them in the worldwide human experience. For one, that experience keeps changing, and two, even the most accomplished anthropologists would never claim to understand the whole human experience.

Some of the more arrogant programmers might make that claim, but we’ll just keep them locked up in Silicon Valley where they belong.

Conclusion

Given the complexity of the task, I’d argue that we either have to be content with template-based AI-made designs that never get better than “decent”. Or, we have to invent a full-on artificial consciousness, and hope that we have something they want that we can provide in return for the best UIs this world has ever seen.

But honestly, that almost seems like a waste of a good killbot.


Featured image via Unsplash.

Source

p img {display:inline-block; margin-right:10px;}
.alignleft {float:left;}
p.showcase {clear:both;}
body#browserfriendly p, body#podcast p, div#emailbody p{margin:0;}

Ways to Improve Communication with Your Clients

Original Source: http://feedproxy.google.com/~r/1stwebdesigner/~3/yiZlflsZ93s/

Communication may just be the most overlooked ingredient in building a great website. I’d argue that it’s just as important as awesome design and development skills.

Without it, the final product is going to suffer. The site may look nice enough, but is it on target with regards to branding and messaging? Will the functionality match up with your client’s intended goals?

Despite its importance, communication is also one of the hardest skills to learn. In addition, it’s a two-way street. Even if you’re gifted in this area, your client may not be.

Let’s explore some ways to improve the dialogue with clients and better ensure a successful project.

Reach Out

One thing to realize about your clients is that they often have busy schedules. In other words, dealing with their current or future website is just one of many things on their to-do list.

As the old saying goes, the squeaky wheel gets the grease. This means that people tend to deal with whatever situation is right in front of them in that very moment. If your website project isn’t in their immediate line of sight, then it’s probably going to stay on the back burner.

To avoid a project that hangs in the air indefinitely, it’s up to you to reach out to clients. Check in on the status of that content you’re waiting for, or the example sites they were supposed to send. Offer your help and to answer any questions they might have.

Taking this little bit of initiative can kickstart the process of actually getting things done.

A person typing on a laptop computer.

Dig for Details

It can be difficult to gain an understanding of what a client really wants. They may sometimes give vague instructions or be otherwise noncommittal when it comes to the look and features of their site.

This can be quite frustrating as you are left to guess the best path forward. It can also lead to a seemingly unending cycle of revisions and, once again, a stagnating project.

You may even get the impression that this person is being hard to deal with. However, that’s most likely not the case. It may just be that they really aren’t sure what they want or are having trouble explaining it.

This is another instance where being assertive can help. Ask probing questions, provide either-or scenarios and try to make the discussion a productive one.

It’s important to remember that this is a process and that things aren’t always clear from the get-go. Sometimes, it requires peeling back a few layers before we can find that solid foundation for moving forward.

Women sitting at a table.

Keep Clients Updated

Another key element in communicating with clients is keeping them abreast of progress. After all, they’re investing a good bit of money into their website. It’s only natural to want to know where things stand.

This can be a bit of a delicate balance for designers. You don’t want to overwhelm your clients with constant updates. Yet you don’t want to underwhelm them when there just hasn’t been much progress.

Depending on the scope and timeline of the project, usually a weekly update is enough. And, even if you’re struggling with a specific aspect of things, it’s okay to share that as part of your status report.

Things such as technical roadblocks or even an unexpectedly busy schedule are bound to happen along the way. Most people are pretty understanding about it, so long as you let them know. Rather, it’s the uncertainty that comes with a lack of communication that is more likely to spark a less-than-kind reaction.

Man talking on a phone.

Create Opportunities with Mass Communication

While so much of client communication is person-to-person, there are other opportunities to stay in touch. By taking advantage of available tools, you can get your message out to highly-targeted groups.

Social media is a big one these days. And it can actually be a good place to talk to clients – albeit in a more generalized way. Use it to let them know about articles and tools that may be of interest.

Sure, your feeds may be followed by non-clients as well. However, that can be a positive. By sharing worthwhile information, you become a trusted source. And trust is key for turning prospects into paying customers.

The other mass communication tool is the good old email newsletter. This is still a great forum to share ideas. And, unlike social media, it’s easy to target clients or even a subset of them.

Even better is that clients can respond directly to your mailing, starting what could be a real conversation. At the very least, it’s a solid way to keep them in the loop.

One bit of advice: Avoid making flat-out sales pitches. They’re already your clients, they’ve already purchased something from you. Make sure that whatever you post or send out is of some genuine value.

Social media icons on a tablet screen.

Better Projects, Better Relationships

Effectively communicating with your clients isn’t so much about being perfect. Rather, it’s about making the effort to better understand who they are. The goal is to find out what they’re hoping to achieve and then devise a plan to help them do so.

The end result is a project that accurately reflects their wants and needs. That, in turn, will help you build a solid, lasting relationship.

Just think, if you are able to regularly accomplish this feat, you’ll have loyal clients and be set up for long-term success. It’s a winning formula that both you and your clients will benefit from.


Lūnigo, all digital insurer illustrations for UI

Original Source: http://feedproxy.google.com/~r/abduzeedo/~3/ER8_9Z9ZpeU/lunigo-all-digital-insurer-illustrations-ui

Lūnigo, all digital insurer illustrations for UI

AoiroStudioOct 09, 2019

In product design, especially when building a digital product and/or platform. Aside from building a design system, progressing into an organization collaboration, stepping a design language to the stakeholder’s table and more. We often forget little things like illustrations, yeah that old thing! To be knowledge, it’s a great way to express different kinds of things. Whatever it is an icon, transcending a vision of a feature, on-boarding or just giving a polished look to your product. I think it’s really important to include this mindset in the design process. We are featuring the ‘all digital insurer’ illustration series titled: ‘Lūnigo’ by DHNN Creative Agency.

Iūnigo, the first all digital insurer from Argentina worked with DHNN developing the brand illustrated and digital assets to be displayed into their digital platforms.

Branding
Lūnigo, all digital insurer illustrations for UILūnigo, all digital insurer illustrations for UILūnigo, all digital insurer illustrations for UILūnigo, all digital insurer illustrations for UILūnigo, all digital insurer illustrations for UILūnigo, all digital insurer illustrations for UILūnigo, all digital insurer illustrations for UILūnigo, all digital insurer illustrations for UILūnigo, all digital insurer illustrations for UILūnigo, all digital insurer illustrations for UILūnigo, all digital insurer illustrations for UILūnigo, all digital insurer illustrations for UIBy DHNN Creative Agency

About DHNN Creative Agency

DHNN is a creative agency from Miami, Florida. Their work is a wide range of digital experiences with UI/UX, branding, rebranding, VR and more. Make sure to check out their Behance.

Studio Site
Behance