Getting Started with GraphQL and React Native
Original Source: https://www.sitepoint.com/graphql-react-native-getting-started/?utm_source=rss

In 2012, Facebook engineer Nick Schrock started work on a small prototype to facilitate moving away from an old, unsupported partner API that powered the current Facebook News Feed. At the time, this was called “SuperGraph”. Fast forward to today and SuperGraph has helped shape the open-source query language GraphQL, which has been much of the buzzword in recent times.
Facebook describes GraphQL as a “query language for APIs and a runtime for fulfilling those queries with your existing data”. Put simply, GraphQL is an alternative to REST that has been steadily gaining popularity since its release. Whereas with REST a developer would usually collate data from a series of endpoint requests, GraphQL allows the developer to send a single query to the server that describes the exact data requirement.
Prerequisites
For this tutorial, you’ll need a basic knowledge of React Native and some familiarity with the Expo environment. You’ll also need the Expo client installed on your mobile device or a compatible simulator installed on your computer. Instructions on how to do this can be found here.
Project Overview
In this tutorial, we’re going to demostrate the power of GraphQL in a React Native setting by creating a simple coffee bean comparison app. So that you can focus on all of the great things GraphQL has to offer, I’ve put together the base template for the application using Expo.
To get started, you can clone this repo and navigate to the “getting-started” branch, which includes all of our basic views to start adding our GraphQL data to, as well as all of our initial dependencies, which at this stage are:
{
"expo": "^32.0.0",
"react": "16.5.0",
"react-native": "https://github.com/expo/react-native/archive/sdk-32.0.0.tar.gz",
"react-navigation": "^3.6.1"
}
To clone this branch, you’ll need to open up terminal and run this command:
git clone https://github.com/jamiemaison/graphql-coffee-comparison.git
To then navigate to the getting-started branch, you move into the newly cloned repo with cd graphql-coffee-comparison and run git checkout getting-started.
The next stage is to install our dependencies. To do this, make sure you’re on Node v11.10.1 and run npm install in the root directory of the project. This will add all of the dependencies listed above to your node_modules folder.
To start adding GraphQL to our React Native app, we’re going to need to install a few more dependencies that help us perform a few simple GraphQL functions. As is common with modern JavaScript development, you don’t need all of these dependencies to complete the data request, but they certainly help in giving the developer a better chance of structuring some clean, easy-to-read code. The dependencies you’ll need can be installed by running npm install –save apollo-boost react-apollo graphql-tag graphql.
Here’s an overview of what these dependencies are:
apollo-boost: a zero-configuration way of getting started with GraphQL in React/React Native
react-apollo: this provides an integration between GraphQL and the Apollo client
graphql-tag: a template literal tag that parses GraphQL queries
graphql: the JavaScript reference implementation for GraphQL
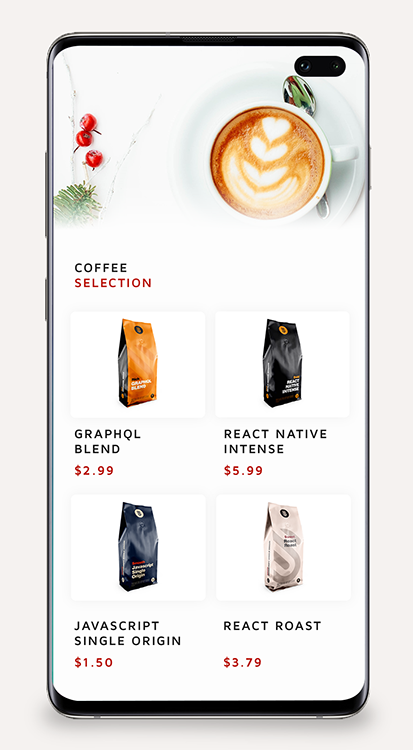
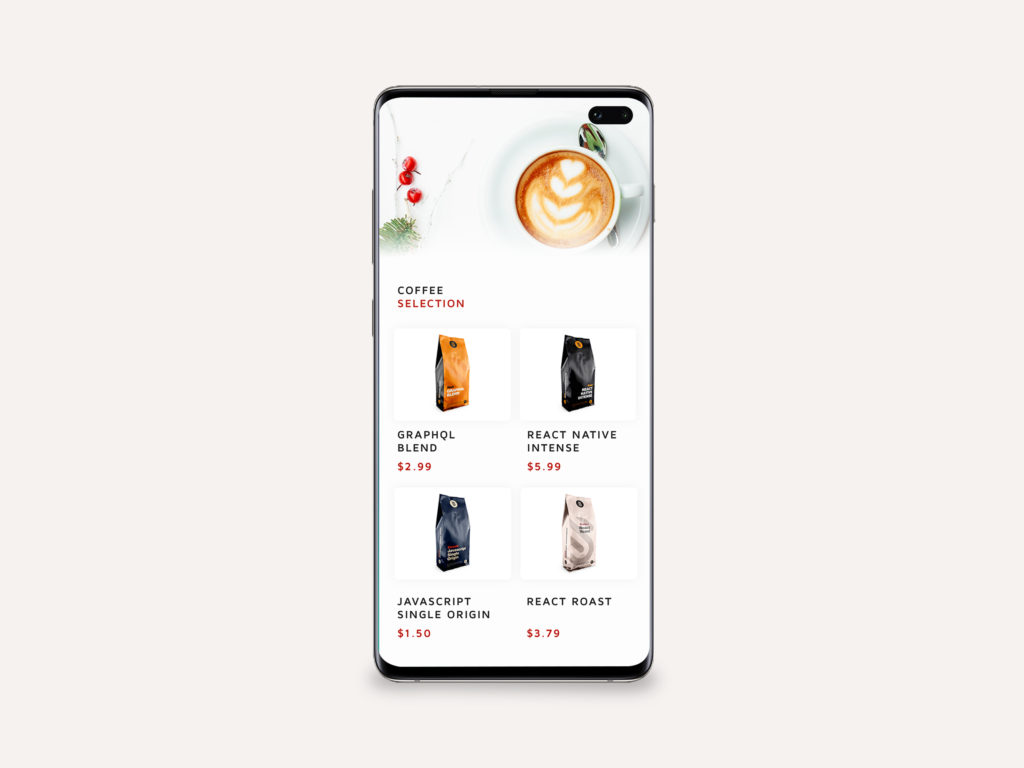
Once all of the necessary dependencies have finished installing, run npm start. You should now see your familiar Expo window, and if you launch the app (either via a simulator or on a device) then you should see a screen similar to this:
In basic terms, this application has two screens that are managed by react-navigation, Home.js and CoffeePage.js. The Home screen contains a simple FlatList that renders all of the coffee beans supplied to its data field. When clicked on, the user is navigated to the CoffeePage for that item, which displays more information about the product. It’s our job to now populate these views with interesting data from GraphQL.
Apollo Server Playground
There are two main elements to any successful GraphQL transaction: the server holding the data, and the front-end query making the request. For the purposes of this tutorial, we aren’t going to start delving into the wonderful world of server-side code, so I’ve created our server for us ready to go. All you need to do is navigate to yq42lj36m9.sse.codesandbox.io in your favorite browser and leave it running throughout the course of development. For those interested, the server itself is running using apollo-server and contains just enough code to hold the data we need and serve it upon receiving an appropriate query. For further reading, you can head over to apollographql.com to read more about apollo-server.
GraphQL Query Basics
Before we get into writing the actual code that’s going to request the data we need for our coffee bean comparison app, we should understand just how GraphQL queries work. If you already know how queries work or just want to get started with coding, you can skip ahead to the next section.
Note: these queries won’t work with our codesandbox server, but feel free to create your own at codesandbox.io if you’d like to test out the queries.
At its simplest level, we can use a flat structure for our queries when we know the shape of the data we’re requesting:
QUERY: RESPONSE:
{ {
coffee { "coffee": {
blend "blend": "rich"
} }
} }
On the left, we see the GraphQL query requesting the blend field from coffee. This works well when we know exactly what our data structure is, but what about when things are less transparent? In this example, blend returns us a string, but queries can be used to request objects as well:
QUERY: RESPONSE:
{ {
coffee { "coffee": {
beans { "beans": [
blend {
} blend: "rich"
} },
} {
blend: "smooth"
}
]
}
}
Here you can see we are simply requesting the beans object, with only the field blend being returned from that object. Each object in the beans array may very well contain other data other than blend, but GraphQL queries help us request only the data we need, cutting out any extra information that’s not necessary for our application.
So what about when we need to be more specific than this? GraphQL provides the capability for many things, but something that allows for extremely powerful data requests is the ability to pass arguments in your query. Take the following example:
QUERY: RESPONSE:
{ {
coffee(companyId: "2") { "coffee": {
beans { "beans": [
blend {
} blend: "rich"
} },
} {
blend: "smooth"
}
]
}
}
What we see is that we can pass an argument — in this case, the companyId — which ensures that we are only returned beans from one particular company. With REST, you can pass a single set of arguments via query params and URL segments, but with GraphQL querying every single field, it can get its own set of arguments. This allows GraphQL to be a dynamic solution for making multiple API fetches per request.
The post Getting Started with GraphQL and React Native appeared first on SitePoint.


Leave a Reply
Want to join the discussion?Feel free to contribute!