What Is a REST API?

Original Source: https://www.sitepoint.com/rest-api/?utm_source=rss

What Is a REST API?

The REST API is a key part of web infrastructure. Learn about REST and REST APIs, and how web apps communicate over HTTP like web browsers and servers do.

Continue reading
What Is a REST API?
on SitePoint.

Collective #726

Original Source: https://tympanus.net/codrops/collective/collective-726/

Inspirational Website of the Week: VoidersClub

A slick retro design with brilliant colors and great typography. Our pick this week.

Get inspired


Our Sponsor

Our annual Summer Sale is back! This is one of only a few times we offer our biggest discounts. Get 20% off Divi, 40% off Divi Cloud and up to 50% off products in the Divi Marketplace!

Get the deal

Making a Morphing 3D Sphere in Javascript with Three.js

In this guide you’ll leanr how to create a morphing sphere with a cool, wireframe background.

Read it

A Handy Use For Cascade Layers

Michelle Barker shares how cascade layers are a perfect solution to a problem she was having.

Read it

The AI Art Apocalypse

Alexander Wales writes about AI created art and what it means for artists.

Read it

Needle (Beta)

Needle Engine is a web-based runtime for 3D apps. It runs on your machine for development, and can be deployed anywhere. It is flexible, extensible, and collaboration and XR come naturally.

Check it out

Design the next iPhone

Apple is running out of ideas and needs your help. Another fun project by Neal Agarwal.

Check it out

Choo-Choo World

An amazing web based wooden train track builder.

Check it out

What was that media query code again??

A website that lists popular media queries with a handy copy button.

Check it out

Sidekick

Sidekick is a live application debugger that lets you troubleshoot your applications while they keep on running.

Check it out

I replaced all our blog thumbnails using DALL·E 2 for $45: here’s what I learned

A very interesting use case for AI generated images in a blog.

Read it

pppalette

An easy color palette generator for beautiful color schemes. Analogous, complementary, split complementary, triadic, monochromatic (tones, tints, shades) & more.

Check it out

CSS Tip

Jhey Thompkins shows how you can select the previous siblings of an element with :has() for a cool hover effect.

Check it out

90’s Cursor Effects

Fun JavaScript mouse effects that follow your cursor or finger! By Tim Holman.

Check it out

Creative list styling

A look at some useful and creative ways to style a list. By Michelle Barker.

Read it

System Design

Learn how to design systems at scale and prepare for system design interviews.

Check it out

Webhooks.fyi

Learn the most popular approaches for building, securing, and operating webhooks, with recommendations for webhook providers and consumers.

Check it out

CSS Grid and Custom Shapes, Part 2

The second article in a series where you’ll learn how to use CSS Grid, clip-path, and mask to create custom shaped grids.

Read it

SurrealDB

A scalable, distributed, collaborative, document-graph database, for the realtime web

Check it out

My Experience Speaking at VueConf US 2022

A detailed article about speaking at a conference by Austin Gil.

Check it out


From Our Blog

Custom SVG Cursors with an Interactive Emitter Effect

Several interactive cursor effects made with JavaScript and SVG.

Check it out

This unreal Mario game is giving me nightmares

Original Source: https://www.creativebloq.com/news/mario-made-in-unreal-engine-5

Mario gets a bizarro remake in Unreal Engine 5.

Richpanel Review: Multi-Channel Customer Support for Shopify and More

Original Source: https://ecommerce-platforms.com/articles/richpanel-review

Are you considering adding a customer support module to your online store? That’s not a bad idea, considering consumers are becoming more and more reliant on chat boxes. But why stop there? Platforms like Richpanel include more than a chat box; with features for multichannel communications, customer portals, and workforce management, you’re able to improve upon several areas of your business with one app.

In this Richpanel review, we explore the features, interface, pricing, and customer support from Richpanel. 

This way, you’ll know if it’s the right customer support app to manage your customer base and workforce. Keep reading our in-depth Richpanel review for all the details!

Richpanel review

Richpanel Review: The Features

Richpanel may look like a simple chat box on the frontend, but it expands into a powerful end-to-end customer service platform that extends beyond serving users on the website, by offering a combination of tools for both online sellers and the customers who land on their websites. 

In this section of our Richpanel review, we outline the standout features to ensure you gain a full understanding of what’s available as a Richpanel user. 

Multichannel Support

One of the core features that helps Richpanel stand out from the competition is how it allows store owners to handle customer support from multiple sales channels in one place. Not only can you add the Richpanel customer support widget on your website (and on any Amazon stores you have), but it fields conversations with customers through:

SMSEmailFacebook and InstagramAircallWhatsappAttentive

sales channels supported by Richpanel

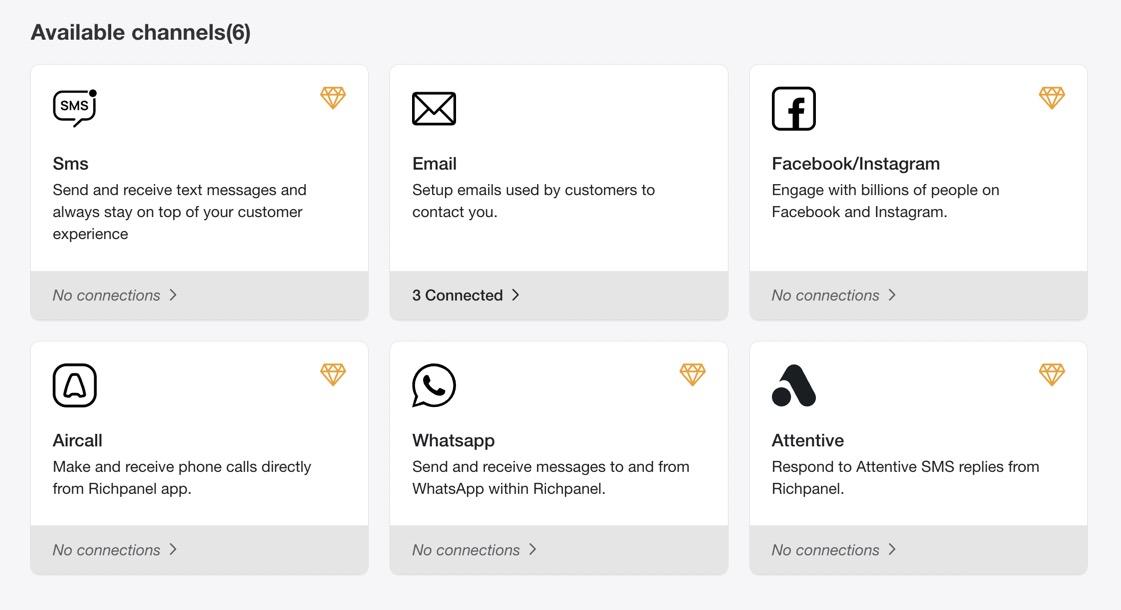
Store owners can connect however many of these they want; after which, messages from all of those channels get sent to the Richpanel message center for processing. 

In addition, Richpanel boasts integrations with top ecommerce platforms like:

ShopifyMagentoWooCommerce

You can also add Richpanel support to any website or online store using their custom integration module. 

These integrations allow you to use Richpanel regardless of the ecommerce platform, and without having experience with API development. 

In addition, there are several ecommerce apps that integrate with Richpanel, ranging from subscription apps to sales and retention tools. This way, your business stack remains connected and shares information between all apps.

Richpanel review of integrations

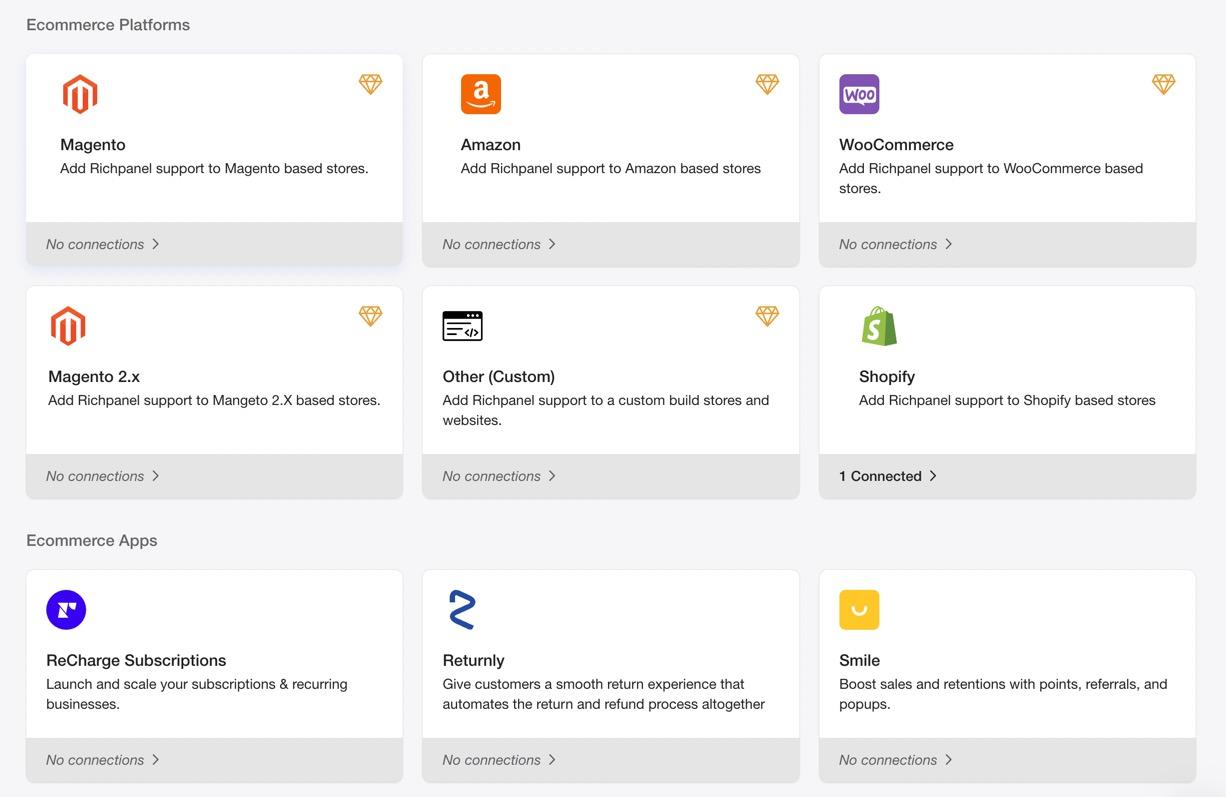
Here are some of the Richpanel app integrations:

AftershipLoop ReturnsReturnlySmile (sales and retention app)ReCharge SubscriptionsSegmentHubspot

Customer Self-Service Portal

The idea behind the customer portal is to give customers the chance to look up information and resolve queries themselves, instead of reaching out to your customer support reps every time a question pops up. 

It’s an automated solution that provides multiple links for customers to look up their account and order details, from order statuses, return details, warranty information, subscription status and what not.

self service - Richpanel review

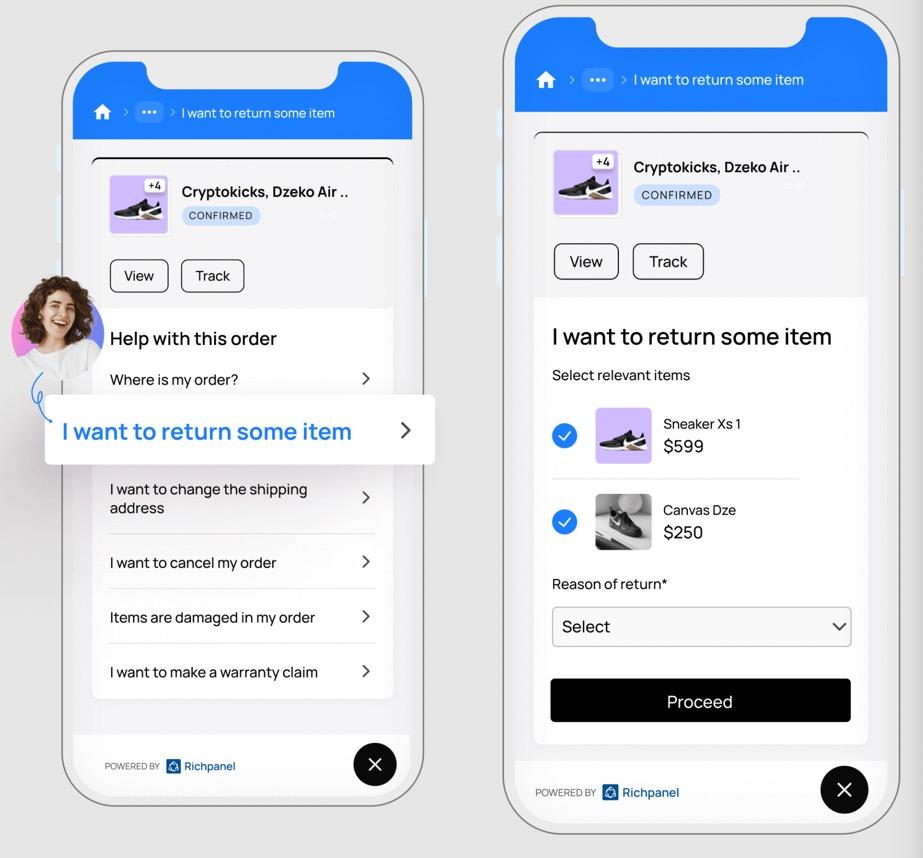
It works by asking the customer to log into their account on your website. Thereafter, they’re given topics and questions to click, such as:

Where is my order?I want to return an itemI want to cancel an orderItems are damaged in my orderI want to make a warranty claim

With this type of setup, the customer manages their account without having to use your customer support resources. It’s all automated and linked to their accounts. So, for instance, they can actually cancel an order with the click of a button.

The customer self-service portal even gives out product recommendations based on customer questions. 

Workforce Management

Workforce management doesn’t come with every customer support app you find for ecommerce platforms like Shopify. Instead, you have to go out and find a separate app to complete two tasks. With Richpanel, your customer communications are tied into the workforce management, and that makes sense, considering each chat with a customer requires fast actions instead of slow thinking and typing. 

The workforce management module provides a system for internal communications and sending conversations to other people. There’s a tool to assign messages to a specific team or teammate, all available from the Richpanel dashboard.

assign to other teams

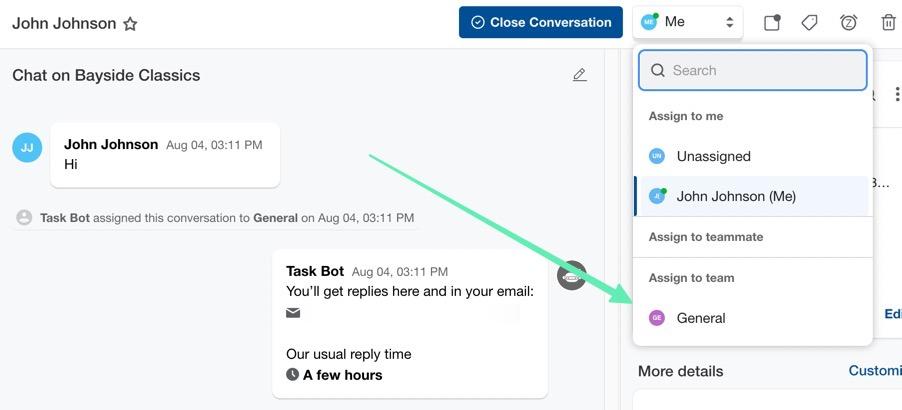
What’s also interesting about the workforce management functionality is that it allows for automations between agents. Instead of selecting an agent to send a conversation, store owners have the option to configure automations that trigger whenever something occurs. Let’s say that a customer starts a new conversation talking about how they didn’t receive an item. Instead of sending it to the general inbox, you’d rather it goes directly to someone in your organization who handles missing items. Therefore, you’d set an if/then automation that marks the message as “high priority” and sends it to the inbox of whomever handles missing items. 

Agent Console

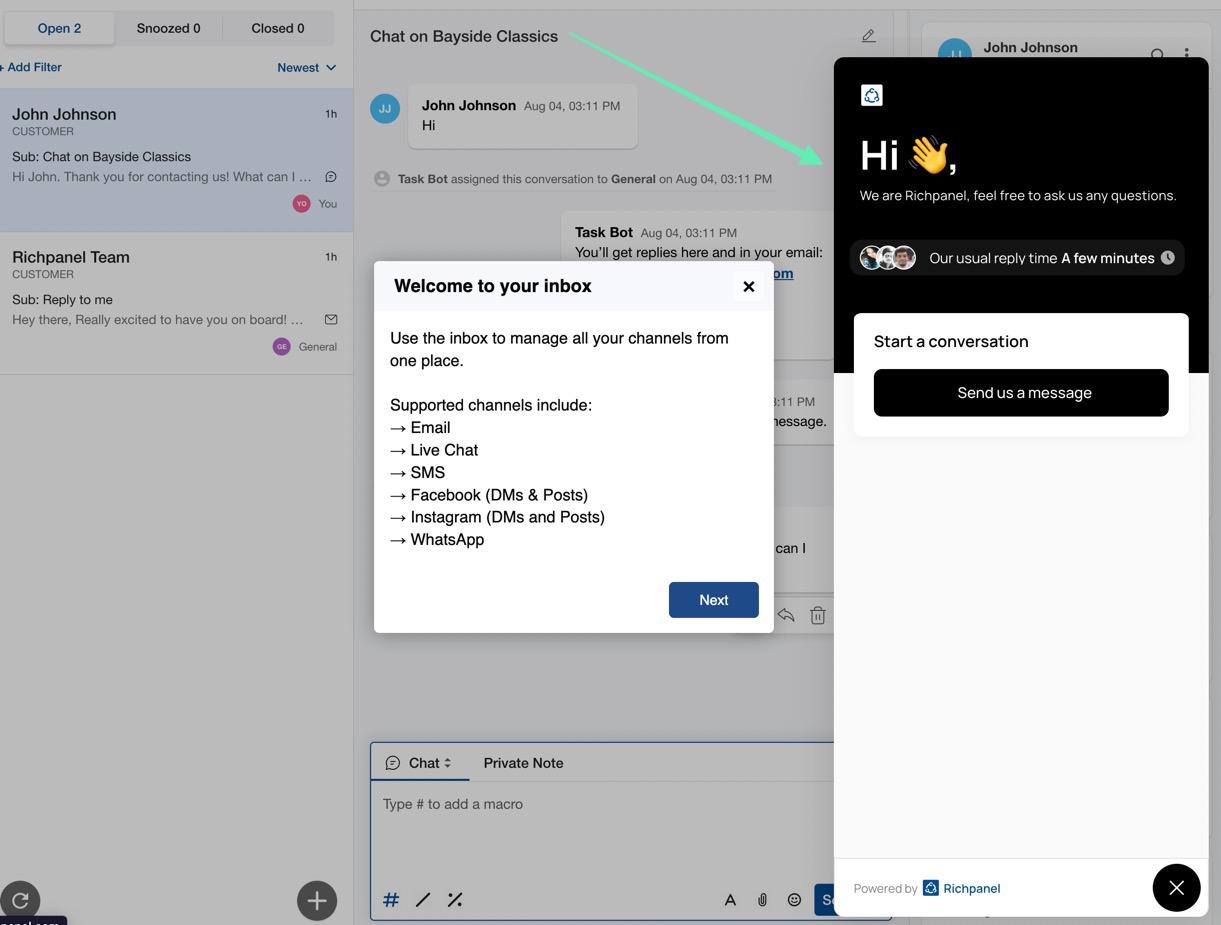
The Agent Console is the heart and soul of the Richpanel operation. It’s where your customer support agents manage online conversations, mark information about customers, and initiate actions when required. 

At its simplest, the agent console lets reps chat with customers, from multiple channels at one time. That means you can chat with a customer from Amazon, while also talking to people who come in through SMS, email, or the chat box. 

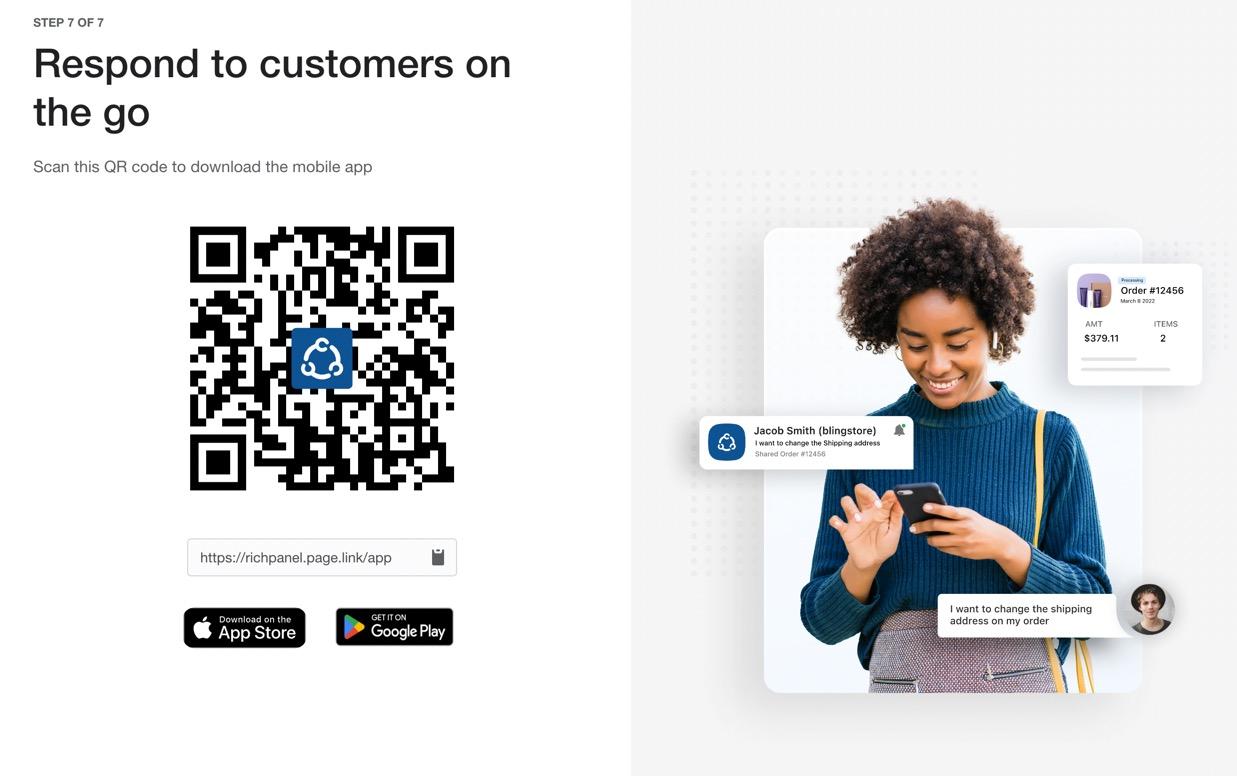
There’s also an app for your reps to download for communicating with customers on the go. This is particularly helpful for smaller operations where one or two people need to keep an eye on customer chats at all times.

the app

We particularly enjoy the actions and automation tools available for customer support reps, all of which come together for a faster, more efficient work area. 

Some of these tools include:

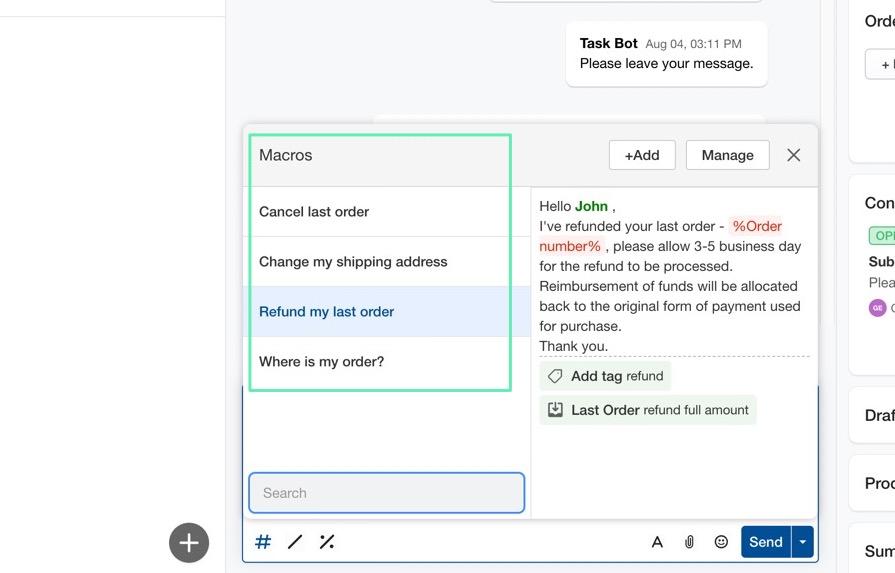
MacrosA 360-degree customer context moduleOrder actionsPower replies

As an example, an agent could quickly reply to a customer that they have refunded the order; the macro sends a complete report of the refund and when they should expect money to return to their account. There are macros for things like cancelling orders, finding orders, and changing shipping addresses.

Richpanel review of macros

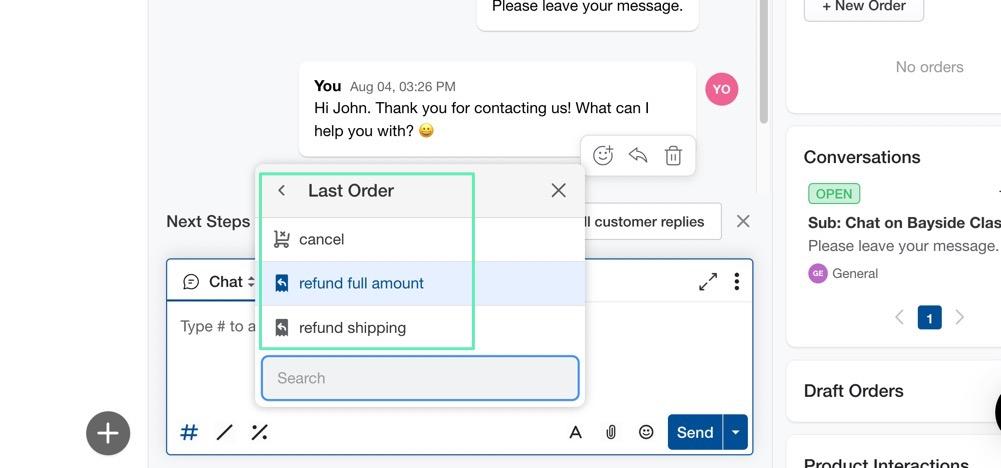
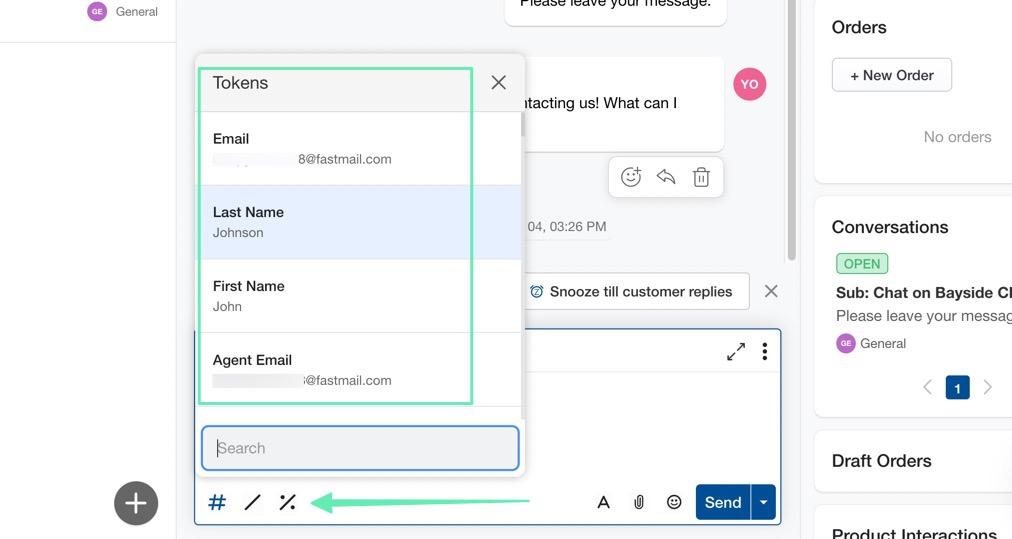
Other actions and automations we enjoy include the Insta Actions and Tokens. 

insta actions

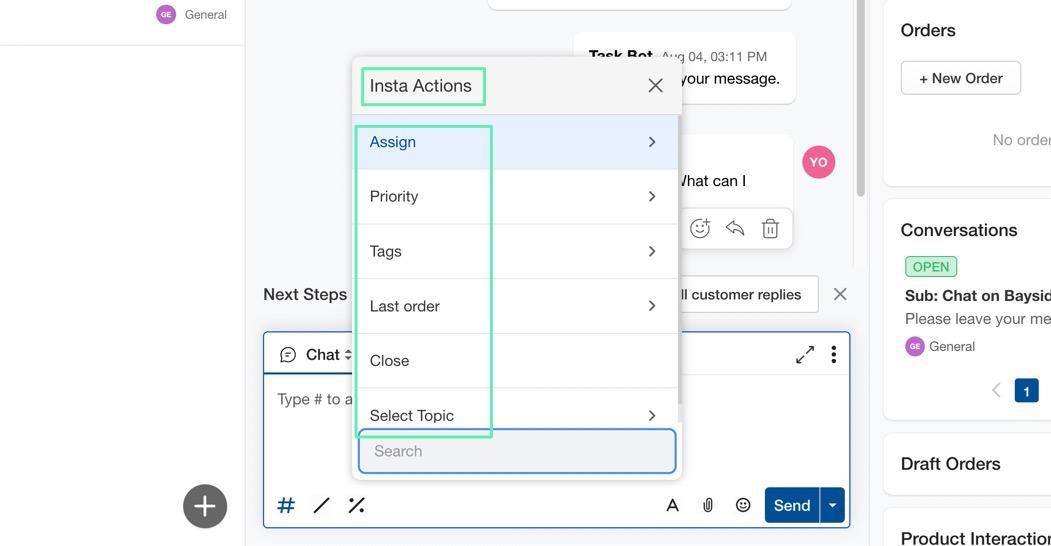
Insta Actions provide quick tools for actually completing tasks like cancelling orders and refunding customers. 

last order

While Tokens are more for filling information into the chat box, like the customer name, agent email, or order details. This essentially eliminates the need to type in lengthy information. 

Richpanel review of tokens

Support Performance

The Team Performance report gives you an overarching view of your entire team, with metrics for:

Conversation createdMessages receivedMultichannel conversationsFirst response timeResolution time

Furthermore, you can break it down into agent views to see which customer support reps perform the best. 

team performance

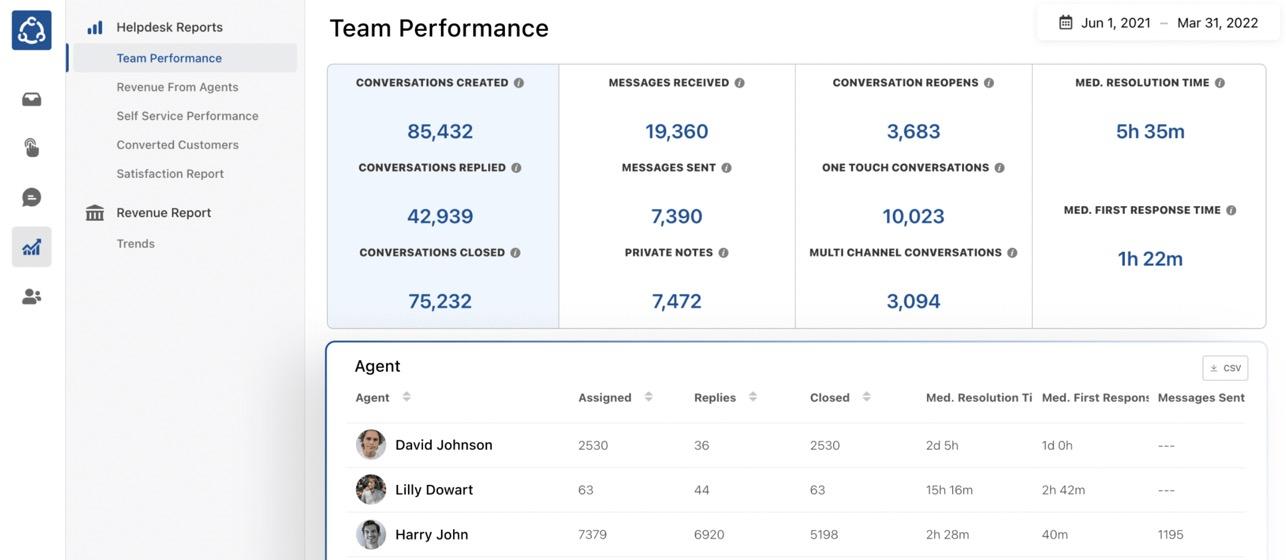
An analysis like this empowers your workforce to spend as much time as possible making customers happy, while also giving you a view of what’s happening with your employees. 

Other elements that come with the support performance module include:

Revenue reports that show how much revenue comes in from customer support interactionsSelf-service performance, or how well the customers can answer questions on their ownCustomer surveys

surveys from the Richpanel review

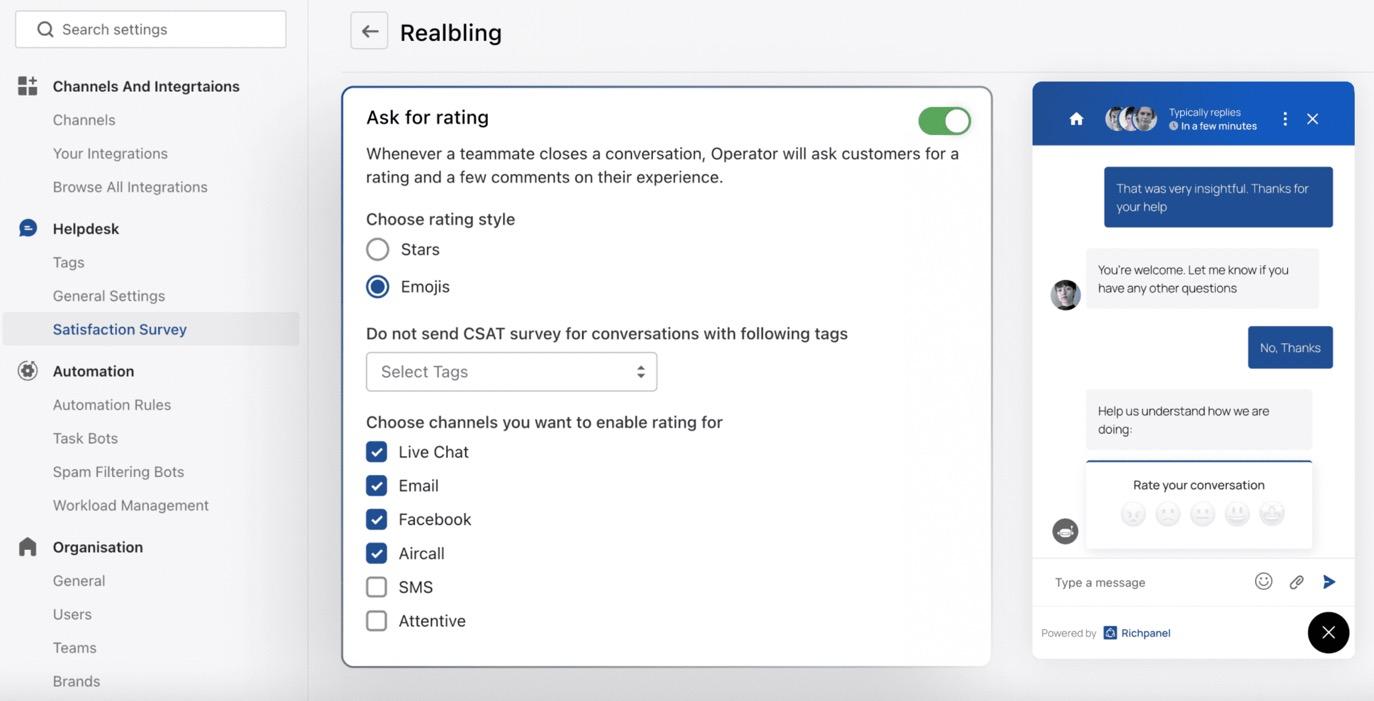
In fact, the Richpanel survey tool has an incredible number of settings, allowing you to ask for a rating after every chain with a customer. You can choose the rating style, select channels for which to collect surveys, and even completely disable the survey center if needed. 

Richpanel Review: The Interface

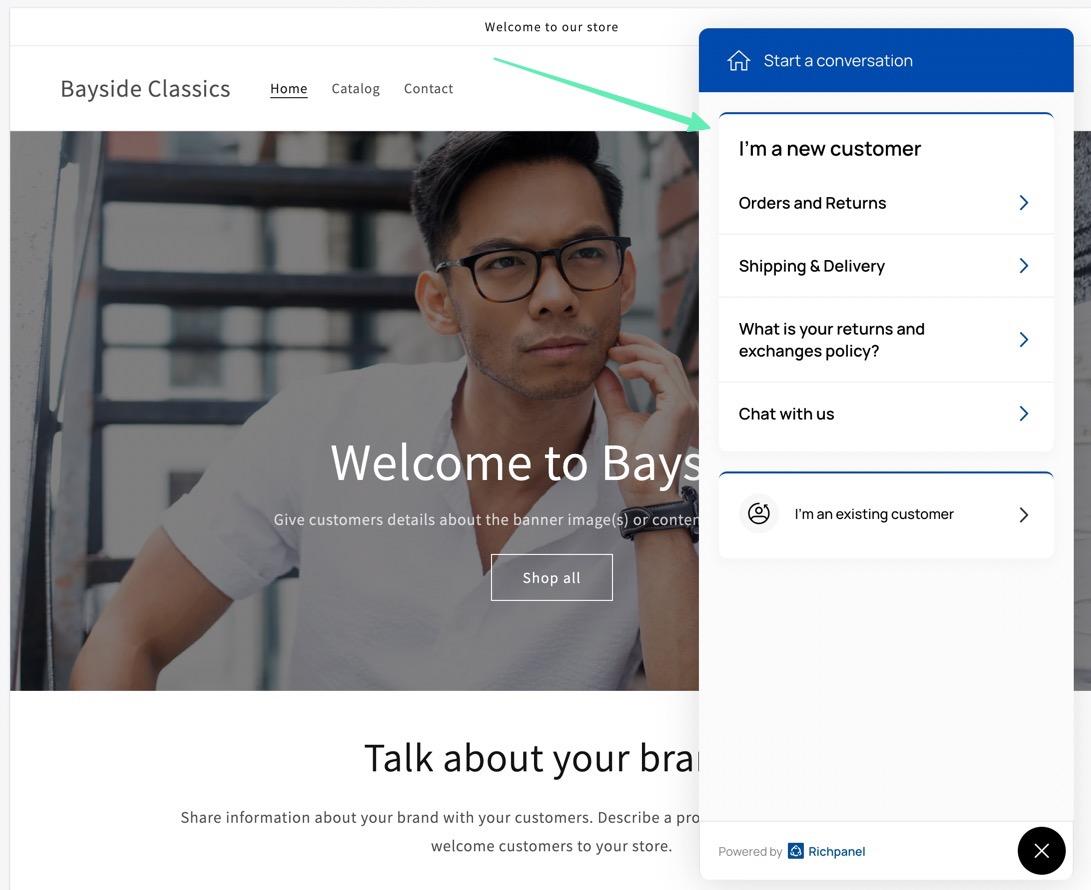
The Richpanel interface starts off impressively, with its simple “getting started” guide, where it asks for you to design your customer support widget with a brand logo and colors.

build your widget

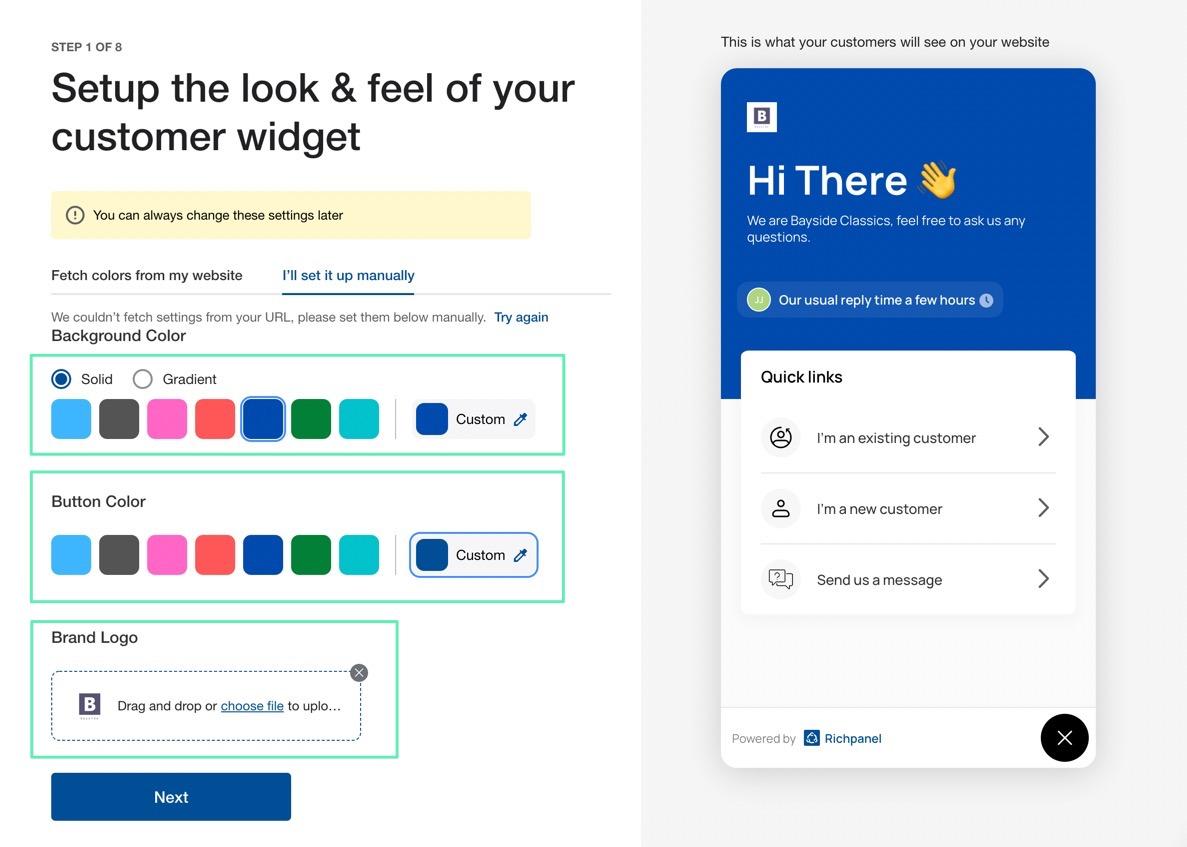
Once designed, the Richpanel chat module appears for all customers, but it’s not too intrusive. Visitors have access to the module whenever they want, and you can even add it to your Amazon store. 

The customer interface functions by trying to get them to solve their own questions first, with smart actions and responses, along with automated replies that provide detailed information, not just a canned response that sounds like a robot.

Richpanel review of customer interface

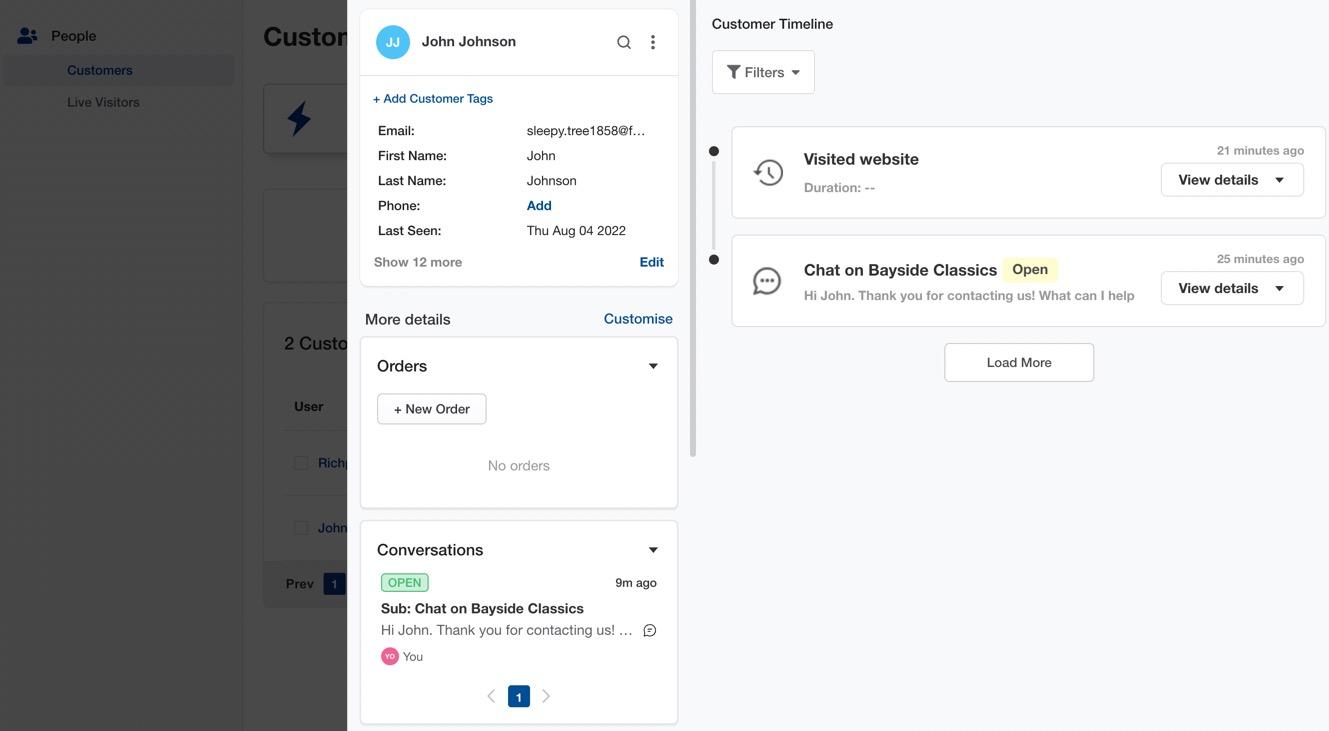
Once a conversation starts, your customer service reps receive notifications to reply. The agent portal features a clean inbox, an area to focus in on one conversation, and a section on the side for a complete view of the customer you’re talking to. 

That section provides information like:

Custom tagsPersonal information like name, email address, and phonePast orders, current items, and an option to make an orderConversations (past and current)Product interactionsSummary dataScores for that customer, like customer lifetime value, total orders, and average order valueNotes, subscriptions, and topics

Richpanel review of chat interface

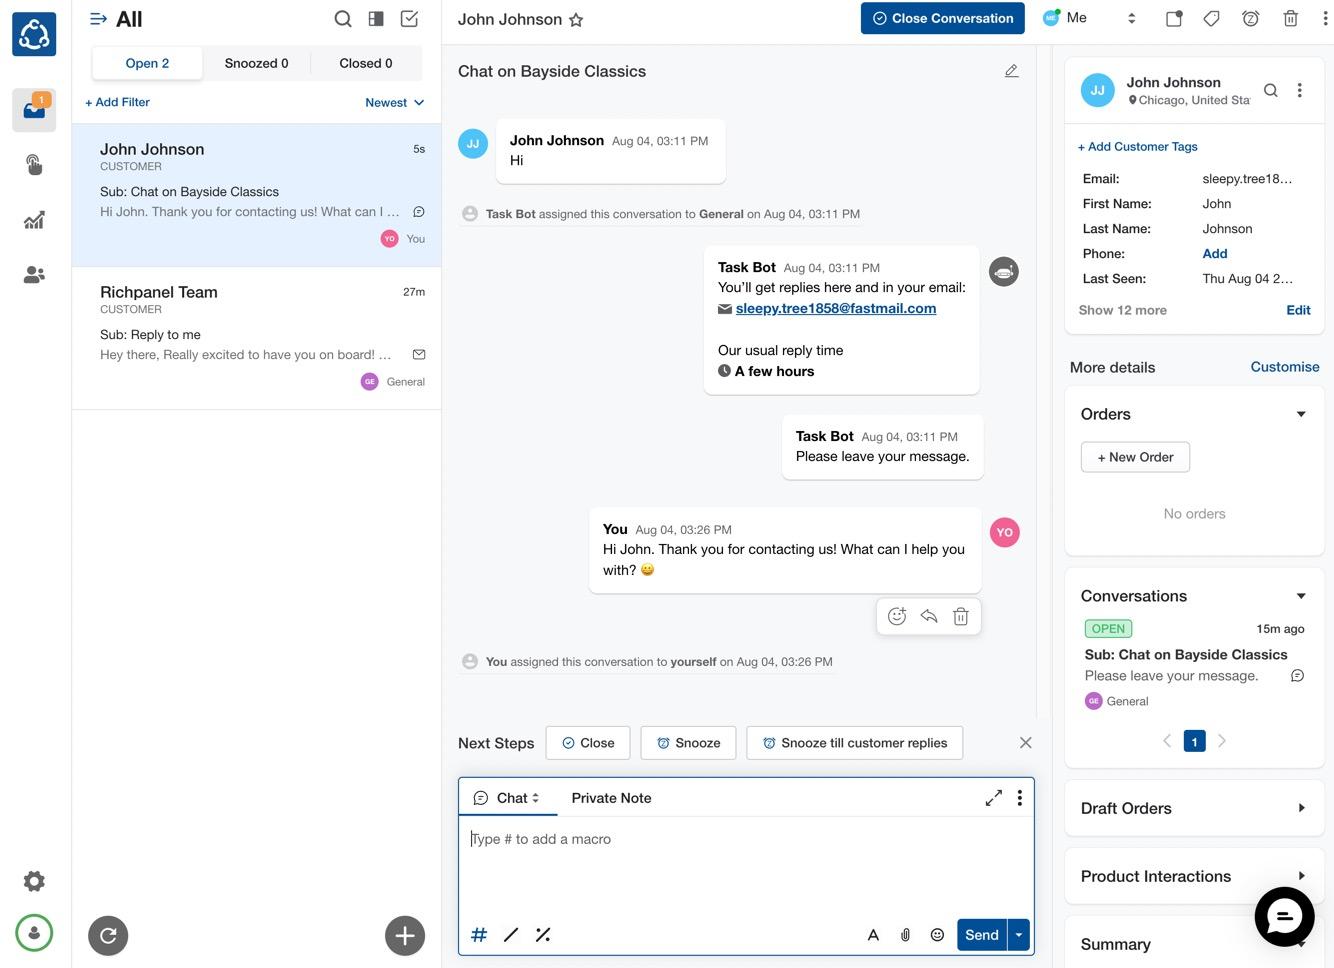
There’s also a customer timeline for a full view of what has happened with that customer in the past, starting with the first interaction and including everything from orders to chats with other agents. 

customer breakdown

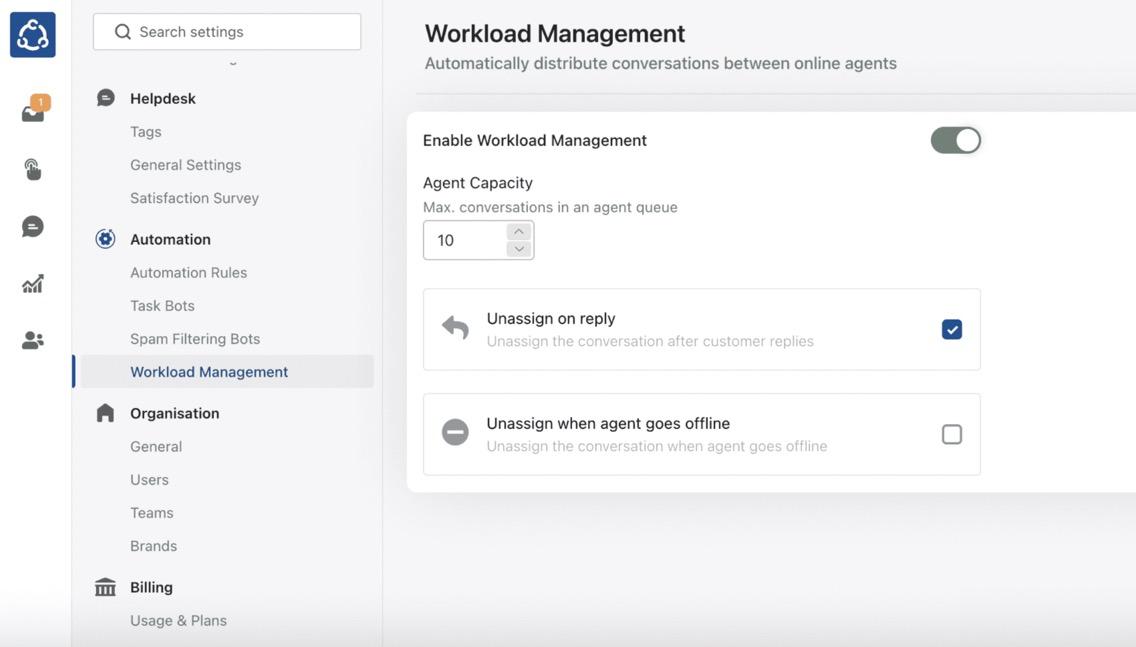
As for the admin interface, Richpanel excels in its ability to break down somewhat complex features into simple tasks. For example, it already sets up automation rules for you, which you can customize, add to, and delete if needed. 

automation rules

You can also access the Settings area for customizing:

The Helpdesk widgetYour satisfaction surveyAutomation rulesTask botsSpam filtering botsWorkload mamagementYour organizations (with settings for teams, users, and brands)Billing

Richpanel review of workload management

After our Richpanel review and interface testing, we found the interface for customers to be intuitive, clean, and inviting. Too often, we see popup windows and annoying chat boxes masquerading as customer support modules. Richpanel makes their customer interface appealing, and you can customize it just enough to make it fit the style of your website. 

When looking at the backend interface, we applaud Richpanel for their compilation of tools on the backend, particularly the Inbox section, where agents have full control over what happens with each conversation. To begin, they receive conversations from multiple channels. After that, they can move the conversations to other departments, create quick actions, macros, and tokens, while also analyzing whether this is a good customer to spend a lot of time on based on their past conversations and purchases. 

Richpanel Review: Pricing

Richpanel has four main pricing plans and an Enterprise plan for brands handling over 5,000 conversations. 

Before exploring the plans, here are some observations on what to expect with Richpanel pricing: 

There’s a 14-day free trial available for testing out the interface.You can’t access the Free plan with ecommerce platforms outside of Shopify.There are no long-term commitments unless you sign up for a yearly plan.Merchants can upgrade or downgrade their plans at any time.Pricing plans are sold as monthly subscriptions, but you can also sign up to pay yearly, which gets you 2 months for free. You can pay extra each month to obtain more conversations. Each plan has its own “extra conversation fee,” ranging from $20 to $30 for 100 more conversations. 

Now let’s take a look at the pricing plans from our Richpanel review: 

Free: 100 conversations included, along with a multichannel inbox, mobile app, email + live chat, a self-service portal with 15 scenarios, and the Shopify integration. $300 per month: Support for 1000 conversations, email + live chat, a multichannel inbox, self-service portal with 15 scenarios, team performance reports, Facebook/Instagram integrations, and support for both Shopify and WooCommerce. ($250 per month for yearly pricing)$600 per month: Up to 2000 conversations, everything from the previous plans, plus SMS and WhatsApp integrations, a Magento integration, phone support (through Aircall), CSAT survey, and a revenue analytics report. ($500 per month with yearly pricing)$900 per month: Up to 5000 conversations per month, everything from the previous plans, plus multi-store and multi-brand support, a dedicated CSM (customer service management) tool, custom connectors, API access, onboarding, and migration support. ($750 per month with yearly pricing)Richpanel Enterprise: You must contact the Richpanel sales team for an Enterprise plan quote. It includes everything from the previous plans, onboarding, a full migration, API endpoints, custom connectors, and support for over 5000 conversations. 

Overall, Richpanel pricing seems fair for growing ecommerce stores. Many smaller stores will be fine with the Free plan, while growing brands benefit from a myriad of features that should bring in more business to outweigh the costs. 

We should mention that your billing depends on how you sign up for the Richpanel app in the first place. For instance, adding the Richpanel app through Shopify means your bill comes through Shopify. Signing up through the Richpanel site, however, pulls payments from the method you add to your Richpanel dashboard. You can find invoices in the area where you sign up. 

Richpanel Review: Customer Support

Do you get customer support for your customer support app? You bet. 

First off, Richpanel uses its own online chat widget inside the Richpanel dashboard, allowing you to reach out to the Richpanel support team at any time. You can start a conversation, browse help articles, and figure out certain parts of the app that may not make sense to you.

chat box in dashboard

That’s the main solution for reaching out to a real person from Richpanel. It’s all tied into their email ticketing system so, whether you send in a direct email or start a chat, Richpanel replies within a few minutes with assistance. You’ll also get a message in your email inbox if desired. 

As for online resources, we like to see a collection of documentation for merchants who want to learn about the app and complete their own research when solving problems. 

Richpanel is no slouch in the documentation game, seeing as how it has a strong selection of articles in its knowledge base. Read about how to manage your inbox, using ecommerce data, and performing order actions, all with documentation that’s rich with visual examples. 

customer support for Richpanel review

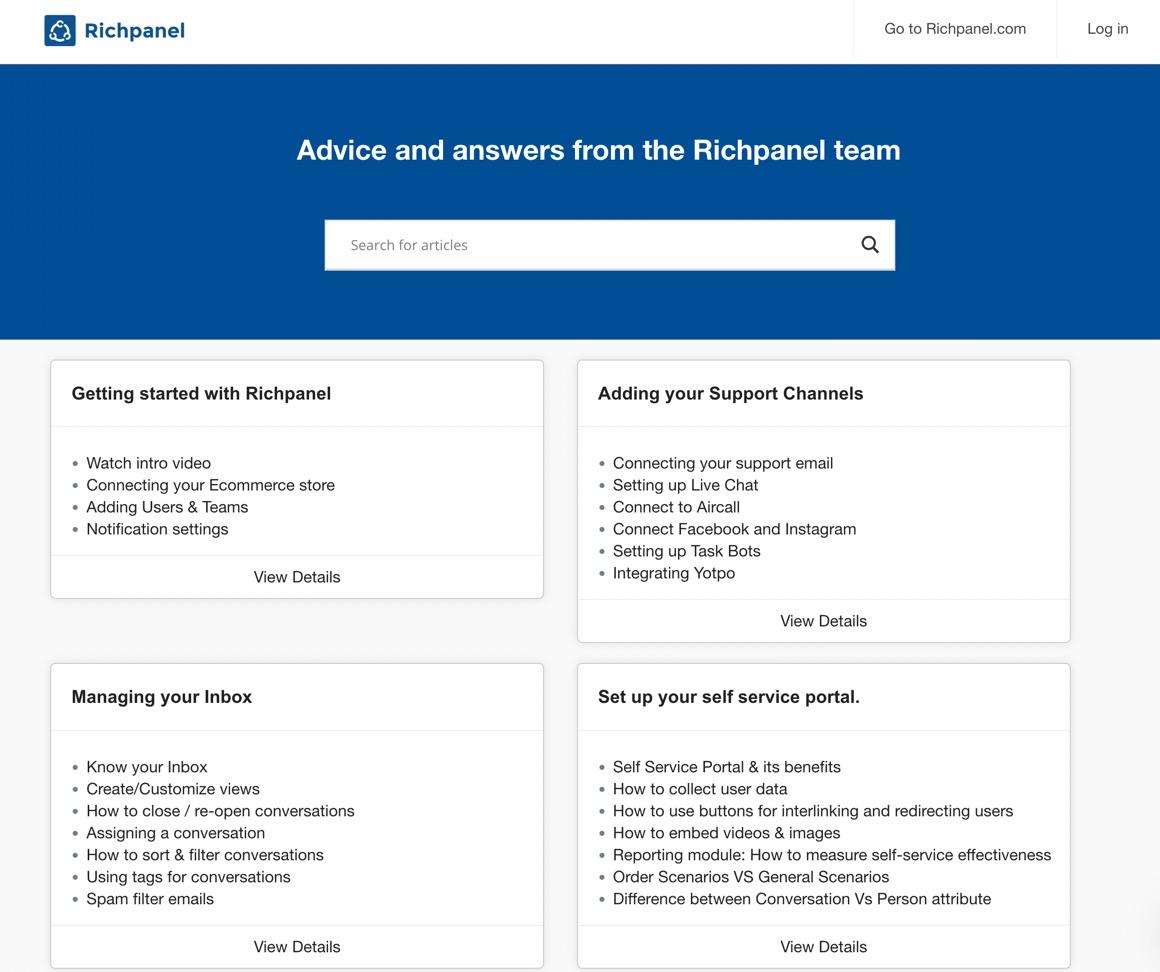
Other than that, Richpanel provides a Developer section for those interested in using the API. You can also tap into the Richpanel blog for less technical topics when compared to the knowledge base. Here, you’ll find content on improving the custom experience, why you should automate your customer service, and how to reduce ecommerce return rates. 

In addition to the primary online resources options, and the online resources, Richpanel maintains social pages on:

FacebookLinkedInTwitterInstagram

You are welcome to reach out to Richpanel on their social pages, and use them as additional online resources to keep up with the company and find tutorials and tips. 

Overall, Richpanel touches on all facets of customer support that help merchants feel comfortable with their choice for an ecommerce customer support app. From a live chat module to in-depth online documentation, you can’t go wrong with Richpanel customer support. 

Is Richpanel Right for Your Online Store? 

With far more than a simple chat module, Richpanel has developed the ideal customer support module for ecommerce stores of all sizes. There are pricing plans for every business, and you can take advantage of the mobile app interface for keeping in touch with customers on the go. We also like how Richpanel has:

Multichannel supportA powerful agent console with quick actions and rulesA workforce management section to assign conversationsSupport performance reports and surveys

Although the pricing can get expensive, we still recommend Richpanel to most online store owners, since you can sign up for the free plan and upgrade whenever you start growing your business. 

If you need any clarification about our Richpanel review, or if you’d like to share your experience with Richpanel, leave us a comment in the section below.

The post Richpanel Review: Multi-Channel Customer Support for Shopify and More appeared first on Ecommerce Platforms.

Rolling Stone bucks the flat logo trend

Original Source: https://www.creativebloq.com/news/rolling-stone-logo

This redesign makes a refreshing change to the current trend.

11 Windows 11 (22H2) Tips You Should Know

Original Source: https://www.hongkiat.com/blog/windows-11-tips-tricks/

Windows 11 got updated recently! After the developer release of Windows 11 22H2 got published in early 2022, Microsoft introduced a bunch of new features targeting its user community. That is, Windows 11 22H2 packs in a whole list of features, fixes, and improvements everyone was waiting for — including me.

Windows 11 got updated!Windows 11 got updated!

Surprisingly, there is a proliferation of features targeted towards home users like us. You can access some of these features via Windows Settings, but some features require additional applications or configuration.

I’ve compiled this post to share with you some hidden gems – trips, tricks, and hacks – to help you make the most out of Windows 11 experience. So, let’s get on.

Table of content:

Installing Windows 11 without Microsoft account.
How to create a local account.
Utilize ‘Do Not Disturb’.
Configuring DND and Focus in Windows 11.
Configuring the Start menu in Windows 11.
How to disable the Widgets panel in Windows 11.
Enabling Voice Access in Windows 11.
Enabling Live Captions in Windows 11.
Enabling the game optimizations in Windows 11.
Enable Efficiency mode for apps.
Remove bloatware or unwanted apps in Windows 11.

1. Skip using a Microsoft account

Microsoft has joined the club with Apple and Google to push online accounts on its operating system. That means you must create and log in with a Microsoft account to use Windows 11, and Microsoft is slowly curbing all the hacks you could have utilized to bypass the online account requirement until now.

Thankfully, Neowin reported a simple hack that involves you using a blacklisted email address like no@thankyou.com to register for the online account. Windows Setup gives an error and skips creating an online account as an extra bonus.

Use a blacklisted email to skip creating an online accountUse a blacklisted email to skip creating an online account

If the above hack fails, or you are installing Windows 11 22H2, Rufus is another hack you can try. Create a bootable drive using Rufus, and you will be able to install Windows 11 22H2 without creating a Microsoft account. As simple as that!

2. Create a local account

If the above hacks get curbed by Microsoft in the future, there is another bypass trick for you. You can create an online temporary account using a temporary email provider. After logging in with the temporary online account in Windows 11, you can create a local administrator account by following these steps:

Open Settings and go to Accounts > Other users.
Add an account in Windows 11Add an account in Windows 11
Click Add account > I don’t have this person’s sign-in information.
Create a local account in Windows 11Create a local account in Windows 11
Click Add a user without a Microsoft account and follow instructions.
Click the new user under Other users and click Change account type.
Change account type in Windows 11Change account type in Windows 11
Select Administrator under Account type and click OK.

Finally, log in to the new account and delete the old one by going to Settings > Accounts > Other users, expanding the old user, and clicking Remove.

Remove a user in Windows 11Remove a user in Windows 11
3. Utilize ‘Do Not Disturb’

Do Not Disturb and Focus (previously known as “Focus Mode”) got improved in Windows 11. You can set up rules to auto-enable the ‘Do not Disturb’ mode. For example, you can enable it during work hours to better focus on your work.

Moreover, you can configure priority notifications to enable specific apps, calls, and reminders to bypass do not disturb mode and send you notifications, like Android and iOS. You can access both upon clicking the clock icon in the Taskbar.

DND and Focus options in Windows 11DND and Focus options in Windows 11
4. Configure DND and Focus

Here’s how you can configure Do Not Disturb, priority notifications, and Focus:

Open Settings and go to System > Notifications.
On this screen, you can click on individual options to configure them:
Configure notifications in Windows 11Configure notifications in Windows 11
Expand Turn on do not disturb automatically and configure options to auto-enable DND.
Auto-enable DND in Windows 11Auto-enable DND in Windows 11
Click Set priority notifications and configure options for priority notifications.
Set priority notifications in Windows 11Set priority notifications in Windows 11
Click Focus and configure options for Focus (aka Focus Mode).
Configure Focus options in Windows 11Configure Focus options in Windows 11

5. Configure the Start menu

Microsoft is trying hard at bringing an intuitive Start menu, however, without much luck. Most people, including me, have a love-hate relationship with the Start menu (and the Start screen) starting from Windows 8.

Nevertheless, Windows does offer some customization options for the Start menu, which got better with Windows 11 22H2. Here’s how to tweak it:

Open Settings and go to Personalization > Start.
Configure its layout and the apps and items visible in the Start menu.
Configure the Start menu in Windows 11Configure the Start menu in Windows 11
Click Folders on this screen to customize the folders shown alongside the Power button in the bottom-right corner of the Start menu.
Configure the Start menu folders in Windows 11Configure the Start menu folders in Windows 11

For instance, I have the Default layout and default settings along with a bunch of folders enabled, so the Start menu on my test system looks like below:

Start menu with folders in Windows 11Start menu with folders in Windows 11
6. Disable the Widgets panel

Windows 11 introduced Widgets panel that shows web-based widgets such as weather, stock market updates, sports news, etc. However, it only works if are you logged in to a Microsoft account on Windows 11. As I told above, Microsoft is trying its best to push you to use an online account, and this is one evidence.

Widgets panel works with a Microsoft accountWidgets panel works with a Microsoft account

If you are a fan of using a local account in Windows due to any reason, you will not be happy with the Widgets. For instance, I do not need or use an online account benefits on my system though I’d have enjoyed Widgets. That said, I disabled the Widgets panel as disabling it minimized memory usage on my system.

Whatever be the reason, you can disable the Widgets panel using these steps:

Press Win + R to see the Run dialog box.
Type gpedit.msc, and press Enter to open the Group Policy Editor.
Under Computer Configuration, go to Administrative Templates > Windows Components > Widgets to check policies for Widgets.
Double-click Allow widgets on the right, click Disable, then click OK.
Disable the Widgets panel in Windows 11Disable the Widgets panel in Windows 11

7. Enable Voice Access

Voice Access is a super handy feature — like Microsoft Cortana — that allows you to control your Windows PC using your voice. You can open and switch between apps, dictate emails, browse the Internet, etc. Voice Access “leverages modern, on-device speech recognition to recognize speech accurately and is supported without an internet connection,” according to Microsoft.

That means Voice Access uses offline machine learning. Here’s how to use it:

Open Settings and go to Accessibility > Speech.
Toggle on the option named Voice access. If you are planning to use this feature frequently, click Start voice access after you sign in to your PC.
Enable Voice Access in Windows 11Enable Voice Access in Windows 11
Follow the instructions on the Set up your mic for voice access screen.
Enable Voice Access in Windows 11Enable Voice Access in Windows 11

8. Enable Live Captions

Live Captions is an accessibility feature inspired from a same-named feature in Android OS for Google Pixels. Captions are auto-generated from all
audio content including the incoming audio from your microphone, interestingly.

This last feature can help during in-person conversations or meetings. However, Live Captions is only supported for content in English (U.S.) for the moment.

Below are the steps to enable Live Captions. You need to download its language files, so you must continue when asked to download them by Windows 11.

Open Settings and go to Accessibility > Captions.
Toggle on the option named Live captions.
Enable Live Captions in Windows 11Enable Live Captions in Windows 11
Thereafter, you can click Win + Ctrl + L to use Live Captions.

9. Enable the game optimizations

Windows 11 22H2 introduced some under-the-hood optimizations for games. This feature improves latency and unlocks other gaming features like Auto High Dynamic Range (HDR) and Variable Refresh Rate (VRR). Here’s how to enable it:

Open Settings and go to Display > Graphics > Default graphics settings.
Toggle on the option named Optimizations for windowed games.
Default graphics settings in Windows 11Default graphics settings in Windows 11

10. Enable Efficiency mode for apps

Microsoft redesigned the Task Manager and enhanced some of its less-known but handy features, making it more helpful than ever. One of these features is Efficiency mode (previously known as “Eco mode”) that lets you limit an app’s resources if you find it be consuming more than average or necessary resources.

Here’s how you can put an app into the Efficiency mode on Windows 11:

Press Win + X and select Task Manager from the context menu.
Select Processes option from the left menu to see the running processes.
Right-click any process and click Efficiency mode to put it into the same.
Put an app into the Efficiency modePut an app into the Efficiency mode

11. Remove bloatware or unwanted apps

Last but important, you may wish to remove bloatware or unwanted apps from your system. The reason being Microsoft has been pushing more default apps (aka bloatware) with Windows starting with Windows 8 than ever before in the history of Windows OSs. Thankfully, O&O AppBuster can remove them.

Follow these steps to remove apps like Windows Clock, Windows Maps, etc.:

Go to https://www.oo-software.com/en/ooappbuster in a web browser.
Click Download near right-top corner of the page and open the file.
Remove bloatware using O&O AppBusterRemove bloatware using O&O AppBuster
Select apps you want to remove and click Remove near top-right corner. For example, I selected 3D Viewer and Groove Music in this screenshot.
Remove bloatware using O&O AppBusterRemove bloatware using O&O AppBuster

Though Windows 11 is relatively new, Microsoft is already introducing a variety of ground-breaking changes including the mandatory use of online accounts in Windows 11. Though it makes sense for mobile devices like smartphones and tablets, many people still prefer a local account on their home computers.

Nevertheless, Windows 11 brings many exciting features. The most notable is the new design system dubbed “Fluent Design” though there are new apps and more features as well. And I hope the tips and tricks in this guide will help you make most out of everything in Windows 11 22H2. How is your experience?

The post 11 Windows 11 (22H2) Tips You Should Know appeared first on Hongkiat.

Cubisms by Raw & Rendered

Original Source: https://abduzeedo.com/cubisms-raw-rendered

Cubisms by Raw & Rendered

abduzeedo0819—22

Raw & Rendered shared another intricate and quite beautiful 3D project title Cubisms. The tools used for this project were Maxon Cinema 4D, Redshift, Substance 3D Painter and Photoshop.

3D 3d art 3d artist c4d cinema 4d motion design octane redshift3D 3d art 3d artist c4d cinema 4d motion design octane redshift3D 3d art 3d artist c4d cinema 4d motion design octane redshift3D 3d art 3d artist c4d cinema 4d motion design octane redshift3D 3d art 3d artist c4d cinema 4d motion design octane redshift3D 3d art 3d artist c4d cinema 4d motion design octane redshift3D 3d art 3d artist c4d cinema 4d motion design octane redshift3D 3d art 3d artist c4d cinema 4d motion design octane redshift3D 3d art 3d artist c4d cinema 4d motion design octane redshift3D 3d art 3d artist c4d cinema 4d motion design octane redshift3D 3d art 3d artist c4d cinema 4d motion design octane redshift3D 3d art 3d artist c4d cinema 4d motion design octane redshift3D 3d art 3d artist c4d cinema 4d motion design octane redshift3D 3d art 3d artist c4d cinema 4d motion design octane redshift3D 3d art 3d artist c4d cinema 4d motion design octane redshift3D 3d art 3d artist c4d cinema 4d motion design octane redshift3D 3d art 3d artist c4d cinema 4d motion design octane redshift3D 3d art 3d artist c4d cinema 4d motion design octane redshift3D 3d art 3d artist c4d cinema 4d motion design octane redshift

For more information make sure to check out Raw & Rendered on:

Behance
Instagram
Website

How the CSS :is, :where and :has Pseudo-class Selectors Work

Original Source: https://www.sitepoint.com/css-is-where-has-pseudo-class-selectors/?utm_source=rss

How the CSS :is, :where and :has Pseudo-class Selectors Work

The new CSS :is(), :where() and :has() pseudo-class selectors are exciting additions to CSS. Learn how easy they are to use!

Continue reading
How the CSS :is, :where and :has Pseudo-class Selectors Work
on SitePoint.

Implementing A Reset Password Feature With Next.js Dynamic Routes

Original Source: https://smashingmagazine.com/2022/08/implementing-reset-password-feature-nextjs-dynamic-routes/

In a general sense, authentication poses itself as a roadblock to many people when they are trying to get started with a particular framework, and Next.js isn’t left behind.

Although, there are lots of resources around building authenticated applications with Next.js. Well, there’s even an open-source project that literally handles authentication from the ground up.

But, the scope of this article doesn’t revolve around the whole concept of authentication. We’re only picking a specific pattern of the authentication process: the “reset password” flow and how it can be implemented on the client-side — frontend — of a web application.

In this article, you’re going to see how this feature can be implemented by using the common data-fetching tool, Axios — the built-in dynamic routes feature of Next.js and the useRouter hook.

An Overview Of The Reset-Password Flow

Since the advent of the web, Engineers have always strived to provide solutions to the problems that arose during the early days of the web — and the security of software on the web is no exception.

There’s this popular saying that goes thus: “Users will always forget their passwords,” and that is the absolute truth. A lot of people even dread the “reset-password” page because, come to think of it, after spending a lot of time trying to guess their passwords — all to no avail — they’re either frustrated or angry as they land on this particular page.

As we create user interfaces, we should also try as much as possible to make the experience enjoyable for the users. As much as we’d love to just get over the flow of the reset password process, the UX of that flow should be prioritized too.

The common flow of the password reset process can be seen below.

The user is frustrated after trying to sign without success. They click on the “password-reset” link, and they’re redirected to the corresponding page. The user interface that they see is the typical web form that’ll take in either their email address or username.
When they type their email address or username into the input field, they click on the button which has the common “email me a recovery link” text.
They get a confirmation that a secure link has been sent to their email. Sometimes, this confirmation text can be displayed in a card-like component or a modal that fades out over time.

Note: For security purposes and good UX, it is good to use a text that is quite similar to this: “An email has been sent to your inbox. Please click the link when you get it.” You can construct this sentence anyhow you deem fit, as long as it does not reveal that the email or username they entered exists in the database. This approach prevents attackers from knowing if that email exists at all, thus sabotaging any phishing attempt they may want to try with the said email address. As for the UX, the text doesn’t assure the user that the credentials they’ve entered are the correct ones. This, in turn, allows them to double-check whatever credentials they’re submitting.

The link that is sent to their email address contains a JWT and their user_id, or in this case, their email address.
Upon clicking on that link, they’re redirected to the route/page where they can input their new password. The route that the user will be on may be of the form below

https://localhost:3000/reset-password/user-email/JWToken

The last part of the flow is to verify if the JWT that is generated is associated with the user’s account. If not, we throw an error by rendering the error message that is obtained from the backend.

Now that you’ve seen how the “reset password” flow is structured, let’s see how it can be implemented with Next.js.

Understanding Dynamic Routes

In this section, we’ll go over the concept of dynamic routes by illustrating it with the folder structure of a Next.js project and see how we’ll integrate it into the “reset password” feature. But first, let’s set up a Next.js app.

npx create-next-app app-name

The command above does that for us. The Next.js team has already shipped a new update to the framework, and they’ve also introduced a couple of new folders and features in the default project structure. However, we won’t be covering much on that aspect, as it is out of the scope of this article. You can read more about the updates here if you want to.

In the snippet below, you’ll see the basic structure of the files we’ll be interacting with in this article.

└── pages /
├── forgot-password/
│ └── [token]/
│ └── [email].js
├── _app.js
└── index.js

Above, you’ll see that the files in the folder structure are quite small. That’s because I want to be concise as much as possible in this article.

And since the implementation of the “password reset” flow is our utmost concern, I think it’ll be best if we have less clutter. Now, let’s get a bit of an understanding of this structure.

You’ll notice that we have the forgot-password folder in the pages directory, which contains some files. But the naming convention of these files is quite different from the way other files are named. The name of the files — token and email.js — are wrapped with a pair of square brackets.

Folders and files that are named like this are referred to as dynamic routes, and since they’re in the pages directory, they automatically become routes that can be accessed by the browser. They are dynamic because the values that these routes take are not static, which means that they change over time.

This pattern of naming files is commonly seen in action when you decide to build a blog or when you’re interacting with data that changes based on the type of user that is logged into an application. You can take a look at how I utilized this feature of Next.js when I was building my blog. You can also learn more about it in the Next.js docs.

In the forgot-password folder, the path to where the UI containing the forgot password form can be accessed here. Take a look at it below.

http://localhost:3000/forgot-password/token/email

Since it is a dynamic route, the token and email URL parameters will always change based on the user that is trying to reset their password. The token and email for user A will be different from that of user B.

Reading Url Parameters With The Userouter Hook

The useRouter hook in Next.js can be used to achieve a lot of practical frontend UI implementations — from the common idea of implementing an active navbar item with the .pathname key, to more complex features.

Let’s see how we can read the URL parameters from dynamic routes with the useRouter hook now, shall we? To do that, you’ll have to import the module into your page/component first.

import { useRouter } from ‘next/router’
export default function PageComponent({ children }) {
const router = useRouter()
return (
<React.Fragment>
{/ page content falls below /}
<div>{children}</div>
</React.Fragment>
)
}

The snippet above shows the basic usage of the hook. Since we’re interested in the query parameters of the URL, it’ll be best if we destructure the query method of the hook instead of doing something like this: router.query. We’ll just do something similar below.

import { useRouter } from ‘next/router’
const { query } = useRouter()

We can now go ahead to create variables that’ll store the URL parameters that we want. The snippet below shows how you can do that.

const token = query.token
const email = query.email

Note that the query.token and query.email values are a result of the name of the files. Recall from the folder structure in the forgot-password folder where we have the [email].js and [token] files. If you rename those files to [userEmail].js and [userToken] respectively, the pattern of assigning these variables will become something like the one below.

const token = query.userToken
const email = query.userEmail

You can always log these variables to the console to see the result.

Now that you’ve gotten an understanding of how these parameters are obtained from the URL, let’s get started by building the structure of the forms.

Building The Forms

In this section, we’ll walk through the process of building the form and how you can use Axios to perform data fetching via the arbitrary API endpoint. We won’t be focusing on the styling of these forms and the explanation of the structure. I’m assuming you already know how to structure and style a basic React form. So let’s get started with the form layout on the forget-password route.

import React from ‘react’
import axios from ‘axios’
import { ErrModal, SuccessModal } from ‘../components/Modals’

export const DefaultResetPassword = () => {
const [email, setEmail] = React.useState(”)
const [loading, setLoading] = React.useState(false)

const handleForgot = () => { } // we’ll see this later

return (
<div>
<form onSubmit={handleForgot} className=”reset-password”>
<h1>Forgot Password</h1>
<p>You are not alone. We’ve all been here at some point.</p>
<div>
<label htmlFor=”email”>Email address</label>
<input
type=”email”
name=”email”
id=”email”
placeholder= “your email address”
value={email}
onChange={(e) => setEmail(e.target.value)}
required
/>
</div>
<button name=”reset-pwd-button” className=”reset-pwd”>
{!loading ? ‘Get secure link’: ‘Sending…’}
</button>
</form>
</div>
)
}

The snippet above shows the basic structure of the UI that you’ll see when you get to the forgot-password route. You’ll notice the text in the paragraph tag below the bold “Forgot password” text.

<p>You are not alone. We’ve all been here at some point</p>

With a type of text like the one above, you are improving the user experience of people who get to the forgot password page of your app. You are assuring them that it is not a big deal that they forgot their password(s), so there’s no need to feel bad about it.

You don’t necessarily need to use the exact text above. You can just make sure that whatever text you are using has a tone of empathy.

Now, let’s move on to the important part of this form, which is where we need to declare a function that’ll send the email that the user enters in the input field to the backend.

import { authEndpoints } from ‘../endpoints’

export const DefaultResetPassword = () => {
const handleForgot = async (e) => {
e.preventDefault()
try {
setLoading(true)
const response = await axios({
method: ‘POST’,
url: authEndpoints.recover,
data: {
email,
},
headers: {
‘Content-Type’: ‘application/json’,
},
})
setResestSuccess(response.data.msg)
setLoading(false)
setResetError(”)
} catch (error) {
setLoading(false)
const { data } = error.response
setResetError(data.msg)
setResestSuccess(null)
}
}
return <div>{/* …previous form component */}</div>
}

From the snippet above, you’ll notice that we’re importing the API endpoint that we’ll be sending a POST request to — and that’s why we’re passing it as a variable to the url key in the Axios method.

The POST request receives the user’s email address as payload, which in turn will be validated at the backend, and a JWT will be generated for that email address which will be used to authorize the password reset process of the user.

setResestSuccess(response.data.msg)
setLoading(false)
setResetError(”)
catch (error) {
setLoading(false)
const { data } = error.response
setResetError(data.msg)
setResestSuccess(null)
}

When you take a look at the snippet above, you’ll notice that we’re using some already-declared state callback functions of the state variables.

An example is the setLoading function which has its value set to true in the try block. Then, its value is set to false when the data has been successfully sent. And if it doesn’t, we have a catch block that will “catch” the error and displays the error message that we’ve destructured from the endpoint.

You’ll also notice that there are a couple of state callback functions in the snippet above, like setResestSuccess and setResetError.

The setters are obtained from the declaration of the state variables. See them below.

import React from ‘react’
import { ErrModal, SuccessModal } from ‘../components/Modals’

export const DefaultResetPassword = () => {
const [resetSuccess, setResestSuccess] = React.useState()
const [resetError, setResetError] = React.useState()
return (
<div>
{resetError ? <ErrModal message={resetError} /> : null}
{resetSuccess ? <SuccessModal message={resetSuccess} /> : null}
<form onSubmit={handleForgot} className=”reset-password”>
{/* form content */}
</form>
</div>
)
}

The error or success messages gotten from the backend can be rendered in the UI to let the user know the status of their action(s).

You’ll notice that we’re using custom modal components to render the message. These components receive the message as props, and they can be reused across the codebase. Take a look at the structure of the components below.

export const SuccessModal = ({ message }) => {
return (
<div className=”auth-success-msg”>
<p>{message}</p>
</div>
)
}
export const ErrModal = ({ message }) => {
return (
<div className=”auth-err-msg”>
<p>{message}</p>
</div>
)
}

You can style these components uniquely so that you can be able to distinguish the “error” modal from the “success” modal. The common convention is to use red color for error messages and green color for success messages. How you choose to style these components is completely up to you.

In addition to all that has been said, we need a way to verify that the correct data type is being passed as a prop to the modal component. This can be achieved with the “prop-type” module in react.

propTypes.ErrModal = {
message: propTypes.string.isRequired,
}
propTypes.SuccessModal = {
message: propTypes.string.isRequired,
}

The type-checking process in the snippet above ensures that the data the component receives must be a string, and it is required. If the component does not receive a prop with a string value, React will throw an error.

Now that we’ve covered the important aspect of the first form and the building blocks of what we’ll be replicating in the reset-password route. Let’s get started by taking a look at the layout of the form below.

import axios from “axios”;
import React from “react”;
import Head from “next/head”;
import { useRouter } from “next/router”;
import { SuccessModal, ErrModal } from “../components/Modals”;

const ResetPassword = () => {
const [newPassword, setNewPassword] = React.useState(“”);
const [loading, setLoading] = React.useState(false);
const [resetPasswordSuccess, setResetPasswordSuccess] = React.useState();
const [resetPasswordError, setResetPasswordError] = React.useState();

const { query } = useRouter();
const token = query.token;
const email = query.email;

const resetPassword = () => { } // coming in later…

return (
<React.Fragment>
<Head>
<title>Reset your password</title>
</Head>
<div>
{email && token ? (
<div className=”auth-wrapper”>
{resetPasswordSuccess ? (
<SuccessModal message={resetPasswordSuccess} />
) : (
null
)}
{resetPasswordError ? (
<ErrModal message={resetPasswordError} />
) : (
null
)}
<form onSubmit={resetPassword} className=”reset-password”>
<h1>Reset Password</h1>
<p>Please enter your new password</p>
<div>
<label htmlFor=”password”>Password*</label>
<input
name=”password”
type=”password”
id=”password”
placeholder=”enter new pasword”
value={newPassword}
onChange={(e) => setNewPassword(e.target.value)}
/>
</input>
<button
name=”reset-pwd-button”
className=”reset-pwd”
>
{!loading ? “Reset” : “Processing…”}
</button>
</form>
</div>
) : (
<p>The page you’re trying to get to isn’t available</p>
)}
</div>
</React.Fragment>
);
};

Since we’ve gone through the rudiments of the first form in the previous section, the snippet above contains almost the same thing in the previous form.

You can see how we’re reading the parameters from the URL and the declarations of the password reset error and success variables too.

const [resetPasswordSuccess, setResetPasswordSuccess] = React.useState()
const [resetPasswordError, setResetPasswordError] = React.useState()
const { query } = useRouter()
const token = query.token
const email = query.email

You’ll also notice the way we’re conditionally rendering the reset password form by checking if the email and token variables are present in the URL; if these variables are false (i.e., they are not in the URL), we render a text that says that the page they’re looking for isn’t available.

{
email && token ? (
<div className=”auth-wrapper”>
<FormComponentt />
</div>
) : (
<p>The page you’re trying to get to isn’t available</p>
)
}

Now, let’s take a look at the handler function that we’d use in sending the new password of the user — coupled with the token and the email for the purpose of verification — to the backend through the API endpoint.

import { authEndpoints } from ‘../endpoints’
const resetPassword = async (e) => {
e.preventDefault()
try {
setLoading(true)
const response = await axios({
method: ‘POST’,
url: authEndpoints.resetPassword,
data: {
token,
email,
password: newPassword,
},
headers: {
‘Content-Type’: ‘application/json’,
},
})
setResetPasswordSuccess(response.data.msg)
setLoading(false)
setTimeout(() => {
router.push(‘/’)
}, 4000)
setResetPasswordError(”)
} catch (error) {
setLoading(false)
setResetPasswordError(error.response.data.msg)
setResetPasswordSuccess(null)
}
}

The snippet above is an asynchronous handler function. We’re using it to send a POST request with the user’s new password, the access token, and the email address — which we grabbed from the query parameters at the URL segment.

setTimeout(() => {
router.push(‘/’)
}, 4000)

When you take a look at the snippet above, you’ll see how we’re using the setTimeout method in JavaScript and Next.js’ useRouter hook to redirect the user to the home page — which is the login page in this case — after four seconds (you can reduce this time frame if you want to), so they can log in again.

Doing this also adds to the good user experience metric, as it prevents the user from looking for a link or a button that takes them back to the login page.

Final Thoughts

There is a lot of information about the best practices and awesome password-reset design patterns out there. This article is just a frontend implementation of a password-reset flow which also factors in the issue of user experience. It is not enough to just create a password reset feature without considering the UX of the people who would use this feature.

Thank you for reading. I hope this article has been helpful!

Further Reading On Smashing Magazine

“How To Implement Authentication In Next.js With Auth0,” Facundo Giuliani
“Dynamic Data-Fetching In An Authenticated Next.js App,” Caleb Olojo
“Localizing Your Next.js App,” Átila Fassina
“The Current State Of Authentication: We Have A Password Problem,” Drew Thomas

The best photos shot on iPhone for World Photography Day

Original Source: https://www.creativebloq.com/news/iphone-world-photography-day

Why don’t ours look like this?