Popular Design News of the Week: December 31, 2018 – January 6, 2019

Original Source: https://www.webdesignerdepot.com/2019/01/popular-design-news-of-the-week-december-31-2018-january-6-2019/

Every week users submit a lot of interesting stuff on our sister site Webdesigner News, highlighting great content from around the web that can be of interest to web designers. 

The best way to keep track of all the great stories and news being posted is simply to check out the Webdesigner News site, however, in case you missed some here’s a quick and useful compilation of the most popular designer news that we curated from the past week.

Note that this is only a very small selection of the links that were posted, so don’t miss out and subscribe to our newsletter and follow the site daily for all the news.

8 Undoubtably True Predictions for UX in 2019


Design Style Guides to Learn from in 2019


A Collection of Great UI Designs


Site Design: Coding is Fun!


8 Examples of How to Effectively Break Out of the Grid


The 15 Coolest Interfaces of the Year


4 Useless Things You Shouldn’t Have Put in your Design Portfolio


Meet Twill: An Open Source CMS Toolkit for Laravel


The Grumpy Designer’s Bold Predictions for 2019


This is not User Experience


Branding Design – What You Need to Know Before Creating a Brand Identity


The Year that Was: 2018 in Web Design


Flat Design Vs. Traditional Design: Comparative Experimental Study


Users Don’t Read


Writing Copy for Landing Pages


The Elements of UI Engineering


Motion Design Looks Hard, but it Doesn’t Have to Be


Merge by UXPin


Responsive Design, and the Role of Development in Design


Material Design Colors Listed


Designing a Great User Onboarding Experience


How to Name UI Components


Is Design Valuable?


40+ Best Bootstrap Admin Templates of 2019


UI Design: Look Back at 12 Top Interface Design Trends in 2018


Want more? No problem! Keep track of top design news from around the web with Webdesigner News.

Add Realistic Chalk and Sketch Lettering Effects with Sketch’it – only $5!

Source

p img {display:inline-block; margin-right:10px;}
.alignleft {float:left;}
p.showcase {clear:both;}
body#browserfriendly p, body#podcast p, div#emailbody p{margin:0;}

How To Design Search For Your Mobile App

Original Source: https://www.smashingmagazine.com/2019/01/design-search-mobile-app/

How To Design Search For Your Mobile App

How To Design Search For Your Mobile App

Suzanne Scacca

2019-01-08T14:00:40+01:00
2019-01-08T17:46:05+00:00

Why is Google the search behemoth it is today? Part of the reason is because of how it’s transformed our ability to search for answers.

Think about something as simple as looking up the definition of a word. 20 years ago, you would’ve had to pull your dictionary off the shelf to find an answer to your query. Now, you open your phone or turn on your computer, type or speak the word, and get an answer in no time at all and with little effort on your part.

This form of digital shortcutting doesn’t just exist on search engines like Google. Mobile apps now have self-contained search functions as well.

Is a search bar even necessary in a mobile app interface or is it overkill? Let’s take a look at why the search bar element is important for the mobile app experience. Then, we’ll look at a number of ways to design search based on the context of the query and the function of the app.

Using The Web With A Screen Reader

Did you know that VoiceOver makes up 11.7% of desktop screen reader users and rises to 69% of screen reader users on mobile? It’s important to know what sort of first-hand difficulties visually impaired users face and what web developers can do to help. Read article →

Our new book, in which Alla Kholmatova explores
how to create effective and maintainable design systems to design great digital products. Meet Design Systems, with common traps, gotchas and the lessons Alla has learned over the years.

Table of Contents →

Mobile App Search Is Non-Negotiable

The search bar has been a standard part of websites for years, but statistics show that it isn’t always viewed as a necessity by users. This data from Neil Patel and Kissmetrics focuses on the perception and usage of the search bar on e-commerce websites:

Kissmetrics site search infographic

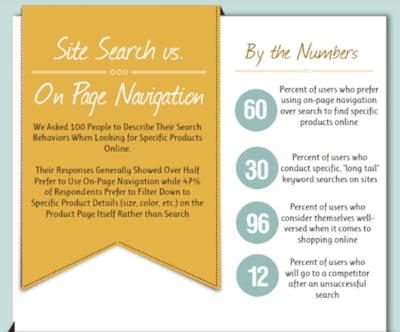
Data from a Kissmetrics infographic about site search. (Source: Kissmetrics) (Large preview)

As you can see, 60% of surveyed users prefer using navigation instead of search while 47% opt for filterable “search” over regular search functionality.

On a desktop website, this makes sense. When a menu is well-designed and well-labeled — no matter how extensive it may be — it’s quite easy to use. Add to that advanced filtering options, and I can see why website visitors would prefer that to search.

But mobile app users are a different breed. They go to mobile apps for different reasons than they do websites. In sum, they want a faster, concentrated, and more convenient experience. However, since smartphone screens have limited space, it’s not really feasible to include an expansive menu or set of filters to aid in the navigation of an app.

This is why mobile apps need a search bar.

You’re going to find a lot of use for search in mobile apps:

Content-driven apps like newspapers, publishing platforms, and blogs;
e-Commerce shops with large inventories and categorization of those inventories;
Productivity apps that contain documents, calendars, and other searchable records;
Listing sites that connect users to the right hotel, restaurant, itinerary, item for sale, apartment for rent, and so on;
Dating and networking apps that connect users with vast quantities of “matches”.

There are plenty more reasons why you’d need to use a search bar on your mobile app, but I’m going to let the examples below speak for themselves.

Ways To Design Search For Your Mobile App

I’m going to break down this next section into two categories:

How to design the physical search element in your mobile app,
How to design the search bar and its results within the context of the app.

1. Designing The Physical Search Element

There are a number of points to consider when it comes to the physical presence of your app search element:

Top Or Bottom?

Shashank Sahay explains why there are two places where the search element appears on a mobile app:

1. Full-width bar at the top of the app.
This is for apps that are driven by search. Most of the time, users open the app with the express purpose of conducting a search.

Facebook app search

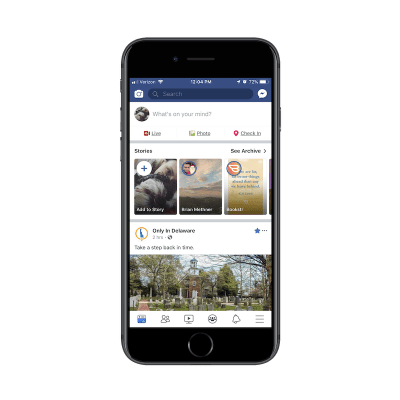
Facebook prioritizes app search by placing it at the top. (Source: Facebook) (Large preview)

Facebook is a good example. Although Facebook users most likely do engage with the news feed in the app, I have a sneaking suspicion that Facebook’s data indicates that the search function is more commonly engaged with — at least in terms of first steps. Hence, why it’s placed at the top of the app.

2. A tab in the bottom-aligned navigation bar.
This is for apps that utilize search as an enhancement to the primary experience of using the app’s main features.

Let’s contrast Facebook against one of its sister properties: Instagram. Unlike Facebook, Instagram is a very simple social media app. Users follow other accounts and get glimpses into the content they share through full-screen story updates as well as from inside their endless-scroll news feed.

Instagram app search

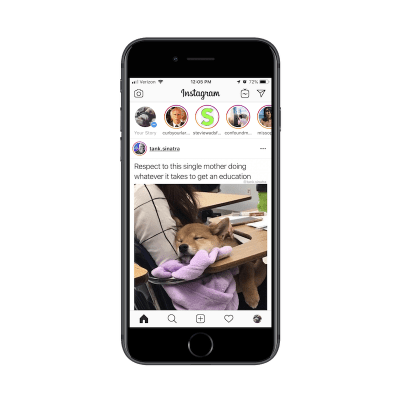
Instagram places its search function in the bottom navigation bar. (Source: Instagram) (Large preview)

With that said, the search function does exist in the navigation bar so that users can look up other accounts to peruse through or follow.

As far as this basic breakdown goes, Sahay is right about how placement of search correlates with intention. But the designing of the search element goes beyond just where it’s placed on the app.

Shallow Or Deep?

There will be times when a mobile app would benefit from a search function deep within the app experience.

You’ll see this sort of thing quite often in e-commerce apps like Bed Bath & Beyond:

Bed Bath & Beyond app search

Bed Bath & Beyond uses deep search to help users find nearby stores (Source: Bed Bath & Beyond) (Large preview)

In this example, this search function exists outside of the standard product search on the main landing page. Results for this kind of search are also displayed in a unique way which is reflective of the purpose of the search:

Bed Bath & Beyond map search results

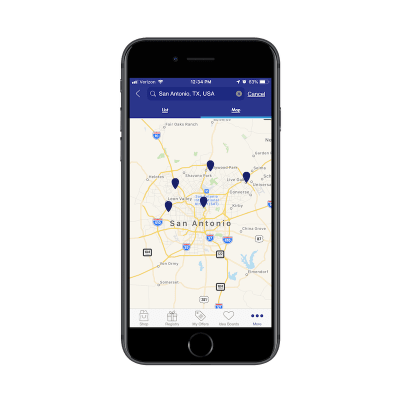
Bed Bath & Beyond displays search results on a map. (Source: Bed Bath & Beyond) (Large preview)

There are other ways you use might need to use “deep” search functions on e-commerce apps.

Think about stores that have loads of comments attached to each product. If your users want to zero in on what other consumers had to say about a product (for example, if a camping tent is waterproof), the search function would help them quickly get to reviews containing specific keywords.

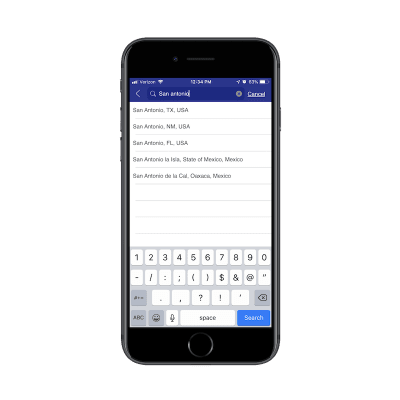
You’ll also see deep searches planted within travel and entertainment apps like Hotels.com:

Hotels.com app search

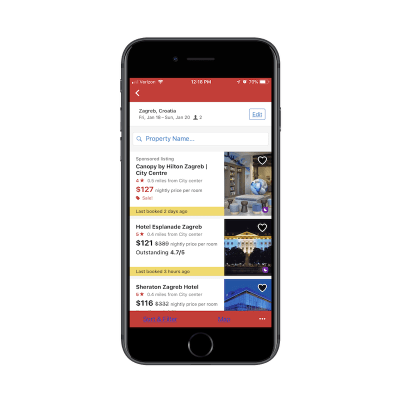
Hotels.com includes a deep search to narrow down results by property name. (Source: Hotels.com) (Large preview)

You’re all probably familiar with the basic search function that goes with any travel-related app. You enter the details of your trip and it pulls up the most relevant results in a list or map format. That’s what this screenshot is of.

However, see where it says “Property Name” next to the magnifying glass? This is a search function within a search function. And the only things users can search for here are actual hotel property names.

Bar, Tab, Or Magnifying Glass?

This brings me to my next design point: how to know which design element to represent the search function with.

You’ve already seen clear reasons to use a full search bar over placing a tab in the navigation bar. But how about a miniaturized magnifying glass?

Here’s an example of how this is used in the YouTube mobile app:

YouTube app search icon

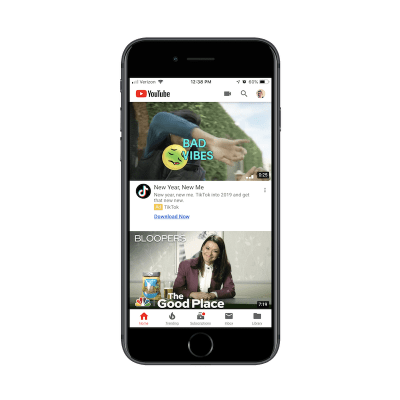
YouTube uses a magnifying glass to represent its search function. (Source: YouTube) (Large preview)

The way I see it, the magnifying glass is the search design element you’d use when:

One of the primary reasons users come to the app is to do a search,
And it competes against another primary use case.

In this case, YouTube needs the mini-magnifying glass because it serves two types of users:

Users that come to the app to search for videos.
Users that come to the app to upload their own videos.

To conserve space, links to both exist within the header of the YouTube app. If you have competing priorities within your app, consider doing the same.

“Search” Or Give A Hint?

One other thing to think about when designing search for mobile apps is the text inside the search box. To decide this, you have to ask yourself:

“Will my users know what sort of stuff they can look up with this search function?”

In most cases they will, but it might be best to include hint text inside the search bar just to make sure you’re not adding unnecessary friction. Here’s what I mean by that:

This is the app for Airbnb:

Airbnb app search text

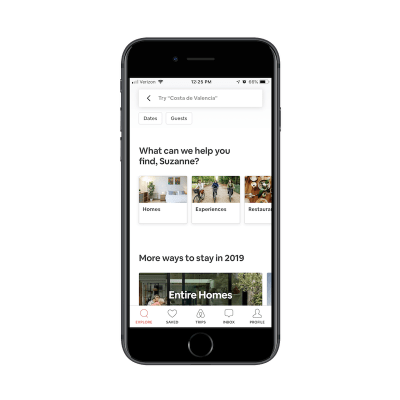
Airbnb offers hint text to guide users to more accurate search results. (Source: Airbnb) (Large preview)

The search bar tells me to “Try ‘Costa de Valencia’”. It’s not necessarily an explicit suggestion. It’s more helping me figure out how I can use this search bar to research places to stay on an upcoming trip.

For users that are new to Airbnb, this would be a helpful tip. They might come to the site thinking it’s like Hotels.com that enables users to look up things like flights and car rentals. Airbnb, instead, is all about providing lodging and experiences, so this search text is a good way to guide users in the right direction and keep them from receiving a “Sorry, there are no results that match your query” response.

2. Designing The Search Bar And Results In Context

Figuring out where to place the search element is one point to consider. Now, you have to think about how to present the results to your mobile app users:

Simple Search

This is the most basic of the search functions you can offer. Users type their query into the search bar. Relevant results appear below. In other words, you leave it up to your users to know what they’re searching for and to enter it correctly.

When a relevant query is entered, you can provide results in a number of ways.

For an app like Flipboard, results are displayed as trending hashtags:

Flipboard app search results

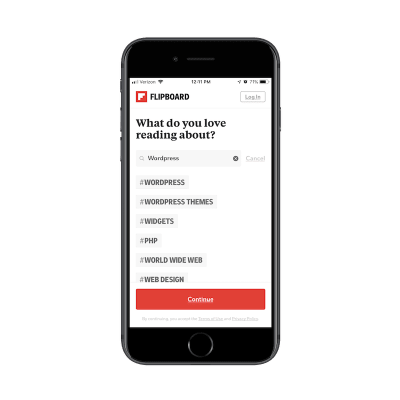
Flipboard displays search results as a list of hashtags. (Source: Flipboard) (Large preview)

It’s not the most common way you’d see search results displayed, but it makes sense in this particular context. What users are searching for are categories of content they want to see in their feed. These hashtagged categories allow users to choose high-level topics that are the most relevant to them.

ESPN has a more traditional basic search function:

ESPN app search results

ESPN has designed its search results in a traditional list. (Source: ESPN) (Large preview)

As you can see, ESPN provides a list of results that contain the keyword. There’s nothing more to it than that though. As you’ll see in the following examples, you can program your app search to more closely guide users to the results they want to see.

Filtered Search

According to the aforementioned Kissmetrics survey, advanced filtering is a popular search method among website users. If your mobile app has a lot of content or a vast inventory of products, consider adding filters to the end of your search function to improve the experience further. Your users are already familiar with the search technique. Plus, it’ll save you the trouble of having to add advancements to the search functionality itself.

Yelp has a nice example of this:

Yelp app search filters

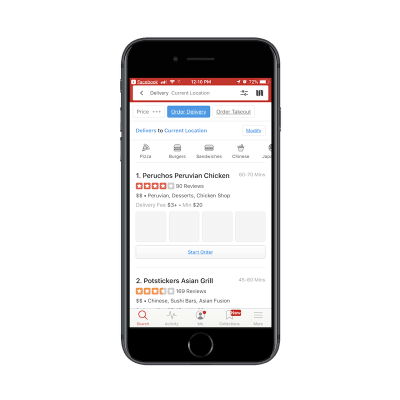
Yelp users have filter options available after doing a search. (Source: Yelp) (Large preview)

In the search above, I originally looked for restaurants in my “Current Location”. Among the various filters displayed, I decided to add “Order Delivery” to my query. My search query then became:

Restaurants > Current Location > Delivery

This is really no different than using breadcrumbs on a website. In this case, you let users do the initial work by entering a search query. Then, you give them filters that allow them to narrow down their search further.

Again, this is another way to reduce the chances that users will encounter the “No results” response to their query. Because filters correlate to actual categories and segmentations that exist within the app, you can ensure they end up with valid search results every time.

e-Commerce websites are another good use case for filters. Here is how Wayfair does this:

Wayfair app search filters

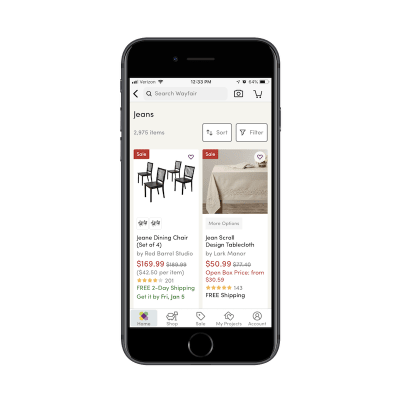
Wayfair includes filters in search to help users narrow down results. (Source: Wayfair) (Large preview)

Wayfair’s list of search results is fairly standard for an e-commerce marketplace. The number of items are displayed, followed by a grid of matching product images and summary details.

Here’s the thing though: Wayfair has a massive inventory. It’s the same with other online marketplaces like Amazon and Zappos. So, when you tell users that their search query produced 2,975 items, you need a way to mitigate some of the overwhelm that may come with that.

By placing the Sort and Filter buttons directly beside the search result total, you’re encouraging users to do a little more work on their search query to ensure they get the best and most relevant results.

Predictive Search

Autocomplete is something your users are already familiar with. For apps that contain lots of content, utilizing this type of search functionality could be majorly helpful to your users.

For one, they already know how it works and so they won’t be surprised when related query suggestions appear before them. In addition, autocomplete offers a sort of personalization. As you gather more data on a user as well as the kinds of searches they conduct, autocomplete anticipates their needs and provides a shortcut to the desired content.

Pinterest is a social media app that people use to aggregate content they’re interested in and to seek out inspiration for pretty much anything they’re doing in life:

Pinterest app search autocomplete

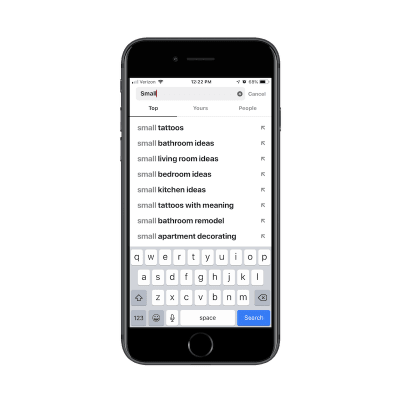
Pinterest anticipates users’ search queries and provides autocomplete shortcuts. (Source: Pinterest) (Large preview)

Take a look at the search results above. Can you tell what I’ve been thinking about lately? The first is how I’m going to decorate my new apartment. The second is my next tattoo. And despite only typing out the word “Small”, Pinterest immediately knew what’s been top-of-mind with me as of recent. That doesn’t necessarily mean I as a user came to the app with that specific intention today… but it’s nice to see that personalized touch as I engage with the search bar.

Another app I engage with a lot is the Apple Photos app:

Apple Photos app search

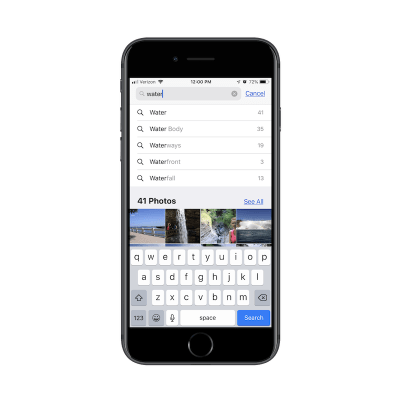
Apple Photos uses autocomplete to help users find the most relevant photos. (Source: Apple) (Large preview)

In addition to using it to store all of my personal photos, I use this on a regular basis to take screenshots for work (as I did in this article). As you can imagine, I have a lot of content saved to this app and it can be difficult finding what I need just by scrolling through my folders.

In the example above, I was trying to find a photo I had taken at Niagara Falls, but I couldn’t remember if I had labeled it as such. So, I typed in “water” and received some helpful autocomplete suggestions on “water”-related words as well as photos that fit the description.

I would also put “Recent Search” results into this bucket. Here’s an example from Uber:

Uber app recent search results

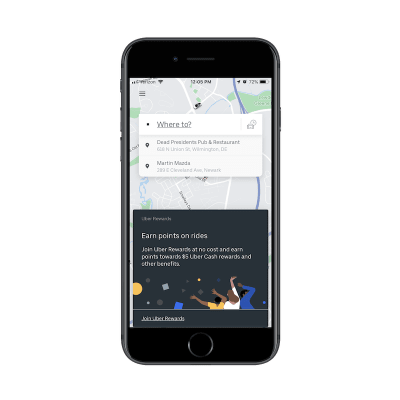
Uber’s recent search results provide one-click shortcuts to repeat users. (Source: Uber) (Large preview)

Before I even had a chance to type my search query in the Uber app, it displays my most recent search queries for me.

I think this would be especially useful for people who use ride-sharing services on a regular basis. Think about professionals who work in a city. Rather than own a car, they use Uber to transport to and from their office as well as client appointments. By providing a shortcut to recent trips in search results, the Uber app cuts down the time they spend booking a trip.

If you have enough data on your users and you have a way to anticipate their needs, autocomplete is a fantastic way to personalize search and improve the overall experience.

Limited Search

I think this time savings point is an important one to remember when designing search for mobile apps.

Unlike websites where longer times-on-page matter, that’s not always the case with mobile apps. Unless you’ve built a gaming or news app where users should spend lots of time engaging with the app on a daily basis, it’s not usually the amount of time spent inside the app that matters.

Your goal in building a mobile app is to retain users over longer periods, which means providing a meaningful experience while they’re inside it. A well-thought-out search function will greatly contribute to this as it gets users immediately to what they want to see, even if it means they leave the app just a few seconds later.

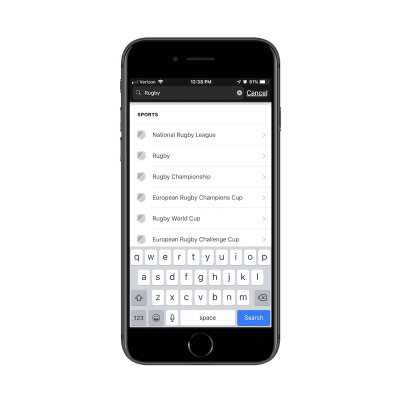
If you have an app that needs to get users in and out of it quickly, think about limiting search results as Ibotta has done:

Ibotta app search categories

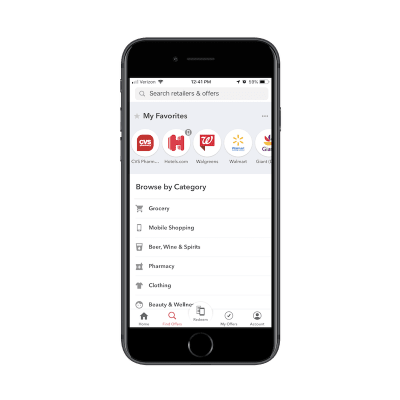
Ibotta displays categories that users can search in. (Source: Ibotta) (Large preview)

While users certainly can enter any query they’d like, Ibotta makes it clear that the categories below are the only ones available to search from. This serves as both a reminder of what the app is capable of as well as a means for circumventing the search results that don’t matter to users.

Hotels.com also places limits on its search function:

Hotels.com limiting search results

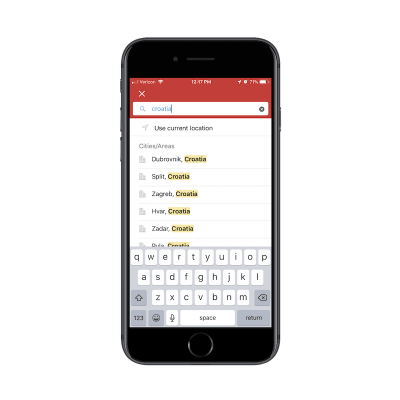
Hotels.com forces users to make a choice so they don’t end up with too many results. (Source: Hotels.com) (Large preview)

As you can see here, users can’t just look for hotels throughout the country of Croatia. It’s just too broad of a search and one that Hotels.com shouldn’t have to provide. For one, it’s probably too taxing on the Hotels.com server to execute a query of that nature. Plus, it would provide a terrible experience for users. Imagine how many hotels would show up in that list of results.

By reining in what your users can search for and the results they can see, you can improve the overall experience while shortening the time it takes them to convert.

Wrapping Up

As you can see here, a search bar isn’t some throwaway design element. When your app promises a speedy and convenient experience to its users, a search bar can cut down on the time they have to spend inside it. It can also make the app a more valuable resource as it doesn’t require much work or effort to get to the desired content.

Smashing Editorial
(ra, yk, il)

10 Things to Quit Doing in 2019

Original Source: https://www.hongkiat.com/blog/things-to-quit-doing-2019/

Read the word “quit” and I’m almost certain you’re already imagining me telling you to leave it all behind, to start anew, to forget the past and other similar sounding advice…

Visit hongkiat.com for full content.

Incredible Reinterpretations of Picasso in 3D using Cinema 4D and Octane

Original Source: http://feedproxy.google.com/~r/abduzeedo/~3/hrPG1jsyW4s/incredible-reinterpretations-picasso-3d-using-cinema-4d-and-octane

Incredible Reinterpretations of Picasso in 3D using Cinema 4D and Octane

abduzeedoJan 08, 2019

Construed MIMIC III is the 3rd installment of the series of studies of Picasso’s artwork and translation to 3D form using Maxon Cinema 4D and Otoy Octane. The project was created by Omar. Aqil and it’s been a great experience for him as he mentioned on his Behance post. “I have learned a lot from his work” – he adds. Omar this time picked six art pieces from Picasso’s work and try to recreate them in a different way. “I am trying to explore more complexity and abstraction of the shapes he used” – adds Omar. The result is a set of beautiful 3D artwork that brings a new dimension to the amazing work of Pablo Picasso. I am trying to explore more complexity and abstraction of the shapes he used

Omar is an art director, CGI, and illustrator currently working at CR Studio. He is based in Lahore, Pakistan and his portfolio includes much more amazing 3D work including the previous two series of artworks for the MIMIC series, the Atypical Portraits. MIMIC II and the original MIMIC. There are other incredible 3D projects in character design and typography, but the highlight for me is the abstract pieces. There are the Cubist Compositions that is also awesome to check out. As you can see, we highly recommend visiting Omar’s portfolio it’s truly inspiring.

Interpreting Picasso in 3D


Respectful UX: 5 Ways to Make Users Feel Valued

Original Source: https://www.webdesignerdepot.com/2019/01/respectful-ux-5-ways-to-make-users-feel-valued/

Every human being needs, rather desperately, to feel accepted. They don’t necessarily need to feel accepted by everyone, but they do need to feel accepted by someone. It’s a part of our nature, and nature in general. Even as I type this, my cat Cleocatra is demanding that I give her attention, and if I don’t, she’ll leave my room in a huff.

[A few minutes later:] She didn’t leave. She stuck her claws into me. Users can have very similar reactions if their needs aren’t met when interacting with your website. Humans will anthropomorphize anything, and if they feel like your website doesn’t accept them for who they are, they might just go find one that will. Or do the claw thing.

This is why users need to feel accepted and respected when they use your site. I’ve put together some ideas about how to achieve that. Don’t expect a list of fifty genders to put in your forms, I’m not the guy to ask about that; this is just usability 101:

1. Respect Their Time

Build your website or product to be as efficient as possible. When users leave because your website didn’t load in five seconds or less, it’s not because they’re entitled. It’s because they have stuff to do, and a finite amount of hours in the day to do it.

If your site asks them to jump through a bunch of hoops before they can even read your content, or get that free e-book, or what-have-you, you’re not respecting their time. If your sign-up form is too detailed and asks for too much information, you’re wasting their time.

Think of all the meetings you’ve had that could have been emails. If your site feels more like going to a meeting, they won’t want to go.

2. Avoid Assumptions & Judgment in all Content

People often hate it when you make assumptions about them. They hate it when those assumptions are wrong, and they especially hate it when the assumptions are right. What will tick anyone right off is when those assumptions come with judgment.

Goddammit Netflix. Yes, I’m still watching.

Marketing in general has operated on assumptions and judgment for years, promoting now-derided ideas about what it means to be male, female, a good parent, or a good person. If you haven’t noticed, these assumptions have been the subject of considerable debate for years, now, and many are even considered harmful.

When you make too many assumptions about who is, or should, be using your website, you risk running off users and customers. Now, why would you do that?

3. Encourage Trying Again

People make mistakes, and lots of them. It’s normal, it’s life, and it’s why we have form validation. Now, if your users are signing up for or buying something they feel they absolutely need, and can’t get anywhere else, they’ll stay. They’ll keep trying to fill out your form, or follow your app’s arcane process for doing things, or no matter what.

I know I’ve personally abandoned checkout processes because, in the end, I felt like the thing I kinda sorta wanted to buy wasn’t worth the effort to try to buy it twice. I figured that if they wanted my money so badly they wouldn’t have made it so hard for me to spend, and went on my merry way.

Having to re-fill entire forms is a particular pet peeve of mine. If there’s a mistake, let me go back and fix the one mistake I made. Do not make me refill entire sections of the form. That just makes me wish I hadn’t bothered in the first place. Encourage people to try again when a process fails by not making them redo more work.

You can also encourage them to try again by never making them feel dumb for screwing up in the first place. Error messages should be clear, gentle, and encouraging. Making users feel dumb is the fastest way to put them on the defensive, and defensive people don’t buy stuff. Make it clear that mistakes are just part of the process sometimes, and they are more likely to feel accepted.

4. Provide Clear Instructions

People are more likely to feel like they belong when they know what they’re “supposed” to do. Learning the rules of any peer group is the first step to feeling accepted in a new place.

Clear instructions can provide this confidence to users (and help avoid situations where they feel dumb). You can do this in your copy, in your micro-copy, or even with those animated walk-throughs that so many apps have nowadays. I’d even go further, and say to have illustrated instructions whenever you can.

Think of those credit card input forms that look like actual credit cards. They’re a perfect example of setting clear expectations and easily-understood requirements. Users that have a clear idea of how to do what they want to do on your site will feel like they belong there.

5. Make a Human Point of Contact Available

“Nah, you’re doing fine.”

“Don’t worry about it. We have it covered on this end.”

“No, that was our mistake, really.”

“No worries, you got everything right.”

“Okay, that is a problem, but we can fix it.”

We all need reassurance from time to time. It helps to have another human being tell us that everything’s going to be okay in the end, and that we didn’t irrevocably ruin things for everyone. Want people to feel accepted? Give them a point of contact with people who can tell them those things.

Even if it’s just an email address, people need a way to talk to another person. Ultimately, a website can only do so much to make people feel accepted and respected. Sometimes, you just need the human touch to make a human connection.

Above all, delivering a feeling of acceptance and respect to people is about recognizing and even appreciating their humanity. We don’t always get enough of that in a digital world.


Featured image via Depositphotos.

Add Realistic Chalk and Sketch Lettering Effects with Sketch’it – only $5!

Source

p img {display:inline-block; margin-right:10px;}
.alignleft {float:left;}
p.showcase {clear:both;}
body#browserfriendly p, body#podcast p, div#emailbody p{margin:0;}

15 Useful WordPress Functions All Developers Should Know

Original Source: https://www.hongkiat.com/blog/useful-wordpress-functions/

WordPress is full of great functions for us developers to use. We can pull post lists out of thin air, manipulate almost everything about them, grab any user we wish and display their social media…

Visit hongkiat.com for full content.

Animated Mesh Lines

Original Source: http://feedproxy.google.com/~r/tympanus/~3/Sd9FEXrcJ-s/

MeshLines_Featured

Two years ago, I started playing with lines in WebGL using THREE.MeshLine, a library made by Jaume Sanchez Elias for Three.js.

This library tackles the problem that you cannot handle the width of your lines with classic lines in Three.js. A MeshLine builds a strip of triangles billboarded to create a custom geometry instead of using the native WebGL GL_LINE method that does not support the width parameter.

These lines shaped as ribbons have a really interesting graphic style. They also have less vertices than a TubeGeometry usually used to create thick lines.

Animate a MeshLine

The only thing missing is the ability to animate lines without having to rebuild the geometry for each frame.
Based on what had already been started and how SVG Line animation works, I added three new parameters to MeshLineMaterial to visualize animated dashed line directly through the shader.

DashRatio: The ratio between what is visible or not (~0: more visible, ~1: less visible)
DashArray: The length of a dash and its space (0 == no dash)
DashOffset: The location where the first dash begins

Like with an SVG path, these parameters allow you to animate the entire traced line if they are correctly handled.

Here is a complete example of how to create and animate a MeshLine:

// Build an array of points
const segmentLength = 1;
const nbrOfPoints = 10;
const points = [];
for (let i = 0; i < nbrOfPoints; i++) {
points.push(i * segmentLength, 0, 0);
}

// Build the geometry
const line = new MeshLine();
line.setGeometry(points);
const geometry = line.geometry;

// Build the material with good parameters to animate it.
const material = new MeshLineMaterial({
lineWidth: 0.1,
color: new Color('#ff0000'),
dashArray: 2, // always has to be the double of the line
dashOffset: 0, // start the dash at zero
dashRatio: 0.75, // visible length range min: 0.99, max: 0.5
});

// Build the Mesh
const lineMesh = new Mesh(geometry, material);
lineMesh.position.x = -4.5;

// ! Assuming you have your own webgl engine to add meshes on scene and update them.
webgl.add(lineMesh);

// ! Call each frame
function update() {
// Check if the dash is out to stop animate it.
if (lineMesh.material.uniforms.dashOffset.value < -2) return;

// Decrement the dashOffset value to animate the path with the dash.
lineMesh.material.uniforms.dashOffset.value -= 0.01;
}

First animated MeshLine

Create your own line style

Now that you know how to animate lines, I will show you some tips on how to customize the shape of your lines.

Use SplineCurve or CatmullRomCurve3

These classes smooth an array of points that is roughly positioned. They are perfect to build curved and fluid lines and keep control of them (length, orientation, turbulences…).

For instance, let’s add some turbulences to our previous array of points:

const segmentLength = 1;
const nbrOfPoints = 10;
const points = [];
const turbulence = 0.5;
for (let i = 0; i < nbrOfPoints; i++) {
// ! We have to wrapped points into a THREE.Vector3 this time
points.push(new Vector3(
i * segmentLength,
(Math.random() * (turbulence * 2)) – turbulence,
));
}

Then, use one of these classes to smooth your array of lines before you create the geometry:

// 2D spline
// const linePoints = new Geometry().setFromPoints(new SplineCurve(points).getPoints(50));

// 3D spline
const linePoints = new Geometry().setFromPoints(new CatmullRomCurve3(points).getPoints(50));

const line = new MeshLine();
line.setGeometry(linePoints);
const geometry = line.geometry;

And like that you create your smooth curved line!

Animated MeshLine Curved

Note that SplineCurve only smoothes in 2D (x and y axis) compared to CatmullRomCurve3 that takes into account three axes.

I recommend to use the SplineCurve, anyway. It is more performant to calculate lines and is often enough to create the desired curved effect.

For instance, my demos Confetti and Energy are only made with the SplineCurve method:

AnimatedMeshLine - Confetti demo

AnimatedMeshLine - Energy demo

Use Raycasting

Another technique taken from a THREE.MeshLine example is using a Raycaster to scan a Mesh already present in the scene.

Thus, you can create your lines that follow the shape of an object:

const radius = 4;
const yMax = -4;
const points = [];
const origin = new Vector3();
const direction = new Vector3();
const raycaster = new Raycaster();

let y = 0;
let angle = 0;
// Start the scan
while (y < yMax) {
// Update the orientation and the position of the raycaster
y -= 0.1;
angle += 0.2;
origin.set(radius * Math.cos(angle), y, radius * Math.sin(angle));
direction.set(-origin.x, 0, -origin.z);
direction.normalize();
raycaster.set(origin, direction);

// Save the coordinates raycsted.
// !Assuming the raycaster cross the object in the scene each time
const intersect = raycaster.intersectObject(objectToRaycast, true);
if (intersect.length) {
points.push(
intersect[0].point.x,
intersect[0].point.y,
intersect[0].point.z,
);
}
}

This method is employed in the Boreal Sky demo. Here I used a sphere part as geometry to create the mesh objectToRaycast:

Boreal Sky - raycasting example

Now, you have enough tools to play and animate MeshLines. Many of these methods are inspired by the library’s examples. Feel free to explore these and share your own experiments and methods to create your own lines!

References and Credits

Three.js
THREE.MeshLine
THREE.MeshLine – Shape example
Gsap

Animated Mesh Lines was written by Jérémie Boulay and published on Codrops.

3 Essential Design Trends, January 2019

Original Source: https://www.webdesignerdepot.com/2019/01/3-essential-design-trends-january-2019/

New year, new design trends!

While everyone is talking about big-picture trends such as designing for voice and virtual reality, there are more immediate design elements that you can see (and deploy) right now for a more on-trend website.

From websites without images above the scroll, to ecommerce that disguises itself as content, to bright blue everything, here’s a look at what’s trending this month.

1. No “Art” Above the Scroll

Have you noticed how many websites don’t have images or video above the scroll? This no “art” design style used to be reserved for coming soon or construction pages that didn’t have images, but it’s trending even for website designs with plenty of other imagery.

If you have a message or statement that is the most important thing for users to know right away, this can be an effective design technique. It works because there’s nothing else to see. (Unless the user refuses to read the words and abandons the design, which can be a risk with this style.)

Make the most of a no art design with beautiful typography and strong color choices.

These design elements can serve as art on their own and help add visual interest to the words on the screen.

Each of the three examples below does this in a slightly different way.

We Are Crowd uses a strong serif-sans serif typography pair on a bright colored background. Users are enticed to delve into the design thanks to an animated scroller on the homepage. The no “art” design actually alternates between image and non-image panels, showing users there is something to look at.

Easys uses a simple serif in the center of the screen to draw the eye. Bright red text on a stark background draws you right to the lettering. There’s also a call to scroll, where the design fills with more color, images and interesting shapes.

David Pacheco’s portfolio takes a more minimal approach to the no art aesthetic. With simple, but oversized sans serif typography and a black background, there’s no way not to know what the website is about. The stark nature of the design makes the small, animated scroller at the bottom left more obvious, and it’s worth the effort with great images of his projects.

2. Bright Blue

It might not come as a surprise that a bright color is trending. But the hue might surprise you. Even though a bright coral was named color of the year by Pantone, bright blue is trending.

Bright blue backgrounds, text elements, overlays and more are everywhere. The color, which has roots in the Material Design palette, is rather cheerful and works with almost any content type. These are reasons why it might be so popular.

Blue is traditionally one of the most used colors among all website designs. Mostly because of associations that are harmonious, pleasing and trustworthy. This brighter blue adds to that with a somewhat lighter feel.

The best part of a website design trend that’s rooted in color is that it’s easy to use. Designers don’t have to overhaul a brand color palette to incorporate bright blue into the design. Sneak it in for accents or in images.

This is also a trend that you can add to a project quickly and without a lot of planning for a modern flair that can be deployed (and even removed) with minimal effort.

Like the blues you see in the examples below? Try these color mixes to replicate the hues:

Matt Downey uses a bright blue with an almost purple undertone; hex #263d83.

Output scrolls trough plenty of bright blue options on the homepage with more purple (hex #4d34d8) and brighter sky blue (hex #3a63d8) options.

Florent Biffi puts a new spin on navy with a brighter tone; hex #142877.

3. Ecommerce That Looks Like Content

Content is king…even when it comes to online sales.

Maybe as a design trend that’s a carryover from social media or maybe just to try something that’s a little more engaging, more ecommerce websites are deploying site architectures that look less like pages of items for sale and more like integrated content elements with a “buy it” button included.

This idea makes sales more about lifestyle and uses a product placement philosophy to sell items. This design concept can take a lot of time to plan out and design effectively, but it can be worthwhile if it resonates with a new customer or shopper base.

It’s likely that it takes a certain type of product as well. Ecommerce websites that use a lot of content and that look more like content that product sales or information tend to be lifestyle brands such as clothing or home textiles. This is because these items don’t need a lot of explanation–most shoppers know what size shirt they wear–and create a sense of urgency in the desire to buy. A customer sees the shirt and want it because of the associated sense of style or connection to brand.

It’s an interesting way to create a more authentic connection with users–a key marketing concept, particularly among millennial shoppers and audiences. It’s one of those design trends that has a lot of potential to grow, but only if designers and developers are willing to commit the time and resources to overhaul their ecommerce projects in this manner.

Conclusion

When it comes to using website design trends, the ones that come and go the quickest are the ones that are most deployable. Some of those–such as color–are on this list. Others, like ecommerce that looks like content, takes a lot more strategy to do well. Which type of trend are you most likely to try?

What trends are you loving (or hating) right now? I’d love to see some of the websites that you are fascinated with. Drop me a link on Twitter; I’d love to hear from you.

Add Realistic Chalk and Sketch Lettering Effects with Sketch’it – only $5!

Source

p img {display:inline-block; margin-right:10px;}
.alignleft {float:left;}
p.showcase {clear:both;}
body#browserfriendly p, body#podcast p, div#emailbody p{margin:0;}

5 awesome JavaScript APIs

Original Source: http://feedproxy.google.com/~r/CreativeBloq/~3/o10Wm2sXjKE/5-awesome-javascript-apis

There are plenty of great JavaScript APIs around right now. Here we've picked five for you to explore in your web projects. Combine them with our pick of the best HTML APIs to help enhance your sites' user experience.

01. Intersection Observer
Status: Working draftRead more: W3C summary

This JavaScript API can be used to understand the visibility and position of DOM elements (known as 'targets') relative to a containing element (the 'root'). Use it to fire a callback whenever an element enters and exits a certain area. This API is best for lazy loading or infinite scroll effects.

02. Reporting Observer
Read more: W3C summary

Part of the Reporting API, Reporting Observers observe some types of reports from JavaScript. Use them to get notified when the browser has to intervene – for example, if it has to provide a fallback for a slow-loading font.

03. OffscreenCanvas
Read more: Google Developers summary

Drawing to a <canvas> is an expensive task for a browser. This new API enables you to render graphics off the main thread, without hitting the DOM.

04. Internationalisation API
Read more: MDN web docs

Known by the namespace Intl, the ECMAScript Internationalization API provides language-sensitive string comparison, number formatting, and date and time formatting. Use it to avoid sending heavy libraries and show dates, numbers and strings in a format that makes sense in the user’s location.

05. CSS Paint API
Read more: Google Developers summary

The CSS Paint API – also known as CSS Custom Paint – enables you to programmatically generate an image whenever a CSS property expects one. Use JavaScript to generate dynamic backgrounds, borders and image masks and apply them in CSS without a heavy performance hit. This API is about to be enabled by default in Chrome Stable.

This article originally appeared in Web Designer magazine. Buy issue 280, or subscribe now.

Read more:

A coder's guide to APIsGet started with the Web Audio API7 hot web trends for 2019

5 Ways to Design for Large Viewports

Original Source: https://www.webdesignerdepot.com/2019/01/5-ways-to-design-for-large-viewports/

Web designers have typically always been big-picture people, in that they like having really big screens in front of them. It’s convenient, and it makes you feel very professional. At this point in my life, I don’t think I could go back to having just one monitor, either. And yet, I find that many websites don’t live up to the potential promised by big darned screens, or even that presented by phones with HD resolutions.

This is because we live in a mobile-first world, with mobile-first people. They go to far off and exotic places like “outside”, so they have to carry their screens around with them. Outside people pretty much pay our bills—whether directly or indirectly—and we have to make websites they can actually use on those small screens.

That is all well and good, and it’s not going to change any time soon. But big screens aren’t going anywhere, either. People still work in offices, at home, and in coffee shops with laptops and desktops. People still have “the family computer” at home. PC gamers exist, and they’re buying some of the biggest screens, right alongside photographers and videographers.

These people are often left with experiences designed for mid-range to small screens. This likely doesn’t break the experience for them, but why shouldn’t they have an experience tailored to their needs? Besides, what is all that extra screen space there for, if not to play with it? Here are a few ways to take advantage of the bigger screens, along with some examples:

1. Literal Big Pictures

One of the most common ways people try to use up the empty space is to put pictures in it. We’ve all seen the ten-trillion websites (I may be exaggerating) that use some stock photo as a background, particularly in the “hero” section on the home page. This is everywhere. You’ve done it, most likely, and God knows I’ve done it.

It is not altogether the worst way to go about it, and it’s not the best. While image compression is getting better and better, those images will still hit you in the bandwidth, caching or no caching. If you want to save you and your CDN some trouble, go with SVG. I know, I keep saying this, but it really works, and it works wonders. See bebold for a picture-perfect (heh) example of how to use simple SVG imagery to fill up some space while keeping the bandwidth and rendering costs light.

2. Scaling the Layout

So we all know how responsive design works, right? Well, it’s gotten a lot easier with CSS Grid. I’ve been experimenting with it for personal projects, and goddamn but it truly changes everything. Those Magazine-type layouts that front-end developers have been trying to make work for decades? They’re easy now. Easy. Go read a tutorial already.

With all that time you have left over, why not see what you can do when you let the central wrapping div go wider than 1,200 pixels? It could be fun. For an absolutely gorgeous (if somewhat bandwidth-heavy) example, see Seedlip.

3. Responsive Type

But hey, sometimes you don’t want to bother so much with pictures. Maybe you just want big darned text. We’ve had various iterations on the responsive layout for years, though. What has been harder is scaling our typography up and down by screen resolution in a way that seems natural and fluid. Sure, you can do it with a few dozen media queries (or like two, if you’re lazy like me), but the CSS calc function has us covered if we want to do it the easy way.

Sure, Chris Coyier has been writing about this since 2012, but the browser support hasn’t always been up to par. I quite like the technique used by Mike Foskett’s Fluid-responsive font-size calculator, which allows you to specify a maximum font-size, and can calculate everything in rems and ems, if that’s the way you want to go.

For an example of the technique in action see any article on CSS-Tricks.

4. Just put More Stuff on the Screen

As an avowed minimalist, I’m not a huge fan of just bombarding the user with information in general. However, there are times when this is exactly what they want and need. The clearest use cases for this approach are in dashboard-style user interfaces, and plain old e-commerce. In either of these cases, if you’re not using the maximum potential space for functionality and/or products, you’re actually slowing the user down when they may not want to be slowed down.

Most dashboard designers are already, well…on board. However, I’m seeing more and more ecommerce site templates trying to cram products into small areas on big screens, and that makes little sense to me.

Example: I dunno… Amazon? I’m not going to link that. They’re going to get our traffic eventually in any case. Actually, the aforementioned Seedlip works very well for this section, too.

Now where I object to this approach is on news sites, and generally they seem to agree with me. Although some are still using up the full screen, they make the content big enough that there’s not too much in the viewport at any one time, encouraging you to scroll down and really pick and choose your articles. Sure, they do it to display more ads, but this might be one of the few times ads have actually helped to improve an experience. Kind of.

5. Video

And lastly, a real no-brainer. I’m not actually sure anyone’s doing this one wrong. Still… if you’re going to use video extensively on your site anyway, and you’re not too fussed about bandwidth, go big. It’s video, that’s what it’s for. If nothing else, at least give people the option to watch your videos in full-screen mode. For examples of this tip in action, see just about any filmmaker’s site. Here’s one: +Ring.

Add Realistic Chalk and Sketch Lettering Effects with Sketch’it – only $5!

Source

p img {display:inline-block; margin-right:10px;}
.alignleft {float:left;}
p.showcase {clear:both;}
body#browserfriendly p, body#podcast p, div#emailbody p{margin:0;}