Original Source: https://www.smashingmagazine.com/2019/07/build-sketch-plugin-javascript-html-css-part-2/
How To Build A Sketch Plugin With JavaScript, HTML And CSS (Part 2)
How To Build A Sketch Plugin With JavaScript, HTML And CSS (Part 2)
Matt Curtis
2019-07-08T12:30:59+02:00
2019-07-08T13:07:00+00:00
As mentioned in part 1, this tutorial is intended for people who know and use the Sketch app and are not afraid of dabbling with code as well. To profit from it the most, you will need to have at least some basic experience writing JavaScript (and, optionally, HTML/CSS).
In the previous part of this tutorial, we learned about the basic files that make up a plugin, and how to create the plugin’s user interface. In this second and final part, we’ll learn how to connect the user interface to the core plugin code and how to implement the plugin’s main features. Last but not least, we’ll also learn how to optimize the code and the way the plugin works.
Building The Plugin’s User Interface: Making Our Web Interface And The Sketch Plugin Code “Talk” To Each Other
The next thing we need to do is to set up communication between our web interface and the Sketch plugin.
We need to be able to send a message from our web interface to the Sketch plugin when the “Apply” button in our web interface is clicked. This message needs to tell us about what settings the user has input — like the number of steps, rotation amount, the number of duplicates to create, and so on.
WKWebView makes this task a little bit easier for us: we can send messages to our Sketch plugin from our web interface’s JavaScript code by using the window.webkit.messageHandlers API.
On our Sketch code’s side, we can use another method, addScriptMessageHandler:name: (or addScriptMessageHandler_name) to register a message handler that will be called whenever it receives a message sent from our plugin web interface.
Let’s start by making sure we can receive messages from our web UI. Head over to our ui.js file’s createWebView function, and add the following:
function createWebView(pageURL){
const webView = WKWebView.alloc().init();
// Set handler for messages from script
const userContentController = webView.configuration().userContentController();
const ourMessageHandler = …
userContentController.addScriptMessageHandler_name(
ourMessageHandler, “sketchPlugin”
);
// Load page into web view
webView.loadFileURL_allowingReadAccessToURL(pageURL, pageURL.URLByDeletingLastPathComponent());
return webView;
};
Here we use the web view’s userContentController property to add a message handler we’ve named “sketchPlugin”. This “user content controller” is the bridge that ensures messages get across from our web view.
You might have noticed something odd about the above code: the object we’re adding as the message handler, ourMessageHandler, doesn’t exist yet! Unfortunately, we can’t just use a regular JavaScript object or function as the handler, as this method expects a certain kind of native object.
Luckily for us, we can get around this limitation by using MochaJSDelegate, a mini-library I wrote that makes it possible to create the kind of native object we need using regular ol’ JavaScript. You’ll need to manually download and save it in your plugin bundle under Sketch/MochaJSDelegate.js.
In order to use it, we’ll need to first import it into ui.js. Add the following at the top of the file:
const MochaJSDelegate = require(“./MochaJSDelegate”);
Now we can use MochaJSDelegate to create the type of message handler addScriptMessageHandler:name: is expecting:
function createWebView(pageURL){
const webView = WKWebView.alloc().init();
// Set handler for messages from script
const userContentController = webView.configuration().userContentController();
const scriptMessageHandler = new MochaJSDelegate({
“userContentController:didReceiveScriptMessage:”: (_, wkMessage) => {
/* handle message here */
}
}).getClassInstance();
userContentController.addScriptMessageHandler_name(
scriptMessageHandler, “sketchPlugin”
);
// Load page into web view
webView.loadFileURL_allowingReadAccessToURL(pageURL, pageURL.URLByDeletingLastPathComponent());
return webView;
};
The code we just added creates the native object we need. It also defines a method on that object named userContentController:didReceiveScriptMessage: — this method is then called with the message we want as the second argument. Since we’re not actually sending any messages yet, we’ll have to come back here at a later time and add some code to actually parse and handle the messages we receive.
Next, we need to add some code to our web interface to send us those messages. Head over to /Resources/web-ui/script.js. You’ll find I’ve already written most of the code that handles retrieving the values of the HTML <inputs /> the user will enter their options into.
What’s still left for us to do is to add the code that actually sends the values over to our Sketch code:
Find the apply function and add the following to the end of it:
// Send user inputs to sketch plugin
window.webkit.messageHandlers.sketchPlugin.postMessage(JSON.stringify({
stepCount, startingOptions, stepOptions
}));
Here we use window.webkit.messageHandlers API we mentioned earlier to access the message handler we registered above as sketchPlugin. Then send a message to it with a JSON string containing the user’s inputs.
Let’s make sure everything is set up properly. Head back to /Sketch/ui.js. In order to make sure we’re getting messages as we expect, we’ll modify the method we defined earlier so that it displays a dialog when we get a message:
function createWebView(pageURL){
// …
const scriptMessageHandler = new MochaJSDelegate({
“userContentController:didReceiveScriptMessage:”: (_, wkMessage) => {
const UI = require(“sketch/ui”);
UI.alert(“Hey, a message!”, wkMessage.body());
}
}).getClassInstance();
userContentController.addScriptMessageHandler_name(
scriptMessageHandler, “sketchPlugin”
);
// …
};
Now run the plugin (you may need to first close any existing Mosaic window you have opened), enter some values, then click “Apply”. You should see an alert like the one below — this means everything is wired up correctly and our message went through successfully! If not, go back over the previous steps and ensure that everything was done as described.
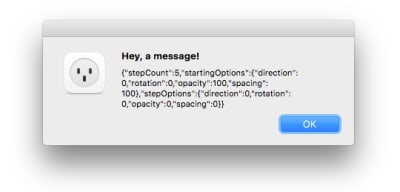
The dialog you should see appear once you click Apply. (Large preview)
Now that we’re able to send messages from our interface to our plugin, we can move on to writing the code that actually does something useful with that information: generating our layer mosaics.
Generating The Layer Mosaics
Let’s take stock of what’s necessary in order to make this happen. Simplifying things a bit, what our code needs to do is:
Find the current document.
Find the current document’s selected layer.
Duplicate the selected layer (we’ll call it the template layer) x number of times.
For each duplicate, tweak its position, rotation, opacity, etc., by the specific values (amounts) set by the user.
Now that we’ve got a reasonable plan, let’s continue writing. Sticking with our pattern of modularizing our code, let’s create a new file, mosaic.js in the Sketch/ folder, and add to it the following code:
function mosaic(options){
};
module.export = mosaic;
We’ll use this function as the only export of this module since it makes for a simpler API to use once we import it — we can just call mosaic() with whatever options we get from the web interface.
The first two steps we need to take are getting the current document, and then its selected layer. The Sketch API has a built-in library for document manipulation which we can get access to by importing the sketch/dom module. We only need the Document object right now, so we’ll pull it out explicitly. At the top of the file, add:
const { Document } = require(“sketch/dom”);
The Document object has a method specifically for accessing the current document we can use, called getSelectedDocument(). Once we have the current document instance, we can access whatever layers the user has selected via the document’s selectedLayers property. In our case, though, we only care about single-layer selections, so we’ll only grab the first layer the user has selected:
function mosaic(options){
const document = Document.getSelectedDocument();
const selectedLayer = document.selectedLayers.layers[0];
};
module.export = mosaic;
Note: You might have been expecting selectedLayers itself to be an array, but it’s not. Instead, it’s an instance of the Selection class. There’s a reason for this: the Selection class contains a bunch of useful helper methods for manipulating the selection like clear, map, reduce, and forEach. It exposes the actual layer array via the layer property.
Let’s also add some warning feedback in case the user forgets to open a document or to select something:
const UI = require(“sketch/ui”);
function mosaic(options){
const document = Document.getSelectedDocument();
// Safety check:
if(!document){
UI.alert(“Mosaic”, “⚠️ Please select/focus a document.”);
return;
}
// Safety check:
const selectedLayer = document.selectedLayers.layers[0];
if(!selectedLayer){
UI.alert(“Mosaic”, “⚠️ Please select a layer to duplicate.”);
return;
}
};
module.export = mosaic;
Now that we’ve written the code for steps 1 and 2 (finding the current document and selected layer), we need to address steps 3 and 4:
Duplicate the template layer x number of times.
For each duplicate, tweak its position, rotation, opacity, etc., by the specific values set by the user.
Let’s start by pulling all the relevant information we need out of options: the number of times to duplicate, starting options, and step options. We can once again use destructuring (like we did earlier with Document) to pull those properties out of options:
function mosaic(options) {
// …
// Destructure options:
var { stepCount, startingOptions, stepOptions } = options;
}
Next, let’s sanitize our inputs and ensure that step count is always at least 1:
function mosaic(options) {
// …
// Destructure options:
var { stepCount, startingOptions, stepOptions } = options;
stepCount = Math.max(1, stepCount);
}
Now we need to make sure that the template layer’s opacity, rotation, etc., all match up with the user’s desired starting values. Since applying the user’s options to a layer is going to be something we’ll do a lot of, we’ll move this work into its own method:
function configureLayer(layer, options, shouldAdjustSpacing){
const { opacity, rotation, direction, spacing } = options;
layer.style.opacity = opacity / 100;
layer.transform.rotation = rotation;
if(shouldAdjustSpacing){
const directionAsRadians = direction * (Math.PI / 180);
const vector = {
x: Math.cos(directionAsRadians),
y: Math.sin(directionAsRadians)
};
layer.frame.x += vector.x * spacing;
layer.frame.y += vector.y * spacing;
}
};
And because spacing only needs to be applied in-between the duplicates and not the template layer, we’ve added a specific flag, shouldAdjustSpacing, that we can set to true or false depending on whether we’re applying options to a template layer or not. That way we can ensure that rotation and opacity will be applied to the template, but not spacing.
Back in the mosaic method, let’s now ensure that the starting options are applied to the template layer:
function mosaic(options){
// …
// Configure template layer
var layer = group.layers[0];
configureLayer(layer, startingOptions, false);
}
Next, we need to create our duplicates. First, let’s create a variable that we can use to track what the options for the current duplicate are:
function mosaic(options){
// …
var currentOptions; // …
}
Since we already applied the starting options to the template layer, we need to take those options we just applied and add the relative values of stepOptions in order to get the options to apply to the next layer. Since we’ll also be doing this several more times in our loop, we’ll also move this work into a specific method, stepOptionsBy:
function stepOptionsBy(start, step){
const newOptions = {};
for(let key in start){
newOptions[key] = start[key] + step[key];
}
return newOptions;
};
After that, we need to write a loop that duplicates the previous layer, applies the current options to it, then offsets (or “steps”) the current options in order to get the options for the next duplicate:
function mosaic(options) {
// …
var currentOptions = stepOptionsBy(startingOptions, stepOptions);
for(let i = 0; i < (stepCount – 1); i++){
let duplicateLayer = layer.duplicate();
configureLayer(duplicateLayer, currentOptions, true);
currentOptions = stepOptionsBy(currentOptions, stepOptions);
layer = duplicateLayer;
}
}
All done — we’ve successfully written the core of what our plugin is supposed to do! Now, we need to wire things up so that when the user actually clicks the “Apply” button our mosaic code is invoked.
Let’s head back to ui.js and adjust our message handling code. What we’ll need to do is parse the JSON string of options we’re getting so that they’re turned into an object we can actually use. Once we have these options, we can then call the mosaic function with them.
First, parsing. We’ll need to update our message handling function to parse the JSON message we get:
function createWebView(pageURL){
// …
const scriptMessageHandler = new MochaJSDelegate({
“userContentController:didReceiveScriptMessage:”: (_, wkMessage) => {
const message = JSON.parse(wkMessage.body());
}
});
}
Next, we’ll need to pass this over to our mosaic function. However, this isn’t really something our code in ui.js should be doing — it’s supposed to be primarily concerned with what’s necessary to display interface-related things on screen — not creating mosaics itself. To keep these responsibilities separate, we’ll add a second argument to createWebView that takes a function, and we’ll call that function whenever we receive options from the web interface.
Let’s name this argument onApplyMessage:
function createWebView(pageURL, onApplyMessage){
// …
const scriptMessageHandler = new MochaJSDelegate({
“userContentController:didReceiveScriptMessage:”: (_, wkMessage) => {
const message = JSON.parse(wkMessage.body());
onApplyMessage(message);
}
});
}
We’ll also need to modify our exported method, loadAndShow, to take this onApplyMessage argument as well and pass it off to createWebView:
function loadAndShow(baseURL, onApplyMessage){
// …
const webView = createWebView(pageURL, onApplyMessage);
}
Finally, head over to main.js. We now need to import our mosaic function, and call it with the options we receive from the plugin’s user interface:
const mosaic = require(“./mosaic”);
function onRun(context){
UI.loadAndShow(context.scriptURL, options => {
mosaic(options);
});
};
We’re almost done!
However, if we ran our code now and clicked the “Apply” button in the plugin interface, nothing would happen. Why? The reason is due to how Sketch scripts are run: by default, they “live” only until the bottom of your script is reached, after which Sketch destroys it and frees up whatever resources it was using.
This is a problem for us since it means that anything we need to have asynchronously happen (in this case, that’s after the bottom of our code is reached), like receiving messages, cannot, because our script has been destroyed. This means we wouldn’t get any of our messages from the web interface since we’re not around to receive and respond to them!
There’s a way to signal to Sketch that we need our script to stay alive beyond this point, using Fibers. By creating a Fiber, we tell Sketch that something asynchronous is happening and that it needs to keep our script around. Sketch will then only destroy our script when absolutely necessary (like the user closing Sketch, or when the Mosaic plugin needs to be updated):
// …
const Async = require(“sketch/async”);
var fiber;
function onRun(context){
if(!fiber){
fiber = Async.createFiber();
fiber.onCleanup(() => {
UI.cleanup();
});
}
UI.loadAndShow(context.scriptURL, options => {
mosaic(options);
});
};
Voilà! Let’s try out our plugin now. With a layer selected in Sketch, enter some settings, then click apply:
Let’s try out our plugin now — with a layer selected in Sketch, enter some settings, then click “Apply.”
Final Improvements
Now that we’ve got the majority of our plugin’s functionality implemented, we can try to “zoom out” a bit and take a look at the big picture.
Improving The User’s Experience
If you’ve played around with the plugin in its current state, you might’ve noticed that one of the biggest points of friction appears when you try to edit a Mosaic. Once you create one, you have to hit undo, adjust the options, then click ‘Apply’ (or press Enter). It also makes it harder to edit a Mosaic after you’ve left your document and returned to it later, since your undo/redo history will have been wiped out, leaving you to manually delete the duplicate layers yourself.
In a more ideal flow, the user could just select a Mosaic group, adjust options and watch the Mosaic update until they get the exact arrangement they’re looking for. To implement this, we have two problems to solve:
First, we’ll need a way to group the duplicates that make up a Mosaic together. Sketch provides the concept of Groups, which we can use to solve this problem.
Second, we’ll need a way to tell the difference between a normal, user-created group and a Mosaic group. Sketch’s API also gives us a way to store information on any given layer, which we can use as a way tag and later identify a group as one of our ‘special’ Mosaic groups.
Let’s revisit the logic we wrote in the previous section to address this. Our original code follows the following steps:
Find the current document.
Find the current document’s selected layer.
Duplicate the selected layer (we’ll call it the template layer) x number of times.
For each duplicate, tweak its position, rotation, opacity, etc., by the specific values (amounts) set by the user.
In order to make our new user flow possible, we need to change these steps to:
Grab the current document.
Grab the current document’s selected layer.
Determine whether the selected layer is a Mosaic group or not.
If it’s some other layer, use it as the template layer and go to step 4.
If it is a Mosaic group, consider the first layer in it as the template layer, and go to step 5.
Wrap the template layer inside a group, and mark that group as a Mosaic group.
Remove all layers from inside the group except the template layer.
Duplicate the template layer x number of times.
For each duplicate, tweak its position, rotation, opacity, etc., by the specific values set by the user.
We’ve got three new steps. For the first new step, step 3, we’ll create a function named findOrMakeSpecialGroupIfNeeded that will look at the layer passed to it to determine whether or not it’s a Mosaic group. If it is, we’ll just return it. Since the user could potentially select a sublayer nested deep in a Mosaic group, we’ll also need to check the parents of the selected layer to tell if they’re one of our Mosaic groups as well:
function findOrMakeSpecialGroupIfNeeded(layer){
// Loop up through the parent hierarchy, looking for a special group
var layerToCheck = layer;
while(layerToCheck){
if(/* TODO: is mosaic layer? */){
return layerToCheck;
}
layerToCheck = layerToCheck.parent;
}
};
If we weren’t able to find a Mosaic group we’ll simply wrap the layer we were passed inside a Group, then tag it as a Mosaic group.
Back at the top of the file, we’ll need to pull out the Group class now too:
const { Document, Group } = require(“sketch/dom”);
function findOrMakeSpecialGroupIfNeeded(layer){
// Loop up through the parent hierarchy, looking for a special group
var layerToCheck = layer;
while(layerToCheck){
if(/* TODO: is mosaic layer? */){
return layerToCheck;
}
layerToCheck = layerToCheck.parent;
}
// Group
const destinationParent = layer.parent;
const group = new Group({
name: “Mosaic Group”,
layers: [ layer ],
parent: destinationParent
});
/* TODO: mark group as mosaic layer */
return group;
};
Now we need to fill in the gaps (todo’s). To begin with, we need a means of identifying whether or not a group is one of the special groups belonging to us or not. Here, the Settings module of the Sketch library comes to our rescue. We can use it to store custom information on a particular layer, and also to read it back.
Once we import the module at the top of the file:
const Settings = require(“sketch/settings”);
We can then use two key methods it provides, setLayerSettingForKey and layerSettingForKey, to set and read data off a layer:
function findOrMakeSpecialGroupIfNeeded(layer){
const isSpecialGroupKey = “is-mosaic-group”;
// Loop up through the parent hierarchy, looking for a special group
var layerToCheck = layer;
while(layerToCheck){
let isSpecialGroup = Settings.layerSettingForKey(layerToCheck, isSpecialGroupKey);
if(isSpecialGroup) return layerToCheck;
layerToCheck = layerToCheck.parent;
}
// Group
const destinationParent = layer.parent;
layer.remove(); // explicitly remove layer from it’s existing parent before adding it to group
const group = new Group({
name: “Mosaic Group”,
layers: [ layer ],
parent: destinationParent
});
Settings.setLayerSettingForKey(group, isSpecialGroupKey, true);
return group;
};
Now that we’ve got a method that handles wrapping a layer in a mosaic group (or, if already a mosaic group, just returns it) we can now plug it into our main mosaic method just after our safety checks:
function mosaic(options){
// … safety checks …
// Group selection if needed:
const group = findOrMakeSpecialGroupIfNeeded(selectedLayer);
}
Next we’ll add a loop to remove all layers from the group except the template layer (which is the first):
function mosaic(options) {
// …
// Remove all layers except the first:
while(group.layers.length > 1){
group.layers[group.layers.length – 1].remove();
}
}
Lastly, we’ll make sure that the group’s size is fitted to its new contents since the user might have originally selected a layer nested within the old group (a layer that we might have removed).
We’ll also need to make sure to set the current selection to our mosaic group itself. This will ensure that if the user is making a bunch of rapid changes to the same mosaic group it won’t become deselected. After the code we already wrote to duplicate a layer, add:
function mosaic(options) {
// …
// Fit group to duplicates
group.adjustToFit();
// Set selection to the group
document.selectedLayers.clear();
group.selected = true;
}
Try out the plugin again. You should find that editing a mosaic is much smoother now!
Improving The Interface
One other thing you might notice is the lack of synchronization between the display window and the interface inside it, in terms of them both becoming visible at the same time. This is due to the fact that when we display the window, the web interface isn’t guaranteed to have finished loading, so sometimes it’ll “pop” or “flash in” afterwards.
One way to fix this is by listening for when the web interface has finished loading, and only then show our window. There is a method, webView:didFinishNavigation:, that WKWebView will call when the current page has finished loading. We can use it to get exactly the notification we’re looking for.
Back in ui.js, we’ll extend the MochaJSDelegate instance we created to implement this method, which will in turn call the onLoadFinish argument we’ll pass to createWebView:
function createWebView(pageURL, onApplyMessage, onLoadFinish){
const webView = WKWebView.alloc().init();
// Create delegate
const delegate = new MochaJSDelegate({
“webView:didFinishNavigation:”: (webView, navigation) => {
onLoadFinish();
},
“userContentController:didReceiveScriptMessage:”: (_, wkMessage) => {
const message = JSON.parse(wkMessage.body());
onApplyMessage(message);
}
}).getClassInstance();
// Set load complete handler
webView.navigationDelegate = delegate;
// Set handler for messages from script
const userContentController = webView.configuration().userContentController();
userContentController.addScriptMessageHandler_name(delegate, “sketchPlugin”);
// Load page into web view
webView.loadFileURL_allowingReadAccessToURL(pageURL, pageURL.URLByDeletingLastPathComponent());
return webView;
};
And back in the loadAndShow method, we’ll adjust it so that it only shows the window once the web view has loaded:
function loadAndShow(baseURL, onApplyMessage){
// …
const window = createWindow();
const webView = createWebView(pageURL, onApplyMessage, () => {
showWindow(window);
});
window.contentView = webView;
_window = window;
};
Bingo! Now our window displays only when the web view has finished loading, avoiding that annoying visual flicker.
Conclusion
Congratulations, you’ve built your first Sketch plugin! ?
If you’d like to install and play around with Mosaic, you can download the complete plugin from GitHub. And before you go, here are a few resources that might be handy during the rest of your journey:
developer.sketchapp.com
The official resource regarding Sketch plugin development. Contains several useful guides, as well as an API reference for the Sketch JavaScript library.
sketchplugins.com
A fantastic and helpful community of Sketch plugin developers. Great for getting all your burning questions answered.
github.com/sketchplugins/plugin-directory
Official, central GitHub repository of Sketch plugins. You can submit your plugins here and share them with the rest of the Sketch community!

(mb, yk, il)