An Introduction to Component Routing with Angular Router
Original Source: https://www.sitepoint.com/component-routing-angular-router/
This article is part 4 of the SitePoint Angular 2+ Tutorial on how to create a CRUD App with the Angular CLI.
Part 0— The Ultimate Angular CLI Reference Guide
Part 1— Getting our first version of the Todo application up and running
Part 2— Creating separate components to display a list of todo’s and a single todo
Part 3— Update the Todo service to communicate with a REST API
Part 4— Use Angular router to resolve data
Part 5— Add authentication to protect private content
In part one we learned how to get our Todo application up and running and deploy it to GitHub pages. This worked just fine but, unfortunately, the whole app was crammed into a single component.
In part two we examined a more modular component architecture and learned how to break this single component into a structured tree of smaller components that are easier to understand, reuse and maintain.
In part three we updated our application to communicate with a REST API backend using RxJS and Angular’s HTTP service.
In this part, we will introduce Angular router and learn how it can update our application when the browser URL changes and vice versa. We will also learn how we can update our application to resolve data from our backend API using the router.
Don’t worry! You don’t need to have followed part one, two or three of this tutorial, for four to make sense. You can simply grab a copy of our repo, checkout the code from part three, and use that as a starting point. This is explained in more detail below.
Up and Running
Make sure you have the latest version of the Angular CLI installed. If you don’t, you can install it with the following command:
npm install -g @angular/cli@latest
If you need to remove a previous version of the Angular CLI, you can:
npm uninstall -g @angular/cli angular-cli
npm cache clean
npm install -g @angular/cli@latest
After that, you’ll need a copy of the code from part three. This is available at https://github.com/sitepoint-editors/angular-todo-app. Each article in this series has a corresponding tag in the repository so you can switch back and forth between the different states of the application.
The code that we ended with in part three and that we start with in this article is tagged as part-3. The code that we end this article with is tagged as part-4.
You can think of tags like an alias to a specific commit id. You can switch between them using git checkout. You can read more on that here.
So, to get up and running (the latest version of the Angular CLI installed) we would do:
git clone git@github.com:sitepoint-editors/angular-todo-app.git
cd angular-todo-app
git checkout part-3
npm install
ng serve
Then visit http://localhost:4200/. If all is well, you should see the working Todo app.
A quick recap
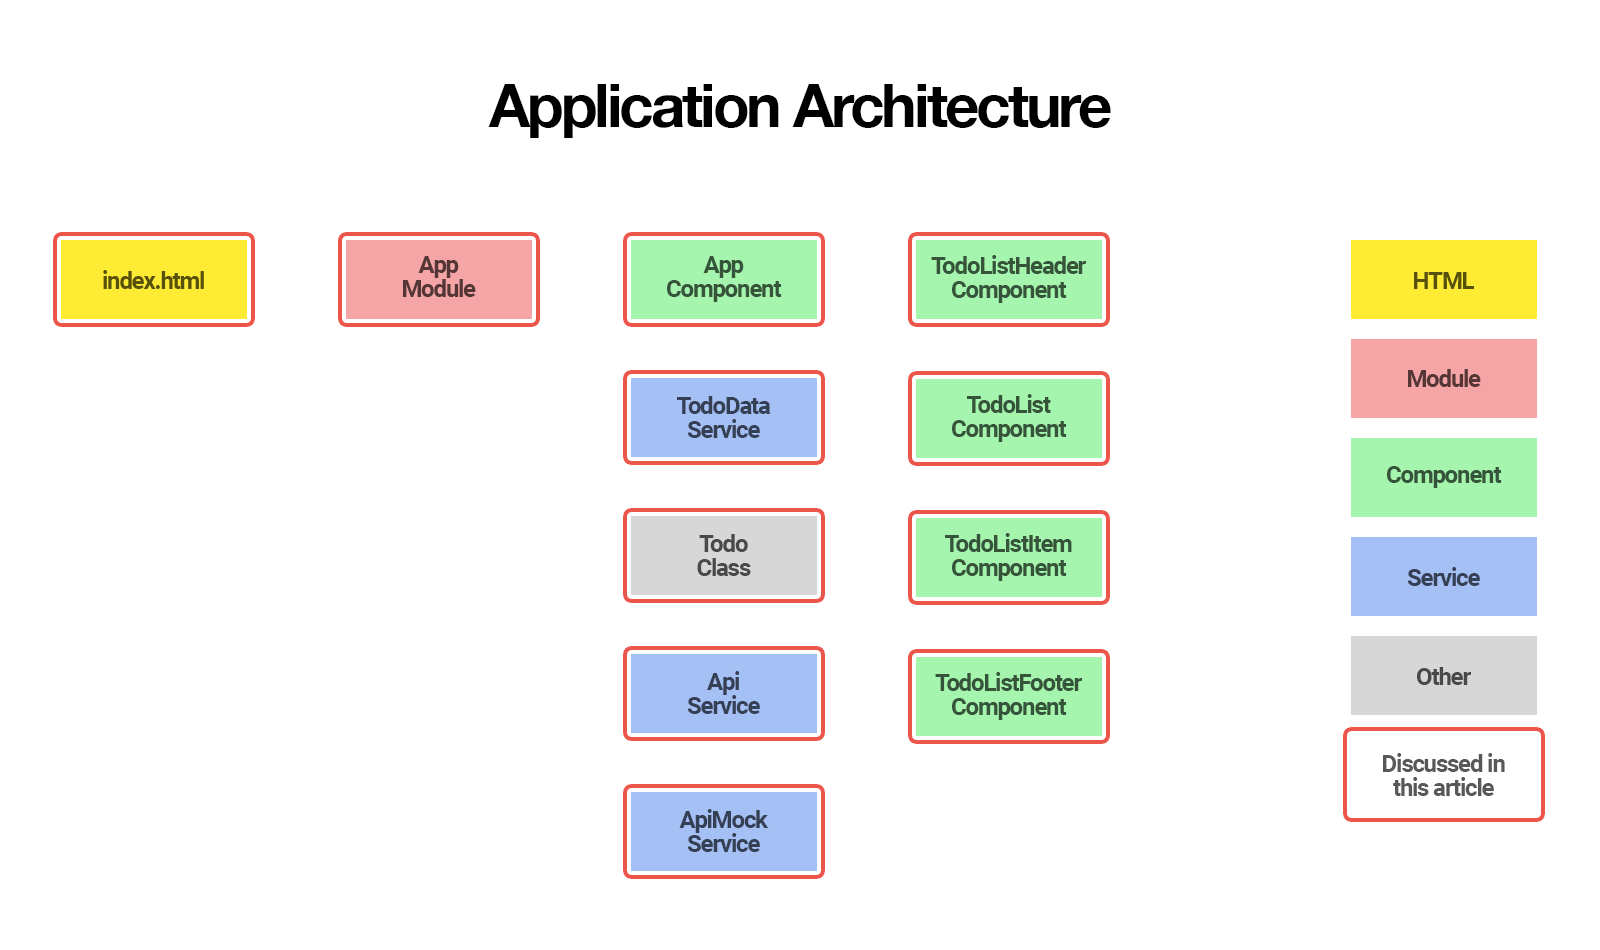
Here is what our application architecture looked like at the end of part 3:
In this article we will:
learn why an application may need routing
learn what a JavaScript router is
learn what Angular router is, how it works and what it can do for you
set up Angular router and configure the routes for our application
create a resolver to fetch the todo’s from our REST API
update our application to fetch the todo’s using our new resolver
By the end of this article, you will understand:
when and why your application may need routing
the difference between routing on the server and routing in the browser
what Angular router is and what it can do for your application
how to set up Angular router
how to configure routes for your application
how to tell Angular router where to place components in the DOM
how to gracefully handle unknown URLs
what a resolver is and what it can be used for
how to use a resolver to resolve data using Angular router
So, let’s get started!
Why routing?
In its current state, our web application does not take the browser URL into account.
We access our application through one URL e.g. http://localhost:4200 and our application is not aware of any other URLs such as http://localhost:4200/todos.
Most web applications need to support different URLs to navigate users to different pages in the application. That is where a router comes in.
In traditional websites, routing is handled by a router on the server:
a user clicks a link in the browser, causing the URL to change
the browser sends an HTTP request to server
the server reads the URL from the HTTP request and generates an appropriate HTTP response
the server sends the HTTP response to the browser
In modern JavaScript web applications, routing is often handled by a JavaScript router in the browser.
What is a JavaScript router?
In essence, a JavaScript router does 2 things:
update the web application state when the browser URL changes
update the browser URL when the web application state changes
JavaScript routers make it possible for us to develop Single Page Applications (SPA’s).
A Single Page Application is a web application that provides a user experience similar to a desktop application. In a Single Page Application, all communication with a back-end occurs behind the scenes.
When a user navigates from one page to another, the page is updated dynamically without reload, even if the URL changes.
There are many different JavaScript router implementations available.
Some of them are specifically written for a certain JavaScript framework such as Angular, ember, React, Vue.js, aurelia, etc. Other implementations are built for generic purposes and are not tied to a specific framework.
What is Angular router?
Angular router is an official Angular routing library, written and maintained by the Angular Core Team.
It is a JavaScript router implementation that is designed to work with Angular and is packaged as @angular/router.
First of all, Angular router takes care of the duties of a JavaScript router:
it activates all required Angular components to compose a page when a user navigates to a certain URL
it lets users navigate from one page to another without page reload
it updates the browser’s history so the user can use the back and forward buttons when navigating back and forth between pages
In addition, Angular router allows us to:
redirect a URL to another URL
resolve data before a page is displayed
run scripts when a page is activated or deactivated
lazy load parts of our application
In this article, we will learn how to set up and configure Angular router, how to redirect a URL and how to use Angular router to resolve todo’s from our back-end API.
In the next article, we will add authentication to our application and use the router to make sure some of the pages can only be accessed when the user is signed in.
How Angular Router Works
Before we dive into the code, it is important to understand how Angular router operates and the terminology it introduces.
When a user navigates to a page, Angular router performs the following steps in order:
it reads the browser URL the user wants to navigate to
it applies a URL redirect (if one is defined)
it figures out which router state corresponds to the URL
it runs the guards that are defined in the router state
it resolves the required data for the router state
it activates the Angular components to display the page
it manages navigation and repeats the steps above when a new page is requested
To accomplish its tasks, Angular router introduces the following terms and concepts:
router service: the global Angular router service in our application
router configuration: definition of all possible router states our application can be in
router state: the state of the router at some point in time, expressed as a tree of activated route snapshots
activated route snapshot: provides access to the URL, parameters, and data for a router state node
guard: script that runs when a route is loaded, activated or deactivated
resolver: script that fetches data before the requested page is activated
router outlet: location in the DOM where Angular router can place activated components
Don’t worry if the terminology sounds overwhelming. You will get used to the terms as we tackle them gradually in this series and as you gain more experience with Angular router.
An Angular application that uses Angular router only has one router service instance; It is a singleton. Whenever and wherever you inject the Router service in your application, you will get access to the same Angular router service instance.
For a more in-depth look at Angular routing process, make sure to check out the 7-step routing process of Angular router navigation.
Enabling Routing
To enable routing in our Angular application, we need to do 3 things:
create a routing configuration that defines the possible states for our application
import the routing configuration into our application
add a router outlet to tell Angular router where to place the activated components in the DOM
So let’s start by creating a routing configuration.
Creating the routing configuration
To create our routing configuration, we need a list of the URLs we would like our application to support.
Currently, our application is very simple and only has one page that shows a list of todo’s:
/: show list of todo’s
which would show the list of todo’s as the homepage of our application.
However, when a user bookmarks / in their browser to consult their list of todo’s and we change the contents of our homepage (which we will do in part 5 of this series), their bookmark would no longer show their list of todo’s.
So let’s give our todo list its own URL and redirect our homepage to it:
/: redirect to /todos
/todos: show list of todo’s
This provides us with two benefits:
when users bookmark the todos page, their browser will bookmark /todos instead of /, which will keep working as expected, even if we change the home page contents
we can now easily change our homepage by redirecting it to any URL we like, which is convenient if you need to change your homepage contents regularly
The official Angular style guide recommends storing the routing configuration for an Angular module in a file with a filename ending in -routing.module.ts that exports a separate Angular module with a name ending in RoutingModule.
Our current module is called AppModule, so we create a file src/app/app-routing.module.ts and export our routing configuration as an Angular module called AppRoutingModule:
Continue reading %An Introduction to Component Routing with Angular Router%


Leave a Reply
Want to join the discussion?Feel free to contribute!