Creating Tiny Desktop Apps With Tauri And Vue.js

Original Source: https://www.smashingmagazine.com/2020/07/tiny-desktop-apps-tauri-vuejs/

Creating Tiny Desktop Apps With Tauri And Vue.js

Creating Tiny Desktop Apps With Tauri And Vue.js

Kelvin Omereshone

2020-07-08T11:00:00+00:00
2020-07-09T18:33:48+00:00

Technology makes our lives better, not just users, but also creators (developers and designers). In this article, I’ll introduce you to Tauri. This article will be useful to you if:

you have been building applications on the web with HTML, CSS, and JavaScript, and you want to use the same technologies to create apps targeted at Windows, macOS, or Linux platforms;
you are already building cross-platform desktop apps with technologies like Electron, and you want to check out alternatives;
you want to build apps with web technologies for Linux distributions, such as PureOS;
you are a Rust enthusiast, and you’d like to apply it to build native cross-platform applications.

We will look at how to build a native cross-platform application from an existing web project. Let’s get to it!

Note: This article assumes you are comfortable with HTML, CSS, JavaScript, and Vue.js.

What Is Tauri?

The official website sums up Tauri well:

Tauri is a polyglot toolchain for building more secure native apps with both tiny and fast binaries. By “polyglot”, I mean that Tauri uses multiple programming languages. At the moment, Rust, JavaScript, and TypeScript are used. But there are plans to let you use Go, C++, Python, and more.
It lets you use any HTML and JavaScript-based front-end framework, such as Vue.js, React, or Angular, to build a native desktop app, and it can be integrated into any pipeline.
It helps you build and bundle binaries for major desktop platforms (mobile and WebAssembly coming soon).

So, basically, Tauri allows you to use web technologies to create tiny and secure native desktop apps.

On its GitHub page, Tauri is described as a framework-agnostic toolchain for building highly secure native apps that have tiny binaries (i.e. file size) and that are very fast (i.e. minimal RAM usage).

Why Not Electron?

A popular tool for using web technologies to build desktop applications is Electron.

However, Electron apps have a rather large bundle size, and they tend to take up a lot of memory when running. Here is how Tauri compares to Electron:

Bundle
The size of a Tauri app can be less than 600 KB.
Memory
The footprint of a Tauri app is less than half the size of an Electron app.
Licence
Relicensing is possible with Tauri, but not with Electron. Electron ships with Chromium right out of the box. However, Chromium includes a digital rights-management system named Widevine. The inclusion of Widevine in Chromium makes apps created with Electron frowned upon by users of platforms such as PureOS for the sole reason that it is not free/libre open-source software (FLOSS). Platforms like PureOS are verified by the Free Software Foundation (FSF). This means that they can only publish free and open-source software in their app stores.

In a nutshell, if your app is built with Electron, it will never be shipped officially in the PureOS store. This should be a concern for developers targeting such distributions.

More Features Of Tauri

Security is really important to the Tauri team. Apps created with Tauri are meant to be secure from the get-go.
Tauri is compatible with any front-end framework, so you don’t have to change your stack.
It has many design patterns to help you choose important features with simple configurations.

Pros Of Tauri

Tauri enables you to take the code base you’ve built for the web and turn it into a native desktop app, without changing a thing.
Although you could use Rust in a Tauri-based project, it is completely optional. If you did, you wouldn’t need to change anything in your original code base targeted for the web.

Real-World Tauri

If you have been part of the Vue.js community for a while, then you’ll have heard of Guillaume Chau, a member of the core team of Vue.js. He is responsible for the Vue.js command-line interface (CLI), as well as other awesome Vue.js libraries. He recently created guijs, which stands for “graphical user interface for JavaScript projects”. It is a Tauri-powered native desktop app to visually manage your JavaScript projects.

Guijs is an example of what is possible with Tauri, and the fact that a core member of the Vue.js team works on the app tells us that Tauri plays nicely with Vue.js (amongst other front-end frameworks). Check out the guijs repository on GitHub if you are interested. And, yes, it is open-source.

How Tauri Works

At a high level, Tauri uses Node.js to scaffold an HTML, CSS, and JavaScript rendering window as a user interface (UI), managed and bootstrapped by Rust. The product is a monolithic binary that can be distributed as common file types for Linux (deb/appimage), macOS (app/dmg), and Windows (exe/msi).

How Tauri Apps Are Made

A Tauri app is created via the following steps:

First, make an interface in your GUI framework, and prepare the HTML, CSS, and JavaScript for consumption.
The Tauri Node.js CLI takes it and rigs the Rust runner according to your configuration.
In development mode, it creates a WebView window, with debugging and Hot Module Reloading.
In build mode, it rigs the bundler and creates a final application according to your settings.

Setting Up Your Environment

Now that you know what Tauri is and how it works, let me walk you through setting up your machine for development with Tauri.

Note: The setup here is for Linux machines, but guides for macOS and for Windows are also available.

Linux Setup

The polyglot nature of Tauri means that it requires a number of tool dependencies. Let’s kick it off by installing some of the dependencies. Run the following:

$ sudo apt update && sudo apt install libwebkit2gtk-4.0-dev build-essential curl libssl-dev appmenu-gtk3-module

Once the above is successful, proceed to install Node.js (if you don’t already have it), because Tauri requires its runtime. You can do so by running this:

curl -o- https://raw.githubusercontent.com/nvm-sh/nvm/v0.35.2/install.sh | bash

This will install nvm (Node.js version manager), which allows you to easily manage the Node.js runtime and easily switch between versions of Node.js. After it is installed, run this to see a list of Node.js versions:

nvm ls-remote

At the time of writing, the most recent version is 14.1.0. Install it like so:

nvm install v14.1.0

Once Node.js is fully set up, you would need to install the Rust compiler and the Rust package manager: Cargo. The command below would install both:

$ curl –proto ‘=https’ –tlsv1.2 -sSf https://sh.rustup.rs | sh

After running this command, make sure that Cargo and Rust are in your $PATH by running the following:

rust –version

If everything has gone well, this should return a version number.

According to the Tauri documentation, make sure you are on the latest version by running the following command:

$ rustup update stable

Voilà! You are one step closer to getting your machine 100% ready for Tauri. All that’s left now is to install the tauri-bundler crate. It’s best to quit your CLI, and run the command below in a new CLI window:

$ cargo install tauri-bundler –force

Eureka! If everything went all right, your machine is now ready for Tauri. Next up, we will get started integrating Tauri with Vue.js. Let’s get to it!

Yarn

The Tauri team recommends installing the Yarn package manager. So let’s install it this way:

npm install -g yarn

Then run the following:

yarn –version

If everything worked, a version number should have been returned.

Integrating Tauri With Vue.js

Now that we have Tauri installed, let’s bundle an existing web project. You can find the live demo of the project on Netlify. Go ahead and fork the repository, which will serve as a shell. After forking it, make sure to clone the fork by running this:

git clone https://github.com/[yourUserName]/nota-web

After cloning the project, run the following to install the dependencies:

yarn

Then, run this:

yarn serve

Your application should be running on localhost:8080. Kill the running server, and let’s install the Vue.js CLI plugin for Tauri.

vue-cli-plugin-tauri

The Tauri team created a Vue.js CLI plugin that quickly rigs and turns your Vue.js single-page application (SPA) into a tiny cross-platform desktop app that is both fast and secure. Let’s install that plugin:

vue add tauri

After the plugin is installed, which might take a while, it will ask you for a window title. Just type in nota and press “Enter”.

Let’s examine the changes introduced by the Tauri plugin.

package.json

The Tauri plugin added two scripts in the scripts section of our package.json file. They are:

“tauri:build”: “vue-cli-service tauri:build”,
“tauri:serve”: “vue-cli-service tauri:serve”

The tauri:serve script should be used during development. So let’s run it:

yarn tauri:serve

The above would download the Rust crates needed to start our app. After that, it will launch our app in development mode, where it will create a WebView window, with debugging and Hot Module Reloading!

src-tauri

You will also notice that the plugin added a src-tauri directory to the root of your app directory. Inside this directory are files and folders used by Tauri to configure your desktop app. Let’s check out the contents:

icons/
src/
build.rs
cmd.rs
main.rs
Cargo.lock
Cargo.toml
rustfmt.toml
tauri.conf.json
tauri.js

The only change we would need to make is in src-tauri/Cargo.toml. Cargo.toml is like the package.json file for Rust. Find the line below in Cargo.toml:

name = “app”

Change it to this:

name = “nota”

That’s all we need to change for this example!

Bundling

To bundle nota for your current platform, simply run this:

yarn tauri:build

Note: As with the development window, the first time you run this, it will take some time to collect the Rust crates and build everything. On subsequent runs, it will only need to rebuild the Tauri crates themselves.

When the above is completed, you should have a binary of nota for your current OS. For me, I have a .deb binary created in the src-tauri/target/release/bundle/deb/ directory.*

Going Cross-Platform

You probably noticed that the yarn tauri:build command just generated a binary for your operating system. So, let’s generate the binaries for other operating systems. To achieve this, we will set up a workflow on GitHub. We are using GitHub here to serve as a distribution medium for our cross-platform app. So, your users could just download the binaries in the “Release” tab of the project.
The workflow we would implement would automatically build our binaries for us via the power of GitHub actions. Let’s get to it.

Creating The Tauri Workflow

Thanks to Jacob Bolda, we have a workflow to automatically create and release cross-platform apps with Tauri on GitHub. Apart from building the binary for the various platforms (Linux, Mac, and Windows), the action would also upload the binary for you as a release on GitHub. It also uses the Create a Release action made by Jacob to achieve this.

To use this workflow, create a .github directory in the root of nota-web. In this directory, create another directory named workflows. We would then create a workflow file in .github/workflows/, and name it release-tauri-app.yml.

In release-tauri-app.yml, we would add a workflow that builds the binaries for Linux, macOS, and Windows. This workflow would also upload the binaries as a draft release on GitHub. The workflow would be triggered whenever we push to the master.

Open release-tauri-app.yml, and add the snippet below:

name: release-tauri-app

on:
push:
branches:
– master
paths:
– ‘**/package.json’

jobs:
check-build:
runs-on: ubuntu-latest
timeout-minutes: 30

steps:
— uses: actions/checkout@v2
— name: setup node
uses: actions/setup-node@v1
with:
node-version: 12
— name: install rust stable
uses: actions-rs/toolchain@v1
with:
toolchain: stable
profile: minimal
— name: install webkit2gtk
run: |
sudo apt-get update
sudo apt-get install -y webkit2gtk-4.0
— run: yarn
— name: build nota for tauri app
run: yarn build
— run: cargo install tauri-bundler –force
— name: build tauri app
run: yarn tauri:build

create-release:
needs: check-build
runs-on: ubuntu-latest
outputs:
RELEASE_UPLOAD_URL: ${{ steps.create_tauri_release.outputs.upload_url }}

steps:
— uses: actions/checkout@v2
— name: setup node
uses: actions/setup-node@v1
with:
node-version: 12
— name: get version
run: echo ::set-env name=PACKAGE_VERSION::$(node -p “require(‘./package.json’).version”)
— name: create release
id: create_tauri_release
uses: jbolda/create-release@v1.1.0
env:
GITHUB_TOKEN: ${{ secrets.GITHUB_TOKEN }}
with:
tag_name: ${{ matrix.package.name }}-v${{ env.PACKAGE_VERSION }}
release_name: ‘Release nota app v${{ env.PACKAGE_VERSION }}’
body: ‘See the assets to download this version and install.’
draft: true
prerelease: false

create-and-upload-assets:
needs: create-release
runs-on: ${{ matrix.platform }}
timeout-minutes: 30

strategy:
fail-fast: false
matrix:
platform: [ubuntu-latest, macos-latest, windows-latest]
include:
— platform: ubuntu-latest
buildFolder: bundle/deb
ext: _0.1.0_amd64.deb
compressed: ”
— platform: macos-latest
buildFolder: bundle/osx
ext: .app
compressed: .tgz
— platform: windows-latest
buildFolder: ”
ext: .x64.msi
compressed: ”

steps:
— uses: actions/checkout@v2
— name: setup node
uses: actions/setup-node@v1
with:
node-version: 12
— name: install rust stable
uses: actions-rs/toolchain@v1
with:
toolchain: stable
profile: minimal
— name: install webkit2gtk (ubuntu only)
if: matrix.platform == ‘ubuntu-latest’
run: |
sudo apt-get update
sudo apt-get install -y webkit2gtk-4.0
— run: yarn
— name: build nota for tauri app
run: yarn build
— run: cargo install tauri-bundler –force
— name: build tauri app
run: yarn tauri:build
— name: compress (macos only)
if: matrix.platform == ‘macos-latest’
working-directory: ${{ format(‘./src-tauri/target/release/{0}’, matrix.buildFolder ) }}
run: tar -czf ${{ format(‘nota{0}{1}’, matrix.ext, matrix.compressed ) }} ${{ format(‘nota{0}’, matrix.ext ) }}
— name: upload release asset
id: upload-release-asset
uses: actions/upload-release-asset@v1.0.2
env:
GITHUB_TOKEN: ${{ secrets.GITHUB_TOKEN }}
with:
upload_url: ${{ needs.create-release.outputs.RELEASE_UPLOAD_URL }}
asset_path: ${{ format(‘./src-tauri/target/release/{0}/nota{1}{2}’, matrix.buildFolder, matrix.ext, matrix.compressed ) }}
asset_name: ${{ format(‘nota{0}{1}’, matrix.ext, matrix.compressed ) }}
asset_content_type: application/zip
— name: build tauri app in debug mode
run: yarn tauri:build –debug
— name: compress (macos only)
if: matrix.platform == ‘macos-latest’
working-directory: ${{ format(‘./src-tauri/target/debug/{0}’, matrix.buildFolder ) }}
run: tar -czf ${{ format(‘nota{0}{1}’, matrix.ext, matrix.compressed ) }} ${{ format(‘nota{0}’, matrix.ext ) }}
— name: upload release asset with debug mode on
id: upload-release-asset-debug-mode
uses: actions/upload-release-asset@v1.0.2
env:
GITHUB_TOKEN: ${{ secrets.GITHUB_TOKEN }}
with:
upload_url: ${{ needs.create-release.outputs.RELEASE_UPLOAD_URL }}
asset_path: ${{ format(‘./src-tauri/target/debug/{0}/nota{1}{2}’, matrix.buildFolder, matrix.ext, matrix.compressed ) }}
asset_name: ${{ format(‘nota-debug{0}{1}’, matrix.ext, matrix.compressed ) }}
asset_content_type: application/zip

To test the workflow, commit and push your changes to your fork’s master branch. After successfully pushing to GitHub, you can then click on the “Actions” tab in GitHub, then click on the “Check build” link to see the progress of the workflow.

Upon successful execution of the action, you can see the draft release in “Releases” on the repository page on GitHub. You can then go on to publish your release!

Conclusion

This article has introduced a polyglot toolchain for building secure, cross-platform, and tiny native applications. We’ve seen what Tauri is and how to incorporate it with Vue.js. Lastly, we bundled our first Tauri app by running yarn tauri:build, and we also used a GitHub action to create binaries for Linux, macOS, and Windows.

Let me know what you think of Tauri — I’d be excited to see what you build with it. You can join the Discord server if you have any questions.

The repository for this article is on GitHub. Also, see the binaries generated by the GitHub workflow.

Smashing Editorial
(ra, il, al)

Removing Panic From E-Commerce Shipping And Inventory Alerts

Original Source: https://www.smashingmagazine.com/2020/07/ecommerce-shipping-inventory-alerts/

Removing Panic From E-Commerce Shipping And Inventory Alerts

Removing Panic From E-Commerce Shipping And Inventory Alerts

Suzanne Scacca

2020-07-09T11:00:00+00:00
2020-07-09T16:34:18+00:00

When it comes to displaying shipping and inventory alerts on an e-commerce website, you have to be very careful about inciting panic in your shoppers.

“Item is out of stock.”

“Expect shipping delays.”

“Page does not exist.”

These words alone are enough to turn a pleasant shopping experience into a panicked and frustrating one.

You have to be very careful about how you design these notices on your site, too. You obviously want to inform visitors of changes that impact their shopping experience, but you don’t want panic to be the resulting emotion when your alert is seen.

Better Search UX

For large-scale and e-commerce sites, the search experience is an increasingly critical tool. You can vastly improve the experience for users with thoughtful microcopy and the right contextualization. Read a related article →

When people panic, the natural response is to find a way to regain some control over the situation. The problem is, that regained control usually comes at the expense of the business’s profits, trust, and customer loyalty.

Unfortunately, some of the design choices we make in terms of alerts can cause undue panic.

If you want to better control your shoppers’ responses and keep them on the path to conversion, keep reading.

Note: Because the following post was written during the coronavirus pandemic, many of the alerts you’re going to see are related to it. However, that doesn’t mean these tips aren’t valid for other panic-inducing situations — like when a storm destroys an area and it’s impossible to order anything in-store or online or like during the November shopping frenzy when out-of-stock inventory is commonplace.

1. Avoid Out-Of-Stock Notices When Possible

Colleen Kirk is a professor of marketing at the New York Institute of Technology and an expert on territorial shopping.

She has a great analogy to help us understand why this happens:

Have you ever felt as if another driver stole your parking spot or were upset when someone else nabbed the last sweater that you had your eye on? If so, you experienced psychological ownership. You can feel psychological ownership over pretty much anything that doesn’t belong to you, from the last chocolate truffle in a display case to the dream home you found on Zillow and even intangible things like ideas.

When it comes to shopping in person, people exhibit territorial shopping traits by placing their items in a shopping cart. Or when they put a separator bar between their items on a conveyor belt and the person’s behind them.

We don’t really have that luxury on a website. The best we can do is enable shoppers to save their items to their cart or a wishlist, but that doesn’t keep the items from selling out before they have a chance to buy them.

This can lead to huge problems, especially when a shopper has gotten excited about that toy or shirt they “put aside”, only to discover a few hours later that the item is gone or no longer available.

The worst thing you could do is to remove out-of-stock product pages. You don’t want shoppers running into a 404 page and experiencing not just panic but also confusion and frustration.

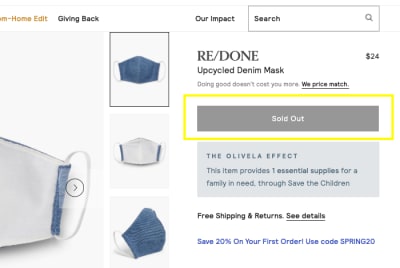
While not as bad, I’d also recommend against displaying an inactive “Sold Out” or “Out of Stock” notice or button to shoppers as Olivela has done here:

Olivela 'sold out' notice and inactive button for upcycled denim mask

The Olivela website displays an inactive ‘Sold Out’ button for its denim mask product. (Source: Olivela) (Large preview)

Seeing this kind of feels like Google Maps directing you to your destination, only for you to end up at the edge of a lake where there’s supposed to be a road.

“Why the heck did you even send me here?”, is what your shoppers are going to wonder. And then they’re going to have to turn around and try to find something comparable to buy instead.

There are better ways to handle this that will also reduce the chances of your shoppers panic-buying a second-rate substitute for the item they really wanted. And this plays into the idea of territorial shopping (but in a healthy way).

This is what Target does when an item is “temporarily out of stock”:

Target out of stock product - 'Notify me when it’s back' button

Target provides shoppers with the option to get notified when out-of-stock items become available. (Source: Target) (Large preview)

Rather than display an unclickable button and just completely shut down shoppers’ hopes of getting the item, a “Notify me when it’s back” button is presented. This is a more positive approach to handling out-of-stock inventory and, if customers really want the item, they’re more likely to use it rather than settle for something else or try another site altogether. (I’ll talk about the “Pick it up” option down below.)

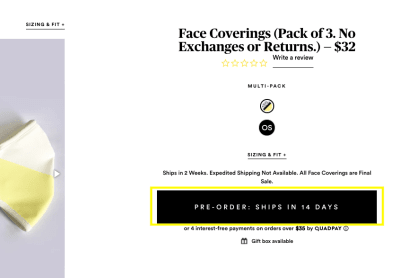
Another way you can handle this is to do what Summersalt does and turn your “Sold Out” button into a “Pre-order” one:

Summersalt 'Pre-order' button for out-of-stock items

Summersalt provides shoppers with ‘Pre-order’ button for out-of-stock items. (Source: Summersalt) (Large preview)

What’s nice about this button is that it not only empowers shoppers to secure the currently unavailable item they have their eyes on, but it tells them exactly when they will get it.

So, if you know when inventory will be restored, this is a better option than the “Notify” button as there’s more transparency about availability.

2. Don’t Over-Promise Or Give Your Shoppers False Hope

It’s a good idea to keep your shoppers informed about how external situations may impact their online shopping experience. And you can use key areas like the website’s sticky banner or a promotional banner on the homepage to do that.

That said, be very careful what you promote.

Special notices aren’t the kinds of things that get ignored the way that cookie consent notices or lead generation pop-ups do.

Consumers know to look at these areas for things like promo codes and sales event details.

If you put anything else in there, you better make sure the notice is positive, useful and truthful.

Let’s take a look at what’s going on with the Gap website:

Gap’s 'Taking Care Takes Time' banner notice on website

Gap’s ‘Taking Care Takes Time’ notice addresses shipping delays due to COVID-19. (Source: Gap) (Large preview)

Gap has three notices that appear in the header of its site:

In black: “Free shipping on $25+, free returns on all orders.”
In white: “Taking Care Takes Time. We’ve implemented special procedures as we work to keep our teams — and you — safe, so shipping of orders may be delayed.”
In blue: “Extra 50% off markdowns + more.”

It’s overwhelming. And it’s almost as if they wanted the alert in the middle to be ignored (or missed altogether) as it’s sandwiched between two very sharp-looking banners that promote attractive deals.

If your alert is related to something that’s going to affect the shoppers’ experience, don’t bury it and don’t try to massage it with overly optimistic messaging. Also, don’t contradict it with another alert that suggests the first one isn’t one to worry about.

Here’s why I say that:

Gap promotion for 'Our Masks are Back' during COVID-19

Gap promotes ‘Our Masks are Back’ on the homepage of its website. (Source: Gap) (Large preview)

This message is problematic for a couple of reasons. For one, Gap’s masks aren’t really “back” if they’re only available for pre-order. Second, it runs contrary to the top banner’s message about shipping delays.

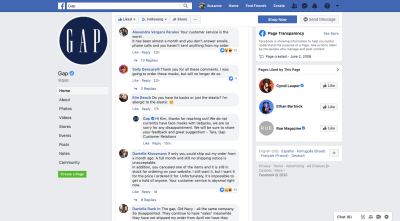
Unsurprisingly, shoppers did not react well to this hyped-up announcement:

Gap backlash on Facebook during COVID-19

Gap receives an extraordinary amount of backlash on Facebook over mismanagement of shipping and promotions. (Source: Gap) (Large preview)

When Facebook ran a promotion on Facebook about the masks, it received a huge amount of backlash from customers. Many customers didn’t want to hear about the masks because they’d been waiting over a month for existing orders to ship and couldn’t get a customer service rep to talk to them. There were also complaints about items being canceled from their orders, only for them to magically become “available” again in the store.

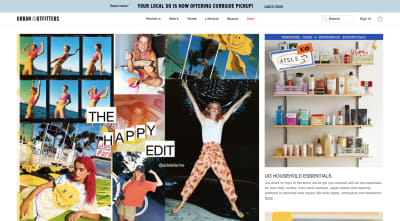
A website that’s handling similar circumstances well right now is Urban Outfitters:

Urban Outfitters curbside pickup - sticky notice on website

Urban Outfitters is focusing on the positive of a bad situation. (Source: Urban Outfitters) (Large preview)

Urban Outfitters, like a lot of non-essential retailers right now, has had to make some adjustments in order to stay alive. But rather than displaying a notice alerting online shoppers to shipping delays like many of its counterparts, Urban Outfitters has turned it into a positive.

The banner reads: “Your local UO is now offering curbside pickup!”

There’s no hidden message here that tries to explain away the brand’s bad behavior. There’s no greedy cash-grab, promising deep discounts for people who shop with them despite likely delays in shipping. There’s no overhyping of a promise they can’t possibly keep.

This is an actionable offer.

What I’d suggest for e-commerce businesses that want to keep customers on their side — even during a tumultuous time — is to keep their alerts simple, honest and useful. And if you’re going to promote multiple ones, make sure they tell the same story.

3. Soften The Blow By Promoting Multichannel Options

I recently signed a new lease on an apartment but was dismayed to discover that my move-in date and furniture delivery date wouldn’t line up because of shipping delays. I was well-aware of this when I made the purchase, but I wasn’t as prepared as I wanted to be. And because we were in the middle of a city-wide lockdown, I was unable to crash with friends who live over the state border.

I thought, “I’ll sleep on an air mattress. No biggie.” But then remembered I left mine behind in Delaware. So, I had to figure out a way to buy a cheap air mattress.

All of my go-to e-commerce websites had shipping delay alerts. And as I perused their available products (which there were very few), my panic only worsened. Until I discovered a website that offered BOPIS.

Buy-online-pickup-in-store is a shopping trend that’s proven very popular with consumers. According to data from Doddle and a report from Business Insider:

68% of U.S. shoppers have used BOPIS on numerous occasions.
50% have chosen where to shop based on BOPIS availability.
Shipping costs (avoiding them), speed and convenience are the primary reasons why customers prefer to buy online and shop in-store. It’s the best of both worlds.

If you’re building an e-commerce site for a company with retail locations that do this, then make sure you get customers thinking about it right away.

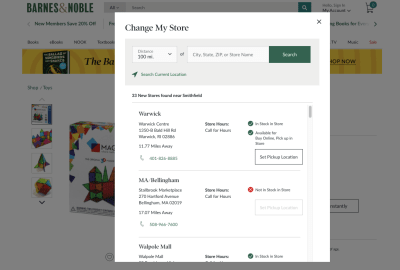
Barnes and Noble, for instance, enables shoppers to set their preferred local store:

Barnes & Noble 'Change My Store' - location selection

Barnes & Noble allows shoppers to set their preferred retail store location. (Source: Barnes and Noble) (Large preview)

This is a great feature to have. The only thing I’d do differently is to place a button in the header of the site that immediately takes them to the “Change My Store” or “Find Store” pop-up or page. That way, shoppers don’t have to wait until they’ve found a product they like to discover whether or not it’s available at their store for pickup.

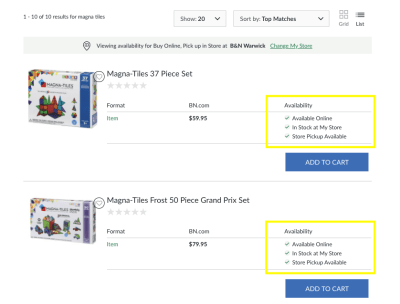
Once a user has set their store location, though, Barnes & Noble remembers it and uses it to enhance the remainder of the shopping experience:

Barnes & Noble search listings with online and in-store availability info

Barnes & Noble uses shopper location information to enhance search listings. (Source: Barnes and Noble) (Large preview)

This is what search listings look like for “Magna Tiles” on the Barnes & Noble site when the user sets their search to “List” view. Pretty neat, right? While “Grid” view is standard, only showing the featured image, product name and price, this view provides extra detail about availability.

This can provide a ton of relief for shoppers who too-often encounter “out-of-stock” or “not available in store” notices on individual product pages. This way, they can spend their time looking at the items they can get the most quickly and conveniently. There are no surprises.

If cross-channel options are available — between website and mobile app, website and retail store, website and third-party delivery service — make sure you call attention to them early on so customers can take advantage of the streamlined shopping experience.

Wrapping Up

Panicked shopping can lead to serious issues for your e-commerce site. Rather than put your shoppers in a situation where they grow impatient, dissatisfied, and frustrated by the site that seems to put up barriers at every turn, design your alerts so that they turn a bad experience into a positive one.

Smashing Editorial
(ra, yk, il)

Picture perfect photography: Discover Luminar’s Erase and Clone & Stamp tools

Original Source: http://feedproxy.google.com/~r/CreativeBloq/~3/2UnKduPcHrI/luminar-erase-clone-stamp-tool

You’re just about to capture the perfect picture when, out of nowhere, someone walks into the shot. Or you’ve nailed the perfect landscape scene, only to notice an ugly road sign in the way. We’ve all experienced the annoyance and frustration of an otherwise perfect picture being spoilt by unwanted objects in the background. Good news is there’s now a quick and even simpler way to remove them. 

Introducing Luminar 4’s Clone & Stamp and Erase tools. 

The Clone & Stamp tool works in the same way as a regular clone tool, and is particularly effective on repeating patterns, fine details and man-made objects. Getting the tones and colours to match when using a clone tool is a well-known challenge, but this is where Luminar 4’s secret weapon – the Erase tool – excels. 

The Erase tool removes objects intelligently, taking textures, patterns and tones from the surrounding image to cover up the object you want to remove automatically. The majority of the time, results are immediate and spot-on. However, a trickier subject will often require some fine tweaking. Let’s take a look at exactly how both of these tools work…

5 simple steps to remove objects from a photo

Skylum Luminar 4

01. Prep your image

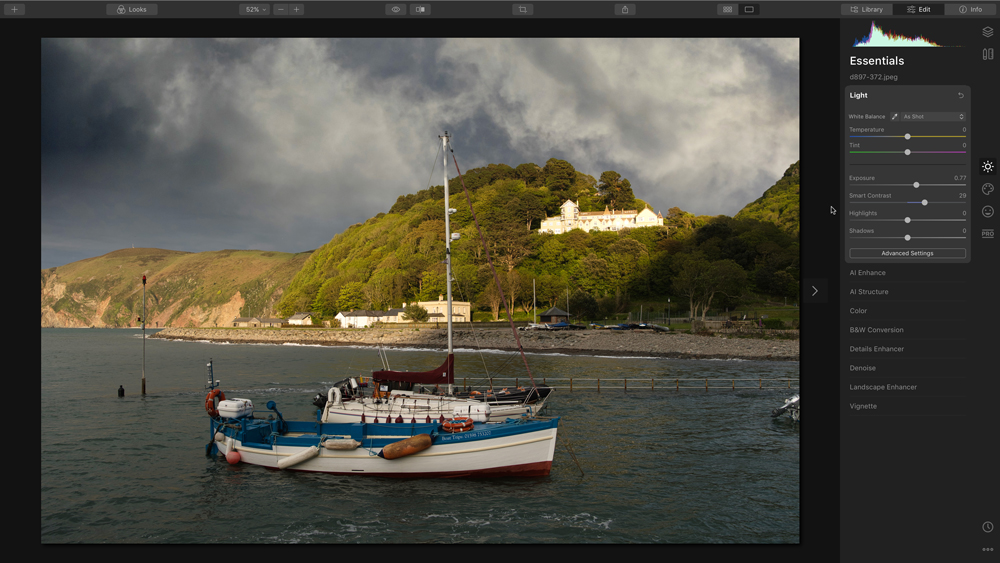
Luminar’s Erase tool creates a composite layer from all the already existing image layers, so it’s important to make any exposure adjustments beforehand. Any tweaks or changes made after the Erase tool has been applied won’t show up. 

Skylum Luminar 4

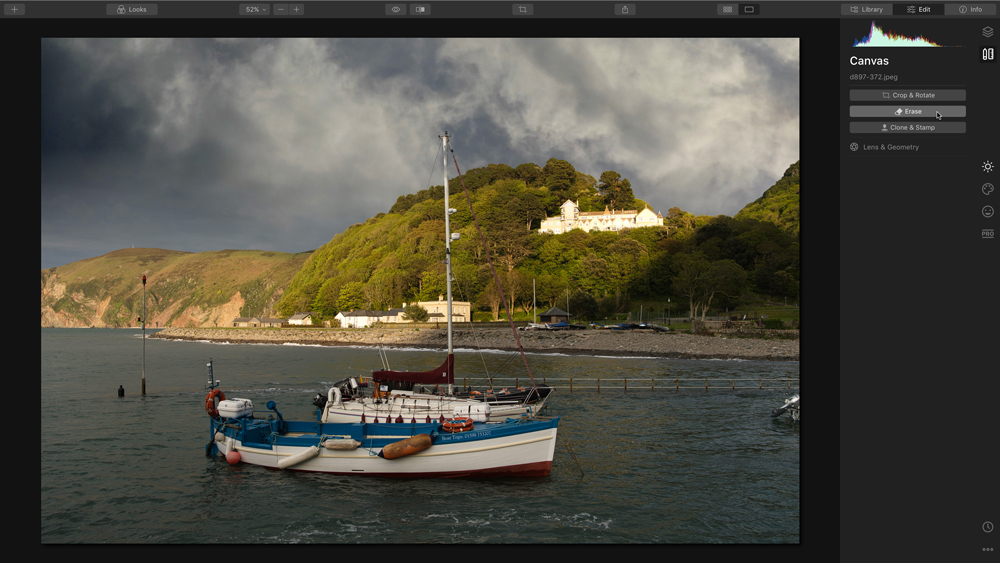
02. Select the Erase tool

In the main Luminar interface, select the Canvas workspace via the button towards the top-right corner. Here you’ll find all manner of useful tools, including Clone & Stamp and Crop & Rotate and, the one you’re looking for, the Erase tool. Select it, and a new layer will be created.

Skylum Luminar 4

03. Erase an object

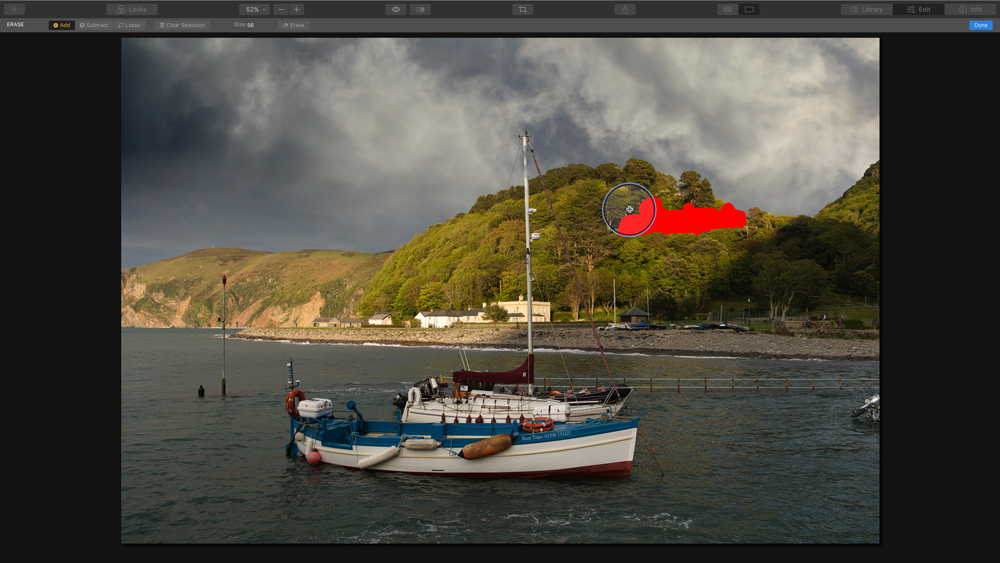
Once selected, you will see the Erase tool consists of a circular brush, with an adjustable slider to choose its size. Using the brush, simply paint over the object you want to remove. Don’t worry too much about being exact, but try to avoid the background as much as possible. 

Skylum Luminar 4

04. Remove multiple objects

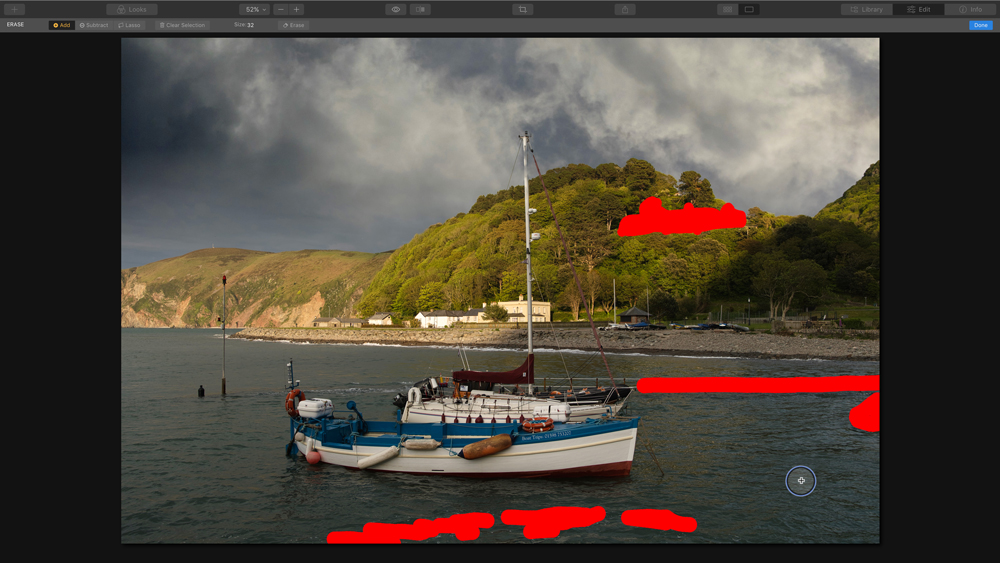
The Erase tool allows you to remove many objects at the same time. Simply release the brush, alter the size to suit and paint over anything you want to get rid of.

Skylum Luminar 4

05. Clean up

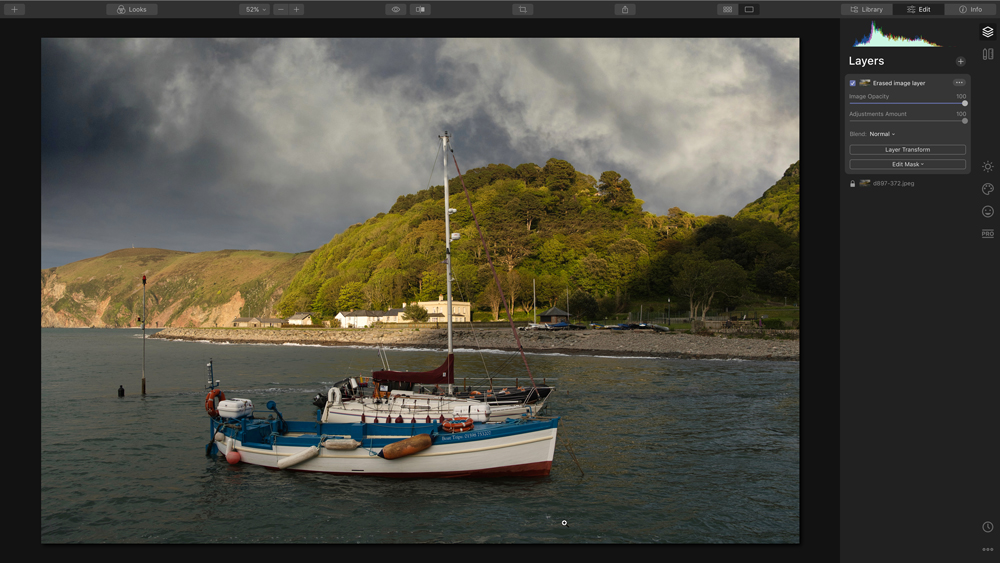
When you have finished painting with the Erase tool and are happy with your selection, click ‘Done’. Use the visibility toggle in the layers panel to see the difference. If the results aren’t right the first time, you can try again on any problem areas, or alternatively use Luminar’s Clone & Stamp tool to make manual repairs…

How to use the Clone & Stamp tool

Skylum Luminar 4

Click top right corner of image to enlarge 

While Luminar’s Erase tool does a fantastic job of removing unwanted objects, more trickier, busy shots might need a bit of fine tuning. This is where the Clone & Stamp tool comes in really handy. Here’s how to make the most of this powerful feature.

01. Create a Clone & Stamp layer

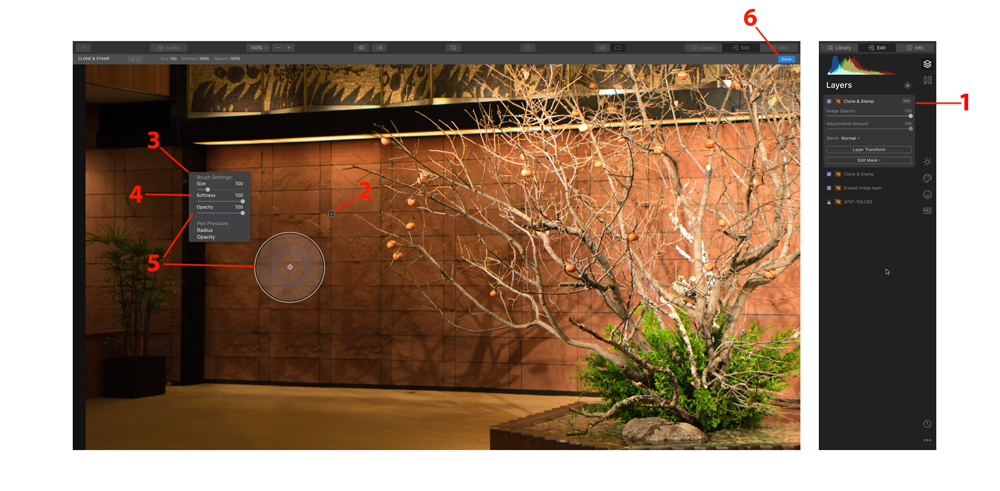
Just like with the Erase tool, selecting the Clone & Stamp feature will create a new composite layer to work on.

02. Clone target area

To start, select the clone source and then paint over the area in need of repair. Press Alt (Option)-click to select a new clone source. 

03. Brush size

The clone brush sizes can be changed to suit using the menu on the top toolbar, or right-click on the image to reveal the brush properties panel. 

04. Brush sensitivity

You can also adjust a brush's soft and hardness options here. A hard brush tends to work well on hard edges, whereas a soft brush is better for blending in areas of softer, shaded areas.

05. Reduce the opacity

For really complex areas, which are proving troublesome, try reducing the opacity and using a larger soft brush to help disguise obvious repairs. 

06. Review

Once finished, click ‘Done’ to generate the Clone & Stamp layer, which you can review or make more repairs on at a later date. 

Get your copy of Skylum Luminar 4 today

Want to give Luminar 4 a go? Right now you can download a free seven-day trial via the Skylum website. Available on both macOS and Windows, should you decide to buy, be sure to use our exclusive discount code CB to save $10/£10 on the regular retail price. 


Eye Vs AI: Harnessing Technology to Successfully Track User Attention

Original Source: https://www.webdesignerdepot.com/2020/07/eye-vs-ai-harnessing-technology-to-successfully-track-user-attention/

Attention is the new gold; brands are in a constant competition for our attention.
A big portion of our time we spend online, where we are bombarded with insane amounts of information and advertisements. It’s hard not to become overwhelmed in this world of consumerism. We have had to become good at quickly evaluating which information is important, especially on the internet.

Good marketing specialists know that they have mere seconds to turn a potential customer into a lead. People are not going to spend a lot of time examining your advertisement or landing page, either it clicks or not. Moreover, most users do not read the articles, they scan them. First impression plays a huge role in the success of your business, so do not leave that to a chance.

You really don’t want your customer to ignore that special sale, subscription option, or another call to action on your webpage. That is why you need to know where that gold-worthy attention goes when a user opens your landing page. Here’s where technology can come in handy.

Eye-Tracking in Web Design

It is very important to know where your website visitor’s attention goes first. How to get that info? Eye-tracking is the answer.

Eye-tracking technology can be used to optimize your website conversions. By tracking eye movements, technology will recognize which content is most intriguing for the users. It will reveal whether people pay most attention where you want them to, which elements are distracting or not visible enough, and where sales are lost. This information is invaluable if you want to succeed in the current market.

This information is invaluable if you want to succeed in the current market

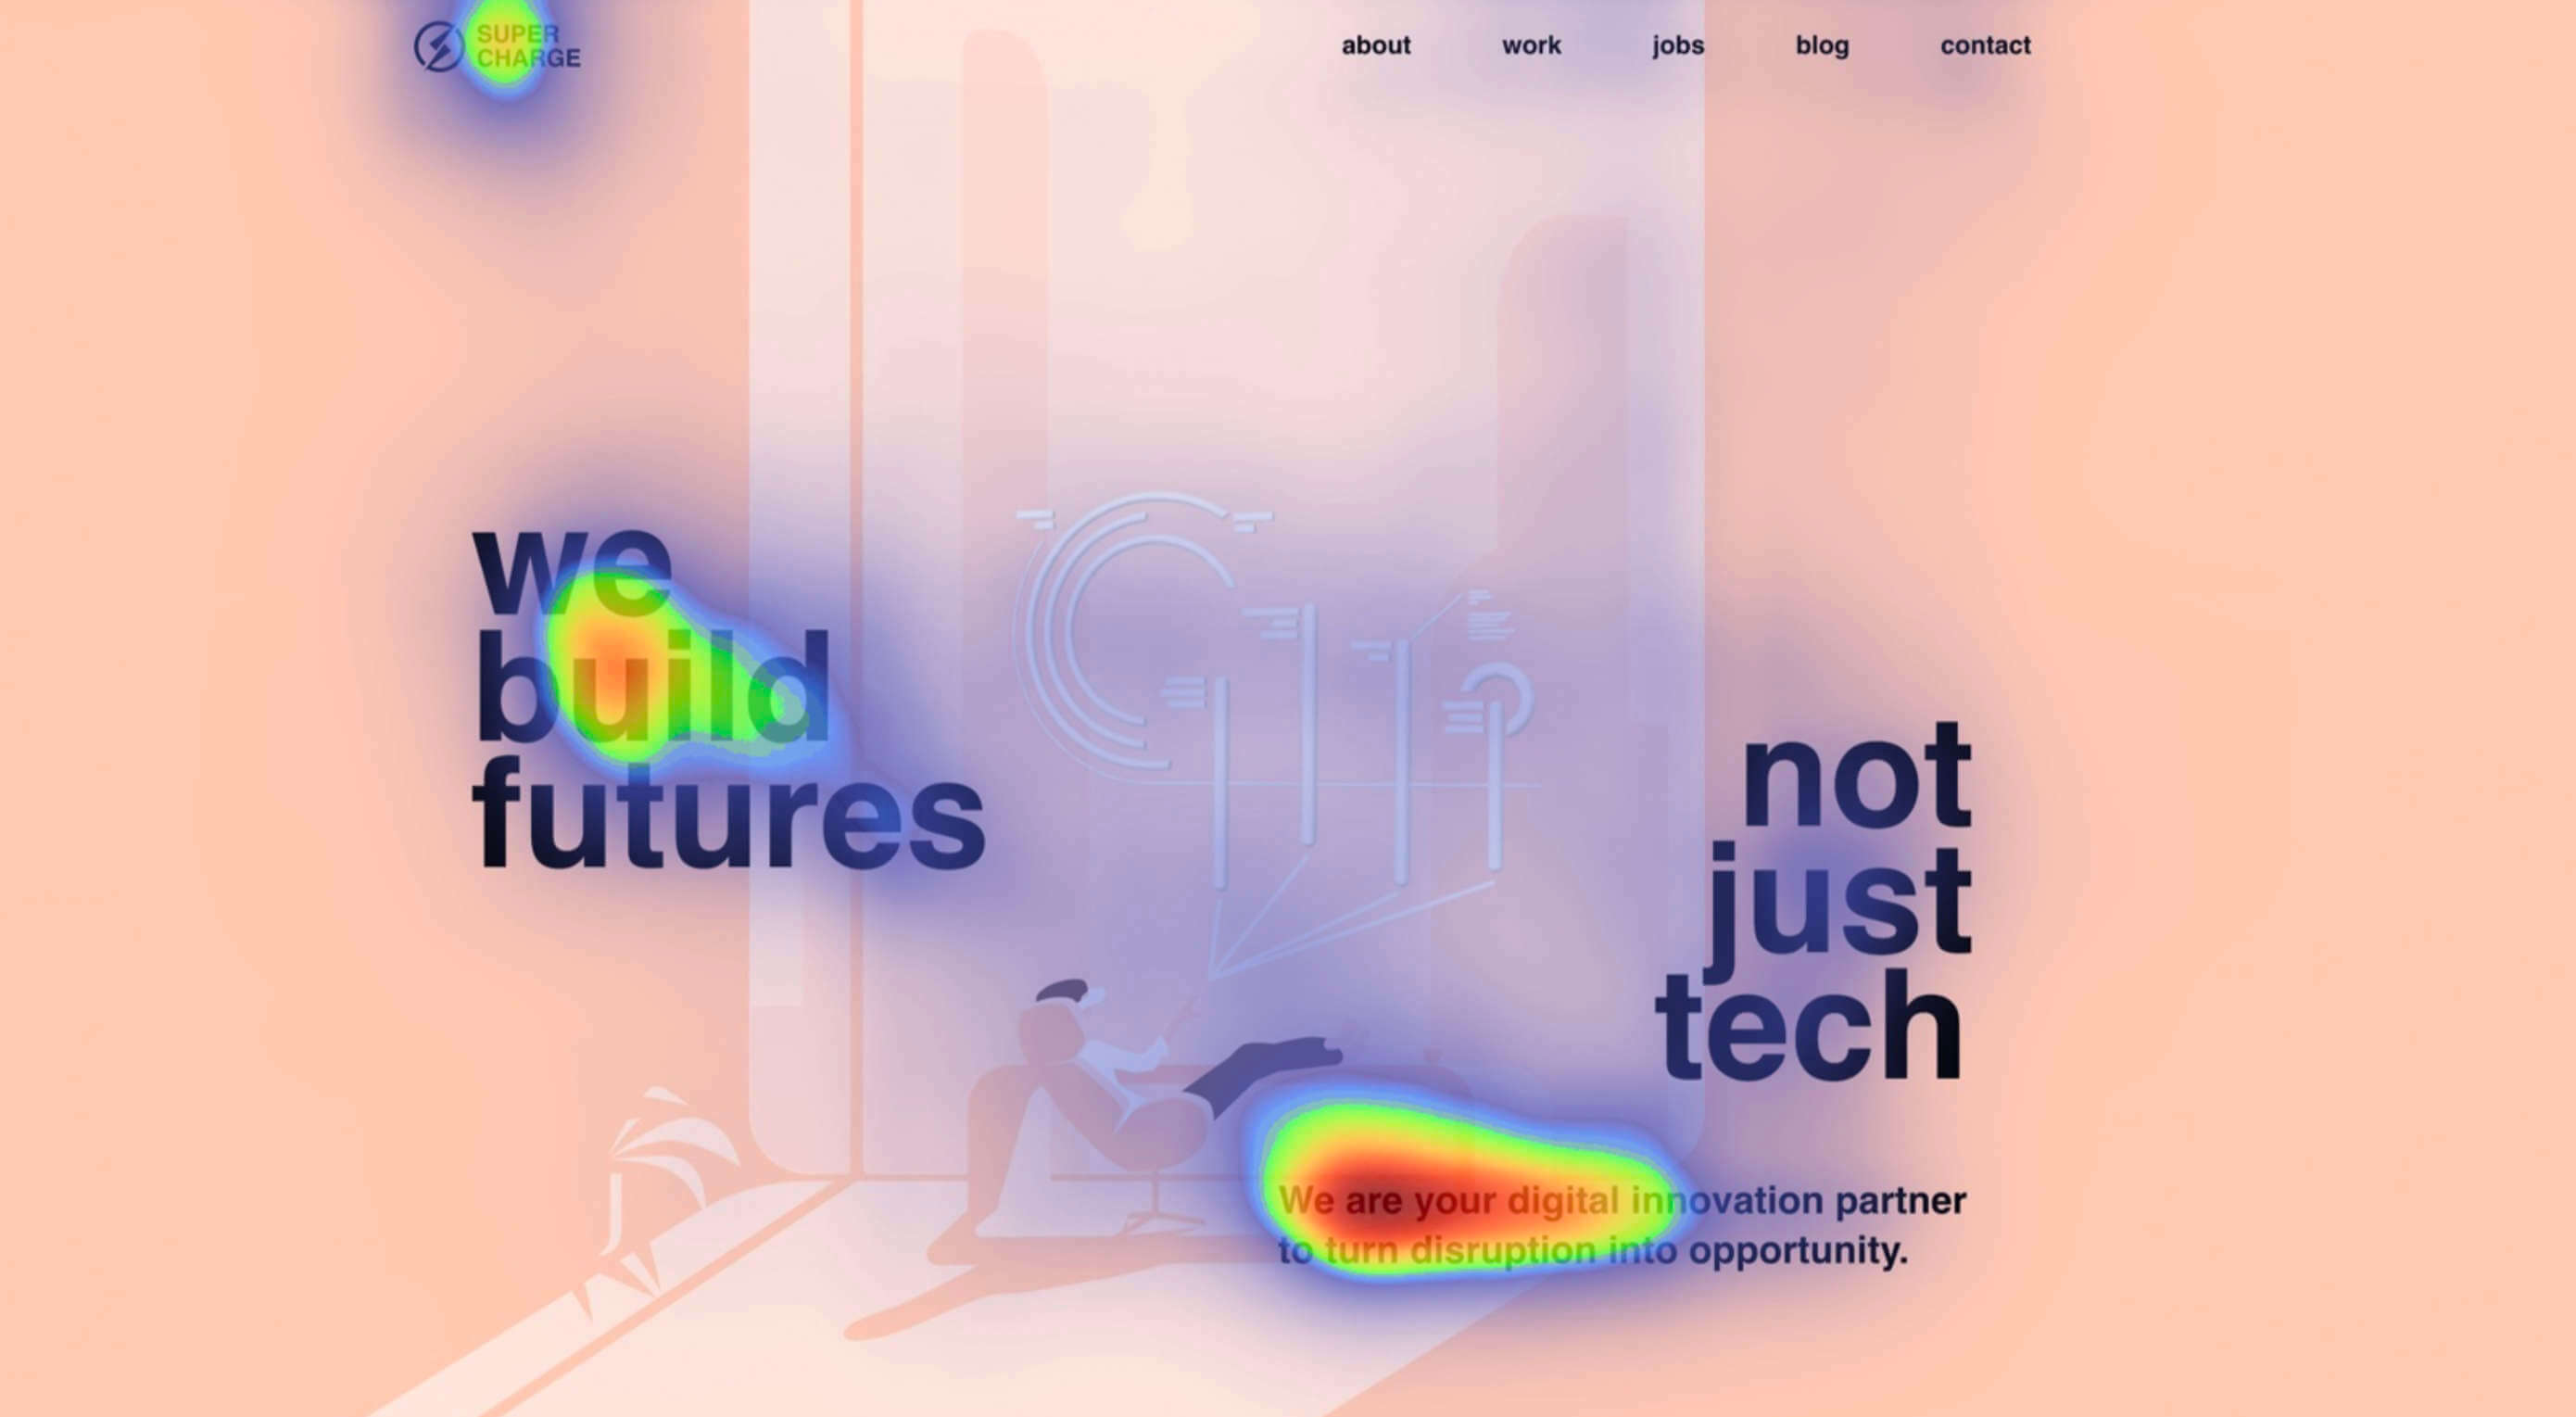
How does it work? An eye tracker, such as webcam or goggles, measures movement of an eye. Collected data is analyzed and presented as a heatmap, highlighting which elements of your design attract most attention. Having in mind that browsing time rarely exceeds a few seconds, this information is very valuable when you try to understand your audience.

You wouldn’t want to spend much time on your website design just to discover it does not generate desired conversion rate. By employing this technology you can make changes based on reliable data rather than intuition and guarantee your business future success.

By now you may think that you definitely need to carry out this eye-tracking study, but there is a catch. A high-quality behavioral observation or eye-tracking is a time-consuming, budget eating complicated process.

If you want to draw conclusions from heatmaps, you would need to include at least 39 participants in a study. One individual test may last from 20 minutes to an hour. Time quickly adds up when you include preparation and analysis of the results. The average eye tracker price is around $17,500 and it may vary between several thousand dollars and $50 000. Of course you can hire a company to carry out this research for you but it may cost you several hundred dollars a month. Luckily, technological innovations allow us to acquire the same insights about users’ attention flow much cheaper and faster than conducting or buying an actual eye-tracking study.

Technological innovations replace real eye-tracking study

AI-Powered Automatization of Eye-Tracking

In this task of understanding how internet users are interacting with your website, Artificial Intelligence (AI) seems to be an answer. AI-based technologies already have become prevalent in various services we use on a daily basis. For example, Netflix’s highly predictive algorithm offers viewers personalized movie recommendations. Medical researchers utilize eye tracking to diagnose conditions like Alzheimer’s disease or Autism. As these algorithms become better every year, AI also becomes an irreplaceable tool in business.

Over the years researchers have collected so much data that human behavior becomes really predictable

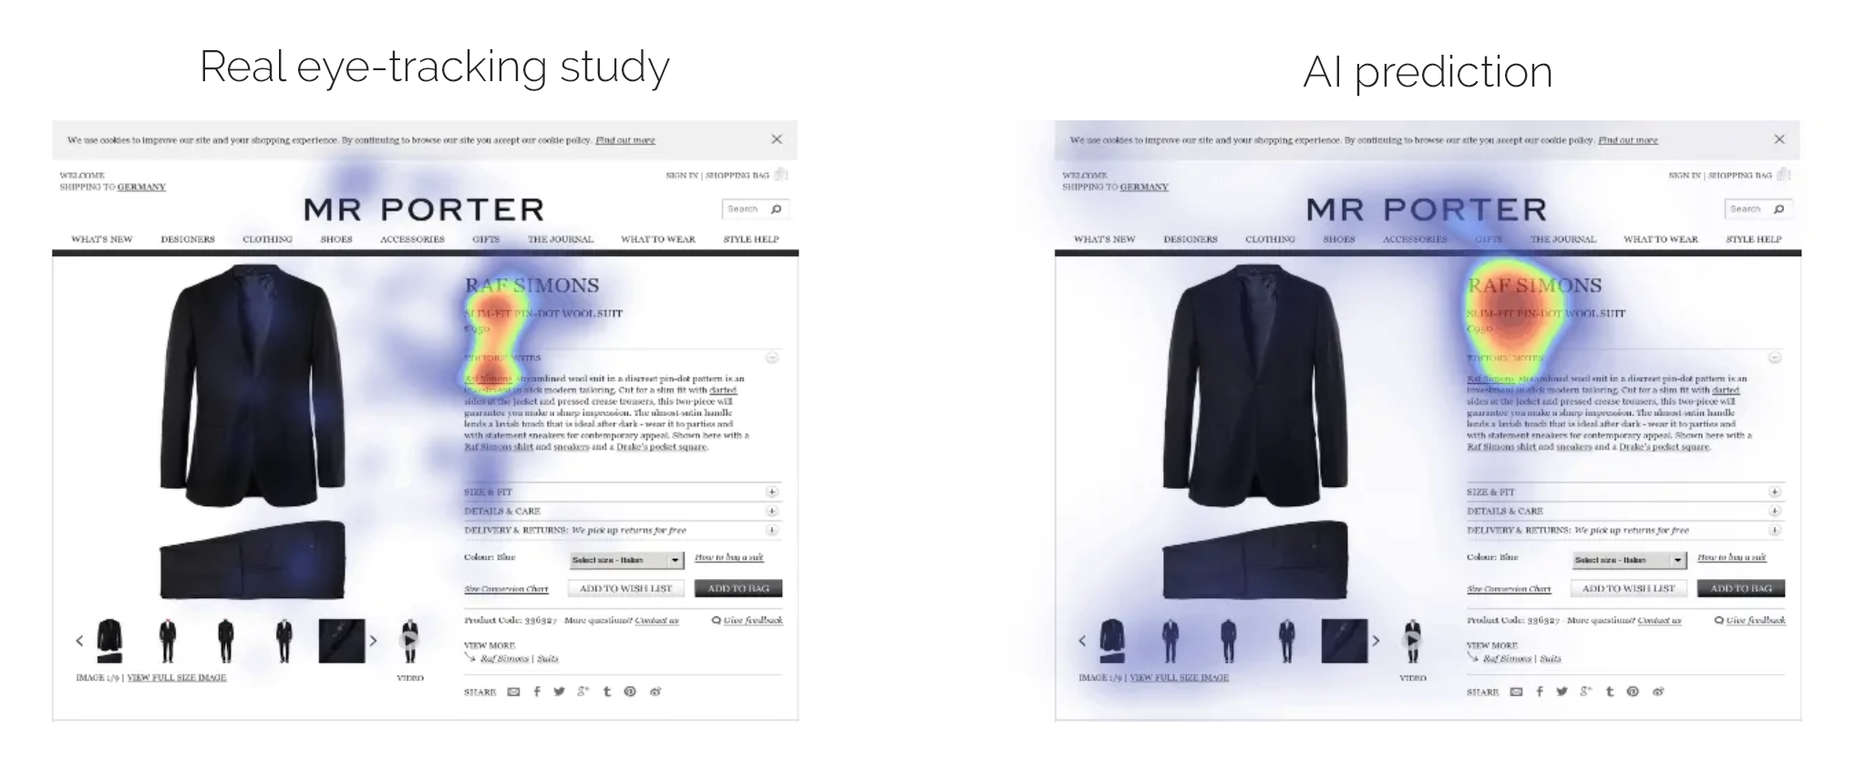
How can AI help you to understand your customer’s attention? The main feature of AI is that it can mimic human intelligence and constantly improve itself by learning from data. Predictive eye-tracking is based on deep learning and trained with previous eye tracking study data. Over the years researchers have collected so much data that human behavior becomes really predictable. Technology predicts which specific areas of your website attract most interest. In this way, AI enables you to speed up the UX research process and get insights about your design in a matter of seconds.

Too good to be true? There are already several available tools on the market, such as Attention Insight or EyeQuant. These predictive design tools are based on deep learning and trained with previous eye-tracking studies data. Up to date, they have achieved an 84-90% accuracy.

AI-powered attention heatmap

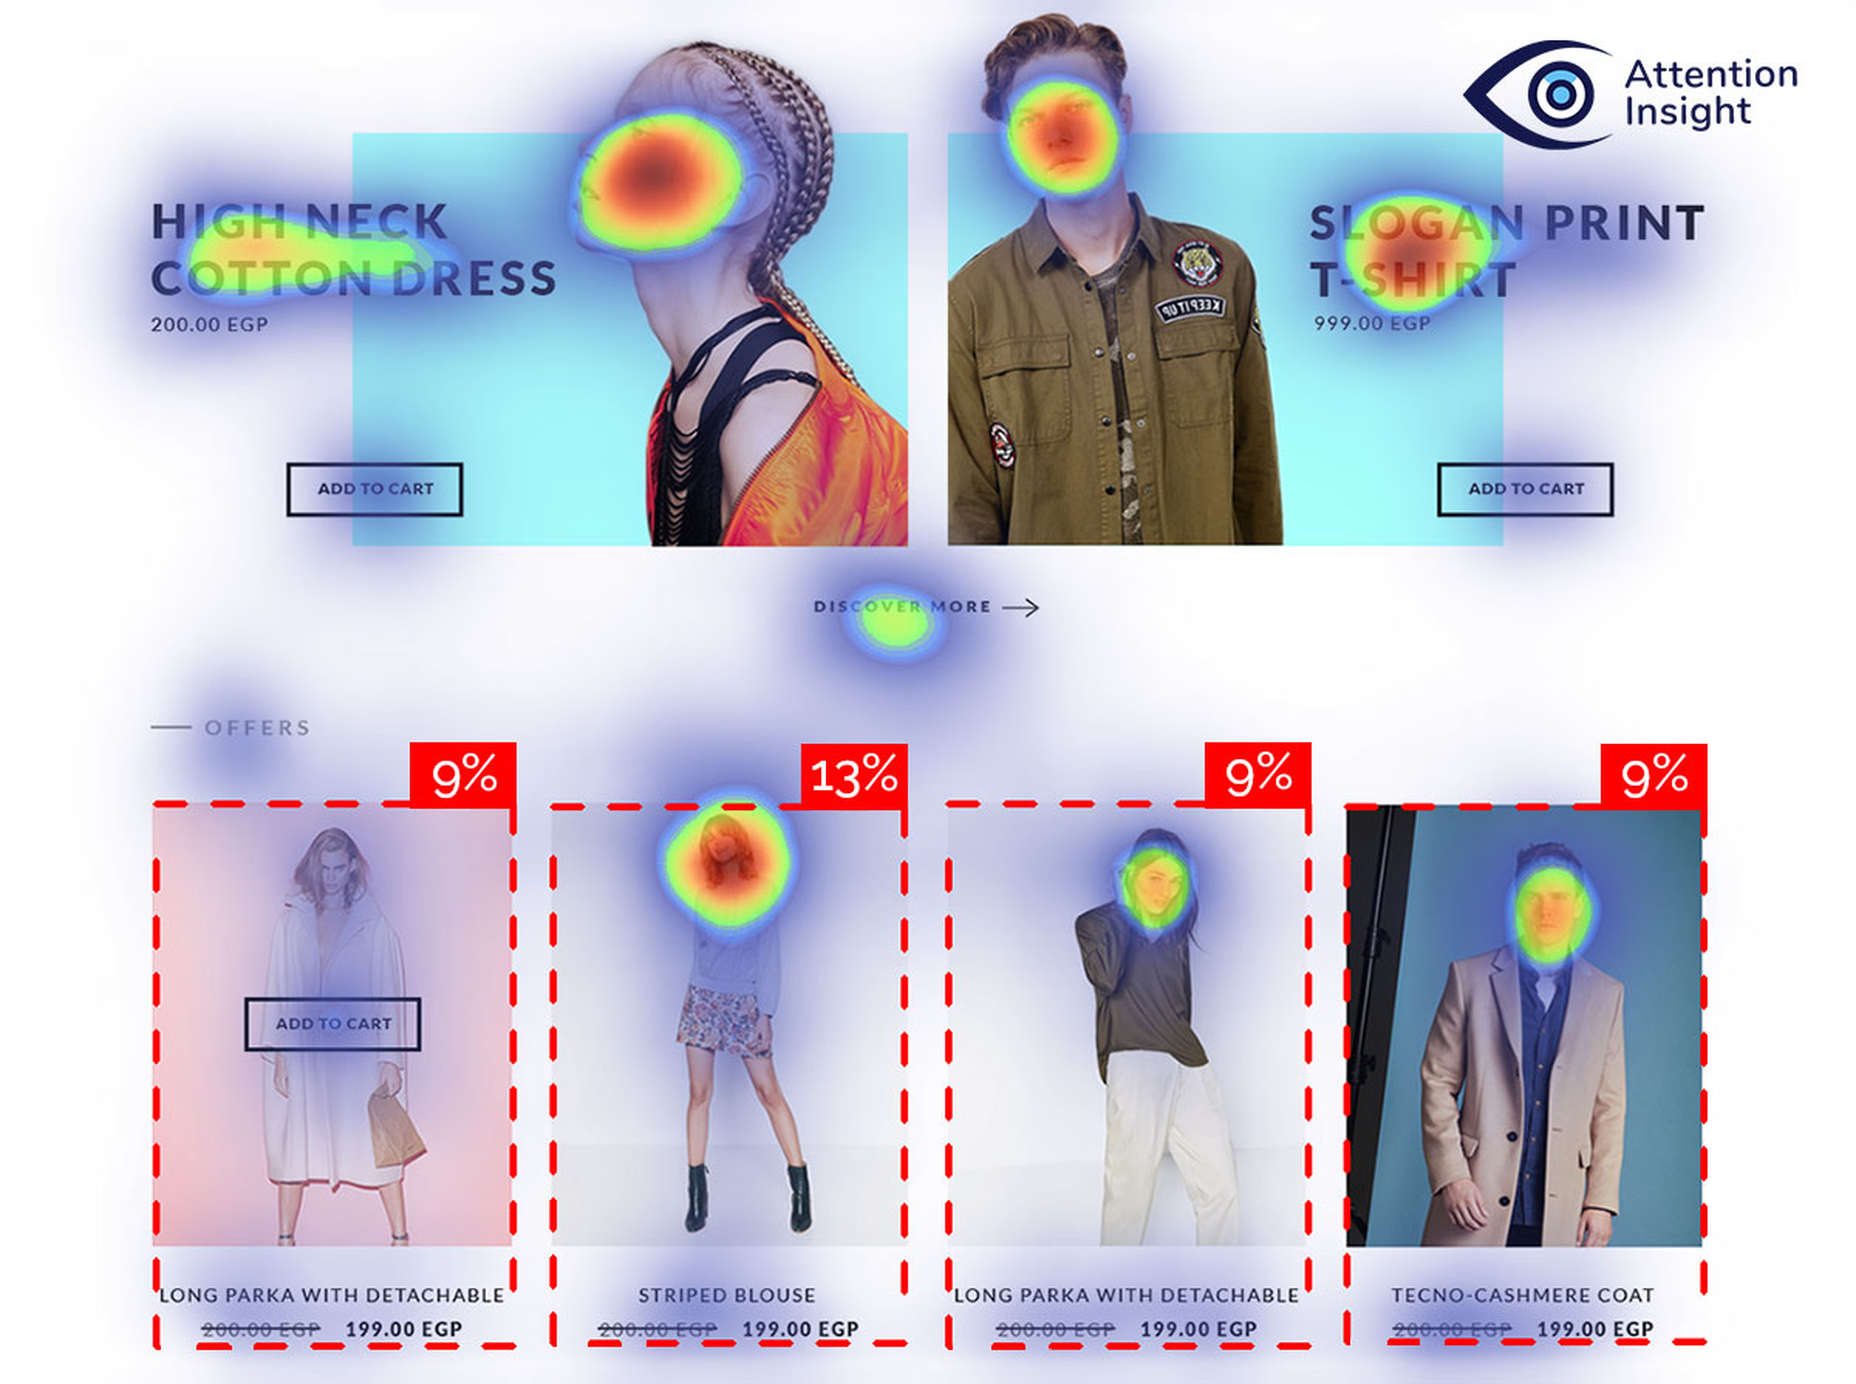
AI solutions for designers and marketers have already become major competitors to traditional eye-tracking studies. Due to active competition, predictive eye-tracking tools are constantly innovating and recently started generating heatmaps for videos. Another useful feature that provides decision-makers with quantitative data is a percentage of attention. Users can define an object that they want to test and get an exact percentage of attention that the object receives.

Conclusion

Since all digital products are competing for user’s limited attention, it has become one of the most valuable resources. Due to fierce competition, it is not enough to rely on your intuition and gut instinct while making important decisions anymore. Designers have a choice in this economy of attention, though.

Yes, there are eye-tracking studies that require a significant amount of time and financial resources.

However, you can make user-centric, data-driven decisions in a quick, scalable, and private way while your product is still under development. AI-powered predictive eye-tracking tools might be an answer. Attention is a new currency, and you must measure it.

Source

p img {display:inline-block; margin-right:10px;}
.alignleft {float:left;}
p.showcase {clear:both;}
body#browserfriendly p, body#podcast p, div#emailbody p{margin:0;}

30+ Cool Biking Gadgets For Avid Cyclists

Original Source: https://www.hongkiat.com/blog/gadgets-for-cyclists/

There’s no doubt about it: cycling is in! Whether for commuting, recreation or sport, it seems that just about everyone is riding some sort of bicycle these days. But in this…

Visit hongkiat.com for full content.

Why We Moved a 20-Year-Old Site to Gatsby

Original Source: https://www.sitepoint.com/our-gatsby-redesign/?utm_source=rss

We knew we had a problem.

In 2019, SitePoint was getting Lighthouse Speed scores under 10 on mobile, and between 20 and 30 on desktop.

Our efforts to control UX bloat were failing in the wake of a publishing business environment that sprang new leaks just as we’d finished temporarily plugging the last one. Our reliance on advertising, controlled by external parties, was a major obstacle to improved site performance. Our traffic growth had turned into decline.

On a site that provided people with a place to come and learn to code with best practices, this was not a good look. And it wasn’t a site we could feel proud of, either.

To make matters worse, operational bottlenecks had arisen that made adaptation a tricky logistical business. Our team was struggling to make changes to the site: having focused on our Premium experience for several years, we were down to one developer with WordPress and PHP experience. To test out code changes, the team would have to wait in a queue to access our staging server.

It wasn’t energizing work for anyone, and it certainly wasn’t efficient.

It was time to make some changes, and we set out to look for a solution. After a lot of research, we decided that Gatsby would be a great fit for our team. It would play to our talent strengths, help us solve all of the issues we had identified, and allow us to keep using WordPress for the backend so the editorial process wouldn’t need to change.

Why We Moved to Gatsby

SitePoint 2020 Redesign

The end result.

Early in the research process, Gatsby started to look like a serious frontrunner. SitePoint isn’t a small site, so we knew that the tech we chose had to be able to handle some pretty intense demands. Gatsby checked all of our boxes:

We could code everything in React, a tech that every member of the front-end team knows and uses daily.
Gatsby is super fast at its core — performance was at the heart of this project, and we could start from a good footing.
The entire site is rendered as static, which would be great for SEO.
We could build it as a new project, which meant no worrying about the existing codebase, which brought a huge amount of legacy code with it.
We could use Gatsby Cloud, allowing the team to get feedback on the build at any time just by pushing the branch to GitHub.
DDoS attacks on WordPress wouldn’t cause us issues, as the front-end is completely stand-alone.

More Maintainable CSS with styled-components

Since we were going to rebuild the site from scratch, we planned to make some design changes at the same time. To help with this work we decided to use styled-components.

styled-components keeps the site’s styling easy to maintain, and we know where to look when we want to change the style of something — the style is always with the component.

How We Made the Build Happen

We started by following Gatsby’s basic docs and pulling in our posts with the gatsby-source-wordpress plugin.

This was a big initial test for us: we had to see if it was even possible to use Gatsby for our site.

After 20 years of blogging, we have over 17,000 posts published. We knew the builds would take a long time, but we had to find out if Gatsby could deal with such a massive amount of content. As you’ve probably figured, the test delivered good news: Gatsby works.

A quick tip for other teams working with large sites: to make development a better experience, we used environment vars to prevent Gatsby from fetching all of the site’s posts in development. There’s nothing quite like a 60 minute hot reload to slow progress.

if (hasNextPage && process.env.NODE_ENV != “development”) {
return fetchPosts({ first: 100, after: endCursor });
}

From this point, we ran into some limitations with the WordPress source plugin. We couldn’t get all the data we needed, so we moved to the WordPress GraphQL plugin.

We use Yoast to set our metadata for SEO, and had to ensure we were pulling in the correct information. We were able to do this with WordPress GraphQL. By doing it this way, the content team could still edit metadata the same way, and the data would still be dynamic and fetched on each build.

During the build, we would have three or four people in the team working on parts of the new blog. In the past, if they wanted to get feedback they’d have to push to our staging server and make sure nobody was already using it.

We found that Gatsby Cloud was a great solution to this issue. Now when someone pushes to a branch in GitHub, it creates a build in Gatsby Cloud along with a preview link. Our developers could share this link and get immediate testing and feedback much more effectively than before.

This faster feedback cycle made it easy to have multiple people on the team working on the build and put an end to a major bottleneck.

Launch Day Fun

On the big day, we launched the new site and ran through our initial tests. The new blog was flying — every page load felt instant.

We ran into some problems on SitePoint Premium, which started running into slows and even crashes. The culprit was a new element on blog pages that pulled in the popular books people were currently reading. It would do this via a client-side API call, and it was too much for Premium to handle due to the amount of traffic we get on the blog side.

We quickly added some page caching to the API to temporarily solve the issues. We realized we were doing this wrong — we should have been sourcing this data at build time, so that the popular books are already loaded when we serve the page to the user.

This is the main mindset shift you need to make when using Gatsby: any data that you can get at build time should be fetched at build time. You should only use client-side API calls when you need live data.

Once we’d re-written the API call to happen during the build, the first load of a blog page was even quicker — and Premium stopped crashing.

What We Still Need to Solve

While it’s hard to overstate how much better our on-site experience is today, there are still a few pain points we need to solve.

If a new article is published, or if content is updated — as it is multiple times per day — we need to re-run the Gatsby build before these changes show up.

Our solution for that right now is a simple cron job that runs at pre-scheduled times over the course of a day. The long-term solution to this is to add a webhook to the WordPress publish and update button, so that a new build is triggered once pressed.

We also need to get incremental builds running. Right now, the entire site needs to be rebuilt each time, and given our content archive, this can take a while. Gatsby just introduced incremental builds as we went live, and we’re working on implementing this on our site. Once that’s set up our builds will be much faster if the only thing that has changed is content.

Our speed score is still not where we want it to be. While the site feels subjectively very fast, we are still not getting consistent scores in Lighthouse. We want to get both mobile and desktop into the green zone (scores of 90+) for optimal user experience and SEO.

Would We Do It Again?

A launch of this type would normally be a pretty nerve-wracking event, and take a lot of work from the team on launch day.

With Gatsby, our launch was really easy. We just had to move WordPress onto a new domain, and point sitepoint.com at the Gatsby version of the site.

Then we sat back and watched the numbers to see what happened to our traffic. Within a few days, the data was starting to come in and we were seeing a 15% increase in traffic. User engagement metrics were up across the board. And we hadn’t even removed our ads yet (which, you may have noticed, we’ve since done).

It’s not hard to figure out why the effects were so immediate. We had better SEO running on static HTML and CSS pages, and massive speed improvements made possibly by the move to Gatsby.

Since we made the move, we’ve increased our Lighthouse speed scores from 6-15 on mobile to the 50-60 range, and from the 30s on desktop into the 70s. We wanted to ensure speed remained top of mind with this change, so we’re using a great tool called Calibre that runs speed tests over a number of top pages each day and alerts us to the scores. We are using this tool to continue to improve our score, so I hope to have another article for you in three months when we get everything to stay in the 90+ range.

The team loves working in Gatsby. The blog codebase was something that nobody wanted to work on. Now, everyone wants to take those cards thanks to the great developer experience.

If you’ve been eyeing a move to Gatsby and wondering if it’s ready for prime time, take our advice — it’s worth the switch.

Continue reading
Why We Moved a 20-Year-Old Site to Gatsby
on SitePoint.

Computerist-inspired Illustrations

Original Source: http://feedproxy.google.com/~r/abduzeedo/~3/hmOm-hlcNbc/computerist-inspired-illustrations

Computerist-inspired Illustrations

AoiroStudio07.08.20

Ada Zielińska is an artist based in Warszawa, Poland. She has shared a series of commissioned & personal illustrations from the past year until now. These illustrations caught my attention of its retro aesthetics that would trigger memories from the ‘Omni Magazine’ days. Where science and fiction came together to combine and share knowledge for its readers. This is pure futurism and I really dig them. What do you think?

Links

https://www.behance.net/adazielinska
https://www.instagram.com/zielinska.ada/


FORK – Surreal Journey Interrogating our Perception

Original Source: http://feedproxy.google.com/~r/abduzeedo/~3/IhPdK7g8Iq4/fork-surreal-journey-interrogating-our-perception

FORK – Surreal Journey Interrogating our Perception
FORK - Surreal Journey Interrogating our Perception

abduzeedo07.07.20

In a museum, a woman looking at a Fork exhibited as a piece of Art let her imagination run wild. The film is a surreal journey interrogating our perception of objects. What happens when you take an object from daily life and move it outside of its original context? What is left of an object when it loses its function? An abstract shape, a sculpture? Can we deconstruct this object into simple elements and create variation of this object? Can those objects be combined to form a larger structure? Can those objects become alive to break free from human ownership? That’s the synopsis of FORK, a really cool film and motion design project created by the amazing people over at Optical Arts a creative studio based in London. With an experimental approach and a collective spirit we explore new ways to tell visual stories, applying innovative techniques to live action, digital and print.

Director Fabrice Le Nezet:

We choose to work with simple objects, some iconic items everyone could easily recognize. A fork, a stool, a Mug. Because we wanted to play with sculptural forms, we chose objects that are beautiful and elegant with clear volume and silhouette.

Behind the Scenes:

Most of this project was completed in lockdown due to Covid-19 pandemic. This presented its own unique challenges, working remotely for the CGI elements was fairly straightforward, but we had to delay the live action element of the shoot until Government restrictions eased. We kept the crew to a minimum and implemented a strict social distancing of two meters and masks and gloves were worn by all. Planning an extra prellight day to the schedule allowed us to set up the different shots with only essential lighting and camera crew, creating a much less demanding, more efficient and most importantly safe shoot day.

Technical Considerations:

The film has been made using a combination of Maya and Houdini and was rendered in Redshift. All shots were then composed in Nuke and Flame and graded using Resolve.

The procedural approach of Houdini made it the perfect tool to create this project. 

While developing some R&D we were able to quickly sketch ideas and seamlessly test dynamic behaviour. Animation was achieved through a mixture of physic based simulation alongside some more manual bespoke procedural setup.

Credits

Creative Direction & Production: Optical Arts
Direction & Design: Fabrice Le Nezet
Music & Sound Design: Niccolò Chotkowski at Smider
VFX Supervisor: Fabrice Le Nezet
2D Supervisor: Miguel Wratten
3D Artist: Max Johnson
Colourist: Martin Pryor
Live Action Producer: Caroline Kinch
Live Action DP: Joe Jackson
1st Assistant Camera: Elliott Lowe
Set Assistant: Jamie-Lee Harding
Model: Emma Norodom at W Models
Clothing: Studio Nicholson

For more information and to read the full making of I highly recommend that you check out https://opticalarts.studio/fork/


Collective #612

Original Source: http://feedproxy.google.com/~r/tympanus/~3/kkY72bec1W8/

Inspirational Website of the Week: Sennesro

Simplicity, elegance and flowy motion made us pick Sennesro as inspirational website this week.

Get inspired

60 Days of Animation

The Undead Institute offers books on HTML, CSS, Responsive Design and more that marry humor, excellent teaching, and brain-lodging practice for an experience that’ll outlive the apocalypse.

Check it out

Irregular-shaped Links with Subgrid

In this excellent article, Michelle Barker shows how CSS subgrid can solve the problem of irregular, distributed link shapes.

Read it

Our Sponsor
Efficiently build beautiful websites for your clients

You’ve never built a WordPress website like this before. Divi is more than just a WordPress theme, it’s a completely new website building platform that replaces the standard WordPress post editor with a vastly superior visual editor.

Check it out

Stryve

A new community for tech enthusiasts to share, learn, and build their careers.

Check it out

The design systems between us

Ethan Marcotte shares his thoughts on why he believes that design systems haven’t brought rich, cross-functional collaboration to most organizations.

Read it

Understanding Template Literals in JavaScript

Tania Rascia’s in-depth explanation of template literals in JavaScript.

Read it

html.systems

An excellent library of components built with HTML, CSS and JavaScript.

Check it out

3D banners with ScrollTrigger

A supercool GSAP scroll demo with some 3D magic.

Check it out

Getting CSS Translate values with JavaScript

Zell Liew shows how you can get CSS translate values in JavaScript by parsing 2d and 3d matrices.

Read it

Aligning Logo Images in CSS

Ahmad Shadeed tackles the task of taking a group of logos, and exploring many ways to align and position them perfectly in CSS.

Read it

Design Better Buttons

A great read on button design best practices by Andrew Coyle.

Read it

Launching docs.github.com

Jenn Leaver writes about the launch of docs.github.com, a single home for all of GitHub’s product documentation.

Read it

Profiled

With Profiled you can create a developer portfolio from your GitHub account.

Check it out

Is WebP really better than JPEG?

According to Google, WebP is 25 – 34% smaller than JPEG at equivalent quality. But how much of it is really true? Find out in this article by Johannes Siipola.

Read it

Free Faces

A great selection of freely available fonts.

Check it out

CSS Painting vs. CSS Houdini Paint API

Lisi Linhart takes a look at the performance of the Paint API vs. traditional CSS painting.

Read it

Dark Ages of the Web

A fun journey that recaps the old Web features and front-end patterns.

Check it out

I Just Hit $100k/yr On GitHub Sponsors!

Caleb Porzio shares his fascinating story of a successful open source project and the earnings he’s made with its screencasts.

Read it

The Google ‘vs’ Trick

Read how ego graphs can help you learn about AI, play chess, eat healthier, buy a dog and find love.

Read it

From Our Blog
Creating a Menu Image Animation on Hover

A tutorial on how to create a hover effect for a menu where images appear with an animation on each item.

Check it out

From Our Blog
UI Interactions & Animations Roundup #8

A new collection of UI animation shots that summarizes the latest creative trends.

Check it out

From Our Blog
Inspirational Websites Roundup #16

This special collection of wonderful websites will get you up-to-date on current web design trends.

Check it out

The post Collective #612 appeared first on Codrops.

Excellent Ideas to Make Money as a Graphic Designer

Original Source: http://feedproxy.google.com/~r/Designrfix/~3/EotLqcOYkKg/excellent-ideas-to-make-money-as-a-graphic-designer

Image source: Burst.Shopify.com Given the current situation in the world, a lot of people have more time to spend at home. Some take this opportunity to be with their families, while others are looking to make extra money. While there are a lot of industries that have to stop or become limited, those who work […]

The post Excellent Ideas to Make Money as a Graphic Designer appeared first on designrfix.com.