The Power of Influencers in Your Marketing Campaign

Original Source: http://feedproxy.google.com/~r/1stwebdesigner/~3/l4-ju5iGb78/

Marketers are always looking for innovative ways to broaden their reach and increase conversions. It can be challenging to find the right targeting strategies for the customers you want to attract.

When you’ve worn through all the tricks in your marketing toolbox, try tapping into your influencers for help.

These individuals and independent operations cultivate dedicated followings by providing consistent, relevant content to their audiences. If your business model appeals to one or more niche markets, partnering with an influencer is a great way to skyrocket interest in your brand quickly.

Instant Access to a Wide Audience

When you start a digital marketing campaign, the planning phase should focus on developing profiles of the types of customers you aim to capture. Casting a wide net at a mildly interested audience can succeed at times, but in the early days of a startup, or for companies working in narrowly focused niches, targeted marketing is much more effective.

An influencer who releases content relevant to your niche is a fantastic doorway to thousands or more potential customers. An influencer may be a single person operating a blog or YouTube channel, or it may be an independently operated podcast or talk show channel with several members.

The best influencers take it upon themselves to explore their niches and deliver authentic, original content to their audiences. Having one create content about your brand, products, or services is a fantastic way to attract leads and build your following.

Authenticity is crucial. The influencer should be keen to share your offerings with the audience after recognizing the value of your work. While you reap the benefits of instant access to a potentially vast audience, the influencer can easily produce fresh new content using your brand.

Eventually, the honest feedback influencers provide about your brand builds your credibility and makes their audience more likely to share what you have to offer with others.

Return on Investment

Marketing is a constantly evolving field, and marketing professionals need to continually reassess the efficacy of their budgets. If an element of a marketing campaign isn’t generating enough revenue to justify its operating cost, it may be time for a change. Return on investment (ROI) is crucial, and influencer marketing can offer up to eleven times the ROI of most other digital marketing techniques.

Take the time to research the influencers in your niche before approaching anyone. If you want to generate the most ROI, you must carefully plan your influencer-driven content. Some examples include:

Product reviews. Provide influencers with samples of your products for review. This is incredibly common in the video game industry, where countless YouTube channels devoted to game reviews cumulatively report billions of views per month. Developers can easily get their games in front of millions of potential players at a very low cost. This generates excitement about upcoming and new releases and encourages engagement within the community.
Demonstrations. Invite influencers to use your services or products as demonstration videos or how-to guides. Modern consumers enjoy informative and instructional content, and this builds engagement among viewers, influencers, and your brand.
Giveaways. Consider providing influencers with several free samples of your products they can use in giveaways and contests. These events are easily shareable across social media outside the influencer’s audience, potentially increasing your brand reach even further. The influencer will enjoy the additional recognition and audience growth, as well.
Audience participation. Your influencer may create a hashtag or other trending submission format for the audience to share experiences. User-generated content is incredibly valuable, recyclable, and leads to happy customers. Modern consumers appreciate making connections with brands, not just making solid purchases. By asking for their feedback and using it wisely, you can generate consistently relevant and valuable content. Again, this is another win-win for you and the influencer.

While some influencer relationships may grow out of mutual benefit, you need to compensate your influencers in some way. You can pay them for their time, but it’s important to consider modern consumers’ attitudes toward sponsored content. Label directly sponsored content appropriately to avoid questions about your content’s credibility – bear in mind that many audience members will doubt the influencer’s sincerity if they know you paid for the content.

An alternative could be to offer influencers a commission based on the sales they bring you, but there are other options, as well.

Product-based companies should consider giving influencers free or discounted products, especially for giveaways. You should be confident in your products, so ask the influencer to do honest reviews about them. You may not always get perfect marks, but consumers appreciate honesty and transparency.

Your influencer can enjoy the free or discounted products, and the audience will appreciate a steady stream of honest content.

Finally, you can cross-promote. Influencers want to build their reach as much as you do – their livelihood depends on maintaining an audience. Give your influencers shout-outs or recommend their channels to your own audience.

Additionally, you may already have quite a bit of social media reach, yourself, so sharing the influencer’s content through your own network will likely benefit you both.

Finding the Right Influencer

Once you decide how to proceed with your influencer-driven content campaign, it’s time to choose the right channels. Start by defining the context of your content – what type of audience is going to want to know about you? You need an influencer whose tone works for your brand image, as well.

There are many humorous YouTube channels with millions of followers, but some companies don’t work on certain channels. Find influencers who cater to your ideal customers and tailor your content accordingly.

Influencers with millions of followers likely receive countless sponsorship and content creation requests, so you may want to start with a few smaller outlets before moving on to influencers with larger audiences. For example, there are countless video game “let’s play” channels on YouTube.

A few have millions of subscribers, but there are also dozens with thousands of dedicated fans. In many cases, consumers will follow several channels in a niche, so gaining traction in one can easily spread to others organically.

Eventually, the larger influencers will take notice, and gaining access to their larger audience numbers should be much easier for you.

Let Audiences Opt in to Your Brand

One of the most valuable aspects of influencer marketing is that audiences choose their influencers. They opt in to what influencers have to offer, so the interest is already present. If you can establish value to the influencer, you’ll build recognition and credibility quickly among the audience. Loyal audiences will want to hear what influencers have to say about your brand.

The relationships you cultivate with influencers can pay off dramatically. You may even develop long-term brand advocacy relationships that benefit your influencers as much as you for years to come. Thoughtful planning, stellar content, and painstaking research into the influencers in your market will help your influencer-driven content flourish, and cultivate your brand recognition faster than most other digital marketing techniques.

However, it’s important to remember the other elements of your marketing campaign when working on your influencer-driven content. Marketing trends change without warning, and you should always look for new ways to provide potential customers with your content.

As your influencer campaign grows, always be on the lookout for new ways to leverage your access to this new, wider audience through other marketing efforts, like your social media presence and email lists.

Once you build a strong bond with an influencer, you’ll grow to share audience members, and may even introduce one another to new prospects and leads. In time, you and your influencers will forge new business relationships and build even more resonance and credibility among potential consumers.

Encourage transparency, authenticity, and quality in your influencer-driven marketing campaign, and you’ll quickly understand why influencer marketing is so powerful.


How Technology Has Changed our Approach to Fitness

Original Source: http://feedproxy.google.com/~r/Designrfix/~3/rxEkrtxs8zQ/how-technology-has-changed-our-approach-to-fitness

Technological advances are continually helping us accomplish our goals. It’s hard to find an industry where this is truer than in the fitness world. It’s never been easier to monitor your heart rate or calories lost. You can track progress over weeks and months or discover new workouts. These individual technologies may change how we […]

The post How Technology Has Changed our Approach to Fitness appeared first on designrfix.com.

6 Ways to Speed Up Slow Clients

Original Source: https://www.webdesignerdepot.com/2018/09/6-ways-to-speed-up-slow-clients/

Frustrated with your client? Beginning to wish you’d never taken this job on in the first place? Do you just need some feedback so that you can move forward?

Picture it: You’ve managed to land a great gig with a well-paying client and you can’t wait to get started and produce some of your best web design work…But then days elapse into weeks and the project just isn’t moving forward. The client replies to you sporadically, doesn’t fully answer your questions, and seems mega evasive.

This sometimes happens. Hey, things come up and get clients get busy. The problem is that you have requirements too, and a “busy” client is killing your schedule and your motivation.

So what do you do?

There’s no need to bail out just yet. In this article, we’re going to take a look at how you can speed up the whole process with slow clients.

1. Don’t Ask Too Much From a Client

If you’ve created multiple different designs for your client to review, plus you’ve got a few new color scheme ideas that you need to run by them, understand that this sort of feedback is heavy going and can overwhelm a busy client.

We know that it’s the client’s project that you’re working. And while you’d think they should be always available to check up on their project, clients often have several things on the go at once.

From now on, you need to take some responsibility. Is it necessary to have a client check every little thing that you do? Or can you get away with slimming down the amount of feedback that you need? If you can, do that.

A good client doesn’t want to—and shouldn’t have to—micromanage you. If you’ve got a massive list of things you want feedback on, find a way of narrowing it down. If you really do have eight templates to show them, cut them back to five.

Take some responsibility and don’t put too much on a client’s plate.

2. Clarify Issues as Soon as Possible

When clients give you a brief, they’ll typically ask if you have any questions. Instead of thinking “No, I’ll be okay for now,” or “I can ask a question at a later date,” use their invitation to ask questions right there and then.

A client might be available to answer at the time, but they might not be as available later on.

Moreover, asking for clarity as soon as possible means that you can just crack on with the job.

If there is something that you aren’t clear about, ask as soon as you can. That way, you can both move forward.

3. Set Expectations

From the start, you could explain to the client that you value, and expect good communication and feedback, and that these things help you to stay motivated and on track.

Of course, you’re also aware that you can’t talk to the client all the time, so why not schedule a brief weekly “catch-up/feedback session” to discuss the project and where you are at?

At the beginning of your project, it’s also important that you lay out what you can do and what you cannot do. Perhaps your client owns an eCommerce store for example and wants marketing services but you only design websites. Let them know this at the beginning to avoid disappointment.

4. Get Them Excited About the Project

It stands to reason that the more excited a client is about a project, the more they’ll want to talk about it, and the faster they’ll respond to your questions.

The easiest way to get a client excited about a project is to deliver your best work. If you deliver a draft that you know is second-rate, their own enthusiasm, motivation and passion for the project might take a dip.

Worse still, it weakens your relationship with them.

Instead of delivering a draft just for the sake of delivering a draft, hand in only your best work. Refine and tweak until you know that what you’ve got is so good that a client will be excited enough to respond and tell you what to do next.

The best thing is, that if a client sees the awesome work you’ve delivered so far, they’ll be so excited to see the end result that they’ll encourage you to stay on track.

5. Show your Own Passion For This Project

If a client can see that a freelancer or agency is super passionate about their project, it fires their own passion.

Rather than a client inspiring you, you can inspire the client!

How so?

A great idea is to get them excited about the tools you’ll be using for this project. Perhaps you could shoot them a message that goes a little like this:

“Hey! So, I’ve been mapping out this project, and wanted to show you some of the awesome tools I’m going to be using. For example, check out this neat POS that’s going to help your clients pay both online and offline.” Or you could show them examples of chatbots that you are going to implement on their website. You could also offer them the option to install a page builder.

Clients want to see you take an interest in their project. By showing your passion, you might be able to speed them up. Pretty soon they’ll be thinking, “Hey, this person really cares about my project. Perhaps I should start prioritizing it some more.”

6. The Follow up Email

If your client becomes unresponsive you must send an effective follow up email.

First, though, don’t become panicked by your clients lack of response. Don’t make assumptions about their thought process. You don’t want your email to come across as naggy.

The point of sending a follow up email is to move the process forward so that you can take further action on the project. Explain this to your client. Let them know that their lack of response may push back the project deadline, which can affect a variety of other projects either directly or indirectly.

It’s also best to have a single point of contact. If you require feedback from 4 different members of staff at a company, its going to be extremely difficult to get approval from each of them.

Conclusion

These are some ways to speed up the web design process with slow clients. All in all, though, there will be times when you’ll just need to have some patience. Clients don’t mind being nudged from time to time, but busy people don’t like to be nagged. Put our tips in place and have some patience with your clients.


Featured image via DepositPhotos.

Add Realistic Chalk and Sketch Lettering Effects with Sketch’it – only $5!

Source

p img {display:inline-block; margin-right:10px;}
.alignleft {float:left;}
p.showcase {clear:both;}
body#browserfriendly p, body#podcast p, div#emailbody p{margin:0;}

Collective #452

Original Source: http://feedproxy.google.com/~r/tympanus/~3/pfSoRJLeCeo/

C452_WOTW

Inspirational Website of the Week: Denys Loveiko

Denys Loveiko’s portfolio combines innovative effects and a beautiful design. Our pick this week.

Get inspired

C452_Hotjar

This content is sponsored via Syndicate Ads
A fast and visual way to better understanding your users

Hotjar is everything your team needs to:
✓ Get ‘in-the-moment’ visual feedback
✓ See how people are using your site
✓ Uncover insights to make the right changes

Try it free

C452_IdleUntilUrgent

Idle Until Urgent

Philip Walton explains how he decreased his site’s first input delay with a strategy he calls “idle until urgent”.

Read it

C452_flexbox

Flexbox: How Big Is That Flexible Box?

Rachel Andrew explores the often confusing issue of sizing in Flexbox and explains how Flexbox decides how big things should be.

Read it

C452_vapid

Vapid

Vapid is an intentionally simple content management system built on the idea that you can create a custom dashboard without ever leaving the HTML. Read more about it in this article.

Check it out

C452_sketch

The Sketch Update We’ve All Been Waiting For

Learn about the Sketch update that offers a new way to apply overrides to symbols. An article by Jon Moore.

Read it

C452_micro

Creating meaningful micro-interactions

Denislav Jeliazkov’s tips for getting those delightful little moments right.

Read it

C452_keyframers

Transform Tumbler

David Khourshid and Stephen Shaw tackle a tricky tumbling transform-origin animation using only CSS.

Watch it

C452_workers

Worker-plugin

Adds native Web Worker bundling support to Webpack with this plugin.

Check it out

C452_SGreif

The 12 Things You Need to Consider When Evaluating Any New JavaScript Library

Sasha Greif explains how to know if a new technology is worth investing time into.

Read it

C452_bookmarklet

Refresh CSS Bookmarklet v2

Lea Verou makes Paul Irish’s bookmarklet that refreshes CSS work with iframes.

Check it out

C453_yeti

Yeti Hand Pagination

An adorable pagination animation by Darin Senneff.

Check it out

C452_bugios12

Array state will be cached in iOS 12 Safari

A Stackoverflow thread that points out a serious bug in iOS 12 Safari. Read more about it in this Reddit, too.

Check it out

C452_realdata

Designing with real data

Read how Dropbox uses Framer X and real data to design. An article by Zach Johnston.

Read it

C452_jsequal

JavaScript Equality Table Game

A game that demonstrates how the == rules are easy to get wrong.

Check it out

C452_merge

Sublime Merge

A new Git client with a three-way merge tool from the makers of Sublime Text.

Check it out

C452_TimesNewer

Times Newer Roman

A font that kinda looks like Times New Roman, except that each character is 5-10% wider. In case you need to fill more pages 😂

Get it

C452_FFreality

Firefox Reality

Firefox Reality is a new browser for Virtual Reality.

Check it out

C452_WowenWilson

The Wow’en Wilson Quiz

A fun Owen Wilson quiz made by Tim Holman and Tobias van Schneider.

Check it out

C452_svgcanvas

Dynamic filters

Jesper Lauridsen is playing with SVG filters using canvas.

Check it out

C452_git

How to organize your git branches

Darío Kondratiuk shows some ways of organizing git branches for a better workflow.

Read it

C452_fonts

The Best Contemporary Free Fonts

Alex Slobzheninov put together a visual guide with download links of the best modern free fonts.

Check it out

C452_mindmap

RealtimeBoard

RealtimeBoard is a simple whiteboarding platform for cross-functional team collaboration.

Check it out

C452_portfolio

How I Built My Design Portfolio from Scratch

Jingyi Lai’s experience of building her own portfolio site from scratch as a product designer.

Read it

Collective #452 was written by Pedro Botelho and published on Codrops.

How to Build React 16 Web Apps with the Sencha Grid

Original Source: https://www.sitepoint.com/how-to-build-react-16-web-apps-with-the-sencha-grid/

React 16 is the first version of React built on top of React’s new core architecture, codenamed “Fiber”. React 16 is designed from the ground up to support asynchronous rendering, which allows processing large component trees without blocking the main execution thread. It supports a number of key features such as catching exceptions using error boundaries, returning multiple components from render, reduced file size and support for MIT license.

If you’re developing a data-driven web application with React 16, chances are you’ll use a grid or spreadsheet-like interface at some point to display data for your users. Depending on the context, your users may expect the grid in your application to be capable of:

Scrolling with a fixed header
Sorting by clicking on a column header
Showing and hiding specific columns
Paging, grouping, and summarization
Editing data in cells
Exporting to Excel
Drilling down/row expansion

A grid can be one of the trickiest and most complex UI components to build in React because many of the necessary features require both significant React expertise, as well as the willingness and ability to dig down into the DOM. Fortunately, the ExtReact Grid provides all of these capabilities and more.

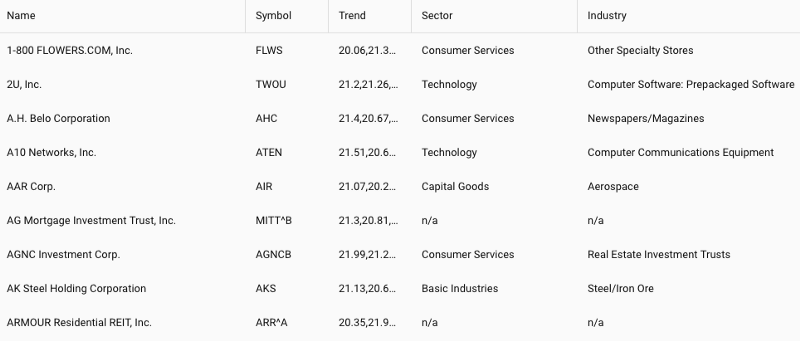
In this article, we’re going to create an example using the Sencha ExtReact Grid that shows information about Stocks and equities companies. If you want to code a grid using an HTML table or another third-party component, you might have to do something like handle clicking on a column header to sort, or clicking on a divider between a column header to resize, or maybe sliding a pager and doing a fetch for the next page of data. With ExtReact Grid, these functionalities are built in. Want to try it yourself? Get started with a 30-day free trial of ExtReact today — sign up here.

Let’s get started with building an application using ExtReact Grid.

Getting Started with ExtReact App Generation

To get started on developing a React application with ExtReact components, please follow the steps below:

Make sure you have a Node environment set up

First, make sure you have Node 8.11+ and NPM 6+ set up on your system. You can download the latest Node version from the Node web site. If you’ve already installed Node, you can easily check the node and npm versions by using these commands:

node -v
npm -v

Get your login credentials for the ExtReact npm repo

ExtReact npm packages are hosted on Sencha’s private npm repo. You log in to that repo once to get access to all ExtReact packages. To get login credentials, go to the ExtReact 30-Day Free Trial page and fill out the form. We’ll send you an email with login details as well as some links to resources such as the docs and sample projects.

Login to ExtReact npm repo and get ExtReact app generator

The next step is to log in to Sencha’s private npm repo, which hosts the ExtReact packages. Use your npm login (provided in the email) to associate the repo with the @sencha scope, and enter the credentials when prompted:

npm login — registry=http://npm.sencha.com — scope=@sencha

The next step is to install ExtReact generator package.

npm install -g @sencha/ext-react-gen

Create your first React App

Run the Yeoman generator to create your first ExtReact app:

ext-react-gen app your-app-name-here -i

The generator will ask you to name your app, name the npm package, and select a theme. The default Material theme (based on Google’s Material design guidelines) is a good choice as a starting theme. Select “Generate an Empty App”. The generator will also prompt you to create a new directory for your project. The generator will then download and create your sample application, including relevant dependencies.

Run your React App

In the generator output, you will find steps to run your application. It’s as simple as changing to your new application directory and running the application using:

npm start

This will fire up the app, your empty React app will just show up with the title of the app. The main component (e.g. StocksGrid) in the application has one container at the root, which is marked as full screen, layout is set to fit, which means it will stretch its child to fill it.

See the code up to this step on GitHub.

Adding a Grid to the application

Add Stocks Data

We’ll be adding an example data set, called stocks.json to the application. It’s a fairly large data set, around 10,000 rows in json, and each row represents a company or ticker symbol — so we have the name of the company, ticker symbol, sector, industries they are in, and an array of ticks which are the last 5 sales of that stock. This is the data we’re going to display in our grid. In a real-world application, all of this data would be returned on the back-end. We’re going to load it statically for this sample application rather than go through all of the mechanics of how to build a back-end rest API. But it’s going to be loaded in the exact same way you would fetch from a real back-end.

Creating a Basic Grid

In the StockGrid component render method, we’re going to return a grid with columns.

To put columns in our grid, we use a column component, and it takes a data index that is the same as the name field of the stocks data. It takes a text prop that is the column header text, and then we can also give the column a width, like a fixed width or a flex or a combination of flex and minimum or maximum as well. We’ll add column components for company name, symbol, ticks, sector, and industry. Create a new StocksGrid class with Grid as shown below:

<Grid >
<Column dataIndex=”name” text=”Name” width={300} />
<Column dataIndex=”symbol” text=”Symbol” />
<Column dataIndex=”ticks” text=”Trend” />
<Column dataIndex=”sector” text=”Sector” width={200} />
<Column dataIndex=”industry” text=”Industry” width={350} />
</Grid>

Now, add StockGrid to Class App as shown below:

export default class App extends Component {
render() {
return (
<ExtReact>
<StocksGrid />
</ExtReact>
)
}
}

See the code up to this step on GitHub.You will be able to see the web application with empty Grid on npm start.

Binding Stock Data with Grid

A grid in ExtReact is a data table that pulls in and renders data from an Ext Data Store. In ExtReact, our store implementation is a data structure that allows you to sort and filter data for a grid or components (like lists or charts).

We can now start by loading the stocks data and creating a store. Again, grids always grab their data from the store, and some of the interactions with grid will trigger events on the store, like reloading or sorting or paging. So to do that, we’ll create our store here.

The Ext data store is different from the flux store. What makes the grid and the store a little different from the standard React approach is that the two are tightly integrated. Typically, you can pass data directly to a store, or a store can pull data on its own from a back-end using a proxy. With ExtReact Grid, you get interactive functionality like filtering, sorting, paging, grouping, and summarization without having to actually code it.

For this example, we’re passing the data directly to the store from the Stocks data file. You can also create a store with a proxy config — having a proxy allows us to do all sorts of great things like remote paging, filtering, and sorting. We set autoload to true, so it automatically loads the grid. The data isn’t particularly sorted by any criteria, so we’re going to have it sort on the client-side by specifying the name property.

this.store = new Ext.data.Store({
data: stocks,
autoLoad: true,
sorters: [{
property: ‘name’
}],
listeners: {
update: this.onRecordUpdated
}
})

In the Grid, assign the store config to the store that was created.

<Grid store={this.store}>

</Grid>

Now, we have a grid with all the data as shown below:

Basic Grid with data

With this simple code, you get a lot of features for free — such as sorting — which allows you to click on any column header and it automatically sorts (see the symbol column in the example below).

In this case, the sorting is done on the client side. But if we implemented a real back-end API, we could configure the proxy to do remote sorting on the back-end and use an “order by clause” in the database to do a sort.

You also get resizable columns for free. So even though we set a width on these columns, if the user wants to see something or close something, he can do that by dragging the column from side to side.

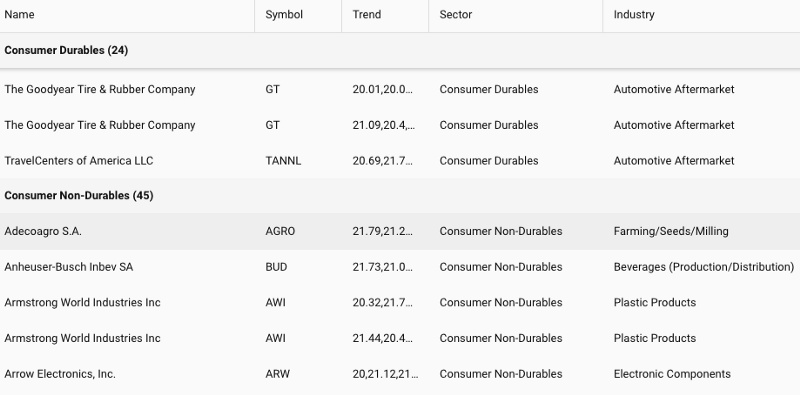
You also get a nice grouping feature too. So if we wanted to group by industry, we could say group by this field, and it will group all of the data by the value of industry, and it will give you a pinned header as you scroll down for each of the groupings.

Grouping by Industry

You’ll notice that this data is rendering pretty quickly for 10,000 records. The reason it renders so quickly is because it’s using what we call buffered rendering. So despite the fact that this table looks full, and you can scroll down and it keeps going and going, on initial loading it only renders a little bit more than what you’re actually seeing in terms of the “view port height.”

The post How to Build React 16 Web Apps with the Sencha Grid appeared first on SitePoint.

3 App and Website Prototyping Tools You Should Check out Today

Original Source: https://www.sitepoint.com/3-app-and-website-prototyping-tools-you-should-check-out-today/

This article was created in partnership with BAWMedia. Thank you for supporting the partners who make SitePoint possible. Prototyping tools are one of the best means of design communication. They are popular among interactive software system designers, developers, and project managers. Prototyping tools have proved to be key to successful design and development. Same goes […]

The post 3 App and Website Prototyping Tools You Should Check out Today appeared first on SitePoint.

Use Your Web Dev Skills to Build a Desktop App with Electron

Original Source: https://www.sitepoint.com/use-your-web-dev-skills-to-build-a-desktop-app-with-electron/

This article was originally published on the Okta developer blog. Thank you for supporting the partners who make SitePoint possible. Electron is a framework for building cross-platform desktop applications with web technologies like JavaScript, HTML, and CSS. It was created for GitHub’s Atom editor and has achieved widespread adoption since. Electron powers several apps that […]

The post Use Your Web Dev Skills to Build a Desktop App with Electron appeared first on SitePoint.

Adobe reveals exciting new Illustrator update

Original Source: http://feedproxy.google.com/~r/CreativeBloq/~3/5a2k7pY-Dq8/adobe-announces-exciting-illustrator-toolbar-update

Adobe has been releasing teasers of the most exciting changes you'll find in the upcoming release of Illustrator CC, and here's one we're particularly excited about: soon designers will be able to customise their toolbars. 

60 amazing Illustrator tutorials

With over 80 tools on offer, finding the ones you want hasn't always been easy. And let's face it, your most-used tools often differ from project to project. Thankfully, there's a clever new way to manage your tools coming your way in the next major Illustrator update. 

Adobe has created a new tools menu, accessible from the bottom of the Illustrator toolbar, in which all available tools are grouped logically by function. Designers will be able to drag and drop the tools they need into their main toolbar, and the ones they don't out of the main toolbar and into the complete menu. See it in action in the short video below.

Users will also be able to create different custom toolbars for different projects. It's a fairly simple update that promises to have a big impact on workflow, making Illustrator much more user-friendly. You can read more on the Adobe Blog.

Read more:

Create sets of product icons in IllustratorThe illustrator hotlist 2018How to create repeat patterns in Illustrator

Should You Choose a Dark or Light Color Scheme?

Original Source: http://feedproxy.google.com/~r/1stwebdesigner/~3/MaTZqfGYXxc/

With many websites and apps making the switch to black and gray UI, you might be wondering: Which is really better? Light design is the safe choice, while dark is trendy. But when done wrong, the results can decimate your conversions.

Both of these styles have their pros and cons – so when is the right time to use them? What sort of websites require bright tones, and which work best in black? Learn the answer before you implement an unbefitting color scheme into your website!

Dark Design

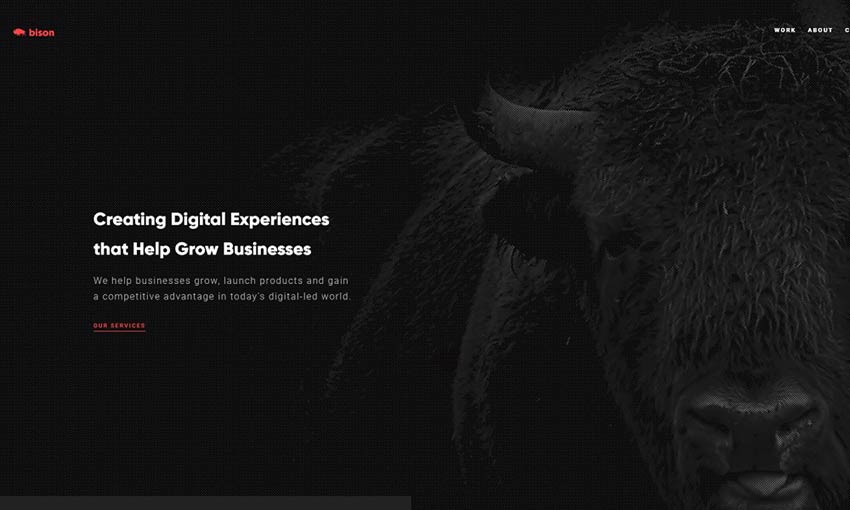
Need something with style? Dark web design is the choice of gaming and technology companies, visual content-heavy sites and those after something a little more atmospheric.

While a dark UI is much harder to pull off, the results are worth it when used correctly. These tones are suited to recreational sites used at night, and ones that aim to emphasize visual or video content. Think of lightboxes; dark website colors create the same effect!

In addition, a dark interface is much better on the eyes long-term. While unsuitable for reading short articles, as black on white is more legible, it’s perfect when you’re working with a lot of text or images for hours on end.

If you decide to go with dark, make sure to pick a muted palette and sparingly use bright colors for emphasis.

Pros:

Enhances long-term readability – great for coding, heavy reading and sites meant to be used for hours
Stylish and trendy
Creates a dramatic or mysterious atmosphere
Can be used to emphasize content or de-emphasize both empty “white space” and cluttered UI

Cons:

Short-term, light text on a dark background strains the eyes; not suitable for blogs or news sites
Hard to master
Does not look good with bright palettes
Unpopular with older computer users

Bison Studio dark web design

Light Design

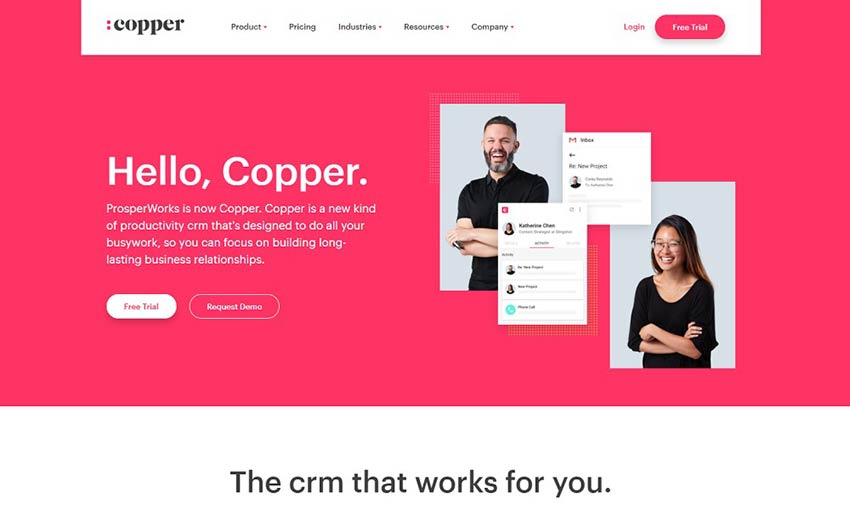
Light interfaces are known for creating a minimalistic, elegant and universally pleasant atmosphere. However, its oversaturation in web design has led to the inverse being considered more attractive. Still, if you’re not willing to take a risk, white is probably the best idea.

If you run a website made up of articles, such as a blog or news site, use light UI; the text is more legible. These sites are also generally visited during the day. Low light levels are what make dark colors better. This is why so many gaming apps use it. Typically, their visitors are playing at night. But when the sun is out, a white background can make text a lot easier to read.

Pros:

More common and a safer choice
Less eye strain while reading; necessary for news sites, blogs, etc.
Enhances color, making it pop

Cons:

Can be seen as boring or overdone
Long-term browsing can cause eye strain
Does not look good with muted colors

Copper light web design

How to Choose Your UI Color Scheme

Now that you know the pros and cons of each, which to choose?

One of the biggest factors should be the branding and overall tone of your website. If you’re after an edgy, modern look, black might be just what you need. If you want to use many bright, cheerful colors, you should certainly go with white.

Dark design is great for websites that will be used long-term and ideally involve little reading. For example, a workflow app that will be used throughout the day. If you need to highlight one part of the UI, such as if you’re creating an art app, a darker palette will work well here too.

A light look, on the other hand, is suitable for any situation. You can go wrong if you choose a bright color scheme. There are other, more subtle ways to make your website stand out. It won’t be quite as striking as greeting visitors with a gray background. But light design is certainly no crutch.

If you can’t commit, why not try both? Night mode toggles give users the choice regarding how to browse. If you’re struggling to pick a design and stick with it, leaving it up to users is the best option.

Now that you know when the best time is to use dark or light web design, which are you going to choose?


Growing a Business Is About the Customer, Not the Product

Original Source: https://www.sitepoint.com/business-growth-customer-product/

Gary Tramer is the co-founder of successful sales engine enterprises SearchWords and LeadChat, and most recently PoweredLocal, a wireless marketing and data analysis automation system. As an expert in sales, lead generation and conversion maximization, Gary is the perfect person to talk to about how businesses create and grow customer bases.

You Should Never Build a Product Before You Sell It

The first thing most people think about when launching a new enterprise is what they’ll be selling, but what they should really be focusing on is who they’ll be selling to. Although your product is important, no matter how good it is, if people aren’t interest in buying it, then your business is likely going to struggle.

When Gary Tramer first became an entrepreneur, the term “start-up” hadn’t even been popularized yet. All he had to rely on for launching a business were past models, all of which told him that a business plan and a well-developed product were the ways to achieve success.

But after spending over $200,000 on development and none on marketing, all Gary and his business partner had achieved was an amazing product that nobody has ever used. The lesson learned was painful but important: never build something before you sell it.

But that doesn’t mean you should give up either.

The hardest part of starting a new business is figuring out why people should care and, more importantly, why they would want to spend their money on it.

Using his personal experience as a door-to-door salesperson, Gary began his first successful enterprise, SearchWords, by signing clients up to SEO packages before he had even created an operating team — testing the product’s viability long before it ever existed.

After three months he had gained over 600 clients that had paid upfront, and three years later that client base had grown to over 6000.

But Gary and his partners soon had a “mass realization” that trying to sell something that directly competed with giant companies like Google probably wasn’t going to work in the long run.

They decided to dig a little deeper, and discovered that one of the main operating issues for SearchWords was converting website visits into actual purchases. And after building a solid client base first, they created a second successful business (LeadChat) out of fixing that problem for people.

Then they did it again by identifying a problem with the LeadChat model — but this time for an ecommerce business.

People asked us “What’s the secret to making ecommerce work?”, and the secret was that Facebook allowed us to target people quite uniquely … We also had an email database that we were growing [so] that we could re-market to people, and we knew everyone visiting the website by using web cookies.

This experience taught Gary Tramer something fundamental about what a successful business looks like. You need customers, but you also need to know them – and collecting data is the best way to achieve that.

The post Growing a Business Is About the Customer, Not the Product appeared first on SitePoint.