User Authentication with the MEAN Stack
Original Source: https://www.sitepoint.com/user-authentication-mean-stack/
In this article, we’re going to look at managing user authentication in the MEAN stack. We’ll use the most common MEAN architecture of having an Angular single-page app using a REST API built with Node, Express and MongoDB.
When thinking about user authentication, we need to tackle the following things:
let a user register
save their data, but never directly store their password
let a returning user log in
keep a logged in user’s session alive between page visits
have some pages that can only been seen by logged in users
change output to the screen depending on logged in status (e.g. a “login” button or a “my profile” button).
Before we dive into the code, let’s take a few minutes for a high-level look at how authentication is going to work in the MEAN stack.
The MEAN Stack Authentication Flow
So what does authentication look like in the MEAN stack?
Still keeping this at a high level, these are the components of the flow:
user data is stored in MongoDB, with the passwords hashed
CRUD functions are built in an Express API — Create (register), Read (login, get profile), Update, Delete
an Angular application calls the API and deals with the responses
the Express API generates a JSON Web Token (JWT, pronounced “Jot”) upon registration or login, and passes this to the Angular application
the Angular application stores the JWT in order to maintain the user’s session
the Angular application checks the validity of the JWT when displaying protected views
the Angular application passes the JWT back to Express when calling protected API routes.
JWTs are preferred over cookies for maintaining the session state in the browser. Cookies are better for maintaining state when using a server-side application.
The Example Application
The code for this article is available on GitHub. To run the application, you’ll need to have Node.js installed, along with MongoDB. (For instructions on how to install, please refer to Mongo’s official documentation — Windows, Linux, macOS).
The Angular App
To keep the example in this article simple, we’ll start with an Angular app with four pages:
home page
register page
login page
profile page
The pages are pretty basic and look like this to start with:
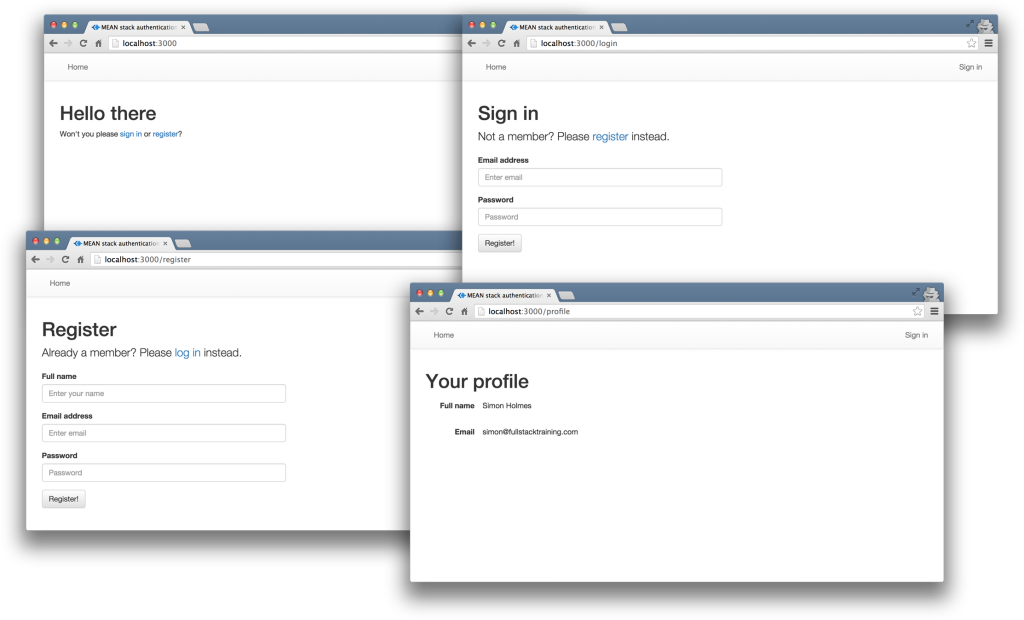
The profile page will only be accessible to authenticated users. All the files for the Angular app are in a folder inside the Angular CLI app called /client.
We’ll use the Angular CLI for building and running the local server. If you’re unfamiliar with the Angular CLI, refer to the Angular 2 Tutorial: Create a CRUD App with Angular CLI to get started.
The REST API
We’ll also start off with the skeleton of a REST API built with Node, Express and MongoDB, using Mongoose to manage the schemas. This API has three routes:
/api/register (POST) — to handle new users registering
/api/login (POST) — to handle returning users logging in
/api/profile/USERID (GET) — to return profile details when given a USERID.
The code for the API is all held in another folder inside the Express app, called api. This holds the routes, controllers and model, and is organized like this:
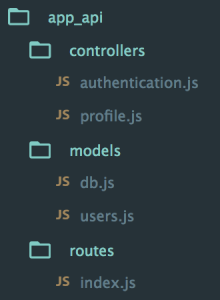
At this starting point, each of the controllers simply responds with a confirmation, like this:
module.exports.register = function(req, res) {
console.log(“Registering user: ” + req.body.email);
res.status(200);
res.json({
“message” : “User registered: ” + req.body.email
});
};
Okay, let’s get on with the code, starting with the database.
Creating the MongoDB Data Schema with Mongoose
There’s a simple user schema defined in /api/models/users.js. It defines the need for an email address, a name, a hash and a salt. The hash and salt will be used instead of saving a password. The email is set to unique as we’ll use it for the login credentials. Here’s the schema:
var userSchema = new mongoose.Schema({
email: {
type: String,
unique: true,
required: true
},
name: {
type: String,
required: true
},
hash: String,
salt: String
});
Managing the Password without Saving It
Saving user passwords is a big no-no. Should a hacker get a copy of your database, you want to make sure they can’t use it to log in to accounts. This is where the hash and salt come in.
The salt is a string of characters unique to each user. The hash is created by combining the password provided by the user and the salt, and then applying one-way encryption. As the hash can’t be decrypted, the only way to authenticate a user is to take the password, combine it with the salt and encrypt it again. If the output of this matches the hash, the password must have been correct.
To do the setting and the checking of the password, we can use Mongoose schema methods. These are essentially functions that you add to the schema. They’ll both make use of the Node.js crypto module.
At the top of the users.js model file, require crypto so that we can use it:
var crypto = require(‘crypto’);
Nothing needs installing, as crypto ships as part of Node. Crypto itself has several methods; we’re interested in randomBytes to create the random salt and pbkdf2Sync to create the hash (there’s much more about Crypto in the Node.js API docs).
Setting the Password
To save the reference to the password, we can create a new method called setPassword on the userSchema schema that accepts a password parameter. The method will then use crypto.randomBytes to set the salt, and crypto.pbkdf2Sync to set the hash:
userSchema.methods.setPassword = function(password){
this.salt = crypto.randomBytes(16).toString(‘hex’);
this.hash = crypto.pbkdf2Sync(password, this.salt, 1000, 64, ‘sha512’).toString(‘hex’);
};
We’ll use this method when creating a user. Instead of saving the password to a password path, we’ll be able to pass it to the setPassword function to set the salt and hash paths in the user document.
Checking the Password
Checking the password is a similar process, but we already have the salt from the Mongoose model. This time we just want to encrypt the salt and the password and see if the output matches the stored hash.
Add another new method to the users.js model file, called validPassword:
userSchema.methods.validPassword = function(password) {
var hash = crypto.pbkdf2Sync(password, this.salt, 1000, 64, ‘sha512’).toString(‘hex’);
return this.hash === hash;
};
Generating a JSON Web Token (JWT)
One more thing the Mongoose model needs to be able to do is generate a JWT, so that the API can send it out as a response. A Mongoose method is ideal here too, as it means we can keep the code in one place and call it whenever needed. We’ll need to call it when a user registers and when a user logs in.
To create the JWT, we’ll use a module called jsonwebtoken which needs to be installed in the application, so run this on the command line:
npm install jsonwebtoken –save
Then require this in the users.js model file:
var jwt = require(‘jsonwebtoken’);
This module exposes a sign method that we can use to create a JWT, simply passing it the data we want to include in the token, plus a secret that the hashing algorithm will use. The data should be sent as a JavaScript object, and include an expiry date in an exp property.
Adding a generateJwt method to userSchema in order to return a JWT looks like this:
userSchema.methods.generateJwt = function() {
var expiry = new Date();
expiry.setDate(expiry.getDate() + 7);
return jwt.sign({
_id: this._id,
email: this.email,
name: this.name,
exp: parseInt(expiry.getTime() / 1000),
}, “MY_SECRET”); // DO NOT KEEP YOUR SECRET IN THE CODE!
};
Note: It’s important that your secret is kept safe: only the originating server should know what it is. It’s best practice to set the secret as an environment variable, and not have it in the source code, especially if your code is stored in version control somewhere.
That’s everything we need to do with the database.
Set Up Passport to Handle the Express Authentication
Passport is a Node module that simplifies the process of handling authentication in Express. It provides a common gateway to work with many different authentication “strategies”, such as logging in with Facebook, Twitter or Oauth. The strategy we’ll use is called “local”, as it uses a username and password stored locally.
To use Passport, first install it and the strategy, saving them in package.json:
npm install passport –save
npm install passport-local –save
Configure Passport
Inside the api folder, create a new folder config and create a file in there called passport.js. This is where we define the strategy.
Before defining the strategy, this file needs to require Passport, the strategy, Mongoose and the User model:
var passport = require(‘passport’);
var LocalStrategy = require(‘passport-local’).Strategy;
var mongoose = require(‘mongoose’);
var User = mongoose.model(‘User’);
For a local strategy, we essentially just need to write a Mongoose query on the User model. This query should find a user with the email address specified, and then call the validPassword method to see if the hashes match. Pretty simple.
There’s just one curiosity of Passport to deal with. Internally, the local strategy for Passport expects two pieces of data called username and password. However, we’re using email as our unique identifier, not username. This can be configured in an options object with a usernameField property in the strategy definition. After that, it’s over to the Mongoose query.
So all in, the strategy definition will look like this:
passport.use(new LocalStrategy({
usernameField: ’email’
},
function(username, password, done) {
User.findOne({ email: username }, function (err, user) {
if (err) { return done(err); }
// Return if user not found in database
if (!user) {
return done(null, false, {
message: ‘User not found’
});
}
// Return if password is wrong
if (!user.validPassword(password)) {
return done(null, false, {
message: ‘Password is wrong’
});
}
// If credentials are correct, return the user object
return done(null, user);
});
}
));
Note how the validPassword schema method is called directly on the user instance.
Now Passport just needs to be added to the application. So in app.js we need to require the Passport module, require the Passport config and initialize Passport as middleware. The placement of all of these items inside app.js is quite important, as they need to fit into a certain sequence.
The Passport module should be required at the top of the file with the other general require statements:
var express = require(‘express’);
var path = require(‘path’);
var favicon = require(‘serve-favicon’);
var logger = require(‘morgan’);
var cookieParser = require(‘cookie-parser’);
var bodyParser = require(‘body-parser’);
var passport = require(‘passport’);
The config should be required after the model is required, as the config references the model.
require(‘./api/models/db’);
require(‘./api/config/passport’);
Finally, Passport should be initialized as Express middleware just before the API routes are added, as these routes are the first time that Passport will be used.
app.use(passport.initialize());
app.use(‘/api’, routesApi);
We’ve now got the schema and Passport set up. Next, it’s time to put these to use in the routes and controllers of the API.
Continue reading %User Authentication with the MEAN Stack%


Leave a Reply
Want to join the discussion?Feel free to contribute!