React Native End-to-end Testing and Automation with Detox
Original Source: https://www.sitepoint.com/detox-react-native-testing-automation/?utm_source=rss

Detox is an end-to-end testing and automation framework that runs on a device or a simulator, just like an actual end user.
Software development demands fast responses to user and/or market needs. This fast development cycle can result (sooner or later) in parts of a project being broken, especially when the project grows so large. Developers get overwhelmed with all the technical complexities of the project, and even the business people start to find it hard to keep track of all scenarios the product caters for.
In this scenario, there’s a need for software to keep on top of the project and allow us to deploy with confidence. But why end-to-end testing? Aren’t unit testing and integration testing enough? And why bother with the complexity that comes with end-to-end testing?
First of all, the complexity issue has been tackled by most of the end-to-end frameworks, to the extent that some tools (whether free, paid or limited) allow us to record the test as a user, then replay it and generate the necessary code. Of course, that doesn’t cover the full range of scenarios that you’d be able to address programmatically, but it’s still a very handy feature.
Want to learn React Native from the ground up? This article is an extract from our Premium library. Get an entire collection of React Native books covering fundamentals, projects, tips and tools & more with SitePoint Premium. Join now for just $9/month.
End-to-end Integration and Unit Testing
End-to-end testing versus integration testing versus unit testing: I always find the word “versus” drives people to take camps — as if it’s a war between good and evil. That drives us to take camps instead of learning from each other and understanding the why instead of the how. The examples are countless: Angular versus React, React versus Angular versus Vue, and even more, React versus Angular versus Vue versus Svelte. Each camp trash talks the other.
jQuery made me a better developer by taking advantage of the facade pattern $('') to tame the wild DOM beast and keep my mind on the task at hand. Angular made me a better developer by taking advantage of componentizing the reusable parts into directives that can be composed (v1). React made me a better developer by taking advantage of functional programming, immutability, identity reference comparison, and the level of composability that I don’t find in other frameworks. Vue made me a better developer by taking advantage of reactive programming and the push model. I could go on and on, but I’m just trying to demonstrate the point that we need to concentrate more on the why: why this tool was created in the first place, what problems it solves, and whether there are other ways of solving the same problems.
As You Go Up, You Gain More Confidence
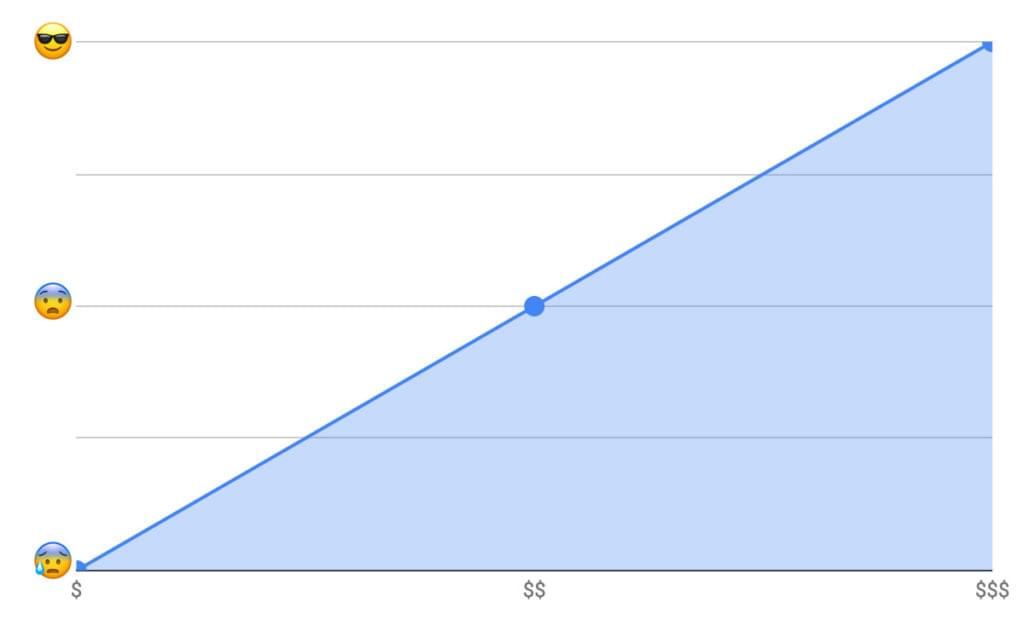
As you go more on the spectrum of simulating the user journey, you have to do more work to simulate the user interaction with the product. But on the other hand, you get the most confidence because you’re testing the real product that the user interacts with. So, you catch all the issues—whether it’s a styling issue that could cause a whole section or a whole interaction process to be invisible or non interactive, a content issue, a UI issue, an API issue, a server issue, or a database issue. You get all of this covered, which gives you the most confidence.
Why Detox?
We discussed the benefit of end-to-end testing to begin with and its value in providing the most confidence when deploying new features or fixing issues. But why Detox in particular? At the time of writing, it’s the most popular library for end-to-end testing in React Native and the one that has the most active community. On top of that, it’s the one React Native recommends in its documentation.
The Detox testing philosophy is “gray-box testing”. Gray-box testing is testing where the framework knows about the internals of the product it’s testing.In other words, it knows it’s in React Native and knows how to start up the application as a child of the Detox process and how to reload it if needed after each test. So each test result is independent of the others.
Prerequisites
macOS High Sierra 10.13 or above
Xcode 10.1 or above
Homebrew:
/usr/bin/ruby -e "$(curl -fsSL https://raw.githubusercontent.com/Homebrew/install/master/install)"
Node 8.3.0 or above:
brew update && brew install node
Apple Simulator Utilities: brew tap wix/brew and brew install applesimutils
Detox CLI 10.0.7 or above:
npm install -g detox-cli
See the Result in Action
First, let’s clone a very interesting open-source React Native project for the sake of learning, then add Detox to it:
git clone https://github.com/ahmedam55/movie-swiper-detox-testing.git
cd movie-swiper-detox-testing
npm install
react-native run-ios
Create an account on The Movie DB website to be able to test all the application scenarios. Then add your username and password in .env file with usernamePlaceholder and passwordPlaceholder respectively:
isTesting=true
username=usernamePlaceholder
password=passwordPlaceholder
After that, you can now run the tests:
detox test
Note that I had to fork this repo from the original one as there were a lot of breaking changes between detox-cli, detox, and the project libraries. Use the following steps as a basis for what to do:
Migrate it completely to latest React Native project.
Update all the libraries to fix issues faced by Detox when testing.
Toggle animations and infinite timers if the environment is testing.
Add the test suite package.
Setup for New Projects
Add Detox to Our Dependencies
Go to your project’s root directory and add Detox:
npm install detox –save-dev
Configure Detox
Open the package.json file and add the following right after the project name config. Be sure to replace movieSwiper in the iOS config with the name of your app. Here we’re telling Detox where to find the binary app and the command to build it. (This is optional. We can always execute react-native run-ios instead.) Also choose which type of simulator: ios.simulator, ios.none, android.emulator, or android.attached. And choose which device to test on:
{
"name": "movie-swiper-detox-testing",
// add these:
"detox": {
"configurations": {
"ios.sim.debug": {
"binaryPath": "ios/build/movieSwiper/Build/Products/Debug-iphonesimulator/movieSwiper.app",
"build": "xcodebuild -project ios/movieSwiper.xcodeproj -scheme movieSwiper -configuration Debug -sdk iphonesimulator -derivedDataPath ios/build",
"type": "ios.simulator",
"name": "iPhone 7 Plus"
}
}
}
}
Here’s a breakdown of what the config above does:
Execute react-native run-ios to create the binary app.
Search for the binary app at the root of the project: find . -name "*.app".
Put the result in the build directory.
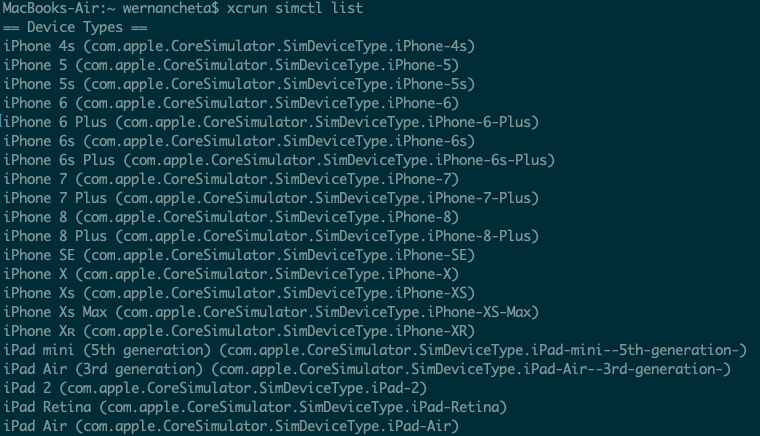
Before firing up the test suite, make sure the device name you specified is available (for example, iPhone 7). You can do that from the terminal by executing the following:
xcrun simctl list
Here’s what it looks like:
Now that weve added Detox to our project and told it which simulator to start the application with, we need a test runner to manage the assertions and the reporting—whether it’s on the terminal or otherwise.
Detox supports both Jest and Mocha. We’ll go with Jest, as it has bigger community and bigger feature set. In addition to that, it supports parallel test execution, which could be handy to speed up the end-to-end tests as they grow in number.
Adding Jest to Dev Dependencies
Execute the following to install Jest:
npm install jest jest-cli –save-dev
The post React Native End-to-end Testing and Automation with Detox appeared first on SitePoint.


Leave a Reply
Want to join the discussion?Feel free to contribute!