Create an Offline-first React Native App Using WatermelonDB
Original Source: https://www.sitepoint.com/create-an-offline-first-react-native-app-using-watermelondb/?utm_source=rss

React Native has different database storage mechanisms for different mobile app purposes. Simple structures — such as user settings, app settings, and other key-value pair data — can be handled easily using async storage or secure storage.
Other applications — such as Twitter clones — fetch data from the server and directly show it to the user. They maintain a cache of data, and if a user needs to interact with any document, they call the APIs directly.
So not all the applications require a database.
When We Need a Database
Applications such as the Nozbe (a to-do app), Expense (a tracker), and SplitWise (for in-app purchases), need to work offline. And to do so, they need a way to store data locally and sync it up with the server. This type of application is called an offline first app. Over time, these apps collect a lot of data, and it becomes harder to manage that data directly — so a database is needed to manage it efficiently.
Options in React Native
When developing an app, choose the database that best fits your requirements. If two options are available, then go with the one that has better documentation and quicker response to issues. Below are some of the best known options available for React Native:
WatermelonDB: an open-source reactive database that can be used with any underlying database. By default, it uses SQLite as the underlying database in React Native.
SQLite (React Native, Expo): the oldest, most used, battle-tested and well-known solution. It’s available for most of the platforms, so if you’ve developed an application in another mobile app development framework, you might already be familiar with it.
Realm (React Native): an open-source solution, but it also has an enterprise edition with lots of other features. They have done a great job and many well-known companies use it.
FireBase (React Native, Expo): a Google service specifically for the mobile development platform. It offers lots of functionality, storage being just one of them. But it does require you to stay within their ecosystem to utilize it.
RxDB: a real-time database for the Web. It has good documentation, a good rating on GitHub (> 9K stars), and is also reactive.
Prerequisites
I assume you have knowledge about basic React Native and its build process. We’re going to use react-native-cli to create our application.
I’d also suggest setting up an Android or iOS development environment while setting up the project, as you may face many issues, and the first step in debugging is keeping the IDE (Android Studio or Xcode) opened to see the logs.
Note: you can check out the official guide for installing dependencies here for more information. As the official guidelines are very concise and clear, we won’t be covering that topic here.
To set up a virtual device or physical device, follow these guides:
using a physical device
using a virtual device
Note: there’s a more JavaScript-friendly toolchain named Expo. The React Native community has also started promoting it, but I haven’t come across a large-scale, production-ready application that uses Expo yet, and Expo port isn’t currently available for those using a database such as Realm — or in our case, WatermelonDB.
App Requirements
We’ll create a movie search application with a title, poster image, genre, and release date. Each movie will have many reviews.
The application will have three screens.
Home will show two buttons — one to generate dummy records, and a second to add new movie. Below it, there will be one search input that can be used to query movie titles from the database. It will show the list of movies below the search bar. If any name is searched, the list will only show the searched movies.
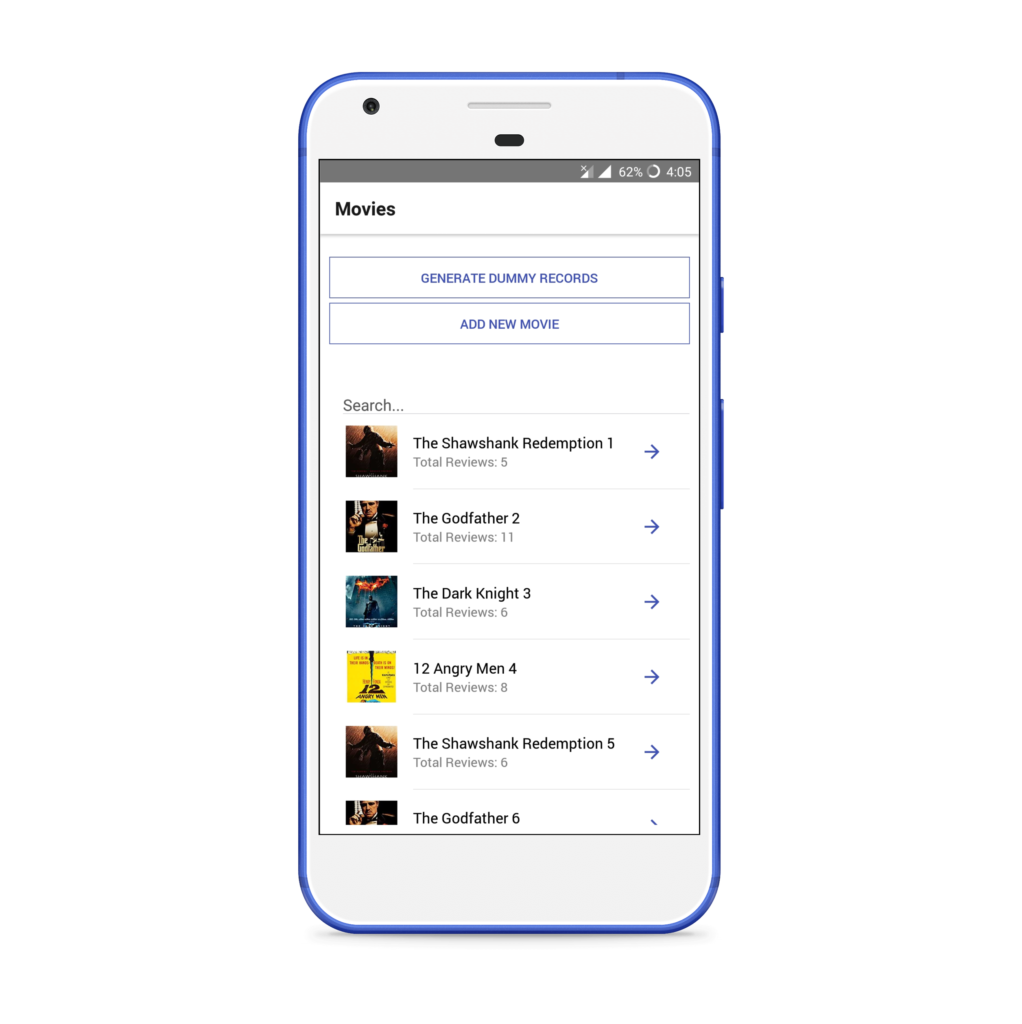
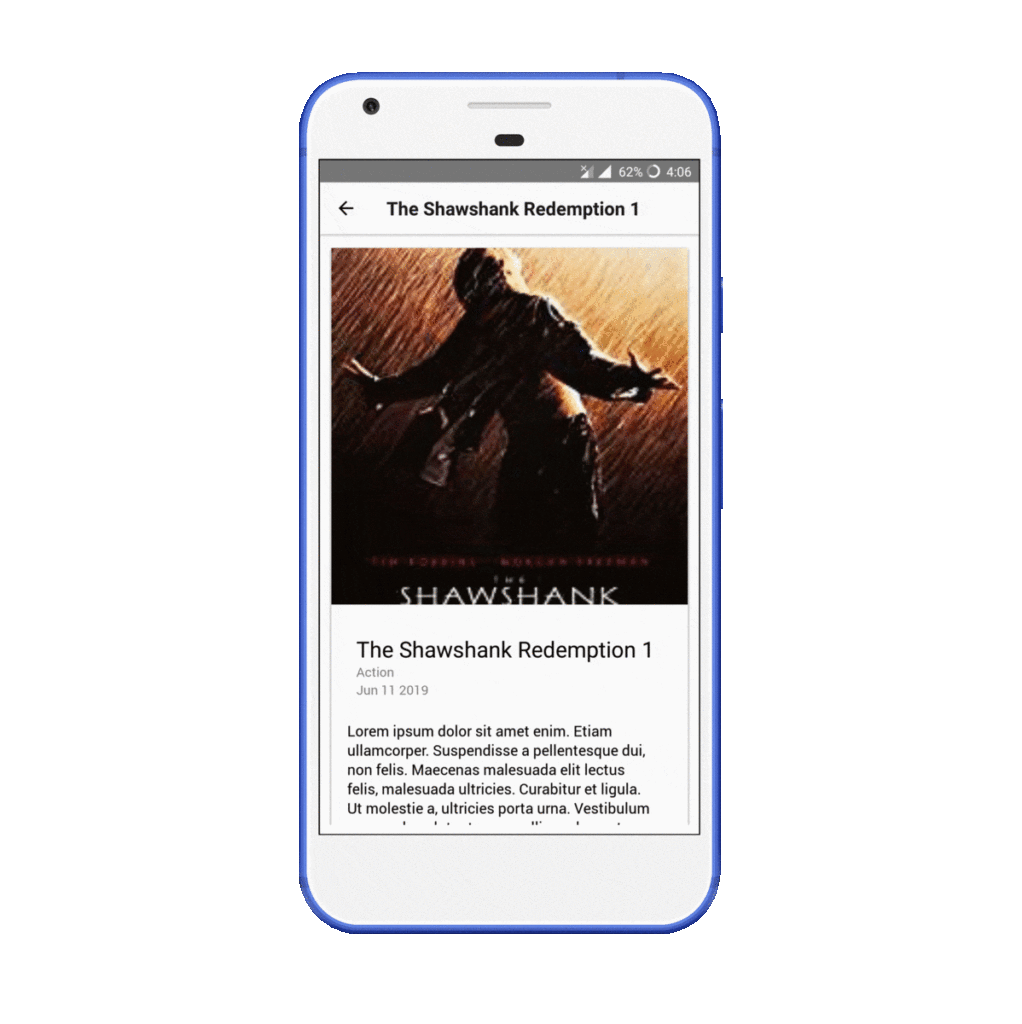
Clicking on any movie will open a Movie Dashboard, from where all its reviews can be checked. A movie can be edited or deleted, or a new review can be added from this screen.
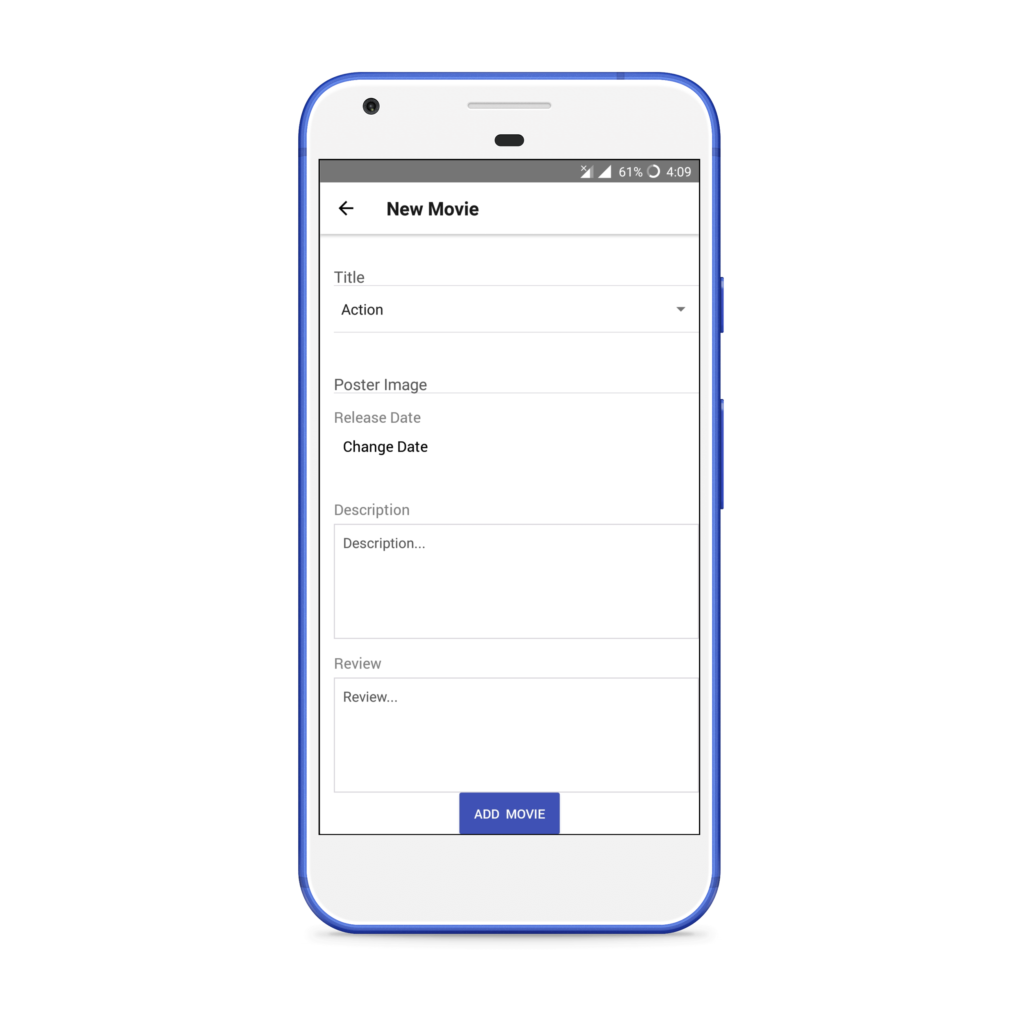
The third screen will be Movie Form, which is used to create/update a movie.
The source code is available on GitHub.
Why We Chose WatermelonDB (features)
We need to create an offline-first application, so a database is a must.
Features of WatermelonDB
Let’s look at some of the features of WatermelonDB.
Fully observable
A great feature of WatermelonDB is its reactive nature. Any object can be observed using observables, and it will automatically rerender our components whenever the data changes. We don’t have to make any extra efforts to use WatermelonDB. We wrap the simple React components and enhance them to make them reactive. In my experience, it just works seamlessly, and we don’t have to care about anything else. We make the changes in the object and our job’s done! It’s persisted and updated at all the places in the application.
SQLite under the hood for React Native
In a modern browser, just-in-time compilation is used to improve speed, but it’s not available in mobile devices. Also, the hardware in mobile devices is slower than in computers. Due to all these factors, JavaScript apps run slower in a mobile application. To overcome this, WatermelonDB doesn’t fetch anything until it’s needed. It uses lazy loading and SQLite as an underlying database on a separate thread to provide a fast response.
Sync primitives and sync adapter
Although WatermelonDB is just a local database, it also provides sync primitives and sync adapters. It makes it pretty easy to use with any of our own back-end databases. We just need to conform to the WatermelonDB sync protocol on the back end and provide the endpoints.
Further features include:
Statically typed using Flow
Available for all platforms
Dev Env and WatermelonDB Setup (v0.0)
We’re going to use react-native-cli to create our application.
Note: you may be able to use it with ExpoKit or Ejecting from Expo.
If you want to skip this part then clone the source repo and checkout the v0.0 branch.
Start a new project:
react-native init MovieDirectory
cd MovieDirectory
Install dependencies:
npm i @nozbe/watermelondb @nozbe/with-observables react-navigation react-native-gesture-handler react-native-fullwidth-image native-base rambdax
Below is the list of installed dependencies and their uses:
native-base: a UI library that will be used for look and feel of our app.
react-native-fullwidth-image: for showing full-screen responsive images. (Sometimes it can be a pain to calculate the width, height and also maintain aspect ratio. So it’s better to use an existing community solution.)
@nozbe/watermelondb: the database we’ll be using.
@nozbe/with-observables: contains the decorators (@) that will be used in our models.
react-navigation: used for Managing routes/screens
react-native-gesture-handler: the dependency for react-navigation.
rambdax: used to generate a random number while creating dummy data.
Open your package.json and replace the scripts with the following code:
"scripts": {
"start": "node node_modules/react-native/local-cli/cli.js start",
"start:ios": "react-native run-ios",
"start:android": "react-native run-android",
"test": "jest"
}
This will be used to run our application in the respective device.
Set Up WatermelonDB
We need to add a Babel plugin to convert our decorators, so install it as a dev dependency:
npm install -D @babel/plugin-proposal-decorators
Create a new file .babelrc in the root of the project:
// .babelrc
{
"presets": ["module:metro-react-native-babel-preset"],
"plugins": [["@babel/plugin-proposal-decorators", { "legacy": true }]]
}
Now use the following guides for your target environment:
iOS
Android
Open the android folder in Android Studio and sync the project. Otherwise, it will give you an error when running the application for the first time. Do the same if you’re targeting iOS.
Before we run the application, we need to link the react-native-gesture handler package, a dependency of react-navigation, and react-native-vector-icons, a dependency of native-base. By default, to keep the binary size of the application small, React Native doesn’t contain all the code to support native features. So whenever we need to use a particular feature, we can use the link command to add the native dependencies. So let’s link our dependencies:
react-native link react-native-gesture-handler
react-native link react-native-vector-icons
Run the application:
npm run start:android
# or
npm run start:ios
If you get an error for missing dependencies, run npm i.
The code up to here is available under the v0.0 branch.
Tutorial
As we’ll be creating a database application, a lot of the code will be back-end only, and we won’t be able to see much on the front end. It might seem a long, but have patience and follow the tutorial till the end. You won’t regret it!
The WatermelonDB workflow can be categorized into three main parts:
Schema: used to define the database table schema.
Models: the ORM mapped object. We’ll interact with these throughout our application.
Actions: used to perform various CRUD operations on our object/row. We can directly perform an action using a database object or we can define functions in our model to perform these actions. Defining them in models is the better practice, and we’re going to use that only.
Let’s get started with our application.
Initialize DB Schema and WatermelonDB (v0.1)
We’ll define our schema, models and database object in our application. We won’t able to see much in the application, but this is the most important step. Here we’ll check that our application works correctly after defining everything. If anything goes wrong, it will be easy to debug it at this stage.
Project Structure
Create a new src folder in the root. This will be the root folder for all of our React Native code. The models folder is used for all of our database-related files. It will behave as our DAO (Data Access Object) folder. This is a term used for an interface to some type of database or other persistence mechanism. The components folder will have all of our React components. The screens folder will have all the screens of our application.
mkdir src && cd src
mkdir models
mkdir components
mkdir screens
Schema
Go to the models folder, create a new file schema.js, and use the following code:
// schema.js
import { appSchema, tableSchema } from "@nozbe/watermelondb";
export const mySchema = appSchema({
version: 2,
tables: [
tableSchema({
name: "movies",
columns: [
{ name: "title", type: "string" },
{ name: "poster_image", type: "string" },
{ name: "genre", type: "string" },
{ name: "description", type: "string" },
{ name: "release_date_at", type: "number" }
]
}),
tableSchema({
name: "reviews",
columns: [
{ name: "body", type: "string" },
{ name: "movie_id", type: "string", isIndexed: true }
]
})
]
});
We’ve defined two tables — one for movies, and another for its reviews. The code itself self-explanatory. Both tables have related columns.
Note that, as per WatermelonDB’s naming convention, all the IDs end with an _id suffix, and the date field ends with the _at suffix.
isIndexed is used to add an index to a column. Indexing makes querying by a column faster, at the slight expense of create/update speed and database size. We’ll be querying all the reviews by movie_id, so we should mark it as indexed. If you want to make frequent queries on any boolean column, you should index it as well. However, you should never index date (_at) columns.
Models
Create a new file models/Movie.js and paste in this code:
// models/Movie.js
import { Model } from "@nozbe/watermelondb";
import { field, date, children } from "@nozbe/watermelondb/decorators";
export default class Movie extends Model {
static table = "movies";
static associations = {
reviews: { type: "has_many", foreignKey: "movie_id" }
};
@field("title") title;
@field("poster_image") posterImage;
@field("genre") genre;
@field("description") description;
@date("release_date_at") releaseDateAt;
@children("reviews") reviews;
}
Here we’ve mapped each column of the movies table with each variable. Note how we’ve mapped reviews with a movie. We’ve defined it in associations and also used @children instead of @field. Each review will have a movie_id foreign key. These review foreign key values are matched with id in the movie table to link the reviews model to the movie model.
For date also, we need to use the @date decorator so that WatermelonDB will give us the Date object instead of a simple number.
Now create a new file models/Review.js. This will be used to map each review of a movie.
// models/Review.js
import { Model } from "@nozbe/watermelondb";
import { field, relation } from "@nozbe/watermelondb/decorators";
export default class Review extends Model {
static table = "reviews";
static associations = {
movie: { type: "belongs_to", key: "movie_id" }
};
@field("body") body;
@relation("movies", "movie_id") movie;
}
We have created all of our required models. We can directly use them to initialize our database, but if we want to add a new model, we again have to make a change where we initialize the database. So to overcome this, create a new file models/index.js and add the following code:
// models/index.js
import Movie from "./Movie";
import Review from "./Review";
export const dbModels = [Movie, Review];
Thus we only have to make changes in our models folder. This makes our DAO folder more organized.
Initialize the Database
Now to use our schema and models to initialize our database, open index.js, which should be in the root of our application. Add the code below:
// index.js
import { AppRegistry } from "react-native";
import App from "./App";
import { name as appName } from "./app.json";
import { Database } from "@nozbe/watermelondb";
import SQLiteAdapter from "@nozbe/watermelondb/adapters/sqlite";
import { mySchema } from "./src/models/schema";
import { dbModels } from "./src/models/index.js";
// First, create the adapter to the underlying database:
const adapter = new SQLiteAdapter({
dbName: "WatermelonDemo",
schema: mySchema
});
// Then, make a Watermelon database from it!
const database = new Database({
adapter,
modelClasses: dbModels
});
AppRegistry.registerComponent(appName, () => App);
We create an adapter using our schema for the underlying database. Then we pass this adapter and our dbModels to create a new database instance.
It’s better at this point in time to check whether our application is working fine or not. So run your application and check:
npm run start:android
# or
npm run start:ios
We haven’t made any changes in the UI, so the screen will look similar to before if everything worked out.
All the code up to this part is under the v0.1 branch.
The post Create an Offline-first React Native App Using WatermelonDB appeared first on SitePoint.


Leave a Reply
Want to join the discussion?Feel free to contribute!