Designing Better Links For Websites And Emails: A Guideline

Original Source: https://smashingmagazine.com/2021/12/designing-better-links-websites-emails-guideline/

Why are “click here” and “by this link” poor choices? And is it acceptable to use “read more”? All these phrases have become so common that many people don’t see any problems with them.

How many times have you encountered or composed the following on websites, in emails, or intranets?

Fill in this form by the end of the day.
Check the equipment policy by the link.
You can find more information here, here, and here.

In this article, I’ll explain popular wording and formatting mistakes and will show more accessible and informative alternatives. Let’s go!

Meaningful Links
Exposing URLs
Download Links
Links vs. Buttons
Link-Rich Texts
Link Accessibility
Distinction
Color Contrast
Focus State
Optimization For Screen Readers
Duplicated Links

Meaningful Links

So what exactly is a hyperlink? It’s a combination of a web address (URL) and a clickable element (oftentimes a word or phrase, sometimes an image). While this is a vast topic, we’ll focus on text links, namely their usability and accessibility.

Thoughtfully composed links express respect to readers, whereas jumbled-up ones cause confusion and suspicion. When a link is presented as “here” or “this,” it’s harder to aim it with a cursor or finger. Also, it lacks transparency. What is hidden behind it: a page or file, an article or web form? One should re-read the whole sentence or paragraph to guess.

On the contrary, URLs attached to concise self-explanatory phrases inform people about the destination and are more convenient targets for clicking or tapping. Moreover, a well-composed link makes sense out of context and typically combines a topic (e.g. security, brand, marketing) and format (questionnaire, request form, guideline, policy, and so on).

Exposing URLs

If a web address is short and doesn’t look like M$c0P88%X4LHr&dxQ1A, then exposing it right away will work quite well, too, especially if the audience is supposed to copy it and paste it somewhere else.

And if you’ve got a long indecipherable chain of symbols, exposing it isn’t a great idea in most situations. In this case, consider embedding a URL into a succinct phrase or shortening the address in tools like Bitly or Cuttly.

However, these tools aren’t silver bullets: you do get a shorter link, but its meaningful parts will be replaced with random symbols, which are suspicious and not informative. Customizing shortened URLs is possible, but it’s typically a paid feature.

Compare the following examples:

bit.ly/30SjUa4y (suspicious and unreadable);
bit.ly/smashing-books (readable topic);
smash.ing/30SjUa4y (recognizable domain);
smash.ing/books (fully transparent).

Download Links

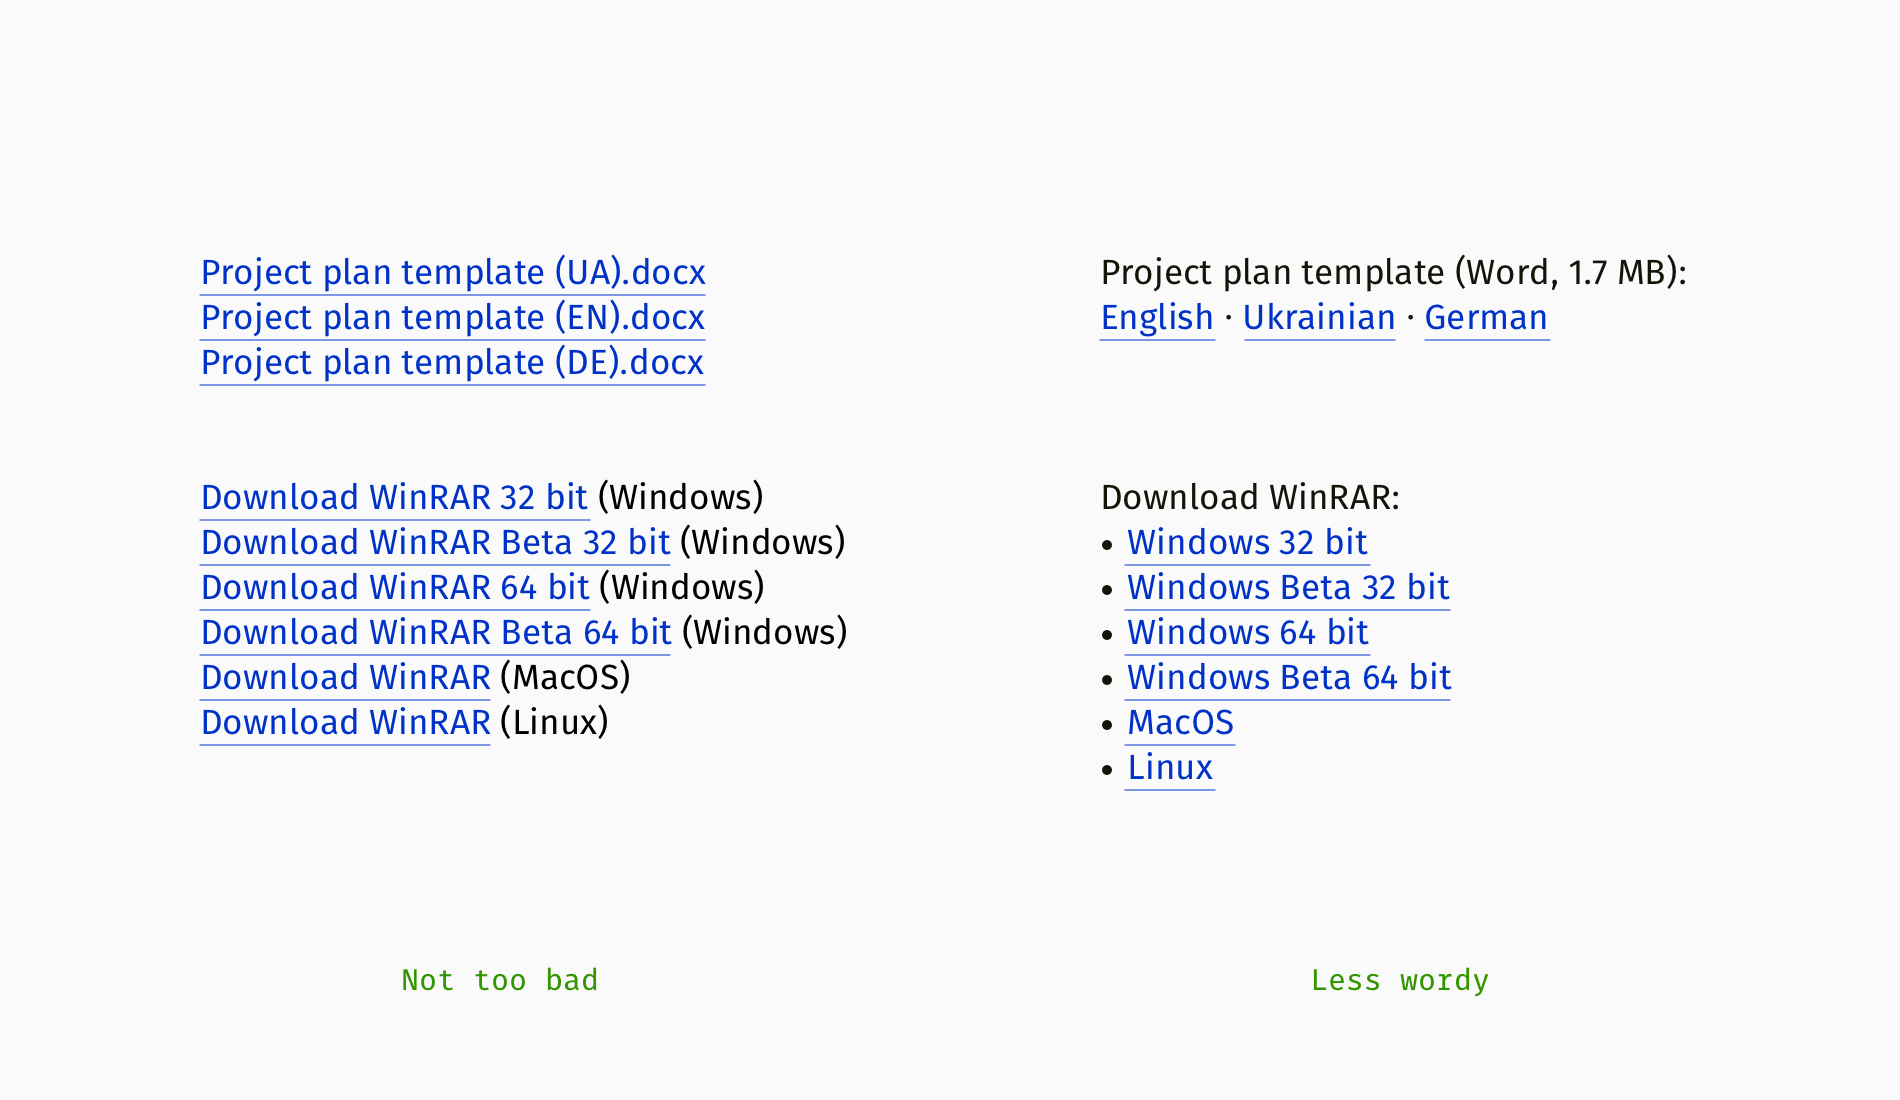
A link that guides to some downloadable resource needs a slightly different treatment. Besides embedding it into a meaningful phrase, you should also inform users about the file format and size:

The format gives clues to what you can do with this data (e.g. if the information is read-only or editable);
The file size is crucial for people with costly internet, slow connection, or limited local storage.

When you share a bunch of files (let’s say in different formats or versions), it’s not enough to design each link correctly. The whole series should be well-scannable and easy to use.

Links vs. Buttons

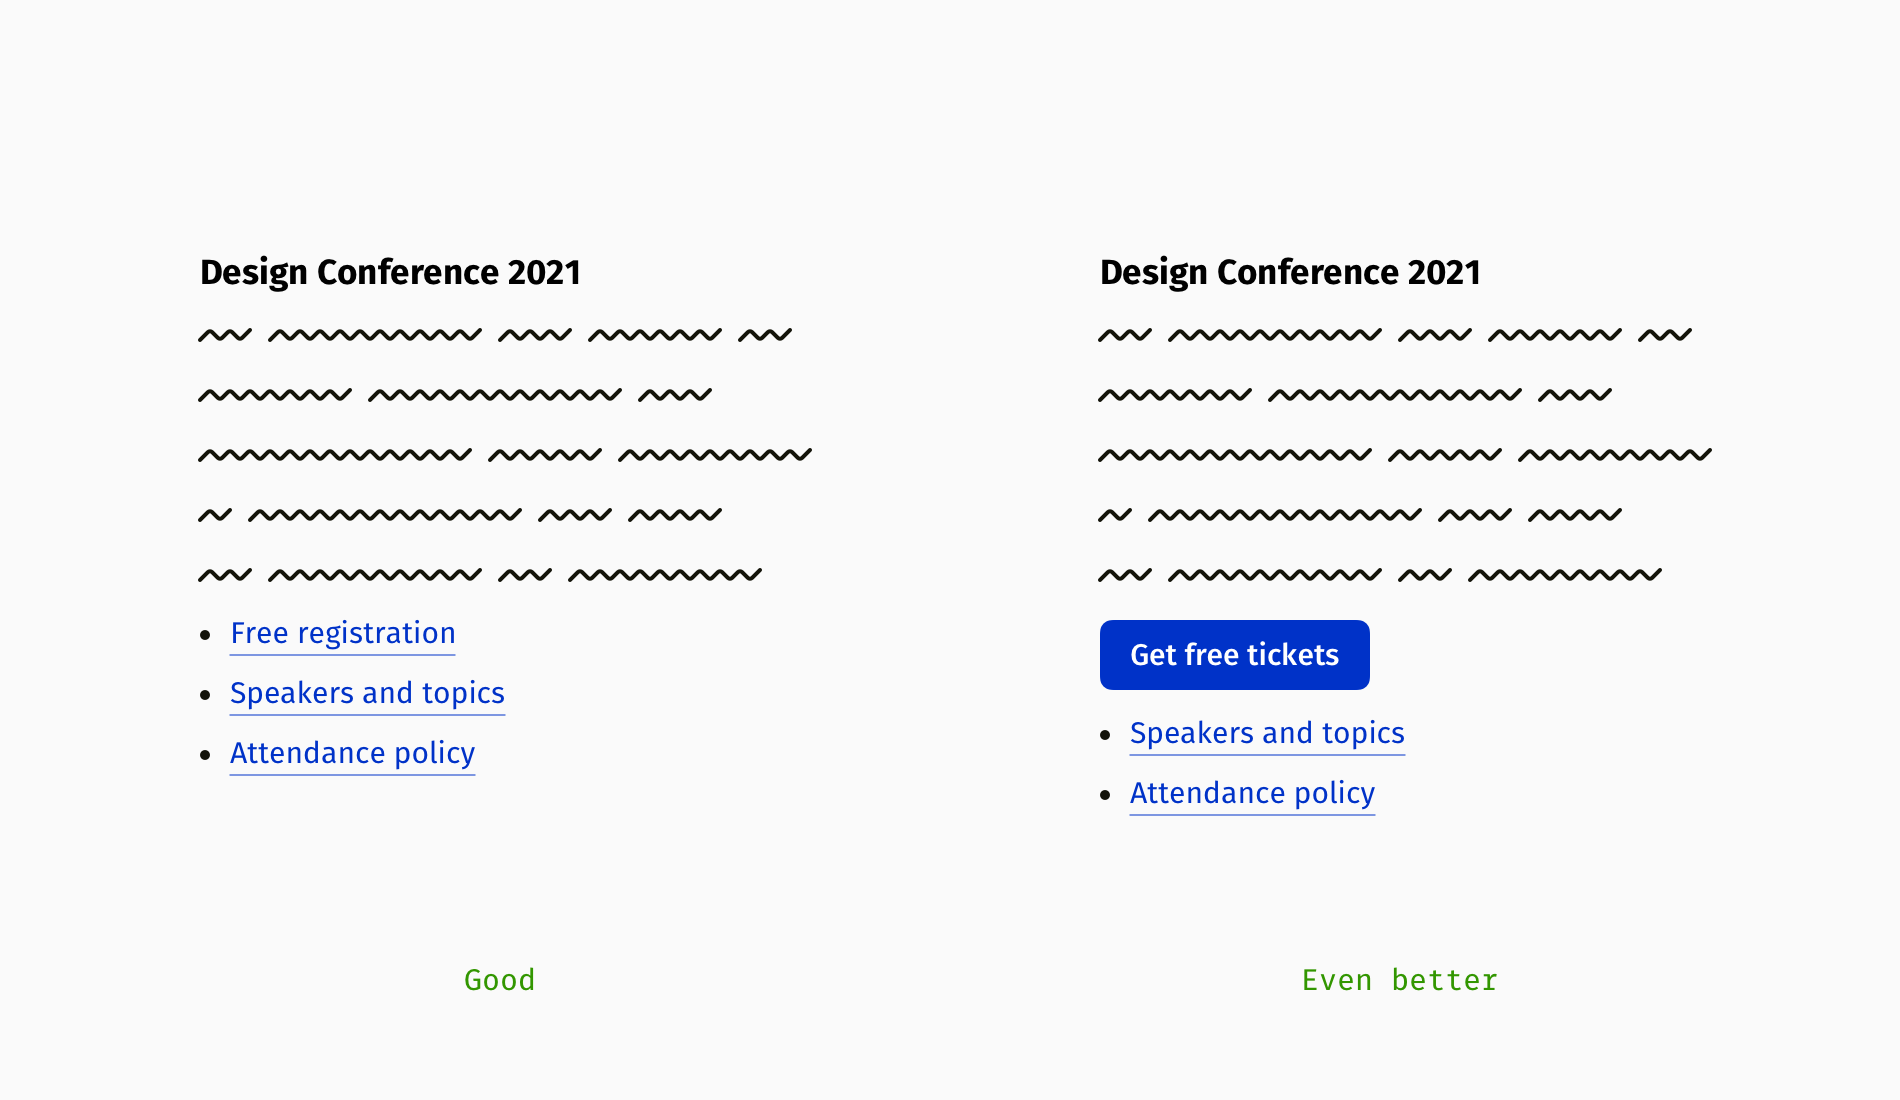
Not all links on a page or in an email are equally important. Authors often want their audience to click on the primary link, whereas other links can be skipped. If you’re going to draw people’s attention to the main action, think of presenting it as a button:

“Subscribe to the newsletter”
“Buy tickets”
“Get the white paper”
“Download the recording”

If you cannot create a button because of technical or time constraints, go for a quick-and-dirty solution: put that link in a separate line, make it bold, add spacing above and below, and so on.

Of course, button text should follow corresponding patterns so that you don’t cross the line between motivating readers and manipulating them:

Be concise (up to 4–5 words);
Ideally, start with a verb (e.g. “get”, “buy”, “download”, “apply for”, and so on);
Call the action honestly (i.e. avoid hushing up unpleasant steps like watching ads, registration or submitting personal data).

Compare “Download the report,” which assumes that downloading starts immediately after clicking, and “Get the report,” when a user downloads the file in exchange for their name and contact details.

Link-Rich Texts

Links enable the functioning of the Internet, however, vigorously pumping URLs into each sentence isn’t a good practice (of course, unless you contribute to a Wikipedia-like knowledge base that is cross-connected by nature).

Step zero is to make sure you really—really—need all the links. If you can edit something out, there won’t be a problem to solve. Otherwise, try to group the links: as a bulleted list, on the side of related paragraphs, or under a suitable title (e.g. “Recommended materials” or “Resources”).

Grouping the links helps a lot, but if the goal is to trigger action, the primary link should stand out. So, why not make it a button, then?

In the previous sections, we figured out how descriptive links increase usability and accessibility. At the same time, such links are longer, and consequently, can appear divided in a paragraph, when the first part of a link remains at the end of the previous line, and the second part jumps to the next line. It seems trivial compared to bigger flaws, but distorted links are a bit annoying in link-crowded texts.

If a paragraph width is fixed, compose text the way all links fit into lines, for example, try to start a paragraph with a link. However, browsers and devices render content differently, and links will still shift for some users. That’s why lists are a safer option for a set of links.

Link Accessibility

Accessible links are not only the ones that look tidy and clear; they should also be properly working. Web Content Accessibility Guidelines (WCAG), the world’s most famous digital accessibility standard, includes recommendations about hyperlinks, including some non-visual features.

Distinction

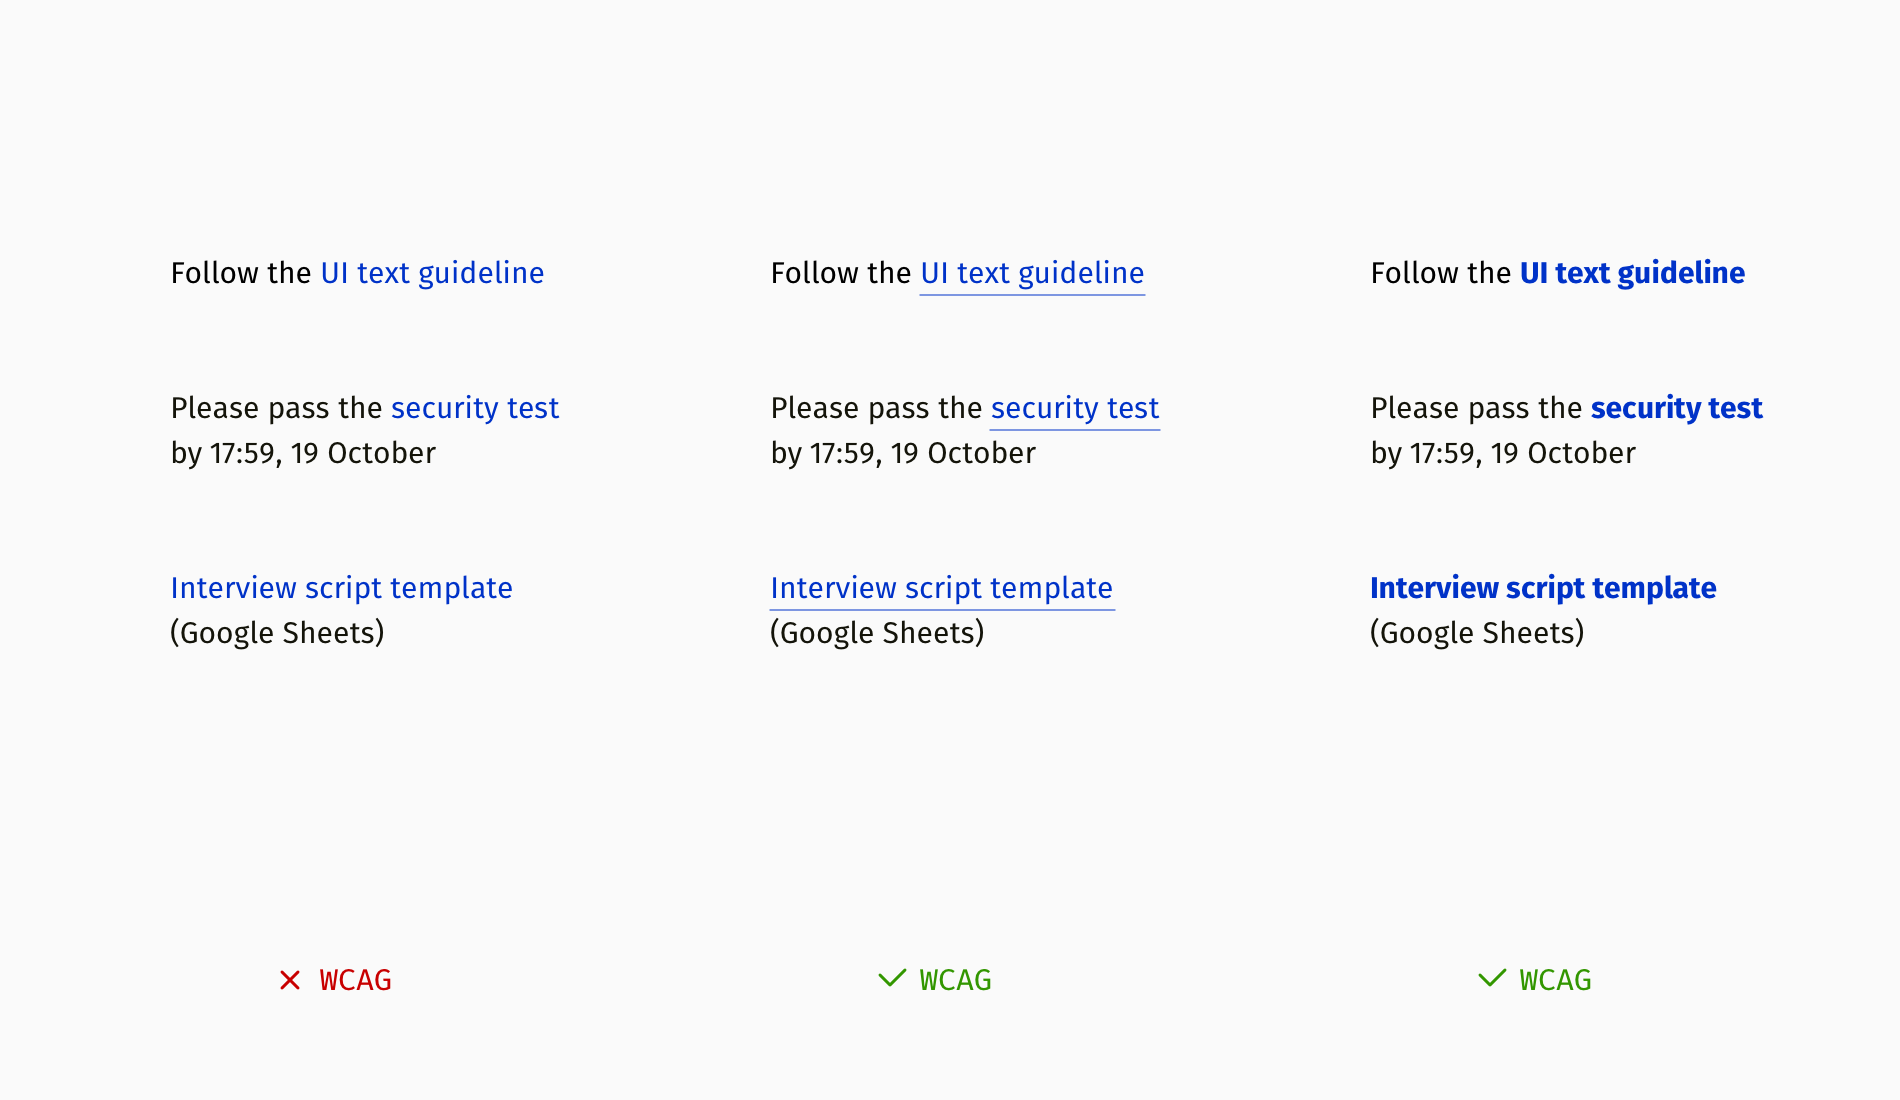
One of the WCAG requirements is not to rely on color only when you want to distinguish a button or link from the rest of the text. Painting links in blue or another color doesn’t suffice since it still might not be visible for people with color blindness. The most typical method is underlining links; they can also appear in bold font.

Color Contrast

Links are essential interactive elements and have to comply with contrast recommendations. WCAG has two levels of contrast compliance:

AA: medium, used by many websites for a mass audience;
AAA: high, primarily applied on governmental sites and by communities of people with disabilities.

For example, the AA level requires maintaining a contrast between a link and background of at least 4.5:1 for normal font size and 3:1 for large text.

Note: You can always check your colors with the help of the online Contrast Checker or Figma’s Contrast plugin.

Focus State

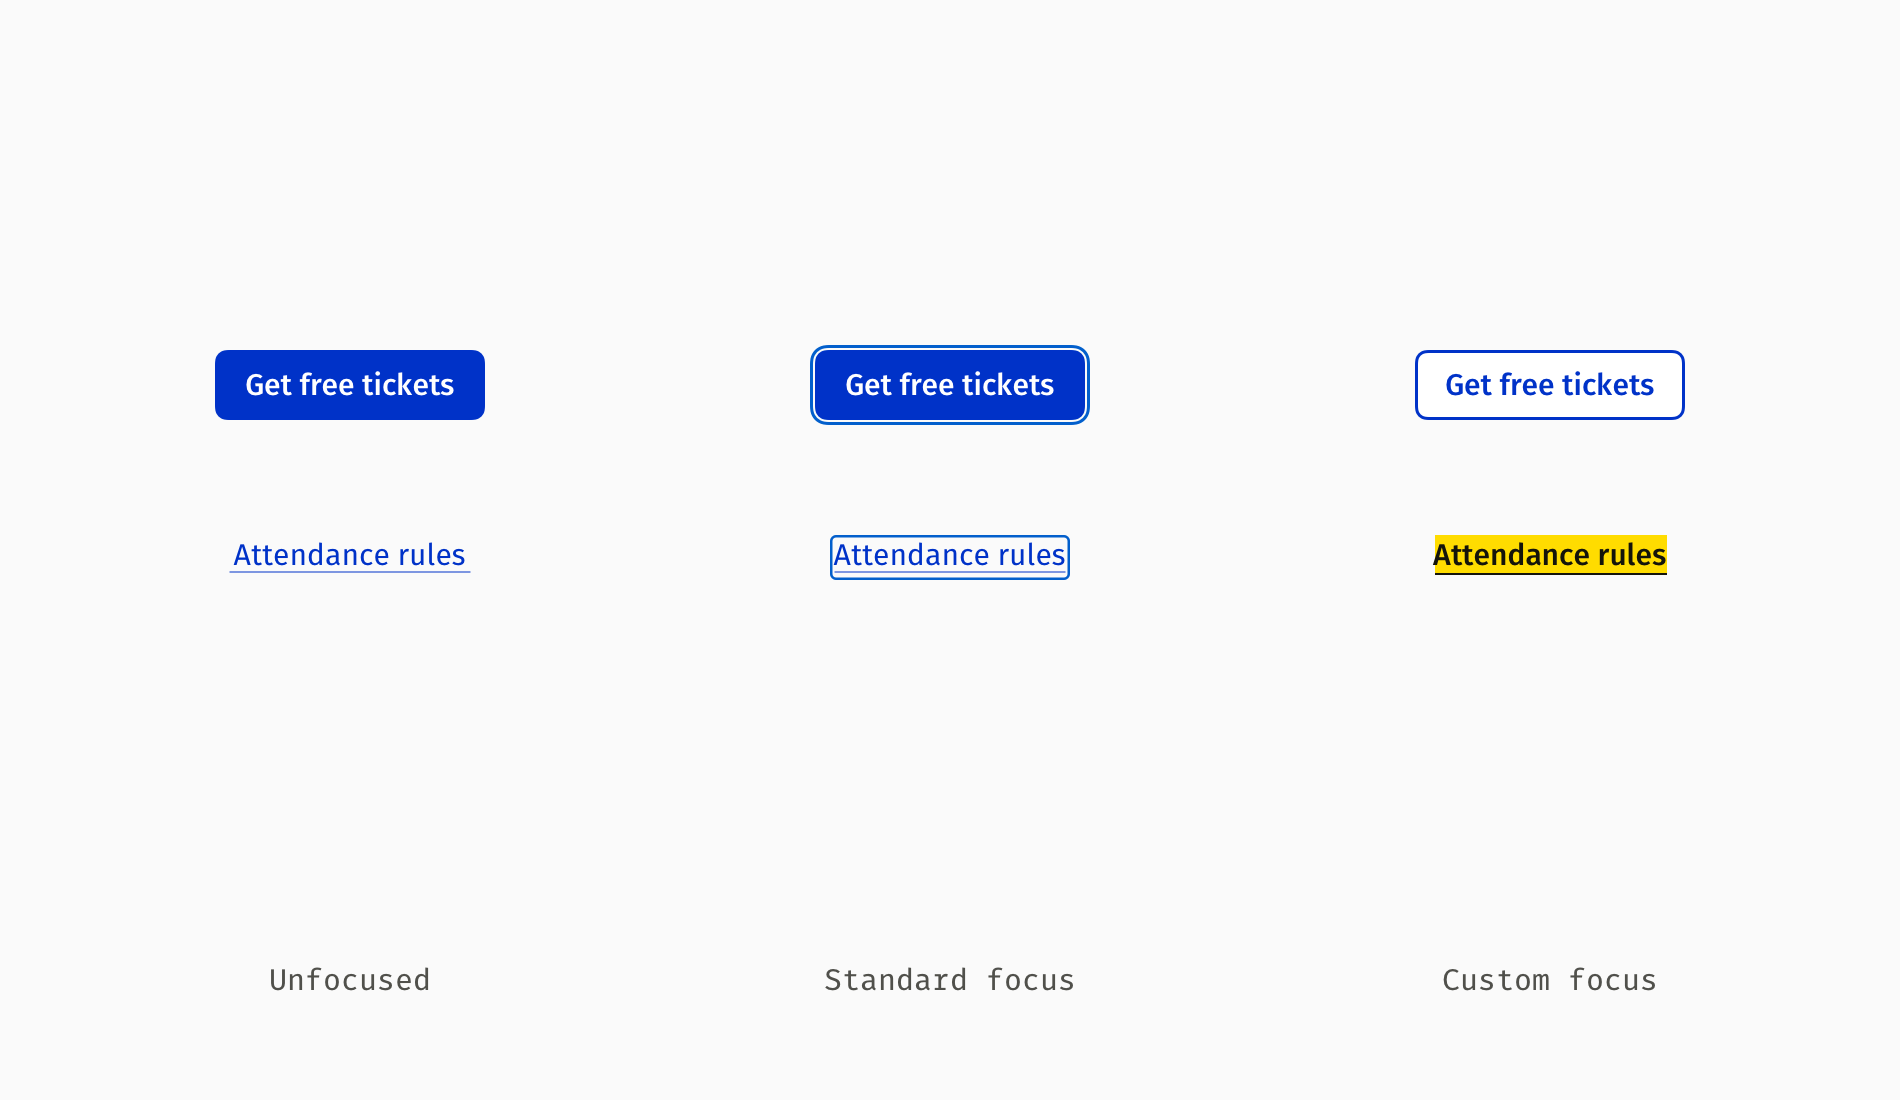
Like all interactive components, links should have a visible keyboard focus. All popular browsers have an embedded accessible focus by default (you might have seen this bold blue frame around input fields, dropdowns, buttons, and links in Google Chrome). Unfortunately, on some sites, focus gets manually removed or visually customized so that a focused link can look even less noticeable (e.g. faded out).

Optimization For Screen Readers

Blind users don’t see the web — they listen to it by means of “screen readers,” assistive programs that transform a written text into fast robotic speech. They navigate with a keyboard and remember dozens of handy shortcuts to jump between headings, buttons, or links instead of obediently listening to the entire content on a page.

So, when you remove wordiness for sighted people (for example, in the lists of different language versions or formats), it’s important to keep links clear for screen reader users, too. Otherwise, blind visitors will hear the following:

“Ukrainian — link, English — link, German — link”

The self-explanatory should be heard instead:

“Download project plan template in Ukrainian — link, download project plan template in English — link…”

And probably the most annoying thing on a news website is to hear this:

“Read more — link, read more — link, read more — link”

Sighted people can guess that “Read more…” relates to the nearest title, and blind people need individualized read-mores. Fortunately, the HTML attribute aria-label comes in handy here; it enables attaching explanatory text for screen reader users.

It’s often a designer’s responsibility to compose accessibility-related text and collaborate with a developer around optimal implementation, so here is a simplified code example:

<h4>News</h4>
<p>Eleks Design Team will participate in the Space Hackathon.
<a href=”aerospace-hackathon.html” aria-label=”Read more about Eleks participation in the Space Hackathon”>Read more…</a>
</p>
<p>Projector Tech and Creative Institute launches five courses on web accessibility this year.
<a href=”new-courses.html” aria-label=”Read more about new courses on accessibility by Projector Institute”>Read more…</a>
</p>

As you can see, each “Read more” has an extended explanation for screen readers. However, you won’t need to take care of article links with aria-label if each title is a link itself.

<h4>News</h4>
<h5><a href=”aerospace-hackathon.html”>Eleks Design Team will participate in the Space Hackathon</a>
</h5>
<h5><a href=”new-courses.html”>Projector Tech and Creative Institute launches five courses on web accessibility this year</a>
</h5>

Duplicated links

Multiple identical links are yet another widespread controversial practice. For example, on a web page, it means that the same web address is attached to an article title, hero image, and intro sentence. At first glance, nothing’s wrong: wherever you click — you get to the article. But for blind users, it means repeating the same information thrice, which extends the time they need to sift through content to what they are interested in.

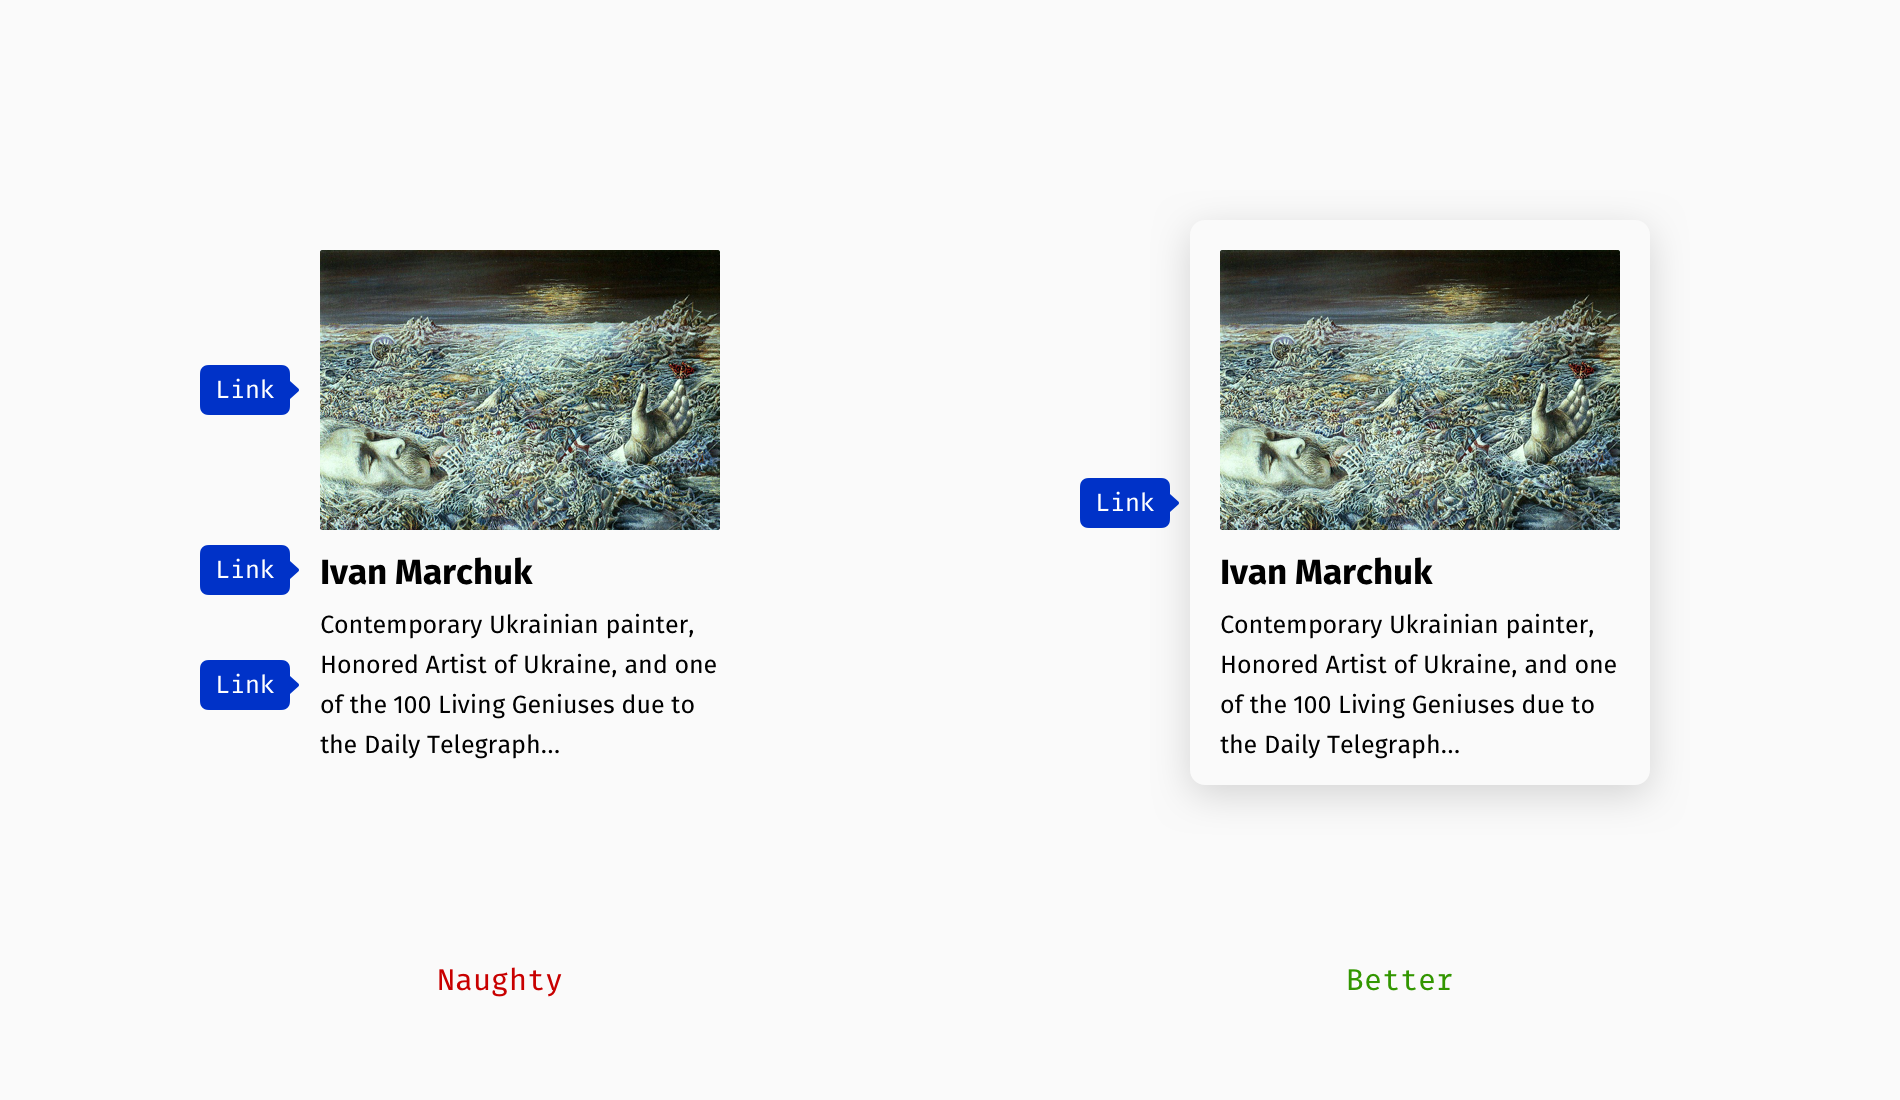
An important note: We are now talking about identical destinations, but a card can include different ones, for instance, a link to the article, author’s profile, and tags. In this case, minor links can appear “wrapped” in the main one.

Now, emails. Let’s say we have an invitation to some online event, where a Zoom link repeats several times. In the event description, “what/when/where” section, and closing part. Not only will it create an impression of mess for sighted users, but also visually impaired users will be troubled with jumping between duplicated links.

Recommended Reading

In this article, I wanted to suggest options instead of showing the topic in black and white. There are multiple shades of good design, and you can find yours on the overlap of best practices and your particular case. Meanwhile, some additional reading on this topic:

“Using aria-label For Link Purpose,” Web Content Accessibility Guidelines (WCAG)
“How To Make ‘Read More’ Links Accessible,” Vision Australia
“Writing Hyperlinks: Salient, Descriptive, Start With Keyword,” Marieke McCloskey, Nielsen Norman Group

15 Best Free VPN Providers

Original Source: https://www.hongkiat.com/blog/free-virtual-private-networks/

According to Google, people are spending an average of 2 hours and 25 minutes a day on the internet. Browsing and accessing several sites, making them vulnerable to cyber thefts and hackers, and most…

Visit hongkiat.com for full content.

Grid Zoom Layout

Original Source: https://tympanus.net/codrops/2021/12/01/grid-zoom-layout/

Today I’d like to share a simple grid concept with you. The idea is to “zoom” or scale up a small grid image and show some more content (i.e. a project slideshow that is not implemented) and a small map that shows a miniature version of the whole image grid so that it becomes easy to navigate.

Combined with some text animations that we’ve previously explored in Layout with Reveal Animations and Content Preview, the whole design comes to life. We are using the same code as in the other demo.

The initially view looks as follows:

When clicking on a grid image, we animate it to the right side of the screen and scale it up.

And this is how it all comes together:

I hope you enjoy this little experiment and find it useful!

Thank you for checking by ?

The post Grid Zoom Layout appeared first on Codrops.

Sencha GRUI Delivers Rich and High Performance Grids For React Applications

Original Source: https://1stwebdesigner.com/sencha-grui-delivers-rich-and-high-performance-grids-for-react-applications/

Sencha GRUI is a perfect modern enterprise solution for React UI that comes with 100+ data grid features. With GRUI, Sencha has re-built the Ext JS grid from the ground up to use modern JavaScript, and a whole new architecture that will deliver all the same great features and even better performance in an easy to use React API.

Here is a quick overview of some of the features:

Ability to handle millions of records.
Large feature set (filtering, grouping, infinite scrolling, and more).
Full customization control.
Data Export capabilities (csv, tsv, html, pdf, xls).
Pre-tested across a wide range of platforms and browsers.
Easy UI component integration to the grid.

With incredibly fast data processing, massive amounts of data is never a problem. Utilizing client and server side buffered store, the Sencha Data Grid is able to load and manipulate large data sets within milliseconds!

Key Features

Virtual Columns

Virtual rendering of rows AND columns
Rendering of visible columns even when configuring an unlimited number of columns
Huge performance increase for large numbers of columns

Infinite Scrolling

Refreshes the viewed rows from the page cache as needed

Slider Paging Toolbar

The paging toolbar allows you to paginate forwards and backwards in the record sets with the slider buttons and input field

Column Drag and Drop

Reorder columns with the intuitive drag and drop interface

Column Editors

Each column can be edited, and you can create custom editors using React components

Sencha GRUI has robust documentation to help you get started quickly, and it is built with Sencha GRUI as an interactive demo so you can see how it works while you learn how to use it.

Pricing

The pricing for Sencha GRUI is simple and transparent, on a per developer basis. $499 per developer gives you a perpetual license, unlimited end users and products, and a year of updates and technical support. There is also a Free plan that offers all of the same features and benefits, but it requires an attribution watermark. However, you can sign up for a free 30-day trial to see if Sencha GRUI will work for you and your projects, so that makes it very easy to get to know the product and determine the route you will take.

Conclusion

Mission critical apps rely on the performance of their data grid components. With custom layouts and simple integration with React, GRUI by Sencha renders unparalleled performance to enterprise applications. The extensive documentation should make this easy to get acquainted with and utilize in your projects, and the pricing – especially the free trial – makes it a no-brainer to give it a try. We recommend you give Sencha GRUI a run and let us know what you think!

Top 10 Best Pocket Printer Reviews

Original Source: https://designrfix.com/reviews/best-pocket-printer

The best pocket printer can be used for printing out documents such as bills, receipts, invoices, etc. Also, they help you to print out pictures, photos, and other images that are stored on your computer or phone. What is a Pocket Printer? A pocket printer is a small device that fits into your pocket. It…

The post Top 10 Best Pocket Printer Reviews appeared first on DesignrFix.

How to Kickstart Your UX Career in 2022

Original Source: https://www.webdesignerdepot.com/2021/12/how-to-kickstart-your-ux-career-in-2022/

As a UX designer, you get to work on creative, rewarding, even life-changing projects. It’s an industry with flexible working and countless opportunities. All this, and you get paid well too.

It doesn’t matter if you’re not a creative prodigy, or a tech grandmaster; you can learn to become a UX designer with the right mindset, a few tools you pick up along the way, and some committed learning.

By the time you’ve finished reading this post, you’ll be well on your way to designing your new career.

You can do this, let’s get started…

What is a Career in UX like?

Every career is different, but generally speaking, a UX designer works on making a user’s interaction with a product or service (normally websites) as intuitive as possible.

Just as a golf architect designs the layout of a golf course to flow through greens, tees, and holes, with buggy paths for access, and the odd bunker to add a challenge; so a UX designer creates the optimum experience for a site. A golf architect doesn’t need to reinvent the game of golf, and neither does a UX designer need to reinvent websites.

A golf architect will not design a course with a 360-degree sand bunker surrounding a tee (well, they might, but they really really shouldn’t), or a hole too small for a golf ball. In the same way as a UX designer, you’re not going to design an ecommerce site with a cart in the bottom left, a non-existent search feature, or hidden pricing.

The best thing about being a UX designer is that you don’t need to spend years in formal education to get qualified. The flipside is that if you want to be a great UX designer, it’s not a walk in the park.

Every designer is different, but some of the main traits of successful UX designers are: an enjoyment of problem-solving; good listening skills; curiosity; open-mindedness; attention to detail; creativity; communication skills; process-driven; and adaptability.

Before committing to this career path, check out a few podcasts, and read a few blog posts, to dip your toe in the water.

Still interested? Excellent, the next step is…

Getting Certified as a UX Designer

UX design is a practical skill. It’s all well and good knowing the theory, but without practice putting the theory into action no one will give you a chance to prove what you can do. So how do you get practical experience? You get certified, and there are three popular options: online, in-person training, or self-taught.

A good UX syllabus will include portfolio-building projects, tool mastery, networking opportunities, and even 1-2-1 mentorship. As well as learning the fundamentals of UX, you’ll cover user research and strategy, analysis, UI design, and more.

Option A: Online Course

Online courses tend to be much easier on the bank balance, as well as being flexible, which means you can fit them around your current job. You can work at your own pace, and in many cases choose modules that interest you, once you’ve completed the basic introduction.

There are many online course providers, including Coursera, Udemy, Skillshare, and Career Foundry.

Whatever option you choose, it is a good idea to get as broad a perspective as possible, so consider following more than one course — perhaps mix and match a paid course with a free one.

Option B: In-Person Training

This could be a university course, or a local boot camp where you physically sit in with an instructor and classmates.

This is more expensive, but it provides benefits that nothing else does. Firstly, you’ll have classmates you can bounce ideas off, collaborate with, keep motivated, inspired, and accountable. You can also get real-time, intensive coaching and advice from someone who’s been there, done that, bought the T-shirt (and redesigned it so it fits better).

Seach local boot camps and workshops, check out workshops at local conferences, and ask your local college what courses they offer.

Option C: Self-Taught

Being self-taught is the cheapest of all options. Work at your own pace, where, and when you want to. Watch YouTube videos, read blogs, garner information anywhere you can find it.

This option involves a lot of stumbling around in the dark. The biggest challenge is that you don’t know what it is that you don’t know. For this reason, it can pay to follow the syllabus of a local college course, even if you’re not enrolled and don’t attend lectures.

In reality, all education is self-taught to an extent, even the most prescribed courses need self-motivation.

Some of the most in-demand UX designers in the world are self-taught, so why not? Start exploring UX blogs like Nielsen Norman Group articles, Google Design,  UX Planet, and UX Matters.

Mastering UX Tools

Recruiters and hiring managers will seek your technical ability and your experience using popular tools from user research, to wireframing, to prototyping. When you get your first job in UX, the tools you use will be determined by your project manager, so it’s a good idea to have a passing familiarity with the most popular. These will include Maze, Userzoom, Sketch, XD, Figma, Marvel, and Hotjar.

If you’re following a guided course you should get an introduction to at least a couple of important tools. Once you understand one, you can probably pick the others up quite quickly… because, after all… they should be intuitive.

You do not need to know how to code, but understanding the roles, and restrictions of HTML, CSS, and JavaScript is very beneficial. When you get your first UX job, you’ll need to be able to talk about how technologies fit into the plan.

Building a UX Portfolio

Your portfolio is your résumé. The golden ticket. The silver bullet. Amassing a content-rich portfolio is paramount. You don’t need a real-world job to build your portfolio, and you should already have content to add from your course.

You need to demonstrate knowledge of UX tools and processes (what future employers will look for). Case studies that incorporate research, problem-solving, strategy, imagination, and (if possible) results are the best way to do this.

There are a variety of ways of building a portfolio, but the best is taking a real website, and redesigning it. Don’t worry if your first few projects aren’t the best; as long as you demonstrate improvement and growth, that counts for something. 

You can showcase your portfolio on sites such as Behance, Dribbble, or preferably create your website.

Landing Your First Job in UX

Start combing the job boards to see which companies are looking for UX designers. There’s a global shortage of qualified UX designers, so if you can’t find anything you’re looking in the wrong place! Make sure your whole network, from your Mom’s hairdresser to the barista at your favorite coffee place know that you’re looking; you never know where a good lead will come from.

Some companies are looking for UX skills as part of other roles. Others are looking for full-time UXers.

Don’t be disheartened if “Junior UX Designer” positions require 2 years of experience; HR just throws this in as a pre-filter. If you think you can do the job, apply anyway, if your portfolio’s good you might get an interview regardless, and if you get an interview they think you’re worth taking the time to meet.

If you don’t get the job, don’t be downhearted. Remember: every time someone else gets a job, that’s one less person you’re competing with for the next job.

Quick Prep on Some Common UX Interview Questions:

What’s your interpretation of a UX Designer?
What has inspired you to become a UX Designer?
How do you take constructive feedback and non-constructive feedback?
Who, or what companies, do you look up to in this industry, and why?
What’s your process with a new project?

Good Luck!

So, now you know what it takes to get into the field, it’s time to start applying yourself to this newfound and richly rewarding career. As the great writer Anton Chekov said, “Knowledge is of no value unless you put it into practice.” So get out there and practice, practice, practice. Add and add and add to your portfolio.

To become a UX Designer, enroll in a great course, build your portfolio, network, apply for roles, and always be learning. Always be open to new ideas and suggestions. There’s a lot of leg work, but the juice will be worth the squeeze. 


Featured image via Unsplash.

Source

p img {display:inline-block; margin-right:10px;}
.alignleft {float:left;}
p.showcase {clear:both;}
body#browserfriendly p, body#podcast p, div#emailbody p{margin:0;}

The post How to Kickstart Your UX Career in 2022 first appeared on Webdesigner Depot.

The 7 best InDesign alternatives

Original Source: https://www.creativebloq.com/features/indesign-alternatives

These are the best InDesign alternatives that don’t require a monthly subscription.