13 Beautiful 2013 Desktop Wallpapers for New Years

Original Source: http://feedproxy.google.com/~r/visualswirl/~3/a-1sIRSLVX8/

Welcome to 2013! To kick off another great  year I’ve rounded up 13 of the best 2013 wallpapers. Start off the new year by making a plan to clean up your desktop. Once it’s clean, you’ll want to decorate with one of these great wallpaper designs. And if you’re looking for monthly calendars for January, head over to Smashing Magazine to see some really great January 2013 calendars. So find the wallpaper that fits your resolutions (pun intended) and here’s to a happy and productive New Years!

2013 Wallpapers for a Happy New Years
Wallpaper by Upwallpapers.net

2013 Sparks New Years Wallpaper

Wallpaper by demeters

Snowflakes 2013 desktop wallpaper

Wallpaper by paha13

crazy colorful 2013 desktop wallpaper

Wallpaper by GuilleBot

Jungle Wallpaper for 2013 desktop

Wallpaper by paha13

Purple desktop wallpaper for 2013

Wallpaper by PSDRoman

cloud rainbow 2013 desktop wallpaper

Wallpaper by Jenova89

hope and darkness 2013 wallpaper desktop

Wallpaper by Zakzak008

2013 wallpapers balloon new year

Wallpaper by tajio

purple bokeh new years 2013 wallpaper

Wallpaper by Concrete Love

Bright wrapping paper 2013 desktop wallpaper

Wallpaper by danishprakash

2013 New Years Wallpaper

Wallpaper by photonica

January 2013 Desktop Wallaper calendar

Wallpaper by ravirajcoomar

Futuristic 2013 wallpaper

The post 13 Beautiful 2013 Desktop Wallpapers for New Years appeared first on Visual Swirl Design Resources.

How to be evil (but please don’t!) – the modals & overlays edition

Original Source: https://css-tricks.com/evil-please-dont-modals-overlays-edition/

We’ve all been there. Landed on a website only to be slapped with a modal that looked something like the one below:

Hello darkness, my old friend.

For me that triggers a knee-jerk reaction: curse for giving them a pageview, close the tab, and never return. But there’s also that off case when we might actually try to get to the info behind that modal. So the next step in this situation is to bring up DevTools in order to delete the modal and overlay, and maybe some other useless things that clutter up the page while we’re at it.

This is where that page starts to dabble in evil.

We may not be able to get to the DevTools via “Inspect Element” because the context menu might be disabled. That one is easy, it only takes them one line of code:

addEventListener(‘contextmenu’, e => e.preventDefault(), false);

But hey, no problem, that’s what keyboard shortcuts are for, right? Right… unless there’s a bit of JavaScript in the vein of the one below running:

addEventListener(‘keydown’, e => {
if(e.keyCode === 123 /* F12: Chrome, Edge dev tools */ ||
(e.shiftKey && e.ctrlKey && (
e.keyCode === 73 /* + I: Chrome, FF dev tools */ ||
e.keyCode === 67 /* + C: Chrome, FF inspect el */ ||
e.keyCode === 74 /* + J: Chrome, FF console */ ||
e.keyCode === 75 /* + K: FF web console */ ||
e.keyCode === 83 /* + S: FF debugger */ ||
e.keyCode === 69 /* + E: FF network */ ||
e.keyCode === 77 /* + M: FF responsive design mode */)) ||
(e.shiftKey && (
e.keyCode === 118 /* + F5: Firefox style editor */ ||
e.keyCode === 116 /* + F5: Firefox performance */)) ||
(e.ctrlKey && e.keyCode === 85 /* + U: Chrome, FF view source */)) {
e.preventDefault();
}
}, false);

Still, nothing can be done about the browser menus. That will finally bring up DevTools for us! Hooray! Delete those awful nodes and… see how the page refreshes because there’s a mutation observer watching out for such actions. Something like the bit of code below:

addEventListener(‘DOMContentLoaded’, e => {
let observer = new MutationObserver((records) => {
let reload = false;

records.forEach((record) => {
record.removedNodes.forEach((node) => {
if(node.id === ‘overlay’ && !validCustomer())
reload = true;
});

if(reload)
window.location.reload(true);
});
});

observer.observe(
document.documentElement, {
attributes: true,
childList: true,
subtree: true,
attributeOldValue: true,
characterData: true
}
);
});

“This is war!” mode activated! Alright, just change the modal and overlay styles then! Except, all the styles are inline, with !important on top of that, so there’s no way we can override it all without touching that style attribute.

Screenshot of developer tools showing elements with a lot of inline styles with !important on the tail of the values.Oh, the !importance of it all…

Some people might remember about how 256 classes override an id, but this has changed in WebKit browsers in the meanwhile (still happens in Edge and Firefox though) and 256 IDs never could override an inline style anyway.

Well, just change the style attribute then. However, another “surprise” awaits: there’s also a bit of JavaScript watching out for attribute changes:

if(record.type === ‘attributes’ &&
(record.target.matches &&
record.target.matches(‘body, #content, #overlay’)) &&
record.attributeName === ‘style’ && !validCustomer())
reload = true;

So unless there are some styles that could help us get the overlay out of the way that the person coding this awful thing missed setting inline, we can’t get past this by modifying style attributes.

The first thing to look for is the display property as setting that to none on the overlay solves all problems. Then there’s the combo of position and z-index. Even if these are set inline on the actual overlay, if they’re not set inline on the actual content below the overlay, then we have the option of setting an even higher z-index value rule for the content and bring it above the overlay. However, it’s highly unlikely anyone would miss setting these.

If offsets (top, right, bottom, left) aren’t set inline, they could help us shift the overlay off the page and the same goes for margin or translate properties. In a similar fashion, even if they’re set inline on the overlay, but not on the actual content and on the parent of both the overlay and the content, then we can shift this parent laterally by something like 100vw and then shift just the content back into view.

At the end of the day, even a combination of opacity and pointer-events could work.

However, if the person coding the annoying overlay didn’t miss setting any of these inline and we have that bit of JS… we cannot mess with the inline styles without making the page reload.

But wait! There’s something that can override inline values with !important, something that’s likely to be missed by many… and that’s @keyframe animations! Adding the following bit of CSS in a new or already existing style element brings the overlay and modal behind the actual content:

#overlay { animation: a 1s infinite }

@keyframes a { { 0%, to { z-index: -1 } } }

However, there might be a bit of JavaScript that prevents us from adding new style or link elements (to reference an external stylesheet) or modifying already existing ones to include the above bit of CSS, as it can be seen here.

if(record.type === ‘characterData’ &&
record.target.parentNode.tagName.toLowerCase() === ‘style’)
reload = true;
record.addedNodes.forEach((node) => {
if(node.matches &&
node.matches(‘style:not([data-href]), link[rel=”stylesheet”]’))
reload = true;
});

See the Pen How to be evil (but please don’t) by Ana Tudor (@thebabydino) on CodePen.

But if there already is an external stylesheet, we could add our bit of CSS there and, save for checking for changes in a requestAnimationFrame loop, there is no way of detecting such a change (there have been talks about a style mutation observer, but currently, we don’t yet have anything of the kind).

Of course, the animation property could also be set inline to none, which would prevent us from using this workaround.

But in that case, we could still disable JavaScript and remove the overlay and modal. Or just view the page source via the browser menu. The bottom line is: if the content is already there, behind the overlay, there is absolutely no sure way of preventing access to it. But trying to anyway is a sure way to get people to curse you.

I wrote this article because I actually experienced something similar recently. I eventually got to the content. It just took more time and it made me hate whoever coded that thing.

It could be argued that these overlays are pretty efficient when it comes to stopping non-technical people, which make up the vast majority of a website’s visitors, but when they go to the trouble of trying to prevent bringing up DevTools, node deletions, style changes and the like, and pack the whole JavaScript that does this into hex on top of it all, they’re not trying to stop just non-technical people.

How to be evil (but please don’t!) – the modals & overlays edition is a post from CSS-Tricks

25 Web Designs with a Clear and Concise Elevator Pitch

Original Source: https://line25.com/articles/25-web-designs-with-a-clear-and-concise-elevator-pitch

The concept of the elevator pitch has become a popular feature in web design. Bold statements that introduce and describe a company or individual now dominate the mastheads of agency and portfolio sites.

In today’s web design showcase, we present 25 great examples of websites that successfully explain what they’re all about in a clear and concise statement. See how they use white space, typography, and color to ensure their message gets across.

Get inspired by these web designs with a clear and concise elevator pitch and see what new things you can learn and then apply in your own projects.

Jan Cavan

Saying as little as possible and not leaving anything to wonder, this artist combines useful information with a short portfolio to make everyone interested in their work.

Jan Cavan Website Design

Boomerang

Another great example of elevator pitch translated into a stunning website. This design uses the first page to make a resume about the company, who they are and what services they provide and also their best clients, to give credibility and to build up trust.

Boomerang Creative Website

Blocks

Get inspired by this website which uses the concept of elevator pitch along with some funny creative animated graphics!

Blocks Website Concept

Talk PR

This website incorporates the elevator pitch concept into every topic in their menu. You can grasp at a glance their message by browsing rapidly through the contents.

Talk PR Website Concept

A Collective

This creative studio’s website has a simple but very effective design which allows you to quickly get the information. Also, this design includes a creative side menu which is within reach at all times, for easy navigation.

A Collective Website Concept

Matt Carvalho

Take a look at the combination between large and small fonts with expressive images which were used to attract site visitor’s attention.

Matt Carvalho Creative Website

Static Interactive

The semi-transparent overlay gives the website a sense of mystery. You can take a glimpse at what lays behind it but you need to take further action to completely see the design.

Static Interactive Website Concept Design

The Infantree

This creative website design will definitely get your attention with its looks and features. Neat features like the video background, full-screen layout make it more appealing and user-friendly.

The Infantree Website Concept Design

Raygun

A beautiful parallax effect has always helped to improve the overall design. This elegant characteristic makes any website look modern. Moreover, the responsive design assures you that the website will display perfectly on any screen size.

Raygun Creative Website

Nudge

This minimalistic website has a creative layout with a grid organization. Also, on hover, the images get a semi-transparent color overlay which displays further information about each item.

Nudge Website Concept

Coulee Creative

This website design will definitely get your attention. With the stunning video background from the homepage, parallax effect on different sections, beautiful typography, etc. there’s a lot to handle with this design.

Coulee Creative Website Concept elevator pitch

Drexler

This website stands out thanks to the unique menu which is displayed in a continuous movement on the right side of the layout. This creative agency also includes animated elements, a complex design with overlay items which you can see when your begin to scroll down.

Drexler Website Concept elevator pitch

Fuzzco

This is an outstanding website design which has a very creative manner to showcase its content. Even without taking any action, the design continuously moves from bottom-up. You can select which area you want to view by using the scroll.

Fuzzco Creative Website Design elevator pitch

Paradox Design Studio

Here you have a lovely website with a well-thought design. The information is organized and everything is accessible, with some animated effects that will get your attention.

Paradox Design Studio Design

Romsey Web Design

This website includes many great features that help improve the overall design. For instance, there’s a beautiful video background, animated effects, neat overlays, lovely fonts, and more.

Romsey Web Design
RGB MEDIA

There’s much to say about this website design. It includes lots of user-friendly features that make it more accessible. The fixed menu design, big headings, concise information, organized layout, responsive design, etc. are some of its features.

RGB MEDIA WEBSITE CONCEPT

Simple Focus

This is a minimalistic website with a well-organized structure in clear sections. It includes beautiful animations which unveil when scrolling down.

Simple Focus Website Design elevator pitch

Navy Design

This bold design will definitely get your attention with the help of the colored background and the big heading. The overall design has a clear organization, everything is within reach, accessible.

Navy Design Creative Website

Hatch

This is a creative website design which has a lovely grid organization. This full-screen layout will surely get your attention with the stunning high-quality graphics and subtle animations.

Hatch Website Concept Design

Spindletop

A parallax effect will definitely make a website stand out. Also, the responsive layout makes it display perfectly, regardless of the screen size.

Spindletop Creative Website

MoreSleep

This is a one-page layout design which has a creative slider gallery. Have a look and see what new things you can learn and use in your future designs.

MoreSleep Website Concept elevator pitch

Electric Pulp

The designer used lots of overlayed elements to create a special design. This includes text, colors, images, etc. Also, the fixed header design makes your navigation accessible at all times.

Electric Pulp Creative Website

Finely

This is a minimalistic website which makes good use of the white space, in order to get the message across.

Finely Website Concept Design

Startup X – Perfect Pitch Deck PowerPoint Template

This stunning template can be used to create your own website with a clear pitch design. This pre-designed layout will assure you that your message will definitely get across.

Startup X Concept Design

Pitch – Modern PowerPoint Presentation Template

This is an excellent presentation template which you can quickly customize and showcase it to your clients.

Pitch Presentation Concept Design

The post 25 Web Designs with a Clear and Concise Elevator Pitch appeared first on Line25.

Minimalist Web Design – More Effective Than Any Other Design Style In The Web Design Industry

Original Source: https://webdesignledger.com/minimalist-web-design-effective-design-style-web-design-industry/

This article is the third in a series devoted to the understanding of minimalism in web design. During the time, this trend has become very popular among the graphic designers and it will still be on top for the years that will come, regardless the influences it will have.

You might assume minimalism is easy – after all, fewer elements mean less work, right? In fact, the opposite is more accurate. Because you are restricted to a usage of few elements, they must be chosen and used with care and thoroughness, having a specific purpose as a starting point. If it’s done properly, minimalist design can be a stunning masterpiece, in terms of UI, visual design, UX and conveying your message to the users.

It may seem ironic, but in the context of web design, simplicity is a little more complex to define. It’s not just the site looks like; it’s about the user’s overall experience while interacting with the site. From this perspective, minimal design is not made by mistake. It is intentional. It is an approach that strips the unnecessary elements from a framework to leave only what is required. Most minimalist websites will not include a lot of colors, textures, shapes or accents. They are defined by fearless usage of negative space in neutral colors, dramatic typography, large and vivid photography, very simple navigation tools and visual balance.           

Minimalism works because it does what all design should do – it puts the emphasis on content.

The advantages of minimalism in web design and the reasons for its popularity include:

It’s a natural fit with responsive design frameworks;
It reduces the information for browsers to process, causing faster site load times and better site performance; this leads to a better usability and user experience;
It needs less CSS and Html rules and elements;
The concept is content-driven, which coincides impeccably with the growth of content-first design processes and trends;
It is suitable for a variety of businesses, from architecture, interior design, fashion, photography, creative studios, to e-commerce, web app development, furniture, HoReCa and so on.

Using the minimalist concept in web design represents modern design. By only focusing on the content and branding, the web design will reflect its main goal and mission without any other distracting elements. 

Below are listed some websites from different industries, which use minimalist design concept for conveying their message and provide a great UX:

Minimalism in photography portfolios

Running a photography business is not common. Beyond stunning photos, it requires much creativity and refinement when it comes to communication with the potential customers. If you want to learn more about running a photography business, you may find more information in Braveen Kumar’s article (link to www.shopify.com/blog/how-to-sell-photos-online)

In terms of web design, minimalism is the preferred choice for the photographers who want to let their work speaking for itself. The style gives an air of elegance and sophistication that lends itself to this industry.

Christine Szczupak Photography

The stylized arrows and subtle drop-shadow are important details that increase the visual appeal of this website.

Ryan Willms

The spacing and arrangement of content here, along with the elegant typography and simple lines, give the feeling of a fresh design.

Caitlin Worthington Photography 

The white background is the perfect canvas for the large and vivid photographs that are perfectly balanced by the typography. A classic example of minimalist design.

Jonathan Glynn Smith


A dramatic splash screen and beautifully minimalist design.

Bruce Percy


A very simple design that leaves the viewer no doubt what he’s seeing. A quick glance is enough to see what the photographer does. Navigation is again clear and simple. The black background works well with the minimalist design.

Minimalism in the creative industry
Exponent PR


To highlight their video montage (and photos as you scroll), Exponent’s site features simple colors and fonts that make everything pop.

Bark PR

Like Exponent PR, the previous PR company on our list, you’ll see flat UI and bold colors. But in Bark PR’s case, the yellow is much more than a simple accent.

Oh My! Digital Design Studio

Oh My!  uses a large white background for some high-contrast effect and a very simple navigation to provide a great UX.

Brave Little Tank

Like Oh My!, Brave Little Tank also uses a large white background for getting a high-contrast effect with the website content. The accents of colors are given by pictures and the green color of highlighted text. The navigation is simple, letting the users dive in quick and easy through the whole site. With its website, Brave Little Tank has created a simple, impactful solution (what they also have promised to their clients).

Brian Danaher

Another website that opts for a single column and bold typography. If you take a closer look, you will notice the classic mix for the minimalist concept: a lot of negative space, large and vivid photos, typography that perfectly balances the images.  

Callens 

Minimalism is the preferred choice for fashion websites and those selling luxury items, like Italian brand Callens. This design concept gives an air of elegance and sophistication that lends itself to certain industries.

Leen Heyne
 

Besides its jewelry, Leen Heyne‘s monochrome logo and company name are the only significant visual elements on its homepage. The surrounding expanse of gray space and white texts make it a safe bet, the user’s eyes going back and forth between the two core visual elements.

 Bulgari

Italian luxury goods brand Bulgari is another company that uses creative techniques to keep its site interesting within its minimal framework. Side-to-side scrolling combines with an ingenious page-turning animation and high-quality photos.

Yield

Lots of space, soft pastels, middle to dark gray colors for text, large photos and keeping buttons to a minimum make Yield’s site delicate and easy to navigate.

 Conspiracy

Conspiracy’s homepage bundles necessary buttons on top then puts the product on a clean canvas.

NTN

This site is traditionally minimal. Design brand NTN uses the abundant white space, personality-infused typography, and a reduced number of elements that the minimalist style is known for.

Minimalism in website and app development
Squarespace

This screenshot from website-building service Squarespace illustrates the idea of one focal point per screen. The site explains everything it needs in screen-by-screen images, and groups together relevant blurbs on the same screen.

Scytale

Scytale is another defining website for the concept of minimalism in web design. They use very large white and light gray background and big and bold typography, helping the user to focus on the main message. The red color used for some flat design and typography are the only color accents used here.

Thrive

Simple design on a subtle grid. Garnished with flat design and simple bright blue color via scrolling. A fun, clean, good interaction!

iPad mini 4

Apple is no stranger to minimalism. The web page for the iPad mini 4 uses lots of literal white space to draw attention to the product’s sleek design. The clear top bar, also featuring an abundance of space, helps the user to navigate.

Château d’Yquem

Winemaker Château d’Yquem combines minimalism and subdivision in its site. Each section follows the minimalist philosophy with only a few elements revolving around a single concept. When combined, the sections’ size and location on screen create a visual hierarchy.

Maemo 

The website for double-Michelin-starred Norwegian restaurant Maaemo uses minimalism to create a sense of class. The visual treatment is perfect for storytelling, as the site demonstrates with HD photos used for each page.

Bottom line

We know you have a lot of information to offer to your visitors and you’d like to feature all of them on your website, but you should keep in mind that will also throw your visitors into an information overload.

Before anything else, make sure your website features only the most important information and link the additional stuff. And don’t worry, if people are interested in learning more about your company, they will look for links or they will contact you.

Most of all, make sure your brand and your target audience fit the concept of minimalism before going for this website design concept. Because unfitting use of colors, typography, and visuals will not bring the same results for your business.

Even if it’s not suitable for all business websites, minimalist design style comes with plenty of great advantages that make it more effective than any other design style in the web design industry.

Read More at Minimalist Web Design – More Effective Than Any Other Design Style In The Web Design Industry

Goroutines Make Concurrency (Almost) Easy

Original Source: http://blog.teamtreehouse.com/goroutines-concurrency

A program that supports concurrency can carry out several operations at the same time. That’s especially important on today’s multi-core computer processors. A program that uses 4 cores at once could theoretically run almost 4 times as fast (well, for certain operations). But programs without concurrency support can usually only use a single core, which lets a lot of processing power go to waste.

Enter Goroutines

When the creators of the Go programming language were writing up their wish list for a new language, they wanted to make it easy to write concurrent programs. Their solution comes in the form of 2 features: goroutines, which are functions that run concurrently, and channels, which simultaneously allow communication and synchronization between goroutines.

An example is probably the quickest way to explain… Suppose you have a generateKey function, which uses a super-secret algorithm to generate cryptographic keys. The function is a bit slow, averaging 3 seconds each time it’s called. So if a program calls generateKey 3 times in a row, that program will take just over 9 seconds to run.

package main

import (
“fmt”
“math/rand”
“time”
)

func generateKey() int {
fmt.Println(“Generating key”)
// Super-secret algorithm!
keys := []int{3, 5, 7, 11}
key := keys[rand.Intn(len(keys))]
// It’s kinda slow!
time.Sleep(3 * time.Second)
fmt.Println(“Done generating”)
return key
}

func main() {
rand.Seed(time.Now().Unix())
// Call generateKey 3 times.
for i := 0; i < 3; i++ {
fmt.Println(generateKey())
}
fmt.Println(“All done!”)
}

The above program produces this output:

Generating key
Done generating
5
Generating key
Done generating
7
Generating key
Done generating
11
All done!

…And as predicted, it takes about 9 seconds. But what if we used goroutines to run the 3 calls to generateKey concurrently? Theoretically, the whole program could run in just over 3 seconds!

A "main" goroutine, running concurrently with several other goroutines.

Goroutine Syntax

Using goroutines is really simple. In fact, you’re automatically using a single goroutine any time you run a Go program, because the main function always runs within a goroutine. Of course, no code will run concurrently unless you create additional goroutines. But that’s not hard to do: just put the keyword go before any function call. (Compare that to Java’s threads, where you have to create a whole new class!) Your main goroutine will immediately resume running after the function call, and the function you called will run simultaneously (that is, concurrently) alongside it, as another goroutine.

Let’s try this out. We’ll just add the go keyword before the call to generateKey:

func main() {
rand.Seed(time.Now().Unix())
for i := 0; i < 3; i++ {
fmt.Println(go generateKey())
}
fmt.Println(“All done!”)
}

But if we try to compile this, we get an error:

syntax error: unexpected go, expecting expression

…Because we’re not allowed to use the go keyword when you’re using a return value from a function. And really, that makes sense. If the main function resumes running before generateKey returns, then what return value will we pass to fmt.Println?

So we’re not really sure how to get the generated keys back. But let’s not give up on using goroutines just yet. We’ll just remove the call to fmt.Println from around go generateKey():

func main() {
rand.Seed(time.Now().Unix())
for i := 0; i < 3; i++ {
go generateKey()
}
fmt.Println(“All done!”)
}

If we try running again, here’s the output we get:

All done!
Generating key
Generating key

Okay… this is kind of a mess. Our main goroutine reaches its end, and prints “All done!”. While this is happening, 2 of our generateKey goroutines begin running, and print “Generating key”. The program exits before the third generateKey goroutine even gets a chance to print anything. (And this program will behave diffferently each time you run it; you can’t be sure when it will exit!)

So now we have 2 problems:

We don’t have a way to get a value back from the other goroutines
We don’t have a way to wait until the other goroutines finish before the main gorooutine exits

Channels to the Rescue

We can solve both of those problems at once with Go channels. A goroutine can write values to a channel, and other goroutines can read them back out. If no values have been written to the channel yet, the goroutine that’s attempting to read from it will wait until a value is added. So channels accomplish 2 things at once:

Communication between goroutines
Synchronization between goroutines

We can create a channel by calling the built-in function make with the type of channel we want to create. (That is, we need to specify what type of values our channel will hold.) myChannel := make(chan bool) makes a channel that holds boolean values, and assigns it to the myChannel variable. make(chan string) will make a channel for strings, make(chan int) makes a channel for integers, and so on.

Once we have a channel, we can write and read values with the <- operator. For example, myChannel <- myValue writes myValue to myChannel, and myValue := <-myChannel reads a value from myChannel and assigns it to myValue.

Using Channels in Our Program

Let’s try getting our key generator working again using channels. We can update generateKey to take a channel as an argument. Instead of returning the key, we can have generateKey write the key to the channel.

Back in the main function, instead of looking for return values from generateKey, we can read keys from the channel. Again, this accomplishes 2 things at once:

Gets the keys we want
Causes the program not to exit until the keys are ready

Let’s try it! Our updates are marked with comments in the code below.

package main

import (
“fmt”
“math/rand”
“time”
)

// Update this function to accept a channel parameter,
// and remove the return value.
func generateKey(channel chan int) {
fmt.Println(“Generating key”)
keys := []int{3, 5, 7, 11}
key := keys[rand.Intn(len(keys))]
time.Sleep(3 * time.Second)
fmt.Println(“Done generating”)
// Write the key to the channel instead of returning.
channel <- key
}

func main() {
rand.Seed(time.Now().Unix())
// Create a channel.
channel := make(chan int)
// Create 3 more goroutines.
for i := 0; i < 3; i++ {
go generateKey(channel)
}
// Read and print keys from the channel.
// This also causes the program to wait until 3
// keys have been read.
for i := 0; i < 3; i++ {
fmt.Println(<-channel)
}
fmt.Println(“All done!”)
}

If we try running this, here’s the output:

Generating key
Generating key
Generating key
Done generating
Done generating
11
3
Done generating
11
All done!

We print 2 of the keys before we’re done generating the third, so it’s not perfectly sequential, but such is the nature of concurrent programming. The important part is, the channel allows us to retrieve the keys, and it causes the program to wait until we have them all before exiting. And because everything happens concurrently, the whole process takes just over 3 seconds!

The Moral of the Story

Goroutines and channels are a simple way to add concurrency to your programs. If your program includes any long-running operations, like waiting for network connections or big calculations, give goroutines a try. You may find it’s an easy way to finish your tasks faster!

P.S.: I’ve made the code from this post available in a Treehouse Workspaces snapshot. You can try running the code right from your browser by forking it and typing go run generate_goroutines.go in the workspace console.

P.P.S: This post was adapted from Go Language Overview. It’s our new course for developers already proficient in programming, who want a quick primer on Go. We’ll be releasing courses for beginning Go programmers too, so keep an eye on our library!

Start learning to code today with a free trial on Treehouse.

The post Goroutines Make Concurrency (Almost) Easy appeared first on Treehouse Blog.

Simple Server Side Rendering, Routing, and Page Transitions with Nuxt.js

Original Source: https://css-tricks.com/simple-server-side-rendering-routing-page-transitions-nuxt-js/

A bit of a wordy title, huh? What is server side rendering? What does it have to do with routing and page transitions? What the heck is Nuxt.js? Funnily enough, even though it sounds complex, working with Nuxt.js and exploring the benefits of isn’t too difficult. Let’s get started!

Server side rendering

You might have heard people talking about server side rendering as of late. We looked at one method to do that with React recently. One particularly compelling aspect is the performance benefits. When we render our HTML, CSS, and JavaScript on the server, we often have less JavaScript to parse both initially and on subsequent updates. This article does really well going into more depth on the subject. My favorite takeaway is:

By rendering on the server, you can cache the final shape of your data.

Instead of grabbing JSON or other information from the server, parsing it, then using JavaScript to create layouts of that information, we’re doing a lot of those calculations upfront, and only sending down the actual HTML, CSS, and JavaScript that we need. This can reap a lot of benefits with caching, SEO, and speed up our apps and sites.

What is Nuxt.js?

Server side rendering sounds pretty nice, but you’re probably wondering if it’s difficult to set up. I’ve been using Nuxt.js for my Vue applications lately and found it surprisingly simple to work with. To be clear: you don’t need to use Nuxt.js in particular to do server side rendering. I’m just a fan of this tool for many reasons. I ran some tests last month and found that Nuxt.js had even higher lighthouse scores out of the gate than Vue’s PWA template, which I thought was impressive.

Nuxt.js is a higher-level framework that you can use with a CLI command that you can use to create universal Vue applications. Here are some, not all, of the benefits:

Server-Side Rendering
Automatic Code Splitting
Powerful Routing System
Great lighthouse scores out of the gate 🐎
Static File Serving
ES6/ES7 Transpilation
Hot reloading in Development
Pre-processors: SASS, LESS, Stylus, etc
Write Vue Files to create your pages and layouts!
My personal favorite: easily add transitions to your pages

Let’s set up a basic application with some routing to see the benefits for ourselves.

Getting Set up

The first thing we need to do if you haven’t already is download Vue’s CLI. You can do so globally with this command:

npm install -g vue-cli

# … or …

yarn add global vue-cli

You will only need to do this once, not every time you use it.

Next, we’ll use the CLI to scaffold a new project, but we’ll use Nuxt.js as the template:

vue init nuxt/starter my-project
cd my-project
yarn # or… npm install
npm run dev

You’ll see the progress of the app being built and it will give you a dedicated development server to check out: http://127.0.0.1:3000/. This is what you’ll see right away (with a pretty cool little animation):

Screenshot of Nuxt starting screen

Let’s take a look at what’s creating this initial view of our application at this point. We can go to the `pages` directory, and inside see that we have an `index.vue` page. If we open that up, we’ll see all of the markup that it took to create that page. We’ll also see that it’s a `.vue` file, using single file components just like any ordinary `vue` file, with a template tag for the HTML, a script tag for our scripts, where we’re importing a component, and some styles in a style tag. (If you aren’t familiar with these, there’s more info on what those are here.) The coolest part of this whole thing is that this .vue file doesn’t require any special setup. It’s placed in the `pages` directory, and Nuxt.js will automatically make this server-side rendered page!

Let’s create a new page and set up some routing between them. In pages/index.vue, dump the content that’s already there, and replace it with:

<template>
<div class=”container”>
<h1>Welcome!</h1>
<p><nuxt-link to=”/product”>Product page</nuxt-link></p>
</div>
</template>

<style>
.container {
font-family: “Quicksand”, “Source Sans Pro”, -apple-system, BlinkMacSystemFont, “Segoe UI”, Roboto, “Helvetica Neue”, Arial, sans-serif; /* 1 */
padding: 60px;
}
</style>

Then let’s create another page in the pages directory, we’ll call it `product.vue` and put this content inside of it:

<template>
<div class=”container”>
<h1>This is the product page</h1>
<p><nuxt-link to=”/”>Home page</nuxt-link></p>
</div>
</template>

Right away, you’ll see this:

Ta-da! 🏆
Right away, we have server side rendering, routing between pages (if you check out the URL you can see it’s going between the index page and product page), and we even have a sweet little green loader that zips across the top. We didn’t have to do much at all to get that going.

You might have noticed in here, there’s a special little element: <nuxt-link to=”/”>. This tag can be used like an a tag, where it wraps around a bit of content, and it will set up an internal routing link between our pages. We’ll use to=”/page-title-here” instead of an href.

Now, let’s add some transitions. We’ll do this in a few stages: simple to complex.

Creating Page Transitions

We already have a really cool progress bar that runs across the top of the screen as we’re routing and makes the whole thing feel very zippy. (That’s a technical term). While I like it very much, it won’t really fit the direction we’re headed in, so let’s get rid of it for now.

We’re going to go into our `nuxt.config.js` file and change the lines:

/*
** Customize the progress-bar color
*/
loading: { color: ‘#3B8070’ },

to

loading: false,

You’ll also notice a few other things in this nuxt.config.js file. You’ll see our meta and head tags as well as the content that will be rendered inside of them. That’s because we won’t have a traditional `index.html` file as we do in our normal CLI build, Nuxt.js is going to parse and build our `index.vue` file together with these tags and then render the content for us, on the server. If you need to add CSS files, fonts, or the like, we would use this Nuxt.js config file to do so.

Now that we have all that down, let’s understand what’s available to us to create page transitions. In order to understand what’s happening on the page that we’re plugging into, we need to review how the transition component in Vue works. I’ve written an article all about this here, so if you’d like deeper knowledge on the subject, you can check that out. But what you really need to know is this: under the hood, Nuxt.js will plug into the functionality of Vue’s transition component, and gives us some defaults and hooks to work with:

transition component hooks

You can see here that we have a hook for what we want to happen right before the animation starts enter, during the animation/transition enter-active, and when it finishes. We have these same hooks for when something is leaving, prepended with leave instead. We can make simple transitions that just interpolate between states, or we could plug a full CSS or JavaScript animation into them.

Usually in a Vue application, we would wrap a component or element in <transition> in order to use this slick little functionality, but Nuxt.js will provide this for us at the get-go. Our hook for the page will begin with, thankfully- page. All we have to do to create an animation between pages is add a bit of CSS that plugs into the hooks:

.page-enter-active, .page-leave-active {
transition: all .25s ease-out;
}
.page-enter, .page-leave-active {
opacity: 0;
transform-origin: 50% 50%;
}

I’m also going to add an extra bit of styling here so that you can see the page transitions a little easier:

html, body {
font-family: “Quicksand”, “Source Sans Pro”, -apple-system, BlinkMacSystemFont, “Segoe UI”, Roboto, “Helvetica Neue”, Arial, sans-serif; /* 1 */
background: #222;
color: white;
width: 100vw;
height: 100vh;
}

a, a:visited {
color: #3edada;
text-decoration: none;
}

.container {
padding: 60px;
width: 100vw;
height: 100vh;
background: #444;
}

Right now we’re using a CSS Transition. This only gives us the ability to designate what to do in the middle of two states. We could do something a little more interesting by having an animation adjust in a way that suggests where something is coming from and going to. For that to happen, we could separate out transitions for page-enter and page-leave-active classes, but it’s a little more DRY to use a CSS animation and specify where things are coming from and going to, and plug into each for .page-enter-active, and .page-leave-active:

.page-enter-active {
animation: acrossIn .45s ease-out both;
}

.page-leave-active {
animation: acrossOut .65s ease-in both;
}

@keyframes acrossIn {
0% {
transform: translate3d(-100%, 0, 0);
}
100% {
transform: translate3d(0, 0, 0);
}
}

@keyframes acrossOut {
0% {
transform: translate3d(0, 0, 0);
}
100% {
transform: translate3d(100%, 0, 0);
}
}

Let’s also add a little bit of special styling to the product page so we can see the difference between these two pages:

<style scoped>
.container {
background: #222;
}
</style>

This scoped tag is pretty cool because it will apply the styles for this page/vue file only. If you have heard of CSS Modules, you’ll be familiar with this concept.

We would see this (this page is for demo purposes only, that’s probably too much movement for a typical page transition):

Now, let’s say we have a page with a totally different interaction. For this page, the movement up and down was too much, we just want a simple fade. For this case, we’d need to rename our transition hook to separate it out.

Let’s create another page, we’ll call it the contact page and create it in the pages directory.

<template>
<div class=”container”>
<h1>This is the contact page</h1>
<p><nuxt-link to=”/”>Home page</nuxt-link></p>
</div>
</template>

<script>
export default {
transition: ‘fadeOpacity’
}
</script>

<style>
.fadeOpacity-enter-active, .fadeOpacity-leave-active {
transition: opacity .35s ease-out;
}

.fadeOpacity-enter, .fadeOpacity-leave-active {
opacity: 0;
}
</style>

Now we can have two-page transitions:

You can see how we could build on these further and create more and more streamlined CSS animations per page. But from here let’s dive into my favorite, JavaScript animations, and create page transitions with a bit more horsepower.

Javascript Hooks

Vue’s <transition> component offers some hooks to use JavaScript animation in place of CSS as well. They are as follows, and each hook is optional. The :css=”false” binding lets Vue know we’re going to use JS for this animation:

<transition
@before-enter=”beforeEnter”
@enter=”enter”
@after-enter=”afterEnter”
@enter-cancelled=”enterCancelled”

@before-Leave=”beforeLeave”
@leave=”leave”
@after-leave=”afterLeave”
@leave-cancelled=”leaveCancelled”
:css=”false”>

</transition>

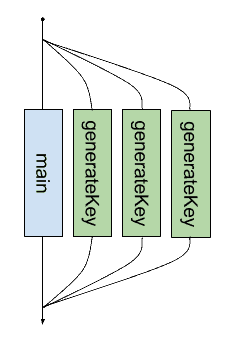
The other thing we have available to us are transition modes. I’m a big fan of these, as you can state that one animation will wait for the other animation to finish transitioning out before transitioning in. The transition mode we will work with will be called out-in.

We can do something really wild with JavaScript and the transition mode, again, we’re going a little nuts here for the purposes of demo, we would usually do something much more subtle:

In order to do something like this, I’ve run yarn add gsap because I’m using GreenSock for this animation. In my index.vue page, I can remove the existing CSS animation and add this into the <script> tags:

import { TweenMax, Back } from ‘gsap’

export default {
transition: {
mode: ‘out-in’,
css: false,
beforeEnter (el) {
TweenMax.set(el, {
transformPerspective: 600,
perspective: 300,
transformStyle: ‘preserve-3d’
})
},
enter (el, done) {
TweenMax.to(el, 1, {
rotationY: 360,
transformOrigin: ‘50% 50%’,
ease: Back.easeOut
})
done()
},
leave (el, done) {
TweenMax.to(el, 1, {
rotationY: 0,
transformOrigin: ‘50% 50%’,
ease: Back.easeIn
})
done()
}
}
}

All of the code for these demos exist in my Intro to Vue repo for starter materials if you’re getting ramped up learning Vue.

One thing I want to call out here is that currently there is a bug for transition modes in Nuxt.js. This bug is fixed, but the release hasn’t come out yet. It should be all fixed and up to date in the upcoming 1.0 release, but in the meantime, here is a working simple sample demo, and the issue to track.

With this working code and those JavaScript hooks we can start to get much fancier and create unique effects, with different transitions on every page:

Here’s the site that the demo was deployed to if you’d like to see it live: https://nuxt-type.now.sh/ as well as the repo that houses the code for it: https://github.com/sdras/nuxt-type

Navigation

In that last demo you might have noticed we had a common navigation across all of the pages what we routed. In order to create this, we can go into the `layouts` directory, and we’ll see a file called `default.vue`. This directory will house the base layouts for all of our pages, “default” being the, uhm, default 🙂

Right away you’ll see this:

<template>
<div>
<nuxt/>
</div>
</template>

That special <nuxt/> tag will be where our `.vue` pages files will be inserted, so in order to create a navigation, we could insert a navigation component like this:

<template>
<div>
<img class=”moon” src=”~assets/FullMoon2010.png” />
<Navigation />
<nuxt/>
</div>
</template>

<script>
import Navigation from ‘~components/Navigation.vue’

export default {
components: {
Navigation
}
}
</script>

I love this because everything is kept nice and organized between our global and local needs.

I then have a component called Navigation in a directory I’ve called `components` (this is pretty standard fare for a Vue app). In this file, you’ll see a bunch of links to the different pages:

<nav>
<div class=”title”>
<nuxt-link to=”/rufina”>Rufina</nuxt-link>
<nuxt-link to=”/prata”>Prata</nuxt-link>
<nuxt-link exact to=”/”>Playfair</nuxt-link>
</div>
</nav>

You’ll notice I’m using that <nuxt-link> tag again even though it’s in another directory, and the routing will still work. But that last page has one extra attribute, the exact attribute: <nuxt-link exact to=”/”>Playfair</nuxt-link> This is because there are many routes that match just the / directory, all of them do, in fact. So if we specify exact, Nuxt will know that we only mean the index page in particular.

Further Resources

If you’d like more information about Nuxt, their documentation is pretty sweet and has a lot of examples to get you going. If you’d like to learn more about Vue, I’ve just made a course on Frontend Masters and all of the materials are open source here, or you can check out our Guide to Vue, or you can go to the docs which are extremely well-written. Happy coding!

Simple Server Side Rendering, Routing, and Page Transitions with Nuxt.js is a post from CSS-Tricks

My Journey Of Learning Programming Through Flatiron School #33

Original Source: https://webdesignledger.com/my-journey-of-learning-programming-through-flatiron-school-33/

My name is Mason Ellwood, and I’m currently working on Flatiron School’s Online Full Stack Web Development Program. Each week, I’ll be writing about my experience, what I’m learning, and tips on learning to code.

It is official! I have passed the Ruby CLI Gem Final project. If you would like to try out my gem for yourself please visit https://rubygems.org/gems/masonellwood_cli_app_two. Rubygems.com is basically the https://www.npmjs.com/ for the Ruby community. If you do not know what NPM is either then RubyGems is basically a place where you can find, install, and publish Ruby Gems that you build yourself. It is an open source project, kind of like Github, where users can store and use other people’s gems for their own purposes.

“RubyGems is a package manager for the Ruby programming language that provides a standard format for distributing Ruby programs and libraries (in a self-contained format called a “gem“), a tool designed to easily manage the installation of gems, and a server for distributing them.” wikipedia

Thank you, Wikipedia.

If you would like to view the screen share of me running through my application, check out the video below.

Sorry for me speaking so quietly in the video, I was in the waiting room at MD Anderson, so I had to keep it down.

To install my Gem to your Gemfile please type into your terminal

gem install masonellwood_cli_app_two

Depending on if you have your local environment setup because most likely you will receive an error of “YOU ARE NOT ALLOWED TO WRITE TO THIS FILE” or something along those lines. This is a mac default so unless you set up RVM or some alternative type of Gem management tool, then most likely you should not change the reader writer permissions of your lab without knowing what you are going.

If you would like to set up your own local environment, you should seriously check out the setup instructions that The Flatiron School has published, they are awesome and they are the same ones that I used to set up my machine. (https://learn.co/manual_setup)

If the file installed without a hiccup then simply type into your terminal

Weather-channel

And this should prompt you to my program which will run through a CLI or command line interface.

Through this project I have learned to speak and present code to a viewer, refactor code on the spot, build a ruby gem, publish a ruby gem, change file permissions, create a local development environment, use bundler to create a base template for gem construction, deeper understanding of debugging, require and use other gems to build projects from, and to be able to approach a problem and think through the steps to solve that problem.

The Professors that have worked with me to complete this project have been amazing, and I thank them for their time and patience with anything that I needed help with. Throughout this project I was finally able to see that I can do this, I can be the developer I want to become, and this decision to become a developer is not over my head.

Read More at My Journey Of Learning Programming Through Flatiron School #33

Improving the Conversation Between Strategists & Developers

Original Source: http://feedproxy.google.com/~r/buildinternet/~3/UtYn17lDDwA/

Hey developers and fellow strategists, we need to talk.

I’ve noticed that we think differently about our relationship in the builder community. You get excited over hardware, lines of code and open APIs while I seek to influence consumer behavior with technology. I feel like this divide may push us away.

Let’s fix this.

Helping Developers

I’ve realized my role in the builder community is to be your biggest fan. I may never need to code in my life but understanding you as a coder is one way we will overcome this. Here are my promises to you:

I will minimize as many distractions as possible to keep you focused  This includes screening phone call before they get to you, waiting to ask questions until you have time to actually think about them and keeping those boring project management short.
I will make you (and what you work on) look amazing. Remember all that traveling I did last spring talking with techies about our platform? I may have dropped your name a dozen times when talking about it. They were impressed.
I will promote your passion to the people who can pay for it. Translating the work you have done into jargon non-techies will understand is my job and I love teaching people new things. So if I ask an obvious question about how it works, it so I can better promote it to folks with dollar-bills to spend.


Helping Strategists

Here’s what I ask of you:

Bug me when you are working on something that will blow my mind. I love when we can geek over technology but I sometimes get busy with client work. Take the initiative and come by to talk about what you are working on. I assure you, I won’t tell you to go away.
Write the technology and hardware used on a Post-It. I know, I’ve asked you the difference between JavaScript and jQuery a hundred times. Let’s keep our sanity and when we are done talking, write down the technology and hardware used so I can Google it later. This will save us both a lot of time (and headaches).
Champion my ideas to find better outcomes to problems. The best success we have at selling our capabilities is to team up and think. Ignore the desire to say it’s impossible on the first try. Ask me questions, goals, and outcomes I’m looking for that could help solve the problem. Sometime it won’t be the first thing that comes to mind.


Helping Each Other

Making (and keeping) promises like these will help us work smarter when tackling an obstruction across the path. I’ve seen this happen at One Mighty Roar where you’d have a hard time identifying someone as a developer or a strategist because everyone invests in the people around them, constantly learning.

The opportunity to improve this relationship is there everyday. You’d be surprise how much of an impact it can have.


The Internet of Islands

Original Source: http://feedproxy.google.com/~r/buildinternet/~3/AwO8myx1V6c/

This morning I found a device that would turn my bed into a giant scale.

It’s a high point for hardware. The rise of crowdfunding and the maker’s movement have helped awesome ideas turn into products you can actually own. We live in the future. Everything is wonderful and nothing is wrong.

Unless you count the islands. Those are a problem.

Gilligan’s IoT

What are islands? Turns out when great hardware launches constantly, the connected device space becomes an overloaded tech flea market. The devices are all valuable on their own, but most suffer from “Now what…?” moments of integration with other things. No two speak the same language, forcing real world application to be based on which parts are easy to stitch together instead of best. Everything is technically connected, but design isolates the useful parts.

Islands are isolated grids of connected devices — silos in an “Intranet of Things”. They come in four types:

Ownership islands

A device connects to a closed grid only. Access is through a proprietary gatekeeper which limits available data and features. Most common for security systems or payment processing devices where the data needs to be accurate.

DIY islands

A device is capable of connecting to anything, but you’ll need to build the bridge first. These devices require technical skills to work with anything outside their product family. Most crowdfunded devices targeting the maker’s culture (i.e. Arduino) launch with “if it has an API, it’ll be fine” DIY mentality. IFTTT has started to attack this particular flavor of device fragmentation with support for smart systems SmartThings and Wemo.

Privacy islands

A device generates sensitive data or runs inside private spaces. If these devices were to connect to a public grid, they’d have to stay anonymous. So far IoT has been a homebody, and privacy islands are most common in home automation device grids.

Niche islands

A device connects to a specialty grid with an intentionally limited user base. This island is most common with today’s enterprise IoT platforms, which miss out in the same way an internet for only business websites would.

Islands are not automatically a bad thing. There are plenty of situations (especially with security and privacy) where intentional islands are the right decision. As the IoT space expands, it’s the unintentional islands and fragmentation we need to look out for.

Connected… to what?

Today’s hardware-first approach for the Internet of Things is like having a room full of smart people that refuse to meet each other. Great on paper, independently impressive, but dead silent from the balcony above. “Build it and they will connect” doesn’t work.

A lot of folks talk about “connected devices” and the “Internet of Things” as statements of connectivity. They aren’t. They are statements of context. A device with a Wi-Fi signal and API isn’t necessarily connected the Internet, it’s just accessible. The important part is not the device, it’s what the device connects to.

I’ll repeat that.

The important part of a connected device is not the device. It’s what the device connects to.

The moment you realize this, IoT’s future is no longer about hardware. Hardware is a constantly revolving door of better stuff that makes last year’s thing obsolete. The Internet of Things is a software problem.

Hardware helps software ask better questions

When you start with hardware, software is what makes your hardware work. A hardware focused approach may create great devices, but most fail the “now what” moment of open-ended integration that comes with connectivity. Offering a RESTful API is only the first step. Some try to sidestep this problem by promoting an open source software initiative, but that’s open-sourcing the wrong piece of the equation and most of the responsibility for teaching.

When you start with software, hardware is what helps your software ask better questions. Questions like “How hot is it in here?”, “Who just walked in?”, and “What’s the quietest conference room available?”. All of these examples are answerable only through a combination of software and hardware. What would you app do if it could ask questions about the real world?

Future proofing the device grid

The Internet of Things is a grid, and we’re all responsible for organizing the things we put on it. What’s important is not just the types of things we attach, but how we teach them to communicate. Today one of the popular answers is Bluetooth LE. Last year it was NFC, but years of barcodes, RFID, and QR also carried the torch to today.

The newest spec will always be around the corner. An ecosystem can’t grow on a foundation that needs to be replaced every two years. What won’t change is the translation. The world needs more people building ecosystems and products that celebrate the latest Kickstarter success story instead of panic attacks about differentiating.

Platforms like IFTTT get this. To them, new stuff is an opportunity to build more great tools. Why wouldn’t they want more players? More importantly, IFTTT doesn’t require a monopoly to be successful. It’s part of the pipeline, and can be responsible for all, pieces, or none of specific interactions. Platforms as tools don’t depend on universal usage — just being the best option more often than not. GitHub isn’t the only source control platform folks use, but it’s damn good at the collaborative bits.

We need more onramps

As people realize the connected space is more than Twitter-enabled toasters, more “things” will join the grid. Awesome. The problem now is a lack of structure waiting for them. Something to bridge the islands. There is no good way for the average person to get involved. When’s the last time you visited a site direct via IP address? The IoT needs its version of browsers.

Developers won’t have any problem, but they aren’t always why we build things are they? The early onramp is paved by the folks that get it, but at a certain point you’re joined by people who don’t know how to code. These are the people delighted to build if only they were offered a “hammer”.

Now where’s the toolbox?

Banner image source.


How to Balance a Startup With Parenthood

Original Source: http://feedproxy.google.com/~r/buildinternet/~3/yIetNC8K_Eo/

One of the common startup myths is that single 20-somethings are the most successful entrepreneurs and that they are the demographic that starts the most companies. Zach and Sam may have started One Mighty Roar before they were even legal to go into a bar, but research from the Kauffman Foundation states that the average founder is actually 40 years old. The same report shows that nearly 70% of entrepreneurs are married and 60% had at least one child. So much for the stereotype.

Tons of startups, from Intel to Starbucks, were all started by parents. I am a dad myself and One Mighty Roar has been growing along with my daughter. Before I became a father, I got to work with a number of folks who taught me some really great lessons about balancing parenthood and a startup, and I still use these lessons to this day.

1. Think of Your Partner As Your Investor

Having a supportive home partner is a must, and you run a chance of a very painful and expensive divorce if you don’t manage the relationship and foster that support. Think of your partner as your investor, because that person has more influence than you think. So before you start a company or pick a team to join, take the time to pitch the venture and convince your most important investor. It is worth getting your partner’s support.

2. Choose Your Startup Team Wisely

The team you work with is like a second family. Pick wisely! There are many reasons I joined the OMR team, but their support of me being a parent from Day One has been nothing but an inspiration. When your team supports your choice to be a parent, it removes a large layer of office politics and acts as a great source of energy. Even your single colleagues may be parents someday. You have to set an example and inspire them not to fear it when their time comes.

3. Communicate Your Schedule and Priorities

Conflict and ambiguity bring an unnecessary level of overhead to work and family relationships. To minimize that overhead, communication and expectations-setting should be at the top of your mind daily. I am a huge fan of “Commanders Intent.” We practice it at One Mighty Roar at every level, from apprentice to founder. You have to let people know what you are going to do and what the final outcome will look like. Communicating possible risks and where you need help will prepare your home and office teams to have your back when needed. In addition to providing context to a lot of your actions, being transparent with what you are doing and how you are going to do it adds a level of personal discipline you need.

4. Focus

If it does not serve your family or business – purge it! Often, the first thing to go are networking events. Those are mostly “drink-ups” that have no real business value, anyway. Second thing to go are meetings with people who are either not helpful to your work or who are “takers.” These are folks who rarely, if ever, reciprocate for the time and connections you give them. Lastly, it is very likely you will be jettisoning a bunch of hobbies and other activities now that you are a parent. If you already have kids, you know that “me time” is like sleep at Navy Seals training – you take when you can get it, since you don’t get to plan for it. For me, sleep has become the most sought after “hobby.” Being a parent and getting to work with my team is extremely fulfilling and honestly I don’t care enough to pick other hobbies back up right now. I know I am not alone thinking that way.

5. Manage Your Energy

Energy management is not just for utilities. Business has strong demands on your mental energy, and your new family can take a physical toll. Pulling all nighters for the sake of work is non-sense. Generally speaking, the work you do when you’re up at 2:00 am isn’t top-quality, and you’re only going to have to redo the work again the following day. So don’t waste your time.

6. Set Boundaries

When people at work and at home know what to expect from you and when, you cut out a massive amount of conflicts. For example, my team knows there are certain days I leave at 5:00 pm to pick up my daughter and am not going to be reachable until she goes to sleep at 8:00 pm. On those days, my wife knows I need to be in extra early to pound out some work. Most weekday evenings I do set aside time to work on finance and legal docs, because I do the best work on those then.

That means that one of the weekend days is exclusively for housework, family fun, and other non-work activities. It also does not relieve me of my share of housework. Those are just couple of examples.

There are many many successful companies being led by parents. Motivation you derive from having to provide for your family, the impending college costs for your kids, that retirement you have to build for yourself, and the drive to make your family proud of you are incredible fuel for building a successful company. Take it one step at the time and you can and will put your family and growing business in equilibrium. It is not only doable, it is also extremely fun and fulfilling.