Printify vs Redbubble (2023): Which is Best for Print On Demand Businesses?

Original Source: https://ecommerce-platforms.com/articles/printify-or-redbubble

Printify vs Redbubble: Which solution is best if you’re planning on starting a print-on-demand business? Both Printify and Redbubble offer ecommerce business owners a convenient way to start selling customized and unique products to consumers online.

With both tools, you can add your unique designs to a variety of different products, ranging from popular apparel garments such as shirts and hoodies, to phone cases, home accessories and more. However, Redbubble and Printify approach the “POD” market from very different angles.

While Printify gives you all the tools you need to create a POD business using your own ecommerce website, as well as various online marketplaces, Redbubble is a dedicated online market designed specifically for creators. Here’s everything you need to know about Redbubble and Printify to determine which solution is best for your company.

What is Printify?

printify homepage - printify vs redbubble

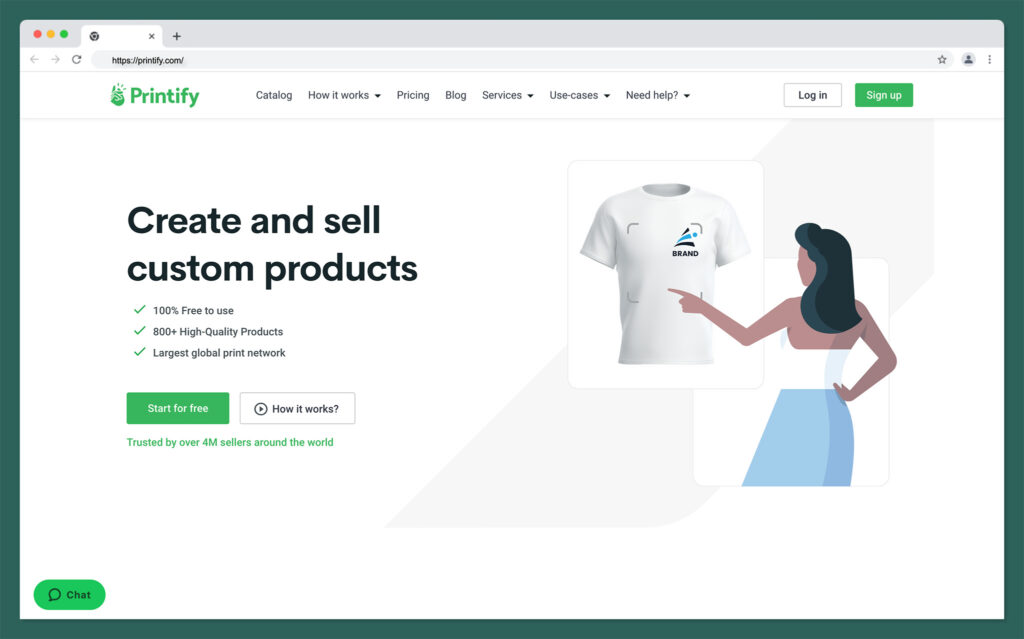
First founded in 2015, Printify is a print-on-demand and dropshipping platform, designed to help ecommerce retailers develop and sell customized products.

Ready to integrate with a host of website builders and marketplaces, such as Shopify, Amazon, eBay, and Etsy, Printify helps companies automate the POD sales model. The solution includes a mockup generator for product design, direct connections to global fulfillment companies, and tools for managing orders and inventory. Printify handles the whole order fulfillment process on behalf of companies, and offers a wide selection of white label product options to choose from.

What is Redbubble?

redbubble homepage - printify vs redbubble

First developed in 2006, long before Printify, Redbubble is a print on demand marketplace. Similar to Printify, Redbubble handles product creation and fulfillment on behalf of vendors, reducing the amount of time you need to spend on logistics and inventory management. Rather than integrating with existing websites, Redbubble acts as a unique platform where companies can connect with customers from an existing global audience.

Geared towards designers, Redbubble gives creators an easy way to monetize their designs without having to invest in the full website building process. The platform has its own mockup generator, tools for marketing and sales, and even useful templates to use for product design.

Go to the top

illustration of a cat climbing a ladder

How Does Printify Work?

On the surface, Printify and Redbubble appear to be two very similar solutions for business owners. They’re both platforms designed for the print-on-demand marketplace, which allow companies to add their own custom designs to products. Both tools offer access to a wide variety of product options, from custom t-shirts, to phone cases and home décor.

However, with Printify, you get all of the tools you need to leverage the print on demand model alongside your existing ecommerce website, or your storefront on common marketplaces. Printify can integrate directly with ecommerce platforms and marketplaces, allowing users to upload product mock-ups directly to their chosen storefront.

Once you’ve created an account and integrated the solution with your existing ecommerce store, you can use Printify to browse through a variety of products organized based on their category, the location of the manufacturer, and other factors. You’ll be able to use the mockup generator to add your own designs to each item, then list the products directly on your store or marketplace storefront.

Once a customer places an order, the Printify software will immediately issue that order to the manufacturer, who handles everything from producing your products, to packaging and shipping them to customers around the world. You can even handpick your supplier, to ensure you’re working with a company that can deliver excellent quality and fast delivery times.

Plus, Printify also gives you an opportunity to order samples of your product before you list them on your online store, so you can invest in effective quality management.

Printify’s range of partners can ship products around the world, to locations from Australia and the US to the UK and various European continents. The global print network offers a range of printing technology options, more than 800 high-quality products, and excellent customized service.

Go to the top

illustration of a cat climbing a ladder

How Does Redbubble Work?

Redbubble is a little different from Printify in terms of functionality. With Redbubble, you also gain access to manufacturing partners and fulfillment companies who can handle product development and shipping on your behalf. However, instead of integrating an end-to-end platform with your existing website, you’ll sell the items you create directly on the Redbubble marketplace.

With more than 18.5 million visitors in the US alone, and countless consumers located in regions around the world, Redbubble makes it easy for creators and business owners to create and sell merch anywhere. All you need to do is create a free account, upload your artwork, and use it to customize the various white label products on the Redbubble platform, using an included mockup generator.

You can then create sales pages for each product, with a title, description, and a selection of images for your product. Whenever a customer places an order through Redbubble, the back-end team produces the item and ships it directly to the consumer. Instead of paying for each product to be created and shipped, you’ll simply earn a commission from each sale, rather than the full sale price.

Redbubble is extremely straightforward for creators and artists who want to monetize their designs without managing a store themselves. Instant access to an existing audience makes it relatively easy to start selling instantly. However, you will need to make sure you research your target audience, create compelling products, and market your goods successfully to make a profit.

Notably, you will need to wait until you earn a specific amount through Redbubble before you can access your profits. Once a month, Redbubble will deposit your funds into your bank or PayPal account provided you’ve earned at least $20. Otherwise, you’ll need to wait for the funds to be released, which may be a problem for some retailers.

Go to the top

illustration of a cat climbing a ladder

Printify vs Redbubble: Ease of Use

Printify and Redbubble are both ideal for retailers and artists who want to access a relatively low barrier to entry when monetizing their designs.

With both of these tools, there are no minimum order quantity requirements, so you can avoid worrying about inventory management and high up-front payments. Additionally, both tools will handle fulfillment on your behalf, dealing with everything from packaging products, to making sure they reach customers as quickly as possible.

Redbubble and Printify also come with tools included to help you make the most of your designs. You can leverage a mockup generator to see what your products will look like in advance, and order samples of each item at a discounted rate.

However, while both tools are extremely straightforward to use, Redbubble might be simpler for those who consider themselves to be true beginners in the ecommerce space.

With Printify, you’re still responsible for establishing your online presence with an online store or marketplace storefront. You also need to handle all of the work of marketing your items yourself, ensuring you attract enough customers to your store to make a profit.

With Redbubble, you may still need to invest in external marketing strategies, but your products get an instant visibility boost, because they’re listed on a popular marketplace straight away. There are no store design concerns to worry about. You simply make a dedicated listing for each item you want to sell. Additionally, Redbubble even offers tools and guides to help you increase your sales.

That being said, Redbubble doesn’t give you as many opportunities to develop your own brand identity as you’ll get on Printify. Since you’re not developing your own online store, you can’t invest in developing a more significant online presence. However, you can still use SEO in your listings to increase visibility, and leverage tools for marketing, like email and social media separately.

Go to the top

illustration of a cat climbing a ladder

Printify vs Redbubble: Product Designs and Quality

Regardless of which niche you plan on targeting with your print on demand business, ensuring you can produce high-quality products is essential. The better the print options and the quality of the overall products you produce, the more likely you are to earn loyal customers.

The good news is that both Printify and Redbubble partner with a variety of companies and fulfillment centers around the world, to ensure you’ll have a selection of great products to choose from. There are various types of printing technology to explore, and a huge range of items available on each platform, from apparel to accessories and home décor.

The bad news is that because both Printify and Redbubble use partners for printing, the quality of your products can vary depending on a number of factors. While both of these platforms do their best to source the help of high-quality, sustainable manufacturers, there’s always a risk that the quality of your items might not live up to expectations.

While the majority of companies using both Printify and Redbubble say the print quality is good, and the materials used are excellent, it’s worth doing your due diligence when using either of these platforms. Ordering samples of your products before you list them on your website can be a good way to ensure you’re meeting the expectations of your customers.

Go to the top

illustration of a cat climbing a ladder

Pricing

Costs are another important factor to consider when choosing the right print on demand solution for your company. The print on demand business model often means that prices can vary drastically depending on the items you choose to produce, your customization options, and shipping.

Both Printify and Redbubble offer free plans, which allow you to get started with the service without paying anything. However, with Printify, you will need to pay for the base cost of the products you produce, as well as any customization fees after a customer places an order. With Redbubble, you don’t pay anything for the initial item, but you only earn a portion of the profits.

Printify Pricing

Alongside its free plan, Printify offers two paid package options, available either on a pay monthly basis, or an annual basis with a 14% discount. Options include:

Premium: $24.99 per month with support for 10 stores per account, unlimited product designs, up to 20% discounts on all products, and order management with Printify Connect.

Enterprise: Custom pricing for merchants with more than 10,000 orders per day, with unlimited stores per account, unlimited product designs, and all the features of Premium.

All plans include access to the Printify mockup generator, integrations with ecommerce platforms, manual and automated order creation, help centers, and custom order imports.

Redbubble Pricing

Redbubble doesn’t have any paid plan options. Instead, it simply pays designers a commission for every product they sell. Margins usually start at around 20% of the full product price, but it is possible to raise or lower the price of your products depending on your needs. It’s worth checking the current price for each item you want to sell before adding it to your store, as the base cost can vary, which influences your total profit margins.

Go to the top

illustration of a cat climbing a ladder

Integrations

As relatively unique print on demand platforms, Printify and Redbubble both take different approaches to integration. Redbubble currently doesn’t offer any native integrations with third-party platforms like Wix, WooCommerce, or Shopify. However, there are tools you can download which allow you to showcase your portfolio on your personal website.

Alternatively, Printify relies heavily on its flexible integration options to ensure companies can make the most of the platform. Printify can integrate directly with your Shopify and WooCommerce selling channels, allowing you to upload mockups, manage orders and automate fulfillment in one place.

Printify also integrates with marketplaces like Etsy, as well as platforms like Ebay, BigCommerce, PrestaShop, Squarespace, and Wix Stores. There’s also a selection of custom API solutions companies can use to create advanced automated workflows.

If you’re looking for a convenient way to create and sell products across a variety of existing channels, Printify is definitely the right option for you. However, if you want an all-in-one solution that allows you to sell custom merch without designing a website, Redbubble might be the best choice.

Go to the top

illustration of a cat climbing a ladder

Fulfillment and Shipping

The great news for would-be store owners is that both Printify and Redbubble can handle all of your fulfillment processes for you, giving you more time to focus on developing your brand, and connecting with customers. Printify has a global print provider network, spread across 110 facilities in the US, Canada, EU, Australia, UK, and China.

The company partners with local fulfillment companies around the world to ensure you can rapidly send products to customers wherever they are. All sales channels and print providers have standard shipping options available. Plus, some providers also offer priority shipping.

Standard shipping from US-based providers usually takes 2-3 days for domestic customers, or 3-5 days for international customers. However, shipping times can vary drastically depending on the supplier you choose and where your customer is located. Some international deliveries can take up to 30 days, and its uncertain whether this includes production times.

Printify does note that most orders are typically shipped within 2 to 7 days of the order submission date, however, and business leaders can track shipments within the app.

Redbubble also has a global printing and fulfillment network, allowing it to deliver products to customers globally. However, the company doesn’t ship to certain locations, such as Cuba and Sudan. Redbubble works with reputable couriers to ship customer orders, such as DHL, FedEx, and UPS.

However, shipping times can still vary depending on your chosen shipping method, and the customer’s location. Redbubble offers a range of standard and priority shipping options, and you can calculate the cost of shipping within your account. Like Printify, Redbubble also gives ecommerce retailers tools for tracking their orders, and allows merchants to share tracking numbers with customers, so they can keep an eye on their purchase.

With both platforms, shipping prices can fluctuate based on the prices provided with partner logistics companies. However, you should be able to calculate shipping prices before you sell anything.

Go to the top

illustration of a cat climbing a ladder

Customer Support

Customer support is an important consideration for any ecommerce business investing in print on demand. If something goes wrong with your order, it’s important to ensure you can contact logistics companies and manufacturers, to get extra help.

Printify offers a range of customer support options, including 24/7 merchant support on all plans, and a self-service help center where you can find crucial articles on a range of topics. You can learn all about troubleshooting common issues, using APIs and integrations, and creating orders.

Printify also runs a fantastic blog which has tips and tricks on how to create the best POD company and increase your profits. Depending on your plan, you may be able to access additional services, like order management with Printify Connect.

Redbubble takes a similar approach to Printify in terms of customer service. There’s a comprehensive help center and knowledge base, as well as FAQs you can check out for extra insights. You’ll also be able to contact Redbubble with questions using the “request submission” form on the website, or by messaging the company on Facebook or Twitter.

Go to the top

illustration of a cat climbing a ladder

Pros and Cons of Printify and Redbubble

Both Printify and Redbubble offer excellent print-on-demand service and support to companies around the globe. They’re ideal for creating and selling custom products online, although they target slightly different customer bases.

Printify is one of the best print-on-demand companies around for merchants who want to design their own products and sell them through an existing ecommerce website or marketplace. Alternatively, Redbubble offers an easy and cost-effective way for artists and creators to monetize their designs without creating a website. Here are some of the core pros and cons of both print on demand companies:

Printify Pros & Cons

Pros 👍
Cons 👎

Pros 👍

Excellent range of custom products to choose from, with stickers, apparel and accessories
Easy-to-use mockup generator for design customization
Various shipping and fulfillment options to choose from
Easy integration with a range of marketplaces and ecommerce store builders
High-quality POD products made with sustainable materials
Variable profit margins, as you can set your own price for items
Great range of branding options.

Cons 👎

Printing partner quality can vary
Requires the creation of your own website
Some products can be quite expensive
Delivery times can be lengthy in some areas

Redbubble Pros & Cons

Pros 👍
Cons 👎

Pros 👍

Easy to access and use for beginners in the commerce world
No monthly costs or set up fees
Various product options from leggings to art prints
Customizable markup options for profit margins
Built-in analytics and insights to increase sales
Low base price for many of the available products
Excellent global distribution network
Access to a large existing audience

Cons 👎

No integrations with existing online tools
Limited branding options for products and packaging
Slow payouts when it comes to receiving earnings
Lots of competition on the platform
Fewer design tools to work with

Go to the top

illustration of a cat climbing a ladder

Printify vs Redbubble: The Verdict

Ultimately, Redbubble and Printify are two excellent options for companies investing in print-on-demand business models. Both solutions offer fantastic fulfillment services, as well as a range of print on demand products to choose from, including wall art, tote bags, clothing, and accessories.

With both platforms, the shipping costs, times, and core price of products can vary, so it’s worth doing your research on both POD sites before you start building your business. Additionally, both of these platforms are designed to serve a slightly different audience.

Redbubble’s product creation and fulfillment tools are ideal for artists who want to monetize their designs without having to worry about building a website from scratch. You can create a wide variety of different products, list them on an active online marketplace, and start making money fast. However, the profit margins can be low to begin with, and there’s a lot of competition to fight against.

On the other hand, Printify is one of the best tools available if you’re looking for a company to help you produce custom products and ship them to customers, while developing a powerful brand. The solution can integrate with a wide variety of marketplace and ecommerce tools, and gives you plenty of ways to differentiate yourself from competitors.

The right option for you will depend on your ideal business model, but keep in mind there are plenty of other alternatives you can consider too, such as Zazzle, TeeSpring, and Printful.

Further reading 📚

Printful vs Redbubble (2023): Which Is Better?

Printify vs Gelato (2023): Which Is Best?

Printify vs Printful (May 2023): The Ultimate Print-on-Demand Services Comparison

Printify vs Spocket (2023): What’s The Difference?

The post Printify vs Redbubble (2023): Which is Best for Print On Demand Businesses? appeared first on Ecommerce Platforms.

How To Deal With Big Tooling Upgrades In Large Organizations

Original Source: https://smashingmagazine.com/2023/05/big-tooling-upgrades-large-organizations/

If you work in software development, you probably know a thing or two about using and maintaining third-party packages. While third-party tooling has its fair share of downsides, there are plenty of advantages as well. The efficiency you get from code that someone else has already written speeds up development and is hard to deny. Sure, there are all sorts of considerations to take in before plopping code from a third party — accessibility, technical debt, and security, to name a few — but the benefits may make taking on those considerations worthwhile for your team.

Upgrades are also part of that set of considerations. Usually, your team may treat this sort of maintenance as a simple task or chore: upgrading dependencies and (automatically) validating that all of the features keep functioning as expected. You probably even have automated checks for keeping all package versions up to date.

But what if the third-party tooling you adopt is big? I mean big, big. That’s common in large organizations. I happen to work for a fairly large organization that leverages big third-party resources, and upgrading those tools is never as simple as running a package update and moving on. I thought I’d share what’s involved in that process because there are many moving pieces that require ample planning, strategy, and coordination. Our team has learned a lot about the process that I hope will benefit you and your team as well.

Some Context On My Organization

I work for Jumbo Supermarkten in the Jumbo Tech Campus (JTC), which is a department of over 350 developers working in agile teams on a range of digital products that help facilitate our core grocery and e-commerce processes.

We have a variety of responsibilities, where 70% of the work is allocated to the primary objectives for each team, and the remaining 30% is dedicated to anything a team wants, as long as it is beneficial to the JTC, which is very useful if you want to deliver value outside of your own team.

When we look at maintaining tooling and packages, balancing the goals of each team with the goals of JTC means that teams effectively maintain their own codebases while also collectively maintaining internally shared codebases that serve as the tooling and foundation of our applications.

Centralized Code As A Bottleneck

To build our applications with consistent standards, we rely on an internal design system and the component library we call Kompas (Dutch for “Compass”). We have built this system ourselves and rely on Vue to render our components and build interactions. Kompas is a hard dependency for virtually all of our applications to ensure uniformity.

This project was not allocated to a dedicated team. Instead, we adopted a strategy that introduced plenty of guidance to allow all front-end developers to contribute. Any developer can add new components to the library as well as features to existing components and keep everything in sync with the designs.

Teams normally work on business features since product owners love delivering customer value. The way we set up our process would allow a team to, in one sprint:

Make the required change in Kompas,
Have it reviewed by peers from both inside and outside a particular team,
Publish the latest version of the component library, and
Use that version in that team’s own application to deliver to the end user.

We can only do this with automation on repetitive processes — linting, formatting, quality assurance, testing, visual comparisons, and publishing — in order to provide enough room for developers to contribute to the process. Our component library is very much a living document of our design system, with multiple minor releases and patches a week. With semantic versioning, we can keep our own applications up to date easily and with confidence.

For bigger undertakings, such as setting up visual snapshot tests, we established temporary working groups alongside our existing teams that we called “front-end chapters” where members join on a voluntary basis. In these meetings, we discuss what needs to be done, and in the available 30% of free time we are allotted, the members of these teams carry out the work and report back to the chapter.

As you can imagine, we’ve spent a lot of time and effort ensuring the quality and making it a reliable part of our landscape.

This all began when Vue was in Version 2. That’s the version we baked into Kompas, which means we effectively forced our whole application landscape to follow suit. This worked perfectly for us; people could focus on their team’s needs while leaning on the support of the entire front-end chapter that works on Kompas.

Following the Vue ecosystem that we introduced, Vuex and Nuxt became part of our environment. And then Vue 3 was announced, and it was a massive breaking change from Vue 2! With the announcement, the end-of-life date for Vue 2 was set for December 31, 2023. We still have some time as of this writing, but the news had a massive impact that cascaded throughout our organization.

We Needed A Strategy

We needed to upgrade Vue from 2 to 3. The first thing that we needed to figure out was when we could reasonably start the process. To assess and strategize, we formed a small virtual team of developers consisting of members from various teams so that multiple perspectives were represented.

We figured that there would be a period of time when we would need to support both versions in order to allow time for migrating between teams. It would be nearly impossible to orchestrate a monolithic release. Thus, we prefer gradual incrementing over massive sweeping changes. On the other hand, having to maintain two versions of Vue for, basically, the same business feature presented costs in time and complexity.

So, in order to execute this process as responsibly as possible, we set out to figure out when we could start, taking into account the longevity of maintaining two codebases while getting early experience from upgrading. We started to map the different tech stacks for each team and plotted out potential bottlenecks for the sake of making the process of our work as widely visible as possible. At this time, our organization had a very flat structure, so we also needed to get internal stakeholders (i.e., product owners, architects, and managers) involved and convey the effect this upgrade would have on teams across the board.

Creating A Map

With our starting point set, we move on to establish a direction. Not having a dedicated team did pose some challenges because it meant that we needed to align everybody in a democratic way. This is, in Dutch culture, also known as polderen:

We try to find consensus in a way where everybody is equally happy, or unhappy, about the final direction.

And this can be challenging in a department that consists of many cultures!

One thing we knew we could rely on was the published best practices from official Vue resources to guide our decision-making process. Referencing the documentation, we did notice opportunities for incremental upgrades. The release of Vue 2.7 (Naruto) was really helpful in the sense that it backported features from Vue 3 back to a Vue 2-compatible version.

We also noted that in our landscape, not all applications were actually using Nuxt. A stable release of Nuxt 3 would be a prerequisite for those applications to even be considered for migration since the Vue major version is tightly coupled with the Nuxt major version. Luckily, some applications in our landscape are standalone Vue apps. These are ideal candidates for the first Vue 3-compatible components.

But first, we would need to have components that were compatible with Vue 3.

The Big Divide

By this point, we were confident enough to get to work. We had a plan and clear strategy, after all. The first order of business was to make sure that our component library was compatible with Vue 3, preferably while minimizing duplicative efforts.

We found a really nice way of doing this:

We created a new workspace called “Kompas-next” next to the regular components folder, which was scaffolded out using Vue 3. Then we imported the components from the original library.

This only works because:

The backported features in Vue 2.7 allowed us to move closer toward the Vue 3 composition API (among other things).
The component syntax between Vue 2 and Vue 3 isn’t radically different anymore.
Vue Demi allowed us to convert components, one by one, to be compatible with both versions.
We made sure that Kompas-next runs isolated tests to ensure stability.

We did have to slightly modify each and every component to adapt to the new standards. We’ll get to that process in a minute.

That said, we were able to publish two versions of our component library: one that is compatible with Vue 2 (Kompas) and one that is compatible with Vue 3 (Kompas-next). This, in turn, meant that the teams that did not have Nuxt as a dependency could potentially start migrating!

Getting Organized

Up to this point, most of the groundwork had been done in a relatively small team. We were in charge of the investigations, communication, and alignment. But we still needed to get stuff done — a lot of stuff!

With every developer being able to contribute, we came to an agreement that fits with the way everybody was already contributing to the component library:

If you touch a component that is not yet compatible, convert it to be compliant with both Vue 2 and Vue 3 using Vue-demi. Add the existing component with tests to the imports of the Kompas-next folder.

Having communicated this strategy early in the process, we immediately saw the Kompas-next library growing. The Vue core team has put so much effort into closing the gap between the two versions, which made our lives much easier.

Feedback From Early Adopters

The teams that were not blocked by a Nuxt 3 release could spend their time migrating their complete app to Vue 3, providing feedback along the way on how we were setting up our packages and converting components.

Seeing the first applications using Vue 3 was a milestone we could all be proud of since we managed to reach it together, collaboratively, and with a united strategy. The strategy worked for us because it closely resembled the way we were already working.

There were indeed some components that were not migrated using this strategy, which indicated to us that they were stale in terms of development. We reasoned that “stale” equals “stable” and that it would be perfectly fine to migrate them by manual assignment and distribution since we can expect it to be close to a one-off migration per component.

We also started to add Vue 3-specific capabilities to our component library, such as our own composables. I think that’s a nice testament to the investment and adoption by our front-end chapter.

With the component library now supporting Vue, we cleared a significant migration hurdle in our organization. We enabled teams to start migrating to Vue 3, and we encouraged new applications to use the latest standards. As a result, we could start thinking about a deprecation path for our Vue 2 codebase. We were cautiously optimistic and aligned the end-of-life date for Kompas with the same date for Vue 2: December 31, 2023.

So, yes, we are not yet finished and still have work to do. In fact, we had…

Two (Minor) Elephants In The Room

To support communication between micro-applications that run on our e-commerce domain, we had resorted to using Vuex in the past. We used to register stores globally so other applications could dispatch actions and retrieve a shared state. This is now gradually being migrated in the sense that we are replacing Vuex with Pinia for internal state management.

For cross-app communication, we are in the process of decoupling Vuex as an external interface and promoting the use of custom events tied to a specific domain. This prevents us from locking ourselves out of future state management tooling.

We are also in the process of preparing our Nuxt applications to be cleared for migration as well. Within our e-commerce domain, we’ve been building specific modules that take a lot of overhead out of our hands: They handle tasks like setting meta headers, security, and analytics. These are being rewritten to use plugins rather than modules. The impact of this breaking change is smaller because it is limited to the teams that use these modules. We see that these teams are using a similar strategy, albeit on a smaller scale, to organize and structure the tasks at hand.

Looking Back

I believe we have a few key takeaways from how we upgraded (and continue to upgrade) from one version of a large third-party resource to another within our large network of teams and shared codebases. I believe the lessons we learned are relevant beyond Vue and can be applied to the processes of other large organizations migrating between versions of a core piece of architecture.

Let’s review what we learned:

Ensure the transition period is clear and as short as possible.
Facilitate breaking the work down into small steps that progress iteratively and solicit feedback from those involved in the process as early and as often as possible.
Onboard key stakeholders to make sure your team has ample time and resources to do the work.
Define a strategy that fits with your organization’s culture.
Foster a collaborative mindset and establish clear communication between teams.
Celebrate wins, even the smallest ones!

The Work Is Never Done, Really

As I mentioned earlier, maintenance is a never-ending piece of the software development process. As Vue creator Evan You stated in the State of the Vuenion 2023, Vue plans to ship more frequent updates and releases. This will keep impacting our work, but that’s okay. We have a plan and blueprint for future releases.

We’re not there yet, but we now know how to get there!

Further Reading On SmashingMag

How To Maintain A Large Next.js Application, Nirmalya Ghosh
Moving From Vue 1 To Vue 2 To Vue 3: A Case Study Of Migrating A Headless CMS System, Lisi Linhart
Optimizing A Vue App, Michelle Barker
Why Web Application Maintenance Should Be More Of A Thing, Darren Beale

Getting Started with Flask, a Python Microframework

Original Source: https://www.sitepoint.com/flask-introduction/?utm_source=rss

Introduction to Flask for the Modern Web

Learn how to install and set up an app with Flask, a popular microframework for Python that offers an alternative to the much larger Django.

Continue reading
Getting Started with Flask, a Python Microframework
on SitePoint.

This AI-generated book cover is causing controversy

Original Source: https://www.creativebloq.com/news/ai-book-cover

New Sarah J. Maas book design angers artists.

Exciting New Tools For Designers, May 2023

Original Source: https://www.webdesignerdepot.com/2023/05/exciting-new-tools-for-designers-may-2023/

Exciting New Tools For Designers, May 2023

There are hundreds of new tools for designers and developers released each month. We sift through them all to bring you the best.

Designing Sticky Menus: UX Guidelines

Original Source: https://smashingmagazine.com/2023/05/sticky-menus-ux-guidelines/

We often rely on sticky headers to point user’s attention to critical features or calls to action. Think of sidebar navigation, CTAs, sticky headers and footers, “fixed” rows or columns in tables, and floating buttons. We’ve already looked into mobile navigation patterns in Smart Interface Design Patterns, but sticky menus deserve a closer look.

As users scroll, a sticky menu always stays in sight. And typically, it’s considered to be a good feature, especially if the menus are frequently used and especially if we want to speed up navigation.

However, sticky menus also come with a few disadvantages. In his recent article on Sticky Menus Are Problematic, And What To Do Instead, Adam Silver argues about some common usability issues of sticky menus — and how to solve them. Let’s take a closer look.

When Sticky Menus Are Useful

How do we decide if a menu should be sticky or not? This depends on the primary job of a page. If it’s designed to primarily convey information and we don’t expect a lot of navigation, then sticky menus aren’t very helpful.

However, if we expect users to navigate between different views on a page a lot and stay on the page while doing so — as it often is on long landing pages, product pages, and filters — then having access to navigation, A-Z or tabs can be very helpful.

Also, when users compare features in a data table, sticky headers help them verify that they always look at the right piece of data. That’s where sticky headers or columns can help and aid understanding. That’s why sticky bars are so frequently used in eCommerce, and in my experience, they improve the discoverability of content and speed of interaction.

Keep Sticky Headers Small, But Large Enough To Avoid Rage Taps

The downside of sticky menus is that they typically make it more difficult for users to explore the page as they obscure content. Full-width bars on mobile and desktop are common, but they need to be compact, especially on narrow screens. And they need to accommodate for accessible tap sizes to prevent rage taps and rage clicks.

Typically, that means we can’t have more than five items in the sticky bar navigation. The choice of the items displayed in the sticky menu should be informed by the most important tasks that users need to perform on the website. If you have more than five items, you probably might need to look into some sort of an overflow menu, as displayed by Samsung.

Whenever users have to deal with forms on a page on mobile, consider replacing sticky menus with accordions. Virtual keyboards typically take up to 60% of the screen, and with a sticky bar in view, filling in a form quickly becomes nothing short of impossible.

Accessibility Issues of Sticky Menus

By their nature, sticky menus always live on top of the content and often cause accessibility issues. They break when users zoom in. They often block the content for keyboard users who tab through the content. They obscure links and other focusable elements. And there is often not enough contrast between the menu and the content area.

Whenever we implement a sticky menu, we need to make sure that focusable elements are still visible with a sticky menu in action. And this also goes for internal page anchors that need to account for the sticky bar with the scroll-padding property in CSS.

Avoid Multiple Scrollbars Of Long Sticky Menus

When sticky menus become lengthy, the last items on the list become difficult to access. We could make them visible with some sort of an overflow menu, but often they appear as scrollable panes, causing multiple scroll bars.

Not only does this behavior cause discoverability issues, but it’s also often a cause for mistakes and repetitive actions on a page. Ideally, we would prevent it by keeping the number of items short, but often it’s not possible or can’t be managed properly.

A way out is to show the menu as an accordion instead in situations when the space is limited, especially on mobile devices. That’s what we do at Smashing Magazine in the checkout, with a button that reveals and hides the contents of the cart when needed.

Partially Persistent Menus

Because sticky menus often take up too much space, we could reveal them when needed and hide them when a user is focused on the content. That’s the idea behind partially persistent headers: as a user starts scrolling down, the menu disappears, but then any scrolling up prompts the menu to appear again.

The issue with this pattern is that sometimes users just want to jump back to a previous section of the page or double-check some details in a previous paragraph, and the menu often gets in the way. Page Laubheimer from NN/Group recommends using a slide-in animation that is roughly 300–400ms long and will preserve the natural feel without being distracting.

Alternatives To Sticky Menus

In some situations, we might not need a sticky menu after all. We can avoid their downsides with shorter pages, or lengthy pages which repeat relevant calls-to-actions or navigation within the page.

We could display a table of contents on the top of the page and bring the user’s attention to the table of contents with a back-to-top link at the bottom of the page.

Wrapping Up

Whenever the job of the page is to help users act, save, and compare, or we expect users to rely on navigation a lot, we might consider displaying sticky navigation. They are most harmful when there isn’t enough space anyway, as it often is with forms on mobile devices.

Sticky menus do come at a cost, as we need to account for usability and accessibility issues, especially for zooming, keyboard navigation, and anchor jumps. Add them if you need them, but be careful in plugging them in by default.

We need to prioritize what matters and remove what doesn’t. And too often, the focus should lie entirely on content and not navigation.

You can find more details on navigation UX in the video library on Smart Interface Design Patterns 🍣 — with a live UX training that’s coming up in September this year.

Further Resources

Of course, the techniques listed above barely scratch the surface. Here are wonderful articles around sticky headers, from design considerations to technical implementations:

“The Problem With Sticky Menus, And What To Do Instead”, by Adam Silver,
“Sticky Headers: 5 Ways To Make Them Better”, by Page Laubheimer,
“A Different Approach To Sticky In-page Navigation”, by Corey Snyder.

An Introduction to the Bun JavaScript Runtime

Original Source: https://www.sitepoint.com/bun-javascript-runtime-introduction/?utm_source=rss

An Introduction to the Bun JavaScript Runtime

Learn about Bun, a rival JavaScript runtime contender to Node.js and Deno, and the reasons it may tempt you away from your current favorite.

Continue reading
An Introduction to the Bun JavaScript Runtime
on SitePoint.

How to Find the Right White Label Website Builder for Your Agency

Original Source: https://www.webdesignerdepot.com/2023/05/white-label-website-builder-for-agencies/

How to Find the Right White Label Website Builder for Your Agency

An Introduction to Container Queries in CSS

Original Source: https://www.sitepoint.com/css-container-queries-introduction/?utm_source=rss

An Introduction to Container Queries in CSS

Container queries enable the styling of elements based on available space. They allow us to build resilient components that are adaptable.

Continue reading
An Introduction to Container Queries in CSS
on SitePoint.