Apache vs Nginx Performance: Optimization Techniques
Original Source: https://www.sitepoint.com/apache-vs-nginx-performance-optimization-techniques/
Some years ago, the Apache Foundation’s web server, known simply as “Apache”, was so ubiquitous that it became synonymous with the term “web server”. Its daemon process on Linux systems has the name httpd (meaning simply http process) — and comes preinstalled in major Linux distributions.
It was initially released in 1995, and, to quote Wikipedia, “it played a key role in the initial growth of the World Wide Web”. It is still the most-used web server software according to W3techs. However, according to those reports which show some trends of the last decade and comparisons to other solutions, its market share is decreasing. The reports given by Netcraft and Builtwith differ a bit, but all agree on a trending decline of Apache’s market share and the growth of Nginx.
Nginx — pronounced engine x — was released in 2004 by Igor Sysoev, with the explicit intent to outperform Apache. Nginx’s website has an article worth reading which compares these two technologies. At first, it was mostly used as a supplement to Apache, mostly for serving static files, but it has been steadily growing, as it has been evolving to deal with the full spectrum of web server tasks.
It is often used as a reverse proxy, load balancer, and for HTTP caching. CDNs and video streaming providers use it to build their content delivery systems where performance is critical.
Apache has been around for a long time, and it has a big choice of modules. Managing Apache servers is known to be user-friendly. Dynamic module loading allows for different modules to be compiled and added to the Apache stack without recompiling the main server binary. Oftentimes, modules will be in Linux distro repositories, and after installing them through system package managers, they can be gracefully added to the stack with commands like a2enmod. This kind of flexibility has yet to be seen with Nginx. When we look at a guide for setting up Nginx for HTTP/2, modules are something Nginx needs to be built with — configured for at build-time.
One other feature that has contributed to Apache’s market rule is the .htaccess file. It is Apache’s silver bullet, which made it a go-to solution for the shared hosting environments, as it allows controlling the server configuration on a directory level. Every directory on a server served by Apache can have its own .htaccess file.
Nginx not only has no equivalent solution, but discourages such usage due to performance hits.
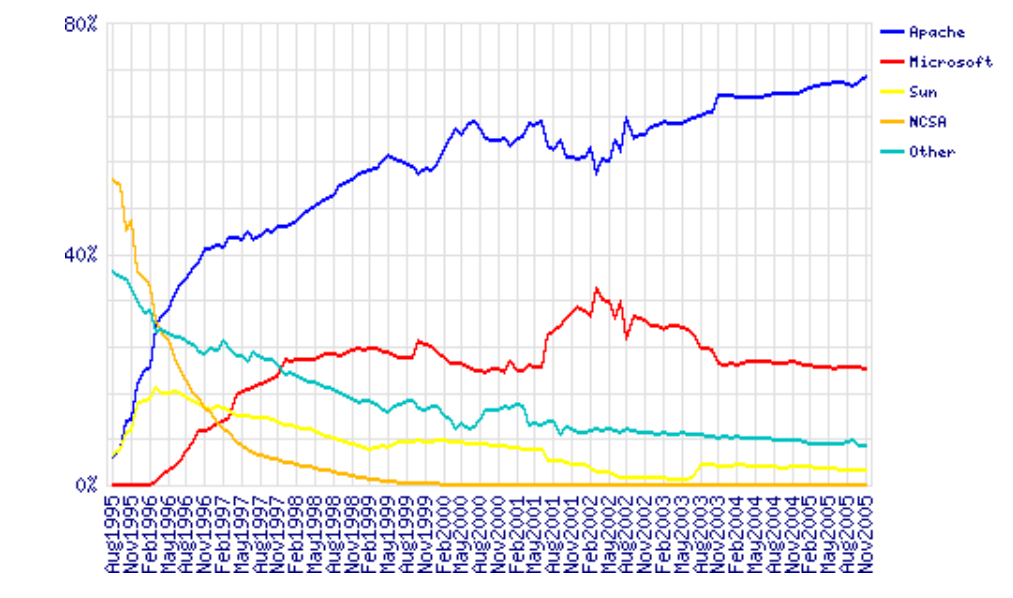
Server vendors market share 1995–2005. Data by Netcraft
LiteSpeed, or LSWS, is one server contender that has a level of flexibility that can compare to Apache, while not sacrificing performance. It supports Apache-style .htaccess, mod_security and mod_rewrite, and it’s worth considering for shared setups. It was planned as a drop-in replacement for Apache, and it works with cPanel and Plesk. It’s been supporting HTTP/2 since 2015.
LiteSpeed has three license tiers, OpenLiteSpeed, LSWS Standard and LSWS Enterprise. Standard and Enterprise come with an optional caching solution comparable to Varnish, LSCache, which is built into the server itself, and can be controlled, with rewrite rules, in .htaccess files (per directory). It also comes with some DDOS-mitigating “batteries” built in. This, along with its event-driven architecture, makes it a solid contender, targeting primarily performance-oriented hosting providers, but it could be worth setting up even for smaller servers or websites.
Hardware Considerations
When optimizing our system, we cannot emphasize enough giving due attention to our hardware setup. Whichever of these solutions we choose for our setup, having enough RAM is critical. When a web server process, or an interpreter like PHP, don’t have enough RAM, they start swapping, and swapping effectively means using the hard disk to supplement RAM memory. The effect of this is increased latency every time this memory is accessed. This takes us to the second point — the hard disk space. Using fast SSD storage is another critical factor of our website speed. We also need to mind the CPU availability, and the physical distance of our server’s data centers to our intended audience.
To dive in deeper into the hardware side of performance tuning, Dropbox has a good article.
Monitoring
One practical way to monitor our current server stack performance, per process in detail, is htop, which works on Linux, Unix and macOS, and gives us a colored overview of our processes.
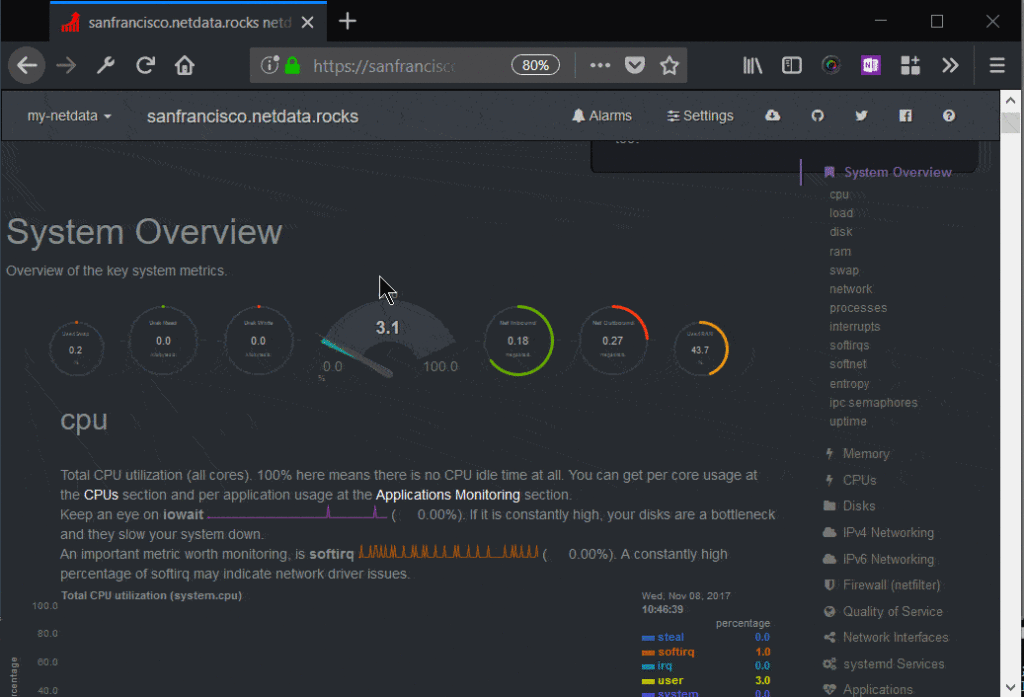
Other monitoring tools are New Relic, a premium solution with a comprehensive set of tools, and Netdata, an open-source solution which offers great extensibility, fine-grained metrics and a customizable web dashboard, suitable for both little VPS systems and monitoring a network of servers. It can send alarms for any application or system process via email, Slack, pushbullet, Telegram, Twilio etc.
Monit is another, headless, open-source tool which can monitor the system, and can be configured to alert us, or restart certain processes, or reboot the system when some conditions are met.
Testing the System
AB — Apache Benchmark — is a simple load-testing tool by Apache Foundation, and Siege is another load-testing program. This article explains how to set them both up, and here we have some more advanced tips for AB, while an in-depth look at Siege can be found here.
If you prefer a web interface, there is Locust, a Python-based tool that comes in very handy for testing website performance.
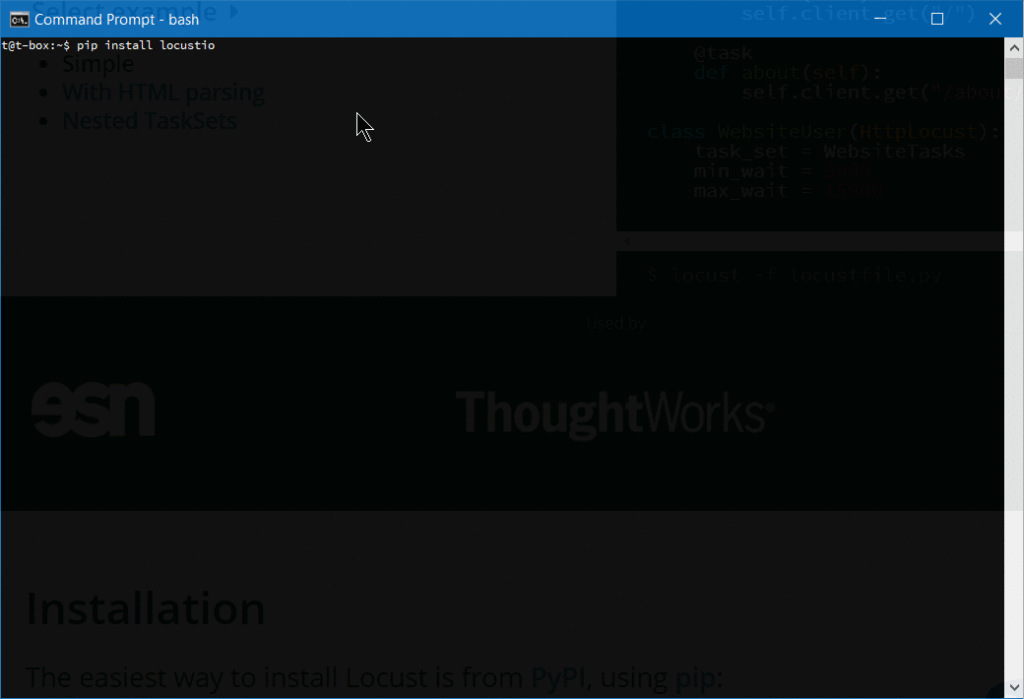
After we install Locust, we need to create a locustfile in the directory from which we will launch it:
from locust import HttpLocust, TaskSet, task
class UserBehavior(TaskSet):
@task(1)
def index(self):
self.client.get(“/”)
@task(2)
def shop(self):
self.client.get(“/?page_id=5”)
@task(3)
def page(self):
self.client.get(“/?page_id=2”)
class WebsiteUser(HttpLocust):
task_set = UserBehavior
min_wait = 300
max_wait = 3000
Then we simply launch it from the command line:
locust –host=https://my-website.com
One warning with these load-testing tools: they have the effect of a DDoS attack, so it’s recommended you limit testing to your own websites.
Tuning Apache
Apache’s mpm modules
Apache dates to 1995 and the early days of the internet, when an accepted way for servers to operate was to spawn a new process on each incoming TCP connection and to reply to it. If more connections came in, more worker processes were created to handle them. The costs of spawning new processes were high, and Apache developers devised a prefork mode, with a pre-spawned number of processes. Embedded dynamic language interpreters within each process (like mod_php) were still costly, and server crashes with Apache’s default setups became common. Each process was only able to handle a single incoming connection.
This model is known as mpm_prefork_module within Apache’s MPM (Multi-Processing Module) system. According to Apache’s website, this mode requires little configuration, because it is self-regulating, and most important is that the MaxRequestWorkers directive be big enough to handle as many simultaneous requests as you expect to receive, but small enough to ensure there’s enough physical RAM for all processes.
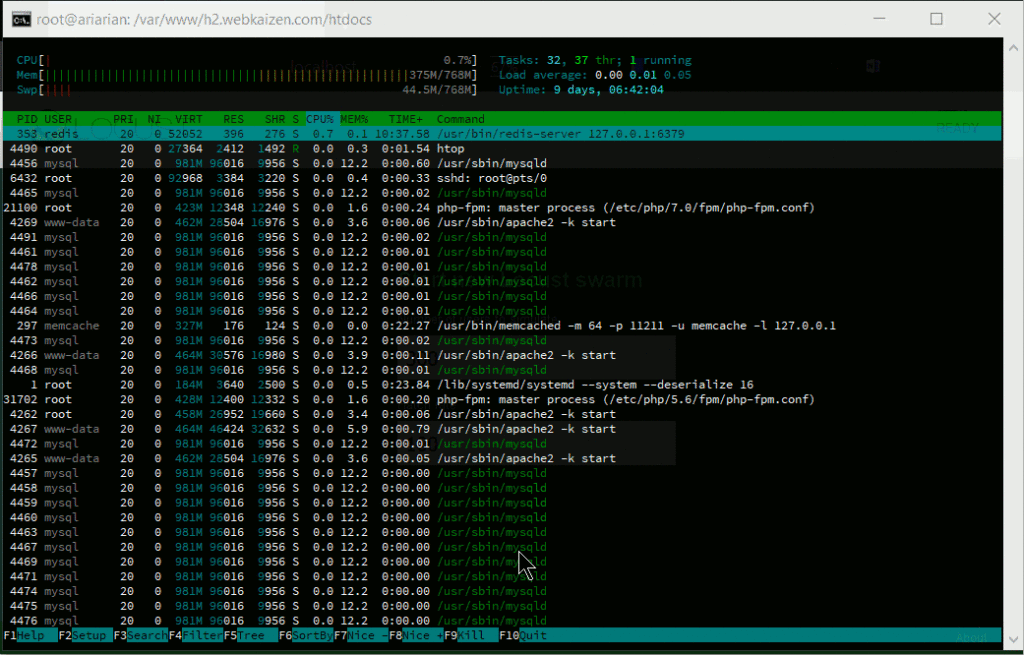
A small Locust load test that shows spawning of huge number of Apache processes to handle the incoming traffic.
We may add that this mode is maybe the biggest cause of Apache’s bad name. It can get resource-inefficient.
Version 2 of Apache brought another two MPMs that try to solve the issues that prefork mode has. These are worker module, or mpm_worker_module, and event module.
Worker module is not process-based anymore; it’s a hybrid process-thread based mode of operation. Quoting Apache’s website,
a single control process (the parent) is responsible for launching child processes. Each child process creates a fixed number of server threads as specified in the ThreadsPerChild directive, as well as a listener thread which listens for connections and passes them to a server thread for processing when they arrive.
This mode is more resource efficient.
2.4 version of Apache brought us the third MPM — event module. It is based on worker MPM, and added a separate listening thread that manages dormant keepalive connections after the HTTP request has completed. It’s a non-blocking, asynchronous mode with a smaller memory footprint. More about version 2.4 improvements here.
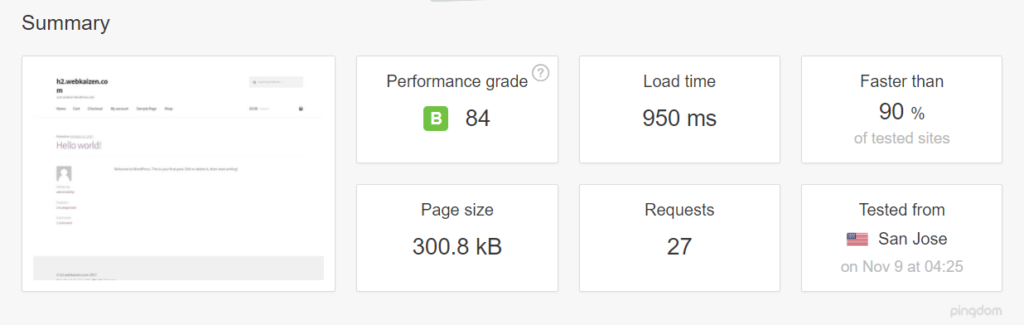
We have loaded a testing WooCommerce installation with around 1200 posts on a virtual server and tested it on Apache 2.4 with the default, prefork mode, and mod_php.
First we tested it with libapache2-mod-php7 and mpm_prefork_module at https://tools.pingdom.com:
Then, we went for testing the event MPM module.
We had to add multiverse to our /etc/apt/sources.list:
deb http://archive.ubuntu.com/ubuntu xenial main restricted universe multiverse
deb http://archive.ubuntu.com/ubuntu xenial-updates main restricted universe multiverse
deb http://security.ubuntu.com/ubuntu xenial-security main restricted universe multiverse
deb http://archive.canonical.com/ubuntu xenial partner
Then we did sudo apt-get updateand installed libapache2-mod-fastcgi and php-fpm:
sudo apt-get install libapache2-mod-fastcgi php7.0-fpm
Since php-fpm is a service separate from Apache, it needed a restart:
sudo service start php7.0-fpm
Then we disabled the prefork module, and enabled the event mode and proxy_fcgi:
sudo a2dismod php7.0 mpm_prefork
sudo a2enmod mpm_event proxy_fcgi
We added this snippet to our Apache virtual host:
<filesmatch “.php$”>
SetHandler “proxy:fcgi://127.0.0.1:9000/”
</filesmatch>
This port needs to be consistent with php-fpm configuration in /etc/php/7.0/fpm/pool.d/www.conf. More about the php-fpm setup here.
Then we tuned the mpm_event configuration in /etc/apache2/mods-available/mpm_event.conf, keeping in mind that our mini-VPS resources for this test were constrained — so we merely reduced some default numbers. Details about every directive on Apache’s website, and tips specific to the event mpm here. Keep in mind that started servers consume an amount of memory regardless of how busy they are. The MaxRequestWorkers directive sets the limit on the number of simultaneous requests allowed: setting MaxConnectionsPerChild to a value other than zero is important, because it prevents a possible memory leak.
<ifmodule mpm_event_module>
StartServers 1
MinSpareThreads 30
MaxSpareThreads 75
ThreadLimit 64
ThreadsPerChild 30
MaxRequestWorkers 80
MaxConnectionsPerChild 80
</ifmodule>
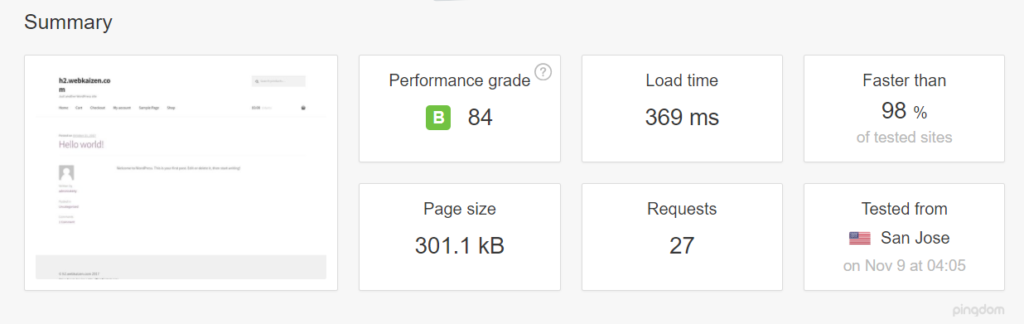
Then we restarted the server with sudo service apache2 restart (if we change some directives, like ThreadLimit, we will need to stop and start the service explicitly, with sudo service apache2 stop; sudo service apache2 start).
Our tests on Pingdom now showed page load time reduced by more than half:
The post Apache vs Nginx Performance: Optimization Techniques appeared first on SitePoint.


Leave a Reply
Want to join the discussion?Feel free to contribute!