Understanding TypeScript Generics
Original Source: https://smashingmagazine.com/2020/10/understanding-typescript-generics/
In this article, we’ll be learning the concept of Generics in TypeScript and examining how Generics can be used to write modular, decoupled, and reusable code. Along the way, we’ll briefly discuss how they fit into better testing patterns, approaches to error handling, and domain/data-access separation.
A Real-World Example
I want to enter into the world of Generics not by explaining what they are, but rather by providing an intuitive example for why they are useful. Suppose you’ve been tasked with building a feature-rich dynamic list. You could call it an array, an ArrayList, a List, a std::vector, or whatever, depending upon your language background. Perhaps this data structure must have in-built or swappable buffer systems as well (like a circular buffer insertion option). It will be a wrapper around the normal JavaScript array so that we can work with our structure instead of plain arrays.
The immediate issue you’ll come across is that of constraints imposed by the type system. You can’t, at this point, accept any type you want into a function or method in a nice clean way (we’ll revisit this statement later).
The only obvious solution is to replicate our data structure for all different types:
const intList = IntegerList.create();
intList.add(4);
const stringList = StringList.create();
stringList.add(‘hello’);
const userList = UserList.create();
userList.add(new User(‘Jamie’));
The .create() syntax here might look arbitrary, and indeed, new SomethingList() would be more straight-forward, but you’ll see why we use this static factory method later. Internally, the create method calls the constructor.
This is terrible. We have a lot of logic within this collection structure, and we’re blatantly duplicating it to support different use cases, completely breaking the DRY Principle in the process. When we decide to change our implementation, we’ll have to manually propagate/reflect those changes across all structures and types we support, including user-defined types, as in the latter example above. Suppose the collection structure itself was 100 lines long — it would be a nightmare to maintain multiple different implementations where the only difference between them is types.
An immediate solution that might come to mind, especially if you have an OOP mindset, is to consider a root “supertype” if you will. In C#, for example, there consists a type by the name of object, and object is an alias for the System.Object class. In C#’s type system, all types, be they predefined or user-defined and be they reference types or value types, inherit either directly or indirectly from System.Object. This means that any value can be assigned to a variable of type object (without getting into stack/heap and boxing/unboxing semantics).
In this case, our issue appears solved. We can just use a type like any and that will allow us to store anything we want within our collection without having to duplicate the structure, and indeed, that’s very true:
const intList = AnyList.create();
intList.add(4);
const stringList = AnyList.create();
stringList.add(‘hello’);
const userList = AnyList.create();
userList.add(new User(‘Jamie’));
Let’s look at the actual implementation of our list using any:
class AnyList {
private values: any[] = [];
private constructor (values: any[]) {
this.values = values;
// Some more construction work.
}
public add(value: any): void {
this.values.push(value);
}
public where(predicate: (value: any) => boolean): AnyList {
return AnyList.from(this.values.filter(predicate));
}
public select(selector: (value: any) => any): AnyList {
return AnyList.from(this.values.map(selector));
}
public toArray(): any[] {
return this.values;
}
public static from(values: any[]): AnyList {
// Perhaps we perform some logic here.
// …
return new AnyList(values);
}
public static create(values?: any[]): AnyList {
return new AnyList(values ?? []);
}
// Other collection functions.
// …
}
All the methods are relatively simple, but we’ll start with the constructor. Its visibility is private, for we’ll assume that our list is complex and we wish to disallow arbitrary construction. We also may want to perform logic prior to construction, so for these reasons, and to keep the constructor pure, we delegate these concerns to static factory/helper methods, which is considered a good practice.
The static methods from and create are provided. The method from accepts an array of values, performs custom logic, and then uses them to construct the list. The create static method takes an optional array of values for in the event that we want to seed our list with initial data. The “nullish coalescing operator” (??) is used to construct the list with an empty array in the event that one is not provided. If the left side of the operand is null or undefined, we’ll fall back to the right side, for in this case, values is optional, and thus may be undefined. You can learn more about nullish coalescing at the relevant TypeScript documentation page.
I’ve also added a select and a where method. These methods just wrap JavaScript’s map and filter respectively. select permits us to project an array of elements into a new form based on the provided selector function, and where permits us to filter out certain elements based on the provided predicate function. The toArray method simply converts the list to an array by returning the array reference we hold internally.
Finally, suppose that the User class contains a getName method which returns a name and also accepts a name as its first and only constructor argument.
Note: Some readers will recognize Where and Select from C#’s LINQ, but keep in mind, I’m trying to keep this simple, thus I’m not worried about laziness or deferred execution. Those are optimizations that could and should be made in real life.
Furthermore, as an interesting note, I want to discuss the meaning of “predicate”. In Discrete Mathematics and Propositional Logic, we have the concept of a “proposition”. A proposition is some statement that can be considered true or false, such as “four is divisible by two”. A “predicate” is a proposition that contains one or more variables, thus the truthfulness of the proposition depends upon that of those variables. You can think about it like a function, such as P(x) = x is divisible by two, for we need to know the value of x to determine if the statement is true or false. You can learn more about predicate logic here.
There are a few issues that are going to arise from the use of any. The TypeScript compiler knows nothing about the elements inside the list/internal array, thus it won’t provide any help inside of where or select or when adding elements:
// Providing seed data.
const userList = AnyList.create([new User(‘Jamie’)]);
// This is fine and expected.
userList.add(new User(‘Tom’));
userList.add(new User(‘Alice’));
// This is an acceptable input to the TS Compiler,
// but it’s not what we want. We’ll definitely
// be surprised later to find strings in a list
// of users.
userList.add(‘Hello, World!’);
// Also acceptable. We have a large tuple
// at this point rather than a homogeneous array.
userList.add(0);
// This compiles just fine despite the spelling mistake (extra ‘s’):
// The type of `users` is any.
const users = userList.where(user => user.getNames() === ‘Jamie’);
// Property `ssn` doesn’t even exist on a `user`, yet it compiles.
users.toArray()[0].ssn = ‘000000000’;
// `usersWithId` is, again, just `any`.
const usersWithId = userList.select(user => ({
id: newUuid(),
name: user.getName()
}));
// Oops, it’s “id” not “ID”, but TS doesn’t help us.
// We compile just fine.
console.log(usersWithId.toArray()[0].ID);
Since TypeScript only knows that the type of all array elements is any, it can’t help us at compile time with the non-existent properties or the getNames function that doesn’t even exist, thus this code will result in multiple unexpected runtime errors.
To be honest, things are beginning to look quite dismal. We tried implementing our data structure for each concrete type we wished to support, but we quickly realized that that was not in any way maintainable. Then, we thought we were getting somewhere by using any, which is analogous to depending upon a root supertype in an inheritance chain from which all types derive, but we concluded that we lose type-safety with that method. What’s the solution, then?
It turns out that, at the beginning of the article, I lied (kind of):
“You can’t, at this point, accept any type you want into a function or method in a nice clean way.”
You actually can, and that’s where Generics come in. Notice I said “at this point”, for I was assuming we didn’t know about Generics at that point in the article.
I’ll start by showing the full implementation of our List structure with Generics, and then we’ll take a step back, discuss what they actually are, and determine their syntax more formally. I’ve named it TypedList to differentiate from our earlier AnyList:
class TypedList<T> {
private values: T[] = [];
private constructor (values: T[]) {
this.values = values;
}
public add(value: T): void {
this.values.push(value);
}
public where(predicate: (value: T) => boolean): TypedList<T> {
return TypedList.from<T>(this.values.filter(predicate));
}
public select<U>(selector: (value: T) => U): TypedList<U> {
return TypedList.from<U>(this.values.map(selector));
}
public toArray(): T[] {
return this.values;
}
public static from<U>(values: U[]): TypedList<U> {
// Perhaps we perform some logic here.
// …
return new TypedList<U>(values);
}
public static create<U>(values?: U[]): TypedList<U> {
return new TypedList<U>(values ?? []);
}
// Other collection functions.
// ..
}
Let’s try making the same mistakes as earlier once again:
// Here’s the magic. TypedList will operate on objects
// of type User due to the <User> syntax.
const userList = TypedList.create<User>([new User(‘Jamie’)]);
// The compiler expects this.
userList.add(new User(‘Tom’));
userList.add(new User(‘Alice’));
// Argument of type ‘0’ is not assignable to parameter
// of type ‘User’. ts(2345)
userList.add(0);
// Property ‘getNames’ does not exist on type ‘User’.
// Did you mean ‘getName’? ts(2551)
// Note: TypeScript infers the type of users to be
// TypedList<User>
const users = userList.where(user => user.getNames() === ‘Jamie’);
// Property ‘ssn’ does not exist on type ‘User’. ts(2339)
users.toArray()[0].ssn = ‘000000000’;
// TypeScript infers usersWithId to be of type
// TypedList<{ id: string, name: string }>
const usersWithId = userList.select(user => ({
id: newUuid(),
name: user.getName()
}));
// Property ‘ID’ does not exist on type ‘{ id: string; name: string; }’.
// Did you mean ‘id’? ts(2551)
console.log(usersWithId.toArray()[0].ID)
As you can see, the TypeScript compiler is actively aiding us with type-safety. All of those comments are errors I receive from the compiler when attempting to compile this code. Generics have permitted us to specify a type that we wish to permit our list to operate on, and from that, TypeScript can tell the types of everything, all the way down to the properties of individual objects within the array.
The types we provide can be as simple or complex as we want them to be. Here, you can see we can pass both primitives and complex interfaces. We could also pass other arrays, or classes, or anything:
const numberList = TypedList.create<number>();
numberList.add(4);
const stringList = TypedList.create<string>();
stringList.add(‘Hello, World’);
// Example of a complex type
interface IAircraft {
apuStatus: ApuStatus;
inboardOneRPM: number;
altimeter: number;
tcasAlert: boolean;
pushBackAndStart(): Promise<void>;
ilsCaptureGlidescope(): boolean;
getFuelStats(): IFuelStats;
getTCASHistory(): ITCASHistory;
}
const aircraftList = TypedList.create<IAircraft>();
aircraftList.add(/* … */);
// Aggregate and generate report:
const stats = aircraftList.select(a => ({
…a.getFuelStats(),
…a.getTCASHistory()
}));
The peculiar uses of T and U and <T> and <U> in the TypedList<T> implementation are examples of Generics in action. Having fulfilled our directive of constructing a type-safe collection structure, we’ll leave this example behind for now, and we’ll return to it once we understand what Generics actually are, how they work, and their syntax. When I’m learning a new concept, I always like to begin by seeing a complex example of the concept in use, so that when I start learning the basics, I can make connections between the basic topics and the existing example I have in my head.
What Are Generics?
A simple manner by which to understand Generics is to consider them as relatively analogous to placeholders or variables but for types. That’s not to say that you can perform the same operations upon a generic type placeholder as you can a variable, but a generic type variable could be thought of as some placeholder that represents a concrete type that will be used in the future. That is, using Generics is a method of writing programs in terms of types that are to be specified at a later point in time. The reason why this is useful is because it allows us to build data structures that are reusable across the different types they operate upon (or type-agnostic).
That’s not particularly the best of explanations, so to put it in more simple terms, as we’ve seen, it is common in programming that we might need to build a function/class/data structure that will operate upon a certain type, but it is equally common that such a data structure needs to work across a variety of different types as well. If we were stuck in a position where we had to statically declare the concrete type upon which a data structure would operate at the time when we design the data structure (at compile time), we’d very quickly find that we need to rebuild those structures in an almost-exactly-the-same-manner for every type we wish to support, as we saw in the examples above.
Generics help us to solve this problem by permitting us to defer the requirement for a concrete type until it is actually known.
Generics In TypeScript
We now have somewhat of an organic idea for why Generics are useful and we’ve seen a slightly complicated example of them in practice. For most, the TypedList<T> implementation probably already makes a lot of sense, especially if you come from a statically-typed language background, but I can remember having a difficult time understanding the concept when I was first learning, thus I want to build up to that example by starting with simple functions. Concepts related to abstraction in software can be notoriously difficult to internalize, so if the notion of Generics has not quite clicked yet, that’s completely fine, and hopefully, by this article’s closing, the idea will be at least somewhat intuitive.
To build up to being able to understand that example, let’s work up from simple functions. We’ll start with the “Identity Function”, which is what most articles, including the TypeScript documentation itself, like to use.
An “Identity Function”, in mathematics, is a function that maps its input directly to its output, such as f(x) = x. What you put in is what you get out. We can represent that, in JavaScript, as:
function identity(input) {
return input;
}
Or, more tersely:
const identity = input => input;
Trying to port this to TypeScript brings back the same type system issues we saw before. The solutions are typing with any, which we know is seldom a good idea, duplicating/overloading the function for each type (breaks DRY), or using Generics.
With the latter option, we can represent the function as follows:
// ES5 Function
function identity<T>(input: T): T {
return input;
}
// Arrow Function
const identity = <T>(input: T): T => input;
console.log(identity<number>(5)); // 5
console.log(identity<string>(‘hello’)); // hello
The <T> syntax here declares this function as Generic. Just like a function allows us to pass an arbitrary input parameter into its argument list, with a Generic function, we can pass an arbitrary type parameter as well.
The <T> part of the signature of identity<T>(input: T): T and <T>(input: T): T in both cases declares that the function in question will accept one generic type parameter named T. Just like how variables can be of any name, so can our Generic placeholders, but it’s a convention to use a capital letter “T” (“T” for “Type”) and to move down the alphabet as needed. Remember, T is a type, so we also state that we will accept one function argument of name input with a type of T and that our function will return a type of T. That’s all the signature is saying. Try letting T = string in your head — replace all the Ts with string in those signatures. See how nothing all that magical is going on? See how similar it is to the non-generic way you use functions every day?
Keep in mind what you already know about TypeScript and function signatures. All we’re saying is that T is an arbitrary type that the user will provide when calling the function, just like input is an arbitrary value that the user will provide when calling the function. In this case, input must be whatever that type T is when the function is called in the future.
Next, in the “future”, in the two log statements, we “pass in” the concrete type we wish to use, just like we do a variable. Notice the switch in verbiage here — in the initial form of <T> signature, when declaring our function, it is generic — that is, it works on generic types, or types to be specified later. That’s because we don’t know what type the caller will wish to use when we actually write the function. But, when the caller calls the function, he/she knows exactly what type(s) they want to work with, which are string and number in this case.
You can imagine the idea of having a log function declared this way in a third-party library — the library author has no idea what types the developers who use the lib will want to use, so they make the function generic, essentially deferring the need for concrete types until they are actually known.
I want to stress that you should think of this process in a similar fashion that you do the notion of passing a variable to a function for the purposes of gaining a more intuitive understanding. All we’re doing now is passing a type too.
At the point where we called the function with the number parameter, the original signature, for all intents and purposes, could be thought of as identity(input: number): number. And, at the point where we called the function with the string parameter, again, the original signature might just as well have been identity(input: string): string. You can imagine that, when making the call, every generic T gets replaced with the concrete type you provide at that moment.
Exploring Generic Syntax
There are different syntaxes and semantics for specifying generics in the context of ES5 Functions, Arrow Functions, Type Aliases, Interfaces, and Classes. We’ll explore those differences in this section.
Exploring Generic Syntax — Functions
You’ve seen a few examples of generic functions by now, but it’s important to note that a generic function can accept more than one generic type parameter, just like it can variables. You could choose to ask for one, or two, or three, or however many types you want, all separated by commas (again, just like input arguments).
This function accepts three input types and randomly returns one of them:
function randomValue<T, U, V>(
one: T,
two: U,
three: V
): T | U | V {
// This is a tuple if you’re not familiar.
const options: [T, U, V] = [
one,
two,
three
];
const rndNum = getRndNumInInclusiveRange(0, 2);
return options[rndNum];
}
// Calling the function.
// `value` has type `string | number | IAircraft`
const value = randomValue<
string,
number,
IAircraft
>(
myString,
myNumber,
myAircraft
);
You can also see that the syntax is slightly different depending on whether we use an ES5 Function or an Arrow Function, but both declare the type parameters in the signature:
const randomValue = <T, U, V>(
one: T,
two: U,
three: V
): T | U | V => {
// This is a tuple if you’re not familiar.
const options: [T, U, V] = [
one,
two,
three
];
const rndNum = getRndNumInInclusiveRange(0, 2);
return options[rndNum];
}
Keep in mind that there is no “uniqueness constraint” forced on the types — you could pass in any combination you wish, such as two strings and a number, for instance. Additionally, just like the input arguments are “in scope” for the body of the function, so are the generic type parameters. The former example demonstrates that we have full access to T, U, and V from within the body of the function, and we used them to declare a local 3-tuple.
You can imagine that these generics operate over a certain “context” or within a certain “lifetime”, and that depends on where they’re declared. Generics on functions are in scope within the function signature and body (and closures created by nested functions), while generics declared on a class or interface or type alias are in scope for all members of the class or interface or type alias.
The notion of generics on functions is not limited to “free functions” or “floating functions” (functions not attached to an object or class, a C++ term), but they can also be used on functions attached to other structures, too.
We can place that randomValue in a class and we can call it just the same:
class Utils {
public randomValue<T, U, V>(
one: T,
two: U,
three: V
): T | U | V {
// …
}
// Or, as an arrow function:
public randomValue = <T, U, V>(
one: T,
two: U,
three: V
): T | U | V => {
// …
}
}
We could also place a definition within an interface:
interface IUtils {
randomValue<T, U, V>(
one: T,
two: U,
three: V
): T | U | V;
}
Or within a type alias:
type Utils = {
randomValue<T, U, V>(
one: T,
two: U,
three: V
): T | U | V;
}
Just like before, these generic type parameters are “in scope” for that particular function — they are not class, or interface, or type alias-wide. They live only within the particular function upon which they’re specified. To share a generic type across all members of a structure, you must annotate the structure’s name itself, as we’ll see below.
Exploring Generic Syntax — Type Aliases
With Type Aliases, the generic syntax is used on the alias’s name.
For instance, some “action” function that accepts a value, possibly mutates that value, but returns void could be written as:
type Action<T> = (val: T) => void;
Note: This should be familiar to C# developers who understand the Action<T> delegate.
Or, a callback function that accepts both an error and a value could be declared as such:
type CallbackFunction<T> = (err: Error, data: T) => void;
const usersApi = {
get(uri: string, cb: CallbackFunction<User>) {
/// …
}
}
With our knowledge of function generics, we could go further and make the function on the API object generic too:
type CallbackFunction<T> = (err: Error, data: T) => void;
const api = {
// `T` is available for use within this function.
get<T>(uri: string, cb: CallbackFunction<T>) {
/// …
}
}
Now, we’re saying that the get function accepts some generic type parameter, and whatever that is, CallbackFunction receives it. We’ve essentially “passed” the T that goes into get as the T for CallbackFunction. Perhaps this would make more sense if we change the names:
type CallbackFunction<TData> = (err: Error, data: TData) => void;
const api = {
get<TResponse>(uri: string, cb: CallbackFunction<TResponse>) {
// …
}
}
Prefixing type params with T is merely a convention, just like prefixing interfaces with I or member variables with _. What you can see here is that CallbackFunction accepts some type (TData) which represents the data payload available to the function, while get accepts a type parameter that represents the HTTP Response data type/shape (TResponse). The HTTP Client (api), similar to Axios, uses whatever that TResponse is as the TData for CallbackFunction. This allows the API caller to select the data type they’ll be receiving back from the API (suppose somewhere else in the pipeline we have middleware that parses the JSON into a DTO).
If we wanted to take this a little further, we could modify the generic type parameters on CallbackFunction to accept a custom error type as well:
type CallbackFunction<TData, TError> = (err: TError, data: TData) => void;
And, just like you can make function arguments optional, you can with type parameters too. In the event that the user does not provide an error type, we’ll set it to the error constructor by default:
type CallbackFunction<TData, TError = Error> = (err: TError, data: TData) => void;
With this, we can now specify a callback function type in multiple ways:
const apiOne = {
// Error is used by default for CallbackFunction.
get<TResponse>(uri: string, cb: CallbackFunction<TResponse>) {
// …
}
};
apiOne.get<string>(‘uri’, (err: Error, data: string) => {
// …
});
const apiTwo = {
// Override the default and use HttpError instead.
get<TResponse>(uri: string, cb: CallbackFunction<TResponse, HttpError>) {
// …
}
};
apiTwo.get<string>(‘uri’, (err: HttpError, data: string) => {
// …
});
This idea of default parameters is acceptable across functions, classes, interfaces, and so on — it’s not just limited to type aliases. In all the examples we’ve seen so far, we could have assigned any type parameter we wanted to a default value. Type Aliases, just like functions, can take as many generic type parameters as you wish.
Exploring Generic Syntax — Interfaces
As you’ve seen, a generic type parameter can be provided to a function on an interface:
interface IUselessFunctions {
// Not generic
printHelloWorld();
// Generic
identity<T>(t: T): T;
}
In this case, T lives only for the identity function as its input and return type.
We can also make a type parameter available to all members of an interface, just like with classes and type aliases, by specifying that the interface itself accepts a generic. We’ll talk about the Repository Pattern a little later when we discuss more complex use cases for generics, so it’s alright if you’ve never heard of it. The Repository Pattern permits us to abstract away our data storage as to make business logic persistence-agnostic. If you wished to create a generic repository interface that operated on unknown entity types, we could type it as follows:
interface IRepository<T> {
add(entity: T): Promise<void>;
findById(id: string): Promise<T>;
updateById(id: string, updated: T): Promise<void>;
removeById(id: string): Promise<void>;
}
Note: There are many different thoughts around Repositories, from Martin Fowler’s definition to the DDD Aggregate definition. I’m merely attempting to show a use case for generics, so I’m not too concerned with being fully correct implementation-wise. There’s definitely something to be said for not using generic repositories, but we’ll talk about that later.
As you can see here, IRepository is an interface that contains methods for storing and retrieving data. It operates on some generic type parameter named T, and T is used as input to add and updateById, as well as the promise resolution result of findById.
Keep in mind that there’s a very big difference between accepting a generic type parameter on the interface name as opposed to allowing each function itself to accept a generic type parameter. The former, as we’ve done here, ensures that each function within the interface operates on the same type T. That is, for an IRepository<User>, every method that uses T in the interface is now working on User objects. With the latter method, each function would be allowed to work with whatever type it wants. It would be very peculiar to only be able to add Users to the Repository but be able to receive Policies or Orders back, for instance, which is the potential situation we’d find ourselves in if we couldn’t enforce that the type is uniform across all methods.
A given interface can contain not only a shared type, but also types unique to its members. For instance, if we wanted to mimic an array, we could type an interface like this:
interface IArray<T> {
forEach(func: (elem: T, index: number) => void): this;
map<U>(func: (elem: T, index: number) => U): IArray<U>;
}
In this case, both forEach and map have access to T from the interface name. As stated, you can imagine that T is in scope for all members of the interface. Despite that, nothing stops individual functions within from accepting their own type parameters as well. The map function does, with U. Now, map has access to both T and U. We had to name the parameter a different letter, like U, because T is already taken and we don’t want a naming collision. Quite like its name, map will “map” elements of type T within the array to new elements of type U. It maps Ts to Us. The return value of this function is the interface itself, now operating on the new type U, so that we can somewhat mimic JavaScript’s fluent chainable syntax for arrays.
We’ll see an example of the power of Generics and Interfaces shortly when we implement the Repository Pattern and discuss Dependency Injection. Once again, we can accept as many generic parameters as well as select one or more default parameters stacked at the end of an interface.
Exploring Generic Syntax — Classes
Much the same as we can pass a generic type parameter to a type alias, function, or interface, we can pass one or more to a class as well. Upon doing so, that type parameter will be accessible to all members of that class as well as extended base classes or implemented interfaces.
Let’s build another collection class, but a little simpler than TypedList above, so that we can see the interop between generic types, interfaces, and members. We’ll see an example of passing a type to a base class and interface inheritance a little later.
Our collection will merely support basic CRUD functions in addition to a map and forEach method.
class Collection<T> {
private elements: T[] = [];
constructor (elements: T[] = []) {
this.elements = elements;
}
add(elem: T): void {
this.elements.push(elem);
}
contains(elem: T): boolean {
return this.elements.includes(elem);
}
remove(elem: T): void {
this.elements = this.elements.filter(existing => existing !== elem);
}
forEach(func: (elem: T, index: number) => void): void {
return this.elements.forEach(func);
}
map<U>(func: (elem: T, index: number) => U): Collection<U> {
return new Collection<U>(this.elements.map(func));
}
}
const stringCollection = new Collection<string>();
stringCollection.add(‘Hello, World!’);
const numberCollection = new Collection<number>();
numberCollection.add(3.14159);
const aircraftCollection = new Collection<IAircraft>();
aircraftCollection.add(myAircraft);
Let’s discuss what’s going on here. The Collection class accepts one generic type parameter named T. That type becomes accessible to all members of the class. We use it to define a private array of type T[], which we could also have denoted in the form Array<T> (See? Generics again for normal TS array typing). Further, most member functions utilize that T in some way, such as by controlling the types that are added and removed or checking if the collection contains an element.
Finally, as we’ve seen before, the map method requires its own generic type parameter. We need to define in the signature of map that some type T is mapped to some type U through a callback function, thus we need a U. That U is unique to that function in particular, which means we could have another function in that class that also accepts some type named U, and that’d be fine, because those types are only “in scope” for their functions and not shared across them, thus there are no naming collisions. What we can’t do is have another function that accepts a generic parameter named T, for that’d conflict with the T from the class signature.
You can see that when we call the constructor, we pass in the type we want to work with (that is, what type each element of the internal array will be). In the calling code at the bottom of the example, we work with strings, numbers, and IAircrafts.
How could we make this work with an interface? What if we have different collection interfaces that we might want to swap out or inject into calling code? To get that level of reduced coupling (low coupling and high cohesion is what we should always aim for), we’ll need to depend on an abstraction. Generally, that abstraction will be an interface, but it could also be an abstract class.
Our collection interface will need to be generic, so let’s define it:
interface ICollection<T> {
add(t: T): void;
contains(t: T): boolean;
remove(t: T): void;
forEach(func: (elem: T, index: number) => void): void;
map<U>(func: (elem: T, index: number) => U): ICollection<U>;
}
Now, let’s suppose we have different kinds of collections. We could have an in-memory collection, one that stores data on disk, one that uses a database, and so on. By having an interface, the dependent code can depend upon the abstraction, permitting us to swap out different implementations without affecting the existing code. Here is the in-memory collection.
class InMemoryCollection<T> implements ICollection<T> {
private elements: T[] = [];
constructor (elements: T[] = []) {
this.elements = elements;
}
add(elem: T): void {
this.elements.push(elem);
}
contains(elem: T): boolean {
return this.elements.includes(elem);
}
remove(elem: T): void {
this.elements = this.elements.filter(existing => existing !== elem);
}
forEach(func: (elem: T, index: number) => void): void {
return this.elements.forEach(func);
}
map<U>(func: (elem: T, index: number) => U): ICollection<U> {
return new InMemoryCollection<U>(this.elements.map(func));
}
}
The interface describes the public-facing methods and properties that our class is required to implement, expecting you to pass in a concrete type that those methods will operate upon. However, at the time of defining the class, we still don’t know what type the API caller will wish to use. Thus, we make the class generic too — that is, InMemoryCollection expects to receive some generic type T, and whatever it is, it’s immediately passed to the interface, and the interface methods are implemented using that type.
Calling code can now depend on the interface:
// Using type annotation to be explicit for the purposes of the
// tutorial.
const userCollection: ICollection<User> = new InMemoryCollection<User>();
function manageUsers(userCollection: ICollection<User>) {
userCollection.add(new User());
}
With this, any kind of collection can be passed into the manageUsers function as long as it satisfies the interface. This is useful for testing scenarios — rather than dealing with over-the-top mocking libraries, in unit and integration test scenarios, I can replace my SqlServerCollection<T> (for example) with InMemoryCollection<T> instead and perform state-based assertions instead of interaction-based assertions. This setup makes my tests agnostic to implementation details, which means they are, in turn, less likely to break when refactoring the SUT.
At this point, we should have worked up to the point where we can understand that first TypedList<T> example. Here it is again:
class TypedList<T> {
private values: T[] = [];
private constructor (values: T[]) {
this.values = values;
}
public add(value: T): void {
this.values.push(value);
}
public where(predicate: (value: T) => boolean): TypedList<T> {
return TypedList.from<T>(this.values.filter(predicate));
}
public select<U>(selector: (value: T) => U): TypedList<U> {
return TypedList.from<U>(this.values.map(selector));
}
public toArray(): T[] {
return this.values;
}
public static from<U>(values: U[]): TypedList<U> {
// Perhaps we perform some logic here.
// …
return new TypedList<U>(values);
}
public static create<U>(values?: U[]): TypedList<U> {
return new TypedList<U>(values ?? []);
}
// Other collection functions.
// ..
}
The class itself accepts a generic type parameter named T, and all members of the class are provided access to it. The instance method select and the two static methods from and create, which are factories, accept their own generic type parameter named U.
The create static method permits the construction of a list with optional seed data. It accepts some type named U to be the type of every element in the list as well as an optional array of U elements, typed as U[]. When it calls the list’s constructor with new, it passes that type U as the generic parameter to TypedList. This creates a new list where the type of every element is U. It is exactly the same as how we could call the constructor of our collection class earlier with new Collection<SomeType>(). The only difference is that the generic type is now passing through the create method rather than being provided and used at the top-level.
I want to make sure this is really, really clear. I’ve stated a few times that we can think about passing around types in a similar way that we do variables. It should already be quite intuitive that we can pass a variable through as many layers of indirection as we please. Forget generics and types for a moment and think about an example of the form:
class MyClass {
private constructor (t: number) {}
public static create(u: number) {
return new MyClass(u);
}
}
const myClass = MyClass.create(2.17);
This is very similar to what is happening with the more-involved example, the difference being that we’re working on generic type parameters, not variables. Here, 2.17 becomes the u in create, which ultimately becomes the t in the private constructor.
In the case of generics:
class MyClass<T> {
private constructor () {}
public static create<U>() {
return new MyClass<U>();
}
}
const myClass = MyClass.create<number>();
The U passed to create is ultimately passed in as the T for MyClass<T>. When calling create, we provided number as U, thus now U = number. We put that U (which, again, is just number) into the T for MyClass<T>, so that MyClass<T> effectively becomes MyClass<number>. The benefit of generics is that we’re opened up to be able to work with types in this abstract and high-level fashion, similar to how we can normal variables.
The from method constructs a new list that operates on an array of elements of type U. It uses that type U, just like create, to construct a new instance of the TypedList class, now passing in that type U for T.
The where instance method performs a filtering operation based upon a predicate function. There’s no mapping happening, thus the types of all elements remain the same throughout. The filter method available on JavaScript’s array returns a new array of values, which we pass into the from method. So, to be clear, after we filter out the values that don’t satisfy the predicate function, we get an array back containing the elements that do. All those elements are still of type T, which is the original type that the caller passed to create when the list was first created. Those filtered elements get given to the from method, which in turn creates a new list containing all those values, still using that original type T. The reason why we return a new instance of the TypedList class is to be able to chain new method calls onto the return result. This adds an element of “immutability” to our list.
Hopefully, this all provides you with a more intuitive example of generics in practice, and their reason for existence. Next, we’ll look at a few of the more advanced topics.
Generic Type Inference
Throughout this article, in all cases where we’ve used generics, we’ve explicitly defined the type we’re operating on. It’s important to note that in most cases, we do not have to explicitly define the type parameter we pass in, for TypeScript can infer the type based on usage.
If I have some function that returns a random number, and I pass the return result of that function to identity from earlier without specifying the type parameter, it will be inferred automatically as number:
// `value` is inferred as type `number`.
const value = identity(getRandomNumber());
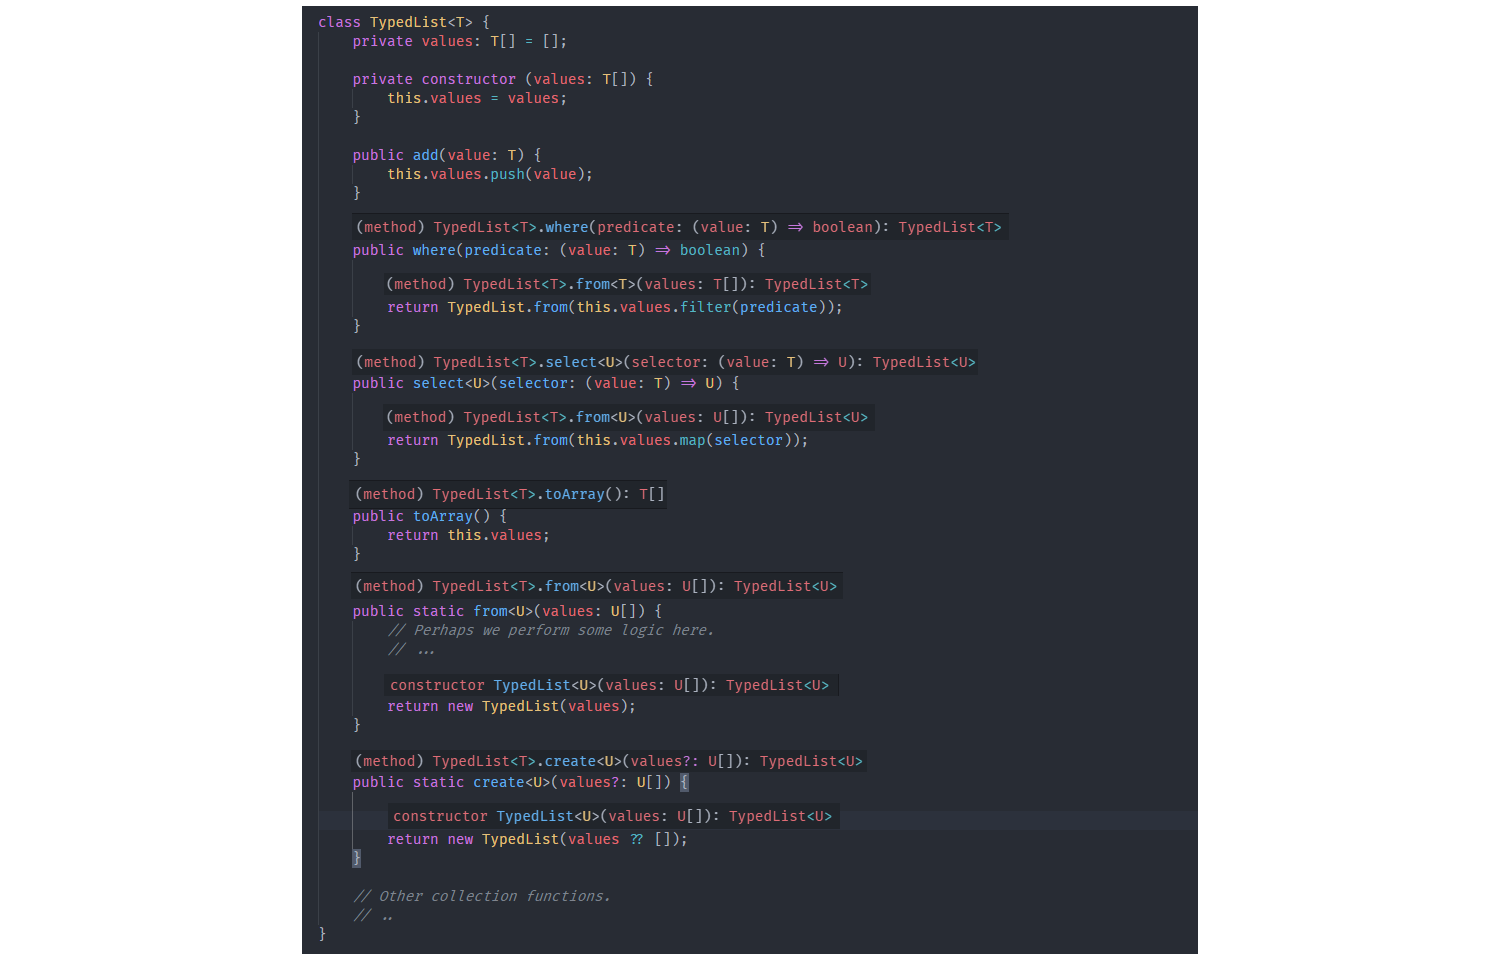
To demonstrate type inference, I’ve removed all the technically extraneous type annotations from our TypedList structure earlier, and you can see, from the pictures below, that TSC still infers all types correctly:
TypedList without extraneous type declarations:
class TypedList<T> {
private values: T[] = [];
private constructor (values: T[]) {
this.values = values;
}
public add(value: T) {
this.values.push(value);
}
public where(predicate: (value: T) => boolean) {
return TypedList.from(this.values.filter(predicate));
}
public select<U>(selector: (value: T) => U) {
return TypedList.from(this.values.map(selector));
}
public toArray() {
return this.values;
}
public static from<U>(values: U[]) {
// Perhaps we perform some logic here.
// …
return new TypedList(values);
}
public static create<U>(values?: U[]) {
return new TypedList(values ?? []);
}
// Other collection functions.
// ..
}
Based on function return values and based on the input types passed into from and the constructor, TSC understands all type information. On the image below, I’ve stitched multiple images together which shows Visual Studio’s Code TypeScript’s Language Extension (and thus the compiler) inferring all the types:
Generic Constraints
Sometimes, we want to put a constraint around a generic type. Perhaps we can’t support every type in existence, but we can support a subset of them. Let’s say we want to build a function that returns the length of some collection. As seen above, we could have many different types of arrays/collections, from the default JavaScript Array to our custom ones. How do we let our function know that some generic type has a length property attached to it? Similarly, how do restrict the concrete types we pass into the function to those that contain the data we need? An example such as this one, for instance, would not work:
function getLength<T>(collection: T): number {
// Error. TS does not know that a type T contains a length property.
return collection.length;
}
The answer is to utilize Generic Constraints. We can define an interface that describes the properties we need:
interface IHasLength {
length: number;
}
Now, when defining our generic function, we can constrain the generic type to be one that extends that interface:
function getLength<T extends IHasLength>(collection: T): number {
// Restricting `collection` to be a type that contains
// everything within the `IHasLength` interface.
return collection.length;
}
Real-World Examples
In the next couple of sections, we’ll discuss some real-world examples of generics that create more elegant and easy-to-reason-about code. We’ve seen a lot of trivial examples, but I want to discuss some approaches to error handling, data access patterns, and front-end React state/props.
Real-World Examples — Approaches To Error Handling
JavaScript contains a first-class mechanism for handling errors, as do most programming languages — try/catch. Despite that, I’m not a very big fan of how it looks when used. That’s not to say I don’t use the mechanism, I do, but I tend to try and hide it as much as I can. By abstracting try/catch away, I can also reuse error handling logic across likely-to-fail operations.
Suppose we’re building some Data Access Layer. This is a layer of the application that wraps the persistence logic for dealing with the data storage method. If we’re performing database operations, and if that database is used across a network, particular DB-specific errors and transient exceptions are likely to occur. Part of the reason for having a dedicated Data Access Layer is to abstract away the database from the business logic. Due to that, we can’t be having such DB-specific errors being thrown up the stack and out of this layer. We need to wrap them first.
Let’s look at a typical implementation that would use try/catch:
async function queryUser(userID: string): Promise<User> {
try {
const dbUser = await db.raw(`
SELECT * FROM users WHERE user_id = ?
`, [userID]);
return mapper.toDomain(dbUser);
} catch (e) {
switch (true) {
case e instanceof DbErrorOne:
return Promise.reject(new WrapperErrorOne());
case e instanceof DbErrorTwo:
return Promise.reject(new WrapperErrorTwo());
case e instanceof NetworkError:
return Promise.reject(new TransientException());
default:
return Promise.reject(new UnknownError());
}
}
}
Switching over true is merely a method to be able to use the switch case statements for my error checking logic as opposed to having to declare a chain of if/else if — a trick I first heard from @Jeffijoe.
If we have multiple such functions, we have to replicate this error-wrapping logic, which is a very bad practice. It looks quite good for one function, but it’ll be a nightmare with many. To abstract away this logic, we can wrap it in a custom error handling function that will pass through the result, but catch and wrap any errors should they be thrown:
async function withErrorHandling<T>(
dalOperation: () => Promise<T>
): Promise<T> {
try {
// This unwraps the promise and returns the type `T`.
return await dalOperation();
} catch (e) {
switch (true) {
case e instanceof DbErrorOne:
return Promise.reject(new WrapperErrorOne());
case e instanceof DbErrorTwo:
return Promise.reject(new WrapperErrorTwo());
case e instanceof NetworkError:
return Promise.reject(new TransientException());
default:
return Promise.reject(new UnknownError());
}
}
}
To ensure this makes sense, we have a function entitled withErrorHandling that accepts some generic type parameter T. This T represents the type of the successful resolution value of the promise we expect returned from the dalOperation callback function. Usually, since we’re just returning the return result of the async dalOperation function, we wouldn’t need to await it for that would wrap the function in a second extraneous promise, and we could leave the awaiting to the calling code. In this case, we need to catch any errors, thus await is required.
We can now use this function to wrap our DAL operations from earlier:
async function queryUser(userID: string) {
return withErrorHandling<User>(async () => {
const dbUser = await db.raw(`
SELECT * FROM users WHERE user_id = ?
`, [userID]);
return mapper.toDomain(dbUser);
});
}
And there we go. We have a type-safe and error-safe function user query function.
Additionally, as you saw earlier, if the TypeScript Compiler has enough information to infer the types implicitly, you don’t have to explicitly pass them. In this case, TSC knows that the return result of the function is what the generic type is. Thus, if mapper.toDomain(user) returned a type of User, you wouldn’t need to pass the type in at all:
async function queryUser(userID: string) {
return withErrorHandling(async () => {
const dbUser = await db.raw(`
SELECT * FROM users WHERE user_id = ?
`, [userID]);
return mapper.toDomain(user);
});
}
Another approach to error handling that I tend to like is that of Monadic Types. The Either Monad is an algebraic data type of the form Either<T, U>, where T can represent an error type, and U can represent a failure type. Using Monadic Types hearkens to functional programming, and a major benefit is that errors become type-safe — a normal function signature doesn’t tell the API caller anything about what errors that function might throw. Suppose we throw a NotFound error from inside queryUser. A signature of queryUser(userID: string): Promise<User> doesn’t tell us anything about that. But, a signature like queryUser(userID: string): Promise<Either<NotFound, User>> absolutely does. I won’t explain how monads like the Either Monad work in this article because they can be quite complex, and there are a variety of methods they must have to be considered monadic, such as mapping/binding. If you’d like to learn more about them, I’d recommend two of Scott Wlaschin’s NDC talks, here and here, as well as Daniel Chamber’s talk here. This site as well these blog posts may be useful too.
Real-World Examples — Repository Pattern
Let’s take a look at another use case where Generics might be helpful. Most back-end systems are required to interface with a database in some manner — this could be a relational database like PostgreSQL, a document database like MongoDB, or perhaps even a graph database, such as Neo4j.
Since, as developers, we should aim for lowly coupled and highly cohesive designs, it would be a fair argument to consider what the ramifications of migrating database systems might be. It would also be fair to consider that different data access needs might prefer different data access approaches (this starts to get into CQRS a little bit, which is a pattern for separating reads and writes. See Martin Fowler’s post and the MSDN listing if you wish to learn more. The books “Implementing Domain Driven Design” by Vaughn Vernon and “Patterns, Principles, and Practices of Domain-Driven Design” by Scott Millet are good reads as well). We should also consider automated testing. The majority of tutorials that explain the building of back-end systems with Node.js intermingle data access code with business logic with routing. That is, they tend to use MongoDB with the Mongoose ODM, taking an Active Record approach, and not having a clean separation of concerns. Such techniques are frowned upon in large applications; the moment you decide you’d like to migrate one database system for another, or the moment you realize that you’d prefer a different approach to data access, you have to rip out that old data access code, replace it with new code, and hope you didn’t introduce any bugs to routing and business logic along the way.
Sure, you might argue that unit and integration tests will prevent regressions, but if those tests find themselves coupled and dependent upon implementation details to which they should be agnostic, they too will likely break in the process.
A common approach to solve this issue is the Repository Pattern. It says that to calling code, we should allow our data access layer to mimic a mere in-memory collection of objects or domain entities. In this way, we can let the business drive the design rather than the database (data model). For large applications, an architectural pattern called Domain-Driven Design becomes useful. Repositories, in the Repository Pattern, are components, most commonly classes, that encapsulate and hold internal all the logic to access data sources. With this, we can centralize data access code to one layer, making it easily testable and easily reusable. Further, we can place a mapping layer in between, permitting us to map database-agnostic domain models to a series of one-to-one table mappings. Each function available on the Repository could optionally use a different data access method if you so choose.
There are many different approaches and semantics to Repositories, Units of Work, database transactions across tables, and so on. Since this is an article about Generics, I don’t want to get into the weeds too much, thus I’ll illustrate a simple example here, but it’s important to note that different applications have different needs. A Repository for DDD Aggregates would be quite different than what we’re doing here, for instance. How I portray the Repository implementations here is not how I implement them in real projects, for there is a lot of missing functionality and less-than-desired architectural practices in use.
Let’s suppose we have Users and Tasks as domain models. These could just be POTOs — Plain-Old TypeScript Objects. There is no notion of a database baked into them, thus, you wouldn’t call User.save(), for instance, as you would using Mongoose. Using the Repository Pattern, we might persist a user or delete a task from our business logic as follows:
// Querying the DB for a User by their ID.
const user: User = await userRepository.findById(userID);
// Deleting a Task by its ID.
await taskRepository.deleteById(taskID);
// Deleting a Task by its owner’s ID.
await taskRepository.deleteByUserId(userID);
Clearly, you can see how all the messy and transient data access logic is hidden behind this repository facade/abstraction, making business logic agnostic to persistence concerns.
Let’s start by building a few simple domain models. These are the models that the application code will interact with. They are anemic here but would hold their own logic to satisfy business invariants in the real-world, that is, they wouldn’t be mere data bags.
interface IHasIdentity {
id: string;
}
class User implements IHasIdentity {
public constructor (
private readonly _id: string,
private readonly _username: string
) {}
public get id() { return this._id; }
public get username() { return this._username; }
}
class Task implements IHasIdentity {
public constructor (
private readonly _id: string,
private readonly _title: string
) {}
public get id() { return this._id; }
public get title() { return this._title; }
}
You’ll see in a moment why we extract identity typing information to an interface. This method of defining domain models and passing everything through the constructor is not how I’d do it in the real world. Additionally, relying on an abstract domain model class would have been more preferable than the interface to get the id implementation for free.
For the Repository, since, in this case, we expect that many of the same persistence mechanisms will be shared across different domain models, we can abstract our Repository methods to a generic interface:
interface IRepository<T> {
add(entity: T): Promise<void>;
findById(id: string): Promise<T>;
updateById(id: string, updated: T): Promise<void>;
deleteById(id: string): Promise<void>;
existsById(id: string): Promise<boolean>;
}
We could go further and create a Generic Repository too to reduce duplication. For brevity, I won’t do that here, and I should note that Generic Repository interfaces such as this one and Generic Repositories, in general, tend to be frowned upon, for you might have certain entities which are read-only, or write-only, or which can’t be deleted, or similar. It depends on the application. Also, we don’t have a notion of a “unit of work” in order to share a transaction across tables, a feature I would implement in the real world, but, again, since this is a small demo, I don’t want to get too technical.
Let’s start by implementing our UserRepository. I’ll define an IUserRepository interface which holds methods specific to users, thus permitting calling code to depend on that abstraction when we dependency inject the concrete implementations:
interface IUserRepository extends IRepository<User> {
existsByUsername(username: string): Promise<boolean>;
}
class UserRepository implements IUserRepository {
// There are 6 methods to implement here all using the
// concrete type of `User` – Five from IRepository<User>
// and the one above.
}
The Task Repository would be similar but would contain different methods as the application sees fit.
Here, we’re defining an interface that extends a generic one, thus we have to pass the concrete type we’re working on. As you can see from both interfaces, we have the notion that we send these POTO domain models in and we get them out. The calling code has no idea what the underlying persistence mechanism is, and that’s the point.
The next consideration to make is that depending on the data access method we choose, we’ll have to handle database-specific errors. We could place Mongoose or the Knex Query Builder behind this Repository, for example, and in that case, we’ll have to handle those specific errors — we don’t want them to bubble up to business logic for that would break separation of concerns and introduce a larger degree of coupling.
Let’s define a Base Repository for the data access methods we wish to use that can handle errors for us:
class BaseKnexRepository {
// A constructor.
/*
Wraps a likely to fail database operation within a function that handles errors by catching
them and wrapping them in a domain-safe error.
@param dalOp The operation to perform upon the database.
/
public async withErrorHandling<T>(dalOp: () => Promise<T>) {
try {
return await dalOp();
} catch (e) {
// Use a proper logger:
console.error(e);
// Handle errors properly here.
}
}
}
Now, we can extend this Base Class in the Repository and access that Generic method:
interface IUserRepository extends IRepository<User> {
existsByUsername(username: string): Promise<boolean>;
}
class UserRepository extends BaseKnexRepository implements IUserRepository {
private readonly dbContext: Knex | Knex.Transaction;
public constructor (private knexInstance: Knex | Knex.Transaction) {
super();
this.dbContext = knexInstance;
}
// Example findById implementation:
public async findById(id: string): Promise<User> {
return this.withErrorHandling<User>(async () => {
const dbUser = await this.dbContext<DbUser>()
.select()
.where({ user_id: id })
.first();
// Maps type DbUser to User
return mapper.toDomain(dbUser);
});
}
// There are 5 methods to implement here all using the
// concrete type of User.
}
Notice that our function retrieves a DbUser from the database and maps it to a User domain model before returning it. This is the Data Mapper pattern and it’s crucial to maintaining separation of concerns. DbUser is a one-to-one mapping to the database table — it’s the data model that the Repository operates upon — and is thus highly dependent on the data storage technology used. For this reason, DbUsers will never leave the Repository and will be mapped to a User domain model before being returned. I didn’t show the DbUser implementation, but it could just be a simple class or interface.
Thus far, using the Repository Pattern, powered by Generics, we’ve managed to abstract away data access concerns into small units as well as maintain type-safety and re-usability.
Finally, for the purposes of Unit and Integration Testing, let’s say that we’ll keep an in-memory repository implementation so that in a test environment, we can inject that repository, and perform state-based assertions on disk rather than mocking with a mocking framework. This method forces everything to rely on the public-facing interfaces rather than permitting tests to be coupled to implementation details. Since the only differences between each repository are the methods they choose to add under the ISomethingRepository interface, we can build a generic in-memory repository and extend that within type-specific implementations:
class InMemoryRepository<T extends IHasIdentity> implements IRepository<T> {
protected entities: T[] = [];
public findById(id: string): Promise<T> {
const entityOrNone = this.entities.find(entity => entity.id === id);
return entityOrNone
? Promise.resolve(entityOrNone)
: Promise.reject(new NotFound());
}
// Implement the rest of the IRepository<T> methods here.
}
The purpose of this base class is to perform all the logic for handling in-memory storage so that we don’t have to duplicate it within in-memory test repositories. Due to methods like findById, this repository has to have an understanding that entities contain an id field, which is why the generic constraint on the IHasIdentity interface is necessary. We saw this interface before — it’s what our domain models implemented.
With this, when it comes to building the in-memory user or task repository, we can just extend this class and get most of the methods implemented automatically:
class InMemoryUserRepository extends InMemoryRepository<User> {
public async existsByUsername(username: string): Promise<boolean> {
const userOrNone = this.entities.find(entity => entity.username === username);
return Boolean(userOrNone);
// or, return !!userOrNone;
}
// And that’s it here. InMemoryRepository implements the rest.
}
Here, our InMemoryRepository needs to know that entities have fields such as id and username, thus we pass User as the generic parameter. User already implements IHasIdentity, so the generic constraint is satisfied, and we also state that we have a username property too.
Now, when we wish to use these repositories from the Business Logic Layer, it’s quite simple:
class UserService {
public constructor (
private readonly userRepository: IUserRepository,
private readonly emailService: IEmailService
) {}
public async createUser(dto: ICreateUserDTO) {
// Validate the DTO:
// …
// Create a User Domain Model from the DTO
const user = userFactory(dto);
// Persist the Entity
await this.userRepository.add(user);
// Send a welcome email
await this.emailService.sendWelcomeEmail(user);
}
}
(Note that in a real application, we’d probably move the call to emailService to a job queue as to not add latency to the request and in the hopes of being able to perform idempotent retries on failures (— not that email sending is particularly idempotent in the first place). Further, passing the whole user object to the service is questionable too. The other issue to note is that we could find ourselves in a position here where the server crashes after the user is persisted but before the email is sent. There are mitigation patterns to prevent this, but for the purposes of pragmatism, human intervention with proper logging will probably work just fine).
And there we go — using the Repository Pattern with the power of Generics, we’ve completely decoupled our DAL from our BLL and have managed to interface with our repository in a type-safe manner. We’ve also developed a way to rapidly construct equally type-safe in-memory repositories for the purposes of unit and integration testing, permitting true black-box and implementation-agnostic tests. None of this would have been possible without Generic types.
As a disclaimer, I want to once again note that this Repository implementation is lacking in a lot. I wanted to keep the example simple since the focus is the utilization of generics, which is why I didn’t handle the duplication or worry about transactions. Decent repository implementations would take an article all by themselves to explain fully and correctly, and the implementation details change depending on whether you’re doing N-Tier Architecture or DDD. That means that if you wish to use the Repository Pattern, you should not look at my implementation here as in any way a best practice.
Real-World Examples — React State & Props
The state, ref, and the rest of the hooks for React Functional Components are Generic too. If I have an interface containing properties for Tasks, and I want to hold a collection of them in a React Component, I could do so as follows:
import React, { useState } from ‘react’;
export const MyComponent: React.FC = () => {
// An empty array of tasks as the initial state:
const [tasks, setTasks] = useState<Task[]>([]);
// A counter:
// Notice, type of `number` is inferred automatically.
const [counter, setCounter] = useState(0);
return (
<div>
<h3>Counter Value: {counter}</h3>
<ul>
{
tasks.map(task => (
<li key={task.id}>
<TaskItem {…task} />
</li>
))
}
</ul>
</div>
);
};
Additionally, if we want to pass a series of props into our function, we can use the generic React.FC<T> type and get access to props:
import React from ‘react’;
interface IProps {
id: string;
title: string;
description: string;
}
export const TaskItem: React.FC<IProps> = (props) => {
return (
<div>
<h3>{props.title}</h3>
<p>{props.description}</p>
</div>
);
};
The type of props is inferred automatically to be IProps by the TS Compiler.
Conclusion
In this article, we’ve seen many different examples of Generics and their use cases, from simple collections, to error handling approaches, to data access layer isolation, and so on. In the simplest of terms, Generics permit us to build data structures without needing to know the concrete time upon which they will operate at compile-time. Hopefully, this helps to open up the subject a little more, make the notion of Generics a little bit more intuitive, and bring across their true power.


 It’s fun to see new website design tools that reflect current times and the state of the world. That’s very true this month with new databases devoted to diversity and women in technology, as well and resources to make your design life easier.