Cloning Tinder Using React Native Elements and Expo

Original Source: https://www.sitepoint.com/cloning-tinder-using-react-native-elements-expo/?utm_source=rss

Cloning Tinder Using React Native Elements and Expo

Making pixel-perfect layouts on mobile is hard. Even though React Native makes it easier than its native counterparts, it still requires a lot of work to get a mobile app to perfection.

In this tutorial, we’ll be cloning the most famous dating app, Tinder. We’ll then learn about a UI framework called React Native Elements, which makes styling React Native apps easy.

Since this is just going to be a layout tutorial, we’ll be using Expo, as it makes setting things up much easier than plain old react-native-cli. We’ll also be making use of a lot of dummy data to make our app.

We’ll be making a total of four screens—Home, Top Picks, Profile, and Messages.

Prerequisites

For this tutorial, you need a basic knowledge of React Native and some familiarity with Expo. You’ll also need the Expo client installed on your mobile device or a compatible simulator installed on your computer. Instructions on how to do this can be found here.

You also need to have a basic knowledge of styles in React Native. Styles in React Native are basically an abstraction similar to that of CSS, with just a few differences. You can get a list of all the properties in the styling cheatsheet.

Throughout the course of this tutorial we’ll be using yarn. If you don’t have yarn already installed, install it from here.

Also make sure you’ve already installed expo-cli on your computer.

If it’s not installed already, then go ahead and install it:

$ yarn global add expo-cli

To make sure we’re on the same page, these are the versions used in this tutorial:

Node 11.14.0
npm 6.4.1
yarn 1.15.2
expo 2.16.1

Make sure to update expo-cli if you haven’t updated in a while, since expo releases are quickly out of date.

We’re going to build something that looks like this:

Tinder Demo in Expo

If you just want to clone the repo, the whole code can be found on GitHub.

Getting Started

Let’s set up a new Expo project using expo-cli:

$ expo init expo-tinder

It will then ask you to choose a template. You should choose tabs and hit Enter.

Expo Init - Choose A Template

Then it will ask you to name the project. Type expo-tinder and hit Enter again.

Expo Init - Name the Project

Lastly, it will ask you to press y to install dependencies with yarn or n to install dependencies with npm. Press y.

Expo Init - Install the dependencies

This bootstraps a brand new React Native app using expo-cli.

React Native Elements

React Native Elements is a cross-platform UI Toolkit for React Native with consistent design across Android, iOS and Web.

It’s easy to use and completely built with JavaScript. It’s also the first UI kit ever made for React Native.

It allows us to fully customize styles of any of our components the way we want so every app has its own unique look and feel.

It’s also open source and backed by a community of awesome developers.

You can build beautiful applications easily.

React Native Elements Demo

Cloning Tinder UI

We’ve already created a project named expo-tinder.

To run the project, type this:

$ yarn start

Press i to run the iOS Simulator. This will automatically run the iOS Simulator even if it’s not opened.

Press a to run the Android Emulator. Note that the emulator must be installed and started already before typing a. Otherwise it will throw an error in the terminal.

It should look like this:

Expo Tabs App

The post Cloning Tinder Using React Native Elements and Expo appeared first on SitePoint.

Create a Cron Job on AWS Lambda

Original Source: https://www.sitepoint.com/create-aws-lambda-cron-job/?utm_source=rss

Create a Cron Job on AWS Lambda

Cron jobs are really useful tools in any Linux or Unix-like operating systems. They allow us to schedule scripts to be executed periodically. Their flexibility makes them ideal for repetitive tasks like backups and system cleaning, but also data fetching and data processing.

For all the good things they offer, cron jobs also have some downsides. The main one is that you need a dedicated server or a computer that runs pretty much 24/7. Most of us don’t have that luxury. For those of us who don’t have access to a machine like that, AWS Lambda is the perfect solution.

AWS Lambda is an event-driven, serverless computing platform that’s a part of the Amazon Web Services. It’s a computing service that runs code in response to events and automatically manages the computing resources required by that code. Not only is it available to run our jobs 24/7, but it also automatically allocates the resources needed for them.

Setting up a Lambda in AWS involves more than just implementing a couple of functions and hoping they run periodically. To get them up and running, several services need to be configured first and need to work together. In this tutorial, we’ll first go through all the services we’ll need to set up, and then we’ll implement a cron job that will fetch some updated cryptocurrency prices.

Understanding the Basics

As we said earlier, some AWS services need to work together in order for our Lambda function to work as a cron job. Let’s have a look at each one of them and understand their role in the infrastructure.

S3 Bucket

An Amazon S3 bucket is a public cloud storage resource available in Amazon Web Services’ (AWS) Simple Storage Service (S3), an object storage offering. Amazon S3 buckets, which are similar to file folders, store objects, which consist of data and its descriptive metadata. — TechTarget

Every Lambda function needs to be prepared as a “deployment package”. The deployment package is a .zip file consisting of the code and any dependencies that code might need. That .zip file can then be uploaded via the web console or located in an S3 bucket.

IAM Role

An IAM role is an IAM identity that you can create in your account that has specific permissions. An IAM role is similar to an IAM user, in that it is an AWS identity with permission policies that determine what the identity can and cannot do in AWS. — Amazon

We’ll need to manage permissions for our Lambda function with IAM. At the very least it should be able to write logs, so it needs access to CloudWatch Logs. This is the bare minimum and we might need other permissions for our Lambda function. For more information, the AWS Lambda permissions page has all the information needed.

CloudWatch Events Rule

CloudWatch Events support cron-like expressions, which we can use to define how often an event is created. We’ll also need to make sure that we add our Lambda function as a target for those events.

Lambda Permission

Creating the events and targeting the Lambda function isn’t enough. We’ll also need to make sure that the events are allowed to invoke our Lambda function. Anything that wants to invoke a Lambda function needs to have explicit permission to do that.

These are the building blocks of our AWS Lambda cron job. Now that we have an idea of all the moving parts of our job, let’s see how we can implement it on AWS.

Implementing a Cron Job on AWS

A lot of the interactions we described earlier are taken care of by Amazon automatically. In a nutshell, all we need to do is to implement our service (the actual lambda function) and add rules to it (how often and how the lambda will be executed). Both permissions and roles are taken care of by Amazon; the defaults provided by Amazon are the ones we’ll be using.

Lambda function

First, let’s start by implementing a very simple lambda function. In the AWS dashboard, use the Find Services function to search by lambda. In the lambda console, select Create a function. At this point, we should be in Lambda > Functions > reate Function.

To get things going, let’s start with a static log message. Our service will only be a print function. For this, we’ll use Node.js 10x as our runtime language. Give it a function name, and on Execution Role let’s stay with Create a new role with basic lambda permissions. This is a basic set of permissions on IAM that will allow us to upload logs to Amazon CloudWatch logs. Click Create Function.

Create a new lambda function

Our function is now created with an IAM Role. In the code box, substitute the default code with the following:

exports.handler = async (event) => {
console.log(“Hello Sitepoint Reader!”);
return {};
};

To check if the code is executing correctly, we can use the Test function. After giving a name to our test, it will execute the code and show its output in the Execution Result field just below our code.

If we test the code above we can see that we have no response, but in the function logs, we can see we have our message printed. This indicates that our service is running correctly so we can proceed with our cron implementation.

The post Create a Cron Job on AWS Lambda appeared first on SitePoint.

15 Textured Grunge Fonts With a Handmade Style

Original Source: http://feedproxy.google.com/~r/1stwebdesigner/~3/w3wv63J2uAA/

Are you on the hunt for some gritty, textured experimental fonts for your website? Grunge style typography might be just what you need.

The inspiration for many art styles, grunge music and fashion is associated with harsh songs, ripped jeans, and distorted instrument sounds. It was an unorthodox genre far removed from cleaner brands of music.

Grunge typography is much the same, sharply divulging from traditional elegant serifs and clean sans-serifs to create a new unique style. These fonts tend to have a dirty, smudged, paint-brushed, or eroded look. They can be simple and legible or distorted and dramatic.

These fonts look great on rock music sites and graphics, but anyone can use them. If you want to add a little texture and variation to your project, or need to draw eyes to a part of your website, try one of these stand-out grunge fonts.

UNLIMITED DOWNLOADS: 400,000+ Fonts & Design Assets

DOWNLOAD NOW

Fierce by Itsmesimon

Example of Fierce by Itsmesimon

UnderWorld by hmeneses

Example of UnderWorld by hmeneses

Ugly Alligator by Cosmic Store

Example of Ugly Alligator by Cosmic Store

Bearpaw by Dennis Anderson

Example of Bearpaw by Dennis Anderson

Smile and Wave by Chris Vile

Example of Smile and Wave by Chris Vile

Brush Up by PintassilgoPrints

Example of Brush Up by PintassilgoPrints

Splandor Typeface by ilhamherry

Example of Splandor Typeface by ilhamherry

New York by Saji Johnny Kundukulam

Example of New York by Saji Johnny Kundukulam

Conspiracy by Nerfect Type Laboratories

Example of Conspiracy by Nerfect Type Laboratories

Grunge Tire by Just Type It

Example of Grunge Tire by Just Type It

Crayon Hand by Letters & Numbers

Example of Crayon Hand by Letters & Numbers

Beyond Wonderland by Chris Hansen

Example of Beyond Wonderland by Chris Hansen

Againts Typeface by Fortunes Co

Example of Againts Typeface by Fortunes Co

Gunshot by Gleb Guralnyk

Example of Gunshot by Gleb Guralnyk

Eveleth by Yellow Design Studio

Example of Eveleth by Yellow Design Studio

Unconventional, Interesting Fonts

If you’re tired of clean web design and want to put a spin on things, you should definitely consider grunge typography. The fonts are highly unique, and thus overuse can dull their message. But a grunge font in just the right place can attract attention and add a little interest to a bland webpage.

You don’t have to be making a rock website to use grunge fonts. You can find more subtle textured effects on all sorts of websites, especially ones that want to add a natural feel or tell the world that they’re unconventional.

Using a grunge font in just the right place can leave a big impact on visitors, so don’t be afraid to try one.


Editorial Design Patterns With CSS Grid And Named Columns

Original Source: https://www.smashingmagazine.com/2019/10/editorial-design-patterns-css-grid-subgrid-naming/

Editorial Design Patterns With CSS Grid And Named Columns

Editorial Design Patterns With CSS Grid And Named Columns

Rachel Andrew

2019-10-04T12:30:00+02:00
2019-10-04T12:35:51+00:00

Many websites, in particular those which display long-form content, have a fairly straightforward repeating pattern of components: a full-width area for images, a central content area, and perhaps a split view of two half-width blocks. These components repeat to display an article, images and other related content — with content editors selecting the right component as they create articles for publication.

In this article, I’m going to demonstrate an approach to this kind of editorial design, which builds on a few techniques some of which are discussed in the following articles:

“Breaking Out With CSS Grid Layout”
“Breaking Out With CSS Grid Explained”
“Naming Things In CSS Grid Layout”

In addition to this being a nice way to name sections of your layout, this technique exposes a whole bunch of interesting things about Grid Layout which you may find useful in creating your own layout patterns. It also demonstrates more of the promise of subgrid (a part of the upcoming Level 2 of the grid specification and being implemented in Firefox).

Naming Things In CSS Grid Layout

When using CSS Grid Layout, you can name lines and areas. Both of these things can make working with Grid — especially complex grids — more straightforward. Defining naming conventions for things in your layout can be useful when working with your team; it is much easier to understand where anything placed with grid-area: content will end up than having something placed from column-line: 3 / 9.

When using the grid-template-areas approach, you give the items that you want to place on the grid a name by using the grid-area property and then placing them around the grid. In the following example, the item with grid-area: content goes into the grid area defined by the grid-template-areas property:

See the Pen [Layout With Named Area](https://codepen.io/rachelandrew/pen/zYOQBba) by Rachel Andrew.

See the Pen Layout With Named Area by Rachel Andrew.

This works well for components where you have one item to go into one area; however, if you want to place multiple things into the content area (one below the other), using grid-area is the wrong approach. Instead, you might define names for the column lines and place the item from the start to end line.

See the Pen [Layout With Named Columns](https://codepen.io/rachelandrew/pen/xxKNONQ) by Rachel Andrew.

See the Pen Layout With Named Columns by Rachel Andrew.

This isn’t as neat, however, when using the grid-area approach we have to know both the start and end line when placing an item using grid-column or grid-row — or do we?

Take a look at this next CodePen example. My items are placed using a single name or ident by using the grid-column property, even though some of the grid areas being targeted cross a number of columns:

See the Pen [Layout with Named Columns](https://codepen.io/rachelandrew/pen/mdbYEod) by Rachel Andrew.

See the Pen Layout with Named Columns by Rachel Andrew.

My aim here is to abstract away the complexity of the grid setup when actually using the grid. I can put a lot of work into creating the initial grid, but then place things without thinking too much about it as I populate my pages. I also want to make sure that we can repeat the components as often as we need to as we build up the article. What I have in mind is a content creator using a CMS, and creating blocks of content using the different patterns whilst knowing that they will be placed correctly one below the other on the overall grid.

In order to understand how I got to this point requires an understanding of a few things about CSS Grid Layout as well as named lines and areas.

We Can Name Lines

As you’ve already seen in my second example above, we can name lines on the grid that can be pretty much anything we like — other than the word span. The name is an ident rather than a string which is why it is not quoted.

However, you will see many examples where the naming conventions name-start and name-end are used that append -start onto the name of the start line and -end on the name of the end line. This is not purely convention and for the technique I am going to show you why we need to name our lines this way. So you should pick a name for the area you are describing, and then add the -start and -end suffixes — which need to match, of course!

We name our lines inside square brackets. Lines can (and often need to) have multiple names. In this case, space separates the names. When placing the items using line-based positioning, you can pick any name for the line to do the placement.

With our named lines in place, we could place our items using grid-column by specifying the start and end line name. This pattern is just the same as using line numbers, so the name before the slash is the start line and the name after is the end line.

See the Pen [Example using start and end lines](https://codepen.io/rachelandrew/pen/VwZOPgO) by Rachel Andrew.

See the Pen Example using start and end lines by Rachel Andrew.

This places the items but isn’t the neat single name per item that I used in the example. However, we now have everything in place due to the special way that Grid handles named areas and lines.

Line Names Give Us A Named Area

Assuming you have named your lines with -start and -end as I have, Grid will give you a named area of the main name you used. Therefore, in my case, I have areas named content, start-half, end-half, full and center. Each of these areas is a single row (as I don’t have named rows), however, it will span the column tracks from the -start to the -end line.

Named Areas Give Us A Named Line Of The Main Name Used

If we want to be able to place our items as if we have a column name, we also need to make use of the fact that when we create a grid area, we get a line name of the main name used; that is, the main name being the name with -start and -end removed. This line name resolves to the start or end of the area depending on whether we are targeting grid-column-start or grid-column-end.

So, we have an area named content, because we have column lines named content-start and content-end. The area named content also gives us the ability to use grid-column-start: content which will resolve to the start line of that content area, while grid-column-end: content will resolve to the end line of the content area.

This, therefore, means that we can place an item into the content area by using the following:

.content {
grid-column: content / content;
}

Next, we can now tidy up this technique further due to the fact that if you use a named line for grid-column-start and omit the end line (rather than spanning one track as would be the case if you used line numbers), grid copies the name over to the end line. Therefore, grid-column: content is exactly the same as grid-column: content / content;

This is then all we need to be able to place items using grid-column with a simple, single name. This behavior is all exactly as specified and not some kind of “hack”. It demonstrates the depth of thinking that went into the creation of the Grid Layout specification, and the amount of careful work that has gone into making it so straightforward to lay items out in our designs.

Giving This Technique Superpowers With Subgrid

I think this technique is a nice one that enables a very straightforward way of declaring where elements should be placed on the grid. However, if we add subgrid support to the mix, it becomes very powerful indeed.

Currently, subgrid is being implemented in Firefox, and so these next examples require Firefox Nightly to run. You can download Nightly here.

The subgrid value of grid-template-columns and grid-template-rows means that sizing created on a parent grid can be opted into by an item which is a child of the grid (assuming it is also using grid layout) by having display: grid applied.

Note: You can read more about the features of subgrid in my articles here on Smashing Magazine “CSS Grid Level 2: Here Comes Subgrid” and “Digging Into The Display Property: Grids All The Way Down”.

Line Names From The Parent Are Passed Into Subgrids

In addition to the track sizing information being passed into the child grid, any line names set on the parent will be passed in. This means that we can use our “column names” within subgridded components, making this solution very useful in a world where subgrid exists. An item placed in content — even if nested down inside subgrids — will line up with one placed as a direct child of the main grid.

In this next example, I have nested two elements directly inside the div with a class of full-2. I have also placed a ul inside .content. If we look at the items inside full-2, in order to place these on the parent grid, we need to make the selector full-2 a grid with display: grid then use the grid-template-columns property with a value of subgrid.

This causes the grid on .full-2 to use the tracks defined on the parent grid, and have access to the named lines defined there. As this is a full-width item, this really will behave just like the parent grid in terms of placing our items. We can then use any of the names we defined for the different columns to place the items. In this case, I have set both child elements to grid-column: center and they display one after the other in that center area.

.full-2 {
grid-row: 4;
grid-column: full;
display: grid;
row-gap: 10px;
grid-template-columns: subgrid;
}

.full-2 > div {
background-color: rgb(124,222,220);
grid-column: center;
}

A set of boxes, one with other boxes nested instead

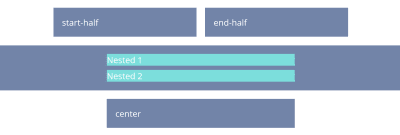
The nested elements line up with the grid on the parent (Large preview)

If we take a look at our nested ul inside .content, we will need to create a subgrid on the selector .content just as with the last example; when we do this, the ul falls into the first track of the subgrid. If we want to lay out the listen items on the subgrid, we need to do two things: cause the ul to take up the same area as its parent by placing it with grid-column: content, and then making it a grid which is a subgrid.

Having done this the list items will lay out using auto-placement into the column tracks of the subgrid:

.content {
grid-row: 1;
grid-column: content;
display: grid;
grid-template-columns: subgrid;
}

.content ul {
grid-column: content;
display: grid;
row-gap: 10px;
grid-template-columns: subgrid;
}

A set of boxes, the nested boxes falling into the tracks of the grid

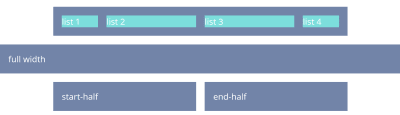
With auto-placement the items fall into the tracks of the parent (Large preview)

Once you have your grid, you can use the names from the parent in exactly the same way as before.

.content li:nth-child(1) {
grid-column: center;
}

.content li:nth-child(2) {
grid-column: start-half;
}

.content li:nth-child(3) {
grid-column: end-half;
}

.content li:nth-child(4) {
grid-column: content;
}

Screenshot of various boxes, which line up in columns

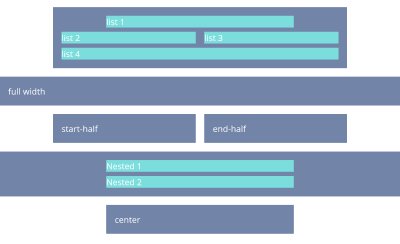
The completed subgrid layout (Large preview)

If you have Firefox Nightly, you can see the full demo in this CodePen example:

See the Pen [Naming Column and Subgrid](https://codepen.io/rachelandrew/pen/OJLYRRb) by Rachel Andrew.

See the Pen Naming Column and Subgrid by Rachel Andrew.

You can keep “nesting’ subgrids into your markup structure like this, and each time the line names will be passed through. This is a feature that I think will be particularly useful.

When you create a subgrid, the line numbers correspond to the lines of the subgrid and not the parent grid. Therefore, if you do want to ensure that elements in the subgrid line up with the parent grid, then using line names or named areas (as shown in this example) will make that straightforward and logical.

Wrapping Up

You now know how to use this technique for your main grid, and hopefully, it won’t take too long before we start seeing support for subgrid in all browsers. It’ll enable techniques such as this one and make it incredibly powerful for us to use.

Smashing Editorial
(il)

Defend Your WordPress Website Against Brute-Force Attacks

Original Source: http://feedproxy.google.com/~r/1stwebdesigner/~3/f-AnFeBnM20/

Whether you’re fairly new to WordPress or an experienced developer, you might be surprised at just how often your websites are under attack. You might also be wondering who, or what, is carrying out this type of activity – not to mention why they’d target you.

The answers are simple. In most cases, the bad actor is an automated bot. And you’re being targeted simply because you happen to be running WordPress. As the most popular Content Management System (CMS) out there, it is directly in the crosshairs of malicious actors.

While there are all sorts of different attacks floating around out there, the brute-force variety are among the most popular. And that happens to be our subject for today.

Let’s take a look at what brute-force attacks are and some ways you can better protect your WordPress website.

What Is a “Brute-Force” Attack?

A brute-force attack, according to Wikipedia:

“…consists of an attacker submitting many passwords or passphrases with the hope of eventually guessing correctly.”

In the real world, this means that a malicious script runs repeatedly, entering usernames and passwords into the WordPress login page. It’s possible to see hundreds or even thousands of attempts like this per day.

Of course, if this were all completely random, it would be pretty difficult to successfully log into a website using such a technique. But there are two major reasons why these attacks can sometimes work:

The use of weak login credentials, such as using an ultra-common username and password.
Using credentials that have been previously leaked elsewhere.

If either of these scenarios are in place, that raises the odds of a successful attack. And once the attacker has access to your WordPress dashboard, they can wreak all sorts of havoc.

But even if unsuccessful, these attacks can be both an annoyance and a drain on server resources. Therefore, it’s important to put policies in place that can help mitigate their damage.

Binary code on a computer screen.

Ways to Fight Back

Thankfully, there are a number of things you can do to better protect your WordPress website against brute-force attacks. The most basic being instituting common sense security measures, such as using strong passwords and virtually anything other than “admin” as your username. These steps alone will at least make your site more difficult to crack.

However, there are some even stronger actions you can take, including:

Limit Access to the Login Page

Depending on your web server’s setup, you might consider blocking out access to the WordPress login page to all but a specific group or range of IP addresses. On an Apache server, for example, this could be done via the .htaccess file.

The caveat is that this strategy depends on administrators having a static IP address. In corporate environments, this would likely be the case. However, other scenarios may make this method more difficult. The official WordPress documentation has some further advice that is worth a look.

Another approach is to password-protect the login page at the server level. While this adds a bit of inconvenience, it does help to ensure that only authorized users gain access to the dashboard.

Utilize a Plugin

There are a number of WordPress plugins that are dedicated to security, with several offering features designed to protect against brute-force attacks. Some of the more popular options include:

Jetpack’s “Protect” feature, which will block unwanted login attempts.

Wordfence employs several login-specific measures, such as two-factor authentication, reCAPTCHA and brute-force protection. There is also a companion plugin that solely focuses on login security.

Login LockDown is a plugin designed to limit brute-force attempts. It automatically locks out offending IP addresses after a set number of failed logins.

iThemes Security offers several login-related protections, including brute-force protection, two-factor authentication and the ability to rename the /wp-admin/ folder in order to thwart bots.

Employ a CDN/Firewall

Content Delivery Networks (CDNs) not only improve the performance of your website, they offer the side benefit of serving as a barrier between malicious bots and your WordPress install.

CDN providers often include methods to block out IP addresses or even entire countries from accessing your site (or, at least your dashboard). Depending on the service you use, there may also be protections specifically targeted at stopping brute-force attacks.

The beauty of this approach is that you can significantly lighten the load on your web server. How? Attackers are stopped by the CDN’s firewall before they ever reach your site. It’s kind of like having a giant flyswatter out in front of your house, rejecting pests before they make it to your front door.

A hammer smashing glass.

When It Comes to Security, Be Proactive

Unfortunately, doing nothing to combat brute-force logins is not a viable option. These attacks are both ubiquitous and relentless. And the landscape certainly doesn’t look like it will get better on its own. Therefore, it’s up to us to take preventative measures.

Thankfully, it’s not really that difficult. The options above, while not 100% perfect, are fairly easy to implement. And each one makes things that much tougher on the average bot.

Plus, when you think about it, the relative cost of mitigating these attacks now is much less than having to deal with a hacked website later on. That alone makes being proactive more than worth the effort.


The 20 secret UX tips you need to know

Original Source: http://feedproxy.google.com/~r/CreativeBloq/~3/Tg4dQJayu-A/10-steps-engaging-user-experience-3156607

Gathering UX tips from the experts could be the key to the success of your website. Over the last 20 years, I’ve worked with some great brands across multi-discipline experiences. When doing this, you tend to pick up a heap of knowledge along the way that you use on a daily basis without even thinking about. The sort of things that become ingrained. Whether you are new to user experience and UI design or an all-rounded design veteran, I hope this is a small insight into my top 20 pro tips for creating the best possible experiences for your users.

If you're designing all-new UX, you'll want to see how it fares with the user. Check out Creative Bloq's handy guide to user testing for all you'll need to know.

01. Know your users

UX tips: User profiles

Get to know your users, listen to them and mix up the way you test

As a designer, it’s really important to design how your users are likely to interact with a website, product or mobile application when exploring it. Don’t just use analytics and stats; get into the shoes of your users. Dig a little bit deeper. After understanding users, you will be able to make informed decisions in your design.

02. Write user profiles and user stories

When creating user profiles, ensure you actually interview a person. Time and time again I see a lot of profiling that is made up and not based on any form of research. When writing user stories, having an actual person in mind will help you to funnel those users to making the decisions you want. Never assume as a designer. It’s good practice to get into the routine of writing user stories. 

A user story is a high-level definition of a requirement, containing just enough information so that you can implement it within your UX. This not only helps to focus the hierarchy of what you are trying to get people to do, it also helps you to clearly create user goals. Point the user stories back to your user profiles within your interaction design. Ultimately, this will help with conversion and also create a testing hierarchy to work from.

03. Listen to your users

Listening is one of the most important aspects of good UX design. Always take time to listen to your customers and most importantly when collaborating with conversion rate specialists. As a UX designer it’s your responsibility to bring together all of the requirements from a wide range of stakeholders.

That's why the greatest digital projects are often those where there is a perfect equilibrium between the client's objectives and the user's needs. Sit on that fence, and balance well.

04. Get out of the lab environment when testing mobile

I’ve thought this for a long time about user testing. Why would you test a user in a lab when the majority of their time using a mobile is on the move? You can gain excellent insight by changing the way you test and where you test.

05. Use effective tools for collaborative teams

UX tips: workflow

Consider tools, logic and animation

If you are an independent business you will no doubt find yourself collaborating with a number of specialist people on a project. Setting up clear communication channels is a must. I spend more time planning, collaborating and organising teams to deliver great products and design. I tend to use software such as Jira or Confluence for the more heavyweight projects and Trello or Asana for smaller projects linked with Slack. These are fantastic tools to make your life easier when delivering projects. It will also save your inbox and the off chance of losing an important email.

06. Design with UX in mind

It’s good to seek inspiration. There are a lot of great resources online and huge communities of users that share their work, research and results, so seek these out. I like to find UX inspiration on Instagram and sites like awwwards.com and Behance.

07. Embrace the white space

I always use consistent typography and white space. Your clients will expect you to fill the space or certainly ‘make the logo bigger’ but white space is so important, especially designing for mobile. Ensure you follow some simple grid systems. I do this all the time with layouts. It not only makes the design process simpler but also consistent. Have fun with white space and don’t be afraid to play around with the size of typographic headers and also the fonts you use. Think of a website like a road trip: move users seamlessly from one section to the next by understanding the users’ personas, goals and needs.

08. Never put emotion before logic

UX tips friction free

Be careful not to distract the user

Users often perceive visually pleasing designs as being easy to use. However, there is a fine line between distracting a user from their task and enforcing branding/marketing. Users are more likely to notice items near the top of the page, in order of their importance.

09. Include animation

Splash screens and simple loading animations create brand intrigue. When onboarding a user for the first time, go the extra mile with simple animations, top tips or even introduce your app with some brand animations. Allow the user to skip or ‘don’t show’ if they are returning but don’t overload your animations. More than three seconds loading time results in around a 55 per cent bounce rate. Give users feedback if their waiting time is more than one second.

10. Reduce the need for carousels

Okay, I’ll raise my hand and admit using a carousel in a recent project but it was to explain a customer’s process and it wasn’t just the latest promo marketing had asked me to add into a home page. Stats do indicate that most users stop viewing carousel content after three or four slides. Don’t overload a carousel with more than four slides or even better, get into the habit of not using them at all.

11. Focus on details

Think about focusing on the other tiny details, as it will take your user experience to the next level. When was the last time you designed an interesting 404 page? Here are some great examples of how to design a 404 error page – and how not to.

12. Concentrate on content

UX tips: Content

Content is king

Copy and content rule when it comes to your interface. Make good use of headings, sub-headings and copy breaks. Create smaller paragraphs to help viewers scan your web pages quickly to make your content more user-friendly. I like to make sure copy isn’t too long. Be clear and concise with what you are saying. Users will scroll down the web page as long as it is clear that relevant information is below the fold. However, don’t make the pages too long. It’s all in the balance.

13. Design with content and not Latin text

I see this all the time when designers don’t work with the content. It does help customers ‘fill in the boxes’ but UX and UI design should never be about this. When I design I aim to write the content or collaborate with a copywriter. It gives a customer more context with your wireframes and early design stages. Even if it’s first draft content, it still enables you to make more informed decisions on how the content people are engaging with will be presented.

14. Have a conversation with your site’s users

UX tips

Make online experiences conversational

Well not literally but metaphorically. Make online experiences conversational. Content can be so much more appealing when your users connect. Don’t leave users in the dark; offer simple guidance (I don’t mean waffle) about what they need to do. It makes it more engaging. Brands like Innocent Drinks are a great example of how to create good conversation with brand experience.

15. Know that less is more

Paul Rand, American art director and graphic designer born in 1914, once said: “Good design doesn’t date, bad design does”. We tend to see a lot of design trends and styles that come and go, not just in terms of UI and UX but across design in general. Find your own design style. Work hard at it, create rules, follow design practice and question why. All great design always has one thing in common and that is simplicity. So strive for simplicity and clarity in your design to ensure it is received by the audience in a single glance or interaction. Minimalist and simple designs are easy to understand and are more appreciated by your audience.

16. Learn Hick’s law

If you don’t know about Hick’s law, do some research into it, as it will change the way you approach user interface design. Hick’s law – also known as the Hick–Hyman law – takes its moniker from the British and American psychologists William Edmund Hick and Ray Hyman and establishes the time it takes for a person to make a decision based on the possible choices available. 

Hick’s law assesses the information capacity in choice reaction experiments. The amount of time it takes in order to process a certain amount of bits in the Hick–Hyman law is known as the rate of gain of information. So in essence, keep those options to a minimum. Apply this practical advice to your designs. Remove unessential noise so users have a clear journey of interaction. 

You’ve got to find the balance between creating an engaging brand experience that converts users and designing something that looks like it was straight out of the 1990s. Speed things up by reducing the chance users will get distracted and leave. Research more into Hick’s law as it no doubt will help with your end product; it certainly has helped me.

17. Never interrupt users for no reason

Don’t get me started on chatbots or instant messages. Although there are pros and cons about using chatbots, interrupting a user as they start their problem-solving journey is detrimental to their experience. For example, opening up a dialogue box without the user having done anything is a bad idea and just annoying. Many sites bombard visitors with ‘How can I help?’ or ‘I’m a chatbot… let’s get started’. A dialogue should always open on an interaction and never be intrusive.

18. Avoid 'Get Started' as a call to action

Avoid ‘Get Started’ as a call to action This is one of my pet hates. I see it a lot. In fact avoid internalised language across any call to actions but especially ‘Get Started’. Your customer may call it one thing but your user might not understand it. Language is key, so ensure it’s simple and direct. Take care to never use ambiguous language.

19. Be proactive when it comes to responsive design

UX tips: Accessibility

Design with accessibility and responsiveness in mind

I always start with designing for mobile and then work on mobile and desktop simultaneously. There are more approaches than ‘just stacking the content’ for mobile. As a UI designer I’ve learnt to effectively design responsive user interfaces that make use of flexible layouts, images and style sheets. Having a good relationship with your coder is a must if you’re not building the site or app. 

20. Make your designs accessible

I had an experience a few years back working with a client that got extremely frustrated during the design stage. There was a huge problem trying to get colours signed off. What I hadn’t ascertained was that the customer was in fact slightly colour blind. Colour blindness (colour vision deficiency) affects approximately one in 12 men and one in 200 women in the world. In Britain, this means that there are approximately 3 million colour blind people (about 4.5 per cent of the entire population), most of whom are male. 

I highly recommend getting hold of some sim specs during your testing process. It will take your user testing to a new level. Convert your designs to greyscale to ensure all users have a unified experience. Avoid the use of blue for any text on websites other than links. Be aware of the contrast on mobile websites as well. Reserve one colour for CTAs and make sure it contrasts with the rest of the page. Cold and dark colours stay in the background and warm bright colours like orange come forward. If your client’s brand has similar colours in tone, recommend a new contrast colour. You might find conversions go up. 

Check out our guide to inclusive web design.

This article was originally published in issue 321of net, the world's best-selling magazine for web designers and developers. Buy issue 321 or subscribe to net.

Related articles:

The best new UX books right now7 golden rules of UXHow to use colour to shape UX

Understand CSS Border Corner Shape

Original Source: https://www.hongkiat.com/blog/css3-border-shape/

We have been seeing several new CSS3 features that are widely implemented, such as Rounded Corner, Box Shadow, and Text Shadow, just to name a few. Still, there are several features that are…

Visit hongkiat.com for full content.

50 Beautiful Nature Wallpapers For Your Desktop

Original Source: https://www.hongkiat.com/blog/100-absolutely-beautiful-nature-wallpapers-for-your-desktop/

Huge collection of high-quality and beautiful nature wallpapers.

The post 50 Beautiful Nature Wallpapers For Your Desktop appeared first on Hongkiat.

Visit hongkiat.com for full content.

Photoshop Alternatives for Designers

Original Source: http://feedproxy.google.com/~r/1stwebdesigner/~3/DggnTxgLQEU/

One of the biggest hurdles to becoming a web or graphic designer is the cost. Professional design software takes time to learn and is expensive on top.

Photoshop may be the leader in graphics editing, but it has a price tag to match. With the Creative Cloud service on a monthly payment scheme, it can cost you a minimum of $120 per year, and you don’t even get a permanent license to use Photoshop.

If that’s just too expensive for you, or you want editing software with a perpetual licensing model, there are plenty of alternatives out there. Some are even free. Here are 6 design software alternatives with similar functions and feel to Photoshop.

Your Web Designer Toolbox
Unlimited Downloads: 500,000+ Web Templates, Icon Sets, Themes & Design Assets


DOWNLOAD NOW

Affinity Photo

Example of Affinity Photo

Affinity Photo is one of the best and most similar Photoshop alternatives available. A one-time $50 fee gets you access to an advanced and affordable program for Mac or Windows, or you can get a cheaper version for your tablet.

The editor comes with support for RAW files, panoramas, vector drawing, and effective retouching tools. Its one downside is the limited plugin selection that leaves it not very extendable. But for a majority of designers, it can take Photoshop’s place pretty well.

GIMP

Example of GIMP

You can’t beat free, and open source GIMP is a popular Photoshop competitor. A majority of Photoshop’s tools are available here, and it accepts a wide range of file formats including PSDs.

One of GIMP’s main features is its customizability. There are hundreds of third-party tools ranging from entire plugins to artistic brushes. However, its interface is less streamlined than Photoshop’s, and it’s missing some important tools like non-destructive editing and CMYK support.

But overall, it’s a solid choice for graphic designers if you don’t need certain advanced features.

Sketch

Example of Sketch

Sketch is a vector graphics editor and web design tool for macOS, with multiple improvements over Photoshop in areas of UI design. It’s made for website prototyping and comes with grids built in, pixel perfect precision, and smart guide functionality.

The program is focused solely on UI and mockups, and comes with no features like bitmap brushes or photo editing. If you find yourself using Photoshop’s other artistic features frequently, you may want a more general-purpose editor. But UI/UX designers will quickly fall in love with this easy-to-use program.

Photopea

Example of Photopea

For a free, entirely in-browser editor, Photopea comes with a surprising array of features. Its clean interface will feel very familiar to Photoshop fans, and you’ll be shocked at how much is packed into it.

That said, if you’re used to advanced or even mid-level Photoshop features, Photopea doesn’t yet hold up in all of these areas. It’s a great emergency editor, and perfect if you only need a basic set of tools. Some designers won’t need anything more, but don’t expect the raw power of a downloadable program from this.

Krita

Example of Krita

If your design work often involves painting and creating artwork or graphics, Krita would be a great choice. It’s free and open source, and has the power of Photoshop with an interface specialized for artists.

There are over 100 brushes included and ways to download more, a fully customizable interface, vector support, and HDR painting. Krita isn’t suitable for general editing and manipulation, but it’s perfect for illustrators and graphic designers.

Figma

Example of Figma

Figma is similar to Sketch in that it’s focused around prototyping and UI design, but it comes with its own host of features. The biggest is its support for live multi-user editing with your teammates. It works in the browser and has a free starter plan for up to two designers.

It also comes with vector editing, commenting, prototyping tools, and the ability to export as a PDF or image. If your focus is on collaboration, and you want to design alongside others, Figma is definitely one to consider.

Low-Cost Photoshop Alternatives

Photoshop is considered a staple of a designer’s toolkit, but it hardly has a monopoly on the industry. There are plenty of other programs out there that have similar functionality to Photoshop and a price tag as low as free.

Just remember that these programs only provide similar functionality to Photoshop. If you use other programs in the Creative Cloud suite, such as Lightroom, Illustrator, Dreamweaver, or InDesign, you’ll need to find alternatives for those as well.