Original Source: https://smashingmagazine.com/2021/09/http3-practical-deployment-options-part3/
Hello, and welcome to the final installment of this three-part series on the new HTTP/3 and QUIC protocols! If after the previous two parts — HTTP/3 history and core concepts and HTTP/3 performance features — you’re convinced that starting to use the new protocols is a good idea (and you should be!), then this final piece includes all you need to know to get started!
First, we’ll discuss which changes you need to make to your pages and resources to optimally use the new protocols (that’s the easy part). Next, we’ll look at how to set up servers and clients (that’s the hard part unless you’re using a content delivery network (CDN)). Finally, we’ll see which tools you can use to evaluate the performance impact of the new protocols (that’s the almost impossible part, at least for now).
This series is divided into three parts:
HTTP/3 history and core concepts
This is targeted at people new to HTTP/3 and protocols in general, and it mainly discusses the basics.
HTTP/3 performance features
This is more in-depth and technical. People who already know the basics can start here.
Practical HTTP/3 deployment options (current article)
This explains the challenges involved in deploying and testing HTTP/3 yourself. It details how and if you should change your web pages and resources as well.
Changes To Pages And Resources
Let’s begin with some good news: If you’re already on HTTP/2, you probably won’t have to change anything to your pages or resources when moving to HTTP/3!. This is because, as we’ve explained in part 1 and part 2, HTTP/3 is really more like HTTP/2-over-QUIC, and the high-level features of the two versions have stayed the same. As such, any changes or optimizations made for HTTP/2 will still work for HTTP/3 and vice versa.
However, if you’re still on HTTP/1.1, or you have forgotten about your transition to HTTP/2, or you never actually tweaked things for HTTP/2, then you might wonder what those changes were and why they were needed. You would, however, be hard-pressed even today to find a good article that details the nuanced best practices. This is because, as I stated in the introduction to part 1, much of the early HTTP/2 content was overly optimistic about how well it would work in practice, and some of it, quite frankly, had major mistakes and bad advice. Sadly, much of this misinformation persists today. That’s one of my main motivations in writing this series on HTTP/3, to help prevent that from happening again.
The best all-in-one nuanced source for HTTP/2 I can recommend at this time is the book HTTP/2 in Action by Barry Pollard. However, since that’s a paid resource and I don’t want you to be left guessing here, I’ve listed a few of the main points below, along with how they relate to HTTP/3:
1. Single Connection
The biggest difference between HTTP/1.1 and HTTP/2 was the switch from 6 to 30 parallel TCP connections to a single underlying TCP connection. We discussed a bit in part 2 how a single connection can still be as fast as multiple connections, because of how congestion control can cause more or earlier packet loss with more connections (which undoes the benefits of their aggregated faster start). HTTP/3 continues this approach, but “just” switches from one TCP to one QUIC connection. This difference by itself doesn’t do all that much (it mainly reduces the overhead on the server-side), but it leads to most of the following points.
2. Server Sharding and Connection Coalescing
The switch to the single connection set-up was quite difficult in practice because many pages were sharded across different hostnames and even servers (like img1.example.com and img2.example.com). This was because browsers only opened up to six connections for each individual hostname, so having multiple allowed for more connections! Without changes to this HTTP/1.1 set-up, HTTP/2 would still open up multiple connections, reducing how well other features, such as prioritization (see below), could actually work.
As such, the original recommendation was to undo server sharding and to consolidate resources on a single server as much as possible. HTTP/2 even provided a feature to make the transition from an HTTP/1.1 set-up easier, called connection coalescing. Roughly speaking, if two hostnames resolve to the same server IP (using DNS) and use a similar TLS certificate, then the browser can reuse a single connection even across the two hostnames.
In practice, connection coalescing can be tricky to get right, e.g. due to several subtle security issues involving CORS. Even if you do set it up properly, you could still easily end up with two separate connections. The thing is, that’s not always bad. First, due to poorly implemented prioritization and multiplexing (see below), the single connection could easily be slower than using two or more. Secondly, using too many connections could cause early packet loss due to competing congestion controllers. Using just a few (but still more than one), however, could nicely balance congestion growth with better performance, especially on high-speed networks. For these reasons, I believe that a little bit of sharding is still a good idea (say, two to four connections), even with HTTP/2. In fact, I think most modern HTTP/2 set-ups perform as well as they do because they still have a few extra connections or third-party loads in their critical path.
3. Resource Bundling and Inlining
In HTTP/1.1, you could have only a single active resource per connection, leading to HTTP-level head-of-line (HoL) blocking. Because the number of connections was capped at a measly 6 to 30, resource bundling (where smaller subresources are combined into a single larger resource) was a long-time best practice. We still see this today in bundlers such as Webpack. Similarly, resources were often inlined in other resources (for example, critical CSS was inlined in the HTML).
With HTTP/2, however, the single connection multiplexes resources, so you can have many more outstanding requests for files (put differently, a single request no longer takes up one of your precious few connections). This was originally interpreted as, “We no longer need to bundle or inline our resources for HTTP/2”. This approach was touted to be better for fine-grained caching because each subresource could be cached individually and the full bundle didn’t need to be redownloaded if one of them changed. This is true, but only to a relatively limited extent.
For example, you could reduce compression efficiency, because that works better with more data. Additionally, each extra request or file has an inherent overhead because it needs to be handled by the browser and server. These costs can add up for, say, hundreds of small files compared to a few large ones. In our own early tests, I found seriously diminishing returns at about 40 files. Though those numbers are probably a bit higher now, file requests are still not as cheap in HTTP/2 as originally predicted. Finally, not inlining resources has an added latency cost because the file needs to be requested. This, combined with prioritization and server push problems (see below), means that even today you’re still better off inlining some of your critical CSS. Maybe someday the Resource Bundles proposal will help with this, but not yet.
All of this is, of course, still true for HTTP/3 as well. Still, I’ve read people claim that many small files would be better over QUIC because more concurrently active independent streams mean more profits from the HoL blocking removal (as we discussed in part 2). I think there might be some truth to this, but, as we also saw in part 2, this is a highly complex issue with a lot of moving parameters. I don’t think the benefits would outweigh the other costs discussed, but more research is needed. (An outrageous thought would be to have each file be exactly sized to fit in a single QUIC packet, bypassing HoL blocking completely. I will accept royalties from any startup that implements a resource bundler that does this. ;))
4. Prioritization
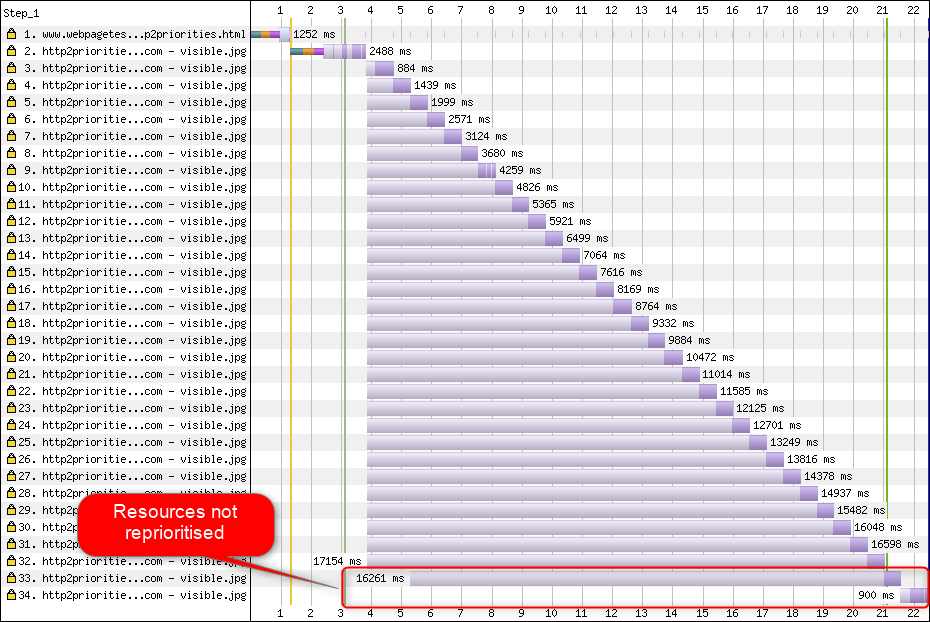
To be able to download multiple files on a single connection, you need to somehow multiplex them. As discussed in part 2, in HTTP/2, this multiplexing is steered using its prioritization system. This is why it’s important to have as many resources as possible requested on the same connection as well — to be able to properly prioritize them among each other! As we also saw, however, this system was very complex, causing it to often be badly used and implemented in practice (see the image below). This, in turn, has meant that some other recommendations for HTTP/2 — such as reduced bundling, because requests are cheap, and reduced server sharding, to make optimal use of the single connection (see above) — have turned out to underperform in practice.
Sadly, this is something that you, as an average web developer, can’t do much about, because it’s mainly a problem in the browsers and servers themselves. You can, however, try to mitigate the issue by not using too many individual files (which will lower the chances for competing priorities) and by still using (limited) sharding. Another option is to use various priority-influencing techniques, such as lazy loading, JavaScript async and defer, and resource hints such as preload. Internally, these mainly change the priorities of the resources so that they get sent earlier or later. However, these mechanisms can (and do) suffer from bugs. Additionally, don’t expect to slap a preload on a bunch of resources and make things faster: If everything is suddenly a high priority, then nothing is! It’s even very easy to delay actually critical resources by using things like preload.
As also explained in part 2, HTTP/3 fundamentally changes the internals of this prioritization system. We hope this means that there will be many fewer bugs and problems with its practical deployment, so at least some of this should be solved. We can’t be sure yet, however, because few HTTP/3 servers and clients fully implement this system today. Nevertheless, the fundamental concepts of prioritization won’t change. You still won’t be able to use techniques such as preload without really understanding what happens internally, because it might still mis-prioritize your resources.
5. Server Push and First Flight
Server push allows a server to send response data without first waiting for a request from the client. Again, this sounds great in theory, and it could be used instead of inlining resources (see above). However, as discussed in part 2, push is very difficult to use correctly due to issues with congestion control, caching, prioritization, and buffering. Overall, it’s best not to use it for general web page loading unless you really know what you’re doing, and even then it would probably be a micro-optimization. I still believe it could have a place with (REST) APIs, though, where you can push subresources linked to in the (JSON) response on a warmed-up connection. This is true for both HTTP/2 and HTTP/3.
To generalize a bit, I feel that similar remarks could be made for TLS session resumption and 0-RTT, be it over TCP + TLS or via QUIC. As discussed in part 2, 0-RTT is similar to server push (as it’s typically used) in that it tries to accelerate the very first stages of a page load. However, that means it is equally limited in what it can achieve at that time (even more so in QUIC, due to security concerns). As such, a micro-optimization is, again, how you probably need to fine-tune things on a low level to really benefit from it. And to think I was once very excited to try out combining server push with 0-RTT.
What Does It All Mean?
All the above comes down to a simple rule of thumb: Apply most of the typical HTTP/2 recommendations that you find online, but don’t take them to the extreme.
Here are some concrete points that mostly hold for both HTTP/2 and HTTP/3:
Shard resources over about one to three connections on the critical path (unless your users are mostly on low-bandwidth networks), using preconnect and dns-prefetch where needed.
Bundle subresources logically per path or feature, or per change frequency. Five to ten JavaScript and five to ten CSS resources per page should be just fine. Inlining critical CSS can still be a good optimization.
Use complex features, such as preload, sparingly.
Use a server that properly supports HTTP/2 prioritization. For HTTP/2, I recommend H2O. Apache and NGINX are mostly OK (although could do better), while Node.js is to be avoided for HTTP/2. For HTTP/3, things are less clear at this time (see below).
Make sure that TLS 1.3 is enabled on your HTTP/2 web server.
As you can see, while far from simple, optimizing pages for HTTP/3 (and HTTP/2) is not rocket science. What will be more difficult, however, is correctly setting up HTTP/3 servers, clients, and tools.
Servers and Networks
As you probably understand by now, QUIC and HTTP/3 are quite complex protocols. Implementing them from scratch would involve reading (and understanding!) hundreds of pages spread over more than seven documents. Luckily, multiple companies have been working on open-source QUIC and HTTP/3 implementations for over five years now, so we have several mature and stable options to choose from.
Some of the most important and stable ones include the following:
Language
Implementation
Python
aioquic
Go
quic-go
Rust
quiche (Cloudflare), Quinn, Neqo (Mozilla)
C and C++
mvfst (Facebook), MsQuic, (Microsoft), <a hrefhttps://quiche.googlesource.com/quiche/QUICHE (Google), ngtcp2, LSQUIC (Litespeed), picoquic, quicly (Fastly)
However, many (perhaps most) of these implementations mainly take care of the HTTP/3 and QUIC stuff; they are not really full-fledged web servers by themselves. When it comes to your typical servers (think NGINX, Apache, Node.js), things have been a bit slower, for several reasons. First, few of their developers were involved with HTTP/3 from the start, and now they have to play catch-up. Many bypass this by using one of the implementations listed above internally as libraries, but even that integration is difficult.
Secondly, many servers depend on third-party TLS libraries such as OpenSSL. This is, again, because TLS is very complex and has to be secure, so it’s best to reuse existing, verified work. However, while QUIC integrates with TLS 1.3, it uses it in ways much different from how TLS and TCP interact. This means that TLS libraries have to provide QUIC-specific APIs, which their developers have long been reluctant or slow to do. The issue here especially is OpenSSL, which has postponed QUIC support, but it is also used by many servers. This problem got so bad that Akamai decided to start a QUIC-specific fork of OpenSSL, called quictls. While other options and workarounds exist, TLS 1.3 support for QUIC is still a blocker for many servers, and it is expected to remain so for some time.
A partial list of full web servers that you should be able to use out of the box, along with their current HTTP/3 support, follows:
Apache
Support is unclear at this time. Nothing has been announced. It likely also needs OpenSSL. (Note that there is an Apache Traffic Server implementation, though.)
NGINX
This is a custom implementation. This is relatively new and still highly experimental. It is expected to be merged to mainline NGINX by the end of 2021. This is relatively new and still highly experimental. Note that there is a patch to run Cloudflare’s quiche library on NGINX as well, which is probably more stable for now.
Node.js
This uses the ngtcp2 library internally. It is blocked by OpenSSL progress, although they plan to switch to the QUIC-TLS fork to get something working sooner.
IIS
Support is unclear at this time, and nothing has been announced. It will likely use the MsQuic library internally, though.
Hypercorn
This integrates aioquic, with experimental support.
Caddy
This uses quic-go, with full support.
H2O
This uses quicly, with full support.
Litespeed
This uses LSQUIC, with full support.
Note some important nuances:
Even “full support” means “as good as it gets at the moment”, not necessarily “production-ready”. For instance, many implementations don’t yet fully support connection migration, 0-RTT, server push, or HTTP/3 prioritization.
Other servers not listed, such as Tomcat, have (to my knowledge) made no announcement yet.
Of the web servers listed, only Litespeed, Cloudflare’s NGINX patch, and H2O were made by people intimately involved in QUIC and HTTP/3 standardization, so these are most likely to work best early on.
As you can see, the server landscape isn’t fully there yet, but there are certainly already options for setting up an HTTP/3 server. However, simply running the server is only the first step. Configuring it and the rest of your network is more difficult.
Network Configuration
As explained in part 1, QUIC runs on top of the UDP protocol to make it easier to deploy. This, however, mainly just means that most network devices can parse and understand UDP. Sadly, it does not mean that UDP is universally allowed. Because UDP is often used for attacks and is not critical to normal day-to-day work besides DNS, many (corporate) networks and firewalls block the protocol almost entirely. As such, UDP probably needs to be explicitly allowed to/from your HTTP/3 servers. QUIC can run on any UDP port but expect port 443 (which is typically used for HTTPS over TCP as well) to be most common.
However, many network administrators will not want to just allow UDP wholesale. Instead, they will specifically want to allow QUIC over UDP. The problem there is that, as we’ve seen, QUIC is almost entirely encrypted. This includes QUIC-level metadata such as packet numbers, but also, for example, signals that indicate the closure of a connection. For TCP, firewalls actively track all of this metadata to check for expected behavior. (Did we see a full handshake before data-carrying packets? Do the packets follow expected patterns? How many open connections are there?) As we saw in part 1, this is exactly one of the reasons why TCP is no longer practically evolvable. However, due to QUIC’s encryption, firewalls can do much less of this connection-level tracking logic, and the few bits they can inspect are relatively complex.
As such, many firewall vendors currently recommend blocking QUIC until they can update their software. Even after that, though, many companies might not want to allow it, because firewall QUIC support will always be much less than the TCP features they’re used to.
This is all complicated even more by the connection migration feature. As we’ve seen, this feature allows for the connection to continue from a new IP address without having to perform a new handshake, by the use of connection IDs (CIDs). However, to the firewall, this will look as if a new connection is being used without first using a handshake, which might just as well be an attacker sending malicious traffic. Firewalls can’t just use the QUIC CIDs, because they also change over time to protect users’ privacy! As such, there will be some need for the servers to communicate with the firewall about which CIDs are expected, but none of these things exist yet.
There are similar concerns for load balancers for larger-scale set-ups. These machines distribute incoming connections over a large number of back-end servers. Traffic for one connection must, of course, always be routed to the same back-end server (the others wouldn’t know what to do with it!). For TCP, this could simply be done based on the 4-tuple, because that never changes. With QUIC connection migration, however, that’s no longer an option. Again, servers and load balancers will need to somehow agree on which CIDs to choose in order to allow deterministic routing. Unlike for firewall configuration, however, there is already a proposal to set this up (although this is far from widely implemented).
Finally, there are other, higher-level security considerations, mainly around 0-RTT and distributed denial-of-service (DDoS) attacks. As discussed in part 2, QUIC includes quite a few mitigations for these issues already, but ideally, they will also use extra lines of defense on the network. For example, proxy or edge servers might block certain 0-RTT requests from reaching the actual back ends to prevent replay attacks. Alternatively, to prevent reflection attacks or DDoS attacks that only send the first handshake packet and then stop replying (called a SYN flood in TCP), QUIC includes the retry feature. This allows the server to validate that it’s a well-behaved client, without having to keep any state in the meantime (the equivalent of TCP SYN cookies). This retry process best happens, of course, somewhere before the back-end server — for example, at the load balancer. Again, this requires additional configuration and communication to set up, though.
These are only the most prominent issues that network and system administrators will have with QUIC and HTTP/3. There are several more, some of which I’ve talked about. There are also two separate accompanying documents for the QUIC RFCs that discuss these issues and their possible (partial) mitigations.
What Does It All Mean?
HTTP/3 and QUIC are complex protocols that rely on a lot of internal machinery. Not all of that is ready for prime time just yet, although you already have some options to deploy the new protocols on your back ends. It will probably take a few months to even years for the most prominent servers and underlying libraries (such as OpenSSL) to get updated, however.
Even then, properly configuring the servers and other network intermediaries, so that the protocols can be used in a secure and optimal fashion, will be non-trivial in larger-scale set-ups. You will need a good development and operations team to correctly make this transition.
As such, especially in the early days, it is probably best to rely on a large hosting company or CDN to set up and configure the protocols for you. As discussed in part 2, that’s where QUIC is most likely to pay off anyway, and using a CDN is one of the key performance optimizations you can do. I would personally recommend using Cloudflare or Fastly because they have been intimately involved in the standardization process and will have the most advanced and well-tuned implementations available.
Clients and QUIC Discovery
So far, we have considered server-side and in-network support for the new protocols. However, several issues are also to be overcome on the client’s side.
Before getting to that, let’s start with some good news: Most of the popular browsers already have (experimental) HTTP/3 support! Specifically, at the time of writing, here is the status of support (see also caniuse.com):
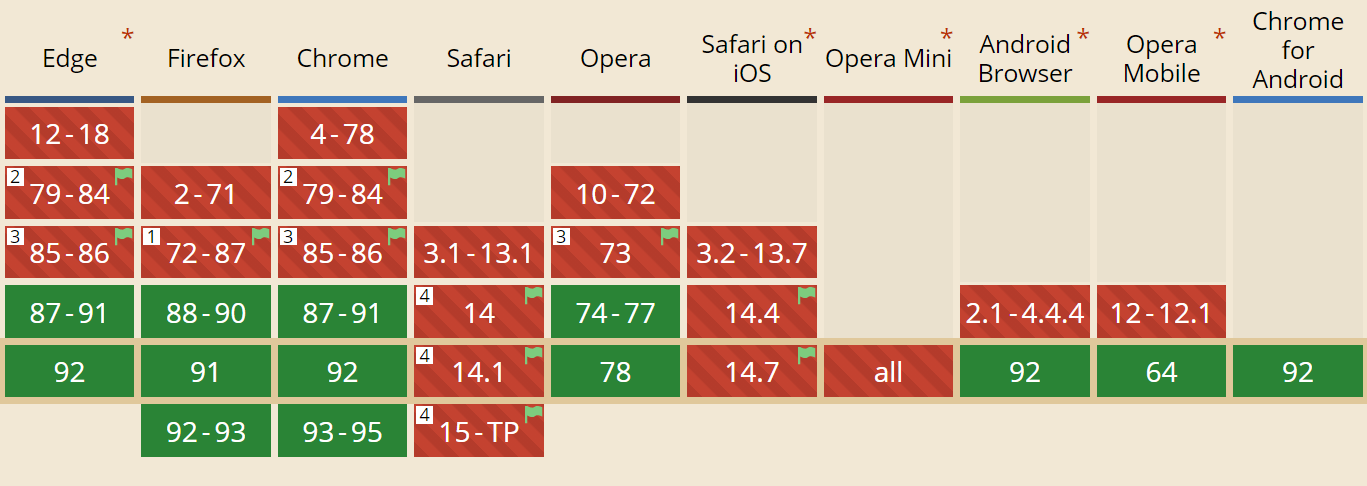
Google Chrome (version 91+): Enabled by default.
Mozilla Firefox (version 89+): Enabled by default.
Microsoft Edge (version 90+): Enabled by default (uses Chromium internally).
Opera (version 77+): Enabled by default (uses Chromium internally).
Apple Safari (version 14): Behind a manual flag. Will be enabled by default in version 15, which is currently in technology preview.
Other Browsers: No signals yet that I’m aware of (although other browsers that use Chromium internally, such as Brave, could, in theory, also start enabling it).
Note some nuances:
Most browsers are rolling out gradually, whereby not all users will get HTTP/3 support enabled by default from the start. This is done to limit the risks that a single overlooked bug could affect many users or that server deployments become overloaded. As such, there is a small chance that, even in recent browser versions, you won’t get HTTP/3 by default and will have to manually enable it.
As with the servers, HTTP/3 support does not mean that all features have been implemented or are being used at this time. Particularly, 0-RTT, connection migration, server push, dynamic QPACK header compression, and HTTP/3 prioritization might still be missing, disabled, used sparingly, or poorly configured.
If you want to use client-side HTTP/3 outside of the browser (for example, in your native app), then you would have to integrate one of the libraries listed above or use cURL. Apple will soon bring native HTTP/3 and QUIC support to its built-in networking libraries on macOS and iOS, and Microsoft is adding QUIC to the Windows kernel and their .NET environment, but similar native support has (to my knowledge) not been announced for other systems like Android.
Alt-Svc
Even if you’ve set up an HTTP/3-compatible server and are using an updated browser, you might be surprised to find that HTTP/3 isn’t actually being used consistently. To understand why, let’s suppose you’re the browser for a moment. Your user has requested that you navigate to example.com (a website you’ve never visited before), and you’ve used DNS to resolve that to an IP. You send one or more QUIC handshake packets to that IP. Now several things can go wrong:
The server might not support QUIC.
One of the intermediate networks or firewalls might block QUIC and/or UDP completely.
The handshake packets might be lost in transit.
However, how would you know (which) one of these problems has occurred? In all three cases, you’ll never receive a reply to your handshake packet(s). The only thing you can do is wait, hoping that a reply might still come in. Then, after some waiting time (the timeout), you might decide there’s indeed a problem with HTTP/3. At that point, you would try to open a TCP connection to the server, hoping that HTTP/2 or HTTP/1.1 will work.
As you can see, this type of approach could introduce major delays, especially in the initial year(s) when many servers and networks won’t support QUIC yet. An easy but naïve solution would simply be to open both a QUIC and TCP connection at the same time and then use whichever handshake completes first. This method is called “connection racing” or “happy eyeballs”. While this is certainly possible, it does have considerable overhead. Even though the losing connection is almost immediately closed, it still takes up some memory and CPU time on both the client and server (especially when using TLS). On top of that, there are also other problems with this method involving IPv4 versus IPv6 networks and the previously discussed replay attacks (which my talk covers in more detail).
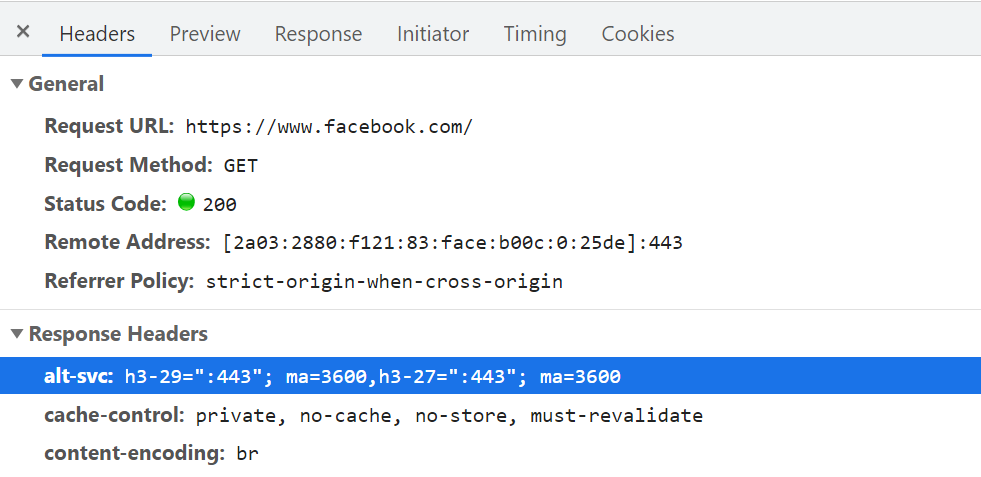
As such, for QUIC and HTTP/3, browsers would rather prefer to play it safe and only try QUIC if they know the server supports it. As such, the first time a new server is contacted, the browser will only use HTTP/2 or HTTP/1.1 over a TCP connection. The server can then let the browser know it also supports HTTP/3 for subsequent connections. This is done by setting a special HTTP header on the responses sent back over HTTP/2 or HTTP/1.1. This header is called Alt-Svc, which stands for “alternative services”. Alt-Svc can be used to let a browser know that a certain service is also reachable via another server (IP and/or port), but it also allows for the indication of alternative protocols. This can be seen below in figure 1.
Upon receipt of a valid Alt-Svc header indicating HTTP/3 support, the browser will cache this and try to set up a QUIC connection from then on. Some clients will do this as soon as possible (even during the initial page load — see below), while others will wait until the existing TCP connection(s) are closed. This means that the browser will only ever use HTTP/3 after it has downloaded at least a few resources via HTTP/2 or HTTP/1.1 first. Even then, it’s not smooth sailing. The browser now knows that the server supports HTTP/3, but that doesn’t mean the intermediate network won’t block it. As such, connection racing is still needed in practice. So, you might still end up with HTTP/2 if the network somehow delays the QUIC handshake enough. Additionally, if the QUIC connection fails to establish a few times in a row, some browsers will put the Alt-Svc cache entry on a denylist for some time, not trying HTTP/3 for a while. As such, it can be helpful to manually clear your browser’s cache if things are acting up because that should also empty the Alt-Svc bindings. Finally, Alt-Svc has been shown to pose some serious security risks. For this reason, some browsers pose extra restrictions on, for instance, which ports can be used (in Chrome, your HTTP/2 and HTTP/3 servers need to be either both on a port below 1024 or both on a port above or equal to 1024, otherwise Alt-Svc will be ignored). All of this logic varies and evolves wildly between browsers, meaning that getting consistent HTTP/3 connections can be difficult, which also makes it challenging to test new set-ups.
There is ongoing work to improve this two-step Alt-Svc process somewhat. The idea is to use new DNS records called SVCB and HTTPS, which will contain information similar to what is in Alt-Svc. As such, the client can discover that a server supports HTTP/3 during the DNS resolution step instead, meaning that it can try QUIC from the very first page load instead of first having to go through HTTP/2 or HTTP/1.1. For more information on this and Alt-Svc, see last year’s Web Almanac chapter on HTTP/2.
As you can see, Alt-Svc and the HTTP/3 discovery process add a layer of complexity to your already challenging QUIC server deployment, because:
you will always need to deploy your HTTP/3 server next to an HTTP/2 and/or HTTP/1.1 server;
you will need to configure your HTTP/2 and HTTP/1.1 servers to set the correct Alt-Svc headers on their responses.
While that should be manageable in production-level set-ups (because, for example, a single Apache or NGINX instance will likely support all three HTTP versions at the same time), it might be much more annoying in (local) test set-ups (I can already see myself forgetting to add the Alt-Svc headers or messing them up). This problem is compounded by a (current) lack of browser error logs and DevTools indicators, which means that figuring out why exactly the set-up isn’t working can be difficult.
Additional Issues
As if that wasn’t enough, another issue will make local testing more difficult: Chrome makes it very difficult for you to use self-signed TLS certificates for QUIC. This is because non-official TLS certificates are often used by companies to decrypt their employees’ TLS traffic (so that they can, for example, have their firewalls scan inside encrypted traffic). However, if companies would start doing that with QUIC, we would again have custom middlebox implementations that make their own assumptions about the protocol. This could lead to them potentially breaking protocol support in the future, which is exactly what we tried to prevent by encrypting QUIC so extensively in the first place! As such, Chrome takes a very opinionated stance on this: If you’re not using an official TLS certificate (signed by a certificate authority or root certificate that is trusted by Chrome, such as Let’s Encrypt), then you cannot use QUIC. This, sadly, also includes self-signed certificates, which are often used for local test set-ups.
It is still possible to bypass this with some freaky command-line flags (because the common –ignore-certificate-errors doesn’t work for QUIC yet), by using per-developer certificates (although setting this up can be tedious), or by setting up the real certificate on your development PC (but this is rarely an option for big teams because you would have to share the certificate’s private key with each developer). Finally, while you can install a custom root certificate, you would then also need to pass both the –origin-to-force-quic-on and –ignore-certificate-errors-spki-list flags when starting Chrome (see below). Luckily, for now, only Chrome is being so strict, and hopefully, its developers will loosen their approach over time.
If you are having problems with your QUIC set-up from inside a browser, it’s best to first validate it using a tool such as cURL. cURL has excellent HTTP/3 support (you can even choose between two different underlying libraries) and also makes it easier to observe Alt-Svc caching logic.
What Does It All Mean?
Next to the challenges involved with setting up HTTP/3 and QUIC on the server-side, there are also difficulties in getting browsers to use the new protocols consistently. This is due to a two-step discovery process involving the Alt-Svc HTTP header and the fact that HTTP/2 connections cannot simply be “upgraded” to HTTP/3, because the latter uses UDP.
Even if a server supports HTTP/3, however, clients (and website owners!) need to deal with the fact that intermediate networks might block UDP and/or QUIC traffic. As such, HTTP/3 will never completely replace HTTP/2. In practice, keeping a well-tuned HTTP/2 set-up will remain necessary both for first-time visitors and visitors on non-permissive networks. Luckily, as we discussed, there shouldn’t be many page-level changes between HTTP/2 and HTTP/3, so this shouldn’t be a major headache.
What could become a problem, however, is testing and verifying whether you are using the correct configuration and whether the protocols are being used as expected. This is true in production, but especially in local set-ups. As such, I expect that most people will continue to run HTTP/2 (or even HTTP/1.1) development servers, switching only to HTTP/3 in a later deployment stage. Even then, however, validating protocol performance with the current generation of tools won’t be easy.
Tools and Testing
As was the case with many major servers, the makers of the most popular web performance testing tools have not been keeping up with HTTP/3 from the start. Consequently, few tools have dedicated support for the new protocol as of July 2021, although they support it to a certain degree.
Google Lighthouse
First, there is the Google Lighthouse tool suite. While this is an amazing tool for web performance in general, I have always found it somewhat lacking in aspects of protocol performance. This is mostly because it simulates slow networks in a relatively unrealistic way, in the browser (the same way that Chrome’s DevTools handle this). While this approach is quite usable and typically “good enough” to get an idea of the impact of a slow network, testing low-level protocol differences is not realistic enough. Because the browser doesn’t have direct access to the TCP stack, it still downloads the page on your normal network, and it then artificially delays the data from reaching the necessary browser logic. This means, for example, that Lighthouse emulates only delay and bandwidth, but not packet loss (which, as we’ve seen, is a major point where HTTP/3 could potentially differ from HTTP/2). Alternatively, Lighthouse uses a highly advanced simulation model to guesstimate the real network impact, because, for example, Google Chrome has some complex logic that tweaks several aspects of a page load if it detects a slow network. This model has, to the best of my knowledge, not been adjusted to handle IETF QUIC or HTTP/3 yet. As such, if you use Lighthouse today for the sole purpose of comparing HTTP/2 and HTTP/3 performance, then you are likely to get erroneous or oversimplified results, which could lead you to wrong conclusions about what HTTP/3 can do for your website in practice. The silver lining is that, in theory, this can be improved massively in the future, because the browser does have full access to the QUIC stack, and thus Lighthouse could add much more advanced simulations (including packet loss!) for HTTP/3 down the line. For now, though, while Lighthouse can, in theory, load pages over HTTP/3, I would recommend against it.
WebPageTest
Secondly, there is WebPageTest. This amazing project lets you load pages over real networks from real devices across the world, and it also allows you to add packet-level network emulation on top, including aspects such as packet loss! As such, WebPageTest is conceptually in a prime position to be used to compare HTTP/2 and HTTP/3 performance. However, while it can indeed already load pages over the new protocol, HTTP/3 has not yet been properly integrated into the tooling or visualizations. For example, there are currently no easy ways to force a page load over QUIC, to easily view how Alt-Svc was actually used, or even to see QUIC handshake details. In some cases, even seeing whether a response used HTTP/3 or HTTP/2 can be challenging. Still, in April, I was able to use WebPageTest to run quite a few tests on facebook.com and see HTTP/3 in action, which I’ll go over now.
First, I ran a default test for facebook.com, enabling the “repeat view” option. As explained above, I would expect the first page load to use HTTP/2, which will include the Alt-Svc response header. As such, the repeat view should use HTTP/3 from the start. In Firefox version 89, this is more or less what happens. However, when looking at individual responses, we see that even during the first page load, Firefox will switch to using HTTP/3 instead of HTTP/2! As you can see in figure 2, this happens from the 20th resource onwards. This means that Firefox establishes a new QUIC connection as soon as it sees the Alt-Svc header, and it switches to it once it succeeds. If you scroll down to the connection view, it also seems to show that Firefox even opened two QUIC connections: one for credentialed CORS requests and one for no-CORS requests. This would be expected because, as we discussed above, even for HTTP/2 and HTTP/3, browsers will open multiple connections due to security concerns. However, because WebPageTest doesn’t provide more details in this view, it’s difficult to confirm without manually digging through the data. Looking at the repeat view (second visit), it starts by directly using HTTP/3 for the first request, as expected.
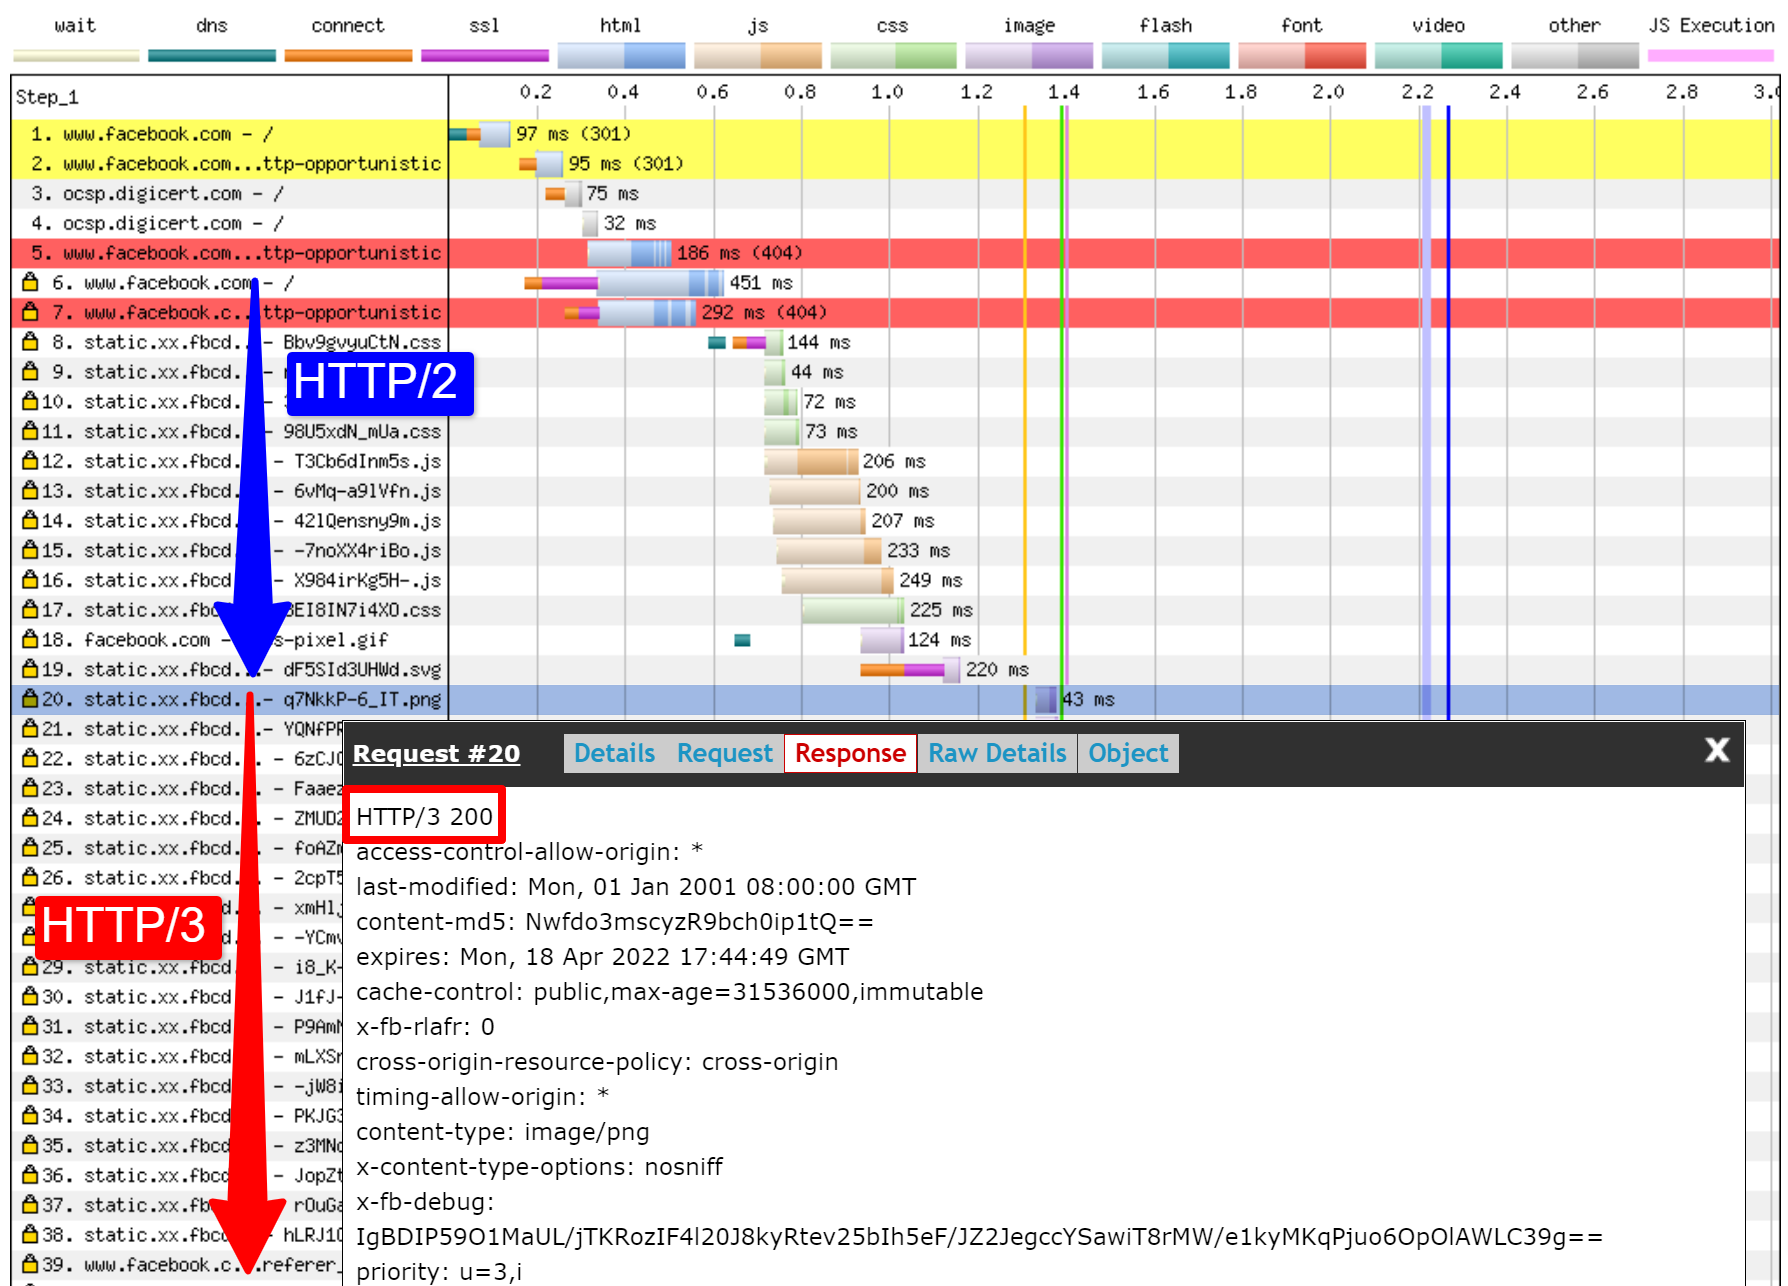
Next, for Chrome, we see similar behavior for the first page load, although here Chrome already switches on the 10th resource, much earlier than Firefox. It’s a bit more unclear here whether it switches as soon as possible or only when a new connection is needed (for example, for requests with different credentials), because, unlike for Firefox, the connection view also doesn’t seem to show multiple QUIC connections. For the repeat view, we see some weirder things. Unexpectedly, Chrome starts off using HTTP/2 there as well, switching to HTTP/3 only after a few requests! I performed a few more tests on other pages as well, to confirm that this is indeed consistent behaviour. This could be due to several things: It might just be Chrome’s current policy, it might be that Chrome “raced” a TCP and QUIC connection and TCP won initially, or it might be that the Alt-Svc cache from the first view was unused for some reason. At this point, there is, sadly, no easy way to determine what the problem really is (and whether it can even be fixed).
Another interesting thing I noticed here is the apparent connection coalescing behavior. As discussed above, both HTTP/2 and HTTP/3 can reuse connections even if they go to other hostnames, to prevent downsides from hostname sharding. However, as shown in figure 3, WebPageTest reports that, for this Facebook load, connection coalescing is used over HTTP/3 for facebook.com and fbcdn.net, but not over HTTP/2 (as Chrome opens a secondary connection for the second domain). I suspect this is a bug in WebPageTest, however, because facebook.com and fbcnd.net resolve to different IPs and, as such, can’t really be coalesced.
The figure also shows that some key QUIC handshake information is missing from the current WebPageTest visualization.

Note: As we see, getting “real” HTTP/3 going can be difficult sometimes. Luckily, for Chrome specifically, we have additional options we can use to test QUIC and HTTP/3, in the form of command-line parameters.
On the bottom of WebPageTest’s “Chromium” tab, I used the following command-line options:
–enable-quic –quic-version=h3-29 –origin-to-force-quic-on=www.facebook.com:443,static.xx.fbcdn.net:443
The results from this test show that this indeed forces a QUIC connection from the start, even in the first view, thus bypassing the Alt-Svc process. Interestingly, you will notice I had to pass two hostnames to –origin-to-force-quic-on. In the version where I didn’t, Chrome, of course, still first opened an HTTP/2 connection to the fbcnd.net domain, even in the repeat view. As such, you’ll need to manually indicate all QUIC origins in order for this to work!
We can see even from these few examples that a lot of stuff is going on with how browsers actually use HTTP/3 in practice. It seems they even switch to the new protocol during the initial page load, abandoning HTTP/2 either as soon as possible or when a new connection is needed. As such, it’s difficult not only getting a full HTTP/3 load, but also getting a pure HTTP/2 load on a set-up that supports both! Because WebPageTest doesn’t show much HTTP/3 or QUIC metadata yet, figuring out what’s going on can be challenging, and you can’t trust the tools and visualizations at face value either.
So, if you use WebPageTest, you’ll need to double-check the results to make sure which protocols were actually used. Consequently, I think this means that it’s too early to really test HTTP/3 performance at this time (and especially too early to compare it to HTTP/2). This belief is strengthened by the fact that not all servers and clients have implemented all protocol features yet. Due to the fact that WebPageTest doesn’t yet have easy ways of showing whether advanced aspects such as 0-RTT were used, it will be tricky to know what you’re actually measuring. This is especially true for the HTTP/3 prioritization feature, which isn’t implemented properly in all browsers yet and which many servers also lack full support for. Because prioritization can be a major aspect driving web performance, it would be unfair to compare HTTP/3 to HTTP/2 without making sure that at least this feature works properly (for both protocols!). This is just one aspect, though, as my research shows how big the differences between QUIC implementations can be. If you do any comparison of this sort yourself (or if you read articles that do), make 100% sure that you’ve checked what’s actually going on.
Finally, also note that other higher-level tools (or data sets such as the amazing HTTP Archive) are often based on WebPageTest or Lighthouse (or use similar methods), so I suspect that most of my comments here will be widely applicable to most web performance tooling. Even for those tool vendors announcing HTTP/3 support in the coming months, I would be a bit skeptical and would validate that they’re actually doing it correctly. For some tools, things are probably even worse, though; for example, Google’s PageSpeed Insights only got HTTP/2 support this year, so I wouldn’t wait for HTTP/3 arriving anytime soon.
Wireshark, qlog and qvis
As the discussion above shows, it can be tricky to analyze HTTP/3 behavior by just using Lighthouse or WebPageTest at this point. Luckily, other lower-level tools are available to help with this. First, the excellent Wireshark tool has advanced support for QUIC, and it can experimentally dissect HTTP/3 as well. This allows you to observe which QUIC and HTTP/3 packets are actually going over the wire. However, in order for that to work, you need to obtain the TLS decryption keys for a given connection, which most implementations (including Chrome and Firefox) allow you to extract by using the SSLKEYLOGFILE environment variable. While this can be useful for some things, really figuring out what’s happening, especially for longer connections, could entail a lot of manual work. You would also need a pretty advanced understanding of the protocols’ inner workings.
Luckily, there is a second option, qlog and qvis. qlog is a JSON-based logging format specifically for QUIC and HTTP/3 that is supported by the majority of QUIC implementations. Instead of looking at the packets going over the wire, qlog captures this information on the client and server directly, which allows it to include some additional information (for example, congestion control details). Typically, you can trigger qlog output when starting servers and clients with the QLOGDIR environment variable. (Note that in Firefox, you need to set the network.http.http3.enable_qlog preference. Apple devices and Safari use QUIC_LOG_DIRECTORY instead. Chrome doesn’t yet support qlog.)
These qlog files can then be uploaded to the qvis tool suite at qvis.quictools.info. There, you’ll get a number of advanced interactive visualizations that make it easier to interpret QUIC and HTTP/3 traffic. qvis also has support for uploading Wireshark packet captures (.pcap files), and it has experimental support for Chrome’s netlog files, so you can also analyze Chrome’s behavior. A full tutorial on qlog and qvis is beyond the scope of this article, but more details can be found in tutorial form, as a paper, and even in talk-show format. You can also ask me about them directly because I’m the main implementer of qlog and qvis. 😉
However, I am under no illusion that most readers here should ever use Wireshark or qvis, because these are quite low-level tools. Still, as we have few alternatives at the moment, I strongly recommend not extensively testing HTTP/3 performance without using this type of tool, to make sure you really know what’s happening on the wire and whether what you’re seeing is really explained by the protocol’s internals and not by other factors.
What Does It All Mean?
As we’ve seen, setting up and using HTTP/3 over QUIC can be a complex affair, and many things can go wrong. Sadly, no good tool or visualization is available that exposes the necessary details at an appropriate level of abstraction. This makes it very difficult for most developers to assess the potential benefits that HTTP/3 can bring to their website at this time or even to validate that their set-up works as expected.
Relying only on high-level metrics is very dangerous because these could be skewed by a plethora of factors (such as unrealistic network emulation, a lack of features on clients or servers, only partial HTTP/3 usage, etc.). Even if everything did work better, as we’ve seen in part 2, the differences between HTTP/2 and HTTP/3 will likely be relatively small in most cases, which makes it even more difficult to get the necessary information from high-level tools without targeted HTTP/3 support.
As such, I recommend leaving HTTP/2 versus HTTP/3 performance measurements alone for a few more months and focusing instead on making sure that our server-side set-ups are functioning as expected. For this, it’s easiest to use WebPageTest in combination with Google Chrome’s command-line parameters, with a fallback to curl for potential issues — this is currently the most consistent set-up I can find.
Conclusion and Takeaways
Dear reader, if you’ve read the full three-part series and made it here, I salute you! Even if you’ve only read a few sections, I thank you for your interest in these new and exciting protocols. Now, I will summarize the key takeaways from this series, provide a few key recommendations for the coming months and year, and finally provide you with some additional resources, in case you’d like to know more.
Summary
First, in part 1, we discussed that HTTP/3 was needed mainly because of the new underlying QUIC transport protocol. QUIC is the spiritual successor to TCP, and it integrates all of its best practices, as well as TLS 1.3. This was mainly needed because TCP, due to its ubiquitous deployment and integration in middleboxes, has become too inflexible to evolve. QUIC’s usage of UDP and almost full encryption means that we (hopefully) only have to update the endpoints in the future in order to add new features, which should be easier. QUIC, however, also adds some interesting new capabilities. First, QUIC’s combined transport and cryptographic handshake is faster than TCP + TLS, and it can make good use of the 0-RTT feature. Secondly, QUIC knows it is carrying multiple independent byte streams and can be smarter about how it handles loss and delays, mitigating the head-of-line blocking problem. Thirdly, QUIC connections can survive users moving to a different network (called connection migration) by tagging each packet with a connection ID. Finally, QUIC’s flexible packet structure (employing frames) makes it more efficient but also more flexible and extensible in the future. In conclusion, it’s clear that QUIC is the next-generation transport protocol and will be used and extended for many years to come.
Secondly, in part 2, we took a bit of a critical look at these new features, especially their performance implications. First, we saw that QUIC’s use of UDP doesn’t magically make it faster (nor slower) because QUIC uses congestion control mechanisms very similar to TCP to prevent overloading the network. Secondly, the faster handshake and 0-RTT are more micro-optimizations, because they are really only one round trip faster than an optimized TCP + TLS stack, and QUIC’s true 0-RTT is further affected by a range of security concerns that can limit its usefulness. Thirdly, connection migration is really only needed in a few specific cases, and it still means resetting send rates because the congestion control doesn’t know how much data the new network can handle. Fourthly, the effectiveness of QUIC’s head-of-line blocking removal severely depends on how stream data is multiplexed and prioritized. Approaches that are optimal to recover from packet loss seem detrimental to general use cases of web page loading performance and vice versa, although more research is needed. Fifthly, QUIC could easily be slower to send packets than TCP + TLS, because UDP APIs are less mature and QUIC encrypts each packet individually, although this can be largely mitigated in time. Sixthly, HTTP/3 itself doesn’t really bring any major new performance features to the table, but mainly reworks and simplifies the internals of known HTTP/2 features. Finally, some of the most exciting performance-related features that QUIC allows (multipath, unreliable data, WebTransport, forward error correction, etc.) are not part of the core QUIC and HTTP/3 standards, but rather are proposed extensions that will take some more time to be available. In conclusion, this means QUIC will probably not improve performance much for users on high-speed networks, but will mainly be important for those on slow and less-stable networks.
Finally, in this part 3, we looked at how to practically use and deploy QUIC and HTTP/3. First, we saw that most best practices and lessons learned from HTTP/2 should just carry over to HTTP/3. There is no need to change your bundling or inlining strategy, nor to consolidate or shard your server farm. Server push is still not the best feature to use, and preload can similarly be a powerful footgun. Secondly, we’ve discussed that it might take a while before off-the-shelf web server packages provide full HTTP/3 support (partly due to TLS library support issues), although plenty of open-source options are available for early adopters and several major CDNs have a mature offering. Thirdly, it’s clear that most major browsers have (basic) HTTP/3 support, even enabled by default. There are major differences in how and when they practically use HTTP/3 and its new features, though, so understanding their behavior can be challenging. Fourthly, we’ve discussed that this is worsened by a lack of explicit HTTP/3 support in popular tools such as Lighthouse and WebPageTest, making it especially difficult to compare HTTP/3 performance to HTTP/2 and HTTP/1.1 at this time. In conclusion, HTTP/3 and QUIC are probably not quite ready for primetime yet, but they soon will be.
Recommendations
From the summary above, it might seem like I am making strong arguments against using QUIC or HTTP/3. However, that is quite opposite to the point I want to make.
First, as discussed at the end of part 2, even though your “average” user might not encounter major performance gains (depending on your target market), a significant portion of your audience will likely see impressive improvements. 0-RTT might only save a single round trip, but that can still mean several hundred milliseconds for some users. Connection migration might not sustain consistently fast downloads, but it will definitely help people trying to fetch that PDF on a high-speed train. Packet loss on cable might be bursty, but wireless links might benefit more from QUIC’s head-of-line blocking removal. What’s more, these users are those who would typically encounter the worst performance of your product and, consequently, be most heavily affected by it. If you wonder why that matters, read Chris Zacharias’ famous web performance anecdote.
Secondly, QUIC and HTTP/3 will only get better and faster over time. Version 1 has focused on getting the basic protocol done, keeping more advanced performance features for later. As such, I feel it pays to start investing in the protocols now, to make sure you can use them and the new features to optimal effect when they become available down the line. Given the complexity of the protocols and their deployment aspects, it would be good to give yourself some time to get acquainted with their quirks. Even if you don’t want to get your hands dirty quite yet, several major CDN providers offer mature “flip the switch” HTTP/3 support (particularly, Cloudflare and Fastly). I struggle to find a reason not to try that out if you’re using a CDN (which, if you care about performance, you really should be).
As such, while I wouldn’t say that it’s crucial to start using QUIC and HTTP/3 as soon as possible, I do feel there are plenty of benefits already to be had, and they will only increase in the future.
Further Reading
While this has been a long body of text, sadly, it really only scratches the technical surface of the complex protocols that QUIC and HTTP/3 are.
Below you will find a list of additional resources for continued learning, more or less in order of ascending technical depth:
“HTTP/3 Explained,” Daniel Stenberg
This e-book, by the creator of cURL, summarizes the protocol.
“HTTP/2 in Action,” Barry Pollard
This excellent all-round book on HTTP/2 has reusable advice and a section on HTTP/3.
@programmingart, Twitter
My tweets are mostly dedicated to QUIC, HTTP/3, and web performance (including news) in general. See for example my recent threads on QUIC features.
“YouTube,” Robin Marx
My over 10 in-depth talks cover various aspects of the protocols.
“The Cloudlare Blog”
This is the main product of a company that also runs a CDN on the side.
“The Fastly Blog”
This blog has excellent discussions of technical aspects, embedded in the wider context.
QUIC, the actual RFCs
You’ll find links to the IETF QUIC and HTTP/3 RFC documents and other official extensions.
IIJ Engineers Blog: Excellent deep technical explanations of QUIC feature details.
HTTP/3 and QUIC academic papers, Robin Marx
My research papers cover stream multiplexing and prioritization, tooling, and implementation differences.
QUIPS, EPIQ 2018, and EPIQ 2020
These papers from academic workshops contain in-depth research on security, performance, and extensions of the protocols.
With that, I leave you, dear reader, with a hopefully much-improved understanding of this brave new world. I am always open to feedback, so please let me know what you think of this series!
This series is divided into three parts:
HTTP/3 history and core concepts
This is targeted at people new to HTTP/3 and protocols in general, and it mainly discusses the basics.
HTTP/3 performance features
This is more in-depth and technical. People who already know the basics can start here.
Practical HTTP/3 deployment options (current article)
This explains the challenges involved in deploying and testing HTTP/3 yourself. It details how and if you should change your web pages and resources as well.
 Every day design fans submit incredible industry stories to our sister-site, Webdesigner News. Our colleagues sift through it, selecting the very best stories from the design, UX, tech, and development worlds and posting them live on the site.


 Since school is back in session, this month’s roundup has a learning focus. In addition to tools, many of the resources include guides, tutorials, and cheat sheets to help make design work easier.