Collective #467

Original Source: http://feedproxy.google.com/~r/tympanus/~3/5f2yFY_cT2I/

C467_gridorframework

CSS Frameworks Or CSS Grid: What Should I Use For My Project?

Rachel Andrew takes a look at the often asked question if one should use CSS Frameworks or CSS Grid.

Read it

C467_Bugsnag

This content is sponsored via Syndicate Ads
Level up your JavaScript error monitoring

Automatically detect JS errors impacting your users. Get comprehensive diagnostic reports, know instantly which errors are worth fixing, & debug in minutes.

Try it free

C467_Perfcss

CSS and Network Performance

A great article by Harry Roberts on the best network performance practices for loading CSS.

Read it

C467_pwa

Designing a progressive web app

An article by Mustafa Kurtuldu that covers the process and the lessons learned when designing a PWA.

Read it

C467_float

Editorial Layouts, Floats, and CSS Grid

Rob Weychert writes how aligning floated elements to an established grid can be a real headache.

Read it

C467_colorpalette

Building Your Color Palette

A great, systematic approach to building a solid color palette. Check out the fruitful comments on HN.

Read it

C467_babelplugn

babel-plugin-rawact

A babel plugin which compiles React.js components into native DOM instructions to eliminate the need for the react library at runtime. A proof-of-concept by Tobias Koppers.

Check it out

C467_emojibuilder

Emoji builder

Philipp Antoni made this superfun Emoji builder. So many possibilities!

Check it out

C467_game

The Adventure of Detective Moustachio

A fantastic pixelart web game made by Renaud Rohlinger, Lucas Fiorella and Sofiane Hocine.

Play it

C467_write

Write Freely

Write Freely is free and open source software for starting a minimalist blog, or an entire community.

Check it out

C467_light

Flashlight effect at haunted house

Anya Melnyk created this lovely demo.

Check it out

C467_XSS

XSStrike

An advanced Cross Site Scripting (XSS) detection suite.

Check it out

C467_custom

A Guide to Custom Elements for React Developers

Charles Peters shows how Custom elements can offer the same general benefits of React components without being tied to a specific framework implementation.

Read it

C467_visualizer

Web Audio Visualizations

A nice collection of experimental audio visualizations with Audio WebGL (three.js) and Canvas. By Ion D. Filho.

Check it out

C467_cubes

Cubes Dance

A mesmerizing demo by Ion D. Filho.

Check it out

C467_pixelfont

Free Font: Game Over

A free retro pixel font created by Mariano Diez.

Get it

C467_icons

Virtual and Augmented Reality Icons

A set of 48 virtual reality-themed icons free for a subscription. Made by the folks from Vexels for InVision.

Check it out

C467_now2

Now 2.0

The library that makes serverless application deployment easy just got a major update.

Check it out

C467_demohall

Codevember 10 – Night-time #6

Great demo for the Codevember challenge by Mathijs.

Check it out

C467_3dnetworks

TensorSpace.js

An interactive 3D visualization framework for Neural Networks.

Check it out

C467_switch

Checkbox Toggle Switches Are Confusing UI

Marcus Connor shares his thoughts on checkbox toggle switches and offers the rocker switch as an alternative.

Read it

C467_clock

#Codevember 02 – Time

A realistic looking clock demo by David Lyons.

Check it out

Collective #467 was written by Pedro Botelho and published on Codrops.

Five Techniques to Lazy Load Images for Website Performance

Original Source: https://www.sitepoint.com/five-techniques-lazy-load-images-website-performance/

Five Techniques to Lazy Load Images for Website Performance

This article is part of a series created in partnership with SiteGround. Thank you for supporting the partners who make SitePoint possible.

With images making up a whopping 65% of all web content, page load time on websites can easily become an issue.

Even when properly optimized, images can weigh quite a bit. This can have a negative impact on the time visitors have to wait before they can access content on your website. Chances are, they get impatient and navigate somewhere else, unless you come up with a solution to image loading that doesn’t interfere with the perception of speed.

In this article, you will learn about five approaches to lazy loading images that you can add to your web optimization toolkit to improve user experience on your website.

What Is Lazy Loading?

Lazy loading images consists in loading images on websites asynchronously, that is, after the above-the-fold content is fully loaded, or even conditionally, only when they appear in the browser’s viewport. This means that, if users don’t scroll all the way down, images placed at the bottom of the page won’t even be loaded.

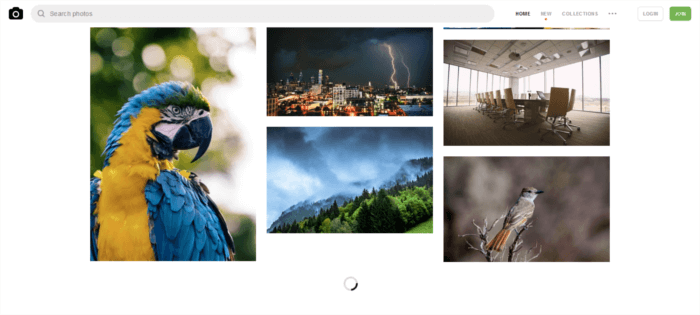
A number of websites use this approach, but it’s especially noticeable on image-heavy sites. Try browsing your favorite online hunting ground for high-res photos, and you’ll soon realize how the website loads just a limited number of images. As you scroll down the page, you’ll see placeholder images quickly filling up with real images for preview. For instance, notice the loader on Unsplash.com: scrolling that portion of the page into view triggers the replacement of a placeholder with a full-res photo:

Lazy loading in action on Unsplash.com

Why Should You Care About Lazy Loading Images?

There are at least a couple of excellent reasons why you should consider lazy loading images for your website:

If your website uses JavaScript to display content or provide some kind of functionality to users, loading the DOM quickly becomes critical. It’s in fact common for scripts to wait until the DOM has completely loaded before they start running. On a site with a significant number of images lazy loading, or loading images asynchronously, could make the difference between users staying or leaving your website

Since most lazy loading solutions consist in loading images only if the user has scrolled to the location where images would be visible inside the viewport, if users never get to that point, those images will never be loaded. This means considerable savings in bandwidth, for which most users, especially those accessing the web on mobile devices and slow-connections, will be thanking you.

Well, lazy loading images helps with website performance, but what’s the best way to go about it?

There is no perfect way.

If you live and breath JavaScript, implementing your own lazy loading solution shouldn’t be an issue. Nothing gives you more control than coding something yourself.

Alternatively, you can browse the web for viable approaches and start experimenting with them. I did just that and came across these five interesting techniques.

#1 David Walsh’s Simple Image Lazy Load and Fade

David Walsh has proposed his own custom script for lazy loading images. Here’s a simplified version:

The src attribute of the img tag is replaced with a data-src attribute in the markup:

[code language=”html”]
<img data-src=”image.jpg” alt=”test image”>
[/code]

In the CSS, img elements with a data-src attribute are hidden. Once loaded, images will appear with a nice fade-in effect using CSS transitions:

[code language=”css”]
img {
opacity: 1;
transition: opacity 0.3s;
}

img[data-src] {
opacity: 0;
}
[/code]

JavaScript then adds the src attribute to each img element and gives it the value of their respective data-src attributes. Once images have finished loading, the script removes the data-src attribute from img elements altogether:

[code language=”js”]
[].forEach.call(document.querySelectorAll(‘img[data-src]’), function(img) {
img.setAttribute(‘src’, img.getAttribute(‘data-src’));
img.onload = function() {
img.removeAttribute(‘data-src’);
};
});
[/code]

David Walsh also offers a fallback solution to cover cases where JavaScript fails, which you can find out more about on his blog.

The merit of this solution: it’s a breeze to implement and it’s effective.

On the flip side, this method doesn’t include loading on scroll functionality. In other words, all images are loaded by the browser, whether users have scrolled them into view or not. Therefore, you get the advantage of a fast loading page because images are loaded after the HTML content. However, you don’t get the saving on bandwidth that comes with preventing unnecessary image data from being loaded when visitors don’t view the entire page content.

#2 Robin Osborne’s Progressively Enhanced Lazy Loading

The post Five Techniques to Lazy Load Images for Website Performance appeared first on SitePoint.

Page Flip Layout

Original Source: http://feedproxy.google.com/~r/tympanus/~3/DrqIsKILhiE/

Today we’d like to share a flat take on a magazine-like layout with a “page flip” animation. When navigating, the content gets covered and then the next “pages” show. Depending on how far the pages are apart (when choosing a page from the menu), we show multiple elements to cover the content, creating a flat page flip look. We’ve added a little visual indicator on each page side, representing a book cover. The indicator will grow, depending on which page we’re currently at.

The animations are powered by TweenMax.

PageFlipLayout_featured

Attention: Note that we use modern CSS properties like CSS Grid and CSS Custom Properties that are not supported in older browsers.

The layout consists of a custom CSS grid setting for every “page”. We don’t really divide the two sides, but simulate it by adding a middle line. To make a custom grid, we use a 20×20 cell structure and add a custom position for every figure using the grid-area property.

PageFlipLayout_first

The menu allows us to jump between pages. The blue lines on each side of the screen serve as a decorative indicator, resembling a book cover (viewed from inside of a book):

PageFlipLayout_menu

The flat “page flip” animation is made up of several layers if we go to a page that is “further away”.

PageFlipLayout_all

We hope you enjoy this layout and find it useful!

References and Credits

Images from Unsplash.com
TweenMax by Greensock
imagesLoaded by Dave DeSandro

Page Flip Layout was written by Mary Lou and published on Codrops.

How to Deploy and Host a Joomla Website on Alibaba Cloud ECS

Original Source: https://www.sitepoint.com/how-to-deploy-and-host-a-joomla-website-on-alibaba-cloud-ecs/

This article was originally published on Alibaba Cloud. Thank you for supporting the partners who make SitePoint possible.

Joomla! is a free and open source content management system (CMS), and is one of the most popular among them. According to the official website, Joomla! is built on a model-view-controller web application framework that can be used independently of the CMS, allowing you to build powerful online applications.

One of my personal favorite features of Joomla! is the multi-language support with its large library of language packs. You can also translate the website admin backend with language extensions, helping you to easily localize your website.

This step-by-step guide will walk you through setting up and deploying a Joomla! website on an Alibaba Cloud Elastic Compute Service (ECS) instance with Ubuntu 16.04.

Requirements and Prerequisites

Before we deploy our Joomla! instance, we need to fulfill the following requirements. We need to set up an Alibaba Cloud Elastic Compute Service (ECS) Linux server (Ubuntu 16.04) with basic configurations. You should also allocate administrator (sudo) privileges to a non-root user.

You can refer to this guide for setting up your Alibaba Cloud ECS instance. If you don't have an Alibaba Cloud account, you can sign up for free and enjoy $300 of Free Trial credit.

Installing Joomla on an Ubuntu 16.04 ECS Instance

To install Joomla on our server, we need to first install a LAMP (Linux, Apache, MySQL, PHP) stack.

Step 1: Connect to Your Server

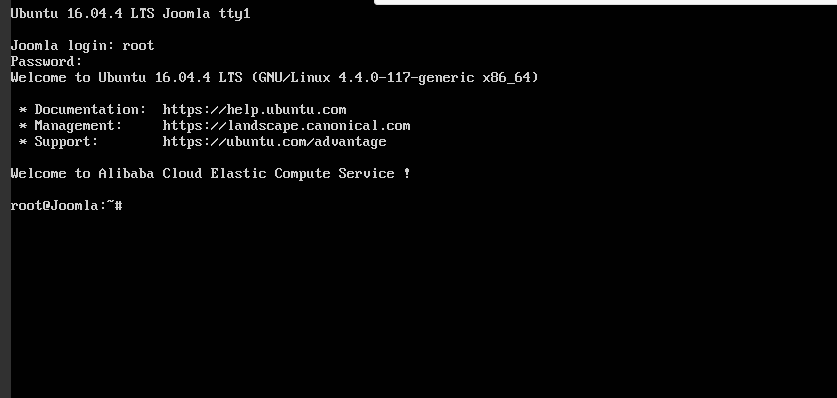
There are many ways to connect to your server, but I will be using the Alibaba Cloud console for simplicity. To do this, go to your instance section and click connect from your created instance. You will be redirected to the Terminal.

Enter username as Root and the password you created. If you didn't create a password, just continue by hitting enter. You are logged in to your server as system administrator.

All the commands in the following sections should be typed in this terminal.

Step 2: Install Apache

To install Apache, update your server repository list by typing command below.

sudo apt-get update

Then install the Apache web server.

sudo apt-get install apache2

Step 3: Install MySQL

Joomla, like most other content management systems, requires MySQL for its backend. So we need to install MySQL and link it to PHP.

To do this, add the following command.

sudo apt-get install mysql-server php7.0-mysql

You'll be asked to enter a MySQL password. Keep the password secure because you will need it later.

Complete the installation process of MySQL with the command below.

/usr/bin/mysql_secure_installation

You'll be asked to enter the MySQL password you just created. Continue with the installation process by making the following selections.

Would you like to setup VALIDATE password plugin ? [Y/N] N
Change the root password ? [ Y/N ] N
Remove anonymous users ? [Y/N] Y
Disallow root login remotely ? [Y/N] Y
Remove test database and access to it ? [Y/N] Y
Reload privilege tables now ? [Y/N] Y

Step 4: Install PHP

Joomla! requires PHP to be installed. Execute the following command to install PHP 7.0 and other required PHP modules.

sudo apt-get install php7.0 libapache2-mod-php7.0 php7.0-mcrypt php7.0-xml php7.0-curl php7.0-json php7.0-cgi

Step 5: Confirm LAMP Installation

To confirm LAMP stack has been installed on your Ubuntu 16.04 server, follow the procedures below.

Open the web browser and navigate to your server's IP address. You'll see the Apache2 Ubuntu Default page.

Note: To check your server’s public IP address, check your ECS Instance dashboard. You'll see both private and public IP addresses. Use the public IP address to access your website. If you don't see the public IP address consider setting up an Elastic IP address.

In order to confirm the PHP installation on your server, remove the default page and replace it with the PHP code below. To do this use the commands below.

rm /var/www/html/index.html

Replace with a new file:

touch /var/www/html/index.php
nano /var/www/html/index.php

Enter a sample PHP code below:

<?php
phpinfo();
?>

To check your page, navigate to your web browser and enter the public IP address. You should see information about PHP installation if the LAMP stack is correctly installed on your server.

The post How to Deploy and Host a Joomla Website on Alibaba Cloud ECS appeared first on SitePoint.

Reebok #BeMoreHuman Hand-Drawn Typeface

Original Source: http://feedproxy.google.com/~r/abduzeedo/~3/aOqzjIUhN1A/reebok-bemorehuman-hand-drawn-typeface

Reebok #BeMoreHuman Hand-Drawn Typeface

Reebok #BeMoreHuman Hand-Drawn Typeface

AoiroStudio
Nov 09, 2018

I was surfing on Behance for an inspiration related to fonts for ABDZ. I stumbled across the work of Simon Stratford who is a designer based in London, UK. He published a project for Reebok #BeMoreHuman Typeface fully hand-drawed. It’s just a beautiful and yet powerful campaign featuring popular celebrities like Gal Gadot (Wonder Woman, Danai Gurira (from Black Panther) and more. I would totally advise you to check out the videos as well, it’s great to see Simon’s work animated and represented by strong women.

Reebok #BeMoreHuman—Working with Venables Bell + Partners I created a hand-drawn typeface that could be adapted by other designers to form distinctive lettering work for their new Reebok #BeMoreHuman campaign. I only created the typeface with many alternatives Venables Bell + Partners created the photography, layouts, lettering and other adaptations.

More Links
Personal Site
Behance
Typography
Reebok #BeMoreHuman Hand-Drawn TypefaceReebok #BeMoreHuman Hand-Drawn TypefaceReebok #BeMoreHuman Hand-Drawn TypefaceReebok #BeMoreHuman Hand-Drawn TypefaceReebok #BeMoreHuman Hand-Drawn TypefaceReebok #BeMoreHuman Hand-Drawn Typeface
Videos
Gal Gadot

Danai Gurira

Natjalie Emmanuel

Gigi Hadid

Typography
typeface
hand-lettering
lettering


10 Missing Features All Browsers Should Have

Original Source: https://www.hongkiat.com/blog/browser-features-most-wanted/

Browsers, the windows to the Web, have become an essential tool for many Internet users. In spite of how important it is and having been in existence for a reasonable period of time, its evolution…

Visit hongkiat.com for full content.

The best photo books in 2018

Original Source: http://feedproxy.google.com/~r/CreativeBloq/~3/1n_I30hN8oI/the-best-photo-books-in-2018

Digital photography has completely changed how we deal with our photographs. In the good old days of film cameras you'd send your film off to be developed, get some printed snapshots back and then stick the best ones into a photo album that might take years to fill.

Today, though, even if you've got the best camera on the market, you're likely to have a big 'PICTURES' or 'PHOTOS' folder on your computer, stuffed with thousands of shots. And while you might upload a few of them to Facebook or photography websites, the vast majority of them will simply linger on your hard disk forever.

If you miss the tactile experience of physically flicking through a photo album, though, it's easy to get your best photos printed in a professional-looking photo book; here are the best options available right now.

The best photo books in the US

The best photo books in 2018: Mixbook

Mixbook isn't the cheapest option, but its software is wonderfully easy to use with simple but fully editable templates that make the whole business of collating your photos into a book an absolute joy. There are plenty of backgrounds and even stickers to work with if you want to customise your finished book, and the end results are great, with a professional finish.

The best photo books in 2018: Picaboo

Picaboo's print quality isn't the best, but it makes up for this with the options it gives you when you're putting your photo book together. Its software manages to be easy to use while giving you loads of options to play with, including searchable background and clip art to help you nail exactly the look you're after for your finished book, as well as the ability to polish your photos so that they match your backgrounds.

The best photo books in 2018: Shutterfly

For a great all-round option it's hard to go wrong with Shutterfly. It provides simple and more involved tools to help you design your photo book, with loads of templates and backgrounds to choose from. But if you'd rather leave it to the experts, it also provides a Make My Book services. With this option, you choose a size and style and hand over up to 800 photos and any special instructions, and Shutterfly's designers will have your book ready for review in three days.

The best photo books in 2018: Snapfish

Snapfish won't design your book for you, but its process is almost as easy. It provides over 120 themes with a massive selection of backgrounds to work with, and once you've settled on your chosen style it'll guide you through the design process with a straightforward drag-and-drop interface. The end results aren't quite up to the quality of other services listed here, but you should be able to get a good deal on the price.

The best photo books in 2018: Apple Photos

If you're on a Mac, perhaps the easiest way to turn your photos into a book is to use the Apple Photo book options. It's simple to use and follows Apple's minimal style, which will result in a clean design, but it might all feel a little limiting if you want more control over the end results. At the end of the process, you'll get a great-quality book with decent photo reproduction; not the best, but certainly not to be sniffed at.

The best photo books in the UK

The best photo books in 2018: CEWE

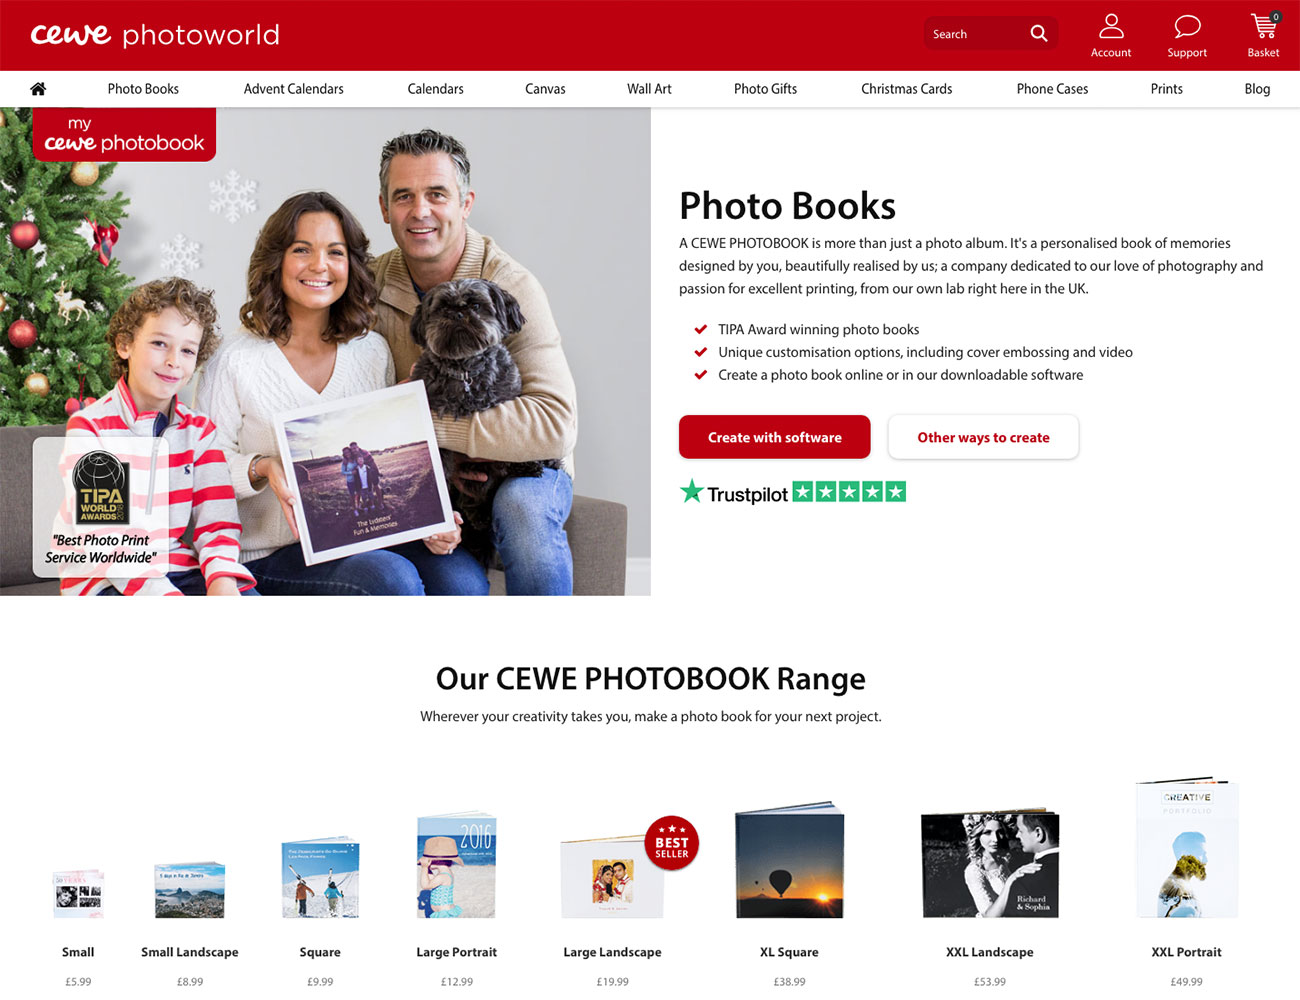
If you're picky about end results, then you'll find it hard to go wrong with CEWE. It'll guide you through all the options on offer, and there are absolutely loads of them, with plenty of paper stock to choose from and luxury cover options for the perfect finish. For the most demanding print aficionados, there's even the option to add spot varnish and foil treatments. Obviously these extra options don't come cheap, but if you have the means, you'll find they're well worth the effort.

The best photo books in 2018: Whitewall

For ease of use, Whitewall's online book creator is a godsend; simply upload all your photos and it'll automatically arrange them for you throughout your book (up to 252 pages), leaving you to tweak the final layout if you want. Its default 170gsm paper is a little flimsy; we'd recommend paying a little extra for the 250gsm option, and the print quality's generally good, although skin tones are a little on the cold side. Best of all, you can expect your finished book to turn up in just a few days.

The best photo books in 2018: BobBooks

To really turn heads with your photo book, head to BobBooks and go for its Lustre Photographic option; it'll cost you more but the results are stunning, with heavyweight 300gsm paper stock and a lustre finish that can't help but show off your photos to best effect. BobBook's print process is similarly top-drawer, boasting vibrant, accurate colour reproduction and beautifully sharp images. The business of actually creating your book is also good and straightforward, with an easy-to-use online interface as well as desktop and iPad apps and even a pro design service.

The best photo books in 2018: Bonusprint

Bonusprint's a venerable name in the photo business dating back to the 1960s, and while you may not go to it any more to get your film developed, it's a great place to get some excellent deals on photo books and much more. Its online and offline book design software is easy to use, and its smart assistant will select your best photos and lay them out for you, allowing you to edit the layouts and add extra images, clip art and text afterwards. As for the print quality, it's not quite up to BobBook's standards, but there's little to complain about.

The best photo books in 2018: Photobox

Like Bonusprint, Photobox is another site that's liberal with the discount offers, so you'd have to go out of your way to pay full whack for your photo book. Its online book creation software's pretty slick with lots of layout, background and cropping options, and will give you a 3D preview of your finished book so you can be sure of what you're getting. Photobox's standard 170gsm stock is a little thin; we'd recommend upgrading to its premium 230gsm paper for best results, and even with that you'll find the print quality lacking in sharpness.

Related articles:

The best monitors for photo editing in 2018How to prepare a file for print45 best photo apps and photo editing software

Remarkable Illustrations by Dylan Choonhachat

Original Source: http://feedproxy.google.com/~r/abduzeedo/~3/MmxHa9eQdB4/remarkable-illustrations-dylan-choonhachat

Remarkable Illustrations by Dylan Choonhachat

Remarkable Illustrations by Dylan Choonhachat

AoiroStudio
Nov 09, 2018

Let’s take a look at the illustration works by Los Angeles based illustrator and sketch artist Dylan Choonhachat. We are featuring his remarkable set of illustrations where it’s mostly about character design. You can tell that his craft is progressing more and more. I can’t wait to see more of his work in the near future, make sure to give him some love on Behance.

More Links
Personal Site
Behance
Illustrations
Remarkable Illustrations by Dylan ChoonhachatRemarkable Illustrations by Dylan ChoonhachatRemarkable Illustrations by Dylan ChoonhachatRemarkable Illustrations by Dylan ChoonhachatRemarkable Illustrations by Dylan ChoonhachatRemarkable Illustrations by Dylan ChoonhachatRemarkable Illustrations by Dylan ChoonhachatRemarkable Illustrations by Dylan ChoonhachatRemarkable Illustrations by Dylan Choonhachat

illustration
digital art


Sharing Data Among Multiple Servers Through AWS S3

Original Source: https://www.smashingmagazine.com/2018/11/sharing-data-among-multiple-servers-through-aws-s3/

Sharing Data Among Multiple Servers Through AWS S3

Sharing Data Among Multiple Servers Through AWS S3

Leonardo Losoviz

2018-11-08T12:30:30+01:00
2018-11-09T10:44:31+00:00

When providing some functionality for processing a file uploaded by the user, the file must be available to the process throughout the execution. A simple upload and save operation presents no issues. However, if in addition the file must be manipulated before being saved, and the application is running on several servers behind a load balancer, then we need to make sure that the file is available to whichever server is running the process at each time.

For instance, a multi-step “Upload your user avatar” functionality may require the user to upload an avatar on step 1, crop it on step 2, and finally save it on step 3. After the file is uploaded to a server on step 1, the file must be available to whichever server handles the request for steps 2 and 3, which may or may not be the same one for step 1.

A naive approach would be to copy the uploaded file on step 1 to all other servers, so the file would be available on all of them. However, this approach is not just extremely complex but also unfeasible: for instance, if the site runs on hundreds of servers, from several regions, then it cannot be accomplished.

A possible solution is to enable “sticky sessions” on the load balancer, which will always assign the same server for a given session. Then, steps 1, 2 and 3 will be handled by the same server, and the file uploaded to this server on step 1 will still be there for steps 2 and 3. However, sticky sessions are not fully reliable: If in between steps 1 and 2 that server crashed, then the load balancer will have to assign a different server, disrupting the functionality and the user experience. Likewise, always assigning the same server for a session may, under special circumstances, lead to slower response times from an overburdened server.

A more proper solution is to keep a copy of the file on a repository accessible to all servers. Then, after the file is uploaded to the server on step 1, this server will upload it to the repository (or, alternatively, the file could be uploaded to the repository directly from the client, bypassing the server); the server handling step 2 will download the file from the repository, manipulate it, and upload it there again; and finally the server handling step 3 will download it from the repository and save it.

Getting workflow just right ain’t an easy task. So are proper estimates. Or alignment among different departments. That’s why we’ve set up “this-is-how-I-work”-sessions — with smart cookies sharing what works well for them. A part of the Smashing Membership, of course.

Explore Smashing Membership ↬

Smashing TV, with live sessions for professional designers and developers.

In this article, I will describe this latter solution, based on a WordPress application storing files on Amazon Web Services (AWS) Simple Storage Service (S3) (a cloud object storage solution to store and retrieve data), operating through the AWS SDK.

Note 1: For a simple functionality such as cropping avatars, another solution would be to completely bypass the server, and implement it directly in the cloud through Lambda functions. But since this article is about connecting an application running on the server with AWS S3, we don’t consider this solution.

Note 2: In order to use AWS S3 (or any other of the AWS services) we will need to have a user account. Amazon offers a free tier here for 1 year, which is good enough for experimenting with their services.

Note 3: There are 3rd party plugins for uploading files from WordPress to S3. One such plugin is WP Media Offload (the lite version is available here), which provides a great feature: it seamlessly transfers files uploaded to the Media Library to an S3 bucket, which allows to decouple the contents of the site (such as everything under /wp-content/uploads) from the application code. By decoupling contents and code, we are able to deploy our WordPress application using Git (otherwise we cannot since user-uploaded content is not hosted on the Git repository), and host the application on multiple servers (otherwise, each server would need to keep a copy of all user-uploaded content.)

Creating The Bucket

When creating the bucket, we need to pay consideration to the bucket name: Each bucket name must be globally unique on the AWS network, so even though we would like to call our bucket something simple like “avatars”, that name may already be taken, then we may choose something more distinctive like “avatars-name-of-my-company”.

We will also need to select the region where the bucket is based (the region is the physical location where the data center is located, with locations all over the world.)

The region must be the same one as where our application is deployed, so that accessing S3 during the process execution is fast. Otherwise, the user may have to wait extra seconds from uploading/downloading an image to/from a distant location.

Note: It makes sense to use S3 as the cloud object storage solution only if we also use Amazon’s service for virtual servers on the cloud, EC2, for running the application. If instead, we rely on some other company for hosting the application, such as Microsoft Azure or DigitalOcean, then we should also use their cloud object storage services. Otherwise, our site will suffer an overhead from data traveling among different companies’ networks.

In the screenshots below we will see how to create the bucket where to upload the user avatars for cropping. We first head to the S3 dashboard and click on “Create bucket”:
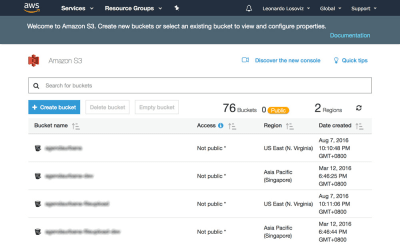
S3 dashboard

S3 dashboard, showing all our existing buckets. (Large preview)

Then we type in the bucket name (in this case, “avatars-smashing”) and choose the region (“EU (Frankfurt)”):
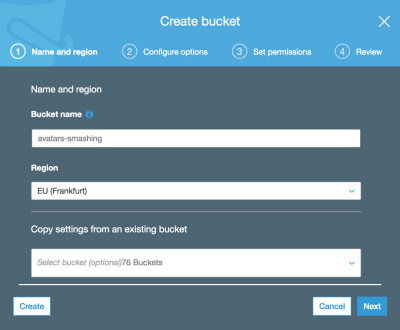
Create a bucket screen

Creating a bucket through in S3. (Large preview)

Only the bucket name and region are mandatory. For the following steps we can keep the default options, so we click on “Next” until finally clicking on “Create bucket”, and with that, we will have the bucket created.

Setting Up The User Permissions

When connecting to AWS through the SDK, we will be required to enter our user credentials (a pair of access key ID and secret access key), to validate that we have access to the requested services and objects. User permissions can be very general (an “admin” role can do everything) or very granular, just granting permission to the specific operations needed and nothing else.

As a general rule, the more specific our granted permissions, the better, as to avoid security issues. When creating the new user, we will need to create a policy, which is a simple JSON document listing the permissions to be granted to the user. In our case, our user permissions will grant access to S3, for bucket “avatars-smashing”, for the operations of “Put” (for uploading an object), “Get” (for downloading an object), and “List” (for listing all the objects in the bucket), resulting in the following policy:

{
“Version”: “2012-10-17”,
“Statement”: [
{
“Effect”: “Allow”,
“Action”: [
“s3:Put*”,
“s3:Get*”,
“s3:List*”
],
“Resource”: [
“arn:aws:s3:::avatars-smashing”,
“arn:aws:s3:::avatars-smashing/*”
]
}
]
}

In the screenshots below, we can see how to add user permissions. We must go to the Identity and Access Management (IAM) dashboard:

IAM dashboard

IAM dashboard, listing all the users we have created. (Large preview)

In the dashboard, we click on “Users” and immediately after on “Add User”. In the Add User page, we choose a user name (“crop-avatars”), and tick on “Programmatic access” as the Access type, which will provide the access key ID and secret access key for connecting through the SDK:

Add user page

Adding a new user. (Large preview)

We then click on button “Next: Permissions”, click on “Attach existing policies directly”, and click on “Create policy”. This will open a new tab in the browser, with the Create policy page. We click on the JSON tab, and enter the JSON code for the policy defined above:
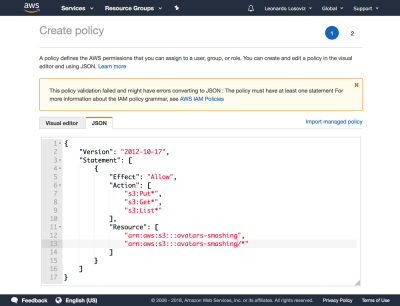
Create policy page

Creating a policy granting ‘Get’, ‘Post’ and ‘List’ operations on the ‘avatars-smashing’ bucket. (Large preview)

We then click on Review policy, give it a name (“CropAvatars”), and finally click on Create policy. Having the policy created, we switch back to the previous tab, select the CropAvatars policy (we may need to refresh the list of policies to see it), click on Next: Review, and finally on Create user. After this is done, we can finally download the access key ID and secret access key (please notice that these credentials are available for this unique moment; if we don’t copy or download them now, we’ll have to create a new pair):

User creation success page

After the user is created, we are offered a unique time to download the credentials. (Large preview)

Connecting To AWS Through The SDK

The SDK is available through a myriad of languages. For a WordPress application, we require the SDK for PHP which can be downloaded from here, and instructions on how to install it are here.

Once we have the bucket created, the user credentials ready, and the SDK installed, we can start uploading files to S3.

Uploading And Downloading Files

For convenience, we define the user credentials and the region as constants in the wp-config.php file:

define (‘AWS_ACCESS_KEY_ID’, ‘…’); // Your access key id
define (‘AWS_SECRET_ACCESS_KEY’, ‘…’); // Your secret access key
define (‘AWS_REGION’, ‘eu-central-1’); // Region where the bucket is located. This is the region id for “EU (Frankfurt)”

In our case, we are implementing the crop avatar functionality, for which avatars will be stored on the “avatars-smashing” bucket. However, in our application we may have several other buckets for other functionalities, requiring to execute the same operations of uploading, downloading and listing files. Hence, we implement the common methods on an abstract class AWS_S3, and we obtain the inputs, such as the bucket name defined through function get_bucket, in the implementing child classes.

// Load the SDK and import the AWS objects
require ‘vendor/autoload.php’;
use AwsS3S3Client;
use AwsExceptionAwsException;

// Definition of an abstract class
abstract class AWS_S3 {

protected function get_bucket() {

// The bucket name will be implemented by the child class
return ”;
}
}

The S3Client class exposes the API for interacting with S3. We instantiate it only when needed (through lazy-initialization), and save a reference to it under $this->s3Client as to keep using the same instance:

abstract class AWS_S3 {

// Continued from above…

protected $s3Client;

protected function get_s3_client() {

// Lazy initialization
if (!$this->s3Client) {

// Create an S3Client. Provide the credentials and region as defined through constants in wp-config.php
$this->s3Client = new S3Client([
‘version’ => ‘2006-03-01’,
‘region’ => AWS_REGION,
‘credentials’ => [
‘key’ => AWS_ACCESS_KEY_ID,
‘secret’ => AWS_SECRET_ACCESS_KEY,
],
]);
}

return $this->s3Client;
}
}

When we are dealing with $file in our application, this variable contains the absolute path to the file in disk (e.g. /var/app/current/wp-content/uploads/users/654/leo.jpg), but when uploading the file to S3 we should not store the object under the same path. In particular, we must remove the initial bit concerning the system information (/var/app/current) for security reasons, and optionally we can remove the /wp-content bit (since all files are stored under this folder, this is redundant information), keeping only the relative path to the file (/uploads/users/654/leo.jpg). Conveniently, this can be achieved by removing everything after WP_CONTENT_DIR from the absolute path. Functions get_file and get_file_relative_path below switch between the absolute and the relative file paths:

abstract class AWS_S3 {

// Continued from above…

function get_file_relative_path($file) {

return substr($file, strlen(WP_CONTENT_DIR));
}

function get_file($file_relative_path) {

return WP_CONTENT_DIR.$file_relative_path;
}
}

When uploading an object to S3, we can establish who is granted access to the object and the type of access, done through the access control list (ACL) permissions. The most common options are to keep the file private (ACL => “private”) and to make it accessible for reading on the internet (ACL => “public-read”). Because we will need to request the file directly from S3 to show it to the user, we need ACL => “public-read”:

abstract class AWS_S3 {

// Continued from above…

protected function get_acl() {

return ‘public-read’;
}
}

Finally, we implement the methods to upload an object to, and download an object from, the S3 bucket:

abstract class AWS_S3 {

// Continued from above…

function upload($file) {

$s3Client = $this->get_s3_client();

// Upload a file object to S3
$s3Client->putObject([
‘ACL’ => $this->get_acl(),
‘Bucket’ => $this->get_bucket(),
‘Key’ => $this->get_file_relative_path($file),
‘SourceFile’ => $file,
]);
}

function download($file) {

$s3Client = $this->get_s3_client();

// Download a file object from S3
$s3Client->getObject([
‘Bucket’ => $this->get_bucket(),
‘Key’ => $this->get_file_relative_path($file),
‘SaveAs’ => $file,
]);
}
}

Then, in the implementing child class we define the name of the bucket:

class AvatarCropper_AWS_S3 extends AWS_S3 {

protected function get_bucket() {

return ‘avatars-smashing’;
}
}

Finally, we simply instantiate the class to upload the avatars to, or download from, S3. In addition, when transitioning from steps 1 to 2 and 2 to 3, we need to communicate the value of $file. We can do this by submitting a field “file_relative_path” with the value of the relative path of $file through a POST operation (we don’t pass the absolute path for security reasons: no need to include the “/var/www/current” information for outsiders to see):

// Step 1: after the file was uploaded to the server, upload it to S3. Here, $file is known
$avatarcropper = new AvatarCropper_AWS_S3();
$avatarcropper->upload($file);

// Get the file path, and send it to the next step in the POST
$file_relative_path = $avatarcropper->get_file_relative_path($file);
// …

// ————————————————–

// Step 2: get the $file from the request and download it, manipulate it, and upload it again
$avatarcropper = new AvatarCropper_AWS_S3();
$file_relative_path = $_POST[‘file_relative_path’];
$file = $avatarcropper->get_file($file_relative_path);
$avatarcropper->download($file);

// Do manipulation of the file
// …

// Upload the file again to S3
$avatarcropper->upload($file);

// ————————————————–

// Step 3: get the $file from the request and download it, and then save it
$avatarcropper = new AvatarCropper_AWS_S3();
$file_relative_path = $_REQUEST[‘file_relative_path’];
$file = $avatarcropper->get_file($file_relative_path);
$avatarcropper->download($file);

// Save it, whatever that means
// …

Displaying The File Directly From S3

If we want to display the intermediate state of the file after manipulation on step 2 (e.g. the user avatar after cropped), then we must reference the file directly from S3; the URL couldn’t point to the file on the server since, once again, we don’t know which server will handle that request.

Below, we add function get_file_url($file) which obtains the URL for that file in S3. If using this function, please make sure that the ACL of the uploaded files is “public-read”, or otherwise it won’t be accessible to the user.

abstract class AWS_S3 {

// Continue from above…

protected function get_bucket_url() {

$region = $this->get_region();

// North Virginia region is simply “s3”, the others require the region explicitly
$prefix = $region == ‘us-east-1’ ? ‘s3’ : ‘s3-‘.$region;

// Use the same scheme as the current request
$scheme = is_ssl() ? ‘https’ : ‘http’;

// Using the bucket name in path scheme
return $scheme.’://’.$prefix.’.amazonaws.com/’.$this->get_bucket();
}

function get_file_url($file) {

return $this->get_bucket_url().$this->get_file_relative_path($file);
}
}

Then, we can simply we get the URL of the file on S3 and print the image:

printf(
“<img src=’%s’>”,
$avatarcropper->get_file_url($file)
);

Listing Files

If in our application we want to allow the user to view all previously uploaded avatars, we can do so. For that, we introduce function get_file_urls which lists the URL for all the files stored under a certain path (in S3 terms, it’s called a prefix):

abstract class AWS_S3 {

// Continue from above…

function get_file_urls($prefix) {

$s3Client = $this->get_s3_client();

$result = $s3Client->listObjects(array(
‘Bucket’ => $this->get_bucket(),
‘Prefix’ => $prefix
));

$file_urls = array();
if(isset($result[‘Contents’]) && count($result[‘Contents’]) > 0 ) {

foreach ($result[‘Contents’] as $obj) {

// Check that Key is a full file path and not just a “directory”
if ($obj[‘Key’] != $prefix) {

$file_urls[] = $this->get_bucket_url().$obj[‘Key’];
}
}
}

return $file_urls;
}
}

Then, if we are storing each avatar under path “/users/${user_id}/“, by passing this prefix we will obtain the list of all files:

$user_id = get_current_user_id();
$prefix = “/users/${user_id}/”;
foreach ($avatarcropper->get_file_urls($prefix) as $file_url) {
printf(
“<img src=’%s’>”,
$file_url
);
}

Conclusion

In this article, we explored how to employ a cloud object storage solution to act as a common repository to store files for an application deployed on multiple servers. For the solution, we focused on AWS S3, and proceeded to show the steps needed to be integrated into the application: creating the bucket, setting-up the user permissions, and downloading and installing the SDK. Finally, we explained how to avoid security pitfalls in the application, and saw code examples demonstrating how to perform the most basic operations on S3: uploading, downloading and listing files, which barely required a few lines of code each. The simplicity of the solution shows that integrating cloud services into the application is not difficult, and it can also be accomplished by developers who are not much experienced with the cloud.

Smashing Editorial
(rb, ra, yk, il)

Creative Package Designs For Bottles & Jars You Have To See

Original Source: https://www.hongkiat.com/blog/bottles-jars-creative-packaging/

The goal of any package design is to be unique and to differentiate itself from competitors. A bottle or jar can be somewhat of a white canvas for creative package designers. It’s a space for…

Visit hongkiat.com for full content.