Picture perfect photography: Discover Luminar’s Erase and Clone & Stamp tools

Original Source: http://feedproxy.google.com/~r/CreativeBloq/~3/2UnKduPcHrI/luminar-erase-clone-stamp-tool

You’re just about to capture the perfect picture when, out of nowhere, someone walks into the shot. Or you’ve nailed the perfect landscape scene, only to notice an ugly road sign in the way. We’ve all experienced the annoyance and frustration of an otherwise perfect picture being spoilt by unwanted objects in the background. Good news is there’s now a quick and even simpler way to remove them. 

Introducing Luminar 4’s Clone & Stamp and Erase tools. 

The Clone & Stamp tool works in the same way as a regular clone tool, and is particularly effective on repeating patterns, fine details and man-made objects. Getting the tones and colours to match when using a clone tool is a well-known challenge, but this is where Luminar 4’s secret weapon – the Erase tool – excels. 

The Erase tool removes objects intelligently, taking textures, patterns and tones from the surrounding image to cover up the object you want to remove automatically. The majority of the time, results are immediate and spot-on. However, a trickier subject will often require some fine tweaking. Let’s take a look at exactly how both of these tools work…

5 simple steps to remove objects from a photo

Skylum Luminar 4

01. Prep your image

Luminar’s Erase tool creates a composite layer from all the already existing image layers, so it’s important to make any exposure adjustments beforehand. Any tweaks or changes made after the Erase tool has been applied won’t show up. 

Skylum Luminar 4

02. Select the Erase tool

In the main Luminar interface, select the Canvas workspace via the button towards the top-right corner. Here you’ll find all manner of useful tools, including Clone & Stamp and Crop & Rotate and, the one you’re looking for, the Erase tool. Select it, and a new layer will be created.

Skylum Luminar 4

03. Erase an object

Once selected, you will see the Erase tool consists of a circular brush, with an adjustable slider to choose its size. Using the brush, simply paint over the object you want to remove. Don’t worry too much about being exact, but try to avoid the background as much as possible. 

Skylum Luminar 4

04. Remove multiple objects

The Erase tool allows you to remove many objects at the same time. Simply release the brush, alter the size to suit and paint over anything you want to get rid of.

Skylum Luminar 4

05. Clean up

When you have finished painting with the Erase tool and are happy with your selection, click ‘Done’. Use the visibility toggle in the layers panel to see the difference. If the results aren’t right the first time, you can try again on any problem areas, or alternatively use Luminar’s Clone & Stamp tool to make manual repairs…

How to use the Clone & Stamp tool

Skylum Luminar 4

Click top right corner of image to enlarge 

While Luminar’s Erase tool does a fantastic job of removing unwanted objects, more trickier, busy shots might need a bit of fine tuning. This is where the Clone & Stamp tool comes in really handy. Here’s how to make the most of this powerful feature.

01. Create a Clone & Stamp layer

Just like with the Erase tool, selecting the Clone & Stamp feature will create a new composite layer to work on.

02. Clone target area

To start, select the clone source and then paint over the area in need of repair. Press Alt (Option)-click to select a new clone source. 

03. Brush size

The clone brush sizes can be changed to suit using the menu on the top toolbar, or right-click on the image to reveal the brush properties panel. 

04. Brush sensitivity

You can also adjust a brush's soft and hardness options here. A hard brush tends to work well on hard edges, whereas a soft brush is better for blending in areas of softer, shaded areas.

05. Reduce the opacity

For really complex areas, which are proving troublesome, try reducing the opacity and using a larger soft brush to help disguise obvious repairs. 

06. Review

Once finished, click ‘Done’ to generate the Clone & Stamp layer, which you can review or make more repairs on at a later date. 

Get your copy of Skylum Luminar 4 today

Want to give Luminar 4 a go? Right now you can download a free seven-day trial via the Skylum website. Available on both macOS and Windows, should you decide to buy, be sure to use our exclusive discount code CB to save $10/£10 on the regular retail price. 


Eye Vs AI: Harnessing Technology to Successfully Track User Attention

Original Source: https://www.webdesignerdepot.com/2020/07/eye-vs-ai-harnessing-technology-to-successfully-track-user-attention/

Attention is the new gold; brands are in a constant competition for our attention.

A big portion of our time we spend online, where we are bombarded with insane amounts of information and advertisements. It’s hard not to become overwhelmed in this world of consumerism. We have had to become good at quickly evaluating which information is important, especially on the internet.

Good marketing specialists know that they have mere seconds to turn a potential customer into a lead. People are not going to spend a lot of time examining your advertisement or landing page, either it clicks or not. Moreover, most users do not read the articles, they scan them. First impression plays a huge role in the success of your business, so do not leave that to a chance.

You really don’t want your customer to ignore that special sale, subscription option, or another call to action on your webpage. That is why you need to know where that gold-worthy attention goes when a user opens your landing page. Here’s where technology can come in handy.

Eye-Tracking in Web Design

It is very important to know where your website visitor’s attention goes first. How to get that info? Eye-tracking is the answer.

Eye-tracking technology can be used to optimize your website conversions. By tracking eye movements, technology will recognize which content is most intriguing for the users. It will reveal whether people pay most attention where you want them to, which elements are distracting or not visible enough, and where sales are lost. This information is invaluable if you want to succeed in the current market.

This information is invaluable if you want to succeed in the current market

How does it work? An eye tracker, such as webcam or goggles, measures movement of an eye. Collected data is analyzed and presented as a heatmap, highlighting which elements of your design attract most attention. Having in mind that browsing time rarely exceeds a few seconds, this information is very valuable when you try to understand your audience.

You wouldn’t want to spend much time on your website design just to discover it does not generate desired conversion rate. By employing this technology you can make changes based on reliable data rather than intuition and guarantee your business future success.

By now you may think that you definitely need to carry out this eye-tracking study, but there is a catch. A high-quality behavioral observation or eye-tracking is a time-consuming, budget eating complicated process.

If you want to draw conclusions from heatmaps, you would need to include at least 39 participants in a study. One individual test may last from 20 minutes to an hour. Time quickly adds up when you include preparation and analysis of the results. The average eye tracker price is around $17,500 and it may vary between several thousand dollars and $50 000. Of course you can hire a company to carry out this research for you but it may cost you several hundred dollars a month. Luckily, technological innovations allow us to acquire the same insights about users’ attention flow much cheaper and faster than conducting or buying an actual eye-tracking study.

Technological innovations replace real eye-tracking study

AI-Powered Automatization of Eye-Tracking

In this task of understanding how internet users are interacting with your website, Artificial Intelligence (AI) seems to be an answer. AI-based technologies already have become prevalent in various services we use on a daily basis. For example, Netflix’s highly predictive algorithm offers viewers personalized movie recommendations. Medical researchers utilize eye tracking to diagnose conditions like Alzheimer’s disease or Autism. As these algorithms become better every year, AI also becomes an irreplaceable tool in business.

Over the years researchers have collected so much data that human behavior becomes really predictable

How can AI help you to understand your customer’s attention? The main feature of AI is that it can mimic human intelligence and constantly improve itself by learning from data. Predictive eye-tracking is based on deep learning and trained with previous eye tracking study data. Over the years researchers have collected so much data that human behavior becomes really predictable. Technology predicts which specific areas of your website attract most interest. In this way, AI enables you to speed up the UX research process and get insights about your design in a matter of seconds.

Too good to be true? There are already several available tools on the market, such as Attention Insight or EyeQuant. These predictive design tools are based on deep learning and trained with previous eye-tracking studies data. Up to date, they have achieved an 84-90% accuracy.

AI-powered attention heatmap

AI solutions for designers and marketers have already become major competitors to traditional eye-tracking studies. Due to active competition, predictive eye-tracking tools are constantly innovating and recently started generating heatmaps for videos. Another useful feature that provides decision-makers with quantitative data is a percentage of attention. Users can define an object that they want to test and get an exact percentage of attention that the object receives.

Conclusion

Since all digital products are competing for user’s limited attention, it has become one of the most valuable resources. Due to fierce competition, it is not enough to rely on your intuition and gut instinct while making important decisions anymore. Designers have a choice in this economy of attention, though.

Yes, there are eye-tracking studies that require a significant amount of time and financial resources.

However, you can make user-centric, data-driven decisions in a quick, scalable, and private way while your product is still under development. AI-powered predictive eye-tracking tools might be an answer. Attention is a new currency, and you must measure it.

Source

p img {display:inline-block; margin-right:10px;}
.alignleft {float:left;}
p.showcase {clear:both;}
body#browserfriendly p, body#podcast p, div#emailbody p{margin:0;}

30+ Cool Biking Gadgets For Avid Cyclists

Original Source: https://www.hongkiat.com/blog/gadgets-for-cyclists/

There’s no doubt about it: cycling is in! Whether for commuting, recreation or sport, it seems that just about everyone is riding some sort of bicycle these days. But in this…

Visit hongkiat.com for full content.

Why We Moved a 20-Year-Old Site to Gatsby

Original Source: https://www.sitepoint.com/our-gatsby-redesign/?utm_source=rss

We knew we had a problem.

In 2019, SitePoint was getting Lighthouse Speed scores under 10 on mobile, and between 20 and 30 on desktop.

Our efforts to control UX bloat were failing in the wake of a publishing business environment that sprang new leaks just as we’d finished temporarily plugging the last one. Our reliance on advertising, controlled by external parties, was a major obstacle to improved site performance. Our traffic growth had turned into decline.

On a site that provided people with a place to come and learn to code with best practices, this was not a good look. And it wasn’t a site we could feel proud of, either.

To make matters worse, operational bottlenecks had arisen that made adaptation a tricky logistical business. Our team was struggling to make changes to the site: having focused on our Premium experience for several years, we were down to one developer with WordPress and PHP experience. To test out code changes, the team would have to wait in a queue to access our staging server.

It wasn’t energizing work for anyone, and it certainly wasn’t efficient.

It was time to make some changes, and we set out to look for a solution. After a lot of research, we decided that Gatsby would be a great fit for our team. It would play to our talent strengths, help us solve all of the issues we had identified, and allow us to keep using WordPress for the backend so the editorial process wouldn’t need to change.

Why We Moved to Gatsby

SitePoint 2020 Redesign

The end result.

Early in the research process, Gatsby started to look like a serious frontrunner. SitePoint isn’t a small site, so we knew that the tech we chose had to be able to handle some pretty intense demands. Gatsby checked all of our boxes:

We could code everything in React, a tech that every member of the front-end team knows and uses daily.
Gatsby is super fast at its core — performance was at the heart of this project, and we could start from a good footing.
The entire site is rendered as static, which would be great for SEO.
We could build it as a new project, which meant no worrying about the existing codebase, which brought a huge amount of legacy code with it.
We could use Gatsby Cloud, allowing the team to get feedback on the build at any time just by pushing the branch to GitHub.
DDoS attacks on WordPress wouldn’t cause us issues, as the front-end is completely stand-alone.

More Maintainable CSS with styled-components

Since we were going to rebuild the site from scratch, we planned to make some design changes at the same time. To help with this work we decided to use styled-components.

styled-components keeps the site’s styling easy to maintain, and we know where to look when we want to change the style of something — the style is always with the component.

How We Made the Build Happen

We started by following Gatsby’s basic docs and pulling in our posts with the gatsby-source-wordpress plugin.

This was a big initial test for us: we had to see if it was even possible to use Gatsby for our site.

After 20 years of blogging, we have over 17,000 posts published. We knew the builds would take a long time, but we had to find out if Gatsby could deal with such a massive amount of content. As you’ve probably figured, the test delivered good news: Gatsby works.

A quick tip for other teams working with large sites: to make development a better experience, we used environment vars to prevent Gatsby from fetching all of the site’s posts in development. There’s nothing quite like a 60 minute hot reload to slow progress.

if (hasNextPage && process.env.NODE_ENV != “development”) {
return fetchPosts({ first: 100, after: endCursor });
}

From this point, we ran into some limitations with the WordPress source plugin. We couldn’t get all the data we needed, so we moved to the WordPress GraphQL plugin.

We use Yoast to set our metadata for SEO, and had to ensure we were pulling in the correct information. We were able to do this with WordPress GraphQL. By doing it this way, the content team could still edit metadata the same way, and the data would still be dynamic and fetched on each build.

During the build, we would have three or four people in the team working on parts of the new blog. In the past, if they wanted to get feedback they’d have to push to our staging server and make sure nobody was already using it.

We found that Gatsby Cloud was a great solution to this issue. Now when someone pushes to a branch in GitHub, it creates a build in Gatsby Cloud along with a preview link. Our developers could share this link and get immediate testing and feedback much more effectively than before.

This faster feedback cycle made it easy to have multiple people on the team working on the build and put an end to a major bottleneck.

Launch Day Fun

On the big day, we launched the new site and ran through our initial tests. The new blog was flying — every page load felt instant.

We ran into some problems on SitePoint Premium, which started running into slows and even crashes. The culprit was a new element on blog pages that pulled in the popular books people were currently reading. It would do this via a client-side API call, and it was too much for Premium to handle due to the amount of traffic we get on the blog side.

We quickly added some page caching to the API to temporarily solve the issues. We realized we were doing this wrong — we should have been sourcing this data at build time, so that the popular books are already loaded when we serve the page to the user.

This is the main mindset shift you need to make when using Gatsby: any data that you can get at build time should be fetched at build time. You should only use client-side API calls when you need live data.

Once we’d re-written the API call to happen during the build, the first load of a blog page was even quicker — and Premium stopped crashing.

What We Still Need to Solve

While it’s hard to overstate how much better our on-site experience is today, there are still a few pain points we need to solve.

If a new article is published, or if content is updated — as it is multiple times per day — we need to re-run the Gatsby build before these changes show up.

Our solution for that right now is a simple cron job that runs at pre-scheduled times over the course of a day. The long-term solution to this is to add a webhook to the WordPress publish and update button, so that a new build is triggered once pressed.

We also need to get incremental builds running. Right now, the entire site needs to be rebuilt each time, and given our content archive, this can take a while. Gatsby just introduced incremental builds as we went live, and we’re working on implementing this on our site. Once that’s set up our builds will be much faster if the only thing that has changed is content.

Our speed score is still not where we want it to be. While the site feels subjectively very fast, we are still not getting consistent scores in Lighthouse. We want to get both mobile and desktop into the green zone (scores of 90+) for optimal user experience and SEO.

Would We Do It Again?

A launch of this type would normally be a pretty nerve-wracking event, and take a lot of work from the team on launch day.

With Gatsby, our launch was really easy. We just had to move WordPress onto a new domain, and point sitepoint.com at the Gatsby version of the site.

Then we sat back and watched the numbers to see what happened to our traffic. Within a few days, the data was starting to come in and we were seeing a 15% increase in traffic. User engagement metrics were up across the board. And we hadn’t even removed our ads yet (which, you may have noticed, we’ve since done).

It’s not hard to figure out why the effects were so immediate. We had better SEO running on static HTML and CSS pages, and massive speed improvements made possibly by the move to Gatsby.

Since we made the move, we’ve increased our Lighthouse speed scores from 6-15 on mobile to the 50-60 range, and from the 30s on desktop into the 70s. We wanted to ensure speed remained top of mind with this change, so we’re using a great tool called Calibre that runs speed tests over a number of top pages each day and alerts us to the scores. We are using this tool to continue to improve our score, so I hope to have another article for you in three months when we get everything to stay in the 90+ range.

The team loves working in Gatsby. The blog codebase was something that nobody wanted to work on. Now, everyone wants to take those cards thanks to the great developer experience.

If you’ve been eyeing a move to Gatsby and wondering if it’s ready for prime time, take our advice — it’s worth the switch.

Continue reading
Why We Moved a 20-Year-Old Site to Gatsby
on SitePoint.

Computerist-inspired Illustrations

Original Source: http://feedproxy.google.com/~r/abduzeedo/~3/hmOm-hlcNbc/computerist-inspired-illustrations

Computerist-inspired Illustrations

AoiroStudio07.08.20

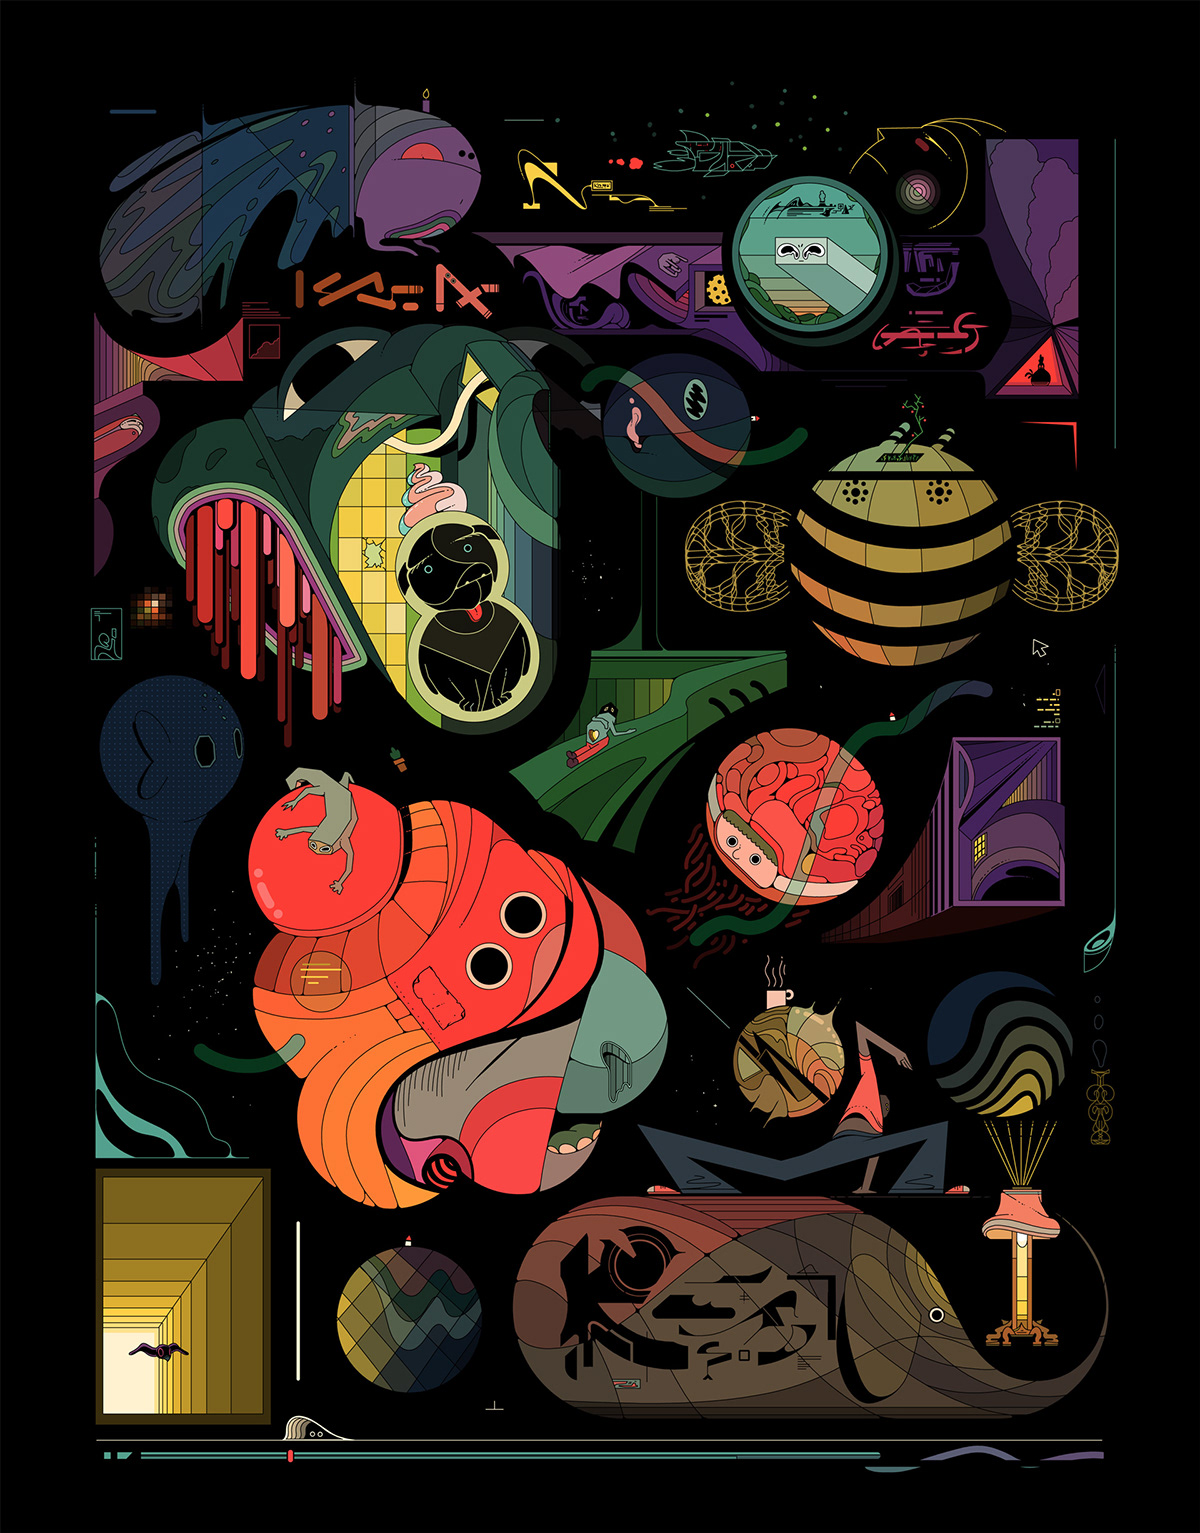
Ada Zielińska is an artist based in Warszawa, Poland. She has shared a series of commissioned & personal illustrations from the past year until now. These illustrations caught my attention of its retro aesthetics that would trigger memories from the ‘Omni Magazine’ days. Where science and fiction came together to combine and share knowledge for its readers. This is pure futurism and I really dig them. What do you think?

Links

https://www.behance.net/adazielinska
https://www.instagram.com/zielinska.ada/


FORK – Surreal Journey Interrogating our Perception

Original Source: http://feedproxy.google.com/~r/abduzeedo/~3/IhPdK7g8Iq4/fork-surreal-journey-interrogating-our-perception

FORK – Surreal Journey Interrogating our Perception
FORK - Surreal Journey Interrogating our Perception

abduzeedo07.07.20

In a museum, a woman looking at a Fork exhibited as a piece of Art let her imagination run wild. The film is a surreal journey interrogating our perception of objects. What happens when you take an object from daily life and move it outside of its original context? What is left of an object when it loses its function? An abstract shape, a sculpture? Can we deconstruct this object into simple elements and create variation of this object? Can those objects be combined to form a larger structure? Can those objects become alive to break free from human ownership? That’s the synopsis of FORK, a really cool film and motion design project created by the amazing people over at Optical Arts a creative studio based in London. With an experimental approach and a collective spirit we explore new ways to tell visual stories, applying innovative techniques to live action, digital and print.

Director Fabrice Le Nezet:

We choose to work with simple objects, some iconic items everyone could easily recognize. A fork, a stool, a Mug. Because we wanted to play with sculptural forms, we chose objects that are beautiful and elegant with clear volume and silhouette.

Behind the Scenes:

Most of this project was completed in lockdown due to Covid-19 pandemic. This presented its own unique challenges, working remotely for the CGI elements was fairly straightforward, but we had to delay the live action element of the shoot until Government restrictions eased. We kept the crew to a minimum and implemented a strict social distancing of two meters and masks and gloves were worn by all. Planning an extra prellight day to the schedule allowed us to set up the different shots with only essential lighting and camera crew, creating a much less demanding, more efficient and most importantly safe shoot day.

Technical Considerations:

The film has been made using a combination of Maya and Houdini and was rendered in Redshift. All shots were then composed in Nuke and Flame and graded using Resolve.

The procedural approach of Houdini made it the perfect tool to create this project. 

While developing some R&D we were able to quickly sketch ideas and seamlessly test dynamic behaviour. Animation was achieved through a mixture of physic based simulation alongside some more manual bespoke procedural setup.

Credits

Creative Direction & Production: Optical Arts
Direction & Design: Fabrice Le Nezet
Music & Sound Design: Niccolò Chotkowski at Smider
VFX Supervisor: Fabrice Le Nezet
2D Supervisor: Miguel Wratten
3D Artist: Max Johnson
Colourist: Martin Pryor
Live Action Producer: Caroline Kinch
Live Action DP: Joe Jackson
1st Assistant Camera: Elliott Lowe
Set Assistant: Jamie-Lee Harding
Model: Emma Norodom at W Models
Clothing: Studio Nicholson

For more information and to read the full making of I highly recommend that you check out https://opticalarts.studio/fork/


Collective #612

Original Source: http://feedproxy.google.com/~r/tympanus/~3/kkY72bec1W8/

Inspirational Website of the Week: Sennesro

Simplicity, elegance and flowy motion made us pick Sennesro as inspirational website this week.

Get inspired

60 Days of Animation

The Undead Institute offers books on HTML, CSS, Responsive Design and more that marry humor, excellent teaching, and brain-lodging practice for an experience that’ll outlive the apocalypse.

Check it out

Irregular-shaped Links with Subgrid

In this excellent article, Michelle Barker shows how CSS subgrid can solve the problem of irregular, distributed link shapes.

Read it

Our Sponsor
Efficiently build beautiful websites for your clients

You’ve never built a WordPress website like this before. Divi is more than just a WordPress theme, it’s a completely new website building platform that replaces the standard WordPress post editor with a vastly superior visual editor.

Check it out

Stryve

A new community for tech enthusiasts to share, learn, and build their careers.

Check it out

The design systems between us

Ethan Marcotte shares his thoughts on why he believes that design systems haven’t brought rich, cross-functional collaboration to most organizations.

Read it

Understanding Template Literals in JavaScript

Tania Rascia’s in-depth explanation of template literals in JavaScript.

Read it

html.systems

An excellent library of components built with HTML, CSS and JavaScript.

Check it out

3D banners with ScrollTrigger

A supercool GSAP scroll demo with some 3D magic.

Check it out

Getting CSS Translate values with JavaScript

Zell Liew shows how you can get CSS translate values in JavaScript by parsing 2d and 3d matrices.

Read it

Aligning Logo Images in CSS

Ahmad Shadeed tackles the task of taking a group of logos, and exploring many ways to align and position them perfectly in CSS.

Read it

Design Better Buttons

A great read on button design best practices by Andrew Coyle.

Read it

Launching docs.github.com

Jenn Leaver writes about the launch of docs.github.com, a single home for all of GitHub’s product documentation.

Read it

Profiled

With Profiled you can create a developer portfolio from your GitHub account.

Check it out

Is WebP really better than JPEG?

According to Google, WebP is 25 – 34% smaller than JPEG at equivalent quality. But how much of it is really true? Find out in this article by Johannes Siipola.

Read it

Free Faces

A great selection of freely available fonts.

Check it out

CSS Painting vs. CSS Houdini Paint API

Lisi Linhart takes a look at the performance of the Paint API vs. traditional CSS painting.

Read it

Dark Ages of the Web

A fun journey that recaps the old Web features and front-end patterns.

Check it out

I Just Hit $100k/yr On GitHub Sponsors!

Caleb Porzio shares his fascinating story of a successful open source project and the earnings he’s made with its screencasts.

Read it

The Google ‘vs’ Trick

Read how ego graphs can help you learn about AI, play chess, eat healthier, buy a dog and find love.

Read it

From Our Blog
Creating a Menu Image Animation on Hover

A tutorial on how to create a hover effect for a menu where images appear with an animation on each item.

Check it out

From Our Blog
UI Interactions & Animations Roundup #8

A new collection of UI animation shots that summarizes the latest creative trends.

Check it out

From Our Blog
Inspirational Websites Roundup #16

This special collection of wonderful websites will get you up-to-date on current web design trends.

Check it out

The post Collective #612 appeared first on Codrops.

Excellent Ideas to Make Money as a Graphic Designer

Original Source: http://feedproxy.google.com/~r/Designrfix/~3/EotLqcOYkKg/excellent-ideas-to-make-money-as-a-graphic-designer

Image source: Burst.Shopify.com Given the current situation in the world, a lot of people have more time to spend at home. Some take this opportunity to be with their families, while others are looking to make extra money. While there are a lot of industries that have to stop or become limited, those who work […]

The post Excellent Ideas to Make Money as a Graphic Designer appeared first on designrfix.com.

Earning Made Easy in 2020 With ClickFunnels

Original Source: http://feedproxy.google.com/~r/Designrfix/~3/jUCWlbRXSTo/earning-made-easy-in-2020-with-clickfunnels

Starting a company was never easy, but now if they are not online, they practically don’t exist. If you are stressing over your startup or are trying to figure out the ins and outs of how to establish your presence online, ClickFunnels are just what you are looking for. ClickFunnels helps business owners with the […]

The post Earning Made Easy in 2020 With ClickFunnels appeared first on designrfix.com.

Power and portability: The laptop changing the game for 3D artists

Original Source: http://feedproxy.google.com/~r/CreativeBloq/~3/7ZY0fekA3eo/zenbook-pro-duo-3d-artists

If you are a 3D artist, chances are your studio will include at least a large workstation, multiple monitors and a graphics tablet. The hardware required to create show-stopping 3D art doesn’t exactly lend itself to working on the go. Until now. 

Introducing the blisteringly powerful, dual screen Asus ZenBook Pro Duo laptop. 

The foundation of any workstation is the processing power, and this is where the Zenbook excels. Under the hood of this amazing device you’ll find an Intel Core i9 CPU and NVIDIA RTX 2060 GPU, providing all the power to support the most complex of 3D tasks at speed. 

A creative game-changer

But all the processing power in the world is next to useless unless you can harness it properly, and this is where the ZenBook Pro Duo really shines. This laptop has been specifically designed to help 3D and digital artists make the most of the immense power that lies beneath its equally impressive-looking exterior. 

Built into the ZenBook Pro Duo are not one but two 4K screens, both of which are touch sensitive and colour accurate. The glossy main OLED display is beautifully crisp, but it’s the second screen that really makes this device a game-changer for digital and 3D artists. 

Located at the top of the lower half of the device, the second screen boasts a paper-like finish that works wonderfully with the stylus included. A 3D artist’s workflow will often involve working with multiple palettes and keyboard shortcuts. In this case the second screen is ideal for docking these palettes for easy access and to free up the main screen for the perspective viewport.

The extra screen also means the keyboard has moved to the front edge of the laptop’s body and the trackpad to the right. A huge ergonomic improvement over centralised trackpads, the ZenBook Pro Duo puts an end to reaching over the chassis when typing or using keyboard shortcuts, and offers a much more natural workflow. To use the second screen will, however, mean leaning over the keyboard. But Asus has all bases covered with this design, adding an in-built function to simply lock the keys.

Highly portable power

The ZenBook Pro Duo’s unique design and rich feature set makes for a highly intuitive user experience on a truly mobile workstation that doesn’t compromise on power, and, in many cases, excels over that of a desktop experience.

If you are a 3D or digital artist who needs uncompromised power and portability, the Zenbook Pro Duo is the best solution.