Original Source: https://smashingmagazine.com/2024/08/thoughts-after-15-years-spent-ux-design-part2/
In the previous article in my two-part series, I have explained how important it is to start by mastering your design tools, to work on your portfolio (even if you have very little work experience — which is to be expected at this stage), and to carefully prepare for your first design interviews.
If all goes according to plan, and with a little bit of luck, you’ll land your first junior UX job — and then, of course, you’ll be facing more challenges, about which I am about to speak in this second article in my two-part article series.
In Your New Junior UX Job: On the Way to Grow
You have probably heard of the Pareto Rule, which states that 20% of actions provide 80% of the results.
“The Pareto Principle is a concept that specifies that 80% of consequences come from 20% of the causes, asserting an unequal relationship between inputs and outputs. The principle was named after the economist Vilfredo Pareto.”
— “The Pareto Principle, a.k.a. the Pareto Rule”
This means that some of your actions will help you grow much faster than others.
But before we go into the details, let’s briefly consider the junior UX designer path. I think it’s clear that, at first, juniors usually assist other designers with simple but time-consuming tasks. Then, the level of complexity and your responsibilities start increasing, depending on your performance.
So, you got your first design job? Great! Here are a few things you can focus on if you want to be growing at a faster pace.
Chase For Challenges
The simple but slow way to go is to do your work and then wait until your superiors notice how good you are and start giving you more complex tasks. The problem is that people focus on themselves too much.
So, to “cut some corners,” you need to actively look for challenges. It’s scary, I know, but remember, people who invented any new groundbreaking UX approach or a new framework you see in books and manuals now used their intuition first. You have the whole World Wide Web full of articles and lectures about that. So, define the skill you want to develop, spend a day reading about this topic, find a real problem, and practice. Then, share what you did and get some feedback. After a few iterations, I bet you will be assigned the first real task for your practice!
Use Interfaces Consciously
Take the time to look again at the screenshot of the Amazon website (from Part One):
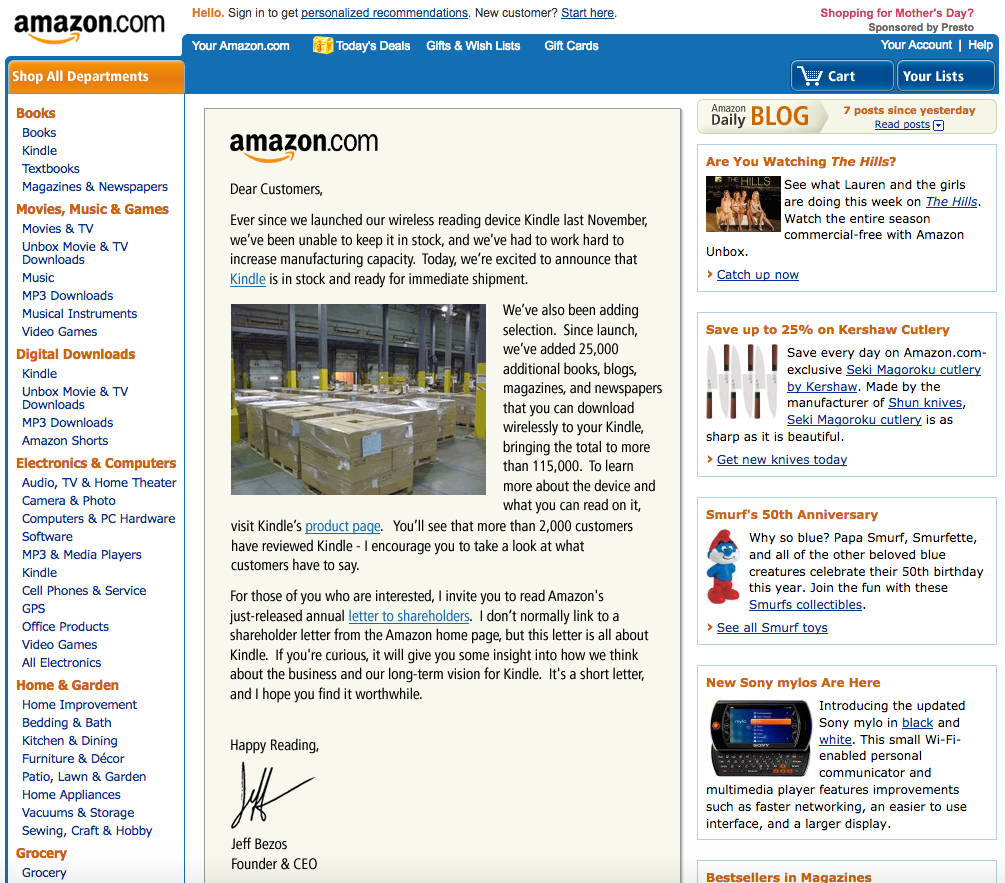
User interfaces didn’t appear in their present form right from the start. Instead, they evolved to their current state over the span of many years. And you all were part of their evolution, albeit passively — you registered on different websites, reset your passwords quite a few times, clicked onboarding screens, filled out short and long web forms, used search, and so on.
In your design work, all tasks (or 99% of them, at least at the beginning) will be based on those UX patterns. You don’t need to reinvent the bicycle; you only need to remember what you already know and pay attention to the details while using the interfaces of the apps on your smartphone and on your computer. Ask yourself:
Why was this designed this way?
What is not clear enough for me as a user?
What is thought out well and what is not?
All of today’s great design solutions were built based on common sense and then documented so that other people can learn how to re-use this knowledge. Develop your own “common sense” skill every day by being a careful observer and by living your life consciously. Notice the patterns of good design, try to understand and memorize them, and then implement and rethink them in your own work.
I can also highly recommend the Smart Interface Design Patterns course with Vitaly Friedman. It provides guidelines and best practices for common components in modern interfaces. Inventing a new solution for every problem takes time, and too often, it’s just unnecessary. Instead, we can rely on bulletproof design patterns to avoid issues down the line. This course helps with just that. In the course, you will study hundreds of hand-picked examples, from complex navigation to filters, tables, and forms, and you will work on actual real-life challenges.

Learn How to Present Your Work
The ability to convey complex thoughts and ideas in the form of clear sentences defines how effectively you will be able to interact with other people.
This is a core work skill — a skill that you’ll be actually using your whole life, and not only in your work. I have written about this topic in much detail previously:
“Good communication is about sharing your ideas as clearly as possible.”
— “Effective Communication For Everyday Meetings” (Smashing Magazine)
In my article, I have described all the general principles that apply to effective communication, with the most important being: to develop a skill, you need to practice.
As a quick exercise, try telling your friends about the work you do and not to be boring while explaining the details. You will feel that you are on the right track if they do not try to change the topic and instead ask you additional questions!
Gather Feedback
Don’t wait for your yearly review to hear about what you were doing right and wrong. Ask people for feedback and suggestions, and ask them often.
To help them start, first, tell them about your weak side and ask them to tell you their own impressions. Try encouraging them to expand their input and ask for recommendations on how you could fix your weaknesses. Don’t forget to tell them when you are trying to apply their suggestions in practice. After all, these people helped you become better, so be thankful.
Learn Business
I see a lot of designers trying to apply all of their experience to every project, and they often complain that it doesn’t work — customers refuse to follow the entire classical UX process, such as defining User Personas, creating the Information Architecture (IA), outlining the customer journey map, and so on. Sometimes, it happens because clients don’t have the time and budget for it, or they don’t see the value because the designer can’t explain it in a proper way.
But remember that many great products were built without using all of today’s available and tested UX approaches &mdahs; this doesn’t mean those approaches are useless. But initially, there was only common sense and many attempts to get better results, and only then did someone describe something as a working approach and specify all the details. So, before trying to apply any of these UX techniques, think about what you need to achieve. Is there any other way to get there within your time and budget?
Learn how the business works. Talk to customers in business language and communicate the value you create and not the specific approach, framework, or tool that you’ll be using.
“Good UX design is where value comes into the picture. We add value when we transform a product or service from delivering a poor experience to providing a good experience.”
— “The Value of Great UX,” by Jared Spool
Learn How to Make Interfaces Nice-looking
Yes, user experience should be first, but let’s be honest — we also love nice things! The same goes for your customers; they can’t always see the UX part of your work but can always say whether the interface is good-looking. So, learn the composition and color theory, use elegant illustrations and icons, learn typography, and always strive to make your work visually appealing. Some would say that it’s not so important, but trust me, it is.
As an exercise, try to copy the design of a few beautifully looking interfaces. Take a look at an interface screen, then close it and try to make a copy of it from memory. When you are done, compare the two and then make a few more adjustments in order to have as close a copy of the interface as possible. Try to understand why the original was built the way it is. I bet this process of reproducing an interface will help you understand many things you haven’t been noticing before.
Save the People’s Time and Efforts
Prepare to get some new tasks in advance. Create a list of questions, and don’t forget to ask about the deadlines. Align your plan and the number of iterations so people know precisely what and when to expect from you. Be curious (but not annoying) by asking or sending questions every few hours (but try to first search for the answers online). Even if you don’t find the exact answer, it’ll help you formulate the right questions better and get a better view of the “big picture.” Remember, one day, you will get a task directly from the customer, so fetching the data you need to complete tasks correctly is an excellent skill to develop.
Structurize Your Knowledge and Create a Learning Plan
When you are just beginning to learn, too many articles about UX design will look like absolute “must-reads” to you. But you will drown in the information if you try to read them all in no particular order. Better, instead of just trying to read everything, try first to find a mentor who will help you build a learning plan and will advise you along the way.
Another good way to start is to complete a solid UX online course. If you can’t, take the learning program of any popular UX course out there and research the topics from the course’s list one by one. Also, you can use such a structured list (going from easier to more complex UX topics) for filtering articles you are going to read.
There are many excellent courses out there, and here are a few suggestions:
“Selection of free UX design courses, including those offering certifications,” by Cheshta Dua
In this article, the author shares a few free UX design courses which helped her get started as a UX designer.
“Best free UX design courses — 2024,” by Cynthia Vinney (UX Design Institute)
This is a comparison of a few free UX design courses, both online and in-person.
“The 10 Best Free UX Design Courses in 2024,” by Rachel Meltze (CareerFoundry)
A selection of free UX design courses — using these you can learn the fundamentals of UX design, the tools designers use, and more about the UX design career path.
“The HTML/CSS Basics (.dev),” by Geoff Graham
The Basics is an excellent online course that teaches the basic principles of front-end development. It’s a good “entry point” for those just coming into front-end development or perhaps for someone with experience writing code from years ago who wants to jump into modern-day development.
Practice, Practice, Practice
Bruce Lee once said:
“I fear not the man who has practiced 10,000 kicks once, but the man who has practiced one kick 10,000 times.”
— Bruce Lee
You may have read a lot about some new revolutionary UX approaches, but only practicing allows you to convert this knowledge into a skill. Our brain continually works to clear out unnecessary information from our memory. Therefore, actively practicing the ideas and knowledge that you have learned is the only way to signal to your brain that this knowledge is essential to be retained and re-used.
On a related note, you will likely remember also the popular “10,000-hour rule,” which was popularized by Malcolm Gladwell’s bestseller book Outliers).
As Malcolm says, the rule goes like this: it takes 10,000 hours of intensive practice to achieve mastery of complex skills and materials, like playing the violin or getting as good as Bill Gates at computer programming. Turns out, practice is important, and it’s surprising how much time and effort it may take to master something complicated. But later research also suggests that someone could practice for thousands of hours and still not be a master performer. They could be outperformed by someone who practiced less but had a teacher who showed them just what to focus on at a key moment in their practice.
So, remember my advice from the previous section? Try to find a mentor because, as I said earlier, learning and practicing with a mentor and a good plan will often lead to better results.
Conclusion
Instead of a conclusion (or trying to give you the answer to the ultimate question of life, the universe, and everything), only a few final words of advice.
Remember, there doesn’t exist a single correct way to do things because there are no absolute criteria to define “things done properly.” You can apply all your knowledge and required steps in the classical design process, and the product may fail.
At the same time, someone could quickly develop a minimum viable product (MVP) without using all of the standard design phases — and still conquer the market. Don’t believe me?
The first Apple iPhone, introduced 17 years ago, didn’t have even a basic copy/paste feature yet we all know how the iPhone conquered the world (and it’s not only the iPhone, there are many other successful MVP examples out there, often conceived by small startups). It’s because Apple engineers and designers got the core product design concept right; they could release a product that didn’t yet have everything in it.
So yes, you need to read a lot about UX and UI design, watch tutorials, learn the design theory, try different approaches, speak to the people using your product (or the first alpha or beta version of it), and practice. But in the end, always ask yourself, “Is this the most efficient way to bring value to people and get the needed results?” If the answer is “No,” update your design plan. Because things are not happening by themselves. Instead, we, humans, make things happen.
You are the pilot of your plane, so don’t expect someone else to care about your success more than you. Do your best. Make corrections and iterate. Learn, learn, learn. And sooner or later, you’ll reach success!
Further Reading
A Selection Of Design Resources (Part One, Part Two)
Photoshop CS Down & Dirty Tricks, a book by Scott Kelby
Bestselling author Scott Kelby shares an amazing collection of Photoshop tricks, including how to create the same exact effects you see every day in magazines, at the movies, on the Web, and more. These are real-world techniques, the same ones you see used by leading Photoshop photographers, designers, and special effect masters.
“Why Designers Aren’t Understood,” by Vitaly Friedman (Smashing Magazine)
How do we conduct UX research when there is no or only limited access to users? Here are some workarounds to run UX research or make a strong case for it. (This article is an upcoming part of the “Smart Interface Design Patterns.” — Editor’s Note)
“UXchallenge,” by Yachin You
This website will help you learn how to solve real problems that customers face and present case studies that are related to these problems.
“Kano analysis: The Kano model explained” (Qualtrics)
Kano analysis (also known as the “Customer Delight vs. Implementation Investment” approach) is a tool that helps you enhance your products and services based on customer emotions. This guide will help you understand what is Kano analysis and how you can use it in practice.
“Kano Model: What It Is & How to Use It to Increase Customer Satisfaction” (Userpilot)
The Kano model uses quick and powerful data analysis to design your product roadmap. In this article, you will learn a brief history of the Kano model, a practical explanation of how it works, five categories of potential customer reactions to new features, and a four-step process for effective Kano analysis.
“The Pareto Principle” (Investopedia)
The Pareto Principle is a concept that specifies that 80% of consequences come from 20% of the causes, asserting an unequal relationship between inputs and outputs. Named after the economist Vilfredo Pareto, this principle serves as a general reminder that the relationship between inputs and outputs is not balanced. The Pareto Principle is also known as the Pareto Rule or the 80/20 Rule.
“Figma Portfolio Templates & Examples” (UX Crush)
A curated selection of portfolio templates for Figma Design.
“How to Define a User Persona,” by Raven Veal (CareerFoundry)
As you break into a career in UX, user personas are one tool you’ll certainly want to have available as you gather user research and find design solutions to solve problems and create more human-friendly products and experiences.
“How to design a customer journey map,” by Emily Stevens (UX Design Institute)
A customer journey map is a visual representation of how a user interacts with your product. This detailed guide will teach you how to create such a customer journey map.
“Building Components For Consumption, Not Complexity” (Part 1, Part 2),” by Luis Ouriach (Smashing Magazine)
In this two-part series of articles, Luis shares his experience with design systems and how you can overcome the potential pitfalls, starting from how to make designers on your team adopt the complex and well-built system that you created to what are the best naming conventions and how to handle the auto-layout of components, indexing/search, and more.
“Effective Communication For Everyday Meetings,” by Andrii Zhdan (Smashing Magazine)
Before any meeting starts, we often have many ideas about what to say and how it should go. But when the meeting happens, reality may “crash” all of our plans. This article is about conducting productive meetings. The author will give you a step-by-step guide on preparing a solid meeting structure that will let you follow the original plan and reach the meeting goals.
“The Value of Great UX,” by Jared Spool
This crossover from poor UX design to good UX design is where value comes into the picture. We add value when we transform a product or service from delivering a poor experience to providing a good experience.
“How Designers Should Ask For (And Receive) High-Quality Feedback,” by Andy Budd (Smashing Magazine)
Designers often complain about the quality of feedback they get from senior stakeholders. In this article, Andy Budd shares a better way of requesting feedback: rather than sharing a linear case study that explains every design revision, the first thing to do would be to better frame the problem.
“Designing A Better Design Handoff File In Figma,” by Ben Shih (Smashing Magazine)
Practical tips to enhance the handoff process between design and development in product development, with provided guidelines for effective communication, documentation, design details, version control, and plugin usage.
“The HTML/CSS Basics (.dev),” by Geoff Graham
The Basics is an online course that teaches the basic principles of front-end development, focusing specifically on HTML and CSS. A good “entry point” for those just coming into front-end development and perhaps for someone with experience writing code years ago who wants to jump into modern-day development.
“Selection of free UX design courses, including those offering certifications,” by Cheshta Dua
In this article, the author shares a few free UX design courses that helped her get started as a UX designer.
“Best free UX design courses — 2024,” by Cynthia Vinney (UX Design Institute)
Check this comparison of several free UX design courses currently on the market, both online and in-person.
“The 10 Best Free UX Design Courses in 2024,” by Rachel Meltze (CareerFoundry)
A selection of free UX design courses where you can learn the fundamentals of UX design, the tools designers use, and the UX design career path. This guide provides a range of courses, from micro-tutorials to full-featured UI/UX courses.
“Researcher Behind ‘10,000-Hour Rule’ Says Good Teaching Matters, Not Just Practice,” by Jeffrey Young (EdSurge Magazine)
It takes 10,000 hours of intensive practice to achieve mastery of complex skills and materials, like playing the violin or getting as good as Bill Gates at computer programming. Turns out, a study also shows that there’s another important variable that Gladwell originally didn’t focus on: how good a student’s teacher is.
“An Apple engineer details why the first iPhone didn’t have copy and paste,” by Filipe Espósito (9to5Mac)
Apple introduced the first iPhone 17 years ago, and a lot has changed since then, but it’s hard to believe that long ago, the iPhone didn’t even have copy-and-paste options. Now, former Apple software engineer Ken Kocienda has revealed details about why the first iPhone didn’t have such features.
“Fifteen examples of successful MVPs,” Ross Krawczyk (RST Software)
Startups need to get their products to the market faster than ever in an increasingly competitive world. The minimum viable product is the way to achieve this, but you must be really able to provide the right key features that give value to a wide customer base in order to attract clients and investors on time.