Simplify The Handoff From Sketch To Visual Studio Code With Indigo.Design
Original Source: https://www.smashingmagazine.com/2019/07/handoff-sketch-indigo-design/
Simplify The Handoff From Sketch To Visual Studio Code With Indigo.Design
Simplify The Handoff From Sketch To Visual Studio Code With Indigo.Design
Suzanne Scacca
2019-07-31T14:00:00+02:00
2019-07-31T21:35:22+00:00
(This is a sponsored article.) If you think about it, software teams are a lot like sports teams. While each team member works towards the same exact goal, the role they play and the actions they take are vastly different from one another.
Which is why it’s crucial to have a seamless way of moving the ball from one team member to another.
Unfortunately, the handoff that takes place within software teams isn’t naturally as smooth as what you see on the sports field. And one of the primary reasons for this is the different systems and approaches used to build products.
Designers create pixel-perfect UIs in Sketch, only to have to translate them into a language that developers can use when they build apps in the Visual Studio Code IDE. Without a seamless way to move product designs through the pipeline, these inefficiencies lead to expensive reworks and debugging after an app has been shuttled from designer to developer.
Needless to say, a solution to the Sketch-to-IDE handoff problem has been a long time coming. It’s not that software teams don’t know how to collaborate or communicate well with one another. It’s just that their disparate systems and strategies make the transition from one team to another clunky, time-consuming and error-ridden.
Today, we’re going to look at why this happens and how your agency can fix the problem with two plugins and a prototyping cloud platform from Indigo.Design.
Where Does the Designer-Developer Handoff Go Wrong?
First, what we should really ask is:
Why is the designer-developer handoff such a problem?
Nick Babich recently wrote about how designers go to great lengths to create digital solutions that are perfectly measured and consistently crafted. But design systems don’t fluently translate to development systems.
The more the designer does to an interface, the more they have to actually communicate to a developer. So, it’s not enough to hand over a Sketch design file and leave the developer to run with it. Designers have to provide design specs that explain how all the moving pieces need to be laid out, spaced, styled, colored, engaged with and so on.
It’s been the only way to ensure that an app ends up pixel-perfect in the end. Even then, it still requires a lot of implementation on the part of the developer once they’re inside their IDE.
As you can imagine, this whole process takes a designer a lot of time to do. But without design specs, developers end up having to play a risky guessing game.
Not only that, developers aren’t typically in the habit of coding with HTML and CSS, which is tedious work and only represents the UI. There’s a lot more code behind the scenes that makes a web app work and not all developers are adept at or interested in learning to write the UI markup. When they’re forced into this position, the steep learning curve adds more time to projects and the resulting reworks and debugging sends costs spiraling out of control.
So, really, the designer-developer handoff has become a matter of whose time can we afford to waste?
“
Is it the designer who has to redline everything so the developer knows how to turn the design into reality?
Or:
Is it the developer who has to look at a design, manually measure everything on the screen and hope they get all the specifications right just by eyeballing it?
No one wins in either scenario. And you’re going to eat away at your profit margins in the process.
There may be some agencies who believe that forcing designers and developers to work in the same platform is the best solution. That way, there’s no need to do all of this translation or interpretation during the handoff from Sketch to Visual Studio Code. But that often results in stifled creativity on the part of the designer or a hampered ability to build effective software solutions on the part of the developer.
So, what’s the answer?
Improve The Designer-Developer Handoff With Indigo.Design
It’s not like Indigo.Design is the first platform to try to solve handoff issues for software teams. InVision and Zeplin have both offered up their own solutions.
Each of these platforms have made visual specifications more accessible for developers while consequently improving the efficiency of designer-developer teams. Specifically:
Designers don’t need to mark up the UI anymore as the platforms handle the redlines.
Developers can manually extract the design specs without the designers’ help.
That said, with platforms like InVision and Zeplin, developers still have to inspect each element and manually code it based on the extracted specs. These platforms also have yet to create a seamless bridge between Sketch and Visual Studio Code.
So, if designers and developers want to work as efficiently as possible with one another, Indigo.Design has developed an answer to their problem:
Step 1: Design in Sketch
There’s really only one thing about this phase that has to change for the designer. The app, pages and flow will still be designed as usual within Sketch, using components from the Indigo.Design UI Kit.

An example of what your app might look like in Sketch. (Source: Sketch) (Large preview)
However, there’s no longer any need to compile redlines or specs for the app anymore. Indigo.Design takes care of it for you.
In order to leverage this, your designer has to ditch whatever prototyping system they were using before. With this new streamlined and error-free system, your designer can easily push their designs into the cloud using the Indigo.Design plugin.
This can be accessed under the Plugins menu > Indigo.Design > Publish Prototype:

The Indigo.Design plugin simplifies the publication of prototypes. (Source: Sketch) (Large preview)
There’s no need for the designer to export files and upload into another system for clients to review or developers to work with. They get to stay right where they are to publish the prototype.
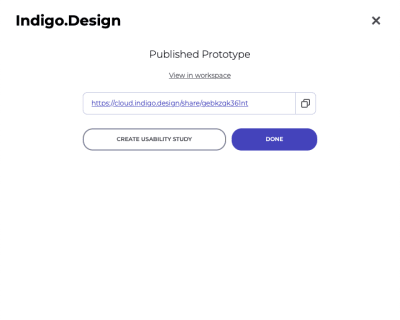
All it takes is one link to move clients, developers and others into the Indigo.Design cloud. (Source: Indigo.Design) (Large preview)
It takes only about a minute to complete the process, too. The designer is then given a link to the cloud which they can share with clients and others to review and comment on the prototype.
Step 2: Work in the Indigo.Design Cloud
To get others into the cloud is easy. The link provided will take them into the experience cloud where the design can be reviewed:

An example of how an app prototype looks in Indigo.Design. (Source: Indigo.Design) (Large preview)
It’s easy to leave comments on top of the design, too. All users have to do is open the Comments panel, drop a pin and attach their comment to it:
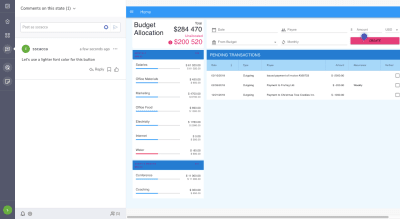
How to leave comments on prototypes in Indigo.Design. (Source: Indigo.Design) (Large preview)
There’s more to this collaboration software than that though. The prototype can also be edited from the cloud.
To access this, the designer, developer and anyone else with group access will locate the project from the prototype library:
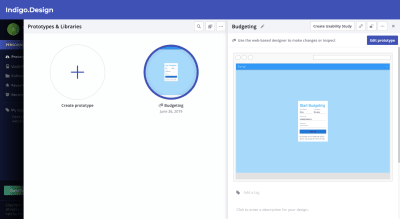
Access to the prototype editor in Indigo.Design. (Source: Indigo.Design) (Large preview)
Click “Edit Prototype” to enter the Indigo.Design editor:

An example of how prototypes appear in the Indigo.Design editor. (Source: Indigo.Design) (Large preview)
Once a screen is selected, the designer can add a hotspot to create a new interaction in the app.
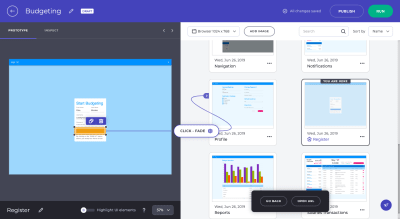
Adding a new interaction to a prototype in Indigo.Design. (Source: Indigo.Design) (Large preview)
You can also use the Indigo.Design editor to inspect the specifications of the app UI:
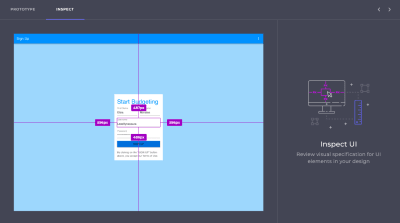
Measuring relative spacing of an app UI in Indigo.Design. (Source: Indigo.Design) (Large preview)
Hovering over an element reveals relative spacing specs. Clicking on an element reveals much more detail:
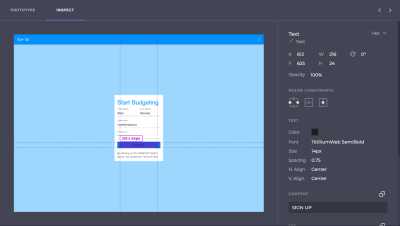
Indigo.Design reveals all specs of the UI in its editor. (Source: Indigo.Design) (Large preview)
The developer can also edit or copy the cleanly written and outputted CSS from this panel, too. (Though they shouldn’t have to, as I’ll explain in the next step.)
See what I mean about saving designers time in generating specs? By simply pushing this design into the Indigo.Design cloud, the specs are automatically generated.
Step 3: Build in Visual Studio Code
Now, let’s say your design is good enough to go into development. The moving of an Indigo.Design prototype to Visual Studio Code is just as easy as the move from Sketch was.
Retrieve the original cloud link provided by the Indigo.Design plugin in Sketch. If you don’t have it anymore, that’s fine. You can retrieve it from the libraries screen in Indigo.Design:
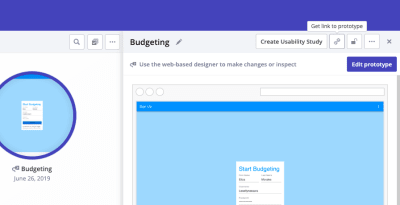
Where to retrieve your Indigo.Design prototype link. (Source: Indigo.Design) (Large preview)
All the developer has to do now is install the Indigo.Design Code Generator extension. This is what enables Visual Studio Code to talk directly to Indigo.Design to retrieve the prototype.
Once the extension is set up, the developer will do the following:
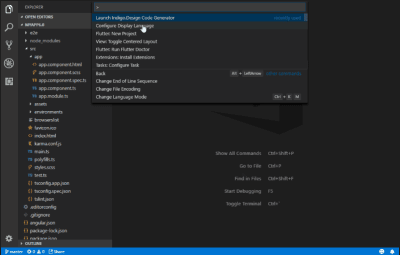
How to launch the Indigo.Design Code Generator in Visual Studio Code. (Source: Visual Studio Code) (Large preview)
Open the app shell that’s already been developed. Then, launch the Indigo.Design Code Generator. This is where you’ll enter the cloud link:
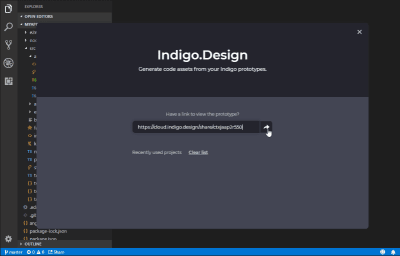
Enter your prototype link into the Indigo.Design Code Generator extension. (Source: Visual Studio Code) (Large preview)
This will reveal a pop-up with the app designs that live in the cloud as well as the individual components they’re comprised of.
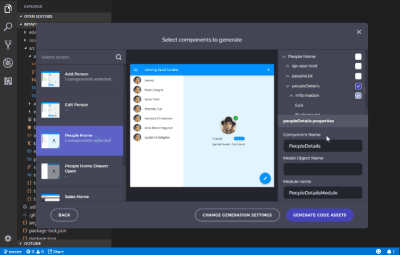
Developers control which components they want to generate code assets for. (Source: Visual Studio Code) (Large preview)
The developer has the option to generate code for all components of the app or to go component-by-component, checking only the ones they need. This is especially helpful if an app is in progress and the developer only needs to import new components into VSC.
By clicking “Generate Code Assets”, the selected components will be added into Angular as readable and semantic HTML and CSS.
The developer now has less to worry about in terms of rebuilding styles or configuring other specs. Instead, they can spend their time building business functionality and really refining the product.
A Note About This Process
It’s important to point out that this Sketch – cloud – Visual Studio Code workflow doesn’t just work with the first iteration of a design. Developers can build while designers work through feedback with clients or usability studies with users — something Indigo.Design has accounted for.
So, let’s say the designer moved a login form UI through Indigo.Design and the developer generated the code to get things moving.
While working on the form, the developer implemented some authentication code in the TypeScript file.
In the meantime, though, the designer received a message from the client, letting them know that a new Universal Login with Google needed to be implemented. Which means the UX has to change.
When the update is ready and the prototype sync’ed to Indigo.Design, the designer messages the developer to let them know about the changes. So, the developer launches the Visual Studio Code Generator once more. However, when regenerating the login screen, they select “Do Not Override” on the TypeScript file. This way, they can preserve the code they wrote while simultaneously importing the new HTML and CSS.
The developer can then make any necessary adjustments based on the updated design.
Wrap-Up
Indigo.Design has effectively created an efficient and bug-free handoff for designers working in Sketch and developers working in Visual Studio Code.
Designers don’t waste time designing in one platform and prototyping in another, drawing up design specs or dealing with file exports. Developers don’t waste time trying to re-create the design intent from a static file.
As Jason Beres, the Senior VP of Product Development for Indigo.Design, said:
With Indigo.Design code generation, all of these bugs are 100% avoided. Not only is the spirit of the design maintained, but pixel-perfect HTML and CSS is created so the developer isn’t in the unfortunate position of having to manually match the design.
And by working out the technical kinks in the designer-developer workflows and handoff, your agency will greatly reduce the cost of reworks and debugging. You’ll also boost profits by providing your software team with a more efficient and quicker way to get apps through the process and in pixel-perfect condition.

(yk,ra)

Leave a Reply
Want to join the discussion?Feel free to contribute!