Collective #864
Original Source: https://tympanus.net/codrops/collective/collective-864/
The State of ES5 on the Web * CSS display contents * Repaint
Original Source: https://tympanus.net/codrops/collective/collective-864/
The State of ES5 on the Web * CSS display contents * Repaint
Original Source: https://tympanus.net/codrops/2024/09/16/designer-spotlight-andrea-jelic/
In this Designer Spotlight, we feature Andrea Jelić, an award-winning web designer and art director from Croatia, as she shares insights into her creative process and showcases her standout web and branding projects.
Original Source: https://www.sitepoint.com/five-techniques-lazy-load-images-website-performance/?utm_source=rss

Discover five techniques to lazy load images for better website performance. Learn how to add lazy loading in HTML, JavaScript, and on scroll.
Continue reading
Five Ways to Lazy Load Images for Better Website Performance
on SitePoint.
Original Source: https://www.creativebloq.com/design/fonts-typography/my-favourite-font-designer-lucy-eden-on-cora
“It has a softness, friendliness and stability to it all at the same time.”
Original Source: https://www.webdesignerdepot.com/tools-for-designers-september-2024/
Welcome to September’s toolbox.
Original Source: https://smashingmagazine.com/2024/09/why-anticipatory-design-not-working-businesses/
Consider the early days of the internet, when websites like NBC News and Amazon cluttered their pages with flashing banners and labyrinthine menus. In the early 2000s, Steve Krug’s book Don’t Make Me Think arrived like a lighthouse in a storm, advocating for simplicity and user-centric design.

Today’s digital world is flooded with choices, information, and data, which is both exciting and overwhelming. Unlike Krug’s time,
Today, the problem isn’t interaction complexity but opacity. AI-powered solutions often lack transparency and explainability, raising concerns about user trust and accountability.
The era of click-and-command is fading, giving way to a more seamless and intelligent relationship between humans and machines.
Expanding on Krug’s Call for Clarity: The Pillars of Anticipatory Design
Krug’s emphasis on clarity in design is more relevant than ever. In anticipatory design, clarity is not just about simplicity or ease of use — it’s about transparency and accountability. These two pillars are crucial but often missing as businesses navigate this new paradigm. Users today find themselves in a digital landscape that is not only confusing but increasingly intrusive. AI predicts their desires based on past behavior but rarely explains how these predictions are made, leading to growing mistrust.
Transparency is the foundation of clarity. It involves openly communicating how AI-driven decisions are made, what data is being collected, and how it is being used to anticipate needs. By demystifying these processes, designers can alleviate user concerns about privacy and control, thereby building trust.
Accountability complements transparency by ensuring that anticipatory systems are designed with ethical considerations in mind. This means creating mechanisms for users to understand, question, and override automated decisions if needed. When users feel that the system is accountable to them, their trust in the technology — and the brand — deepens.
What Makes a Service Anticipatory?
Image AI like a waiter at a restaurant. Without AI, they wait for you to interact with them and place your order. But with anticipatory design powered by AI and ML, the waiter can analyze your past orders (historical data) and current behavior (contextual data) — perhaps, by noticing you always start with a glass of sparkling water.
This proactive approach has evolved since the late 1990s, with early examples like Amazon’s recommendation engine and TiVo’s predictive recording. These pioneering services demonstrated the potential of predictive analytics and ML to create personalized, seamless user experiences.
Amazon’s Recommendation Engine (Late 1990s)
Amazon was a pioneer in using data to predict and suggest products to customers, setting the standard for personalized experiences in e-commerce.
TiVo (1999)
TiVo’s ability to learn users’ viewing habits and automatically record shows marked an early step toward predictive, personalized entertainment.

Netflix’s Recommendation System (2006)
Netflix began offering personalized movie recommendations based on user ratings and viewing history in 2006. It helped popularize the idea of anticipatory design in the digital entertainment space.

How Businesses Can Achieve Anticipatory Design
Designing for anticipation is designing for a future that is not here yet but has already started moving toward us.
Designing for anticipation involves more than reacting to current trends; it requires businesses to plan strategically for future user needs. Two critical concepts in this process are forecasting and backcasting.
Forecasting analyzes past trends and data to predict future outcomes, helping businesses anticipate user needs.
Backcasting starts with a desired future outcome and works backward to identify the steps needed to achieve that goal.
Think of it like planning a dream vacation. Forecasting would involve looking at your past trips to guess where you might go next. But backcasting lets you pick your ideal destination first, then plan the perfect itinerary to get you there.
Forecasting: A Core Concept for Future-Oriented Design
This method helps in planning and decision-making based on probable future scenarios. Consider Netflix, which uses forecasting to analyze viewers’ past viewing habits and predict what they might want to watch next. By leveraging data from millions of users, Netflix can anticipate individual preferences and serve personalized recommendations that keep users engaged and satisfied.
Backcasting: Planning From the Desired Future
Backcasting takes a different approach. Instead of using data to predict the future, it starts with defining a desired future outcome — a clear user intent. The process then works backward to identify the steps needed to achieve that goal. This goal-oriented approach crafts an experience that actively guides users toward their desired future state.
For instance, a financial planning app might start with a user’s long-term financial goal, such as saving for retirement, and then design an experience that guides the user through each step necessary to reach that goal, from budgeting tips to investment recommendations.
Integrating Forecasting and Backcasting In Anticipatory Design
The true power of anticipatory design emerges when businesses efficiently integrate both forecasting and backcasting into their design processes.
For example, Tesla’s approach to electric vehicles exemplifies this integration. By forecasting market trends and user preferences, Tesla can introduce features that appeal to users today. Simultaneously, by backcasting from a vision of a sustainable future, Tesla designs its vehicles and infrastructure to guide society toward a world where electric cars are the norm and carbon emissions are significantly reduced.
Over-Promising and Under-Delivering: The Pitfalls of Anticipatory Design
As businesses increasingly adopt anticipatory design, the integration of forecasting and backcasting becomes essential. Forecasting allows businesses to predict and respond to immediate user needs, while backcasting ensures these responses align with long-term goals. Despite its potential, anticipatory design often fails in execution, leaving few examples of success.
Over the past decade, I’ve observed and documented the rise and fall of several ambitious anticipatory design ventures. Among them, three — Digit, LifeBEAM Vi Sense Headphones, and Mint — highlight the challenges of this approach.
Digit: Struggling with Contextual Understanding
Digit aimed to simplify personal finance with algorithms that automatically saved money based on user spending. However, the service often missed the mark, lacking the contextual awareness necessary to accurately assess users’ real-time financial situations. This led to unexpected withdrawals, frustrating users, especially those living paycheck to paycheck. The result was a breakdown in trust, with the service feeling more intrusive than supportive.

LifeBEAM Vi Sense Headphones: Complexity and User Experience Challenges
LifeBEAM Vi Sense Headphones was marketed as an AI-driven fitness coach, promising personalized guidance during workouts. In practice, the AI struggled to deliver tailored coaching, offering generic and unresponsive advice. As a result, users found the experience difficult to navigate, ultimately limiting the product’s appeal and effectiveness. This disconnection between the promised personalized experience and the actual user experience left many disappointed.

Mint: Misalignment with User Goals
Mint aimed to empower users to manage their finances by providing automated budgeting tools and financial advice. While the service had the potential to anticipate user needs, users often found that the suggestions were not tailored to their unique financial situations, resulting in generic advice that did not align with their personal goals.
The lack of personalized, actionable steps led to a mismatch between user expectations and service delivery. This misalignment caused some users to disengage, feeling that Mint was not fully attuned to their unique financial journeys.

The Risks of Over-promising and Under-Delivering
The stories of Digit, LifeBEAM Vi Sense, and Mint underscore a common pitfall: over-promising and under-delivering. These services focused too much on predictive power and not enough on user experience. When anticipatory systems fail to consider individual nuances, they breed frustration rather than satisfaction, highlighting the importance of aligning design with human experience.
Digit’s approach to automated savings, for instance, became problematic when users found its decisions opaque and unpredictable. Similarly, LifeBEAM’s Vi Sense headphones struggled to meet diverse user needs, while Mint’s rigid tools failed to offer the personalized insights users expected. These examples illustrate the delicate balance anticipatory design must strike between proactive assistance and user control.
Failure to Evolve with User Needs
Many anticipatory services rely heavily on data-driven forecasting, but predictions can fall short without understanding the broader user context. Mint initially provided value with basic budgeting tools but failed to evolve with users’ growing needs for more sophisticated financial advice. Digit, too, struggled to adapt to different financial habits, leading to dissatisfaction and limited success.
Complexity and Usability Issues
Balancing the complexity of predictive systems with usability and transparency is a key challenge in anticipatory design.
When systems become overly complex, as seen with LifeBEAM Vi Sense headphones, users may find them difficult to navigate or control, compromising trust and engagement. Mint’s generic recommendations, born from a failure to align immediate user needs with long-term goals, further illustrate the risks of complexity without clarity.
Privacy and Trust Issues
Trust is critical in anticipatory design, particularly in services handling sensitive data like finance or health. Digit and Mint both encountered trust issues as users grew skeptical of how decisions were made and whether these services truly had their best interests in mind. Without clear communication and control, even the most sophisticated systems risk alienating users.
Inadequate Handling of Edge Cases and Unpredictable Scenarios
While forecasting and backcasting work well for common scenarios, they can struggle with edge cases or unpredictable user behaviors. If an anticipatory service can’t handle these effectively, it risks providing a poor user experience and, in the worst-case scenario, harming the user. Anticipatory systems must be prepared to handle edge cases and unpredictable scenarios.
LifeBEAM Vi Sense headphones struggled when users deviated from expected fitness routines, offering a one-size-fits-all experience that failed to adapt to individual needs. This highlights the importance of allowing users control, even when a system proactively assists them.
Designing for Anticipatory Experiences
Anticipatory design should empower users to achieve their goals, not just automate tasks.
We can follow a layered approach to plan a service that can evolve according to user actions and explicit ever-evolving intent.
But how do we design for intent without misaligning anticipation and user control or mismatching user expectations and service delivery?

At the core of this approach is intent — the primary purpose or goal that the design must achieve. Surrounding this are workflows, which represent the structured tasks to achieve the intent. Finally, algorithms analyze user data and optimize these workflows.
For instance, Thrive (see the image below), a digital wellness platform, aligns algorithms and workflows with the core intent of improving well-being. By anticipating user needs and offering personalized programs, Thrive helps users achieve sustained behavior change.

It perfectly exemplifies the three-layered concentric representation for achieving behavior change through anticipatory design:
1. Innermost layer: Intent
Improve overall well-being: Thrive’s core intent is to help users achieve a healthier and more fulfilling life. This encompasses aspects like managing stress, improving sleep quality, and boosting energy levels.
2. Middle layer: Workflows
Personalized programs and support: Thrive uses user data (sleep patterns, activity levels, mood) to create programs tailored to their specific needs and goals. These programs involve various workflows, such as:
Guided meditations and breathing exercises to manage stress and anxiety.
Personalized sleep routines aimed at improving sleep quality.
Educational content and coaching tips to promote healthy habits and lifestyle changes.
3. Outermost layer: Algorithms
Data analysis and personalized recommendations: Thrive utilizes algorithms to analyze user data and generate actionable insights. These algorithms perform tasks like the following:
Identify patterns in sleep, activity, and mood to understand user challenges.
Predict user behavior to recommend interventions that address potential issues.
Optimize program recommendations based on user progress and data analysis.
By aligning algorithms and workflows with the core intent of improving well-being, Thrive provides a personalized and proactive approach to behavior change. Here’s how it benefits users:
Sustained behavior change: Personalized programs and ongoing support empower users to develop healthy habits for the long term.
Data-driven insights: User data analysis helps users gain valuable insights into their well-being and identify areas for improvement.
Proactive support: Anticipates potential issues and recommends interventions before problems arise.
The Future of Anticipatory Design: Combining Anticipation with Foresight
Anticipatory design is inherently future-oriented, making it both appealing and challenging. To succeed, businesses must combine anticipation — predicting future needs — with foresight, a systematic approach to analyzing and preparing for future changes.
Foresight involves considering alternative future scenarios and making informed decisions to navigate toward desired outcomes. For example, Digit and Mint struggled because they didn’t adequately handle edge cases or unpredictable scenarios, a failure in their foresight strategy (see an image below).

As mentioned, while forecasting and backcasting work well for common scenarios, they can struggle with edge cases or unpredictable user behaviors. Under anticipatory design, if we demote foresight for a second plan, the business will fail to account for and prepare for emerging trends and disruptive changes. Strategic foresight helps companies to prepare for the future and develop strategies to address possible challenges and opportunities.
The Foresight process generally involves interrelated activities, including data research, trend analysis, planning scenarios, and impact assessment. The ultimate goal is to gain a broader and deeper understanding of the future to make more informed and strategic decisions in the design process and foresee possible frictions and pitfalls in the user experience.
Actionable Insights for Designer
Enhance contextual awareness
Help data scientists or engineers to ensure that the anticipatory systems can understand and respond to the full context of user needs, not just historical data. Plan for pitfalls so you can design safety measures where the user can control the system.
Maintain user control
Provide users with options to customize or override automated decisions, ensuring they feel in control of their experiences.
Align short-term predictions with long-term goals
Use forecasting and backcasting to create a balanced approach that meets immediate needs while guiding users toward their long-term objectives.
Proposing an Anticipatory Design Framework
Predicting the future is no easy task. However, design can borrow foresight techniques to imagine, anticipate, and shape a future where technology seamlessly integrates with users evolving needs. To effectively implement anticipatory design, it’s essential to balance human control with AI automation. Here’s a 3-step approach to integrate future thinking into your workflow:
Anticipate Directions of Change
Identify major trends shaping the future.
Imagine Alternative Scenarios
Explore potential futures to guide impactful design decisions.
Shape Our Choices
Leverage these scenarios to align design with user needs and long-term goals.
This proposed framework (see an image above) aims to integrate forecasting and backcasting while emphasizing user intent, transparency, and continuous improvement, ensuring that businesses create experiences that are both predictive and deeply aligned with user needs.
Step 1: Anticipate Directions of Change
Objective: Identify the major trends and forces shaping the future landscape.

Components:
1. Understand the User’s Intent
User Research: Conduct in-depth user research through interviews, surveys, and observations to uncover user goals, motivations, pain points, and long-term aspirations or Jobs-to-be-Done (JTBD). This foundational step helps clearly define the user’s intent.
Persona Development: Develop detailed user personas that represent the target audience, including their long-term goals and desired outcomes. Prioritize understanding how the service can adapt in real-time to changing user needs, offering recommendations, or taking actions aligned with the persona’s current context.
2. Forecasting: Predicting Near-Term User Needs
Data Collection and Analysis: Collaborate closely with data scientists and data engineers to analyze historical data (past interactions), user behavior, and external factors. This collaboration ensures that predictive analytics enhance overall user experience, allowing designers to better understand the implications of data on user behaviors.
Predictive Modeling: Implement continuous learning algorithms that refine predictions over time. Regularly assess how these models evolve, adapting to users’ changing needs and circumstances.
Explore the Delphi Method: This is a structured communication technique that gathers expert opinions to reach a consensus on future developments. It’s particularly useful for exploring complex issues with uncertain outcomes. Use the Delphi Method to gather insights from industry experts, user researchers, and stakeholders about future user needs and the best strategies to meet those needs. The consensus achieved can help in clearly defining the long-term goals and desired outcomes.
Activities:
Conduct interviews and workshops with experts using the Delphi Method to validate key trends.
Analyze data and trends to forecast future directions.
Step 2: Imagine Alternative Scenarios
Objective: Explore a range of potential futures based on these changing directions.

Components:
1. Scenario Planning
Scenario Development: It involves creating detailed, plausible future scenarios based on various external factors, such as technological advancements, social trends, and economic changes. Develop multiple future scenarios that represent different possible user contexts and their impact on their needs.
Scenario Analysis: From these scenarios, you can outline the long-term goals that users might have in each scenario and design services that anticipate and address these needs. Assess how these scenarios impact user needs and experiences.
2. Backcasting: Designing from the Desired Future
Define Desired Outcomes: Clearly outline the long-term goals or future states that users aim to achieve. Use backcasting to reduce cognitive load by designing a service that anticipates future needs, streamlining user interactions, and minimizing decision-making efforts.
Use Visioning Planning: This is a creative process that involves imagining the ideal future state you want to achieve. It helps in setting clear, long-term goals by focusing on the desired outcomes rather than current constraints. Facilitate workshops or brainstorming sessions with stakeholders to co-create a vision of the future. Define what success looks like from the user’s perspective and use this vision to guide the backcasting process.
Identify Steps to Reach Goals: Reverse-engineer the user journey by starting from the desired future state and working backward. Identify the necessary steps and milestones and ensure these are communicated transparently to users, allowing them control over their experience.
Create Roadmaps: Develop detailed roadmaps that outline the sequence of actions needed to transition from the current state to the desired future state. These roadmaps should anticipate obstacles, respect privacy, and avoid manipulative behaviors, empowering users rather than overwhelming them.
Activities:
Develop and analyze alternative scenarios to explore various potential futures.
Use backcasting to create actionable roadmaps from these scenarios, ensuring they align with long-term goals.
Step 3: Shape Our Choices
Objective: Leverage these scenarios to spark new ideas and guide impactful design decisions.

Components:
1. Integrate into the Human-Centered Design Process
Iterative Design with Forecasting and Backcasting: Embed insights from forecasting and backcasting into every stage of the design process. Use these insights to inform user research, prototype development, and usability testing, ensuring that solutions address both predicted future needs and desired outcomes. Continuously refine designs based on user feedback.
Agile Methodologies: Adopt agile development practices to remain flexible and responsive. Ensure that the service continuously learns from user interactions and feedback, refining its predictions and improving its ability to anticipate needs.
2. Implement and Monitor: Ensuring Ongoing Relevance
User Feedback Loops: Establish continuous feedback mechanisms to refine predictive models and workflows. Use this feedback to adjust forecasts and backcasted plans as necessary, keeping the design aligned with evolving user expectations.
Automation Tools: Collaborate with data scientists and engineers to deploy automation tools that execute workflows and monitor progress toward goals. These tools should adapt based on new data, evolving alongside user behavior and emerging trends.
Performance Metrics: Define key performance indicators (KPIs) to measure the effectiveness, accuracy, and quality of the anticipatory experience. Regularly review these metrics to ensure that the system remains aligned with intended outcomes.
Continuous Improvement: Maintain a cycle of continuous improvement where the system learns from each interaction, refining its predictions and recommendations over time to stay relevant and useful.
Use Trend Analysis: This involves identifying and analyzing patterns in data over time to predict future developments. This method helps you understand the direction in which user behaviors, technologies, and market conditions are heading. Use trend analysis to identify emerging trends that could influence user needs in the future. This will inform the desired outcomes by highlighting what users might require or expect from a service as these trends evolve.
Activities:
Implement design solutions based on scenario insights and iterate based on user feedback.
Regularly review and adjust designs using performance metrics and continuous improvement practices.
Conclusion: Navigating the Future of Anticipatory Design
Anticipatory design holds immense potential to revolutionize user experiences by predicting and fulfilling needs before they are even articulated. However, as seen in the examples discussed, the gap between expectation and execution can lead to user dissatisfaction and erode trust.
To navigate the future of anticipatory design successfully, businesses must prioritize transparency, accountability, and user empowerment. By enhancing contextual awareness, maintaining user control, and aligning short-term predictions with long-term goals, companies can create experiences that are not only innovative but also deeply resonant with their users’ needs.
Moreover, combining anticipation with foresight allows businesses to prepare for a range of future scenarios, ensuring that their designs remain relevant and effective even as circumstances change. The proposed 3-step framework — anticipating directions of change, imagining alternative scenarios, and shaping our choices — provides a practical roadmap for integrating these principles into the design process.
As we move forward, the challenge will be to balance the power of AI with the human need for clarity, control, and trust. By doing so, businesses can fulfill the promise of anticipatory design, creating products and services that are not only efficient and personalized but also ethical and user-centric.
In the end,
The success of anticipatory design will depend on its ability to enhance, rather than replace, the human experience.
It is a tool to empower users, not to dictate their choices. When done right, anticipatory design can lead to a future where technology seamlessly integrates with our lives, making everyday experiences simpler, more intuitive, and ultimately more satisfying.
Original Source: https://ecommerce-platforms.com/articles/customcat-vs-printful
CustomCat and Printful are two reliable, and popular print on demand companies. While CustomCat is a veteran in the POD industry, with more than 20 years of experience, Printful is one of my favorite platforms, thanks to its consistently excellent product quality, and wide range of integration options.
I put these two POD vendors head-to-head, looking at their key features, product options, integrations, pricing, and customer support services, to help you choose the right solution.
Quick Verdict
CustomCat and Printful have both earned a reputation as trustworthy POD companies.
They both offer excellent printing quality, with options like DTG and embroidery, and can fulfil orders worldwide.
However, Printful is the better option in my opinion if you’re looking for a more extensive product catalog, a wider range of integration options, and luxury goods. CustomCat is better if you want budget-friendly pricing, and slightly faster order fulfillment.
Try Printful
The Pros and Cons of Both Companies
CustomCat Pros and Cons
Pros ?
Cons ?
Pros ?
Straightforward, beginner-friendly platform
Excellent customer service (with a hotline for sellers)
Budget-friendly pricing for a wide range of products
Slightly faster order fulfillment in some cases
Great customizations, like embroidery and vegan leather patches
Cons ?
Slightly smaller range of products
Fewer sales channel integrations
Longer shipping times outside of the US
Printful Pros and Cons
Pros ?
Cons ?
Pros ?
Consistently superior product quality
Wider range of sales channel integrations
More comprehensive product catalog
Excellent add-on services like design support
More powerful design tools
Cons ?
Longer fulfillment and delivery times
Higher base cost for products
Longer wait times for customer support
Which Platform Has The Best Features?
Winner: Printful
While CustomCat offers unique products and excellent marketing tools, Printful’s broader range of customization options, superior design tools, and wider integration capabilities stand out to me. I particularly appreciate Printful’s AI-powered image upscaling and extensive stock graphics library. Their ‘Quick Store’ feature for US merchants, though limited, is a nice touch for beginners. However, it’s worth noting that CustomCat excels in production speed, which could be crucial for some sellers. Ultimately, Printful’s comprehensive feature set makes it my top choice for most users looking for a versatile POD platform.
CustomCat and Printful are similar in a lot of ways. They both offer a wide range of customizable products, and global fulfillment. However, Printful does offer a few extra services, such as support with design, a “quick stores” generator (for US merchants) and global warehousing. I also love its design tools, as well as its commitment to creating high-quality products.
CustomCat has excellent marketing tools, such as the ability to capture customer data and split-test campaigns. It offers fewer product options overall, but more unique choices, like indoor doormats, vegan leather patch hats, and enamel camping mugs. It also has a great reputation for fast turnaround times, but you will have to wait longer for delivery outside of the US.
Product Options and Customization
Printful has a slightly wider range of products to choose from, boasting over 340 customizable items. CustomCat offers slightly over 300 items, but it’s constantly adding new options to the mix, like the vegan leather patch hats mentioned above. Both companies offer similar profitable options like custom apparel, accessories, and home décor.
They also both offer a range of eco-friendly and sustainable products. Where Printful has the biggest edge, in my opinion, is in its customization options. CustomCat offers Digisoft, embroidery, and dye sublimation. Printful offers all of those, as well as DTF, and all-over printing.
I do think the Digisoft option from CustomCat is excellent, combining the benefits of DTF and DTG. However, Printful’s design tools are a little better in my experience. While CustomCat’s design tools are very easy to use, Printful has some unique features, like AI solutions to upscale your images, and a wide range of customizable stock images and graphics to use.
It’s a tough call, but Printful is slightly better for product options and customization in my opinion.
Product Quality and Production Time
Printful definitely takes the lead in terms of product quality. That doesn’t mean you’ll get poor quality from CustomCat (in fact, they have an excellent reputation for excellent printing). However, Printful uses higher quality materials, inks, and machinery. The company is known worldwide for delivering some of the best prints in the POD market, with a 99% customer satisfaction rate.
One thing CustomCat does do slightly better, is promise customers a 100% free replacement for any products they’re unhappy with, due to manufacturing faults. Additionally, because Printful uses more luxurious materials in its products, the base cost of its products are often slightly higher, making it tougher to earn a consistent profit with this platform.
Plus, CustomCat outperforms Printful in production time. Printful needs around 2-5 business days to complete an order, while CustomCat can finish orders in 3 days or less.
Fulfillment and Sales Channels
Both CustomCat and Printful offer global fulfillment, although CustomCat does offer faster shipping times to US customers (though I did notice international fulfillment is a bit more variable). On average, if your customers are in the US, they can receive their orders in 3 days. Alternatively, Printful’s delivery times can range from 5 to 10 days.
If you’re shipping internationally, customers can wait up to 28 days from a delivery from CustomCat, or up to 20 days for Printful. So, I’d recommend considering whether most of your customers are local, or international, before making your choice.
Notably, Printful does offer a wider range of sales channels than CustomCat. There are more than 20 ecommerce partners, marketplaces, and social media channels to choose from with Printful, including all my favorites, like Shopify, Etsy, and Amazon. CustomCat only integrates directly with four partners, Shopify, WooCommerce, BigCommerce, and Etsy.
Both companies offer an API, but Printful also offers the option to create your own custom “Quick Store”, so you can sell online via a custom link and basic storefront.
This storefront is very straightforward, and you can’t customize it much. Plus, it’s only currently available to US sellers with exclusively US-based customers – but it’s a nice option for beginners in the POD market.
Best for Ease of Use and Customer Support: Printful
Printful wins for customer support. While CustomCat offers phone support and is responsive during business hours, Printful’s 24/7 availability is a major advantage. As someone who’s extensively used both platforms, I find Printful’s constant support crucial for global operations. Both have great self-help resources, but Printful’s round-the-clock assistance gives it the edge for sellers needing support at any hour.
I find Printful slightly more user-friendly overall. Its design tools are more intuitive, and the dashboard is cleaner, which I appreciate as a frequent user.
While CustomCat isn’t far behind and offers robust marketing and reporting tools, Printful’s streamlined interface makes it my top pick for ease of use, especially for newcomers to print-on-demand services.
I didn’t have any trouble experimenting with Printful or CustomCat when conducting this review. They’re both extremely easy-to-use platforms, ideal for beginners. Printful’s design tools are a bit more intuitive, and the dashboard is a little cleaner.
However, CustomCat has slightly more robust tools for marketing and tracking reports.
In terms of customer support, both companies have some great self-help resources. I’ve spent hours browsing through their blogs, FAQs, and guides.
Still, CustomCat is more responsive if you need direct assistance, as they offer a direct phone line to certain sellers (in the US and Vietnam), whereas Printful doesn’t. Both companies do offer email and live chat support, however.
I should note though, CustomCat only offers support from 8am to 6:30pm EST, while Printful promises 24/7 support.
Best for Pricing: Printful
I’ve evaluated both platforms closely, and I’m choosing Printful as the winner for pricing. While their base prices are generally higher, I find Printful’s Growth membership offers valuable discounts that can offset this, especially for businesses scaling up. The 20% off sample orders is a standout feature for me, allowing for cost-effective product testing.
For sellers earning over $12k annually, the free access to these discounts is particularly appealing. In my experience, Printful’s pricing structure, though initially seeming more expensive, can provide better long-term value for growing businesses looking to balance quality with cost.
Like many of the POD solutions I’ve tried, both CustomCat and Printful offer a free plan, which give you access to all the features you need to launch your online store. However, you can choose to upgrade to a paid account with both platforms.
CustomCat Pro, for $25 (annually) or $30 per month, gives you 20-40% off all of the company’s standard wholesale prices, making it a great option for large-scale sellers. Printful’s Growth membership, available for free to users earning more than $12k per year, or for $24.99 per month offers access to various discounts, like up to 30% off certain products, 7% off branding, and so on.
There’s also a Business plan, which is only available to companies earning more than $60k per year, but comes with extra discounts. However, Printful’s products are typically more expensive than those on CustomCat. For instance, if you wanted to order a men’s t-shirt from CustomCat, you’d pay between $5.50 and $29.95 depending on the product features.
With CustomCat, the same types of shirts would cost between $6.95 and $29.95, so you might struggle to achieve the same profit margin. One good thing about Printful is that it offers 20% off sample orders – but CustomCat doesn’t.
Try Printful
CustomCat vs Printful: The Verdict
Ultimately, Printful is my favorite option for companies that want to sell a wide range of highly customizable products worldwide. The company offers superior product quality, fantastic design tools, and access to a wider range of integrations.
However, CustomCat may be a slightly cheaper option (based on core product costs), and it does offer faster turnaround times for US customers. The right option for you will depend on your expectations and business goals, but both platforms are great for POD sellers.
The post CustomCat vs Printful: Which is Better for POD? appeared first on Ecommerce Platforms.
Original Source: https://ecommerce-platforms.com/articles/sell-directly-from-printify
The simple answer is yes. However, Printify isn’t a print on demand marketplace, so you won’t get the same experience as you would if you were selling on channels like Redbubble, for instance.
Here, I’ll show you how you can sell directly from Printify and I’ll tell you how you can use other sales channels with Printify to expand your reach too.
Can You Really Sell Directly from Printify?
Yes, there is a way to sell from Printify directly, without having to build your own ecommerce website or launch a storefront on a platform like Etsy or Amazon. All you need is a Printify pop-up store. This is a free feature offered by Printify to anyone with an account.
Basically, it allows you to create a simple online store with a Printify subdomain, that you can share with your customers to process sales. I want to point out, you don’t get a fully-featured ecommerce solution here – Printify’s pop-up store is pretty basic. You won’t get a lot of control over things like store design with themes, or advanced navigation tools.
I’d still definitely recommend creating your own website with something Shopify as your business starts to grow. But the pop-up store feature does make it very easy (and cheap) to start selling online.
One thing to keep in mind before you dive in is that Printify’s pop-up store is only available to users in certain countries. So, it’s worth checking this option is available to you before you dive in.
How to Sell Directly from Printify with a Pop-Up Store
The good news is that selling from Printify with a pop-up store is extremely straightforward.
All you need to do is sign up for a free Printify account, using your email address, or your existing Google account. Once you’re signed up, click on the “My New Store” tab in your dashboard, then select “Add new store”.
This will take you to Printify’s dashboard, where you can connect your sales channels in a couple of clicks. Scroll down until you see the “Printify Pop-up” banner, and click on “Launch Pop-Up store”.
This will take you to a page where you’ll be asked to enter some details for your new Pop-up store. You’ll need to give your store a name – I recommend choosing something catchy, and memorable. You’ll also need to select your “Country of Tax Residence”.
Click on the “Next” button, and you’ll be asked to choose a theme for your store. Notably, you can change this theme at any time in your Store’s settings later on.
After you select your theme, click “Launch Pop Up Store”, and you’ll be able to click on the name of your new store in your Printify Menu to start adding products.
Designing your products is the same as it would be if you were creating Printify items to sell on any other channel. You’ll still get access to all of Printify’s design tools – including the handy AI solution that generates images for you.
Remember to add a description to each product you produce, before listing it on your Pop-Up store, and configure your settings for shipping and pricing. To see what your store looks like, simply click on the “Visit Store” button.
How Selling from Printify Works
Once you have your pop-up store with Printify, all you need to do is share the link to your personal storefront with your customers. You can put the link on your social media link in bio for instance, or send it directly to customers through a messaging app.
When someone places an order with your store, Printify will charge them and automatically fulfil the orders on your behalf. After deducting the base cost of the product, taxes, and other extra fees, the remaining profits will be transferred to your account (Printify Wallet), and you can extract your earnings from there. Usually, Printify pays sellers on the 14th of each month.
It’s a pretty straightforward process, and you won’t have any upfront fees to pay at all, so if you’re looking for a cheap way to start selling online, this is a great option. However, you will miss out on some opportunities to build a memorable brand this way.
Other Options for Selling Printify Products
Aside from selling directly through a Printify pop-up store, you can also choose from a range of other ways to sell with Printify. I’d definitely recommend picking at least one of these “extra” options to help scale your business.
Option 1: Connect to a Marketplace
If you already have a storefront on an existing marketplace, like Ebay, or Etsy, then you can connect your Printify account to those platforms and sell directly through those too.
All you need to do is click on the “Add new store” option again in your dashboard, and select your preferred marketplace from the list. For instance, if you want to sell on Etsy, click “Connect to Etsy” if you already have an account, or “Sign up” to create an account from scratch.
Printify will walk you through the process of connecting your accounts. Then, from your products page, you can choose which items you want to list on your Etsy store.
Option 2: Use an Ecommerce Platform
The best way to boost your chances of higher sales with Printify is to connect your account to an ecommerce platform like Wix, Shopify, or Squarespace. Ultimately, this will give you greater market reach, more advanced store features, and advanced marketing tools.
Again, you can get started by clicking on the “Add New Store” button, and selecting from the range of sales channels Printify offers:
Once you click on the button for your chosen store, you’ll be asked to log into your account, or create a new account if you’re starting from scratch.
Again, Printify will give you specific instructions to follow depending on the sales channel you choose. You can then publish Printify products straight to your store.
Depending on your chosen sales channel, you can submit orders for fulfillment from your store to Printify by using your Order Desk (with Amazon Marketplace, Weebly, and Ecwid, etc). Or you can manually submit store orders.
You can also use API connections to send order information straight to Printify from your existing store automatically (which is a great way to save yourself some time).
Option 3: Sell through Social Media
Alternatively, if you want to keep things simple, you can sell through social media channels. Printify supports a direct connection with TikTok Shop, which is excellent for creators and influencers who want to sell their own merch without running an online store.
To do this, you’ll need to:
Sign up for a US TikTok seller account – keep in mind, it can take up to 24 hours to be approved.
Click on the “Add New Store” button on Printify, then select TikTok US. Fill in your store name, and click “Next”.
Check the boxes provided and click “Connect”, then authorize your TikTok account in the pop-up box that appears.
Click “Continue” and set up your shipping methods in your Printify dashboard and the TikTok Shop Seller Center.
Publish products from Printify to your TikTok Shop
Keep in mind, if you use an ecommerce platform like Shopify, you can also use third-party apps for other social media channel integrations, like Facebook, Instagram, and Pinterest.
Can You Sell Directly from Printify?
So, yes, anyone can sell from Printify directly using a Printify pop-up shop. However, I do recommend using at least one other sales channel too, if you want to boost your chances of reaching as many customers as possible, and increase your sales.
Frequently Asked Questions (FAQs)
Can I just sell on Printify?
Yes, there is a way to sell through Printify without having to create a separate ecommerce store or online storefront using Printify Pop-up shop. This gives you a free online storefront with a unique URL using the Printify.me domain. There are no upfront costs, but you will have limited control over your branding and scalability.
Where Can I sell Printify products?
There are various options you can explore to sell Printify products online. The easiest option may be to use Printify’s pop-up shop solution. However, you can also sell through ecommerce platforms like Shopify and Squarespace, marketplaces like Ebay and Etsy, and social media channels like TikTok Shop. They’re all accessible from your Printify dashboard.
Can you actually make money from Printify?
Absolutely, there are plenty of successful sellers who have made a decent income selling customized products form Printify. However, for the best results, you will need to invest in creating high-quality items, building and marketing your brand, and making sure you deliver exceptional customer service to your shoppers.
The post Can you Sell Directly from Printify? The Easy Guide appeared first on Ecommerce Platforms.
Original Source: https://www.hongkiat.com/blog/forgot-iphone-passcode-solution/
Uh-oh, you forgot your iPhone passcode? Don’t worry, it happens to the best of us. Getting locked out of your iPhone can be super frustrating, but there’s no need to panic.
In this article, we’ll walk you through the steps to regain access to your device. Whether you’ve completely forgotten your passcode or accidentally locked yourself out, we’ve got the solutions to help you unlock your iPhone and get back to using it in no time.

Table of Content
Understanding the Situation
Using Recovery Mode
Restoring via iTunes or Finder
Using iCloud to Erase Your Device
Contacting Apple Support
Prevent Future Lockouts
Understanding the Situation
If you enter the wrong passcode too many times, you’ll have to wait longer before you can try again. If you keep entering the wrong passcode, your iPhone will eventually become disabled.
To unlock it, you’ll need to erase your device, which deletes all of your data and settings, including the passcode. You can then restore your data from a backup.
Method 1: Using Recovery Mode
If you don’t have a backup, Recovery Mode allows you to restore your iPhone.
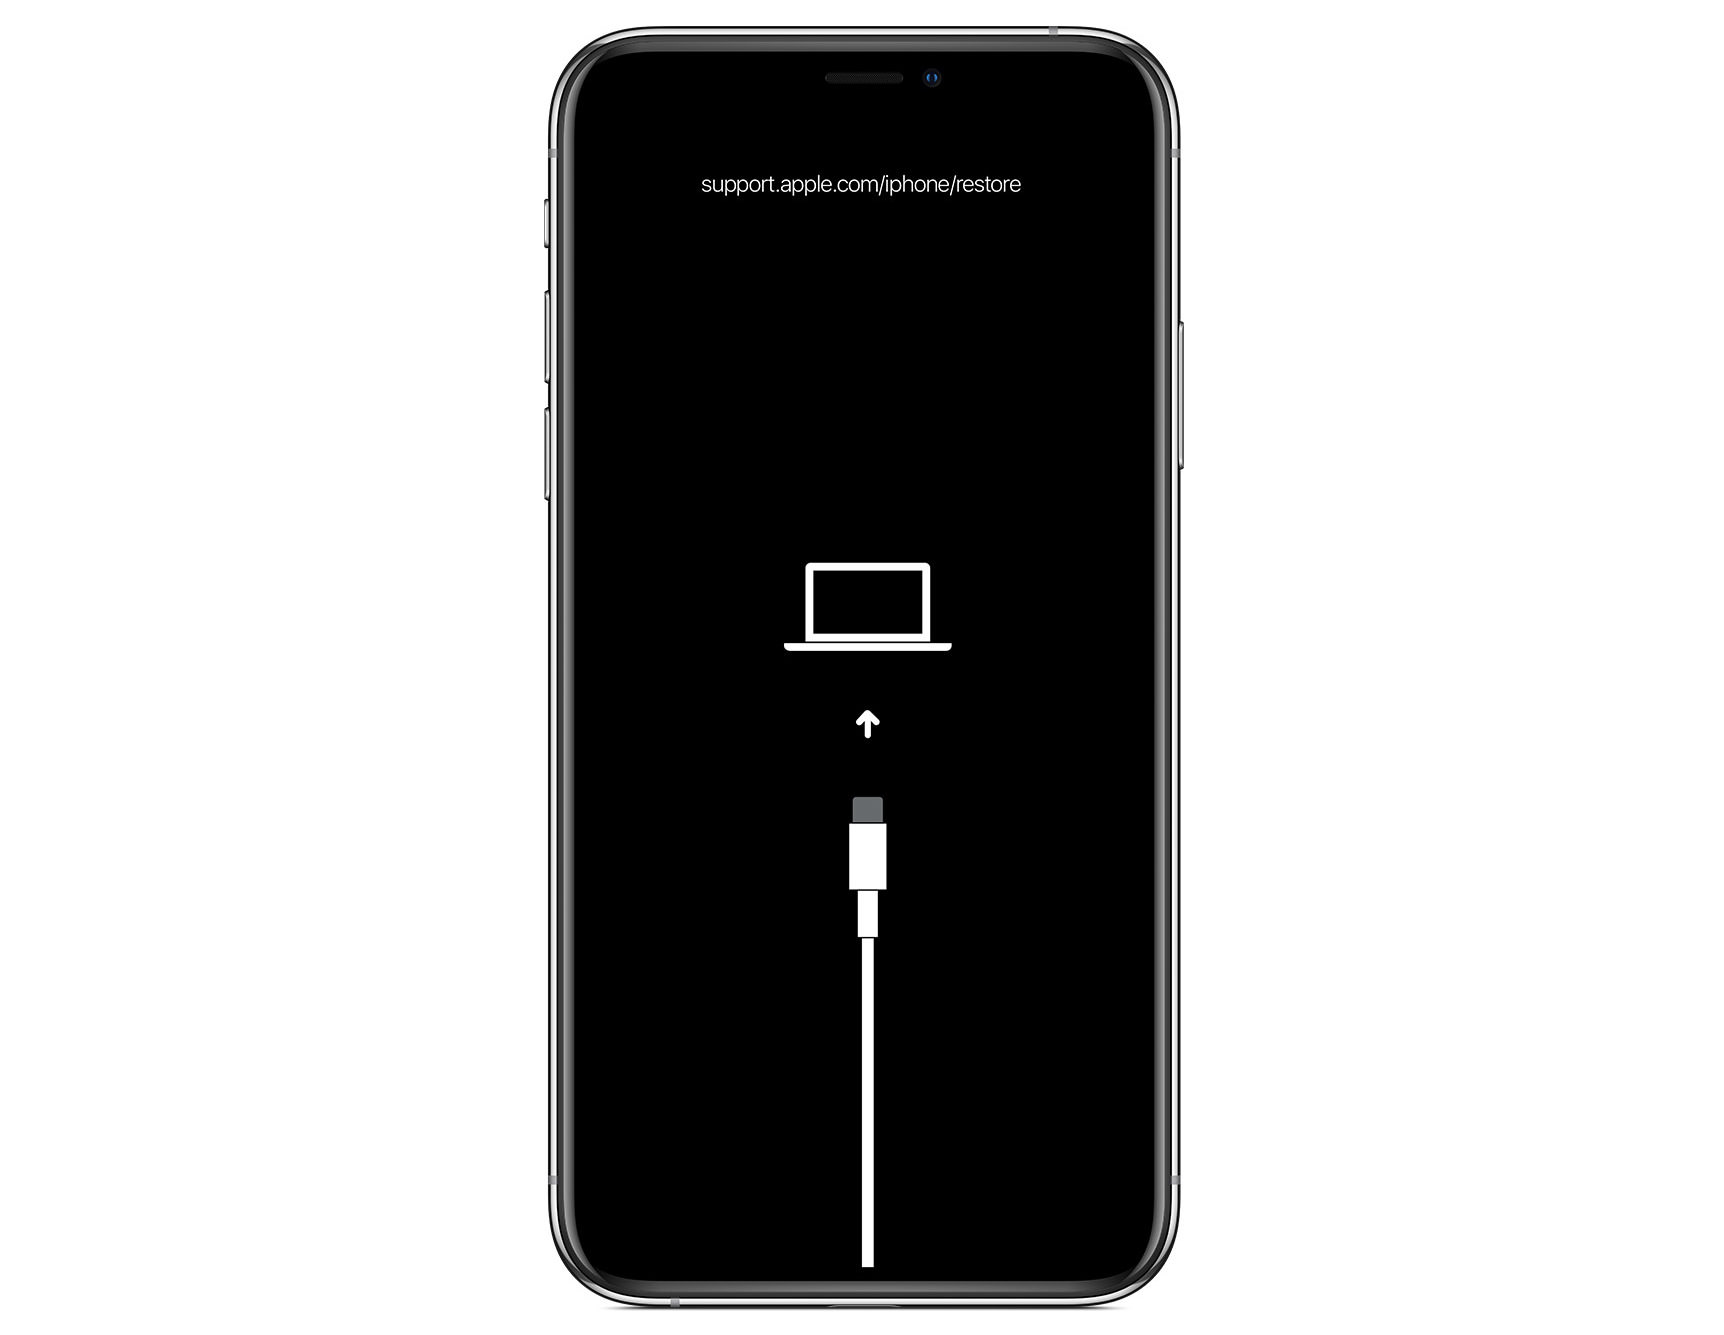
iPhone in Recovery Mode
Here’s how to go into Recovery Mode in your iPhone:
Use a USB cable to connect your iPhone to a Mac or PC.
Enter Recovery Mode:
For iPhone 8 or later: Quickly press and release the Volume Up button, then the Volume Down button, then press and hold the Side button until you see the recovery mode screen.
For iPhone 7 and 7 Plus: Press and hold the Volume Down and Sleep/Wake buttons simultaneously until you see the recovery mode screen.
For iPhone 6s and earlier: Press and hold the Home and Sleep/Wake buttons simultaneously until you see the recovery mode screen.
Open iTunes (on Windows or macOS Mojave and earlier) or Finder (on macOS Catalina and later), then choose the option to Restore your iPhone.
Method 2: Restoring via iTunes or Finder
If you have previously synced your iPhone with iTunes or Finder, you can also use it to restore your device.
Here’s how:
Connect your iPhone to the computer you last synced with using a USB cable.
Launch iTunes (Windows users) or Finder and select your iPhone from the list.
In iTunes or Finder, click on the device or its icon, select “Back Up Now” to create the latest backup, then click “Restore iPhone.”
Method 3: Using iCloud to Erase Your Device
If you have Find My iPhone enabled, you can use iCloud to erase your device. To do that, follow the following instructions below:
Go to iCloud.com in a web browser.
Sign in using your Apple ID.
Click on “Find My” and select your iPhone from the device list.
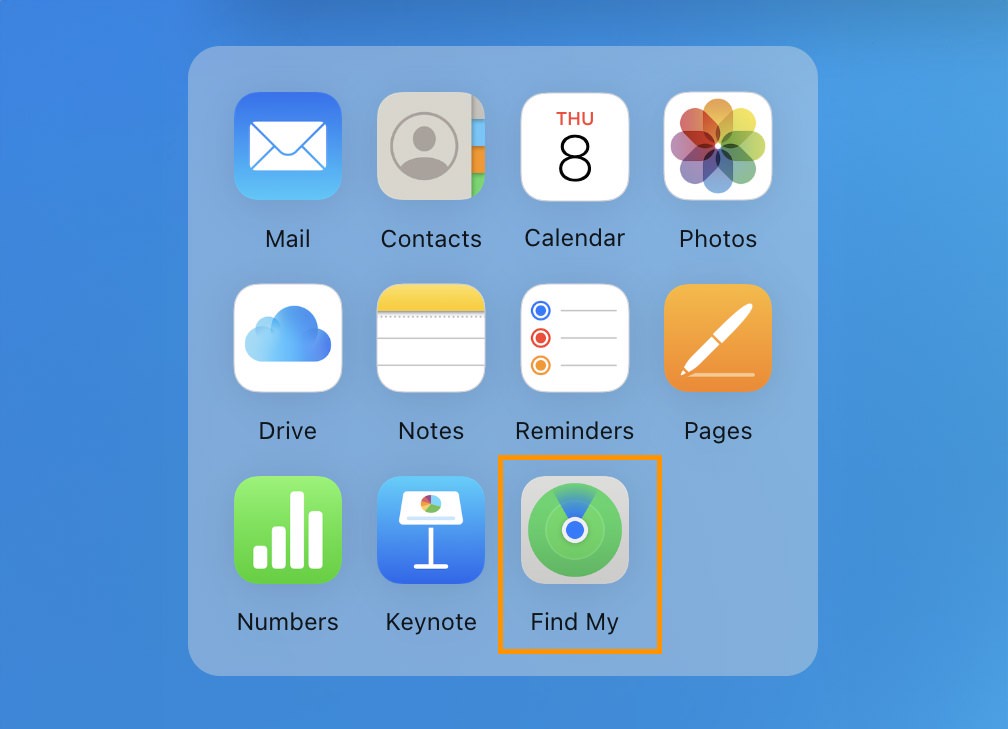
Click “Erase iPhone” to remotely erase all data and settings, including the passcode, so you can restore from a backup.

Method 4: Contacting Apple Support
If none of the above methods work, or if you encounter issues, contacting Apple Support may be your last resort.
Apple technicians can provide additional support and may be able to assist you in unlocking your iPhone.
Preventing Future Lockouts
To avoid the hassle of forgetting your iPhone passcode in the future, consider doing the following:
Enable Face ID or Touch ID: Skip memorizing a passcode by logging in using your face with Face ID or your thumbprint with Touch ID.
Use a Memorable Passcode: Select a passcode that is both meaningful and secure yet easy to remember.
Keep Backups: Ensure you have iCloud backup enabled, or regularly back up your iPhone to your PC via iTunes or Finder.
Final Thoughts
Forgetting your iPhone passcode can be highly inconvenient, but by following the methods outlined above, you can regain access to your device without much hassle.
It’s crucial to regularly back up your iPhone data and take preventive measures to avoid future lockouts, ensuring that your information is always safe and accessible.
The post What to Do If You Forget Your iPhone Passcode appeared first on Hongkiat.
Original Source: https://www.creativebloq.com/3d/zbrush-for-ipad-review-powerful-and-feature-packed-this-feels-like-a-historic-release
The desktop version of ZBrush redesigned for iPad, and it’s brilliant.