Unreal Engine 5 leads a lineup of stellar new indie games
Original Source: https://www.creativebloq.com/3d/video-game-design/unreal-engine-5-leads-a-lineup-of-stellar-new-indie-games
The game art impresses in these highlights from Gamescom 2024.
Original Source: https://www.creativebloq.com/3d/video-game-design/unreal-engine-5-leads-a-lineup-of-stellar-new-indie-games
The game art impresses in these highlights from Gamescom 2024.
Original Source: https://ecommerce-platforms.com/articles/printful-quick-stores-vs-printify-pop-up-store
Printful Quick Stores vs Printify Pop-up Store: which is the best, most user-friendly option for selling print-on-demand products without an ecommerce platform or marketplace account?
First, I want to point out that both Printful Quick Stores, and Printify Pop-up Store aren’t the most scalable or flexible options for online retailers. Ultimately, as your business grows, you’re probably going to want to consider setting up a full store with a platform like Shopify, and integrating it with Printful or Printify.
After all, while Printify and Printful’s simple storefronts are great for beginners with limited budgets, they don’t give you access to all the features you need to grow your revenue, such as robust inventory management tools, marketing apps, and website design customization options.
Still, both tools do have their benefits. I put Printful Quick Stores, and Printify Pop-Up store to the test, to bring you this complete comparison guide.
Printful Quick Stores vs Printify Pop-Up Store: Quick Comparison
Ultimately, Printful Quick Stores and Printify Pop-Up store are very similar services.
Printful Quick StoresPrintify Pop-Up StoreAvailabilityCurrently available to US retailers and US customers only.Available to Printify customers worldwide. PricingFreeFreeCustomization OptionsAdd your own logo to your storeCreate a custom website URL Customize product descriptions and product imagesSet automated default markups for productsAdd your own logo to your storeGet a unique URL for your custom storeCustomize product descriptions and product imagesAutomated pricing customization Core features Simple storefrontEnd-to-end fulfillment through PrintfulComplete access to the Printful POD platformSimple storefront with a handful of themesEnd-to-end fulfillment through Printify partnersFull access to the Printify POD platform Unique benefits Consistent product quality due to in-house printing methodsPowerful mockup generator and design toolsAutomated customer order tracking Wide selection of worldwide printing partnersMore than 850 customizable productsDedicated merchant support teamAI-powered design tools (for products)Best forCompanies that want to take advantage of Printful’s reputation for exceptional print quality. Creators who want to launch a simple store with access to dozens of global print partners and countless unique products.
What is Printful Quick Stores?
Printful Quick Stores is a free tool offered by the Printful print on demand company, that allows users to create a simple online store and start selling items online. It’s quite a new service from Printful, which first launched in June 2024.
Before this, the only way to sell items created with Printful online would be to either manually submit orders to the POD company, or integrate Printful with your existing marketplace or ecommerce platform. Printful integrates with dozens of platforms and tools, from Shopify to Amazon, which is one of the reasons I think it’s among the best POD platforms around.
However, launching and managing an online store can be expensive, time-consuming, and complicated for beginners. That’s why Printful decided to launch its Quick Stores service, to help anyone and everyone take advantage of the growing print on demand market.
Notably, unlike Printify Pop-Up store, Printful Quick Stores is currently only available to retailers and buyers in the US. You can only launch a Quick Store in the United States, and you won’t be able to sell products to global customers.
Try Printful Quick Stores
How to Use Printful Quick Stores
Getting started with Printful Quick Stores is very simple, provided you’re located in the US. All you need to do is sign up for a free account with Printful, then click on the “My Printful” tab in the menu on the right-hand side of your dashboard.
Click the Start button under “Connect your Store”, and you’ll be taken to a page where you can either integrate Printful with an existing sales channel, or create a new Quick Store.
Click Create store now under the Quick Stores option, and Printful will ask you to enter a few details. You can:
Choose a name for your store
Select a custom website address (though it will have the .printful.me TLD)
Pick your country of tax residence (US is the only option for now)
Upload a logo image to add to your store
Set your default markup for all Printful products on your storefront.
Once you’ve entered all your details, click Create Store and go back to your Printful dashboard. Click on the Stores tab and you should see your new store listed at the top of the page.
If you’ve already created product templates in Printful’s dashboard, you can click “Add Product” to immediately add those to your store. Alternatively, select “Add Product” and choose from Printful’s range of customizable products.
When you choose a product to sell on your store, you’ll automatically be taken to Printful’s design tool, where you can upload artwork, adjust its placement, and create mockups for your storefront. You’ll also be able to write product descriptions and add prices before uploading them to your store.
It’s as simple as that. From there, you can share the link to your Printful store with potential customers. Whenever they buy something, your earnings will be added to your Printful wallet. Printful will automatically transfer your profits to your chosen bank account, once a month, provided you’ve earned more than $25.
Try Printify Pop-Up Store
What is Printify Pop-up Store?
Printify Pop-Up store is a similar service to Printify Quick Stores, although Printify did offer the feature first. It allows you to create a simple store with a custom link, so you can sell products online without having to build an ecommerce store, or sell through a marketplace like Amazon.
Again, the store you create will be very basic. Like with Printful, you won’t be able to adjust your store’s appearance or functionality too much. However, Printify does give you some basic themes to choose from. You can also add a logo to your store, give your store a custom name, and create a custom URL. Although your URL will feature the Printify.me TLD (rather than something like .com).
Printify’s Pop-up store service is available to anyone with a Printify account, regardless of your location. I also like the fact that Printify allows you to add links to your social media accounts to your store – this isn’t an option with Printful Quick Stores.
How to Use Printify Pop-Up Stores
The process for creating a Pop-Up store with Printify is very similar to designing a “Quick Store” with Printful. All you need to do is sign up for a free account on Printify, then head to your dashboard, and click the “My New Store” tab in your menu.
Click on Add New Store and you’ll be taken to a page where you can choose to integrate Printify with an existing ecommerce platform or marketplace, or create a new “pop-up” store.
Select “Launch Pop-Up store” and you’ll be taken to a page where you’ll need to enter a few details, you can:
Select your country of tax residence
Choose a unique store name (and custom URL)
Upload a logo to use on your storefront
Choose a theme for your store
Link your social media accounts to your store
Connect your store with Facebook Meta pixels, and Google Analytics
Once you’ve entered all the core details for your store, you’ll be able to choose a theme to alter your store’s appearance. Notably, you won’t get the same variety as you would from a platform like Shopify. There are only five themes available, and they’re all pretty similar.
After choosing a theme, you can launch your pop-up store, then head back to your Printify dashboard to add products to your storefront. If you’ve already used Printify’s design tools to customize one of the products offered by the company, you can hover over the “…” menu next to that product in the “My Products” page to publish it to your store.
If you want to create a new product from scratch, click on the “Catalog” tab and choose from one of Printify’s products. You’ll be able to use all of the state-of-the-art design tools to customize your chosen product, including Printify’s AI image generator.
Remember to add a description to your products before listing them on your website. Once you’ve published your products to your store, you can share your custom link with potential customers. Whenever someone buys something from your store, Printify will send the details to your chosen print partner, and they’ll handle order fulfillment for you.
After deducting the cost of the product, taxes, and other fees from your earnings, Printify will transfer the profit to your Printify Wallet. Your earnings will then be transferred to your chosen bank account on the 14th of each month.
MORE:
Printful vs Printify – Full Comparison
Printify Pop-Up Store Review
Printful Quick Stores Review
Printful Quick Stores vs Printify Pop-Up Store: The Verdict
Printful Quick Stores and Printify Pop-Up Store are almost identical services. They both allow you to launch a storefront for free, and sell products without using a separate ecommerce platform or a marketplace like Etsy. However, Printify’s Pop-Up store does have some unique benefits.
First, it allows you to connect with a wider range of vendors, and choose from a broader selection of products than you’ll get on Printful. Additionally, Printify’s service is:
Available globally (Printful Quick Stores is only available in the US)
More feature-rich, with the option to connect to social media channels, and choose from a (limited) selection of store themes.
Less restrictive, as Printify will allow you to access your profits without any limitations (you have to earn at least $25 before making a withdrawal from Printful).
Obviously, Printful’s Quick Store solution is still very new, so there’s a good chance its features and benefits could improve in the months ahead. For now, however, Printify is the better option for quick and simple POD sellers overall.
The post Printful Quick Stores vs Printify Pop-up Store: Which is Best? appeared first on Ecommerce Platforms.
Original Source: https://ecommerce-platforms.com/articles/printful-quick-stores-guide
Printful Quick Stores, originally introduced by Printful in June 2024, offers entrepreneurs and creators a convenient way to start selling products online, without the need to use a full ecommerce platform, or a marketplace like Etsy and Amazon.
It’s similar in a lot of ways to Printify’s “Pop-Up Store” service, offering a free, all-in-one tool individuals can use to sell a range of customizable products online. Although, personally, I’d recommend integrating Printful with at least one online marketplace or an ecommerce platform like Shopify to boost your brand’s reputation and increase sales, Quick Stores is great for beginners.
Here, I’ll share everything you need to know about Printful Quick Stores, and how it works, and I’ll provide a step-by-step guide for creating your own “Quick Store” with Printful.
Quick Verdict
Printful Quick Stores is a free tool creators can use to launch an online store and sell products through a custom link.
Quick Stores isn’t a comprehensive website builder or ecommerce platform, you won’t get access to a host of themes and design tools like you would with Shopify.
Currently Printful Quick Stores is only available to merchants in the US, and products sold through the channel can only be delivered to US addresses.
You can sell any of customizable products offered by Printful using Quick Stores, provided they’re available in the United States.
Profits earned through Printful Quick Stores are added to your Printful wallet, and transferred to your bank once per month, provided the payout amount exceeds $25.
The Pros and Cons of Printful Quick Stores
Overall, Printful Quick Stores is a convenient, free, and simple solution for selling print on demand merchandise. However, it’s not the best way to build a memorable brand or scale your business. Based on my experience, here are the key pros and cons of using Printful Quick Stores.
Pros 👍
Cons 👎
Pros 👍
It’s completely free to use with no setup costs
Quick Stores is extremely beginner friendly and easy to use
Printful handles production and order fulfillment for you
You benefit from all of Printful’s great design tools
You’ll be able to a wide range of high-quality products
Cons 👎
You can’t change much about the design of your store
You won’t be able to sell anything not created by Printful
Quick Stores is only available to US sellers, and US customers
What is Printful Quick Stores?
Quick Stores is the free tool offered by Printful to creators who want to sell products through a custom link online, without designing and managing a full ecommerce website, or creating an account to sell with a marketplace like Amazon or Etsy.
It basically gives you a simple storefront where you can showcase your logo, list the products you’ve created with Printful, and process customer payments through Stripe. Compared to a comprehensive ecommerce solution, Quick Stores is pretty basic.
There are no themes you can use to customize your site’s design. All you can really customize is your store’s name (and URL), your logo, and your product descriptions and photos.
The good news is that Printful Quick Stores is free, and very easy to use.
Once you create a store with the tool, you can share your custom link with buyers, and they can purchase products in an instant. All of their order information is automatically transferred to Printful, and their team handles the production and fulfillment process for you.
Similar to Printify’s Pop-Up Store creator, Printful Quick Stores offers ecommerce beginners a very easy way to start selling online, and you won’t need any website design knowledge to use it. However, unlike Printify Pop-up Store, Quick Stores is only available in the US (at least for now).
MORE: Printful Quick Stores vs Printify Pop-Up Store
How to Create a Store with Printful Quick Stores
You won’t need any technical knowledge, or design skills to create a Quick Store with Printful. All you need is a free Printful account (you can sign up with your email address or a Facebook, Apple, or Google account). I’d also recommend choosing a business name and designing a logo in advance.
After you sign up for a free Printful account, log in, and visit your Printful dashboard. Click on the Stores tab in the left-hand menu, and you’ll be taken to a page where you can choose whether you want to integrate Printful with an existing sales channel, or create a new store.
Notably, the “Quick Stores” option will only appear for merchants based in the United States. If you don’t see the Quick Stores section on your dashboard, it might not be available for you yet.
If you do see Quick Stores on your dashboard, click the Create store now button.
Customizing your Printful Quick Store
As I mentioned above, you can’t customize Printful Quick Stores like you would an ecommerce store built with Shopify or Wix. All Quick Stores will look very similar. However, you can add unique details to your store. You can choose a store name, and unique printful.me URL, for instance.
Keep in mind you can’t change your URL later, so make sure you choose something unique, memorable, and relevant. Once you’ve added your name and custom website address to your store, you can upload your logo. If you don’t have one, Printful will just display your store name at the top of the page when customers click on your link.
Next, you’ll need to choose your country of tax residence. Remember, Quick Stores is only available to merchants in the US right now, and it only delivers products to US customers.
Finally, you can select a “default markup percentage”. That’s how you tell Printful how to calculate the price of each product. You can change your markup later, or choose unique prices for each product individually too.
Once you’ve entered all of these details, click Create Store and you’ll be ready to start adding products you’ve designed with Printful.
Adding Products to your Printful Quick Store
After you’ve created your store, you can start designing and adding products to sell. Go back to your Printful dashboard and click on the Stores tab, and you’ll see a button to add a product to your store. If you’ve already designed product templates with Printful, you can add them directly.
If you haven’t designed any products yet, click on Product Catalog in the left-hand menu, and you’ll be able to browse through all of Printful’s customizable products.
Select an item you want to customize, and you’ll be taken to Printful’s Design Maker too. This gives you the option to upload designs, adjust their placement, and even add free assets to your design. You can experiment with text, clipart, and images.
Once you’re happy with the design, convert it into a mockup, add a title, and write an enticing description, outlining all of the most enticing features of your new product.
Then, you can adjust your product’s pricing. If you set a default markup percentage for your store, this will immediately determine the initial retail price. However, you can fine tune your pricing at any time. Finally, click Publish to add your product to your store.
Selling and Getting Paid with Printful Quick Stores
Once you have your Quick Store, you’ll need to promote and share it with as many potential customers as possible. I’d recommend publishing your link on your social media pages, and adding it to any email campaigns you send to buyers.
To receive payments for your products, go to your Printful dashboard and click Billing then Quick Store Payments. Choose Set up Payouts to make sure you can access your earnings.
Printful has partnered with Stripe to enable transaction processing for Quick Stores. When you’re creating your store, you’ll be asked to share your bank details, and create an account with Stripe. Then, each month, Printful will transfer anything you earn from Quick Stores into your bank account.
However, payouts are only processed if you earn at least $25. If you don’t meet that cap, you’ll need to wait for the next payout date when you hit the $25 mark.
Frequently Asked Questions (FAQs)
Can You have More than one store on Printful?
While you can only create a single Quick Store with Printful, you can still integrate the platform with a range of marketplaces and ecommerce platforms too. If you want to expand your reach and build your brand, you can connect Printful to channels like Shopify, Amazon, Etsy, and Squarespace.
Why can’t I see Quick Stores on my dashboard?
If you create an account with Printful and don’t see the Quick Stores option, you may be located outside of the United States. Quick Stores is only available to US retailers at this time. Additionally, some US customers may not have access yet, as Printful is taking a phased approach to introducing Quick Stores to all customers.
How is Quick Stores billing different?
If you use Quick Stores for your storefront, customers will pay Printful directly for any products they buy. Printful will then deduct any costs (such as the base product cost and design costs) from this amount, and send your profits to your Printful wallet. You’ll then be paid by Printful once per month, provided your payout exceeds $25.
The post Printful Quick Stores: The Complete Guide for Retailers appeared first on Ecommerce Platforms.
Original Source: https://www.sitepoint.com/momento-migrates-object-cache-to-ampere-altra/?utm_source=rss

Explore Momento’s serverless cache on Ampere-powered Google Tau T2A, simplifying cloud app performance with automated resource management and high scalability.
Continue reading
Momento Migrates Object Cache as a Service to Ampere Altra
on SitePoint.
Original Source: https://www.sitepoint.com/dev-hackathon-reusable-creativity-on-wix-studio/?utm_source=rss

Read Dev Hackathon: Reusable Creativity on Wix Studio and learn Web with SitePoint. Our web development and design tutorials, courses, and books will teach you HTML, CSS, JavaScript, PHP, Python, and more.
Continue reading
Dev Hackathon: Reusable Creativity on Wix Studio
on SitePoint.
Original Source: https://abduzeedo.com/morfos-design-merging-technology-and-nature-branding
Morfos Design: Merging Technology and Nature in Branding

abduzeedo0815—24
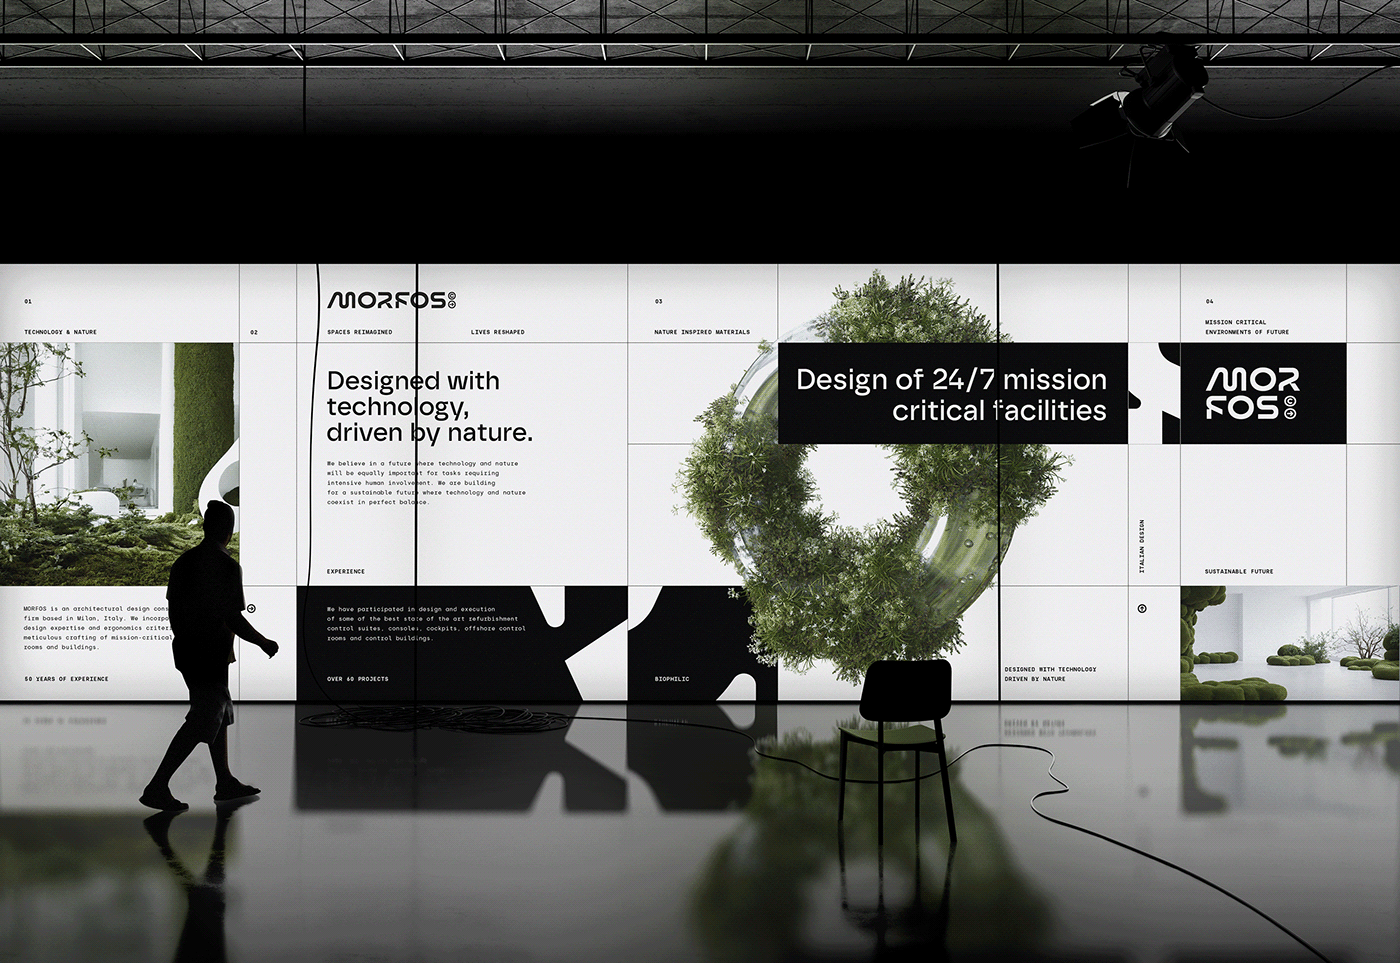
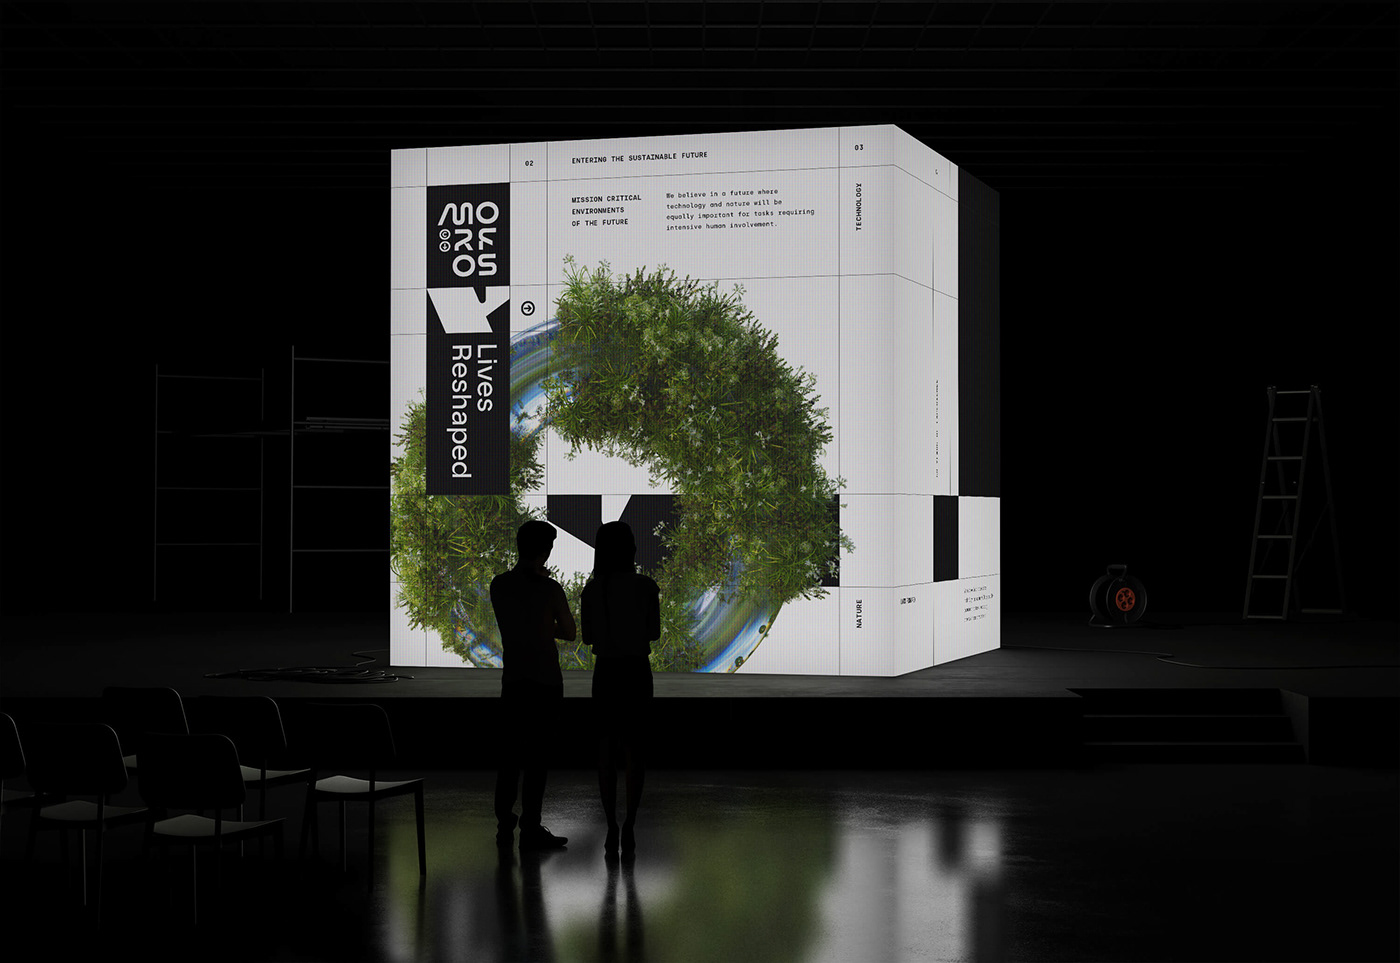
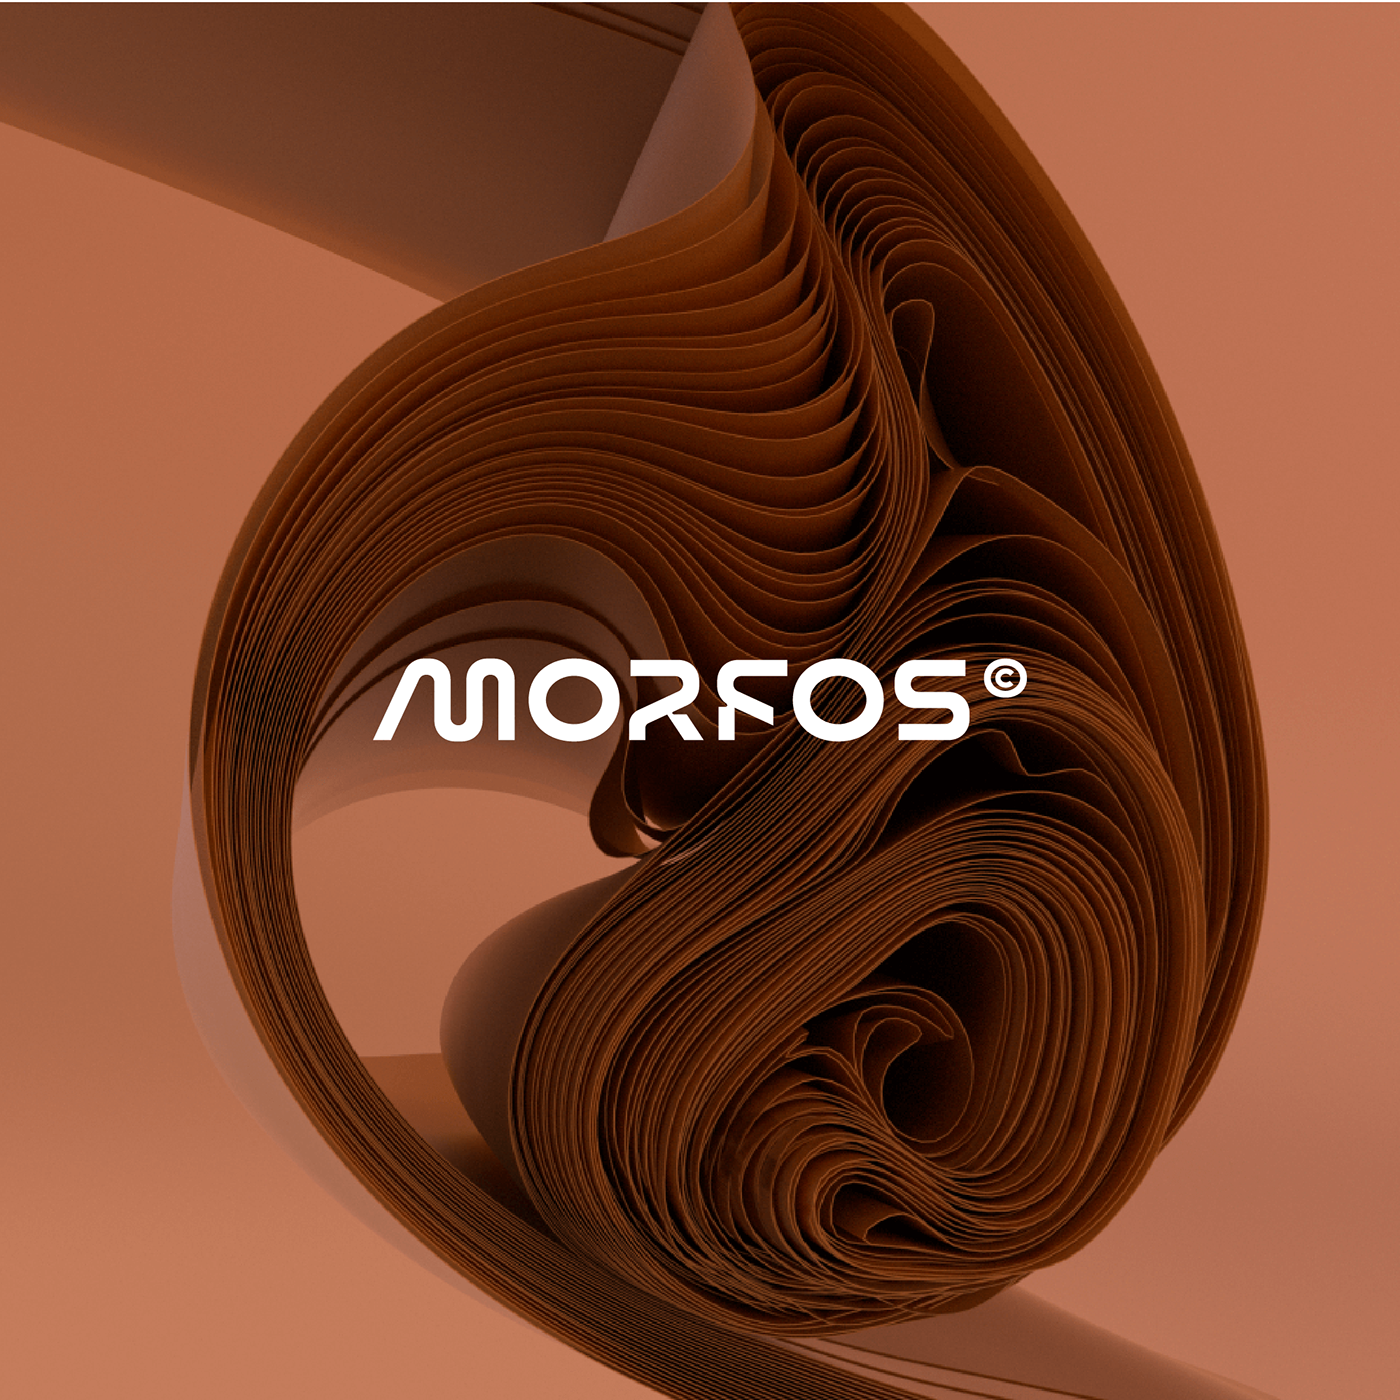
Morfos Design blends technology and nature in their architectural branding and visual identity with dynamic design and biophilic elements.
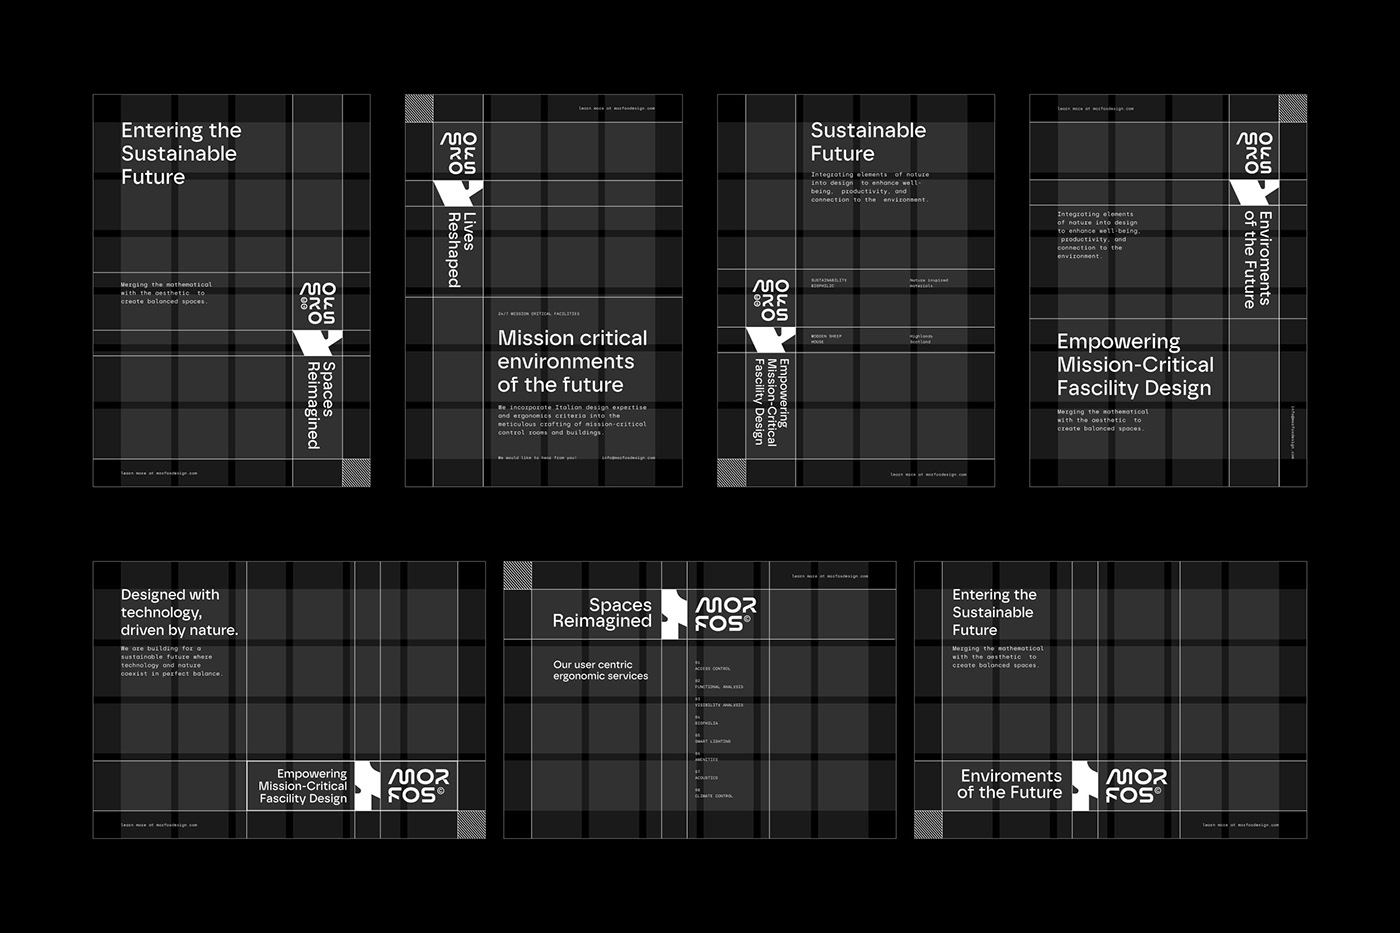
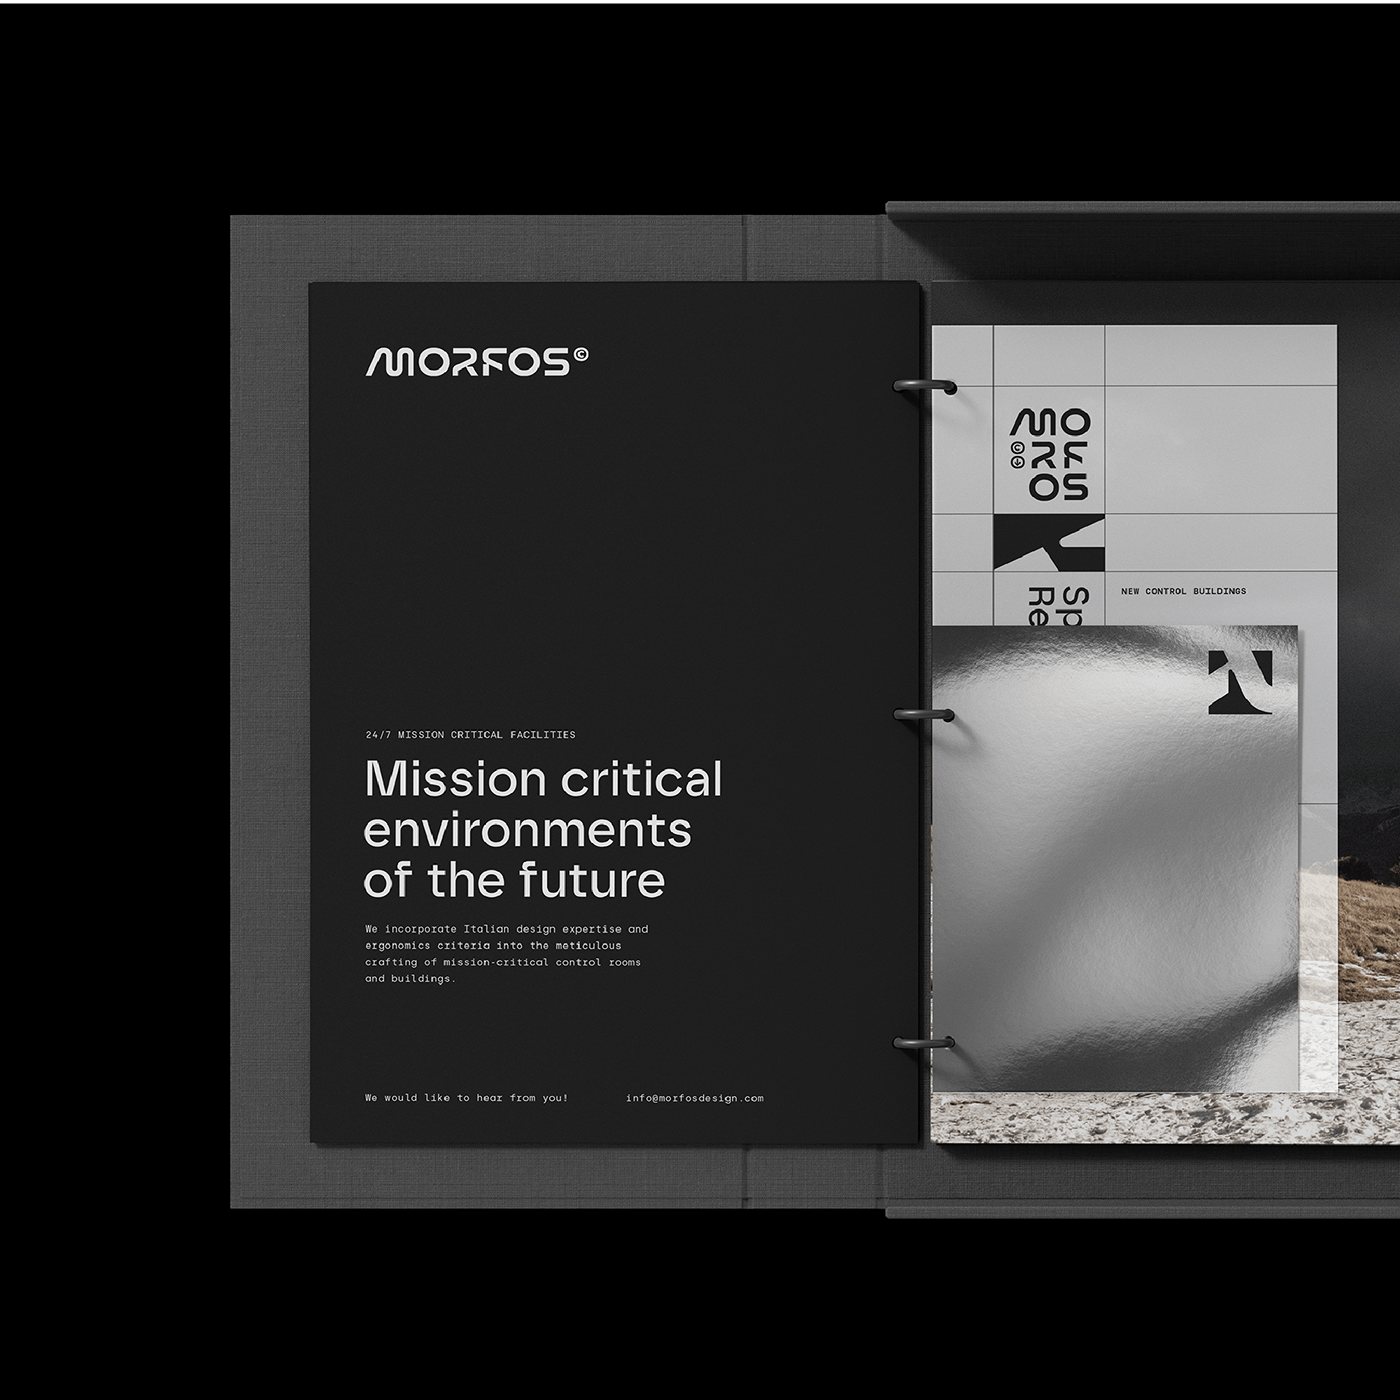
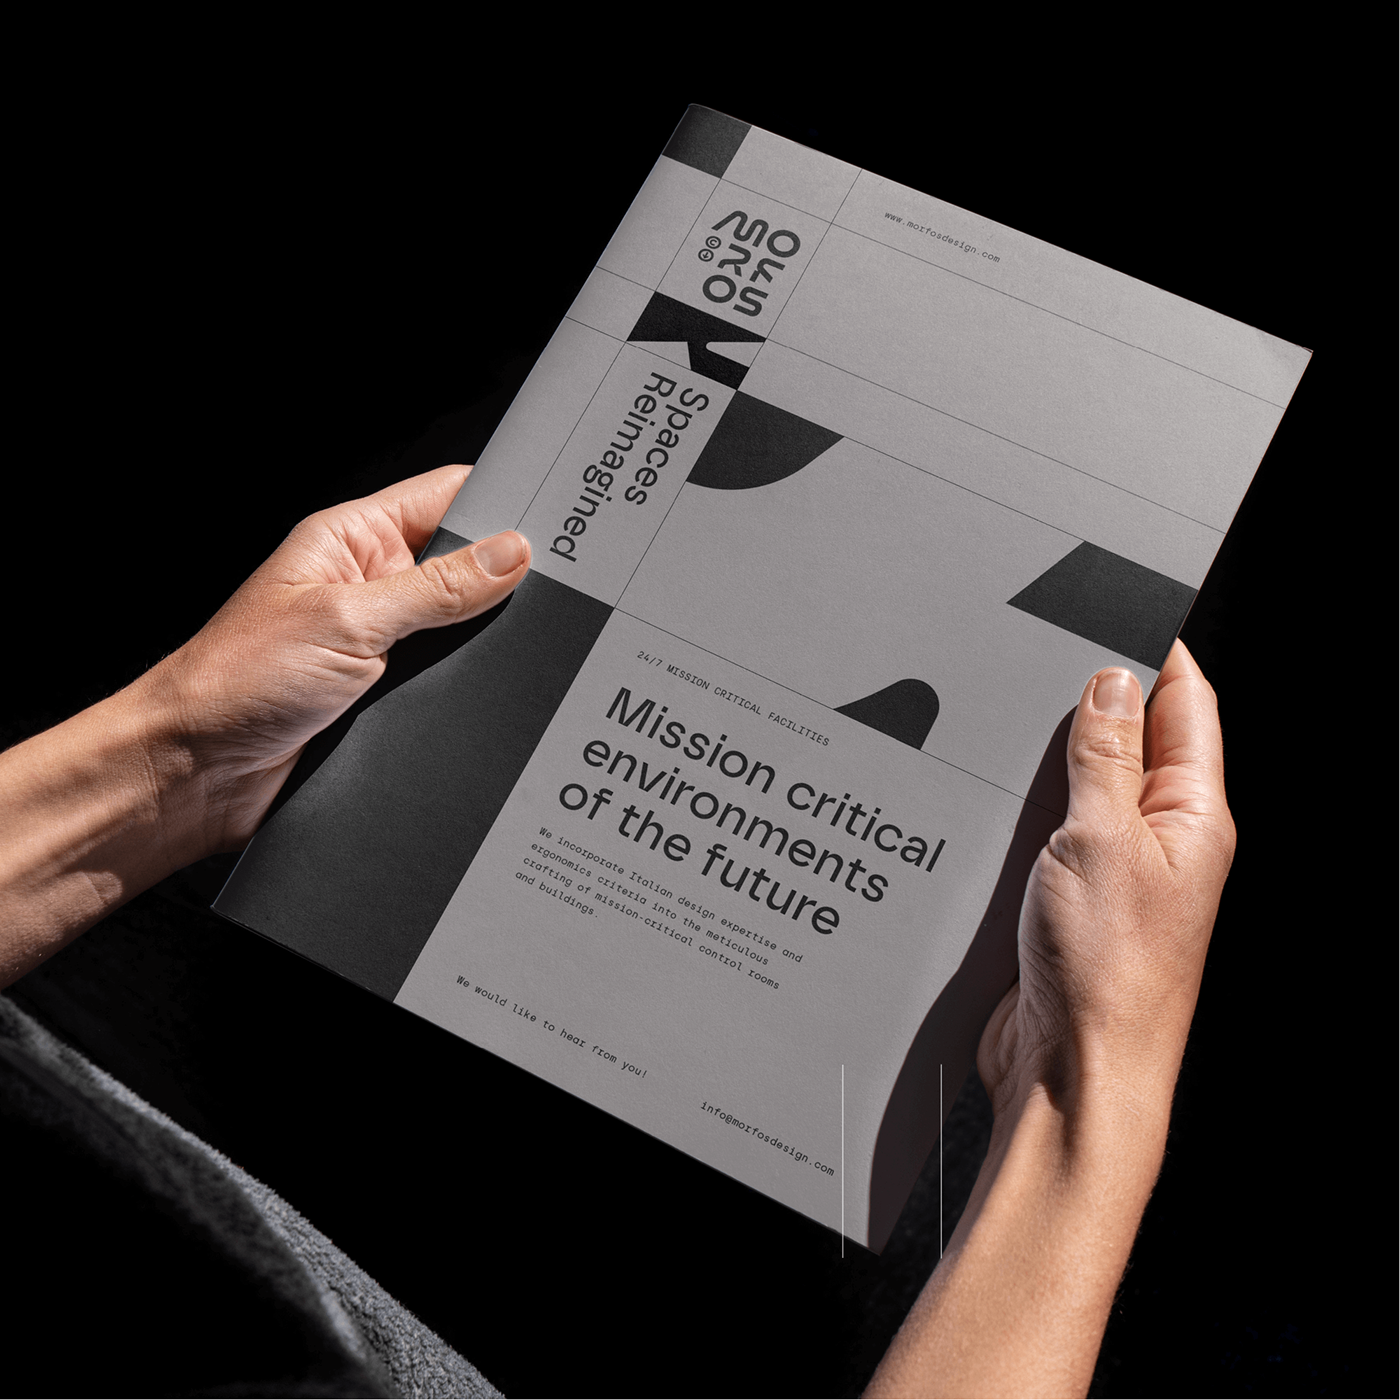
Morfos Design, a Milan-based architectural consultancy, specializes in creating mission-critical control rooms and innovative buildings. Their work draws on Italian design traditions and ergonomic principles, striking a balance between technology, nature, and user-centric solutions.
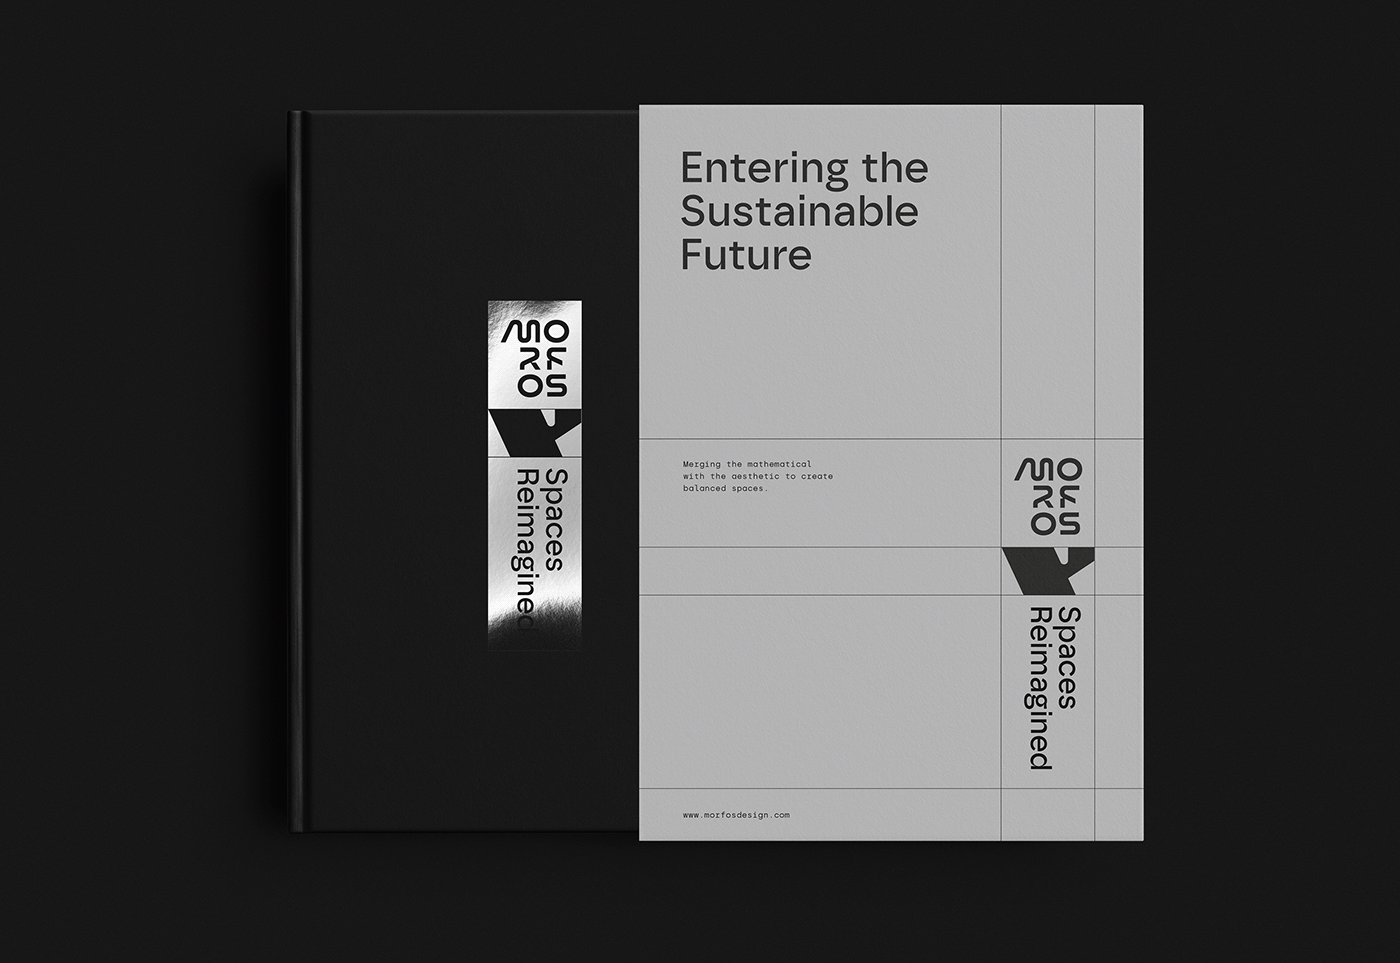
The project scope included research, strategy, logo creation, and crafting a comprehensive visual identity system. Morfos’ visual identity was designed to convey a harmonious blend of technology and nature, emphasizing key elements like user-centrism, innovation, and biophilia.
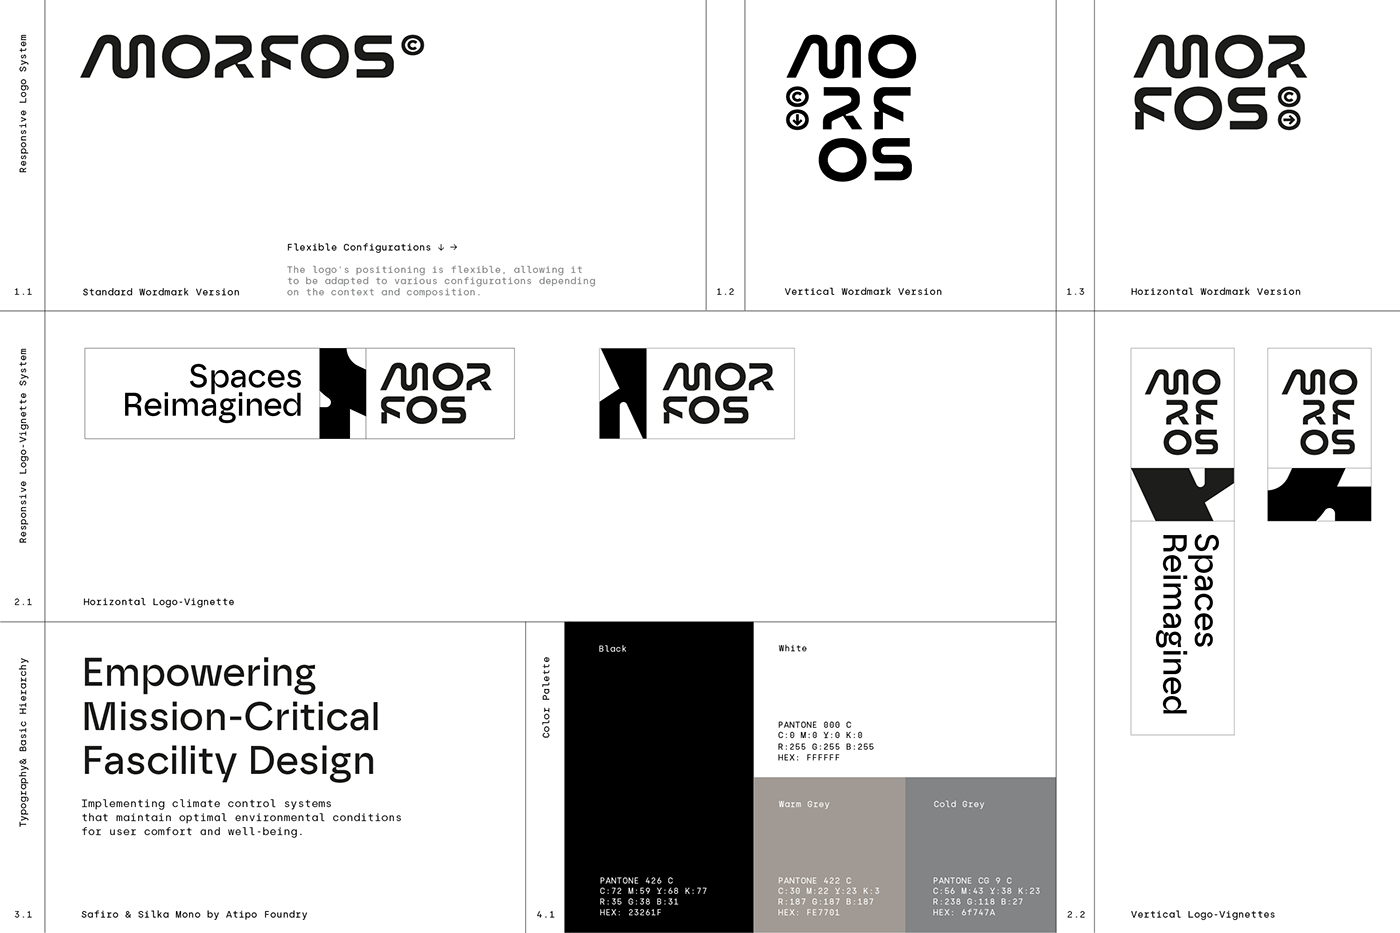
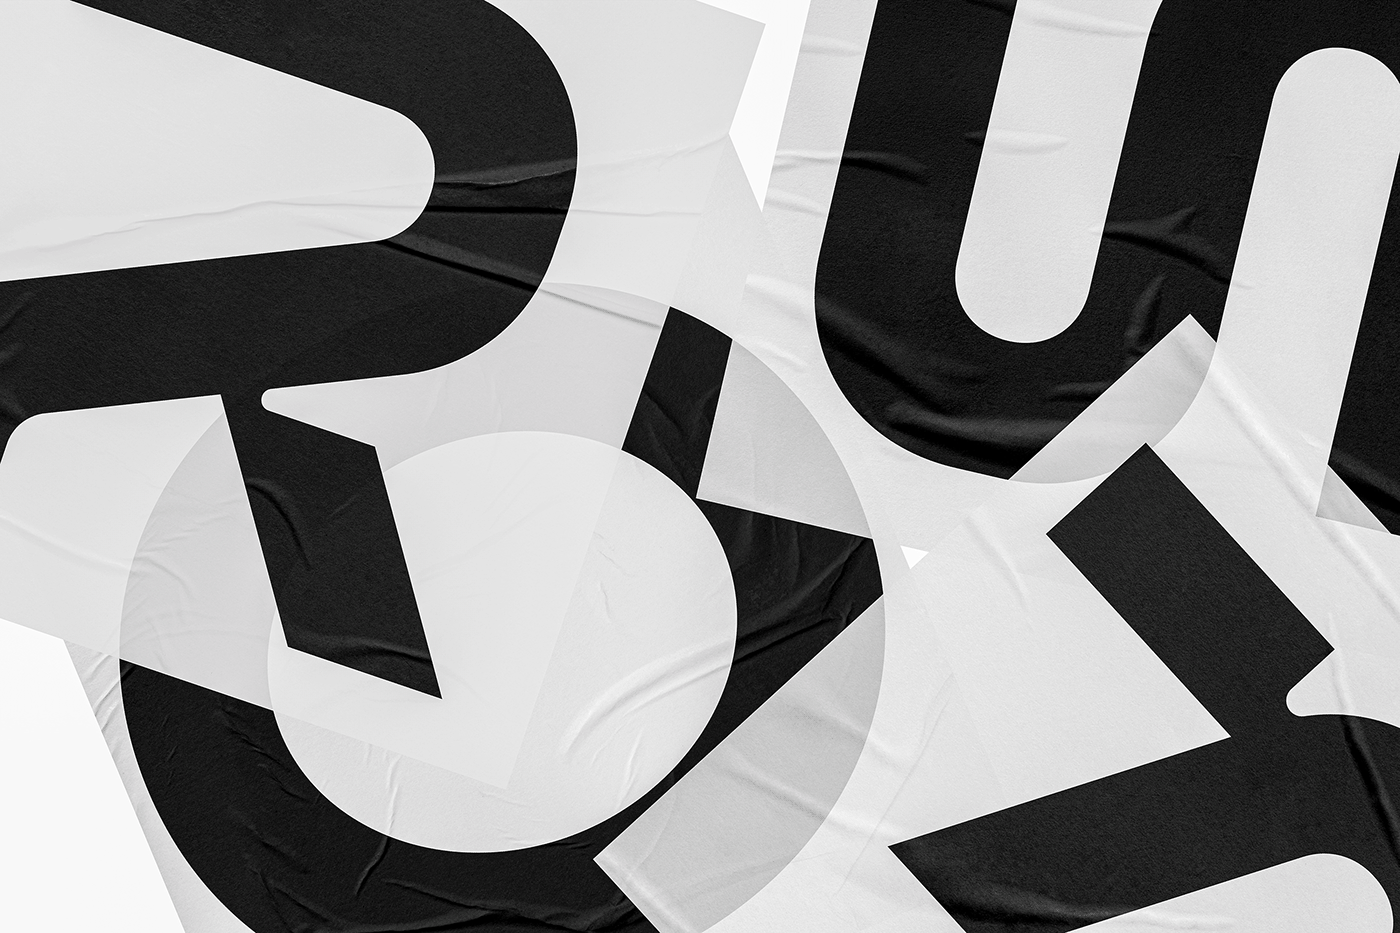
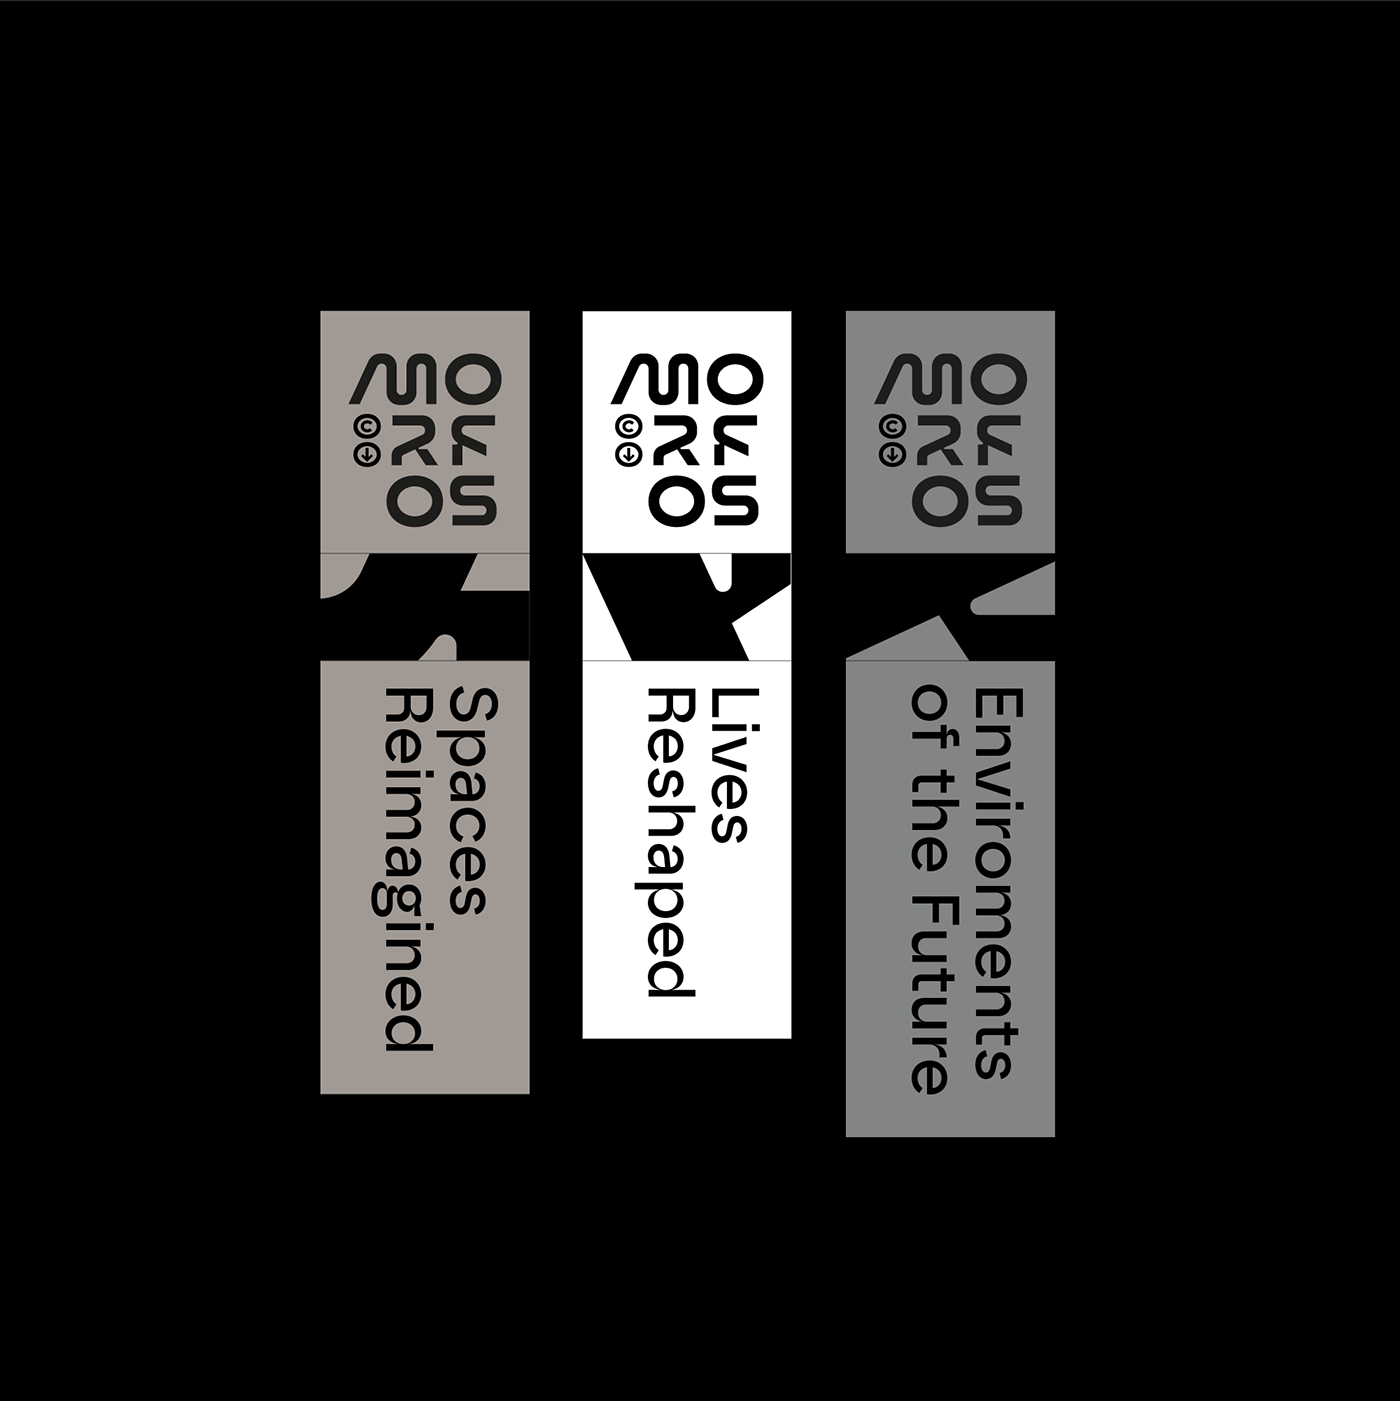
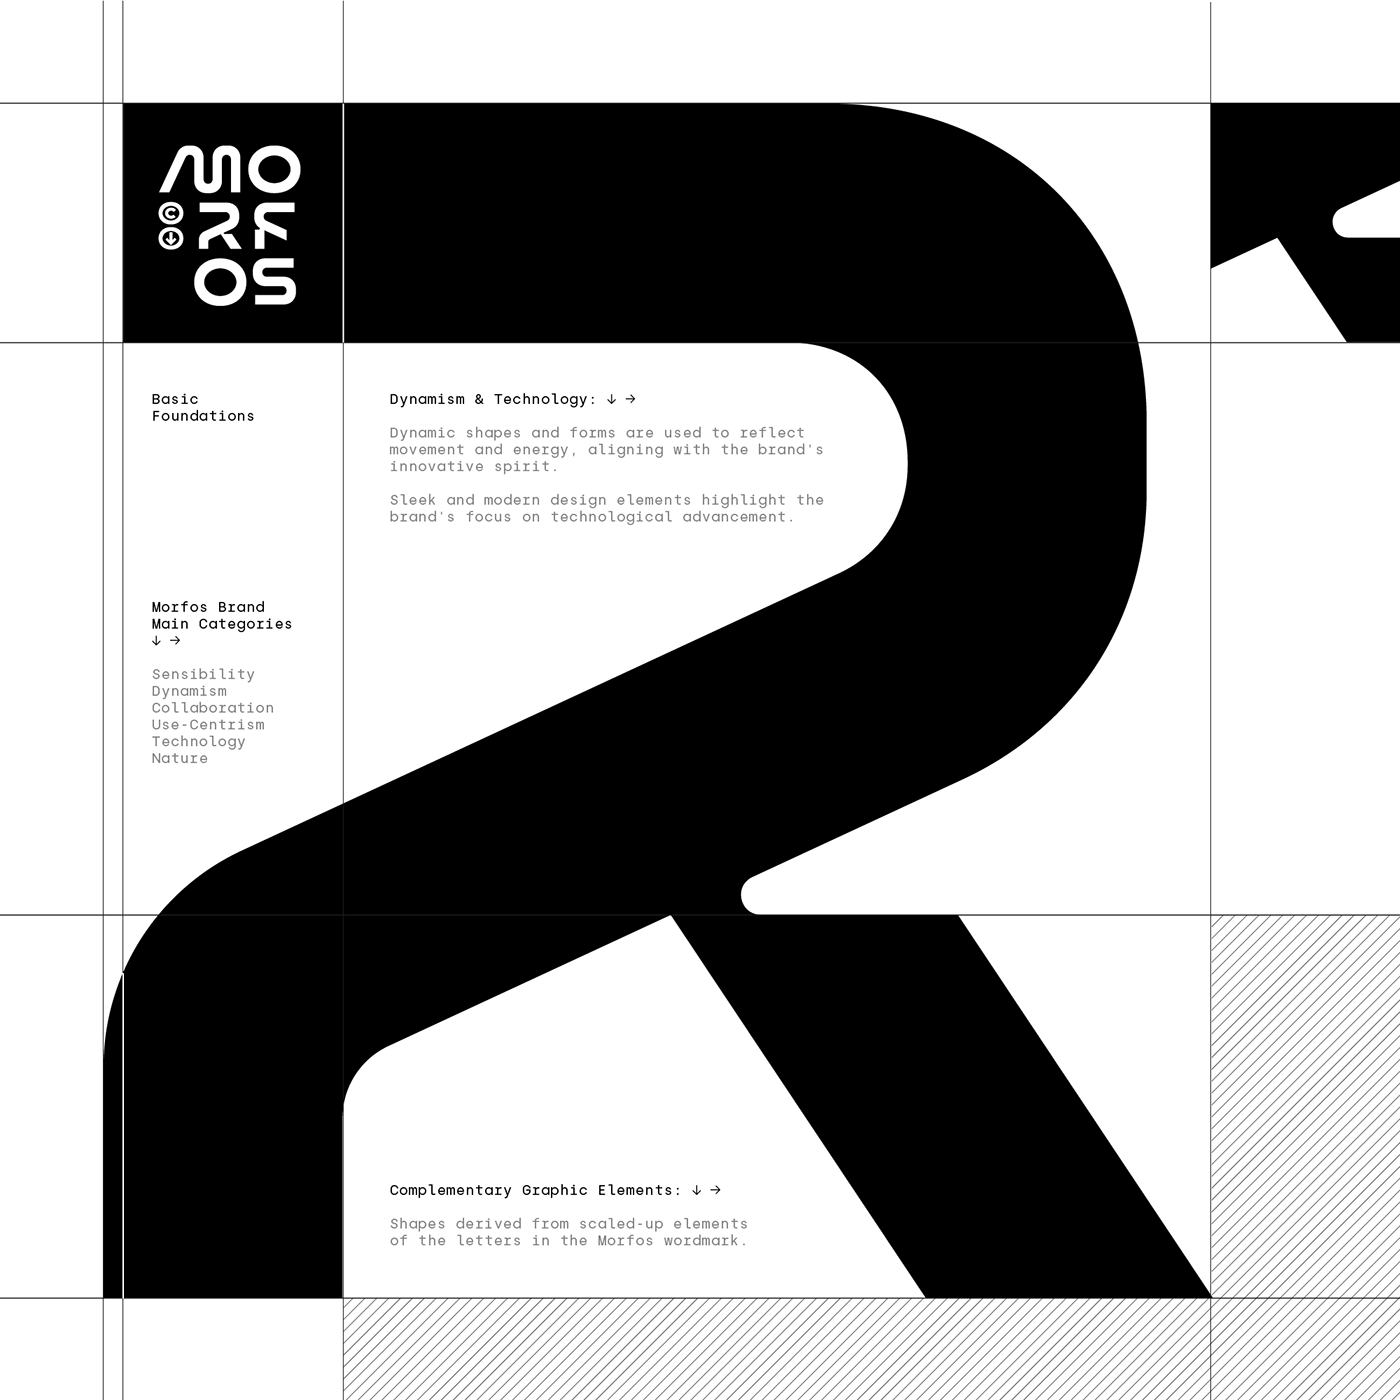
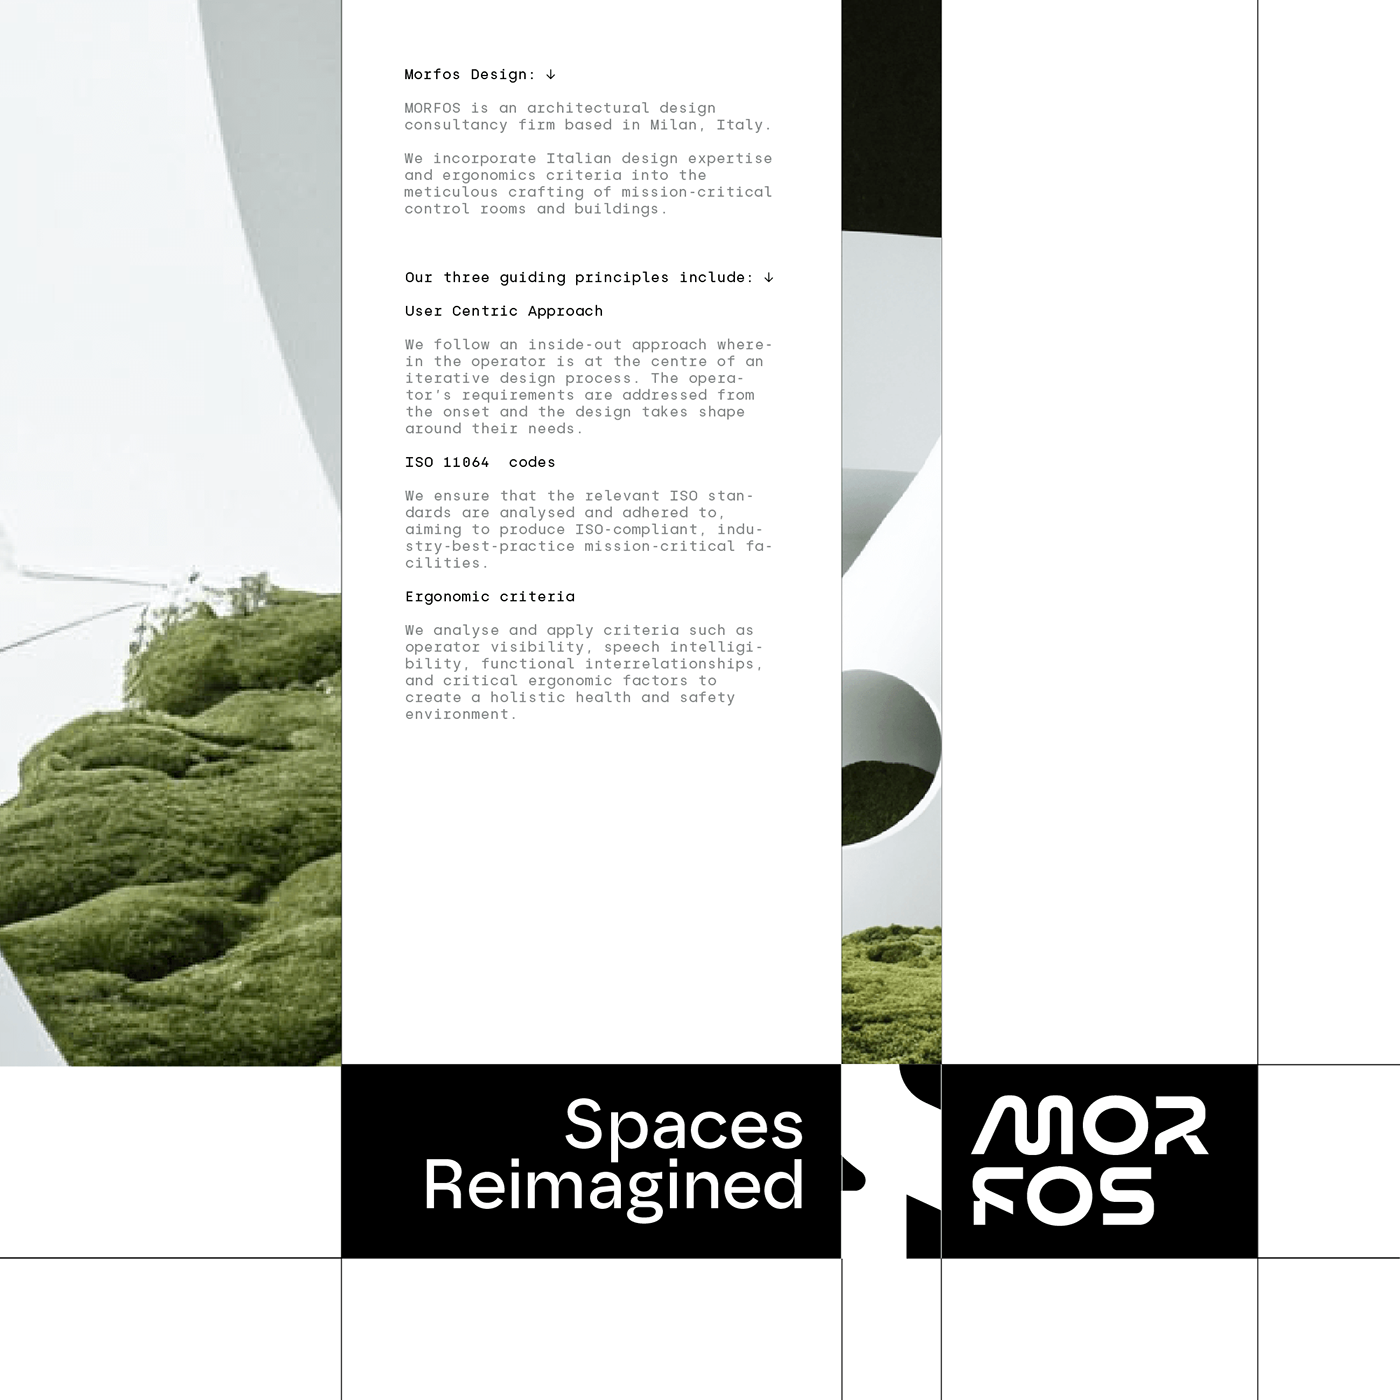
Central to the project is the custom-designed “MORFOS” wordmark. This logo reflects the brand’s core values—sensibility, dynamism, and technology. The letters’ fluid forms communicate movement and energy, while remaining adaptable to various compositions. The flexibility of the wordmark ensures that it integrates seamlessly across multiple platforms, enhancing the brand’s visual storytelling.
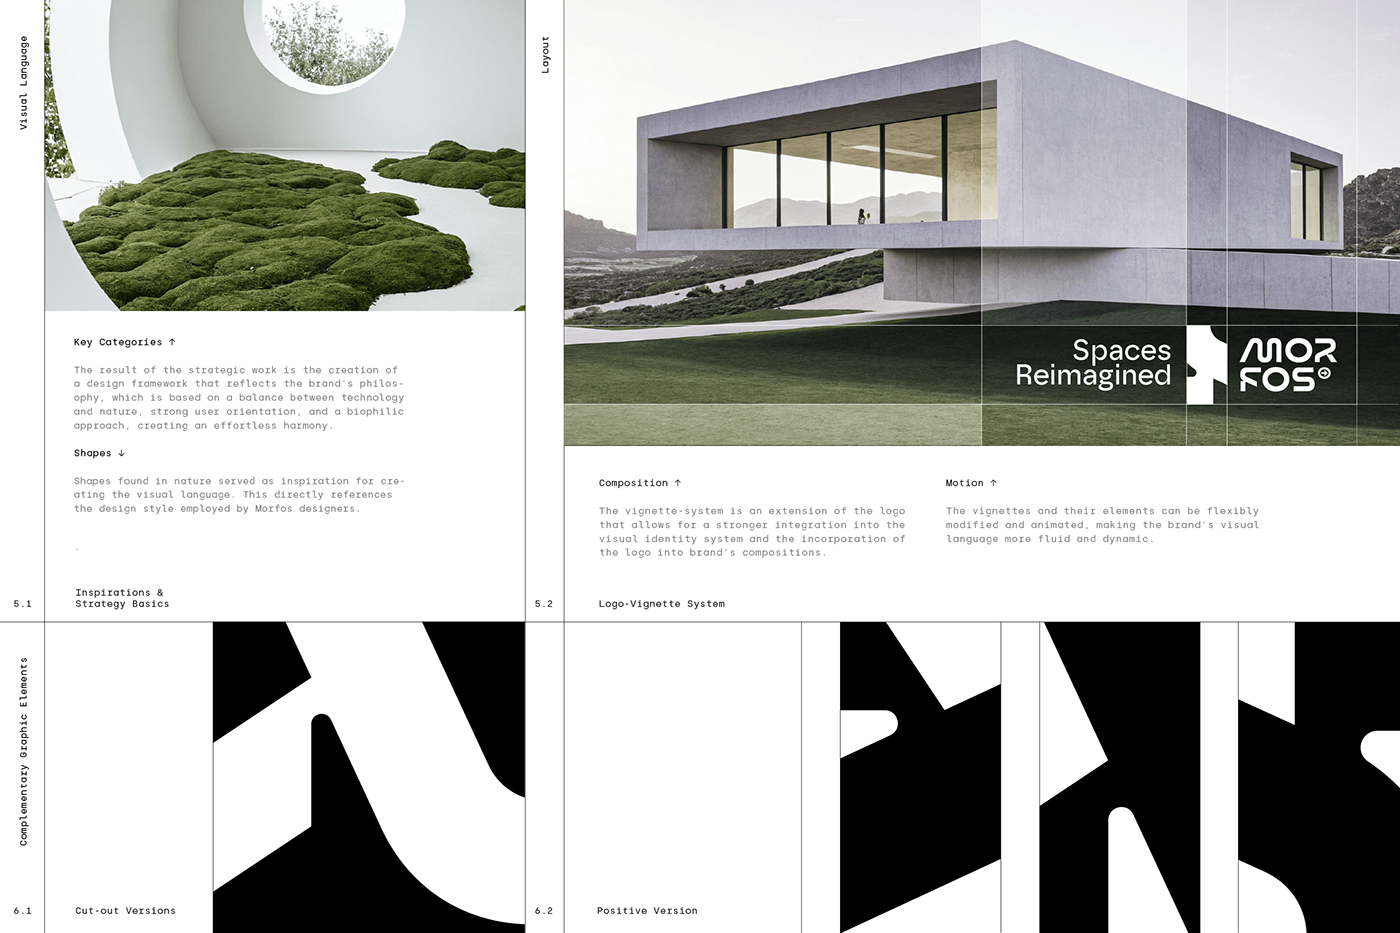
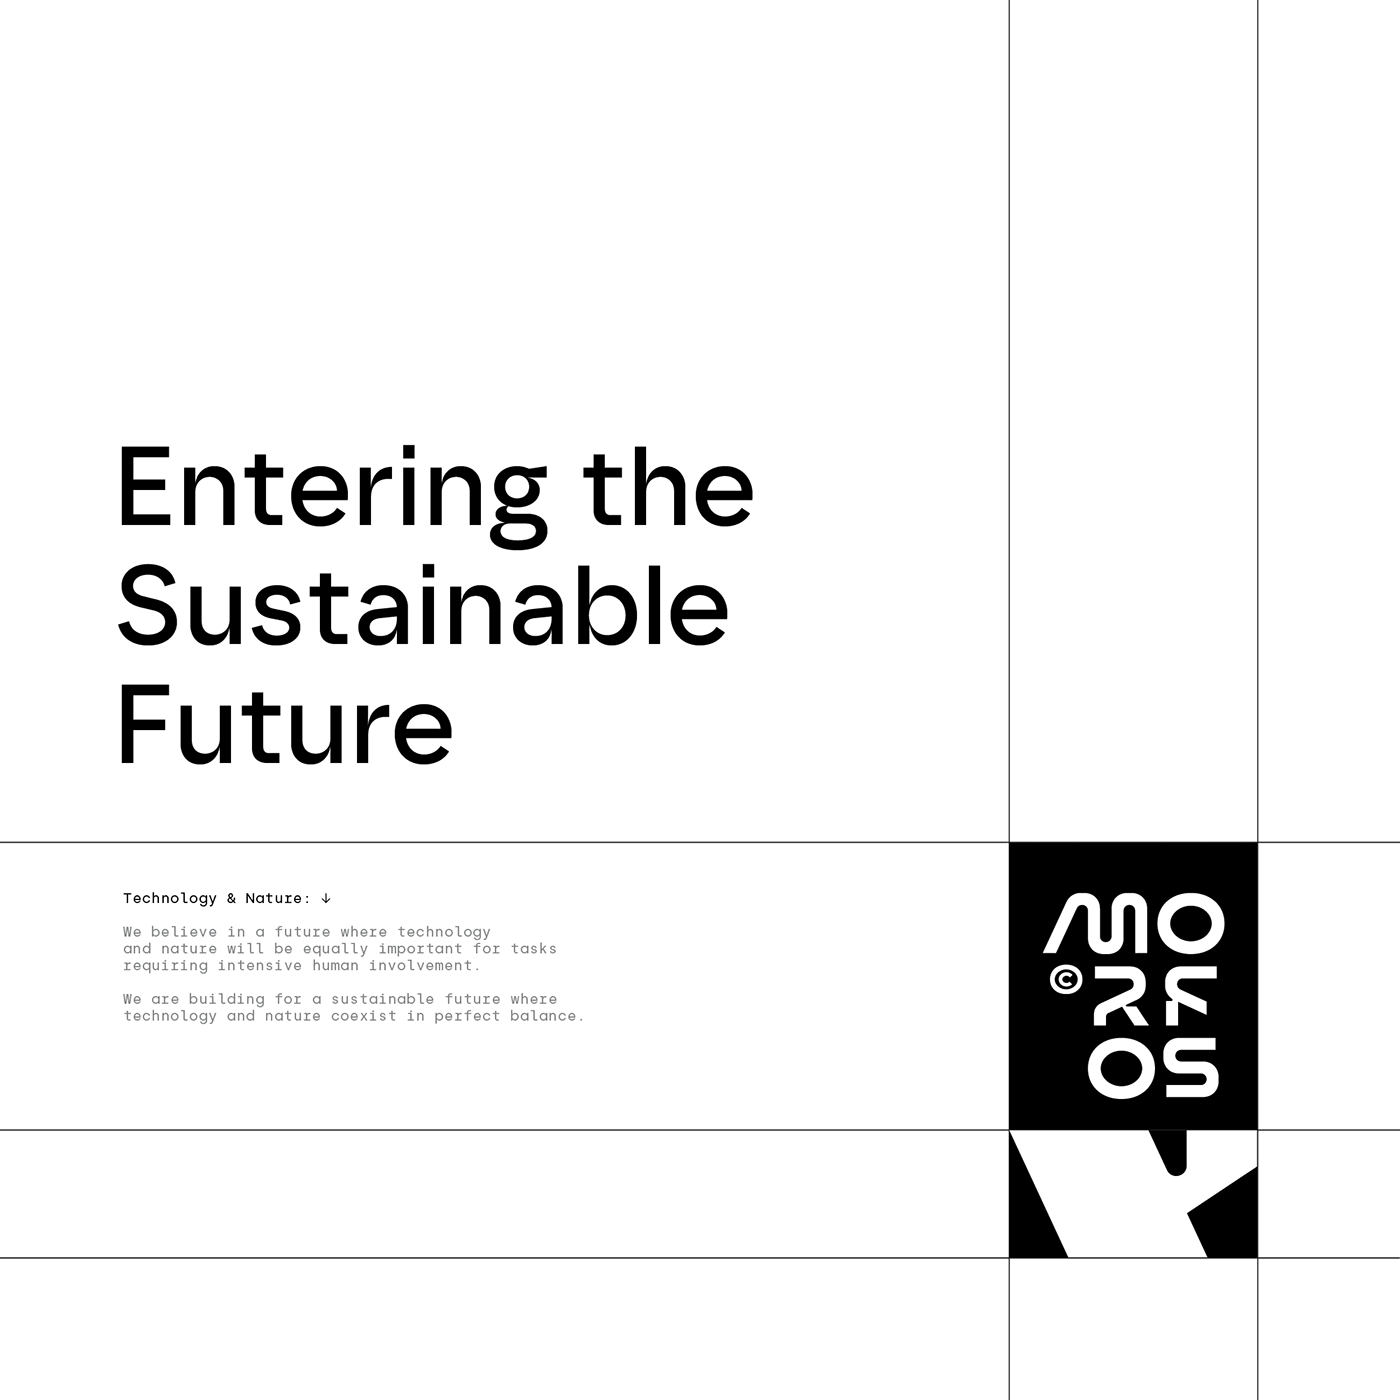
The visual language of Morfos Design takes inspiration from natural forms, merged with technological sophistication. With a minimalist color palette and modern typography, the design reinforces a connection to nature—integral to Morfos’ philosophy. The system’s flexibility ensures a cohesive brand narrative, whether in print, animations, or 3D motion.
An innovative vignette-system expands on the logo’s integration into the visual identity. These vignettes, inspired by natural shapes, are dynamic and adaptable, contributing to a fluid visual system. They can be animated or modified, reinforcing the brand’s emphasis on biophilic design and technological innovation.
By incorporating elements like collaboration and user-centrism, Morfos Design successfully bridges the gap between cutting-edge technology and the calming influence of nature. This visual identity system serves as a testament to their design ethos—creating spaces that are functional, dynamic, and deeply connected to the natural world.
Branding and visual identity artifacts
Credits
Strategy & Concept: Michał Markiewicz
Creative Direction & Design: Michał Markiewicz
Motion & 3D: Kasia Olejarczyk
Graphic Design: Edyta Mucha
Web Design: Edyta Mucha
For more information make sure to check out markiewicz.studio
Original Source: https://tympanus.net/codrops/collective/collective-857/
CSS Grid Areas * So you think you know box shadows? * The Objects of Our Life
Original Source: https://smashingmagazine.com/2024/08/how-defend-your-design-process/
Maybe you’ve been there before: You’re in the middle of the design process, and stakeholders expect you to deliver faster. How do you best manage a situation like this? How do you communicate the design process and defend it when stakeholders think the design is taking too long?
Let’s take a closer look at what you can do to clarify false expectations and prevent them in the first place.
This article is part of our ongoing series on UX. You can find more details on design patterns and UX strategy in Smart Interface Design Patterns 🍣 — with live UX training coming up this year. Free preview.
Why Stakeholders Ask For Quicker Turnaround
🤔 Polished deliverables hide the process.
When you show someone a polished, final design, they probably won’t see the complexity of the work behind it unless they are a designer themself, of course. That’s the knowledge gap that lies between designers and stakeholders and one of the reasons why stakeholders might make false assumptions about how long the design will take.
🤔 Polished deliverables suggest a fast production time.
Not familiar with the design process, stakeholders often track value in UX deliverables in an attempt to “measure design” and the progress made. And that can lead to a dilemma: When more final, polished deliverables arrive quickly, stakeholders also assume a faster production time. The real value of design, however, lies in the quality of the process behind it.

How To Get Support From Stakeholders
Design is all about well-orchestrated feedback loops. For different audiences, from customers and designers to developers and stakeholders. Cutting corners breaks these feedback loops. The result is poor inputs that lead to poor outcomes — often reversible but sometimes damaging for years to come.
Protecting the design process isn’t only in the interest of the designers but, most importantly, in the interest of the user and the business. So, how can we advocate for it?
✅ Highlight user value.
One mistake to avoid is to present deliverables as “finished.” Emphasize that you are still testing and highlight that the design process is a way to maximize user value and that business value comes from user value, not the other way around. No productivity optimization can automate user value, and there is no “later” phase to patch broken design work.
✅ Ask for uninterrupted time.
To get the time you and your team need to design, it might be an option to suggest uninterrupted times for heads-down design work. You could also suggest shifting priorities or reducing the overall scope.
✅ Be sincere about the process.
Also, remember to calibrate expectations: You don’t know how your stakeholders work, so you shouldn’t expect that they know and understand the design process. The more sincere you are about what’s needed to be ready, the more likely you are to get understanding and support, rather than fast turnaround requests.
✅ Visualize progress.
As designers, we often get defensive, not showing the work until we feel that it’s in good shape. Personally, I found it remarkably helpful to show the design progress to stakeholders early and repeatedly instead. Not to ask for a personal opinion on the design but if they think it actually helps deliver user value.
A great technique to visualize the complexity of UX work is event storming — we’ll take a closer look at how it works in a second. To keep stakeholders on top of things, it might also be a good idea to report progress proactively. So why not opt for a short, two-minute video update once a week?
Exercise: Event Storming
The most impactful way to be transparent about the process and explain why design takes time is to visualize it. Not as abstract Double-Diamond or Triple-Diamond diagrams, but as messy, real-world sticky notes on a huge Miro or FigJam board — with all the pieces of work needed to get to final deliverables.

How To Run An Event Storming Session
Basically, we bring everyone involved in the project on board for a 2-hour session. We set orange sticky notes as events required for the success of the project on a timeline. Then, we cluster these events and break them across lanes, with everything from user testing and stakeholder approval to research tasks and design initiatives.
The resulting timeline visualizes the process and acts as a reference for the work to be done, or the work completed. Sometimes, we add multiple lanes to map the work across different UX activities, e.g., UX research, UX metrics, and so on. Your timeline might also include any other teams and domains that are relevant to the work — think technical details, risks, stakeholder engagement, user testing, and others.
The Value Of Event Storming
To me, event storming creates a much more honest and real visualization of the design process compared to any diamond diagrams that we often use. It’s messy, it’s complex, it’s difficult, and it matches the complexity of real life. Plus, it’s customized to the needs of a specific project, with people who must be involved for successful delivery.
I can’t emphasize enough just how incredibly impactful this little exercise can be to create a shared understanding about what we are doing, how we are doing it, and what is required from all teams for a successful delivery. I hope it will help you defend your process the next time stakeholders ask for a quicker turnaround. 🙌🏽
Further Reading
“Design Without Process, Or The Form Factor Trap,” by Pavel Samsonov
“How To Increase Heads-Down Time To Design,” by Sungjoon Steve Won
“How Can You Find Time To Design?,” by José Torre
“Product Design: Too Much Work, Too Little Time,” by Tess Gadd
Meet Smart Interface Design Patterns
You can find more details on design patterns and UX strategy in Smart Interface Design Patterns, our 10h-video course with 100s of practical examples from real-life projects — with a live UX training later this year. Everything from mega-dropdowns to complex enterprise tables — with 5 new segments added every year. Jump to a free preview. Use code BIRDIE to save 15% off.
 Meet Smart Interface Design Patterns, our video course on interface design & UX.
Jump to the video course →
100 design patterns & real-life
examples.
10h-video course + live UX training. Free preview.
Original Source: https://tympanus.net/codrops/2024/08/07/interactive-3d-device-showcase-with-threepipe/
Build a minimal 3D web application to showcase designs on a laptop and phone in an interactive environment using Three.js and threepipe.
Original Source: https://ecommerce-platforms.com/articles/can-you-sell-directly-from-printful
Can you sell directly from Printful? Until very recently, the answer was “no”. While Printful’s wide range of integration options allowed creators to embrace a host of sales channels, there was no direct storefront option available from Printful itself – until now.
In June 2024, Printful launched it’s “Quick Stores” service – a free solution that allows beginners to create a simple store and start selling products instantly, without a traditional ecommerce platform.
Here, I’ll tell you exactly how this feature works, and explore some of the other options you have for selling Print on Demand products with Printful.
Can You Sell Directly from Printful?
Yes, you can sell directly through Printful, as of June 2024. However, there are some limitations. First, it’s worth noting that Printful’s solution for direct selling isn’t the same as what you’d get from some other POD companies. There’s no “marketplace”, like you’d get with Spring or Redbubble.
Instead, Printful offers access to a simple storefront where you can list the items you’ve designed with Printful, and start accepting payments. The experience is very similar to using Printify’s Pop-up Store solution. I should say, while the “Quick Stores” feature is great for beginners, and free to use, it’s not going to give you the same functionality as a full ecommerce platform.
You can’t really customize much of your store, beyond the name, logo, and your product names and descriptions. There are no themes to choose from, and you can’t sell any other products that aren’t created specifically with Printful.
Additionally, unlike Printify’s Pop-Up Store service, Quick Stores from Printful are currently only available for retailers and sellers in the US. This means not only can you not launch a store if you’re outside of the United States, but you can’t sell to global audiences either.
How to Sell with Printful’s Quick Stores Feature
Provided you (and your customers) are located in the US, getting started with Printful’s Quick Stores feature is very simple. All you need to do is sign up for a free account with Printful, and visit either the “Quick Stores” page, or your Printful dashboard. If Quick Stores are available in your region, you’ll find the option to create one in the “Stores” tab of your account.
Printful will walk you through the process of setting up your store, asking you to choose a business name, add your logo, and configure payment and shipping details.
Once you have your store, you can design your products in Printful’s Design Maker, or add the ones you’ve already created. You can pick which product images you want to showcase, set your prices, and add descriptions to engage your customers. Then, you simply share the unique link for your store with your customers, and they can make purchases from the link directly.
With Quick Stores, Printful takes care of the entire fulfillment processes, applying standard shipping rates to each purchase automatically. Every month, Printful will automatically transfer the profits from your sales to your bank account (provided your payout amount exceeds $25).
Try Printful Quick Stores
Other Options for Selling with Printful
The Quick Stores feature from Printful is excellent for beginners who want to start selling online without managing a full ecommerce platform, or using a marketplace like Amazon. However, it’s still pretty limited. First, for now, you can only sell in the US. Printful might expand this feature to other regions in the future, of course.
Secondly, you’re not going to get a lot of the features you would get with a full ecommerce platform, such as access to marketing tools, themes for store design, or the option to sell various different products and services.
The good news is there are other ways to sell on Printful. In fact, Printful integrates with dozens of platforms, including marketplaces like Etsy, Ebay and Amazon, and ecommerce platforms like Wix, Shopify, and Squarespace.
You can even sell through TikTok shop! Getting started is simple (and free). Start by visiting the Printful website and creating an account. You can do this by clicking the Sign Up or Get Started buttons on the website. Log in with your email, Facebook, Google, or Apple ID, and a password.
Next, follow these steps:
Step 1: Connect to your Chosen Sales Channel
Once you have an account, you can connect Printful to dozens of sales channels. Simply click on the “Stores” tab in the left-hand menu, then select “Choose Platform.”
Printful will guide you through the process of connecting your store step-by-step. Notably, some connections take a little longer to set up than others. For instance, Etsy, Shopify, and Square Online stores can be set up in a few minutes. However, other platforms take a little more work.
Step 2: Choose your Products
Once you’ve connected your storefront, the next step is choosing your products. There are more than 300 options to choose from, ranging from home accessories to t-shirts and sweatshirts. Click on Product Catalog in your dashboard to start browsing through options, and use the filter buttons to narrow down your choices.
After you find a product, you want to customize, click on Create Product Template, and this will take you to Printful’s design maker. When choosing your products, it’s worth keeping a few things in mind, such as the price of the product (how much it’s going to cost you before you add a profit margin), and the printing methods available.
Printful offers Direct-to-Garment, All-Over print, embroidery, and sublimation, sot here are plenty of great ways to customize your catalog. It’s also worth noting that some products are available for express delivery, so you might want to check if this is an option before you decide on your items.
Step 3: Add Your Designs
In the Design Maker, after you’ve selected your products, you can customize each item with unique images and content. You’ll be able to upload images directly, or choose from a library of pre-existing assets. You can also use text presets, clipart, quotes, and premium images to customize products.
If you’re using your own images, it’s worth making sure they’re in PNG or JPEG format before you upload them to the platform. This will boost your chances of a high-quality print.
Once you’ve chosen your images and text, you can move them into the ideal position on your products, adjust your design and text to fit within the print area, and more. Then, click “Save to Templates”, to prepare your product for selling.
Step 4: Adding Products to your Store
When you’re done designing, click on the Product Templates tab on the left-hand menu, and hover over the item you want to sell. When the three dot “menu” button appears, select Add to Store.
This will connect you immediately to the sales channel you’ve connected to Printful.
Add the mockups you’ve created with Printful to a new product page, and include a description. You’ll also need to choose a price for your product. Remember, when setting your prices, you’ll need to account for the base price of the product (Printful’s fees), the shipping fees, and the profit margin you want to end up with. I’d recommend a profit margin of about 30-40%.
Click Submit to store to finish.
Step 5: Manage Shipping and Fulfillment
After your products are added to your store, you’ll need to choose your shipping options. Printful offers two options. Flat shipping is the standard option, where you’ll pay set fees based on the products you’re selling and their destination – this is the most cost-effective shipping method.
Alternatively, you can choose “Live shipping”, which calculates the cost of shipping based on the customer’s address and the location of the fulfillment center. There are times when this option can be cheaper, if a customer is located close to a Printful fulfillment center. However, live shipping is only available for some platforms – like Shopify.
When you’ve chosen your shipping options, you have two ways to submit orders to Printful for fulfillment. One option is to manually send order details to Printful through your Printful dashboard. You can do this by clicking on “Product Templates”, hovering over the item, and selecting “Make an Order” when the menu button appears.
Alternatively – and this is the better option in my opinion- you can automate order fulfillment. In the Printful dashboard, go to Settings and select Order. Then, in your Order Import Settings choose to “automatically” fulfil each order, and click Save.
Step 6: Paying Printful
The good news is with Printful, you only need to pay for orders after your customers actually make them, this reduces your upfront costs as a seller. Whenever you submit an order, manually or automatically, you’ll be charged (rather than your customer). The amount you’re charged includes the base price of the product, taxes, shipping, and other fees (like fees for branding).
Notably, you do keep all of the money your customer pays you through your online store. Printful accepts various payment methods, including PayPal, debit, and credit cards.
To set up your payment options, go to the Printful Dashboard, then click on Billing followed by Billing methods.
Click Add new Billing method, and submit your payment details. You can set different billing methods for each sales channel you use, if you prefer.
Alternatively, you can set up a Printful Wallet in the Billing section, which you can add funds to whenever you choose. This is a good way to save yourself some time adding payment details every time a customer makes an order with your store.
Read more:
Printful Review 2024 – Expert Insights on Quality, Pricing, and Services
Printful vs Printify (2024): The Ultimate Comparison of Printify vs Printful Platforms
Can You Make Money with Printful?
Just because Printful doesn’t give you a full ecommerce platform, and currently limits its Quick Stores feature to US sellers, doesn’t mean you can’t make a profit with the solution. If you are based in the US, the new Quick Stores feature is a great way to dive into online selling with minimal effort, and absolutely no upfront costs.
Based on my experience, I’d definitely recommend branching out into a few different sales channels, even if you can use the Quick Stores feature, to boost your revenue.
If you’re based outside of the US, or you want more freedom to design your own storefront and sell to customers all over the world, Printful gives you a ton of integration options to choose from. Plus, it’s one of the most reliable POD companies I’ve reviewed, offering a wide range of high-quality products, and fantastic tools for creators.
The post Can You Sell Directly from Printful? How Does it Work? appeared first on Ecommerce Platforms.