10 Creative Techniques Using CSS3 Box Shadow

Original Source: https://www.hongkiat.com/blog/css3-box-shadows-effects/

We have seen a tremendous number of advancements in CSS3 web development over just the past few years. Popular websites all around the Internet have begun incorporating many unique styles such as…

Visit hongkiat.com for full content.

7 Awesome Wireframing Tools You Should Be Using

Original Source: https://www.sitepoint.com/best-wireframing-tools/

A Roundup of the Best Wireframing Tools

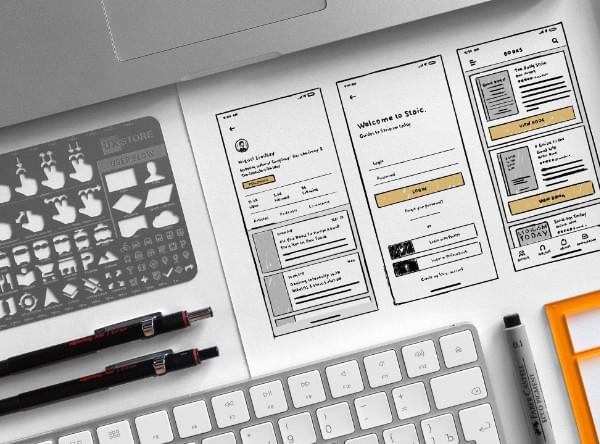
Over the years, we’ve become so much more knowledgeable about the UX design process, especially in regards to wireframing — a highly useful design exercise that can significantly improve the overall user experience of the final product.

In this roundup, we’ll take a look at the best wireframing tools.

What is a Wireframe?

A wireframe is the skeletal mockup of a design — the unstyled, barebones foundation that exists before the addition of fonts, colors, and any other visual aesthetics. Wireframing often happens after ideation but before high-fidelity prototyping.

Wireframing is sometimes referred to as “mid-fidelity,” and what defines a wireframing tool is the fact that they allow designers to drag and drop ready-made design elements and components onto the canvas, so that they can experiment with ideas quickly in a non-destructive environment, collect feedback from stakeholders, and even conduct user testing.

How Are Wireframes Used in UX?

Wireframing offers designers a chance to carefully think about the core UX of their design, meaning the usability, accessibility, scannability, clickability, and so on (often with special focus on the navigation, form, and checkout UX).

While visual design contributes to UX as well, designing the “surface layer” alongside the core UX can quickly turn into a complicated mess, which is why we design these skeletal mockups known as wireframes before moving to high-fidelity.

Let’s take a look at the best wireframing tools that are currently available.

Balsamiq

Platforms: Web, macOS, Windows
Pricing: various options for web and desktop

Balsamiq is a major player in the wireframing space.

What makes it stand out from the rest is its (optional) sketch-like visual aesthetic, which reminds us that wireframes should be experimental, low/mid-fidelity, and even disposable — the kind of attitude that makes wireframing thrive.

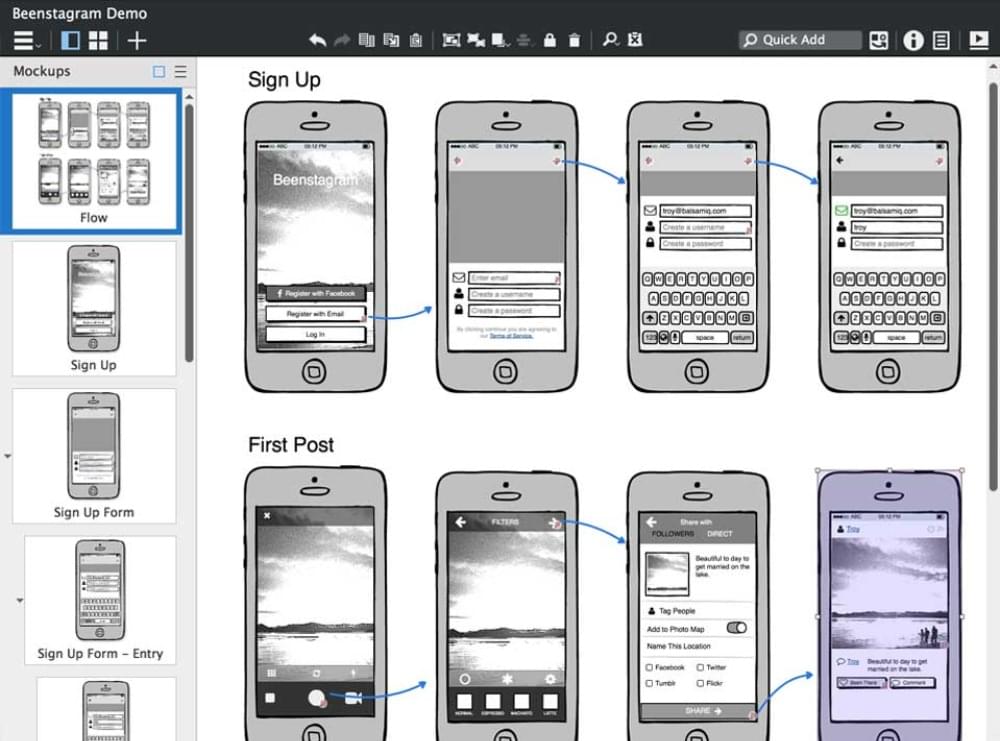
An example of the Balsamiq interface

Balsamiq is ideal for lean, agile teams, with features that help designers test wireframes on real devices, as well as collaborate on feedback with stakeholders. With integrations that enable bug-tracking (for example, with Jira Cloud), Balsamiq suits both designers and manager types alike.

As for wireframing components, Balsamiq is one of the most-equipped, being one of the most-seasoned tools on the market today. As with all wireframing tools, these are used by simply dragging components onto the canvas to visualize ideas quickly.

Whimsical

Platforms: Web only
Pricing: Free Plan, $8, or $12 (/month)

Despite being relatively new to the industry, and thus having the smallest repertoire of wireframing components, Whimsical is the best looking, the easiest to use, the most fun to use, and finally, the cheapest wireframing tool on the market today (minus Justinmind, which is free for “wireframing only”).

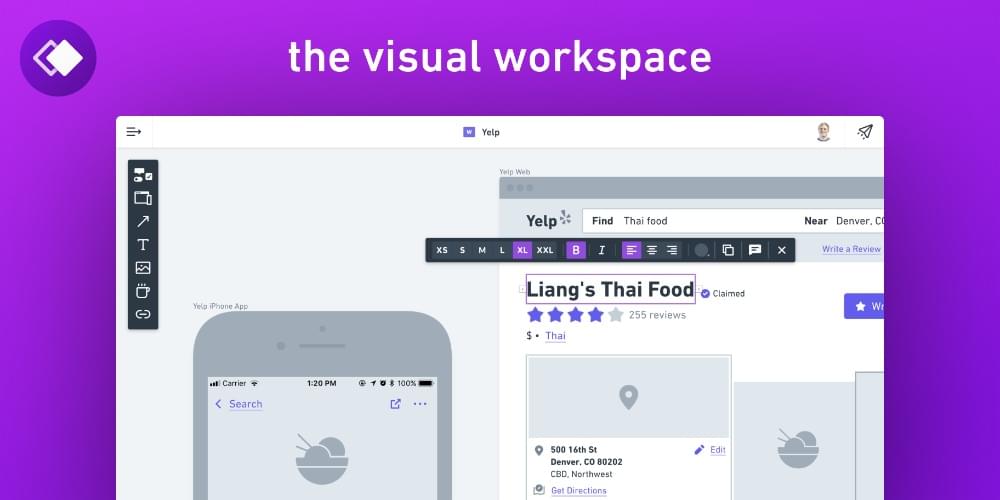
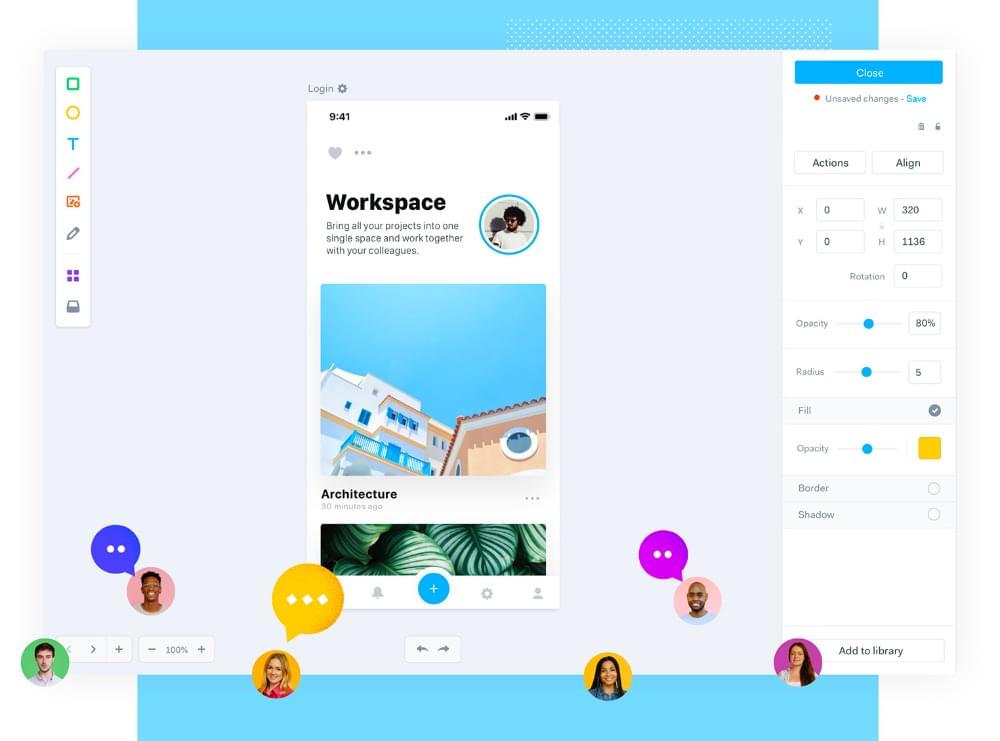
An example of the Whimsical workspace

A major downside is that there aren’t any user testing features. However, other collaborators can at least add their feedback by commenting on wireframes, and even manage bugs, tasks, and improvements in a Trello-like, kanban-style board. So far, the feature set is gearing up to be massively useful in a design sprint-style workflow.

Also, mind-mapping features are on the way.

Axure RP

Platforms: macOS and Windows
Pricing: various options for teams and individuals

Axure RP, like Balsamiq, is another huge wireframing tool, modestly offering dynamic, data-driven content features, animation features, and also adaptive and conditional layouts. It’s no wonder that “87% of the Fortune 100 companies use Axure”.

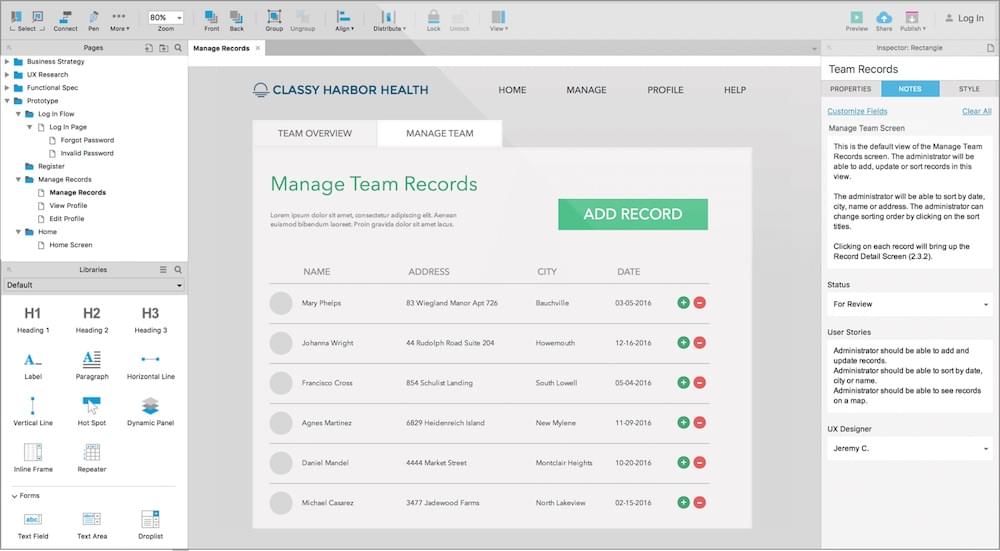
The Axure interface

Axure has been around for a whopping 16 years. Its only downside is the lack of user/usability testing features.

Marvel

Platforms: Web
Pricing: Free Plan, $12, $42, or $84 (/month)

Marvel is known as being one of the easiest tools to master, which includes its wireframing features. Although the majority of the workflow happens in Sketch, where designs are then handed off to developers, Marvel’s lesser-known wireframing tools are both easy to use and nice to look at — much like Whimsical’s.

The Marvel workspace

Since Marvel integrates with user testing tool Lookback, you could say that Marvel is a more-seasoned Whimsical, albeit more expensive due to the addition of prototyping and handoff features, but nonetheless a very worthy addition to this list.

The post 7 Awesome Wireframing Tools You Should Be Using appeared first on SitePoint.

A Look Into: Setting Up Local Server with AMPPS

Original Source: https://www.hongkiat.com/blog/ampps-server/

MAMP is one of the most popular application in OSX to run local server; for Windows users, WAMP or XAMPP is likely the most widely used options. These 3 applications are sufficient for the job. But…

Visit hongkiat.com for full content.

Inside Look at Tony Hawk's Skate Jam Game UI Design & Process

Original Source: http://feedproxy.google.com/~r/abduzeedo/~3/2LyUTxjnQeQ/inside-look-tony-hawks-skate-jam-game-ui-design-process

Inside Look at Tony Hawk’s Skate Jam Game UI Design & Process
Inside Look at Tony Hawk's Skate Jam Game UI Design & Process

AoiroStudioFeb 06, 2019

Our pals from Adobe XD have shared a story with a recent collaboration between the legendary Tony Hawk and the team over Maple Media for his new game Skate Jam. Now tackling the mobile game’s world, Tony Hawk’s Skate Jam is now out on iOS and Android. Using Adobe XD for the design process, we are following their journey at designing for a dozen of screen sizes, countless different devices, two dominant operating systems, and an iterative development process where content will continue to be added and updated, long after the game is released. Also you should definitely check out Tony Hawk’s Skate Jam Contest where you will get to create, skate, and win! Design an original skateboard deck for Tony Hawk’s Skate Jam game.

In their words

Inside Look at Tony Hawk's Skate Jam Game UI Design & Process

It’s the one ‘console’ almost everyone owns,” Tony Hawk said when asked why he is taking his video game franchise into the mobile world. “The technology has come far enough to create a skateboarding game reminiscent of my previous series. Players can look forward to short bursts of action-packed gameplay that instills a desire to return and finish new challenges with bigger scores

Tony entrusted Maple Media with the design of his mobile game. The company is known for creating mobile properties and has designed a mobile skateboarding game before, but even chief operating officer David Bos admits the caliber and scale of the Tony Hawk game franchise presented a unique challenge for the company. To create a mobile experience that would meet Tony’s high bar, Maple Media adopted Adobe XD into its workflows. Watch the video below to see their story (and hear more from Tony himself), and read on to learn more about the UX process that went into designing Tony Hawk’s Skate Jam.

Links

Skate Jam
Maple Media
Game UI Design

Inside Look at Tony Hawk's Skate Jam Game UI Design & ProcessInside Look at Tony Hawk's Skate Jam Game UI Design & ProcessInside Look at Tony Hawk's Skate Jam Game UI Design & Process

Creating an awesome and authentic skateboarding experience on mobile

“Skateboarding and Tony Hawk are super popular in Brazil. Brazil is largely an Android market. On Android, there’s no consistent device size whatsoever, so we have players there who are playing on the latest and greatest devices that are streaming faster than the average computer, to devices that are four or five years old and have a screen size half the size or smaller than some of the large devices,” said David, adding that accessible and authentic customizable controls were also a priority for Tony, to make the game both easy to pick up and play, and true to real skateboarding techniques.

UX designer Xiaoxuan (Sally) Liu was tasked with designing the game’s UI at scale. With so many UI elements on each screen, and so many different devices to serve, managing buttons and icons and keeping them consistent across multiple layouts and aspect ratios was her greatest challenge. She used Adobe XD’s Linked Symbols feature to maintain her design system; while she laid out user flows across artboards for the various device sizes, she was able to change aspects of individual symbols and apply those changes across all iterations of the game (or not, in cases where she needed to alter a symbol for a specific screen size).

The push-and-pull of multi-device design

While designing for so many devices and screens is a UX challenge, UX designers are not the only ones who need to be worried about it. While the team at Maple Media thoroughly the importance of an intuitive user interface to creating a fun user experience, they also faced the pressure of deadlines and delivery. This resulted in a lot of conversations about how much each aspect Tony Hawk’s Skate Jam should be refined and retooled, with the knowledge it would have to scale across many different devices and devices sizes.

Collaborating one-on-one with Tony Hawk

With more than a dozen games under his belt, Tony Hawk is far from a newcomer in the video game world. He’s also much more than a figurehead for his games, taking a hands-on approach to ensuring the games he puts his name on deliver authentic skateboarding experiences. To collaborate with Tony in real-time and gather his feedback at multiple stages of design, Xiaoxuan published her Adobe XD prototypes to the web, creating a private link to a webpage Tony could access. Tony would then interact with the prototype and make comments right in the browser, which Xiaoxuan could and see and react to instantly. This grew increasingly important as release got closer.

Links

More on Adobe Blog


How People Make Decisions

Original Source: https://www.smashingmagazine.com/2019/02/human-decision-making/

How People Make Decisions

How People Make Decisions

Susan Weinschenk

2019-02-07T13:30:37+01:00
2019-02-07T15:05:47+00:00

(This article is sponsored by Adobe.) Kelly’s in charge of choosing IT cloud services at her company. She has signed the company up for a chatbot service, and has had the “Pro” level service (not the “Free” or “Standard”) for two years.

It’s time for the annual renewal. Will she renew? Will she decide to renew, but switch to the free service only? Is there anything about the email notice and/or webpage for the service that will either encourage her or discourage her from renewing?

A pricing plan that is presented to Kelly

The pricing plan that is presented to Kelly. (Large preview)

There is a lot of research on human decision-making. Here are some of my favorite insights from the research.

Most Decisions Are Not Made “Logically”

We like to think that we are logical and that when we are making a decision, we carefully weigh all of our alternatives. When it’s time to buy a new car, do we read all the specs and reviews, and choose the one that is the safest and most economical? When it’s time to renew the chatbot service, does Kelly do a study to see how much use she has made of the “Pro” services and evaluate whether she should stay with that level and pay that amount each month?

These would be the logical ways to make the decision, and although we sometimes make decisions rationally and logically, there are hundreds of decisions we make every day, and we don’t do a logical think through of every one. Even the big decisions where we think we are being logical, the research shows that most of our decisions — big or small — are made unconsciously and involve emotion.

Here are some facts about decisions that may surprise you.

Most Of Our Decisions Are Made Unconsciously

By looking at brain activity while making a decision, researchers could predict what choice people would make 7-10 seconds before they themselves were even aware of having made a decision. This means that even when people think they are making a conscious, logical, decision, chances are that they aren’t aware that they’ve already made a decision and that it was unconscious. We aren’t even aware of our own process.

Do you write your messaging and content to appeal to logical thinking?

If so, it’s possible and even probable that your logical, persuasive arguments to your target audience about why they should go with the premium service, or why they should purchase a particular product may be in vain.

Be suspicious of what people say.

Another problem is that if you are diligent in your design process and ask people what factors are important to them, you might not be getting a true answer.

For example, if someone interviewed Kelly and asked her why she chooses the “Pro” level each year, it is likely that she will come up with an answer that sounds very logical (i.e. about the service, how her company uses it and so on) when the real reason she stays with “Pro” rather than the “Free” plan may be emotional (“I don’t want to have things go wrong and if I pay money things won’t go wrong”) or just habit (“It’s what we always sign up for”). What people tell you is the reason for why they do what they do may not be the actual reason.

People need to feel in order to decide.

If you can’t feel emotions, then you can’t make decisions — thanks to our ventro-medial pre-frontal cortex (or ‘vmPFC’).

The vmPFC is part of the prefrontal cortex, i.e. the front of your brain. It is important in regulating fear. Other parts of your brain (in particular the amygdala) tell you when you should be afraid and what you should be afraid of. The amygdala is where “conditioned” fear responses are born and perpetuated. The vmPFC, in contrast, has an opposite role. It mitigates conditioned fear. It stops you from continuing to be afraid in certain situations. When the vmPFC is active then you are able to let go of conditioned fears. As a result, you are then able to make a decision.

You should just assume that all decisions involve emotions. Rather than just making logical arguments to persuade, you are more likely to persuade people to take an action if you understand how they are feeling about the decision and feed their feeling. For example, if Kelly is feeling apprehensive about making a wrong decision then your messaging should be more about making her feel secure and safe than it is about product features.

People buy when they feel confident of their decision.

There is actually a neuron that fires up in the brain that triggers people to take action when the brain decides it is confident of a decision. This is subjective. It’s not necessarily based on the amount of information you’ve collected — it’s a feeling of confidence.

If you want people to take an action then you need to make them feel confident. If you want Kelly to choose the “Pro” level again, then you need to give her messaging about the “Pro” version that makes her confident of her choice. For example, feed data back to her about how much she has used the service. This will make her feel confident that she is making the correct choice.

Don’t Confuse Unconscious With Irrational Or Bad

I take exception with writers who equate unconscious decision making with making poor or irrational decisions. For example, Dan Ariely in his book, “Predictably Irrational: The Hidden Forces That Shape Our Decisions” implies that unless we work hard to prevent it, many to most of our decisions are poor and irrational.

Most of our mental processing is unconscious, and most of our decision-making is unconscious, but that doesn’t mean it’s faulty, irrational, or bad. We are faced with an overwhelming amount of data (11,000,000 pieces of data come into the brain every second according to Dr. Timothy Wilson in his book “Strangers To Ourselves: Discovering The Adaptive Unconscious”) and our conscious minds can’t process all of that.

Our unconscious has evolved to process most of the data and to make decisions for us according to guidelines and rules of thumb that are in our best interest most of the time. This is the genesis of “trusting your gut”, and most of the time it works!

People do like to think that they are being logical and thorough, however, so you may want to offer logical reasons for why a certain decision should be made so that the person making the decision has a rational reason they can give themselves and others. Go ahead and give Kelly the rational reasons she should renew for the “Pro” level, but just understand that that reason is probably not the actual reason.

Recommended reading: Grabbing Visual Attention With The Visual Cortex

Only Give More Information If People Are Making A Goal-Based Decision

There are two different types of decisions that people make. Value-based decisions are made in the orbitofrontal cortex (OFC). So, during those times when you really are comparing the Honda to the Subaru when you are shopping for a car, then you are making a value-based goal decision. If Kelly was comparing the features of the different levels for the chatbot service then she would be making a value-based goal decision.

Habit-based decisions occur in the basal ganglia (deep in the brain). When you pull your usual cereal off the shelf at the grocery store and put it in your cart, that’s a habit-based decision. If Kelly presses the ‘Renew’ button for the Chatbot software then she is making a habit-based decision.

What’s interesting is that if the OFC is quiet then the habit part of the brain takes over. This means that people are either making a goal-directed decision or a habit decision, but not both at the same time.

An illustration showing the parts of the human brain

Structure of the human brain and location of the basal ganglia (Large preview)

If you give someone a lot of information then they will switch from habit to goal-directed. So if you want someone to make a habit decision, don’t give them too much information to review. If you want them to make a goal-directed decision then do give them information to review.

If you want Kelly to renew for the “Pro” level then don’t give her lots of data. Let her make the habit-based decision to renew. If you are hoping that she will go up a level (not down) then you may want to give her data on her options as that will kick her from a habit decision to a goal-directed decision.

Too Many Choices Means People Won’t Choose

You may have heard the idea that people can only remember, or deal with 7 plus or minus 2 things at a time (5 to 9). This actually is not true. It was a theory first mentioned by Miller in 1956 at a talk he gave at the American Psychological Association meeting. But research since then shows that 7 +- 2 is a myth. The real number is 3-4 not 5-9. Refuting research includes:

“The Magical Number 4 In Short-Term Memory: A Reconsideration Of Mental Storage Capacity,” Nelson Cowan, Behavioral and Brain Sciences (2001)
“The Magical Number Seven: Still Magic After All These Years?,” Alan Baddeley, Psychological Review (1994)
“The Magic Number Seven After Fifteen Years,” Donald Broadbent, Wiley (1975)

And most recently, Sheena Iyengar (author of “The Art Of Choosing”), has conducted several studies that clearly show that if you give people too many choices then they end up not choosing anything at all.

People liked having more choices to choose from but they were more satisfied with their choice when there was less to choose from.

So, if you show someone too many choices (in this case of sales/CRM services) they might not choose any and instead abandon the page.

An example of a ‘customer success platform’ with 12 options to choose from

Showing too many options can only overwhelm your users. Choose less with your goals in mind. (Large preview)

Kelly was given five choices for the Chatbot service. Three to four would have been better.

So, is there anything you can do to encourage Kelly to re-subscribe and not change her level of membership?

In this case, the decision is probably a habit-based decision. The best thing to do, then, is to not do much at all. Don’t send her an email with information on all the membership levels. Instead, give her one or two reasons why continuing with her current subscription is the way to go and leave it at that. At a different time (not when she is deciding whether to renew), you can make a pitch for a higher premium level. But if you do that pitch while she is about to renew, you may jeopardize her habit-based renewal.

Recommended reading: Don’t Let Your Brain Deceive You: Avoiding Bias In Your UX Feedback

Takeaways

If someone is making a habit-based decision, do not give them a lot of information.
Provide people with a brief, but a logical reason for their decision so they can use that to tell themselves and others why they did what they did.
Limit the number of choices people have to make to one, two or three. If you provide too many choices then people likely won’t choose at all.

This article is part of the UX design series sponsored by Adobe. Adobe XD tool is made for a fast and fluid UX design process, as it lets you go from idea to prototype faster. Design, prototype and share — all in one app. You can check out more inspiring projects created with Adobe XD on Behance, and also sign up for the Adobe experience design newsletter to stay updated and informed on the latest trends and insights for UX/UI design.

Smashing Editorial
(cm, ms, ra, il)

Motion Design: Roger Dubuis x Lamborghini

Original Source: http://feedproxy.google.com/~r/abduzeedo/~3/cCF-4mU44fE/motion-design-roger-dubuis-x-lamborghini

Motion Design: Roger Dubuis x Lamborghini

AoiroStudioFeb 06, 2019

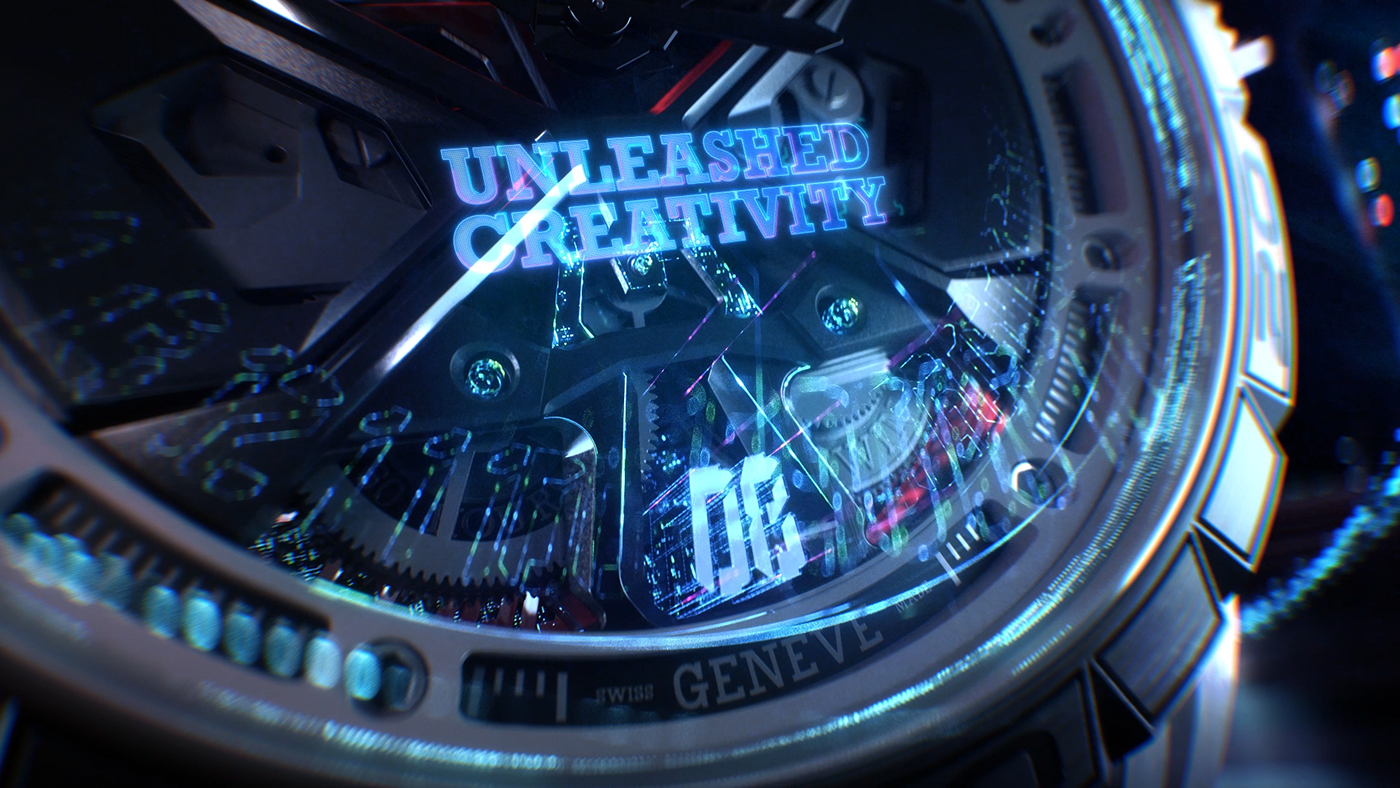
The kind of THRIVE that we enjoy sharing here on ABDZ, this is direction and motion design work by Unit Motion Design, a creative motion studio based in Paris, France. This project is the clash between two brands, Roger Dubuis and of course Lamborghini. A few seconds to create an immersion in these two worlds through a fascinating sequence filled with projections of images and blasting light reflections all over the place. It’s a beauty, check out the video.

Links
Studio Site
Behance

Motion Design
Motion Design: Roger Dubuis x LamborghiniMotion Design: Roger Dubuis x LamborghiniMotion Design: Roger Dubuis x LamborghiniMotion Design: Roger Dubuis x LamborghiniMotion Design: Roger Dubuis x LamborghiniMotion Design: Roger Dubuis x LamborghiniMotion Design: Roger Dubuis x LamborghiniMotion Design: Roger Dubuis x Lamborghini

Credits
Direction: Unit Motion Design
Client: Roger Dubuis
Production: Wizz design
Audio: Echoic Audio
Direction & Creative Direction: François-Côme du Boistesselin
Concept/Art director/Motion Designer: Johnathan Plessel, Thibault Zeller


15 Great Album Cover Ideas To Inspire Your Next Project

Original Source: http://feedproxy.google.com/~r/Designrfix/~3/CFsF8cYYypk/album-cover-ideas

Album covers can be so much more than just a picture of the artist on a background. The best covers are artistic with illustrations or other types of models.Comparison TableAlbum Cover IdeasDetailsAll About The FaceIncludes the musician’s face and it will need an added element of flairIt’s About The BandSimilar to the face cover, but […]

The post 15 Great Album Cover Ideas To Inspire Your Next Project appeared first on designrfix.com.

iOS Performance Tricks To Make Your App Feel More Performant

Original Source: https://www.smashingmagazine.com/2019/02/ios-performance-tricks-apps/

iOS Performance Tricks To Make Your App Feel More Performant

iOS Performance Tricks To Make Your App Feel More Performant

Axel Kee

2019-02-05T13:00:00+01:00
2019-02-05T17:04:51+00:00

Although modern iOS hardware is powerful enough to handle many intensive and complex tasks, the device could still feel unresponsive if you are not careful about how your app performs. In this article, we will look into five optimization tricks that will make your app feel more responsive.

1. Dequeue Reusable Cell

You’ve probably used tableView.dequeueReusableCell(withIdentifier:for:) inside tableView(_:cellForRowAt:) before. Ever wondered why you have to follow this awkward API, instead of just passing an array of cell in? Let’s go through the reasoning of this.

Say you have a table view with a thousand rows. Without using reusable cells, we would have to create a new cell for each row, like this:

func tableView(_ tableView: UITableView, cellForRowAt indexPath: IndexPath) -> UITableViewCell {
// Create a new cell whenever cellForRowAt is called.
let cell = UITableViewCell()
cell.textLabel?.text = “Cell (indexPath.row)”
return cell
}

As you might have thought, this will add a thousand cells to the device’s memory as you scroll to the bottom. Imagine what would happen if each cell contained a UIImageView and a lot of text: Loading them all at once could cause the app to run out of memory! Apart from that, every single cell would require new memory to be allocated during scrolling. If you scroll a table view quickly, a lot of small chunks of memory will be allocated on the fly, and this process will make the UI janky!

To resolve this, Apple has provided us with the dequeueReusableCell(withIdentifier:for:) method. Cell reuse works by placing the cell that is no longer visible on the screen into a queue, and when a new cell is about to be visible on the screen (say, the subsequent cell below as the user scrolls down), the table view will retrieve a cell from this queue and modify it in the cellForRowAt indexPath: method.
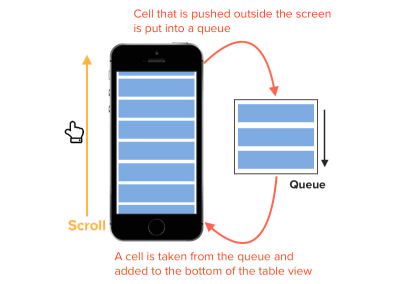
Cell reuse queue mechanism

How cell reuse queues work in iOS (Large preview)

By using a queue to store cells, the table view doesn’t need to create a thousand cells. Instead, it needs just enough cells to cover the area of the table view.

By using dequeueReusableCell, we can reduce the memory used by the app and make it less prone to running out of memory!

Getting workflow just right ain’t an easy task. So are proper estimates. Or alignment among different departments. That’s why we’ve set up “this-is-how-I-work”-sessions — with smart cookies sharing what works well for them. A part of the Smashing Membership, of course.

Explore Smashing Membership ↬

Smashing TV, with live sessions for professional designers and developers.

2. Using A Launch Screen That Looks Like The Initial Screen

As mentioned in Apple’s Human Interface Guidelines (HIG), launch screens can be used to enhance the perception of an app’s responsiveness:

“It’s solely intended to enhance the perception of your app as quick to launch and immediately ready for use. Every app must supply a launch screen.”

It’s a common mistake to use a launch screen as a splash screen to show branding or to add a loading animation. Design the launch screen to be identical to the first screen of your app, as mentioned by Apple:

“Design a launch screen that’s nearly identical to the first screen of your app. If you include elements that look different when the app finishes launching, people can experience an unpleasant flash between the launch screen and the first screen of the app.

“The launch screen isn’t a branding opportunity. Don’t design an entry experience that looks like a splash screen or an “About” window. Don’t include logos or other branding elements unless they’re a static part of your app’s first screen.”

Using a launch screen for loading or branding purposes could slow down the time of first use and make the user feel that the app is sluggish.

When you start a new iOS project, a blank LaunchScreen.storyboard will be created. This screen will be shown to the user while the app loads the view controllers and layout.

To make your app feel faster, you can design the launch screen to be similar to the first screen (view controller) that will be shown to the user.

For example, the Safari app’s launch screen is similar to its first view :
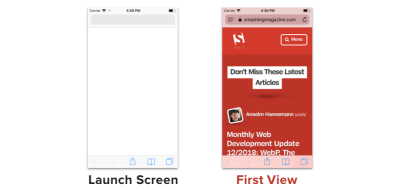
Launch screen and first view look similar

A comparison of launch screen and first view of Safari app (Large preview)

The launch screen storyboard is like any other storyboard file, except that you can only use the standard UIKit classes, like UIViewController, UITabBarController, and UINavigationController. If you attempt to use any other custom subclasses (such as UserViewController), Xcode will notify you that using custom class names is prohibited.

Xcode shows error when a custom class is used

Launch screen storyboard cannot contain non-UIKit standard class. (Large preview)

Another thing to note is that UIActivityIndicatorView doesn’t animate when placed on the launch screen, because iOS will generate a static image from the launch screen storyboard and displays it to the user. (This is mentioned briefly in the WWDC 2014 presentation “Platforms State of the Union”, around 01:21:56.)

Apple’s HIG also advises us not to include text on our launch screen, because the launch screen is static, and you can’t localize text to cater to different languages.

Recommended reading: Mobile App With Facial Recognition Feature: How To Make It Real

3. State Restoration For View Controllers

State preservation and restoration allow the user to return to the exact same UI state from just before they left the app. Sometimes, due to insufficient memory, the operating system might need to remove your app from memory while the app is in the background, and the app might lose track of its last UI state if it is not preserved, possibly causing users to lose their work in progress!

In the multitasking screen, we can see a list of apps that have been put in the background. We might assume that these apps are still running in the background; in reality, some of these apps might get killed and restarted by the system due to the demands of memory. The app snapshots we see in the multitasking view are actually screenshots taken by the system from right when we exited the app (i.e. to go to the home or multitasking screen).
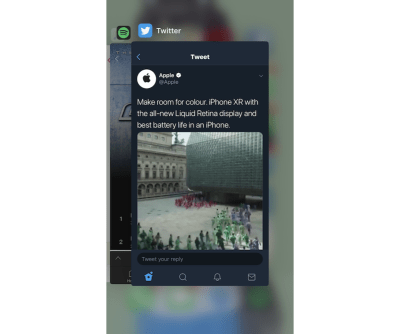
iOS fabricates the illusion of apps running in the background by taking a screenshot of the most recent view

Screenshots of apps taken by iOS when user exits the app (Large preview)

iOS uses these screenshots to give the illusion that the app is still running or is still displaying this particular view, whereas the app might have been already terminated or restarted in the background while still displaying the same screenshot.

Have you ever experienced, upon resuming an app from the multitasking screen, that the app shows a user interface different from the snapshot shown in the multitasking view? This is because the app hasn’t implemented the state-restoration mechanism, and the displayed data was lost when the app was killed in the background. This can lead to a bad experience because the user expects your app to be in the same state as when they left it.

From Apple’s article:

“They expect your app to be in the same state as when they left it. State preservation and restoration ensures that your app returns to its previous state when it launches again.”

UIKit does a lot of work to simplify state preservation and restoration for us: It handles the saving and loading of an app’s state automatically at appropriate times. All we need to do is add some configuration to tell the app to support state preservation and restoration and to tell the app what data needs to be preserved.

To enable state saving and restoring, we can implement these two methods in AppDelegate.swift:

func application(_ application: UIApplication, shouldSaveApplicationState coder: NSCoder) -> Bool {
return true
}

func application(_ application: UIApplication, shouldRestoreApplicationState coder: NSCoder) -> Bool {
return true
}

This will tell the app to save and restore the application’s state automatically.

Next, we’ll tell the app which view controllers need to be preserved. We do this by specifying the “Restoration ID” in the storyboard :
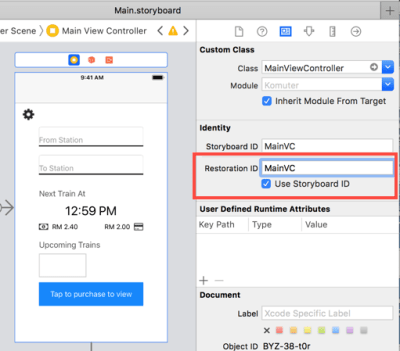
Setting restoration ID in storyboard

Setting restoration ID in storyboard (Large preview)

You can also check “Use Storyboard ID” to use the storyboard ID as the restoration ID.

To set the restoration ID in the code, we can use the restorationIdentifier property of the view controller.

// ViewController.swift
self.restorationIdentifier = “MainVC”

During state preservation, any view controller or view that has been assigned a restoration identifier will have its state saved to disk.

Restoration identifiers can be grouped together to form a restoration path. The identifiers are grouped using the view hierarchy, from the root view controller to the current active view controller. Suppose a MyViewController is embedded in a navigation controller, which is embedded in another tab bar controller. Assuming they are using their own class names as restoration identifiers, the restoration path will look like this:

TabBarController/NavigationController/MyViewController

When the user leaves the app with the MyViewController being the active view controller, this path will be saved by the app; then the app will remember the previous view hierarchy shown (Tab Bar Controller → Navigation Controller → My View Controller).

After assigning the restoration identifier, we will need to implement the encodeRestorableState(with coder:) and decodeRestorableState(with coder:) methods for each of the preserved view controllers. These two methods let us specify what data need to be saved or loaded and how to encode or decode them.

Let’s see the view controller:

// MyViewController.swift

// MARK: State restoration
// UIViewController already conforms to UIStateRestoring protocol by default
extension MyViewController {

// will be called during state preservation
override func encodeRestorableState(with coder: NSCoder) {
// encode the data you want to save during state preservation
coder.encode(self.username, forKey: “username”)
super.encodeRestorableState(with: coder)
}

// will be called during state restoration
override func decodeRestorableState(with coder: NSCoder) {
// decode the data saved and load it during state restoration
if let restoredUsername = coder.decodeObject(forKey: “username”) as? String {
self.username = restoredUsername
}
super.decodeRestorableState(with: coder)
}
}

Remember to call the superclass implementation at the bottom of your own method. This ensures that the parent class has a chance to save and restore state.

Once the objects have finished decoding, applicationFinishedRestoringState() will be called to tell the view controller that the state has been restored. We can update the UI for the view controller in this method.

// MyViewController.swift

// MARK: State restoration
// UIViewController already conforms to UIStateRestoring protocol by default
extension MyViewController {

override func applicationFinishedRestoringState() {
// update the UI here
self.usernameLabel.text = self.username
}
}

There you have it! These are the essential methods to implement state preservation and restoration for your app. Keep in mind that the operating system will remove the saved state when the app is being force-closed by the user, in order to avoid getting stuck in a broken state in case something goes wrong in the state preservation and restoration.

Also, don’t store any model data (i.e. data that should have been saved to UserDefaults or Core Data) to the state, even though it might seem convenient to do so. State data will be removed when the user force quits your app, and you certainly don’t want to lose model data this way.

To test whether state preservation and restoration are working well, follow the steps below:

Build and launch an app using Xcode.
Navigate to the screen with state preservation and restoration that you want to test.
Return to the home screen (by swiping up or double-clicking home button, or pressing Shift ⇧ + Cmd ⌘ + H in the simulator) to send the app to the background.
Stop the app in Xcode by pressing the ⏹ button.
Launch the app again and check whether the state has been restored successfully.

Because this section only covers the basics of state preservation and restoration, I recommend the following articles by Apple Inc. for more in-depth knowledge of state restoration:

Preserving And Restoring State
UI Preservation Process
UI Restoration Process

4. Reduce Usage Of Non-Opaque Views As Much As Possible

An opaque view is a view that has no transparency, meaning that any UI element placed behind it is not visible at all. We can set a view to be opaque in the Interface Builder:
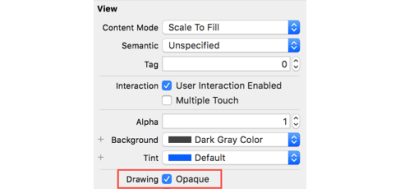
This will inform the drawing system to skip drawing whatever is behind this view

Set UIView to opaque in storyboard (Large preview)

Or we can do it programmatically with the isOpaque property of UIView:

view.isOpaque = true

Setting a view to opaque will make the drawing system optimize some drawing performance while rendering the screen.

If a view has transparency (i.e. alpha is below 1.0), then iOS will have to do extra work to calculate what should be displayed by blending different layers of views in the view hierarchy. On the other hand, if a view is set to opaque, then the drawing system will just put this view in front and avoid the extra work of blending the multiple view layers behind it.

You can check which layers are being blended (non-opaque) in the iOS Simulator by checking Debug → Color Blended Layers.

Green is non-color blended, red is blended layer

Show color blended layers in Simulator

After checking the Color Blended Layers option, you can see that some views are red and some are green. Red indicates that the view is not opaque and that its output display is a result of layers blended behind it. Green indicates that the view is opaque and no blending has been done.
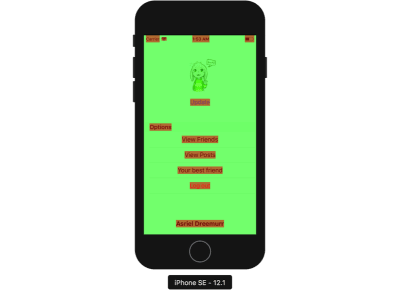
With an opaque color background, the layer doesn’t need to blend with another layer

Assign non-transparent background color to UILabel whenever possible to reduce color blended layers. (Large preview)

The labels shown above (“View Friends”, etc.) are highlighted in red because when a label is dragged to the storyboard, its background color is set to transparent by default. When the drawing system is compositing the display near the label area, it will ask for the layer behind the label and do some calculation.

One way you can optimize app performance is to reduce how many views are highlighted with red as much as possible.

By changing label.backgroundColor = UIColor.clear to label.backgroundColor = UIColor.white, we can reduce layer blending between the label and the view layer behind it.
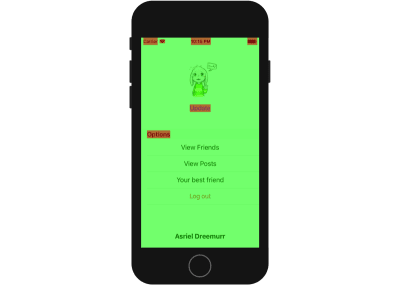
Using a transparent background color will cause layer blending

Many labels are highlighted in red because their background color is transparent, causing iOS to calculate the background color by blending the view behind it. (Large preview)

You might have noticed that, even if you have set a UIImageView to opaque and assigned a background color to it, the simulator will still show red in the image view. This is probably because the image you used for the image view has an alpha channel.

To remove the alpha channel for an image, you can use the Preview app to make a duplicate of the image (Shift ⇧ + Cmd ⌘ + S), and uncheck the “Alpha” checkbox when saving.
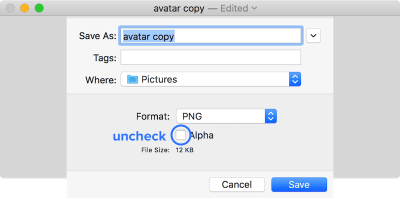
Uncheck the ‘Alpha’ checkbox when saving an image to discard the alpha channel.

Uncheck the ‘Alpha’ checkbox when saving an image to discard the alpha channel. (Large preview)

5. Pass Heavy Processing Functions To Background Threads (GCD)

Because UIKit only works on the main thread, performing heavy processing on the main thread will slow down the UI. The main thread is used by UIKit not only to handle and respond to user input, and also to draw the screen.

The key to making an app responsive is to move as many heavy processing tasks to background threads as possible. Avoid doing complex calculation, networking, and heavy IO operation (e.g. reading and writing to disk) on the main thread.

You might have once used an app that suddenly became unresponsive to your touch input, and it feels like the app has hung. This is most probably caused by the app running heavy computation tasks on the main thread.

The main thread usually alternates between UIKit tasks (such as handling user input) and some light tasks in small intervals. If a heavy task is running on main thread, then UIKit will need to wait until the heavy task has finished before being able to handle touch input.
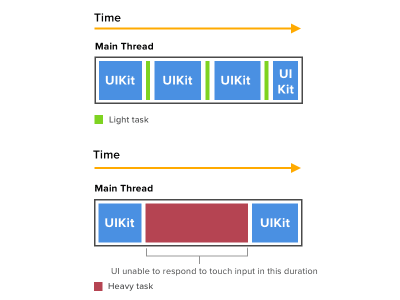
Avoid running performance-intensive or time-consuming task on the main thread

Here is how the main thread handles UI tasks and why it causes the UI to hang when heavy tasks are performed. (Large preview)

By default, the code inside view controller lifecycle methods (such as viewDidLoad) and IBOutlet functions are executed on the main thread. To move heavy processing tasks to a background thread, we can use the Grand Central Dispatch queues provided by Apple.

Here’s the template for switching queues :

// Switch to background thread to perform heavy task.
DispatchQueue.global(qos: .default).async {
// Perform heavy task here.

// Switch back to main thread to perform UI-related task.
DispatchQueue.main.async {
// Update UI.
}
}

The qos stands for “quality of service”. Different quality-of-service values indicate different priorities for the specified tasks. The operating system will allocate more CPU time and CPU power I/O throughput for tasks allocated in queues with higher QoS values, meaning that a task will finish faster in a queue with higher QoS values. A higher QoS value will also consume more energy due to it using more resources.

Here is the list of QoS values from highest to lowest priority:
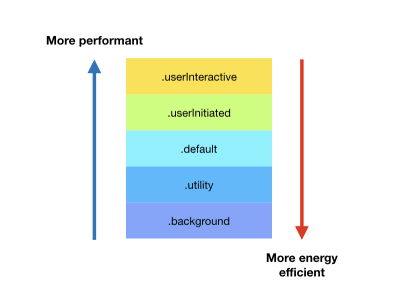
Quality-of-service values of queue sorted by performance and energy efficiency

Quality-of-service values of queue sorted by performance and energy efficiency (Large preview)

Apple has provided a handy table with examples of which QoS values to use for different tasks.

One thing to keep in mind is that all UIKit code should always be executed on the main thread. Modifying UIKit objects (such as UILabel and UIImageView) on the background thread could have an unintended consequence, like the UI not actually updating, a crash occurring, and so on.

From Apple’s article:

“Updating UI on a thread other than the main thread is a common mistake that can result in missed UI updates, visual defects, data corruptions, and crashes.”

I recommend watching Apple’s WWDC 2012 video on UI concurrency to better understand how to build a responsive app.

Notes

The trade-off of performance optimization is that you have to write more code or configure additional settings on top of the app’s functionality. This might make your app delivered later than expected, and you will have more code to maintain in the future, and more code means potentially more bugs.

Before spending time on optimizing your app, ask yourself whether the app is already smooth or whether it has some unresponsive part that really needs to be optimized. Spending a lot of time optimizing an already smooth app to shave off 0.01 seconds might not be worth it, as the time could be better spent developing better features or other priorities.

Further Resources

“A Suite of Delicious iOS Eye Candy,” Tim Oliver, Tokyo iOS Meetup 2018 (Video)
“Building Concurrent User Interfaces on iOS,” Andy Matuschak, WWDC 2012 (Video)
“Preserving Your App’s UI Across Launches,” Apple
“Concurrency Programming Guide: Dispatch Queues,” Documentation Archive, Apple
“Main Thread Checker,” Apple

Smashing Editorial
(jd, ra, il)

Collective #489

Original Source: http://feedproxy.google.com/~r/tympanus/~3/ZAarP0W2IpU/

C489_dan

React as a UI Runtime

An in-depth article by Dan Abramov that will help you understand the React programming model and runtime environment.

Read it

C489_NW

This content is sponsored via Syndicate Ads
Northwestern’s Online MS in Information Design and Strategy

Build the in-demand skills, such as UX, UI, and HCI, needed to drive user interactions. Choose a specialization in content strategy, analytics, or learning design.

Apply now

C489_bus

The curious case of disappearing buses

Yui-Wah (Clement) Lee analyzes the mysterious case of disappearing buses in the real-time traffic information shown on Bristol’s bus display boards.

Read it

C489_wizard

Bandwidth or Latency: When to Optimise for Which

Harry Roberts shares a DevTools tip to determine whether your assets would benefit most from an increase in bandwidth or a reduction in latency.

Read it

C489_react

Learn React App

A tutorial with hands-on exercises to get you started with React.

Check it out

C489_music

WOWA

The Unplash for audio: free (do whatever you want) music that you can use in your projects.

Check it out

C489_animejs

Animated Boxes

A demo showing how the stagger feature in anime.js works. By the folks of Staak.

Check it out

C489_fill

The Many Ways to Change an SVG Fill on Hover (and When to Use Them)

Cassie Evans shows the different ways of changing the color of SVGs.

Read it

C489_3d

Lemon-JS

An accessible 3D rendering engine in JavaScript.

Check it out

C489_useHooks

useHooks

Easy to understand React Hook recipes by Gabe Ragland.

Check it out

C489_limitJS

Limiting JavaScript?

An article by Tim Kadlec where he discusses the controversial idea of limiting the amount of JavaScript a website can load.

Read it

C489_webdev

dailydevlinks

A new site for a daily dose of web dev related articles.

Check it out

C489_avatar

Avatars

A pixel-art avatar generator in JavaScript for browsers and NodeJS.

Check it out

C489_search

MiniSearch

A tiny but powerful in-memory fulltext search engine for JavaScript. Read more about it in this article.

Check it out

C489_audiodemo

Playing with sound and three.js

A three.js sound visualizer made by Sarah Drasner.

Check it out

C489_10

Let’s talk JS ?: unit testing

A useful collection of tools for doing unit tests by areknawo.

Read it

C489_font2

Free Font: US Blaak Bold

A sharp serif font with a glamorous look made by Unidaas. The bold style is for free.

Check it out

C489_Ascii

ASCII renderer

An interactive 3D world rendered in ASCII.

Check it out

C489_tubes

Tubes

An interesting tubes animation made by soju22.

Check it out

C489_font

Free Font: Gorod

A wide uppercase serif typeface by Ilya Zakharov.

Get it

C489_cursors

From Our Blog
Custom Cursor Effects

A collection of five demos and a tutorial on how to create animated custom cursor effects for interactive elements like navigations, galleries and carousels.

Check it out

Collective #489 was written by Pedro Botelho and published on Codrops.

Freebie: Fashion Influencer UI Kit for Adobe XD

Original Source: http://feedproxy.google.com/~r/abduzeedo/~3/rt3z4wgYHME/freebie-fashion-influencer-ui-kit-adobe-xd

Freebie: Fashion Influencer UI Kit for Adobe XD

AoiroStudioFeb 04, 2019

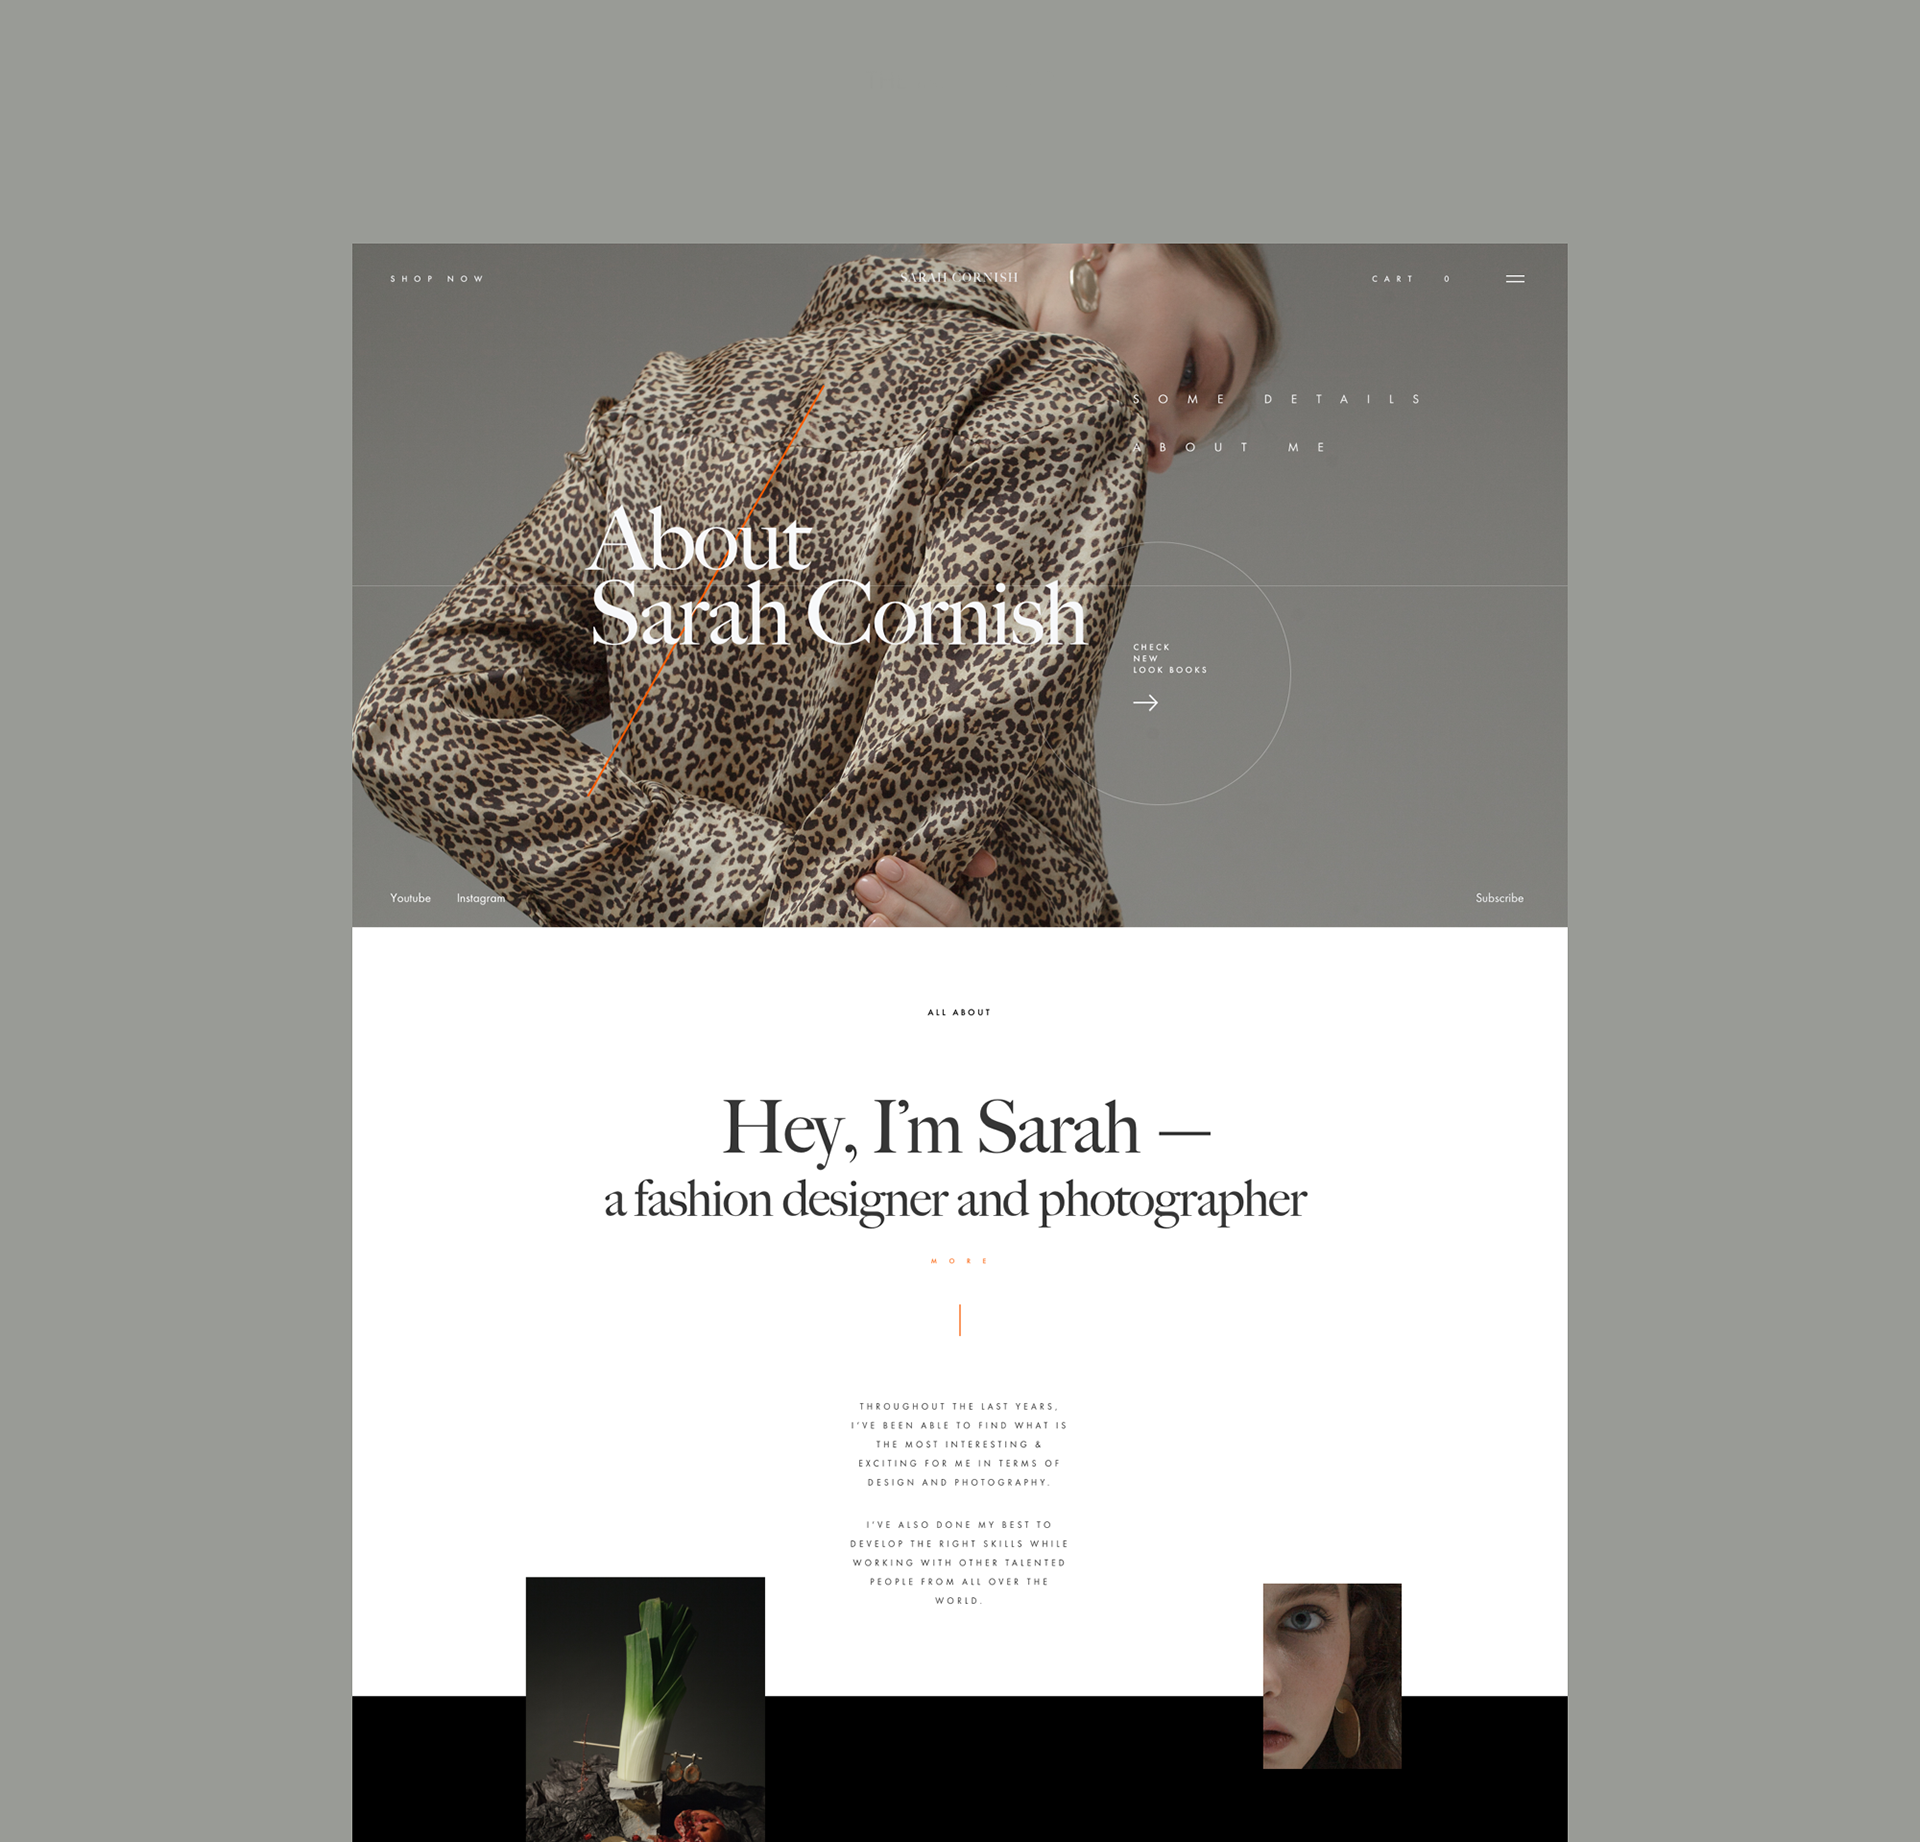
I have been playing more and more with Adobe XD, especially with their latest auto-animate feature. We will definitely release new tutorials about their killer new feature on ABDZ. By the meantime, we are sharing this free UI Kit by Zhenya Rynzhuk called: Fashion Influencer UI Kit for Adobe XD. More than 10 page and 50+ components to get you started on XD, I have personally downloaded the kit and it’s a beautiful effort. Leaving to the discovery of the style guide is quite helpful, I would have loved seeing its mobile treatment but this could happen within their next update. Enjoy!

Links

See the full project
Download the kit
Free UI Kit

Freebie: Fashion Influencer UI Kit for Adobe XDFreebie: Fashion Influencer UI Kit for Adobe XDFreebie: Fashion Influencer UI Kit for Adobe XDFreebie: Fashion Influencer UI Kit for Adobe XDFreebie: Fashion Influencer UI Kit for Adobe XDFreebie: Fashion Influencer UI Kit for Adobe XD

Credits

Zhenya Rynzhuk
Lindsay Munro