How to draw a big cat with pastels
Original Source: http://feedproxy.google.com/~r/CreativeBloq/~3/6EAg0WMujUg/draw-a-big-cat-with-pastels
The softness and luminosity of pastel sticks make them the ideal choice for backgrounds in my pastel drawings; whereas pastel pencils (when sharpened to a fine point) have two types of lead for precision: hard and soft. However, I personally find these attributes are not as important as colour range.
How to draw a landscape with pastels
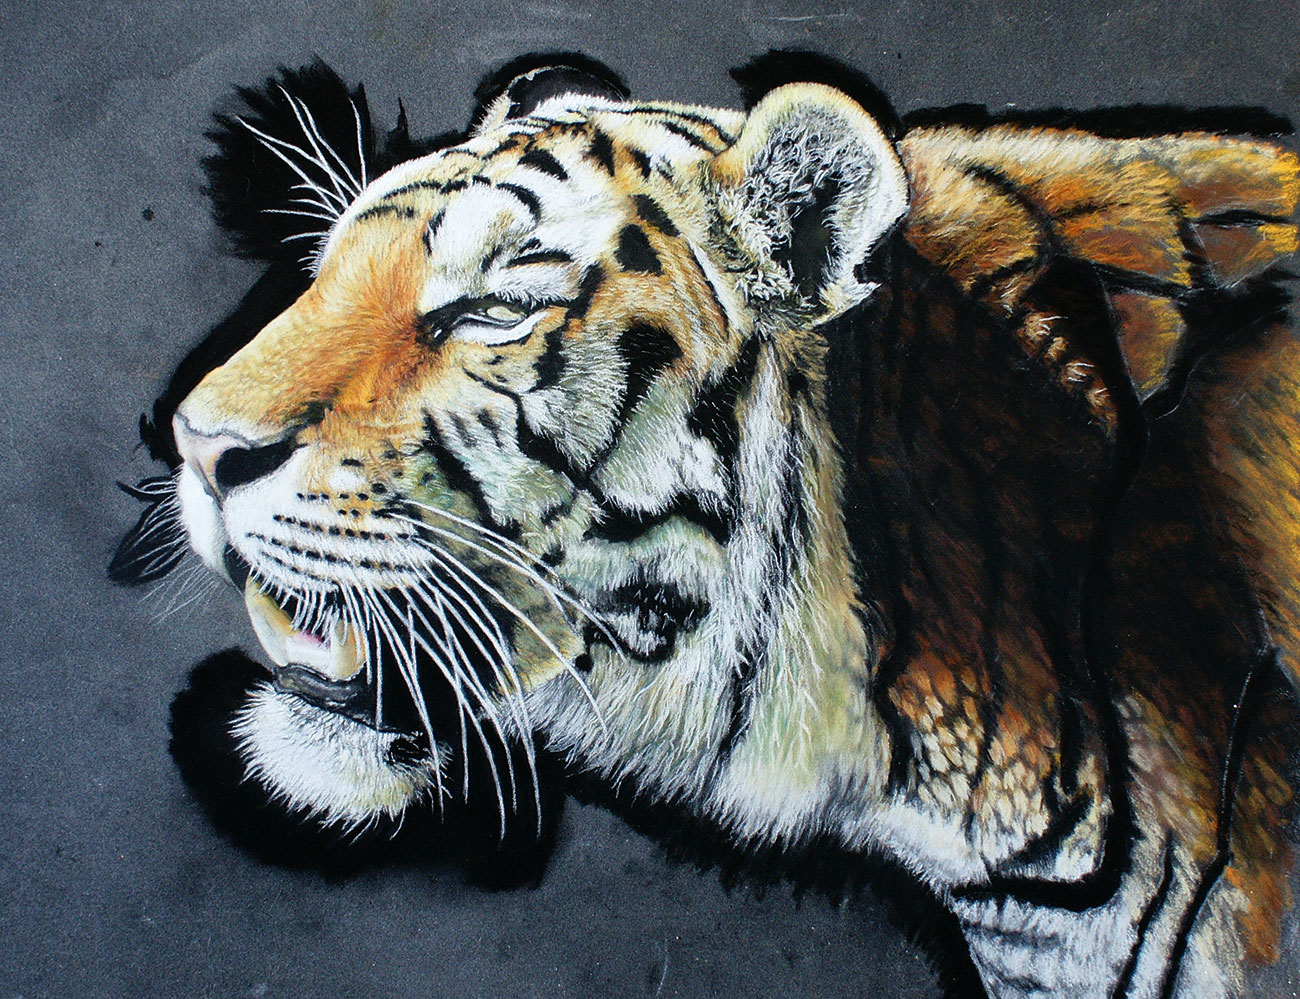
I work mainly from photographs. This allows me to make any changes to the drawn composition should I wish to do so. In choosing this particular shot, I was able to capture a sense of the tiger's presence, which I try to convey with all my work. Not only did it present great tonal values, but also areas of really dark contrast against the lighter shades. The combination of these aspects always makes for a great painting.
As I select my colours ready for my painting, I use spare pieces of Pastelmat as testers to find the correct shades I wish to use. Once I've started, I never use a colour I have not already selected, as a small amount of a new shade would stand out in the painting. I always use Pastelmat for my pastel work – the combination of this surface with pastel pencils is ideal for showing off the effectiveness of the medium.
For this piece, I use the following materials:
Anthracite Pastelmat 360 gsmWinsor & Newton Artists' Soft Pastels (for the background)Hard Conté sticks (for the underpainting)Pastel pencils including Derwent, Faber-Castell and Caran D'acheConté 630 White for the whiskersA HB Pencil for sketching
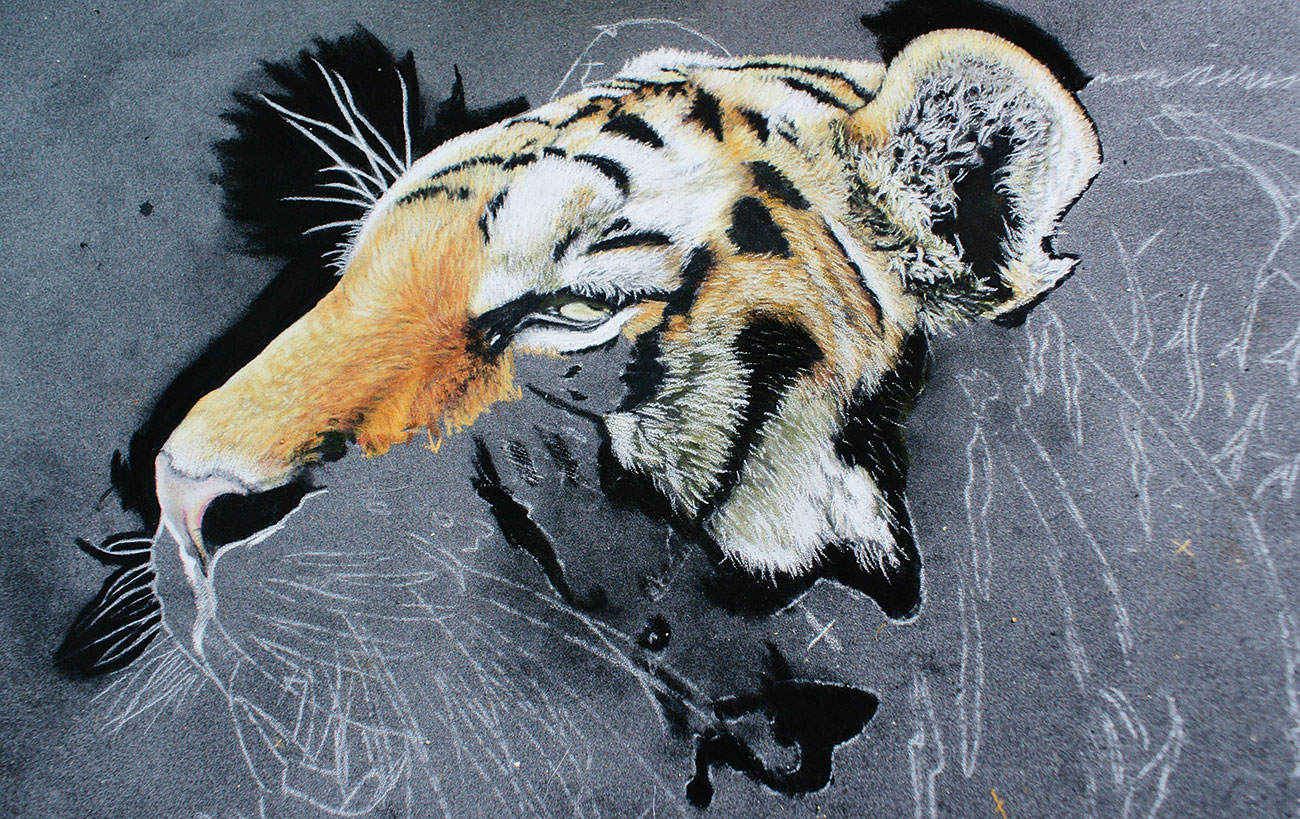
01. The original drawing
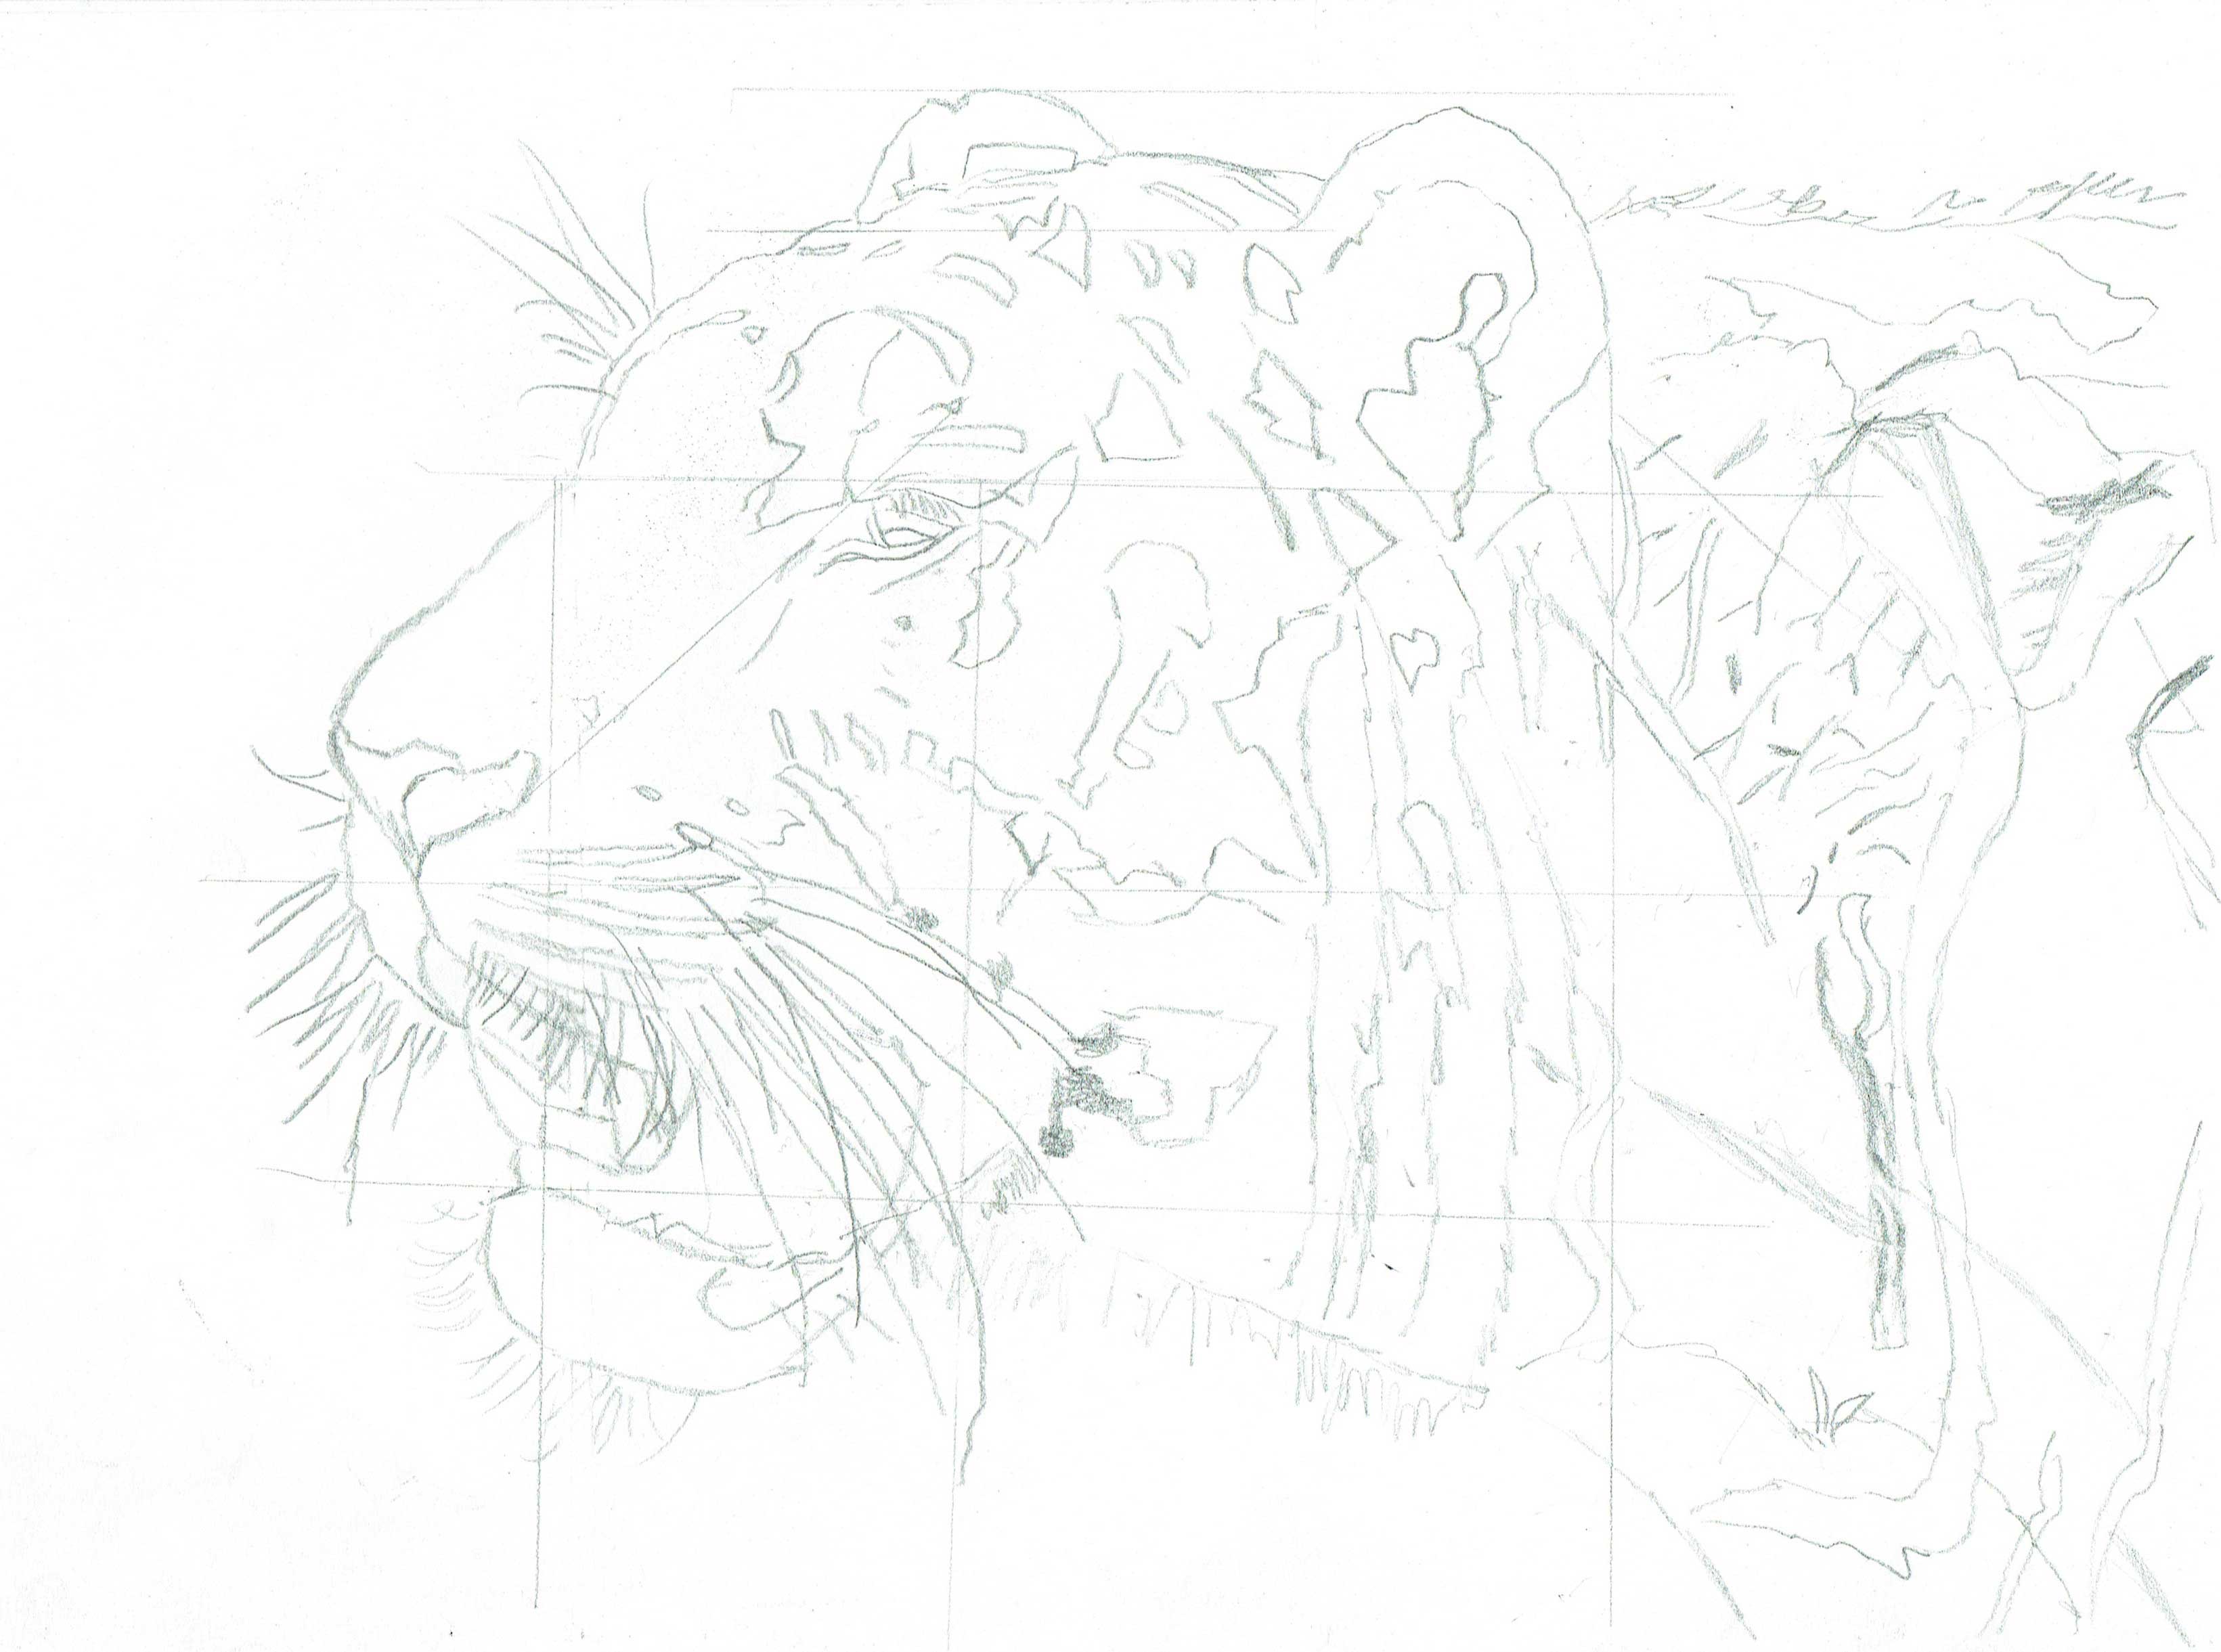
Don’t put too much detail into your initial sketch
I use a general HB pencil to sketch the scene. I avoid a great deal of detail as I tend to remove the lines, using an eraser after transferring it to the Pastelmat. The lines show through the pastel using tracedown paper.
02. Start from a focal point
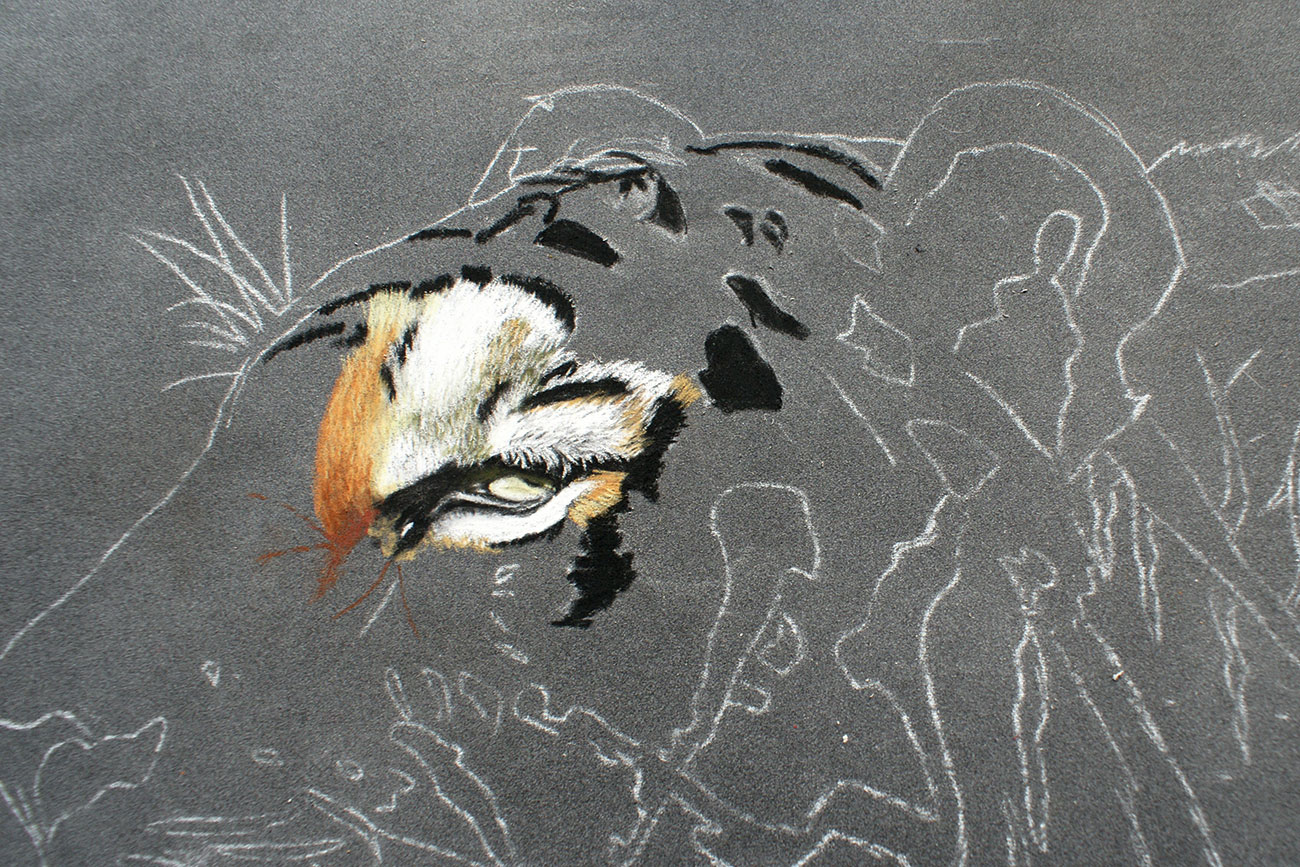
Grab the viewer’s attention by starting with the eyes
I always start with the eye area as this is the focal point to any animal portrait painting. I begin with the white highlights first, and then add the palest colours proceeded by the darker shades in and around the pupil. Following the pupil, I leave gaps in the blackness of the eyelid for the white fur to drop down.
I always find it's best to establish some of the tiger's black stripes in advance, as the white fur sits over the top of its edges. Next, I apply the green and ochre hues over the white in light fine strokes, finally continuing with the orange across the nose area. This area is then worked from dark to light – all using pastel pencils.
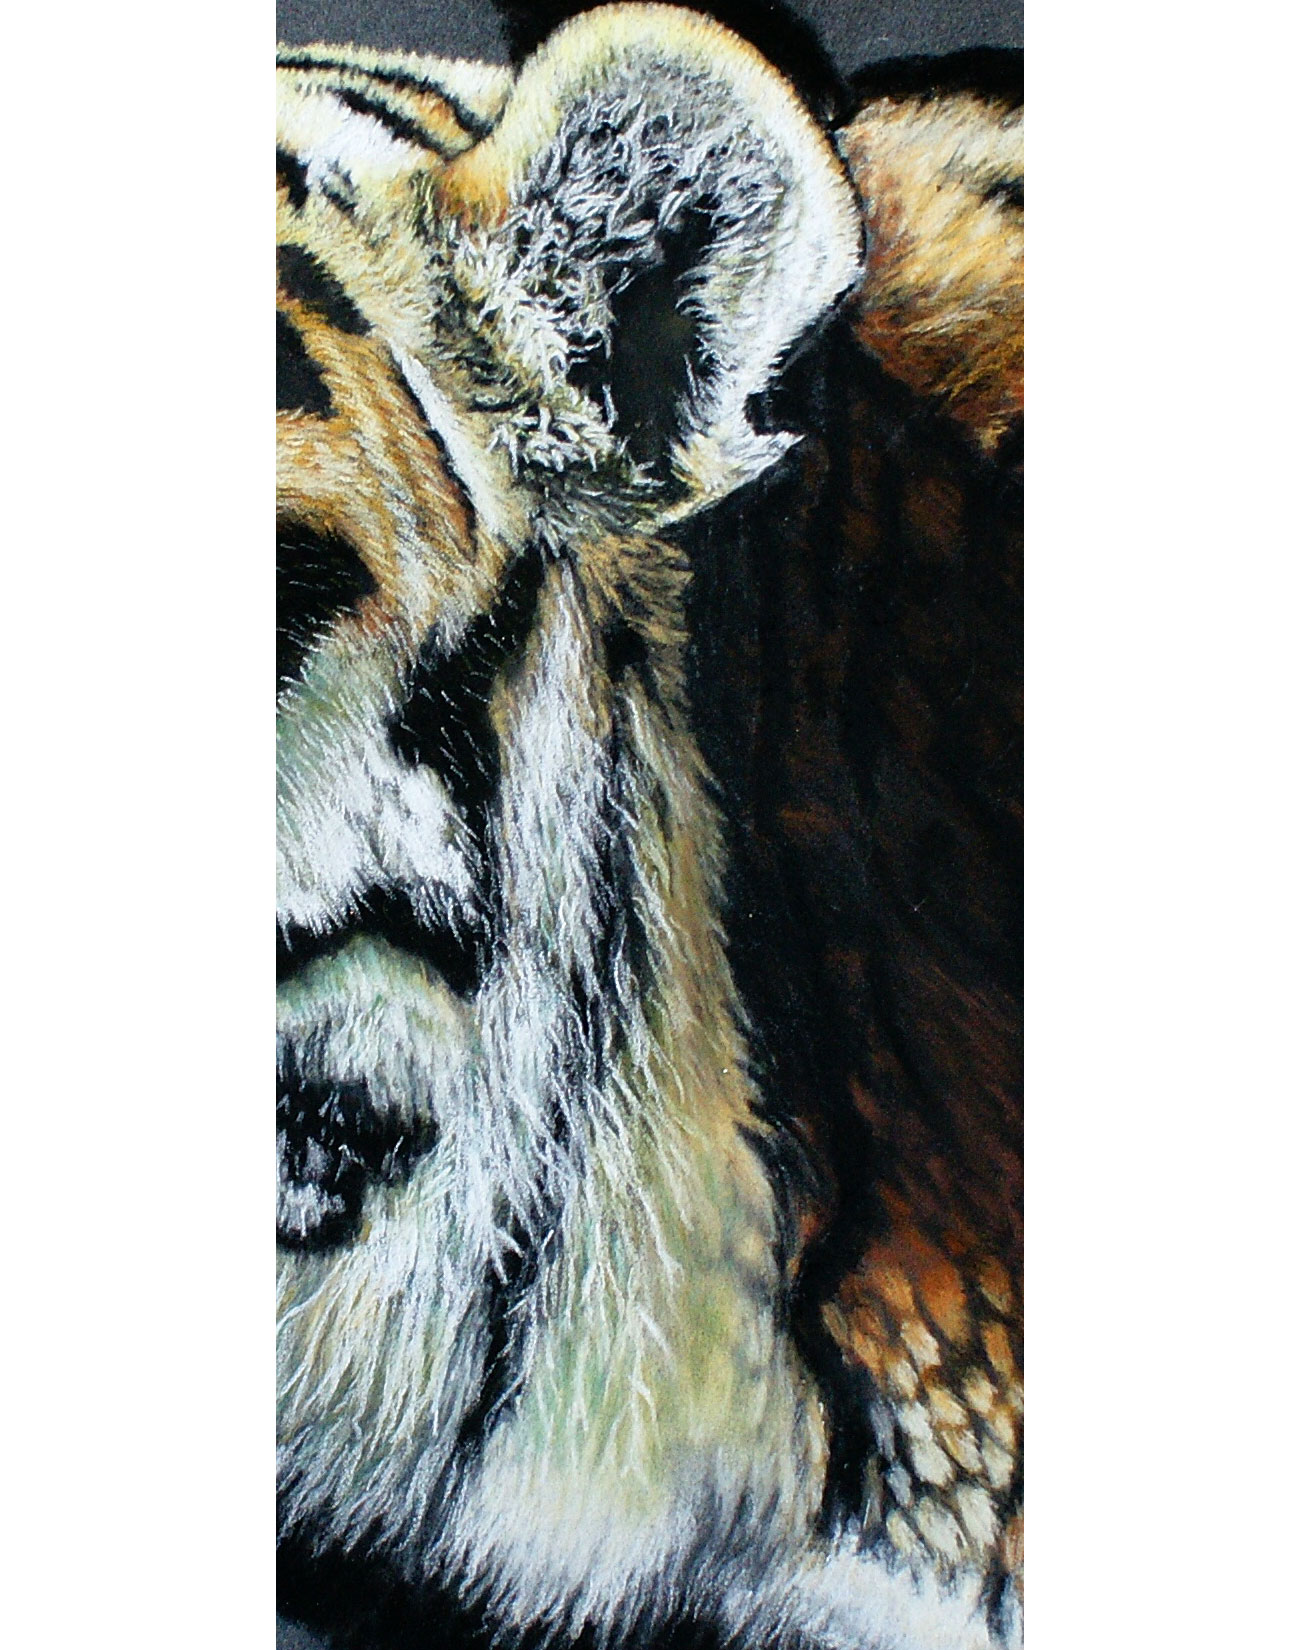
03. Establish head shape
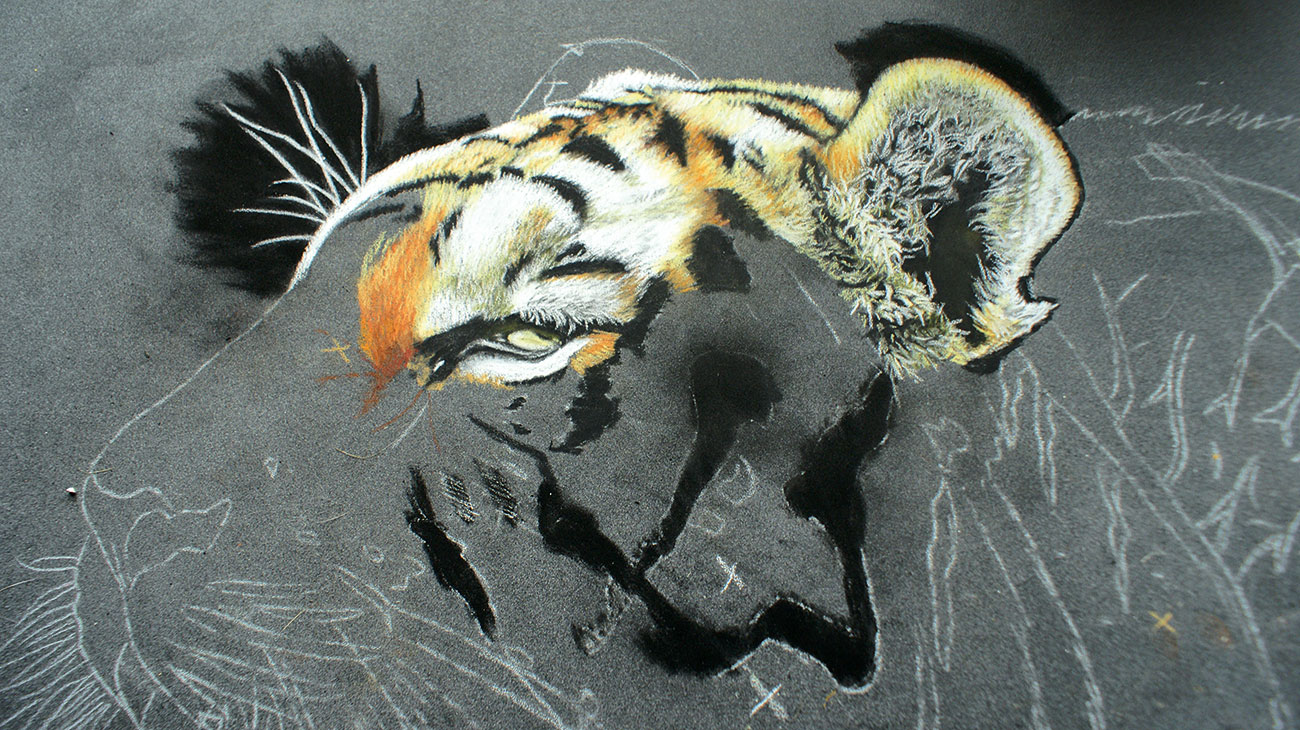
Work in a background edge first to show up the fine hairs
Having established a starting point, I continue above the eye area. I apply a background edge using a soft pastel in black, to account for all the fine hairs that run off the tiger's contour – especially around the ears. After edging the ear from orange, ochre then to cream, the centre is a layer of black, ochre and green all smudged together. I then draw in lots of fine white curly lines, topped with a layer of green and cream. The lines are random, but run in the direction of the tiger's form and shape.
04. Colour the cheek
Build up the side of the head, working in the direction of the fur
Continuing with the side of the head, I use oranges, ochres, and creams once again, noting that the layers of fur are running downwards. I work on the section directly underneath the eye using greens and greys first. I then use white to cover the coloured layers using wavy lines, exposing the original underpainting. I add green to the whiter area, then lastly, I add a layer of orange – ready for the nose.
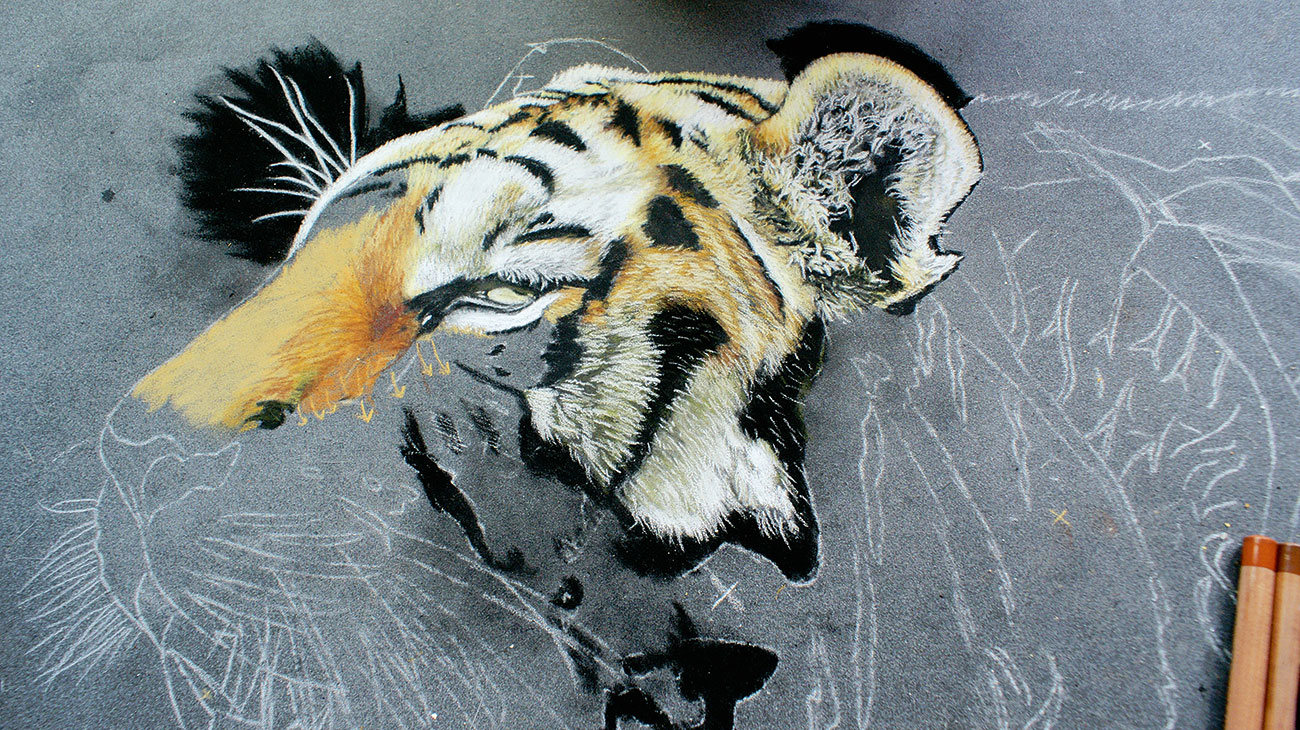
05. Get the nose right
Take time to ensure that you capture the nose’s structure properly
The nose area is the most challenging as its structure spreads out into various directions. The line work runs above the eye, across at the bridge of the nose and curves in a downward stroke half way across the width of the nose, leaving a small triangular patch sitting centrally, just underneath the bridge. I follow this to the tip of the nose, using small light strokes of ochre and cream, continuing with darker shades in a circular motion to the side for depth.
As I reach the fleshy part of the nose, I use grey before edging off in white, then I'm ready to apply the palest of pinks for the nose. Before applying the highlight of white, I add a dash of crimson and ochre, finishing off with black for the nostril.
06. Work on muzzle and mouth
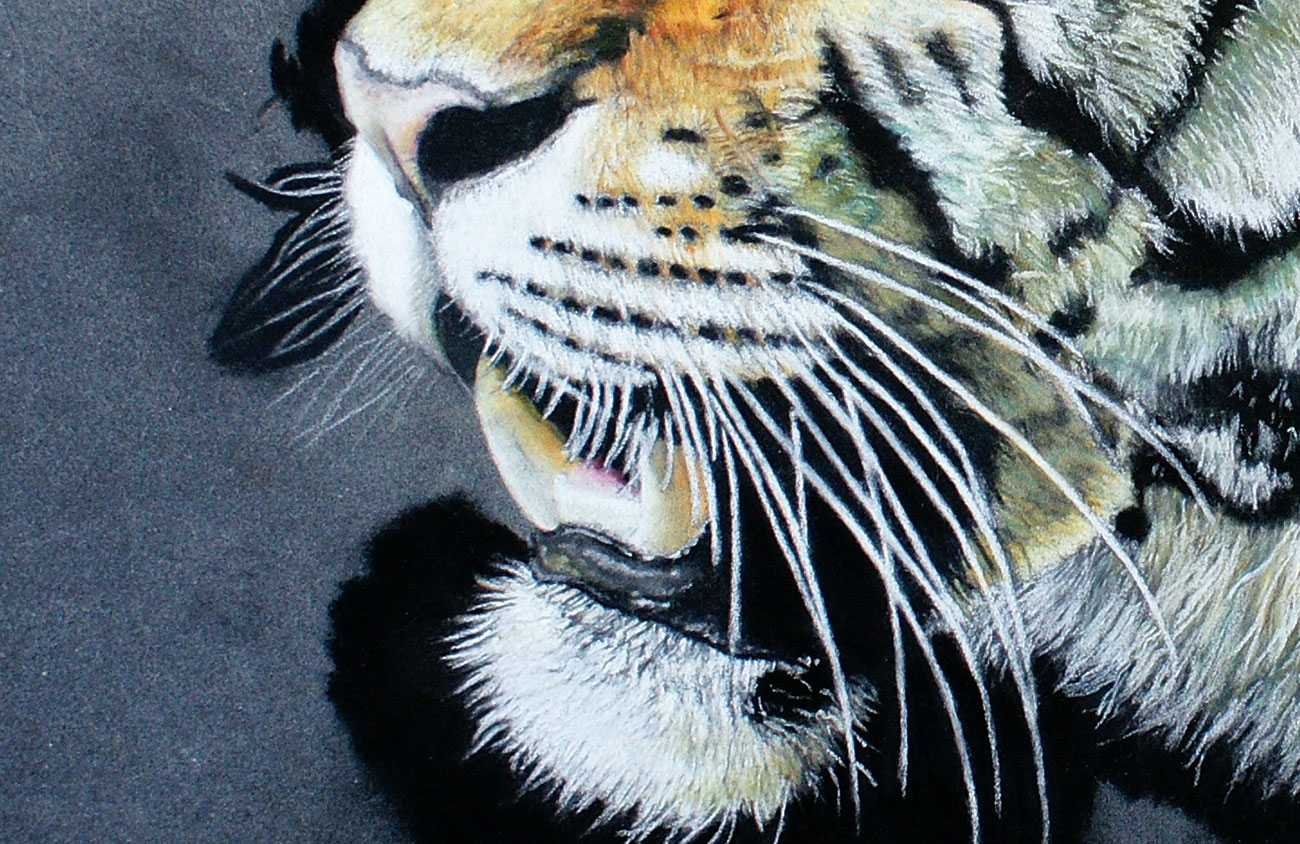
Don’t forget the whiskers!
I now begin working around the cat's muzzle, putting in all the black areas first, sweeping in with the white at a diagonal angle. However, I make sure to leave space for the whiskers, which I drew in with Conté 630 White. I then work on the shadow areas using grey and green in the lower corner of the bottom lip over the black.
I now need to create a 2D effect on the teeth, so I paint a mixture of ochre and yellow on the backs of the teeth. Moving towards the middle, I paint in a yellow towards the front, then a cream on the bottom half, with a white at the tip of the teeth. Once I'm happy with the result, I blend a small amount of pink into the black behind the teeth. I then proceed to the chin, which is all fine strokes of white, plus yellow, green and grey for the shadow areas.
07. Focus on underpainting
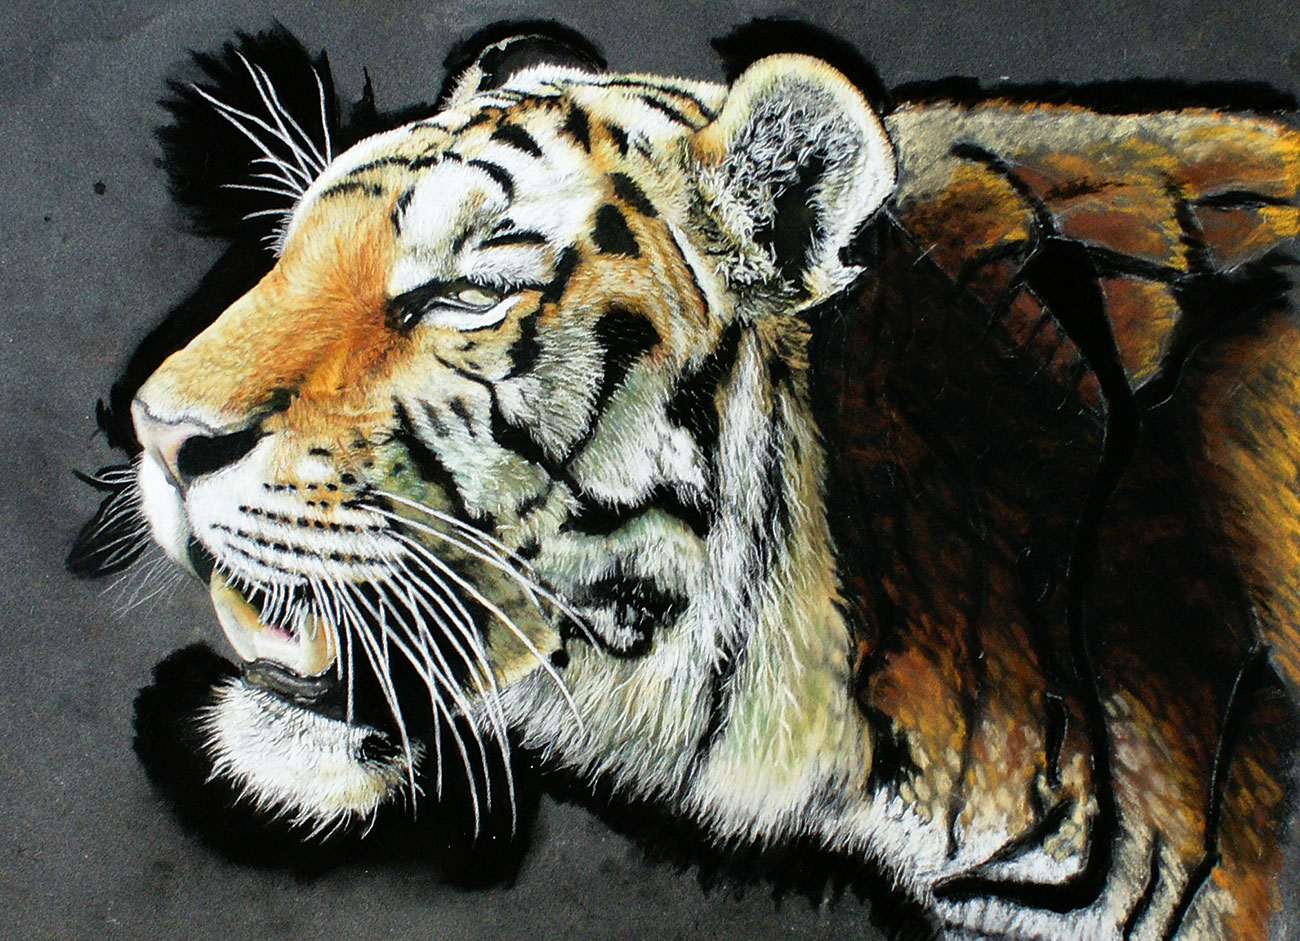
Use hard pastel sticks for your underpainting
Having completed the main facial features, I now move onto the underpainting. This is not only a great way to define colour values and contrast, but also adds depth and body. Without it, the image would appear flat and lifeless. With the use of hard pastel sticks, I establish where the lights and darks are in my painting. This prepares the base ready for the details, which are drawn over the top in pastel pencil.
08. Add layers
Give your picture depth by adding in layers of longer fur
In this step, I paint the longer fur between the face and neck. Starting with the black stripe first, I quickly move onto the white layers, rubbing them lightly into the Pastelmat's base, as I add a layer of yellow and ochre part way through. Shamrock and grey in the shadow areas keep the luminosity in the pastel layers fresh and transparent. Finally, I add fine, light spontaneous strokes, some more heavy than others.
09. Emphasise contrast
Bring in further depth by emphasising the tiger’s natural contrasts
I start with the darkest area, the middle section, so that I can build my colours from dark to light bearing in mind where the contrast is. I lay down black first – for the stripes as well as the shadow area. I then work towards the top with a barely visible, very dark orange. I use a golden yellow to highlight the edges of the fur and a lemon with an upward stroke as the fur reaches the top of the tiger. The highlight is cream, with several white strokes done with an edging of tiny orange pencil marks.
The bottom pattern is a bit tricky: I use orange into cream at a diagonal angle, flicking the pencil out at the bottom edges and blending for a natural look. I add black and grey between each shape, running into white near the bottom.
10. Create the background
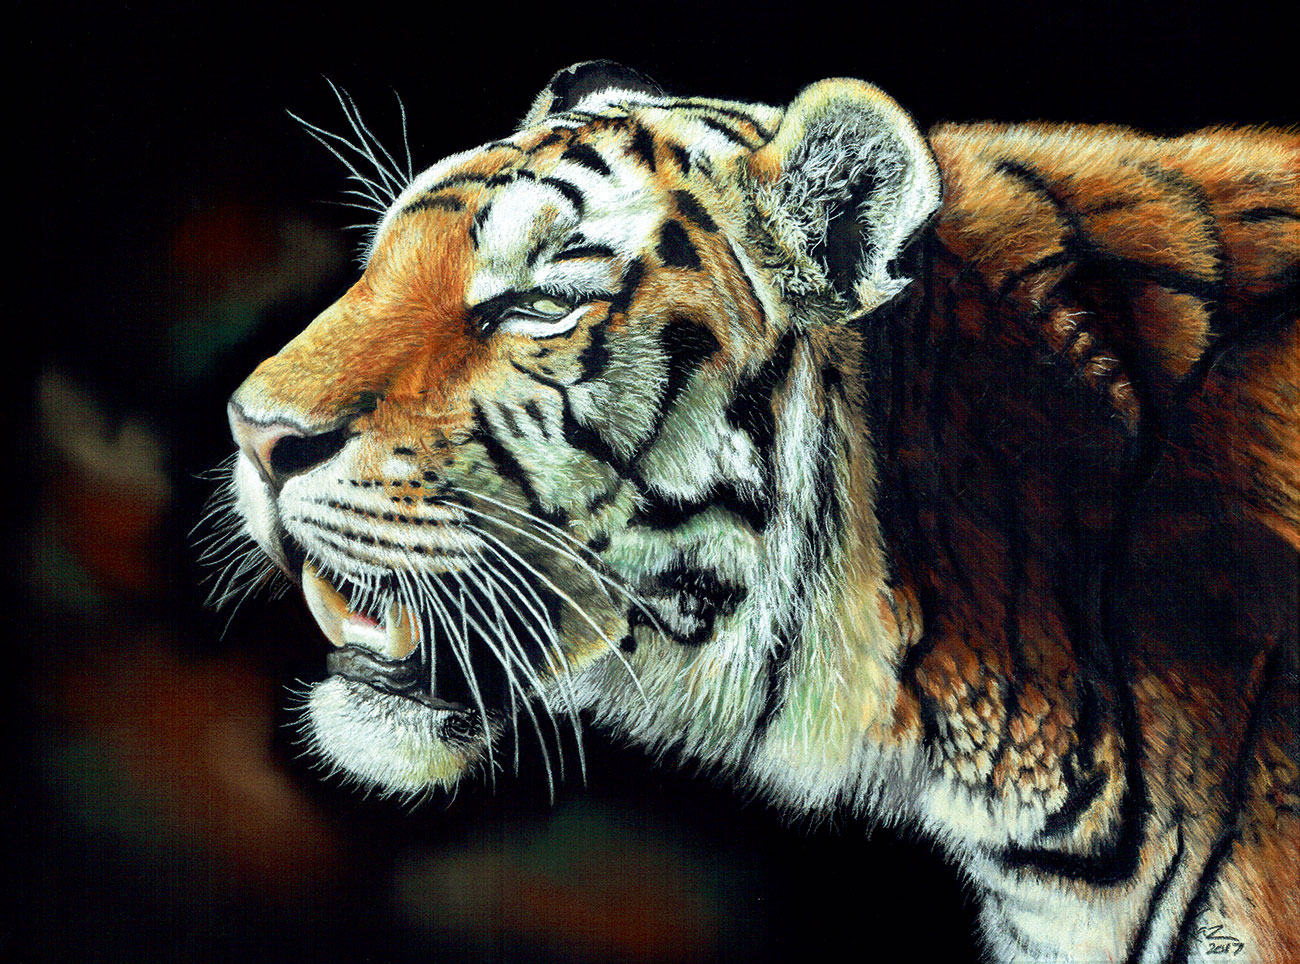
Add a black background then soften it with orange, green and cream
For the background, I cover the Pastelmat in a soft black pastel, which I rub in using an artist's sponge. I then work in a mixture of orange, green and cream directly to the side of the cat to add a warmth in the shadows – still using soft pastels with a circular motion.
This article was originally published in Paint & Draw.
Related articles:
How to add drama to your pastel artworksCarbOthello Pastel Pencil Set (24) reviewHow to fix your finished pastel artwork


Leave a Reply
Want to join the discussion?Feel free to contribute!