Infographic: How people really use voice assistants

Original Source: http://feedproxy.google.com/~r/CreativeBloq/~3/4Sn4OKrPGg0/infographic-how-people-really-use-voice-assistants

Voice interfaces are one of the hottest user experience trends in recent years. New figures reveal that one in 10 Brits now owns at least one of these devices. But how are we really using them? Code Computerlove polled over 1,000 smart speaker owners, and turned their findings into this top infographic.  And if this inspires you to put together your own data visualisation, take a look at our list of the best infographic tools around. 

Read on for some  surprising facts about how UK residents are using this amazing new smart speaker technology.

infographic on voice technology

That's right, a fifth of us are using our clever invisible friends to make sure we don't overcook our eggs in the morning. It's a task that can be accomplished using a normal clock, but, hey, where's the fun in that? 

In fact, mundane tasks lead the way when it comes to smart help – 65 per cent of owners used their assistant to play music or the radio, and over half use it to check the weather forecast.

Furthermore, Alexa still rules the roost in the voice assistant space, with Amazon Echos making up 70 per cent of the devices owned. There are other good options available though (take a look at our sister site TechRadar's guide to smart speakers for more info). 

infographic on voice technology

The big question with any new technology is: is it just a fad? Perhaps not, judging by the fact that 25 per cent of owners chat to their smart assistants every day, even taking it to bed with them. However, a further 30 per cent have forgotten they even have a voice assistant in the house. Less encouraging.

For more interesting finds – including our deep-seated fears about voice assistants – take a look at the full infographic below. Click on the infographic to see the full-size version. 

Read more:

The 5 biggest UX design trends for 2018How to create amazing infographicsHow to design a chatbot experience

How to rescue a logo that has been saved as a bitmap

Original Source: https://inspiredm.com/how-to-rescue-a-logo-that-has-been-saved-as-a-bitmap/

Every designer at some point will encounter the client who brings in a blurry, pixelated JPEG copy of their logo (the only copy they have) and requests for changes to the logo.

Redesigning the logo entirely from scratch is one option, but it can be hard work, as you’ll have to figure out exactly how the original designer achieved the result. This isn’t always so difficult with simple logos, but it’s definitely an issue with logos that have non-standard fonts or very complex artifacts.

As a designer, you know that clients should always have a vector copy of their logo with transparency in the background, but clients don’t know that. They also don’t always know how terrible it looks when a logo is recycled for different purposes using anything other than the vector copy.

Clients also may not understand about the necessity of their logo to contrast with whatever background it is placed on. You can help them with this kind of thing, but first you’ll need to rescue that logo from Bitmap Hell, and bring it in to the glorious paradise of Vector Heaven.

The following is a method that will help you do this.

Start a new vector project.

Many vector graphics applications let you import a file directly from the file manager, but this is not the best way to do this job. If the imported image is the background layer, it can be difficult to delete it in some vector applications.

To save difficulty, it is better to start a brand new project, and discard unwanted layers later.

Create a transparent layer called “background”.

Most of the time you’ll just need to rename the background layer, but if the background layer is not automatically set to transparent, then you should create a new fully transparent background layer and delete the original one. This is to be completely certain your image does not have a background color behind it.

Lock the background layer.

Having gone to all the trouble of creating a proper transparent background, you don’t want to accidentally mess it up. Locking the layer prevents you from changing or moving the layer.

Create a layer above background called “import”.

This is where we’ll import our original logo to. This step might not be needed if your software automatically creates a new layer for imported images. Renaming the layer to “import” will help you to identify it more easily than if the full path name of the imported file is used for the layer name.

Import your logo file to the import layer.

This is the most obvious step. As stated above, your software might put this on it’s own layer. If that happens, just delete the “import” layer and then rename the layer your software just created.

If you are asked if you want to embed or link to the image, choose the embed option (this is fine, because you’re going to delete this layer later anyway).

Resize the image to fit the import layer.

This step is necessary to make sure parts of the logo won’t be cropped out of the image when you save it. What you see is not always what you get when it comes to vector illustrations.

After resizing, you won’t have all that empty page space around the image any more (this is important for when you export the file, because the whole page is exported, not just the image you create).

Lock the import layer.

Now we need to lock the import layer so that we don’t make any accidental changes to the original image. You also won’t want to accidentally move the layer, and locking it prevents that.

Create a transparent layer above import called “trace”.

This is the layer we’ll be working in. You can create additional trace layers (trace1, trace2, etc) for a very complex logo with a lot of different parts.

Carefully trace over the logo.

This is the part of the job you’re going to hate, but it’s obviously the most important one. It’s where the magic happens. If you’re working in multiple trace layers, remember to lock each layer as you leave it.

Sounds like way too much work? A possible way to save time and effort is to use an “edge detect” filter or color matching filter to detect the parts of the logo that need tracing, and copy these to a new layer. The problem with this quicker way of doing things is that it’s not always reliable or accurate.

While tracing, you’ll need to zoom in very tight. The image will be difficult to look at due to pixelation. Try to work out which pixels are “true” and which are “false”. Avoid tracing false pixels.

Lock the trace layer(s).

When you have finished the trace completely, make sure all trace layers are locked, so there is no danger of the work you’ve just done being wasted.

Delete the import layer.

We don’t need the import layer any more because it has done its job. Deleting it makes your image less cluttered.

Flatten the image.

This is an optional step, but again the idea is to make the image less cluttered by reducing everything to a single layer. That may not always be what you want, so think carefully before committing to this action.

For logos with multiple trace layers, you may find it useful to preserve each layer so you can modify individual logo parts more easily in the future.

Save the file.

You wouldn’t want all that work to go to waste, so save the file. Actually it’s best practice to make incremental saves as you work, but it’s not always easy to remember to do it.

Export to other formats if requested.

Now you have the saved new copy of the logo, you can export it to whatever other formats the client needed. If they’re requesting a jpeg, bitmap, or other file type that doesn’t support background transparency, make sure you know the color of the background the logo is going to be placed on.

You also should ensure the client knows the importance of contrast. If the logo is being placed on a background that does not contrast with it appropriately, you should make a copy of your vector modified for better contrast with the desired background color, and you can again export it to other formats as requested by the client.

header image courtesy of Domestic Society Design Co.

The post How to rescue a logo that has been saved as a bitmap appeared first on Inspired Magazine.

Kogin embroidered Insect Brooches

Original Source: http://feedproxy.google.com/~r/abduzeedo/~3/ML1RoYZLucI/kogin-embroidered-insect-brooches

Kogin embroidered Insect Brooches

Kogin embroidered Insect Brooches

AoiroStudio
Jun 29, 2018

Let’s take a look at this unique project by Hiné Mizushima who is (in his own words) Slow Crafter, Needle-felter and Illustrator based in Vancouver, BC in Canada. We are looking at his Kogin embroidered insect brooches he worked on for a group exhibition happening right now in Osaka, Japan. What is Kogin? It’s a traditional quilting method of Aomori’s Tsugaru region, where its characteristic is the beauty of its design. As you can see in the following, it’s an art and we can definitely appreciate its creativity.

Kogin embroidered insect brooches for a group exhibition, The Kingdom of Specimens at ranbu gallery (2nd floor) in Osaka, Japan, opening June 20th, 2018! I used some of my hand-dyed Kogin fabrics and most of my hand-dyed Kogin threads for the brooches, and I also used tiny Japanese glass beads for the details.

More Links
Learn more about Hiné Mizushima
Follow Hiné’s work on Behance
Kogin embroidered Insect BroochesKogin embroidered Insect BroochesKogin embroidered Insect BroochesKogin embroidered Insect BroochesKogin embroidered Insect BroochesKogin embroidered Insect BroochesKogin embroidered Insect BroochesKogin embroidered Insect BroochesKogin embroidered Insect BroochesKogin embroidered Insect BroochesKogin embroidered Insect BroochesKogin embroidered Insect BroochesKogin embroidered Insect BroochesKogin embroidered Insect Brooches

crafts
embroidery
design


Create an Effective Plan for Your Website’s Design

Original Source: http://feedproxy.google.com/~r/1stwebdesigner/~3/gouEHNayjHU/

When designing your own website, it typically requires you to craft a detailed plan for creating it and oftentimes finding people to assist with the project. Sometimes the website design takes no more than a week, but most of the time it takes longer. What’s more is that all websites require testing and some kind of maintenance after the design is done.

Websites are becoming simpler and easier to construct, but you still don’t want to cut any corners along the way. That’s why we’ve compiled a list of steps for you to effectively plan your website’s design.

Create a Plan with Goals

Your plan involves figuring out the purpose of your website. Do you want more sales? Email subscribers? Donations?

After that, you need to set up some goals for that plan. How many sales are you trying to get per month? Is there a certain number of visitors you would like to see every month? Combined with a good analytics program (like Google Analytics), you should be able to check in on all of this information.

Person illustrating a business plan

Assign Roles for that Plan

You often won’t be working on the website design alone. You might need a web developer, along with someone who can write content, like blog posts and webpage details. The same goes for a logo designer and a CSS professional who takes your customizations to the next level.

Once you decide on the professionals needed, outline the roles and make sure everyone knows what others are doing.

Create a Budget Based on the Plan and Roles

It’s good to set your team before establishing a budget, since the web design professionals can help recommend the best value in items like hosting, graphic design, content management systems and more. It doesn’t matter the size of your organization. A budget needs to be put in place to see your expenses and how you plan on paying for those expenses.

Coins and Clock

Develop a Strategy for Content

Without a content strategy, websites tend to not get updated. These types of sites display old, stale information that people don’t care about. Therefore, you should put together a strategy for content such as blog posts, slideshows, documents, videos and pictures. Are you going to post all of these content items starting at day one? Or is it a better idea to make a schedule and share things like videos and blog posts over the course of the year?

Draw Out the Structure of the Website and Make a Mockup

Think about which web pages you’ll use to form your website. For instance, you may have pages like About Us, Contact Us, Portfolio or an Online Shop.

Once you have the list of webpages, generate a mockup, or visual representation of your website, to show to other people in your organization. This is essentially the first draft of the site, which can be developed in Photoshop or many other mockup or wireframe programs online. Most of the time it’s best to have a designer complete the mockup, but sometimes you can do it yourself with pen and paper.

Website Mockup

Design It

From simple navigation to a quality company logo, the process of designing is best accomplished with an experienced web designer. Even if you only hire a consultant or use online resources to design your site, take your time with this process and prepare for lots of testing.

Test the Design Multiple Times

Consistent testing solves many problems and guarantees that the mistakes are minimized. For example, one of your testers might find that the website doesn’t show up properly on Internet Explorer. Another tester may discover that a few of your navigational buttons lead to broken links. Having a solid testing plan ensures that your website is ready to show to both customers and the search engines.

Person typing on a laptop

Maintain, Maintain, Maintain

You may have someone in your organization to maintain the website, or you might want to hire a freelancer to do this. Regardless, maintenance keeps your website secure, up-to-date, clean and fresh with content.

It’s important to assign someone to post new content on your website. It’s also necessary to update your CMS and plugins. In addition, you’ll want to configure a system that backs up your content and secures the site into the future.

Now You’re Ready to Effectively Plan Your Website’s Design

Now that you have the knowledge to plan your website, get started with your outline and think about the people who will undertake every task. If you have any questions about effectively planning your website’s design, let us know in the comments.


30 Cool Screensavers For Your Desktop

Original Source: https://www.hongkiat.com/blog/25-really-cool-screensavers-to-download/

Collection of really cool downloadable screensavers for your desktop when it is idle.

The post 30 Cool Screensavers For Your Desktop appeared first on Hongkiat.

Visit hongkiat.com for full content.

Triple Panel Reveal Slideshow

Original Source: http://feedproxy.google.com/~r/tympanus/~3/qynS_pAghHk/

Today we’d like to show you a little slideshow design with a “triple panel” layout. The infinite slideshow shows a preview of the next and previous slide on both sides of the page. When navigating we use a reveal effect for all three images and animate the titles. The animations are powered by TweenMax.

RevealSlideshow_featured

The demo is kindly sponsored by monday.com: The visual project management tool for designers. If you would like to sponsor one of our demos, find out more here.

Attention: Note that we use modern CSS properties that might not be supported in older browsers.

The image slideshow has two lateral previews and a main image in the center. When hovering over the “Explore” link, the main image will zoom in a bit:

RevealSlideshow_01

When navigating, we animate a reveal element that covers each image. Depending on which direction we are navigating, we make the revealer appear from bottom or from the top. All title elements have an animation except for the “Explore” link.

RevealSlideshow

We hope you enjoy this demo and find it useful!

References and Credits

Images from Unsplash.com
TweenMax by Greensock
imagesLoaded by Dave DeSandro
Building icon designed by Freepik

Triple Panel Reveal Slideshow was written by Mary Lou and published on Codrops.

10 Beautifully Designed Free Bootstrap Dashboard Admin Templates

Original Source: http://feedproxy.google.com/~r/1stwebdesigner/~3/0UZO-ek0L5E/

The goal of any admin area (a.k.a. “Dashboard”;) should be to provide all the functions a user needs and doing so with their ease-of-use in mind. Using the popular Bootstrap framework, you can create an administration area that excels in both form and function.

Here are 10 free Bootstrap-based themes that will help to turn your custom admin area into a user-friendly powerhouse.

All the Admin Templates You Could Ask For

Bootstrap Admin Templates
2M+ items from the worlds largest marketplace for Admin Templates, Themes & Design Assets. All of it can be found at Envato Market.

DOWNLOAD NOW

AdminLTE

AdminLTE is a lightweight theme that prides itself on being both beautiful and useful. It’s fully responsive, includes a selection of six skins and is even optimized for printing.

AdminLTE

Material Dashboard

Built with Google’s Material Design in mind, Material Dashboard is clean and colorful. The UI is inspired a bit by layered sheets of paper and uses light, surface and movement to create an easy-to-use dashboard.

Material Dashboard

AdminBSB – Material Design

Those looking for a very Google-like interface will love AdminBSB – Material Design. It follows the principles of Material Design while providing users with a familiar-looking GUI.

AdminBSB - Material Design

BootFlat Admin

BootFlat Admin features an attractive and easy-to-navigate dashboard area. As its name indicates, it uses the BootFlat flat UI kit.

BootFlat Admin

Klorofil

Klorofil features lots of useful elements such as charts, timelines, notifications and ready-to-use page templates. It provides you with all the basics you’ll need to build a perfect backend to your site or web-based app.

Klorofil

Shoppy E commerce Admin Panel

Using vibrant colors and a flat UI, Shoppy is a great choice for a custom eCommerce dashboard. It’s fully responsive and includes lots of goodies like buttons, icons and animated charts.

Shoppy E commerce Admin Panel

Paper Dashboard

Unlike a lot of admin themes out there, Paper Dashboard is quite subtle in its use of color. That leads to a beautiful UI that may have a bit more of a calming effect than other, more cluttered choices.

Paper Dashboard

Bluebox

There’s something to be said for simplicity in color scheme. Bluebox does it to near perfection in that the consistent use of blue makes it easy to find what you’re looking for. It comes with lots of UI elements while supporting Google Fonts and Fontawesome Icons.

Bluebox

Blocks – Single Page Admin

Blocks takes a different approach to the admin screen by utilizing a fully-widgetized UI. Also gone is the ubiquitous left-side navigation in favor of a much more subtle menu across the top. This just goes to show that there is more than one way to create an appealing admin layout.

Blocks – Single Page Admin

Free Responsive Horizontal Admin

Free Responsive Horizontal Admin also eschews the standard left menu. The theme also makes nice use of white space and sports a muted color scheme. This could be a solid choice for those who need a more simple and minimal type of dashboard.

Free Responsive Horizontal Admin

Admin Themes That Help You Take Control

Admin areas have, to some degree, gotten a bit stale – especially when you look at what some popular CMS are doing. Part of their problem is that you don’t necessarily want to make radical changes to a UI that millions are comfortable with.

So the real innovations are coming in the form of the roll-your-own dashboards, like the ones featured above. Building your own admin can free you up to take a few more chances than the bigger players out there. These Bootstrap-based themes are proof that there is still a lot of room for both improvement and different ideas.


The best 4K monitors for designers 2018

Original Source: http://feedproxy.google.com/~r/CreativeBloq/~3/lvE42f_tulQ/best-monitor

Choosing the best 4K monitor for creative work when you're a designer can be difficult and time consuming. You'll want to make sure that you get a 4K monitor that does your artwork justice.

You also need one that can keep up with the rest of your hardware. After all, you might be armed with a great laptop for graphic design or a brilliant video editing computer – not to mention a top-class Creative Cloud subscription, but if you're not seeing the right colours on your screen, don't have enough inputs or simply have the wrong size monitor, it doesn't matter how good you are: your work will suffer.

This guide will help you choose the best monitor for you, no matter what creative discipline you work in. (Make sure you pick up a quality monitor calibrator as well.)

As you'd expect, all the monitors here are 4K or above, making them an excellent choice for creative professionals and serious hobbyists alike. 

Also read: The best cheap 4K monitor deals of 2018
What is 4K resolution?

4K, also known as Ultra HD, refers to the high-definition resolution 3840 x 2160 pixels, which is four times the 1920 x 1080 pixels found in a full HD TV. 

Read on for our pick of the very best 4K monitors out there for designers, artists and creative professionals. 

The best and most accurate picture quality carries a high price tag. Eizo displays are a familiar sight in professional photography and video production studios. The 31-inch ColorEdge CG318-4K continues this tradition, with not just full sRGB coverage, but 99% of the Adobe RGB spectrum and 98% DCI-P3. It fully supports 10-bit colour, taken from a 16-bit look-up table.

Unlike other 4K monitors, the CG318-4K has a 4096 x 2160 resolution. This reflects the different, slightly taller 4K standard used in digital video production, compared with the 3840 x 2160 resolution used in most computer displays. 

All of these features come together to produce a jaw-dropping image, making your creative work shine. Oh, and there's a built-in calibration tool to constantly keep the colours as accurate as possible, which pops across the screen every time it's powered on, along with a bundled monitor hood.

Dell's top-end 31.5-inch 4K display packs in a lot of professional-grade features for superb colour accuracy. But while it costs a lot less than Eizo's offering, it's still a pricey prospect, as expected of a large high-end 4K monitor.

Dell's top-end 4K display now covers the DCI-P3 colour spectrum. It has a specification that almost rivals Eizo's monster CG318-4K, as it hits 99% Adobe RGB coverage and 87% DCI-P3, delivering great picture quality.

This is an incredible display – but do you really want a 40-inch panel? Based on VA-IPS panel technology, it offers extremely good contrast, with 300 cd/m2 brightness.

Its menu is controlled with a small joystick at the back and it also offers a four-way picture-in-picture (PIP) mode, allowing you to allocate a quarter of the screen to each video input.

On such a large 4K screen, each connected device will have its own 1920 x 1080 screen area – perfect for seeing your designs in Illustrator or working on your 3D art on one machine while looking up reference images on another device on the same screen, for example.

Acer S277HK

If you're after a mid-range 4K monitor that ups the image quality and provides plenty of features, without costing an exorbitant amount, then the Acer’s S277HK is the best mid-range 4K monitor out there. With a 1,000,000,000:1 contrast ratio, a colour gamut of 1.07 billion and a resolution of 3,840 x 2,160, the Acer S277HK excels at image quality. And while the minimalist design might not have a lot to shout about, some will appreciate its pared-down looks. 

The BenQ PD3200U's screen size and resolution makes it a great choice for designers and creators. The screen is a hefty 32-inches, which makes working with 4K images and videos much more comfortable. 3D designers will be grateful for the inclusion of a CAD/CAM mode, and everyone else will appreciate the factory-calibrated colour accuracy and Rec. 709 adherence. It's a pricey monitor, but for many designers, this will be well worth the money.

Asus' Pro Art line competes with professional colour-accurate screens. It's got loads of inputs, with three HDMI ports – including one HDMI 2.0 port capable of the full 60Hz needed for smooth 4K –  and two DisplayPort inputs.

The Asus PA329Q is the upgraded version of of the company's flagship 4K professional display, with a 10-bit IPS panel that now supports a 16-bit colour look-up table and quoted 100% Adobe RGB coverage, with support for the DCI-P3 colour spectrum as well.

Iiyama's 28-inch B2888UHSU is a lot more reasonably priced than many of the options we've presented in this buying guide. It uses a TN panel with a 1ms response time, and although the viewing angles aren't quite as wide as you'll find with an IPS display, there are plenty of small extras that make the B2888UHSU a really good buy.

It has plenty of inputs, too, plus a fully adjustable stand, and a picture-in-picture mode, so you can use two devices simultaneously with this monitor.

The U28E590D is a slick 28-inch 4K monitor with a beautiful design and a whopping 8.3 billion pixels. DisplayPort 1.2 gives you fluid 60Hz 4K, while everything is detailed and clear thanks to a brightness of 370cd/m. Picture settings can be tweaked using the on-screen menu, or you can sit back and enable its Dynamic Contrast mode to do the heavy lifting.

There's also very smart port placement, so you won't have to bend around the back to connect any cables or peripherals.

Related articles:

The best laptops for video editing 2018Typography 55 best free fonts for designersThe best cheap laptop deals for creatives

Visual Design Inspiration for your Monday Morning

Original Source: http://feedproxy.google.com/~r/abduzeedo/~3/9lGDvEOeV1o/visual-design-inspiration-your-monday-morning

Visual Design Inspiration for your Monday Morning

Monday Visual Design Inspiration

abduzeedo
Jul 02, 2018

Monday is always the perfect day to spend some time to collect some visual design inspiration and set some goals for the week. With that in mind, there’s nothing better than getting tons of references. In the past, I used to go through books and magazines, but with the web now things are way easier. So for this post, I would like to share some of the UI design inspiration I have been collecting during the weekend for the upcoming redesign of Abduzeedo, which I will have more to share very soon. 

So for this post, I would like to share some references in web design, app design or simply put, pure design inspiration.

Visual Design Inspiration

03 architecture website3dflipFurnitureStoriesuiAuto landing page dribbbleMaster&DynamicOchcinci landing page nike design ui ux product web dribbble full 5Anicornxorder  yalessandri 3ShopHome 1.0

visual design


How to Run a Heuristic UX Evaluation

Original Source: http://feedproxy.google.com/~r/1stwebdesigner/~3/z1N9WV8rgV4/

User experience development and optimization is a broad field. There are many facets of web design to consider in the development of a website. The factors affecting user experience, or UX, span from content production and page layout to website interactions.

Being able to identify usability issues with a user interface is called heuristics. It encompasses broad, qualitative rules that help determine the usability of your website and the overall experience your visitors are having.

The UX Designer Toolbox
Unlimited Downloads: 500,000+ Wireframe & UX Templates, UI Kits & Design Assets


DOWNLOAD NOW

To ensure better performance, designers use a heuristic evaluation, which is a way to test the overall UX of your site and if the site has usability issues. Your website’s UX is important and can have a big impact on your business and the success of your website.

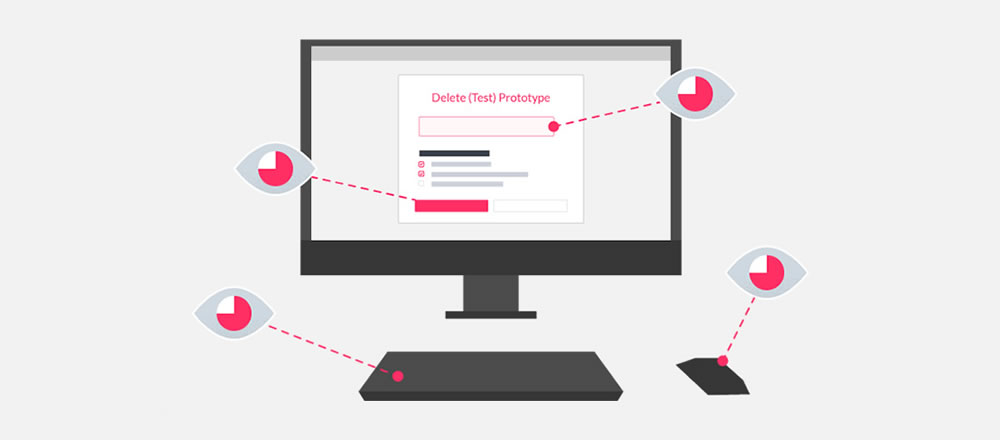
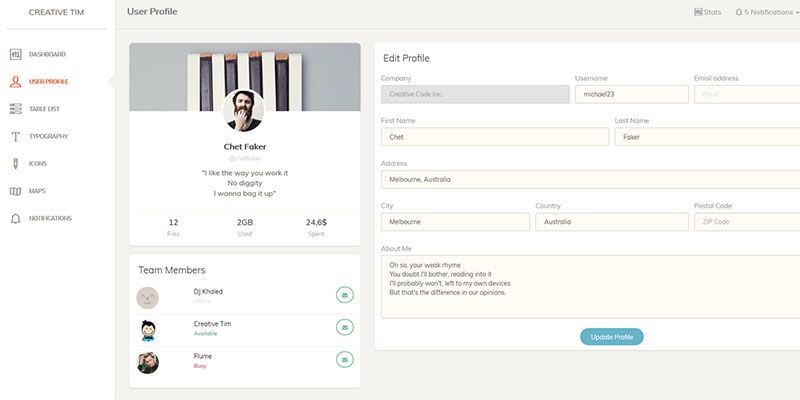
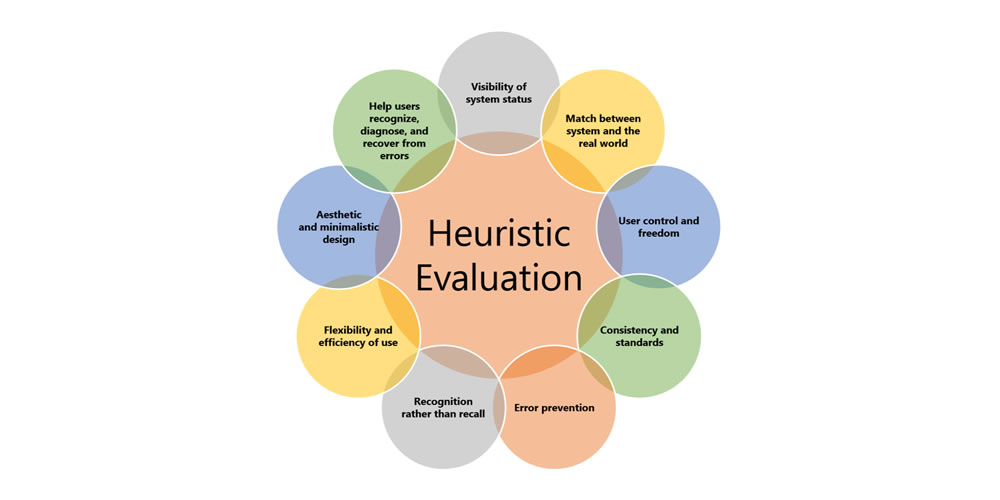
Image via UsabilityGeek.com

A heuristic evaluation is different than user-testing because you are utilizing usability professionals instead of users. Sometimes, this approach is referred to as an expert review since you are getting professional feedback about your UX.

There are over 200 criteria that can be used when a site is being evaluated. Most businesses will determine the specific probes they want to be included in the evaluation. Many experts base their questions and responses on Jacob Neilson’s 10 Heuristics for User Interface Design.

Here is a closer look at those 10 heuristics:

1. Visibility of System Status

The system or website should always keep users in the loop about what is going on. This information is given to users through feedback in a reasonable time.

2. Match Between System and the Real World

The website should cater to a specific audience. The language used through phrases, words, and concepts should be relatable to that specific audience and fit into their worldview.

3. User Control and Freedom

Users will inevitably click on something by mistake, leading them to a page they don’t want to be on. An exit or return option should be available to them for a quick return.

4. Consistency and Standards

Platform conventions have been put in place, so your users do not have to wonder what your website means. Most users are familiar with these conventions. If your site is consistent, it should be easy for users to navigate and know what steps to take to reach a goal.

5. Error Prevention

Evaluators check for situations that could lead to an error page for your user. A good error message will send readers back to where they belong. An even better solution is removing any error-prone conditions on your website.

6. Recognizing Rather than Recalling

Your website should not require its users to remember information. Objects, actions, and options should always be visible, allowing them to keep up with your website’s dialogue without missing a beat.

7. Flexibility and Efficiency of Use

Accelerators are often used to speed up the process and interaction between experienced users and your website. This means that no matter the level of expertise of your user, your site will function at the same speed.

8. Aesthetic and Minimal Design

There should be no fluff or irrelevant information on your website. The design should be aesthetically pleasing and seamlessly incorporate relevant content and information for your users.

9. Helps Users Recognize, Diagnose, and Recover from Errors

Error messages should never include code and should simply explain the problem to users. It should suggest a quick solution that is easy for the user to follow.

10. Help and Documentation

It is most effective to have a system or website that does not require any help or documentation. If your system does require it, it should be easy to find, read, and carry out.

How to Run Your Evaluation

Planning and running your heuristic evaluation can be a long process.

Companies with expansive resources should hire at least three usability experts to perform the evaluation. Your team will decide upon the guidelines to be used during the evaluation, and then each expert will evaluate the site separately. Someone who is comfortable with the site should be available to the experts to answer any questions and record the process.

Before You Start

It is important to have a clear focus of who your users are before you begin the evaluation process. Develop personas or story maps for your users and make sure your website design caters to those individuals.

Consider the different tasks your users do when they are visiting your website. Most businesses prefer to rank these activities in order of importance. Take these tasks and relate them to the guidelines that will be given to the evaluators.

Develop a Method

After you have determined your guidelines and tasks the experts should be evaluating for, develop a method. Your evaluation method will include a system of severity codes the evaluators will be basing their responses on. Once the guidelines and methods are in place and your experts have been trained on them, it is time to run the evaluation.

Write a Report

When the heuristic evaluation is over, it is time to study the responses and write a report on the findings. Just like data, here’s where you gather the intel and analyze it. At this point, you can show developers the problems your users may have and come up with solutions for them.

Though you offer a written report, present your findings in person, if possible. This evaluation was done to test the functionality and UX of your website, and those who are involved in the process need to fully understand the findings – some of that may mean face-to-face interaction.

You will be reporting to the team of developers and key stakeholders in the business, so present the information tactfully and make it clear the recommendations for changes are for the betterment of the business.

Your report should include a list of the specific heuristics that were used in the evaluation. This will show the starting point that gave you your results. Explain who the experts are and their backgrounds to the group.

List the issues you discovered with the most important first. Then, give the audience solutions to how these problems can be fixed efficiently.

Your findings and report may mean some extra work for the developers, so give them as much information as possible about the findings so they understand how the UX is being affected and what they can do to fix it.

Can You Run a Heuristic Evaluation Without Experts?

Small start-ups or freelance web developers may not be able to afford a team of experts to evaluate their web design. In these situations, a more informal method called the heuristic markup can be helpful. This method does not provide professional results but can still be beneficial when testing your usability and UX.

Using this process, you set aside a few hours to walk through the website. Try to separate yourself from the development and act as a member of your target audience.

Keep in mind one of the personas developed for the business and perform the tasks as you imagine they would. Keep notes of your experiences as you move your way through the website, keeping track of areas where you got stumped or see a potential problem.

Insight Into UX Can Boost Your Website’s Traffic

Sometimes, why a website works well for a demographic can be a mystery, and these heuristic evaluations take some of the guesswork out of the process. Regardless of the size of your business, a heuristic evaluation of your website allows you to gain knowledge and experience about what your users are seeing.

Their experience on your website determines how long they stay, if they buy your product or service, and whether they return. Conducting an evaluation is the best way to discover potential problems and develop the best UX for your visitors.