5 Benefits of Using DepositPhotos for Your First Graphic Design Project

Original Source: http://feedproxy.google.com/~r/Designrfix/~3/wu37hc2TRYQ/depositphotos

Web design is hard, especially now since the Internet is full of websites with stunning graphics and one-of-a-kind photos. Whether you’re starting out as a newbie graphic designer or you’ve started your first blog, and you feel clueless about how to get high-quality images for your blog posts, DepositPhotos may be the answer for you. […]

The post 5 Benefits of Using DepositPhotos for Your First Graphic Design Project appeared first on designrfix.com.

Learn Angular: The Collection, Released June 2018

Original Source: https://www.sitepoint.com/learn-angular-the-collection-released-june-2018/

Angular is not just a framework, but rather a platform that empowers developers to build applications for the web, mobile, and the desktop.

This collection is a set of books aimed at getting you up to speed with Angular. It contains:

Learn Angular: Your First Week, a collection of articles introducing Angular
Learn Angular: Build a Todo App, an in-depth project tutorial that builds a complete Angular application from start to finish
Learn Angular: 4 Angular Projects presents four practical Angular projects
Learn Angular: Related Tools & Skills contains a collection of articles outlining essential tools and skills that every modern JavaScript developer should know.

This book is for all front-end developers who want to become proficient with Angular and its related tools. You’ll need to be familiar with HTML and CSS and have a reasonable level of understanding of JavaScript in order to follow the discussion.

Where To Buy

Get the collection on Amazon or on SitePoint Premium – all our books and courses for only $9 a month.

The post Learn Angular: The Collection, Released June 2018 appeared first on SitePoint.

Visual Design Inspiration for your Monday Morning

Original Source: http://feedproxy.google.com/~r/abduzeedo/~3/9lGDvEOeV1o/visual-design-inspiration-your-monday-morning

Visual Design Inspiration for your Monday Morning

Monday Visual Design Inspiration

abduzeedo
Jul 02, 2018

Monday is always the perfect day to spend some time to collect some visual design inspiration and set some goals for the week. With that in mind, there’s nothing better than getting tons of references. In the past, I used to go through books and magazines, but with the web now things are way easier. So for this post, I would like to share some of the UI design inspiration I have been collecting during the weekend for the upcoming redesign of Abduzeedo, which I will have more to share very soon. 

So for this post, I would like to share some references in web design, app design or simply put, pure design inspiration.

Visual Design Inspiration

03 architecture website3dflipFurnitureStoriesuiAuto landing page dribbbleMaster&DynamicOchcinci landing page nike design ui ux product web dribbble full 5Anicornxorder  yalessandri 3ShopHome 1.0

visual design


How to Run a Heuristic UX Evaluation

Original Source: http://feedproxy.google.com/~r/1stwebdesigner/~3/z1N9WV8rgV4/

User experience development and optimization is a broad field. There are many facets of web design to consider in the development of a website. The factors affecting user experience, or UX, span from content production and page layout to website interactions.

Being able to identify usability issues with a user interface is called heuristics. It encompasses broad, qualitative rules that help determine the usability of your website and the overall experience your visitors are having.

The UX Designer Toolbox
Unlimited Downloads: 500,000+ Wireframe & UX Templates, UI Kits & Design Assets


DOWNLOAD NOW

To ensure better performance, designers use a heuristic evaluation, which is a way to test the overall UX of your site and if the site has usability issues. Your website’s UX is important and can have a big impact on your business and the success of your website.

Image via UsabilityGeek.com

A heuristic evaluation is different than user-testing because you are utilizing usability professionals instead of users. Sometimes, this approach is referred to as an expert review since you are getting professional feedback about your UX.

There are over 200 criteria that can be used when a site is being evaluated. Most businesses will determine the specific probes they want to be included in the evaluation. Many experts base their questions and responses on Jacob Neilson’s 10 Heuristics for User Interface Design.

Here is a closer look at those 10 heuristics:

1. Visibility of System Status

The system or website should always keep users in the loop about what is going on. This information is given to users through feedback in a reasonable time.

2. Match Between System and the Real World

The website should cater to a specific audience. The language used through phrases, words, and concepts should be relatable to that specific audience and fit into their worldview.

3. User Control and Freedom

Users will inevitably click on something by mistake, leading them to a page they don’t want to be on. An exit or return option should be available to them for a quick return.

4. Consistency and Standards

Platform conventions have been put in place, so your users do not have to wonder what your website means. Most users are familiar with these conventions. If your site is consistent, it should be easy for users to navigate and know what steps to take to reach a goal.

5. Error Prevention

Evaluators check for situations that could lead to an error page for your user. A good error message will send readers back to where they belong. An even better solution is removing any error-prone conditions on your website.

6. Recognizing Rather than Recalling

Your website should not require its users to remember information. Objects, actions, and options should always be visible, allowing them to keep up with your website’s dialogue without missing a beat.

7. Flexibility and Efficiency of Use

Accelerators are often used to speed up the process and interaction between experienced users and your website. This means that no matter the level of expertise of your user, your site will function at the same speed.

8. Aesthetic and Minimal Design

There should be no fluff or irrelevant information on your website. The design should be aesthetically pleasing and seamlessly incorporate relevant content and information for your users.

9. Helps Users Recognize, Diagnose, and Recover from Errors

Error messages should never include code and should simply explain the problem to users. It should suggest a quick solution that is easy for the user to follow.

10. Help and Documentation

It is most effective to have a system or website that does not require any help or documentation. If your system does require it, it should be easy to find, read, and carry out.

How to Run Your Evaluation

Planning and running your heuristic evaluation can be a long process.

Companies with expansive resources should hire at least three usability experts to perform the evaluation. Your team will decide upon the guidelines to be used during the evaluation, and then each expert will evaluate the site separately. Someone who is comfortable with the site should be available to the experts to answer any questions and record the process.

Before You Start

It is important to have a clear focus of who your users are before you begin the evaluation process. Develop personas or story maps for your users and make sure your website design caters to those individuals.

Consider the different tasks your users do when they are visiting your website. Most businesses prefer to rank these activities in order of importance. Take these tasks and relate them to the guidelines that will be given to the evaluators.

Develop a Method

After you have determined your guidelines and tasks the experts should be evaluating for, develop a method. Your evaluation method will include a system of severity codes the evaluators will be basing their responses on. Once the guidelines and methods are in place and your experts have been trained on them, it is time to run the evaluation.

Write a Report

When the heuristic evaluation is over, it is time to study the responses and write a report on the findings. Just like data, here’s where you gather the intel and analyze it. At this point, you can show developers the problems your users may have and come up with solutions for them.

Though you offer a written report, present your findings in person, if possible. This evaluation was done to test the functionality and UX of your website, and those who are involved in the process need to fully understand the findings – some of that may mean face-to-face interaction.

You will be reporting to the team of developers and key stakeholders in the business, so present the information tactfully and make it clear the recommendations for changes are for the betterment of the business.

Your report should include a list of the specific heuristics that were used in the evaluation. This will show the starting point that gave you your results. Explain who the experts are and their backgrounds to the group.

List the issues you discovered with the most important first. Then, give the audience solutions to how these problems can be fixed efficiently.

Your findings and report may mean some extra work for the developers, so give them as much information as possible about the findings so they understand how the UX is being affected and what they can do to fix it.

Can You Run a Heuristic Evaluation Without Experts?

Small start-ups or freelance web developers may not be able to afford a team of experts to evaluate their web design. In these situations, a more informal method called the heuristic markup can be helpful. This method does not provide professional results but can still be beneficial when testing your usability and UX.

Using this process, you set aside a few hours to walk through the website. Try to separate yourself from the development and act as a member of your target audience.

Keep in mind one of the personas developed for the business and perform the tasks as you imagine they would. Keep notes of your experiences as you move your way through the website, keeping track of areas where you got stumped or see a potential problem.

Insight Into UX Can Boost Your Website’s Traffic

Sometimes, why a website works well for a demographic can be a mystery, and these heuristic evaluations take some of the guesswork out of the process. Regardless of the size of your business, a heuristic evaluation of your website allows you to gain knowledge and experience about what your users are seeing.

Their experience on your website determines how long they stay, if they buy your product or service, and whether they return. Conducting an evaluation is the best way to discover potential problems and develop the best UX for your visitors.


10 Open Source 3D Animated Sliders Built On CSS & JavaScript

Original Source: http://feedproxy.google.com/~r/1stwebdesigner/~3/CI9_9MXM-Lc/

You can add some pretty crazy image sliders into your project with basic jQuery or even with free WordPress plugins.

They all have their own unique animations, custom interfaces and features. But if you can’t find what you want in a plugin, then you may be forced to build it yourself.

That’s what many of the developers featured below did when they built these incredible 3D-animated sliders. Here are 10 of my favorites from CodePen.

Slicebox

See the Pen Slicebox – 3D Image Slider by codefactory (@codefactory) on CodePen.

You’ve probably seen or heard of Slicebox before. This is a popular 3D slideshow plugin and it’s by far one of the most detailed.

This pen offers a live demo of the animated slider in action with most of the features still intact. It all runs on jQuery, while this specific demo works with just 50 lines of JavaScript.

But you can find an even more detailed example on the Codrops site. I’m a huge fan of this slider. If you’re looking for something with crazy 3D effects – this is your best bet.

Rotating Page Slider

See the Pen Rotating 3D Slider by Nikolay Talanov (@suez) on CodePen.

Developer Nikolay Talanov created this rotating slider with some very detailed JavaScript and even more complex HTML/CSS classes.

His code actually follows the BEM naming conventions for CSS, which use a double underline to separate blocks from containers. This makes it a lot easier to skim the code once you understand what you’re looking at.

But this slider may not work for everyone because it rotates the entire page rather than just a part of the page.

Still, it’s a really cool effect that would work very well on specific projects.

Smooth Perspective Slider

See the Pen Smooth 3d perspective slider by Alex Nozdriukhin (@alexnoz) on CodePen.

If you love parallax design on the web, then have a look at this slider created by Alex Nozdriukhin.

As you move your cursor around the page you’ll notice the slideshow element responds in kind. As you rotate your way through the elements, notice the custom animation effects.

This really is pretty smooth and it’s a darn creative use of web animation. However, you may have trouble finding a project that is a good fit for this type of slideshow.

3D Effects with jQuery

See the Pen jQuery 3D Effect Slider by victor (@vkanet) on CodePen.

This basic slider is proof that you can build something great with just a little bit of jQuery. It works on a timer interval, but can also be controlled with the included navigation arrows or dots.

It’s all pretty easy to customize if you’re looking to restyle the animation, as well. Just make sure that you’re up-to-date on the latest jQuery techniques before diving into this code.

3D Flipping Image

See the Pen 3D Flip Image Slideshow by Nik Lanús (@niklanus) on CodePen.

One interesting aspect of this pen is that it doesn’t work exactly like a slideshow. It’s built more to showcase the animation rather than a typical slider UI.

Still, I’d say that developer Nik Lanús has created an amazing design with a very attractive flipping animation.

You can force the images to flip by scrolling up or down on the page (this can all be controlled in jQuery). But it’ll take some work to move this animation effect into a full-blown image slider.

3D Cube Slider

See the Pen 3D Cube slider. Pure CSS. by Ilya K. (@fornyhucker) on CodePen.

I’ve never seen anything quite like this on the web – it has to be one of a kind.

With this 3D cube, you may be surprised how accurate and smooth the animations feel. Note that this script is a bit heavy, so you may have to give the pen a minute to load in.

But here’s the great part: this entire 3D cube animation works on pure CSS. No JavaScript required. How great is that?

Carousel Using TweenMax.js & jQuery

See the Pen 3D Carousel Using TweenMax.js & jQuery by John Blazek (@johnblazek) on CodePen.

You can build some incredible things with custom libraries like TweenMax.

One such example is this carousel, which works just like a typical 3D rotating album you’d expect to find in iTunes. The whole thing is controlled via JavaScript and it works with one of the many TweenMax animations.

Granted, this demo just uses placeholder text for each block – so it’s not all that pretty to look at. But you can easily swap out the text and create one heck of a custom carousel.

3D Slider in Pure CSS

See the Pen PURE CSS 3D SLIDER by Dmitriy Panfilov (@panfilov) on CodePen.

Here’s another radical slider with a super unique interface. This CSS3 slider is built on just HTML and CSS – making it even more impressive.

Creator Dmitriy Panfilov built this like an album stack where you click any of the lower elements to bring it into the foreground. It’s not your typical slideshow interface but it can work very well on websites with enough space.

But this really feels more like a practice project just to prove how much you can do with a little CSS ingenuity.

3D Image Gallery

See the Pen 3D images gallery by Bobby (@ImBobby) on CodePen.

If you’re looking for a rotating carousel with a smaller frame, check out this code snippet.

It works via CSS3 transforms and really does feel like it’s embedded into the page in 3D space. Note that the images may also take a few seconds to load, so it may require some patience on your part.

But what I like most about this snippet its portability. You can reformat the container element to whatever size you’d like – making this flexible and easy to add into any layout.

10. Carousel Cubed

See the Pen 3D Cube Carousel by Derek Wheelden (@frxnz) on CodePen.

Yup, another crazy cube carousel with some pretty whacky code.

This design created by Derek Wheelden relies on Sass and Bourbon mixins to simplify the animations. But all of the jQuery code is built from scratch, so you can easily reuse it without any preprocessing.

Again, this may not prove incredibly useful for every project you build. But the design is flashy enough to grab attention and certainly usable in the majority of modern web browsers.

This is just the tip of the iceberg with 3D effects on the web. If you’d like to see more, have a peek in CodePen for plenty of awesome 3D snippets that you can work with.


Most Promising Web Design Trends To Follow In 2018

Original Source: http://feedproxy.google.com/~r/Designrfix/~3/N3n7oJqmtbw/most-promising-web-design-trends-to-follow-in-2018

Technology is advancing fast, and most people have forgotten the days when time had to be set aside for shopping and running errands. Most businesses now have an online presence because people no longer have the time for time-consuming activities like shopping. Apart from completing their shopping from the comfort of their home, people are […]

The post Most Promising Web Design Trends To Follow In 2018 appeared first on designrfix.com.

Better Collaboration By Bringing Designers Into The Code Review Process

Original Source: https://www.smashingmagazine.com/2018/07/collaboration-designers-code-review-process/

Better Collaboration By Bringing Designers Into The Code Review Process

Better Collaboration By Bringing Designers Into The Code Review Process

Ida Aalen

2018-07-10T13:50:26+02:00
2018-07-10T14:18:57+00:00

Smooth collaboration between developers and designers is something everyone aspires to, but it’s notoriously difficult. But with today’s advanced web, it’s difficult — if not impossible — to build a truly great product without collaborating across disciplines. Because of the range of technologies required to build a product, the product can only truly succeed when all disciplines — developers and designers, content creators, and user experience strategists — are deeply involved from the early stages of the project. When this happens, all ends of what it takes to build a product come naturally together into a unified whole, and a thus great product.

Because of this, no one is really promoting waterfall processes anymore. Nevertheless, involving other people early on, especially people from other disciplines, can feel scary. In the worst case scenario, it leads to “design by committee.”

Moreover, both designers and content strategists often have backgrounds in fields in which a sole creative genius is still the ideal. Having someone else proof your work can feel like a threat to your creativity.

So how can you involve people early on so that you’re avoiding the waterfall, but also making sure that you’re not setting yourself up for design by committee? I found my answer when learning about code reviews.

Getting workflow just right ain’t an easy task. So are proper estimates. Or alignment among different departments. That’s why we’ve set up “this-is-how-I-work”-sessions — with smart cookies sharing what works well for them. A part of the Smashing Membership, of course.

Explore features →

Smashing TV, with live sessions for professional designers and developers.

The Aha! Moment

In July 2017, I founded Confrere together with two developers, and we quickly hired our first engineer (I’m not a developer myself, I’m more of a UX or content designer). Our collaboration was running surprisingly smoothly, so much so that at our retrospectives, the recurring theme was that we all felt that we were “doing it right.”

Three people are smiling and sitting next to each other around a computer. From left to right, they are Dag-Inge (CTO), Ida (CPO) and Ingvild (Sr. Engineer).

Dag-Inge (CTO), myself (CPO) and Ingvild (Sr. Engineer). (Large preview)

I sat down with my colleagues to try to pinpoint what exactly it was that we were “doing right” so that we could try to preserve that feeling even as our company grew and our team expanded. We came to the realization that we all appreciated that the whole team was involved early on and that we were being honest and clear in our feedback to each other. Our CTO Dag-Inge added: “It works because we’re doing it as peers. You’re not being berated and just getting a list of faults”.

The word “peer” is what gave me the aha moment. I realized that those of us working within UX, design, and content have a lot to learn from developers when it comes to collaboration.

Peer reviewing in the form of code reviews is essential to how software gets built. To me, code reviews offer inspiration for improving collaboration within our own fields, but also a model for collaborating across fields and disciplines.

If you’re already familiar with code reviews, feel free to skip the next section.

What Is A Code Review?

A code review can be done in various ways. Today, the most typical form of code review happens in the way of so-called pull requests (using a technology called git). As illustrated below, the pull requests let other people on the team know that a developer has completed code that they wish to merge with the main code base. It also allows the team to review the code: they give feedback on the code before it gets merged, in case it needs improvement.

Pull requests have clearly defined roles: there is an author and a reviewer(s).

Ingvild and Dag-Inge is setting next to each other and smiling. An arrow indicated that Ingvild has sent code to Dag-Inge.

Ingvild (the author) requests a review from Dag-Inge (the reviewer). (Large preview)

As an example, let’s say our senior engineer Ingvild has made a change to Confrere’s sign-up flow. Before it is merged into the main code base and gets shipped, she (the author) creates a pull request to request a review from our CTO Dag-Inge (the reviewer). He won’t make any changes to her code, only add his comments.

Ingvild and Dag-Inge is setting next to each other. An arrow indicates that Dag-Inge has sent comments on code back to Ingvild.

Dag-Inge comments on Ingvild’s code. (Large preview)

It’s up to Ingvild how she wants to act on the feedback she received in the review. She’ll update her pull request with the changes she sees fit.

Ingvild and Dag-Inge are sitting next to each other. An arrow indicates that Ingvild is sending back her code to Dag-Inge, having looked through the code he commented on.

Ingvild updates her code with the changes she sees fit in light of Dag-Inge’s comments. (Large preview)

When the reviewer(s) approve the pull request, Ingvild can then merge her changes with the main code base.

Ingvild and Dag-Inge are sitting next to each other. A thumbs-up is displayed on the code review Dag-Inge has sent to Ingvild. And arrow indicates she pushes this code to the main repository.

After Dag-Inge gives the thumbs up, Ingvild can push the fix to production. (Large preview)

Why Bother Doing Code Review?

If you’ve never done code review, the process above might sound bureaucratic. If you have doubts, here’s a ton of blog posts and academic research about the advantages of code review.

Code reviews set the tone for the entire company that everything we do should be open to scrutiny from others, and that such scrutiny should be a welcome part of your workflow rather than viewed as threatening.

— Bruce Johnson, co-founder of Full Story

Code review reduces risk. Having someone proof your work, and also knowing someone will proof your work, helps weed out
 errors and
 heightens quality. In addition, it ensures consistency and helps every team member familiarize with more of the code base.

When done right, code review also builds a culture for collaboration and openness. Trying to understand and critique other people’s work is an excellent way to learn, and so is getting honest feedback on your work.

Always having at least two people look over the code also curtails ideas of “my” code 
and “your” code.
 It’s our code.

Considering these advantages, a review shouldn’t just be for code.

Review Principles For All Disciplines, Not Just Code

With reviews, there is always one author and one or more reviewers. That means you can involve people early on without falling into design by committee.

First, I have to mention two important factors which will affect your team’s ability to do beneficial reviews. You don’t necessarily have to have mastered them, but as a minimum, you should aspire to the following:

You and your colleagues respect each other and each other’s disciplines.
You’re sufficiently self-assured in your own role so that you feel like you can both give and receive criticism (this is also connected to the team’s psychological safety).

Even if we’re not reviewing code, there’s a lot to learn from existing best practices for code reviews.

Within our team, we try to adhere to the following principles when doing reviews:

Critique the work, 
not the author.
Be critical, but remain 
affable and curious.
Differentiate between a) Suggestions b) Requirements, c) Points that need discussion or clarification.
Move discussions from
 text to face-to-face. (Video counts)
Don’t forget to 
praise the good parts! What’s clever, creative, solid, original, funny, nice, and so on?

These principles weren’t actually written down until after we discussed why our collaboration was working so well. We all felt we were allowed to and expected to ask questions and suggest improvements already, and that our motivations were always about building something great together, and not about criticising another person.

Because we were being clear about what kind of feedback we were giving, and also remembered to praise each other’s good work, doing reviews was a positive force rather than a demotivating one.

An Example

To give you an idea of how our team uses review across disciplines and throughout a process, let’s look at how the different members of our team switched between the roles of author and reviewer when we created our sign-up flow.

Step 1: Requirements gathering

Author: Ida (UX)

Reviewers: Svein (strategy), Dag-Inge (engineering), Ingvild (engineering).

A whiteboard is showing rough sketches of a sign-up form. A man (Svein) and a woman (Ingvild) are smiling and discussing.

The team gathered around the whiteboard. Svein (CEO) to the left, Ingvild (Sr. Eng), to the right. (Large preview)

Whiteboard sessions can be exhausting if there’s no structure to them. To maintain productivity and creativity, we use the author/reviewer structure, even for something as seemingly basic as brainstorming on a whiteboard. In this case, in which we were coming up with the requirements for our sign-up flow, I got to be the author, and the rest of the team gave their feedback and acted as reviewers. Because they also knew they’d be able to review what I came up with in step 2 (plenty more opportunity for adjustments, suggestions, and improvements), we worked swiftly and were able to agree upon the requirements in under 2 hours.

Step 2: Mockup with microcopy

Author: Ida (UX)

Reviewers: Ingvild (engineering), Eivind (design), Svein (strategy).

A screenshot of a Google Doc mocking up a sign-up form with comments from team members Ingvild and Ida.

By mocking up in Google docs, it’s easy for people from all disciplines to provide feedback early on. (Large preview)

As an author, I created a mockup of the sign-up flow with microcopy. Did the sign-up flow make sense, from both the user and engineering perspective? And how could we improve the flow from a design and frontend perspective? At this stage, it was essential to work in a format in which it would be easy for all disciplines to give feedback (we opted for Google Docs, but it could also have been done with a tool like InvisionApp).

Step 3: Implementing the sign-up flow

Author: Ingvild (engineering)

Reviewer: Ida (UX) and Dag-Inge (engineering).

We had agreed upon the flow, the input fields, and the microcopy, and so it was up to Ingvild to implement it. Thanks to Surge, we can automatically create preview URLs of the changes so that people who can’t read code are able to give feedback at this stage as well.

Step 4: User testing

Author: Ida (UX)

Reviewer: The users.

Two women (Ida and a user) sitting next to eachother in front of a laptop.

Ida doing user testing on a small budget. (Large preview)

Yes, we consider user testing a form of review. We brought our newly built sign-up flow face-to-face with actual users. This step gave us a ton of insight, and the most significant changes in our sign-up flow came as a result.

Step 5: Design

Author: Eivind (design)

Reviewers: Ingvild (engineering) and Ida (UX).

A screenshot from Slack. Eivind, the designer, has posted a screenshot, and Ida replies with enthusiasm.

The first version of the sign-up flow was based on existing design components. In this stage, Eivind developed some new components to help improve the design. (Large preview)

When design suddenly shows up here in step 5, it might look a lot like a waterfall process. However, our designer Eivind had already been involved as a reviewer since step 2. He gave a bunch of useful feedback at that stage and was also able to start thinking about how we could improve the design of the sign-up flow beyond the existing modules in our design system. At this step, Eivind could also help solve some of the issues that we identified in the user testing.

Step 6: Implementation

Author: Ingvild (engineering)

Reviewer: Eivind (design), Ida (UX) and Dag-Inge (engineering).

And then we’re back to implementing.

Why review works

In summary, there’s always just one author, thus avoiding design by committee. By involving a range of disciplines as reviewers early on, we avoid having a waterfall process.

People can flag their concerns early and also start thinking about how they can contribute later on. The clearly defined roles keep the process on track.

Regular Review Walkthroughs

Taking inspiration from code walkthroughs, we also do regular review walkthroughs with different foci, guided by the following principles:

The walkthrough is done together.
One person is in charge of reviewing and documenting.
The idea is to identify issues, not necessarily to solve them.
Choose a format that gives as much context as possible, so that it’s easy to act upon the findings later (e.g. InvisionApp for visual reviews, Google Docs for text, and so on).

We’ve done review walkthroughs for things such as accessibility audits, reviewing feature requests, auditing the implementation of the design, and doing heuristic usability evaluations.

When we do our quarterly accessibility reviews, our accessibility consultant Joakim first goes through the interface and documents and prioritizes the issues he’s found in a shared Google Sheet. Joakim then walks us through the most important issues he’s identified.

Meeting face-to-face (or at least on video) to go through the issues helps create an environment for learning rather than a feeling of being supervised or micromanaged.

Three people in a sofa gathered around a laptop. They’re discussing and smiling.

Accessibility review: Joakim (right) walks Ingvild and Dag-Inge through the accessibility issues he found in his audit. (Large preview)

If you find yourself always being tied up with something that’s due for release, or fixing whatever is at the top of your inbox, reviews can help remedy that. If you set aside regular half days for reviewing work you’ve already done, you can identify issues before they become urgent. It can also help you refocus and make sure you’re priorities are keeping along the right lines. Your team should maybe not begin building that new feature before you’re confident that the existing features are living up to your standards.

User Testing Is A Form Of Review

An important motivation for code reviews is to reduce risk. By doing it every single time you introduce a change or add something new to your product, and not just when you suspect something is maybe not up to par, you diminish the chance of shipping bugs or subpar features. I believe we should look at user testing from the same perspective.

You see, if you want to reduce the risk of shipping with major usability issues, user testing has to be part of your process. Just having your UX designers review the interface isn’t enough. Several studies have found that even usability experts fail in identifying every actual usability problems. On average, 1 in 3 issues identified by experts were false alarms — they weren’t issues for users in practice. But worse, 1 in 2 issues that users did in fact have, were overlooked by the experts.

Skipping user testing is just as big a risk as skipping code review.

Does Review Mean Death To Creativity?

People working within design, user experience, and content often have educational backgrounds from art schools or maybe literature, in which the sole creator or creative artistic genius is hailed as the ideal. If you go back in history, this used to be the case for developers as well. Over time, this has changed by necessity as web development has grown more complex.

If you cling to the idea of creativity coming from somewhere deep within yourself, the idea of review might feel threatening or scary. Someone meddling in your half-finished work? Ouch. But if you think about creativity as something that can spring from many sources, including dialogue, collaboration, or any form of inspiration (whether from the outside or from someplace within you), then a review is only an asset and an opportunity.

As long as we’re building something for the web, there’s no way around collaborating with other people, be it within our own field or others. And a good idea will survive review.

Let’s create something great together.

Smashing Editorial
(rb, ra, yk, il)

6 Considerations before Choosing a Web Design Company for Your eCommerce Website

Original Source: http://feedproxy.google.com/~r/Designrfix/~3/tWjkSYMFTYQ/6-considerations-before-choosing-a-web-design-company-for-your-ecommerce-website

If you are not a seasoned eCommerce professional, finding a perfect web design company for website development is more of like Forrest Gump’s box of chocolate: “you never know what you are going to get.” The benefits of having an eCommerce website for your traditional brick-and-mortar store is no secret. Most of the conventional merchants […]

The post 6 Considerations before Choosing a Web Design Company for Your eCommerce Website appeared first on designrfix.com.

97% Off: Get the Youtube Mastery Bundle for Only $41

Original Source: http://feedproxy.google.com/~r/Designrfix/~3/RT1vETle2PA/youtube-mastery-bundle

Youtube is the second largest social media platform, with over a billion monthly active users. In fact, almost of one-third of internet users visit Youtube regularly. If you’re reading this blog post, chances are you have thought of creating your own Youtube channel. But with such an oversaturated platform, it can be difficult to gain […]

The post 97% Off: Get the Youtube Mastery Bundle for Only $41 appeared first on designrfix.com.

Build Custom Dashboards with MongoDB, Azure & Serverless Functions

Original Source: https://www.sitepoint.com/build-custom-dashboards-with-mongodb-azure-serverless-functions/

This article was originally published on Ahmad Awais. Thank you for supporting the partners who make SitePoint possible.

TL;DR: I’m building a custom WordPress dashboard for an enterprise client which is powered by React.js on top of Node.js, with MongoDB Atlas as the database.

This dashboard uses several Microsoft Azure services, e.g., Cognitive Services, Azure App Services, and especially serverless Azure Functions. In this post, you’ll learn how to build a small module from it and the reason behind my choice of stack, apps, and products.

One of my enterprise clients who owns a huge networking and media company has a large-scale WordPress site set up. He recently consulted me about the possibility of building a custom WordPress dashboard (based on the WordPress REST API) — to help him make intelligent business decisions via Machine Learning and Artificial Intelligence.

With JavaScript eating up the world and WordPress adapting to the move by creating the Gutenberg project, I thought of an architecture/stack where WordPress would be our content layer, a familiar battle-tested environment that does its job well with a custom dashboard that’s built with JavaScript.

When you’re tasked to build a modern JavaScript application, you find yourself in a mix of different frameworks, tools, and dev workflows. The JavaScript ecosystem has grown a lot over the last couple of years. We have many, many good options available today.

So, after researching my options for a bit, I opted to use React.js on top of Node.js to start building the custom WordPress dashboard. While the project is in its ideation phase at the moment, I think it’s important that I share some of our goals here to define context behind my choice of the stack.

Custom WordPress Dashboard Goals

Imagine you own a large networking company where over 500 hotels (in three different countries) use your services to power their conference halls, IT meetings, and online property management like the sites and blogs. That’s what my client does.

Most of this is powered by a huge multi-site WordPress instance that manages everything for the hotels, websites, online booking, registrations, events, tickets, reviews, and comments. There’re also other systems running different software which are able to produce content via REST API.

We’ve set out to create a custom WordPress dashboard with many goals in mind, but I’m listing a few of them which are related to this particular article. Take a look at what I have built so far, it’s all based on serverless Azure functions — which are pretty awesome.

A Custom WordPress Dashboard with MongoDB Atlas, Microsoft Azure, & Serverless Functions!

? High-level Data Reporting

The custom dashboard will report all the high-level data, e.g. things like live sales happening throughout my client’s portfolio (500+ hotels), entity/time-based and date-based breakdowns.

And how each of his franchise performing on a daily, weekly, monthly basis. All of this data is being fed to MongoDB Atlas. More on that later.

⚡ Serverless Automation

Most of the modules are built upon serverless architecture — which in this case provides huge benefits. All the automation is always running and the cost is paid as you go i.e. pay for what you use.

An initial rough estimate puts this solution 34% more economical than having a server VM running all the time. We are using Azure Functions for this serverless automation.

? IoT (Internet of Things) Hub

There are about ~200 IT managers working for my client who have IoT enabled devices that feed data into several online projects. This custom dashboard also includes that data for making better decisions and connecting the whole registration, management, maintenance team’s hub into a single place.

As you might have already guessed, this project makes use of IoT Hub from Microsoft Azure to connect, monitor, and manage all of the IoT assets.

? Machine Learning and Artificial Intelligence

We’re using a lot of different services from Microsoft Azure for the sake of making this dashboard artificially intelligent by Machine Learning.

There’s a huge dataset that is fed to the ML Studio which later helps us predict different decisions like space management, low registrations trends for IT events, and questions like why and when these things happen.

While the Machine Learning part is beyond the scope of this article, I still plan to touch base with some of the awesome Artificial Intelligence I’ve been able to cook in via Azure’s Cognitive Services.

? Live & Real-time

One of the most important aspects of this custom dashboard is that it’s live and real-time. Which means I need a managed database that can cope with this amount of data and still stay highly available.

But at the same time, it’s for the management purposes and doesn’t need to have any impact on the WordPress sites. That is a crucial system design decision for this dashboard.

By that what I mean is we can do all sorts of experiments with this custom dashboard but it shouldn’t have any impact on the database/servers which are running the multi-site WordPress instance.

MongoDB & MongoDB Atlas

For this custom WordPress dashboard, I am using MongoDB Atlas as a DBaaS (Database as a Service). And I couldn’t be happier. When I first shared that I’d be using MongoDB, many developers had concerns.

Mongodb

Most of the questions asked why I’d add another layer of complexity by adding yet another database to the mix. Why not use the WordPress database as it is? To answer these questions and more I have prepared a list of reasons as to why I am using MongoDB Atlas.

♨ Dislike for RDBMS

I personally dislike relational databases. Most of the time, for me they get in the way of building applications. I have to completely get out of the app I am building, think about my database in the future and design a good schema which always ends up a bad exercise for my dev workflow. It’s counter-intuitive at best — at least for me, it is.

? HDD Is Cheap — CPU/RAM Is Not

Old databases were mostly designed to save disk space, among other things. This led to a plethora of problems like normalization, indexing, and made sharding, auto-scaling, and replication harder.

Nowadays, disk space is dirt cheap. On the other hand, CPU/RAM is not, and your sysadmin costs can skyrocket very quickly if you end up with a bad choice here.

Like you wanted to create a custom dashboard but your system design architect cost you two sysadmins with how they chose to design your system. Similarly, my client wanted a managed solution without having to hire a team of IT/DevOps folks — at least for an experimental custom dashboard.

? MongoDB’s Pros

Schema-less. Flexible schema for the win. I don’t have to change anything, my regular app development workflow, creating a Node.js-based app that I am manipulating with JSON type data, I can just feed that into MongoDB and it just works.
Workflow-consistency. Creates documents the way my custom dashboard is represented. Sales, Videos, Talks, Comments, Reviews, Registrations, etc. all of that have similar data representation on the frontend and the backend — and even in the database. I manage 3rd party data via middleware. This consistency translates to clean code.
Ease of scale-out. It scales reads by using replica sets. Scales writes by using sharding (auto-balancing). Just fire up another machine and away you go. Most importantly, instead of vertical scaling via RDBMS, MongoDB lets you scale horizontally with different levels of consistency. That’s a big plus. ➕
Cost. Depends on which RDBMS of course, but MongoDB is free and can run on Linux, ideal for running on cheaper commodity kits.

? Why MongoDB Atlas?

Well, now that I know MongoDB is the right database choice, there are so many different options to host your database. I can self-host on my Linux machine via DigitalOcean, use a cloud provider like AWS/Azure or a choose a DBaaS service specific to MongoDB.

Mongodb Atlas

But I want a fast, secure, and managed MongoDB solution that I can easily scale with the growth of the number of modules we attach in this custom WordPress dashboard. That’s MongoDB Atlas.

MongoDB Atlas is a cloud-hosted MongoDB service engineered and run by the same team that builds the database. And guess what, I trust that they follow the best operational practices since they are the ones who’re building MongoDB in the first place.

I want this custom dashboard to be self-managed, serverless, and using MongoDB Atlas saves me from worrying about software patching, backups, and reliable configuration setup for new DB updates. Again a big plus. ➕

Also, the fact that MongoDB Atlas is supported cross-platform as well as cross-region and across different cloud providers makes it a much better choice. I think each Cluster comes with two replica sets, ready to scale.

? MongoDB Compass

Now that we are going to work with MongoDB, it’d be great to have a tool through which we can explore our database, view the changes, debug and so on. For this purpose, MongoDB again takes the lead with a product called MongoDB Compass. Take a look.

Mongodb Compass

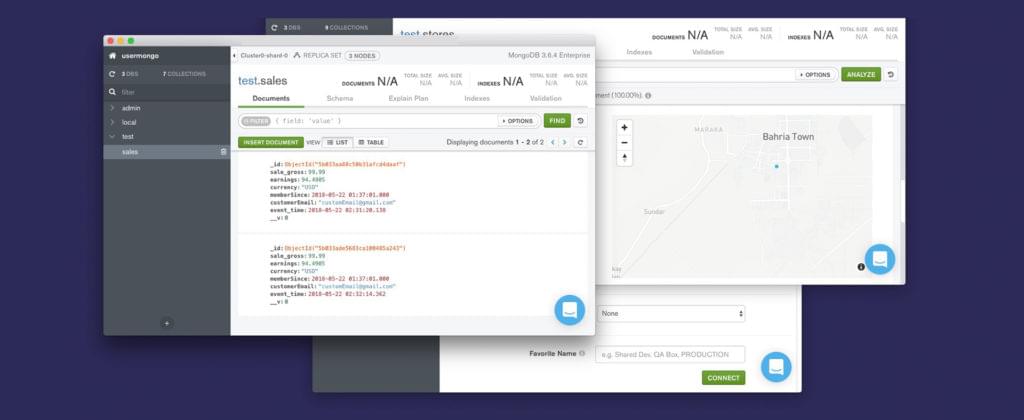
I suggest that you go ahead and download MongoDB Compass. It’s literally the best tool to visualize your MongoDB database. Here’s a set of features:

Visualize and explore: Take a look at your database, find out how things are looking, and even visualize stuff like maps/coordinates.
Insert, modify, and delete: You can also perform CRUD operations for your DB right from MongoDB compass. Makes testing easier.
Debug and optimize: Finally, analyze your data, debug it and even find out about performance issues right inside a great GUI for your database. This tool is a must-have if you work with MongoDB.
Extensible: And the best part is you can build your own plugins to extend MongoDB Compass. Here’s the documentation on building your own Compass plugins.
Enterprise Flavor: MongoDB Compass comes in a few flavors: Community (Free), and Enterprise (Licensed) — the Enterprise version is the one that lets you visualize DB schema.

✅ Getting Started with MongoDB Atlas

Let’s get started and build a simple module that’s part of the custom WordPress dashboard I am building. For this module, we are collecting all the sales related data. For that, we need a MongoDB instance, and of course we’re using MongoDB Atlas here.

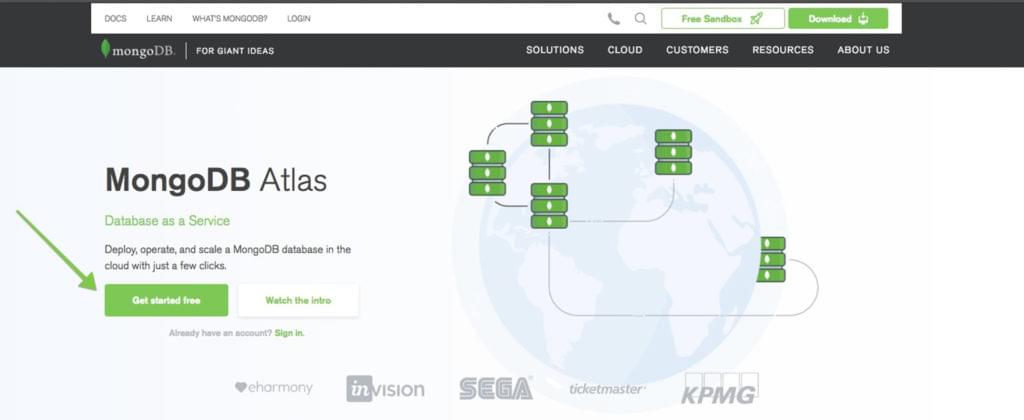
Step #1: Go to MongoDB Atlas →

Go to the MongoDB Atlas site and register a completely free MongoDB instance hosted on AWS, with shared RAM and 512 MB storage. Click the Get Started Free button.

Mongodb Atlas

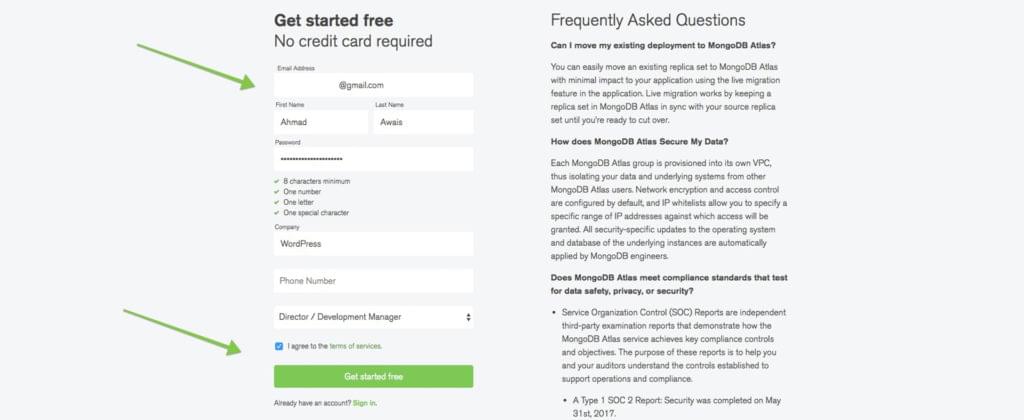
Step #2: Sign up at MongoDB Atlas →

Now go ahead and sign up with your email ID and fill up the details. It’s amazing that you can sign up and use a free MongoDB Atlas hosted DB instance, and they don’t even require you to add a credit card for that.

Mongodb Atlas Signup

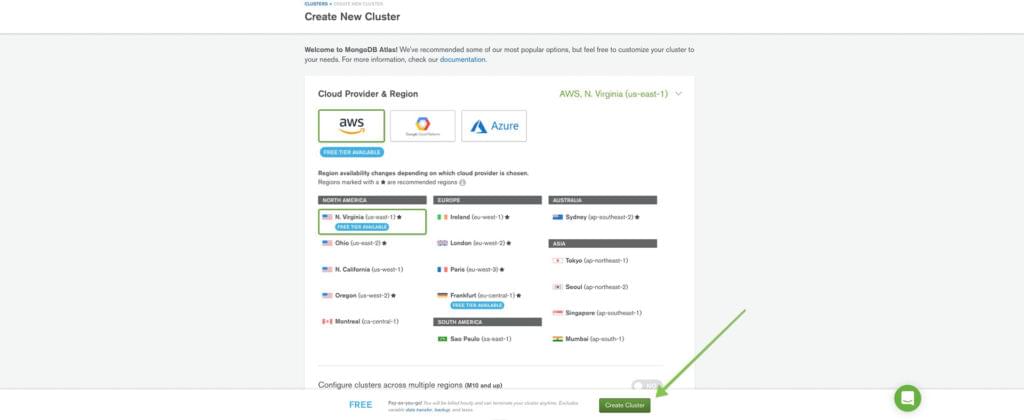
Step #3: Create the Cluster

Now you’ll be redirected to a page with a bunch of information about the new MongoDB Cluster you’re about to create. I suggest that you review this information, and move ahead by clicking the Create Cluster button at the bottom just like in the screenshot below.

Mongodb Atlas Create Cluster

Step #4: Create DB Username & Password

It’ll take a minute and your DB will be created. Once that happens, head over to the Security > MongoDB Users and click on the + ADD NEW USER button on the right, to create a new user for your database. Let’s keep all the other settings set to default for the sake of this intro-article.

I’m setting the user/pass as usermongo but you know better.

GIF for MongoDB Atlas, Microsoft Azure, & Serverless Functions

Step #5: Add IP to Whitelist for Access

To be able to access your MongoDB Atlas database, you need to setup the IP Whitelist with the IP of your server where your app is hosted. Authentication is beyond what I am discussing here so for the purpose of this demo let’s just allow everyone (obviously a bad practice in production).

So, again, head over to the Security > IP Whitelist and click on the + ADD IP ADDRESS button on the right, and finally ALLOW ACCESS FROM ANYWHERE button to allow the anonymous access.

GIF for MongoDB Atlas, Microsoft Azure, & Serverless Functions

Step #6: Connect via MongoDB Compass

Now that our DB’s IP access and a user has been created, we can pick up the connection string and use it to connect to our database with our MongoDB Compass application.

Go to Connect then choose Connect with MongoDB Compass and download Compass if you haven’t. Copy the URI Connection String. Finally, open Compass and it should be able to detect the connection string in your clipboard, allow it to connect to your database.

And you are set to visualize your database, analyze its performance, and even run complete CRUD operations. Awesome! ?

GIF for MongoDB Atlas, Microsoft Azure, & Serverless Functions

Now that we have created a MongoDB Atlas and connected it with MongoDB Compass, we can move forward and start building our Node.js application.

WordPress REST API — FTW!

This WordPress based Node.js custom dashboard interacts with the WordPress instance via the WordPress REST API. Since this is a Node.js app, I am using an awesome library called wpapi written by K Adam White. He has also built a demo Express based WordPress app. That’s what I got inspired by while building this custom dashboard, so you’ll see a lot of it here.

? WordPress Custom Router Based on Express

The router is set up with Express. Here’s a basic error handler and router template for using WordPress with express.

‘use strict’;

var express = require(‘express’);
var router = express.Router();
var siteInfoMiddleware = require(‘../middleware/site-info’);

// Set global site info on all routes
router.use(siteInfoMiddleware);

// Public Routes
// =============

router.get(‘/’, require(‘./index’));
router.get(‘/page/:page’, require(‘./index’));
router.get(‘/:slug’, require(‘./single’));
router.use(‘/tags/:tag’, require(‘./tag’));
router.use(‘/categories/:category’, require(‘./category’));

// Catch 404 and forward to error handler.
router.use(function (req, res, next) {
var err = new Error(‘Not Found’);
err.status = 404;
next(err);
});

// Error Handling
// ==============

// Development error handler will print stacktrace.
function developmentErrorRoute(err, req, res, next) {
res.status(err.status || 500);
res.render(‘error’, {
message: err.message,
error: err
});
}

// Production error handler. No stacktraces leaked to user.
function friendlyErrorRoute(err, req, res, next) {
res.status(err.status || 500);
res.render(‘error’, {
message: err.message,
error: {}
});
}

// Configure error-handling behavior
if (router.get(‘env’) === ‘development’) {
router.use(developmentErrorRoute);
} else {
router.use(friendlyErrorRoute);
}

module.exports = router;

View the code on Gist.

? Basic Express Based Implementation

I am not hosting this entire thing on WordPress, but the initial plan was to do just that. If you want to go do that, you’d wanna build the index by querying all the info using the RSVP.hash utility for convenience and parallelism. For that here’s what you should do.

‘use strict’;

var wp = require( ‘../services/wp’ );
var contentService = require( ‘../services/content-service’ );
var pageNumbers = require( ‘../services/page-numbers’ );
var pageTitle = require( ‘../services/page-title’ );
var RSVP = require( ‘rsvp’ );

function getHomepage( req, res, next ) {
var pages = pageNumbers( req.params.page );

RSVP.hash({
archiveBase: ”,
pages: pages,
title: pageTitle(),
// Primary page content
posts: wp.posts().page( pages.current ),
sidebar: contentService.getSidebarContent()
}).then(function( context ) {
if ( req.params.page && ! context.posts.length ) {
// Invalid pagination: 404
return next();
}

res.render( ‘index’, context );
}).catch( next );
}

module.exports = getHomepage;

View the code on Gist.

? Authentication Cooked In

For this setup, you’ll also need to authenticate your Node.js app by giving it the authentication data, which along with wpapi can be processed like this. Beware this is not always a best practice if you don’t use correct permissions and environment variables settings.

var WP = require( ‘wordpress-rest-api’ );
var _ = require( ‘lodash’ );

var config = _.pick( require( ‘./config’ ).wordpress, [
// Whitelist valid config keys
‘username’,
‘password’,
‘endpoint’
]);

var wp = new WP( config );

module.exports = wp;

View the code on Gist.

? Site Content Accumulation

And finally, you are able to consume all the content by creating a content service which handles recursively fetching:

All the pages of a paged collection.
Your WordPress site’s info.
An alphabetized list of categories.
A specific category (specified by slug) from the content cache.
An alphabetized list of tags.
A specific tag (specified by slug) from the content cache
Other content required to have some feature parity with WP.

The code for this looks somewhat like this.

‘use strict’;

var wp = require( ‘./wp’ );
var cache = require( ‘./content-cache’ );
var _ = require( ‘lodash’ );
var RSVP = require( ‘rsvp’ );

/**
* Recursively fetch all pages of a paged collection
*
* @param {Promise} request A promise to a WP API request’s response
* @returns {Array} A promise to an array of all matching records
*/
function all( request ) {
return request.then(function( response ) {
if ( ! response._paging || ! response._paging.next ) {
return response;
}
// Request the next page and return both responses as one collection
return RSVP.all([
response,
all( response._paging.next )
]).then(function( responses ) {
return _.flatten( responses );
});
});
}

function siteInfo( prop ) {
var siteInfoPromise = cache.get( ‘site-info’ );

if ( ! siteInfoPromise ) {
// Instantiate, request and cache the promise
siteInfoPromise = wp.root( ‘/’ ).then(function( info ) {
return info;
});
cache.set( ‘site-info’, siteInfoPromise );
}

// Return the requested property
return siteInfoPromise.then(function( info ) {
return prop ? info[ prop ] : info;
});
}

/**
* Get an alphabetized list of categories
*
* All archive routes display a sorted list of categories in their sidebar.
* We generate that list here to ensure the sorting logic isn’t duplicated
* across routes.
*
* @method sortedCategories
* @return {Array} An array of category objects
*/
function sortedCategories() {
return all( wp.categories() ).then(function( categories ) {
return _.chain( categories )
.sortBy( ‘slug’ )
.value();
});
}

function sortedCategoriesCached() {
var categoriesPromise = cache.get( ‘sorted-categories’ );

if ( ! categoriesPromise ) {
categoriesPromise = sortedCategories();
cache.set( ‘sorted-categories’, categoriesPromise );
}

return categoriesPromise;
}

/**
* Get a specific category (specified by slug) from the content cache
*
* The WP API doesn’t currently support filtering taxonomy term collections,
* so we have to request all categories and filter them down if we want to get
* an individual term.
*
* To make this request more efficient, it uses sortedCategoriesCached.
*
* @method categoryCached
* @param {String} slug The slug of a category
* @return {Promise} A promise to the category with the provided slug
*/
function categoryCached( slug ) {
return sortedCategoriesCached().then(function( categories ) {
return _.findWhere( categories, {
slug: slug
});
});
}

/**
* Get a specific tag (specified by slug) from the content cache
*
* The WP API doesn’t currently support filtering taxonomy term collections,
* so we have to request all tags and filter them down if we want to get an
* individual term.
*
* To make this request more efficient, it uses the cached sortedTags promise.
*
* @method tagCached
* @param {String} slug The slug of a tag
* @return {Promise} A promise to the tag with the provided slug
*/
function tagCached( slug ) {
return sortedTagsCached().then(function( tags ) {
return _.findWhere( tags, {
slug: slug
});
});
}

/**
* Get an alphabetized list of tags
*
* @method sortedTags
* @return {Array} An array of tag objects
*/
function sortedTags() {
return all( wp.tags() ).then(function( tags ) {
return _.chain( tags )
.sortBy( ‘slug’ )
.value();
});
}

function sortedTagsCached() {
var tagsPromise = cache.get( ‘sorted-tags’ );

if ( ! tagsPromise ) {
tagsPromise = sortedTags();
cache.set( ‘sorted-tags’, tagsPromise );
}

return tagsPromise;
}

function getSidebarContent() {
return RSVP.hash({
categories: sortedCategoriesCached(),
tags: sortedTagsCached()
});
}

module.exports = {
// Recursively page through a collection to retrieve all matching items
all: all,
// Get (and cache) the top-level information about a site, returning the
// value corresponding to the provided key
siteInfo: siteInfo,
sortedCategories: sortedCategories,
sortedCategoriesCached: sortedCategoriesCached,
categoryCached: categoryCached,
tagCached: tagCached,
sortedTags: sortedTags,
sortedTagsCached: sortedTagsCached,
getSidebarContent: getSidebarContent
};

View the code on Gist.

? Custom Routes & Sales Data

Finally, I have cooked in quite a few custom routes from where I can attain any kind of sales related data. For the particular architecture I have in place, I’m again using the RSVP.hash utility for convenience and parallelism. It works like a charm.

The post Build Custom Dashboards with MongoDB, Azure & Serverless Functions appeared first on SitePoint.