OptinMonster Black Friday / Cyber Monday – 35% OFF all plans

Original Source: https://inspiredm.com/optinmonster-black-friday-cyber-monday-35-off-all-plans/

Here’s a quick one. Guess what digital marketers consider to be the most difficult part of their job.

Ok, the fact is 65% of businesses believe that generating site visitors and subsequently leads is exceptionally difficult. It’s undoubtedly that one task you don’t want to be assigned to you.

But then again, generating leads is oddly satisfying. Especially when you systematically source them from your site’s organic traffic.

And you know what? Believe it or not, the most challenging bit is arguably attracting a consistent flow of traffic. That’s why it would be extremely painful if you end up losing your visitors without converting a substantial fraction of them.

Interestingly, however, many marketers consider that a real possibility because of the simple fact that 96% of a website’s visitors are usually not ready to purchase yet.

And then there’s a special group of marketers who’ve managed to overcome that by strategically leveraging lead generation tools. I’m talking about the elite squad that powers onsite lead generation with effective opt-in lead generation solutions- like OptinMonster and the likes.

Astonishing, isn’t it? I guess that’s why I’m particularly fond of seeking ways to beat the system. And this time around, I’ll let you in on a juicy one I stumbled upon. It just so happens that OptinMonster is offering an exclusive 35% discount on all its plans this Black Friday and Cyber Monday- from November the 19th to 26th.

To top it off, it turns out the discount is applicable for more than one month. So, let’s find out more about this, starting with the features;

Feature Highlights of OptinMonster Lead Generation
Drag-and-Drop Builder

OptinMonster, for starters, provides a dynamic drag-and-drop builder for creating your own uniquely striking customized optin forms.

Then get this. It’s entirely manipulated without any form of programming.  The tool basically allows users to build from scratch using the canvas, or proceed with pre-designed templates that can be customized further. In the end, you’re able to combine various eye-catching forms with a wide selection of sound effects and animations.

Multiple Campaign Types

Businesses often use varying approaches when it comes to lead generation and marketing. OptinMonster makes a good attempt at facilitating all the possible strategies through an extensively flexible optin framework. In essence, it comes with the following campaigns:

·         Content Locker- For changing articles into gated elements to facilitate opt-ins.

·         Inline Forms- For attaching forms to your webpage’s content.

·         Sidebar Forms- For placing forms on either side of your site’s pages.

·         Countdown Timer- For encouraging visitors to urgently submit their optin information.

·         Floating Bar- For flexible forms that follow visitors around as they surf through a page.

·         Slide-In Scroll Box- For special forms that shoot up from one of the screen’s corners.

·         Fullscreen Welcome Mat- For momentarily displaying forms that take up the entire screen.

·         Lightbox Popup- For standard forms that pop up on the screen.

Campaign Triggers

OptinMonster heavily uses artificial intelligence to analyze visitor behavior, and subsequently display forms at the right time- based on pre-set trigger parameters. The triggering systems are:

·         Campaign Scheduling- Establish periods for showing selected campaigns.

·         Timed Display Control- Define specific times for displaying campaigns.

·         InactivitySensor- Use special campaigns that specifically show up when visitors are inactive.

·         MonsterLinks 2-Step Optins- Use ideal images and links as pathways to optin forms.

·         Scroll Trigger- Unleash selected optin forms as soon as visitors scroll to a certain point on the web page.

·         Exit-Intent Technology- Drop campaign forms on surfers exiting your web page.

Targeted Campaigns

The AI also comes in handy for when you need to engage a defined set of visitors based on their exact demographics. The systems used to target them include:

·         AdBlock Detection- For engaging visitors who are locking out potential ad income with their AdBlockers.

·         Device-Based Targeting- For reaching out to surfers based on their respective devices.

·         Cookie Retargeting- For unleashing forms aligned to visitors’ cookies.

·         Geo-location Targeting- For showing forms according to visitors’ geographical positions.

·         Onsite Retargeting- For engaging traffic that has visited your site before.

·         Onsite Follow Up Campaigns- For launching systematic messages aligned with actions taken by visitors.

·         Page-Level Targeting- For determining forms as they apply to special site zones accessed by visitors.

·         Referrer Detection- For displaying forms based on the traffic source.

Seamless Integrations

Lead generation is only the first stage of the conversion pipeline. There’s still a long way to go to successfully trigger purchases. And the bulk of it involves a thorough conversion process, complete with the relevant engagement tools. But since OptinMonster is not capable of facilitating all that, it chooses to conveniently integrate with a wide array of third-party email marketing services plus website and ecommerce platforms.

Actionable Insights

All things considered, lead generation is a holistic operation with multiple interconnected variables. Their collective impact depends on the complex set of decisions made at every stage, regarding each distinct parameter. And to help you with that, OptinMonster will keep you informed through its system of actionable insights- involving conversion analytics, A/B testing, and real-time behavior automation.

Normal OptinMonster Pricing

OptinMonster user subscription plans usually cost:

·         $19 per month or alternatively $108 per year for the Basic Plan.

·         $39 per month or alternatively $228 per year for the Plus Plan.

·         $59 per month or alternatively $348 per year for the Pro Plan.

·         $99 per month or alternatively, $588 per year for the Growth Plan.

Special OptinMonster Black Friday/Cyber Monday Discount Pricing

This good news? Well, at a 35% all-year discount, you get to pay:

·         $70.20 instead of $108 for Basic

·         $148.20 instead of $228 for Plus

·         $226.20 instead of $348 for Pro

·         $382.20 instead of $588 for Growth

That essentially translates to 12 discounted months. Quite a hack, right?

What To Do

And now for the revelation…

Just proceed to OptinMonster’s main site and enter BF2018 as the discount code.  Then have all the fun generating leads at a substantially reduced price.

The post OptinMonster Black Friday / Cyber Monday – 35% OFF all plans appeared first on Inspired Magazine.

Avoiding The Pitfalls Of Automatically Inlined Code

Original Source: https://www.smashingmagazine.com/2018/11/pitfalls-automatically-inlined-code/

Avoiding The Pitfalls Of Automatically Inlined Code

Avoiding The Pitfalls Of Automatically Inlined Code

Leonardo Losoviz

2018-11-26T14:00:08+01:00
2018-11-26T18:45:55+00:00

Inlining is the process of including the contents of files directly in the HTML document: CSS files can be inlined inside a style element, and JavaScript files can be inlined inside a script element:

<style>
/* CSS contents here */
</style>

<script>
/* JS contents here */
</script>

By printing the code already in the HTML output, inlining avoids render-blocking requests and executes the code before the page is rendered. As such, it is useful for improving the perceived performance of the site (i.e. the time it takes for a page to become usable.) For instance, we can use the buffer of data delivered immediately when loading the site (around 14kb) to inline the critical styles, including styles of above-the-fold content (as had been done on the previous Smashing Magazine site), and font sizes and layout widths and heights to avoid a jumpy layout re-rendering when the rest of the data is delivered.

However, when overdone, inlining code can also have negative effects on the performance of the site: Because the code is not cacheable, the same content is sent to the client repeatedly, and it can’t be pre-cached through Service Workers, or cached and accessed from a Content Delivery Network. In addition, inline scripts are considered not safe when implementing a Content Security Policy (CSP). Then, it makes a sensible strategy to inline those critical portions of CSS and JS that make the site load faster but avoided as much as possible otherwise.

With the objective of avoiding inlining, in this article we will explore how to convert inline code to static assets: Instead of printing the code in the HTML output, we save it to disk (effectively creating a static file) and add the corresponding <script> or <link> tag to load the file.

Let’s get started!

Recommended reading: WordPress Security As A Process

Front-end is messy and complicated these days. That’s why we publish articles, printed books and webinars with useful techniques to improve your work. Even better: Smashing Membership with a growing selection of front-end & UX goodies. So you get your work done, better and faster.

Explore Smashing Membership ↬

Smashing Cat, just preparing to do some magic stuff.

When To Avoid Inlining

There is no magic recipe to establish if some code must be inlined or not, however, it can be pretty evident when some code must not be inlined: when it involves a big chunk of code, and when it is not needed immediately.

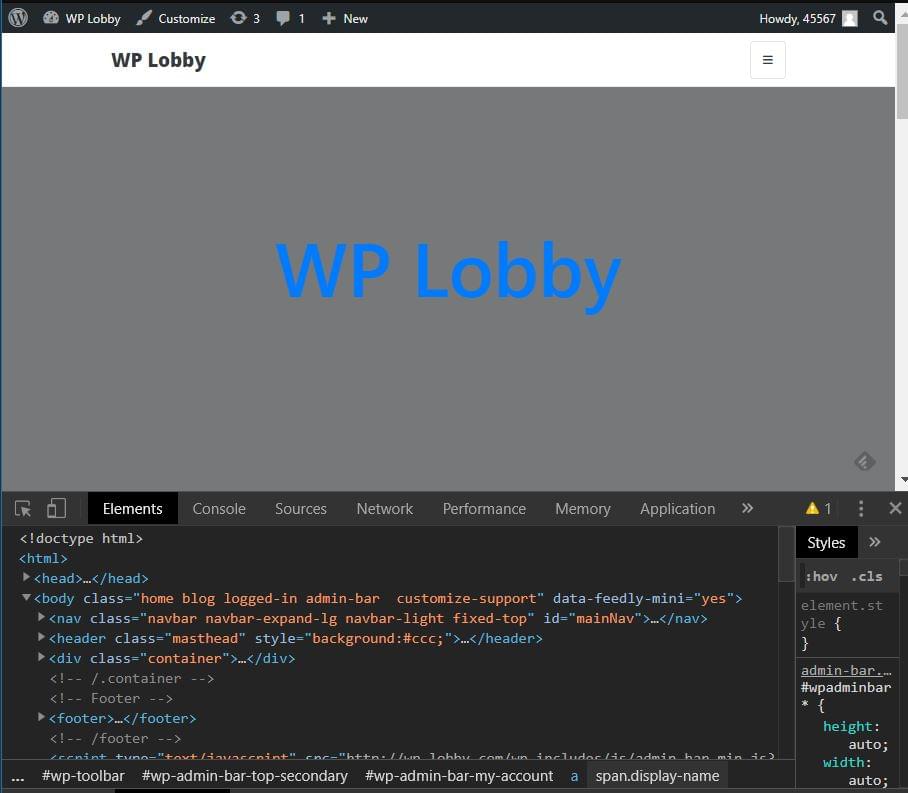
As an example, WordPress sites inline the JavaScript templates to render the Media Manager (accessible in the Media Library page under /wp-admin/upload.php), printing a sizable amount of code:

JavaScript templates inlined by the WordPress Media Manager.

Occupying a full 43kb, the size of this piece of code is not negligible, and since it sits at the bottom of the page it is not needed immediately. Hence, it would make plenty of sense to serve this code through static assets instead or printing it inside the HTML output.

Let’s see next how to transform inline code into static assets.

Triggering The Creation Of Static Files

If the contents (the ones to be inlined) come from a static file, then there is not much to do other than simply request that static file instead of inlining the code.

For dynamic code, though, we must plan how/when to generate the static file with its contents. For instance, if the site offers configuration options (such as changing the color scheme or the background image), when should the file containing the new values be generated? We have the following opportunities for creating the static files from the dynamic code:

On request
When a user accesses the content for the first time.
On change
When the source for the dynamic code (e.g. a configuration value) has changed.

Let’s consider on request first. The first time a user accesses the site, let’s say through /index.html, the static file (e.g. header-colors.css) doesn’t exist yet, so it must be generated then. The sequence of events is the following:

The user requests /index.html;
When processing the request, the server checks if the file header-colors.css exists. Since it does not, it obtains the source code and generates the file on disk;
It returns a response to the client, including tag <link rel="stylesheet" type="text/css" href="/staticfiles/header-colors.css">
The browser fetches all the resources included in the page, including header-colors.css;
By then this file exists, so it is served.

However, the sequence of events could also be different, leading to an unsatisfactory outcome. For instance:

The user requests /index.html;
This file is already cached by the browser (or some other proxy, or through Service Workers), so the request is never sent to the server;
The browser fetches all the resources included in the page, including header-colors.css. This image is, however, not cached in the browser, so the request is sent to the server;
The server hasn’t generated header-colors.css yet (e.g. it was just restarted);
It will return a 404.

Alternatively, we could generate header-colors.css not when requesting /index.html, but when requesting /header-colors.css itself. However, since this file initially doesn’t exist, the request is already treated as a 404. Even though we could hack our way around it, altering the headers to change the status code to a 200, and returning the content of the image, this is a terrible way of doing things, so we will not entertain this possibility (we are much better than this!)

That leaves only one option: generating the static file after its source has changed.

Creating The Static File When The Source Changes

Please notice that we can create dynamic code from both user-dependant and site-dependant sources. For instance, if the theme enables to change the site’s background image and that option is configured by the site’s admin, then the static file can be generated as part of the deployment process. On the other hand, if the site allows its users to change the background image for their profiles, then the static file must be generated on runtime.

In a nutshell, we have these two cases:

User Configuration
The process must be triggered when the user updates a configuration.
Site Configuration
The process must be triggered when the admin updates a configuration for the site, or before deploying the site.

If we considered the two cases independently, for #2 we could design the process on any technology stack we wanted. However, we don’t want to implement two different solutions, but a unique solution which can tackle both cases. And because from #1 the process to generate the static file must be triggered on the running site, then it is compelling to design this process around the same technology stack the site runs on.

When designing the process, our code will need to handle the specific circumstances of both #1 and #2:

Versioning
The static file must be accessed with a “version” parameter, in order to invalidate the previous file upon the creation of a new static file. While #2 could simply have the same versioning as the site, #1 needs to use a dynamic version for each user, possibly saved in the database.
Location of the generated file
#2 generates a unique static file for the whole site (e.g. /staticfiles/header-colors.css), while #1 creates a static file for each user (e.g. /staticfiles/users/leo/header-colors.css).
Triggering event
While for #1 the static file must be executed on runtime, for #2 it can also be executed as part of a build process in our staging environment.
Deployment and distribution
Static files in #2 can be seamlessly integrated inside the site’s deployment bundle, presenting no challenges; static files in #1, however, cannot, so the process must handle additional concerns, such as multiple servers behind a load balancer (will the static files be created in 1 server only, or in all of them, and how?).

Let’s design and implement the process next. For each static file to be generated we must create an object containing the file’s metadata, calculate its content from the dynamic sources, and finally save the static file to disk. As a use case to guide the explanations below, we will generate the following static files:

header-colors.css, with some style from values saved in the database
welcomeuser-data.js, containing a JSON object with user data under some variable: window.welcomeUserData = {name: "Leo"};.

Below, I will describe the process to generate the static files for WordPress, for which we must base the stack on PHP and WordPress functions. The function to generate the static files before deployment can be triggered by loading a special page executing shortcode [create_static_files] as I have described in a previous article.

Further recommended reading: Making A Service Worker: A Case Study

Representing The File As An Object

We must model a file as a PHP object with all corresponding properties, so we can both save the file on disk on a specific location (e.g. either under /staticfiles/ or /staticfiles/users/leo/), and know how to request the file consequently. For this, we create an interface Resource returning both the file’s metadata (filename, dir, type: “css” or “js”, version, and dependencies on other resources) and its content.

interface Resource {

function get_filename();
function get_dir();
function get_type();
function get_version();
function get_dependencies();
function get_content();
}

In order to make the code maintainable and reusable we follow the SOLID principles, for which we set an object inheritance scheme for resources to gradually add properties, starting from the abstract class ResourceBase from which all our Resource implementations will inherit:

abstract class ResourceBase implements Resource {

function get_dependencies() {

// By default, a file has no dependencies
return array();
}
}

Following SOLID, we create subclasses whenever properties differ. As stated earlier, the location of the generated static file, and the versioning to request it will be different depending on the file being about the user or site configuration:

abstract class UserResourceBase extends ResourceBase {

function get_dir() {

// A different file and folder for each user
$user = wp_get_current_user();
return “/staticfiles/users/{$user->user_login}/”;
}

function get_version() {

// Save the resource version for the user under her meta data.
// When the file is regenerated, must execute `update_user_meta` to increase the version number
$user_id = get_current_user_id();
$meta_key = “resource_version_”.$this->get_filename();
return get_user_meta($user_id, $meta_key, true);
}
}

abstract class SiteResourceBase extends ResourceBase {

function get_dir() {

// All files are placed in the same folder
return “/staticfiles/”;
}

function get_version() {

// Same versioning as the site, assumed defined under a constant
return SITE_VERSION;
}
}

Finally, at the last level, we implement the objects for the files we want to generate, adding the filename, the type of file, and the dynamic code through function get_content:

class HeaderColorsSiteResource extends SiteResourceBase {

function get_filename() {

return “header-colors”;
}

function get_type() {

return “css”;
}

function get_content() {

return sprintf(

.site-title a {
color: #%s;
}
“, esc_attr(get_header_textcolor())
);
}
}

class WelcomeUserDataUserResource extends UserResourceBase {

function get_filename() {

return “welcomeuser-data”;
}

function get_type() {

return “js”;
}

function get_content() {

$user = wp_get_current_user();
return sprintf(
“window.welcomeUserData = %s;”,
json_encode(
array(
“name” => $user->display_name
)
)
);
}
}

With this, we have modeled the file as a PHP object. Next, we need to save it to disk.

Saving The Static File To Disk

Saving a file to disk can be easily accomplished through the native functions provided by the language. In the case of PHP, this is accomplished through the function fwrite. In addition, we create a utility class ResourceUtils with functions providing the absolute path to the file on disk, and also its path relative to the site’s root:

class ResourceUtils {

protected static function get_file_relative_path($fileObject) {

return $fileObject->get_dir().$fileObject->get_filename().”.”.$fileObject->get_type();
}

static function get_file_path($fileObject) {

// Notice that we must add constant WP_CONTENT_DIR to make the path absolute when saving the file
return WP_CONTENT_DIR.self::get_file_relative_path($fileObject);
}
}

class ResourceGenerator {

static function save($fileObject) {

$file_path = ResourceUtils::get_file_path($fileObject);
$handle = fopen($file_path, “wb”);
$numbytes = fwrite($handle, $fileObject->get_content());
fclose($handle);
}
}

Then, whenever the source changes and the static file needs to be regenerated, we execute ResourceGenerator::save passing the object representing the file as a parameter. The code below regenerates, and saves on disk, files “header-colors.css” and “welcomeuser-data.js”:

// When need to regenerate header-colors.css, execute:
ResourceGenerator::save(new HeaderColorsSiteResource());

// When need to regenerate welcomeuser-data.js, execute:
ResourceGenerator::save(new WelcomeUserDataUserResource());

Once they exist, we can enqueue files to be loaded through the <script> and <link> tags.

Enqueuing The Static Files

Enqueuing the static files is no different than enqueuing any resource in WordPress: through functions wp_enqueue_script and wp_enqueue_style. Then, we simply iterate all the object instances and use one hook or the other depending on their get_type() value being either "js" or "css".

We first add utility functions to provide the file’s URL, and to tell the type being either JS or CSS:

class ResourceUtils {

// Continued from above…

static function get_file_url($fileObject) {

// Add the site URL before the file path
return get_site_url().self::get_file_relative_path($fileObject);
}

static function is_css($fileObject) {

return $fileObject->get_type() == “css”;
}

static function is_js($fileObject) {

return $fileObject->get_type() == “js”;
}
}

An instance of class ResourceEnqueuer will contain all the files that must be loaded; when invoked, its functions enqueue_scripts and enqueue_styles will do the enqueuing, by executing the corresponding WordPress functions (wp_enqueue_script and wp_enqueue_style respectively):

class ResourceEnqueuer {

protected $fileObjects;

function __construct($fileObjects) {

$this->fileObjects = $fileObjects;
}

protected function get_file_properties($fileObject) {

$handle = $fileObject->get_filename();
$url = ResourceUtils::get_file_url($fileObject);
$dependencies = $fileObject->get_dependencies();
$version = $fileObject->get_version();

return array($handle, $url, $dependencies, $version);
}

function enqueue_scripts() {

$jsFileObjects = array_map(array(ResourceUtils::class, ‘is_js’), $this->fileObjects);
foreach ($jsFileObjects as $fileObject) {

list($handle, $url, $dependencies, $version) = $this->get_file_properties($fileObject);
wp_register_script($handle, $url, $dependencies, $version);
wp_enqueue_script($handle);
}
}

function enqueue_styles() {

$cssFileObjects = array_map(array(ResourceUtils::class, ‘is_css’), $this->fileObjects);
foreach ($cssFileObjects as $fileObject) {

list($handle, $url, $dependencies, $version) = $this->get_file_properties($fileObject);
wp_register_style($handle, $url, $dependencies, $version);
wp_enqueue_style($handle);
}
}
}

Finally, we instantiate an object of class ResourceEnqueuer with a list of the PHP objects representing each file, and add a WordPress hook to execute the enqueuing:

// Initialize with the corresponding object instances for each file to enqueue
$fileEnqueuer = new ResourceEnqueuer(
array(
new HeaderColorsSiteResource(),
new WelcomeUserDataUserResource()
)
);

// Add the WordPress hooks to enqueue the resources
add_action(‘wp_enqueue_scripts’, array($fileEnqueuer, ‘enqueue_scripts’));
add_action(‘wp_print_styles’, array($fileEnqueuer, ‘enqueue_styles’));

That’s it: Being enqueued, the static files will be requested when loading the site in the client. We have succeeded to avoid printing inline code and loading static resources instead.

Next, we can apply several improvements for additional performance gains.

Recommended reading: An Introduction To Automated Testing Of WordPress Plugins With PHPUnit

Bundling Files Together

Even though HTTP/2 has reduced the need for bundling files, it still makes the site faster, because the compression of files (e.g. through GZip) will be more effective, and because browsers (such as Chrome) have a bigger overhead processing many resources.

By now, we have modeled a file as a PHP object, which allows us to treat this object as an input to other processes. In particular, we can repeat the same process above to bundle all files from the same type together and serve the bundled version instead of all the independent files. For this, we create a function get_content which simply extracts the content from every resource under $fileObjects, and prints it again, producing the aggregation of all content from all resources:

abstract class SiteBundleBase extends SiteResourceBase {

protected $fileObjects;

function __construct($fileObjects) {

$this->fileObjects = $fileObjects;
}

function get_content() {

$content = “”;
foreach ($this->fileObjects as $fileObject) {

$content .= $fileObject->get_content().PHP_EOL;
}

return $content;
}
}

We can bundle all files together into the file bundled-styles.css by creating a class for this file:

class StylesSiteBundle extends SiteBundleBase {

function get_filename() {

return “bundled-styles”;
}

function get_type() {

return “css”;
}
}

Finally, we simply enqueue these bundled files, as before, instead of all the independent resources. For CSS, we create a bundle containing files header-colors.css, background-image.css and font-sizes.css, for which we simply instantiate StylesSiteBundle with the PHP object for each of these files (and likewise we can create the JS bundle file):

$fileObjects = array(
// CSS
new HeaderColorsSiteResource(),
new BackgroundImageSiteResource(),
new FontSizesSiteResource(),
// JS
new WelcomeUserDataUserResource(),
new UserShoppingItemsUserResource()
);
$cssFileObjects = array_map(array(ResourceUtils::class, ‘is_css’), $fileObjects);
$jsFileObjects = array_map(array(ResourceUtils::class, ‘is_js’), $fileObjects);

// Use this definition of $fileEnqueuer instead of the previous one
$fileEnqueuer = new ResourceEnqueuer(
array(
new StylesSiteBundle($cssFileObjects),
new ScriptsSiteBundle($jsFileObjects)
)
);

That’s it. Now we will be requesting only one JS file and one CSS file instead of many.

A final improvement for perceived performance involves prioritizing assets, by delaying loading those assets which are not needed immediately. Let’s tackle this next.

async/defer Attributes For JS Resources

We can add attributes async and defer to the <script> tag, to alter when the JavaScript file is downloaded, parsed and executed, as to prioritize critical JavaScript and push everything non-critical for as late as possible, thus decreasing the site’s apparent loading time.

To implement this feature, following the SOLID principles, we should create a new interface JSResource (which inherits from Resource) containing functions is_async and is_defer. However, this would close the door to <style> tags eventually supporting these attributes too. So, with adaptability in mind, we take a more open-ended approach: we simply add a generic method get_attributes to interface Resource as to keep it flexible to add to any attribute (either already existing ones or yet to be invented) for both <script> and <link> tags:

interface Resource {

// Continued from above…

function get_attributes();
}

abstract class ResourceBase implements Resource {

// Continued from above…

function get_attributes() {

// By default, no extra attributes
return ”;
}
}

WordPress doesn’t offer an easy way to add extra attributes to the enqueued resources, so we do it in a rather hacky way, adding a hook that replaces a string inside the tag through function add_script_tag_attributes:

class ResourceEnqueuerUtils {

protected static tag_attributes = array();

static function add_tag_attributes($handle, $attributes) {

self::tag_attributes[$handle] = $attributes;
}

static function add_script_tag_attributes($tag, $handle, $src) {

if ($attributes = self::tag_attributes[$handle]) {

$tag = str_replace(
” src=’${src}’>”,
” src=’${src}’ “.$attributes.”>”,
$tag
);
}

return $tag;
}
}

// Initize by connecting to the WordPress hook
add_filter(
‘script_loader_tag’,
array(ResourceEnqueuerUtils::class, ‘add_script_tag_attributes’),
PHP_INT_MAX,
3
);

We add the attributes for a resource when creating the corresponding object instance:

abstract class ResourceBase implements Resource {

// Continued from above…

function __construct() {

ResourceEnqueuerUtils::add_tag_attributes($this->get_filename(), $this->get_attributes());
}
}

Finally, if resource welcomeuser-data.js doesn’t need to be executed immediately, we can then set it as defer:

class WelcomeUserDataUserResource extends UserResourceBase {

// Continued from above…

function get_attributes() {

return “defer=’defer'”;
}
}

Because it is loaded as deferred, a script will load later, bringing forward the point in time in which the user can interact with the site. Concerning performance gains, we are all set now!

There is one issue left to resolve before we can relax: what happens when the site is hosted on multiple servers?

Dealing With Multiple Servers Behind A Load Balancer

If our site is hosted on several sites behind a load balancer, and a user-configuration dependant file is regenerated, the server handling the request must, somehow, upload the regenerated static file to all the other servers; otherwise, the other servers will serve a stale version of that file from that moment on. How do we do this? Having the servers communicate to each other is not just complex, but may ultimately prove unfeasible: What happens if the site runs on hundreds of servers, from different regions? Clearly, this is not an option.

The solution I came up with is to add a level of indirection: instead of requesting the static files from the site URL, they are requested from a location in the cloud, such as from an AWS S3 bucket. Then, upon regenerating the file, the server will immediately upload the new file to S3 and serve it from there. The implementation of this solution is explained in my previous article Sharing Data Among Multiple Servers Through AWS S3.

Conclusion

In this article, we have considered that inlining JS and CSS code is not always ideal, because the code must be sent repeatedly to the client, which can have a hit on performance if the amount of code is significant. We saw, as an example, how WordPress loads 43kb of scripts to print the Media Manager, which are pure JavaScript templates and could perfectly be loaded as static resources.

Hence, we have devised a way to make the website faster by transforming the dynamic JS and CSS inline code into static resources, which can enhance caching at several levels (in the client, Service Workers, CDN), allows to further bundle all files together into just one JS/CSS resource as to improve the ratio when compressing the output (such as through GZip) and to avoid an overhead in browsers from processing several resources concurrently (such as in Chrome), and additionally allows to add attributes async or defer to the <script> tag to speed up the user interactivity, thus improving the site’s apparent loading time.

As a beneficial side effect, splitting the code into static resources also allows the code to be more legible, dealing with units of code instead of big blobs of HTML, which can lead to a better maintenance of the project.

The solution we developed was done in PHP and includes a few specific bits of code for WordPress, however, the code itself is extremely simple, barely a few interfaces defining properties and objects implementing those properties following the SOLID principles, and a function to save a file to disk. That’s pretty much it. The end result is clean and compact, straightforward to recreate for any other language and platform, and not difficult to introduce to an existing project — providing easy performance gains.

Smashing Editorial
(rb, ra, yk, il)

9 Free Data Visualization Tools

Original Source: http://feedproxy.google.com/~r/1stwebdesigner/~3/Vxx98XaxavI/

Data can be beautiful. And if you’ve ever had to work with graphs and statistics in your web design work before, you know that the extra visual reinforcement is much better than trying to figure out a bunch of numbers.

Writing a blog post, creating a chart for a client’s project, or just trying to get your own personal data sorted; these free tools are just what you need to make charts, graphs, and infographics that are both pretty and easy to understand.

Chartist

Chartist

“Simple responsive charts” – no more, no less. Download this tiny program and create vector pie charts, line graphs and more that will scale to any screen size. You can even add animations! The graphs are highly compatible with a majority of web browsers, so there’s no reason not to use it. However, you will need to learn some JavaScript and CSS. The documentation should be a big help if you’re new to these languages.

RAWGraphs

RAWGraphs

If you’re looking for variety, RAWGraphs has everything under the sun. Just paste in your spreadsheet data or upload a file, and you’ll be able to convert the numbers to anything from a bar graph to a bump chart! You can even add your own chart type if you’re familiar with JavaScript. When done customizing, you can download as a SVG, PNG or JSON file. Or just embed the vector into your site. This advanced program isn’t the easiest to use, but it has a lot of potential.

Datawrapper

Datawrapper

If you have spreadsheet data you want to include in an article, Datawrapper makes it easy to turn it into a beautiful graph. It’s not hard at all, and the graphs are fully customizable down to text alignment and color customization (there are even color-blind filters!) When you’re finished, you just need to sign up and you’ll get the embed code for the chart.

Tableau

Tableau

Need something professional? Tableau Public is a downloadable tool that allows you to visualize data in a variety of ways. Suitable for anything from small charts to dedicated infographics, the app is a great choice for web designers.

ChartBlocks

ChartBlocks

“The world’s easiest chart builder” is exactly what it says. Insert some spreadsheet data, do a little tweaking, pick a theme and you’ve got yourself a chart in less than a minute. If you want to, you can tweak the appearance further. Or you can just download it, embed it or share it on social media!

Beam

Beam

Are all these programs too complicated? Just need to make a simple graph from a handful of data without importing a bunch of files? Just tweak a few names and data points, pick from four types of simple charts, and choose a color profile. Easy as that!

Visualize Free

Visualize Free

This drag-and-drop program is a fantastic way to create beautiful infographics that involve a lot of data. You’ll need to sign up to use the app, but there are a bunch of examples on the homepage that you’re free to customize while getting a feel for the dashboard.

OpenHeatMap

OpenHeatMap

This app is amazing simply because it’s so easy to use! Upload a spreadsheet or Excel file – get a beautiful heatmap with an embed code. The process is clean and perfectly streamlined.

Timeline

Timeline

This one is a bit more difficult to set up, since you’ll need to follow the steps exactly and create a new spreadsheet. But if you need an embeddable interactive timeline for your project, this is the app you’re looking for.

Beautiful Data

Breaking up text with visually stimulating images is a great way to prevent a webpage from looking bland. With these free tools, you’ll be able to create interesting graphs and charts that will draw in anyone who sees them, and in minutes. No more spending hours trying to make your own infographics!


Black Friday Deals of 2018: Editor's Picks

Original Source: http://feedproxy.google.com/~r/abduzeedo/~3/VTdwJGcsMI0/black-friday-deals-2018-editors-picks

Black Friday Deals of 2018: Editor’s Picks

Black Friday Deals of 2018: Editor's Picks

AoiroStudio
Nov 23, 2018

Today is the day where brands, friends and more are kicking off their Black Friday & Cyber Monday deals for the long weekend of festivities. We have made an article entirely about it if you wanna check it out: Black Friday Deals for Designers, the Ultimate List!. Now let’s shift our conversation and still celebrating the spirit of Black Friday. I love Amazon and I took a dive through their Black Friday deals and tried to find the best deals with a decent amount of savings. And I made a roundup! You can easily get distracted on those sites on the apparent of why are you even there in the first place? So shall we?

More Links
Follow my tweets @aoirostudio
Follow my pictures on Instagram
My Best Black Friday Deals of 2018
ASUS Chromebook Flip 12.5-inch Touchscreen now $499.00

Black Friday Deals of 2018: Editor's Picks

Seagate Expansion 4TB now $79.99

Black Friday Deals of 2018: Editor's Picks

Echo Dot with Philips Hue White and Color Smart Light Bulb now $94.99

Black Friday Deals of 2018: Editor's Picks

Blue Yeti USB Microphone now $89.00

Black Friday Deals of 2018: Editor's Picks

CORSAIR K95 Gaming Keyboard now $139.99

Black Friday Deals of 2018: Editor's Picks

Manfrotto Compact Tripod now $41.67

Black Friday Deals of 2018: Editor's Picks

Logitech Wireless Mouse now $14.24

Black Friday Deals of 2018: Editor's Picks

Samsung 34″ Thunderbolt now $749.99

Black Friday Deals of 2018: Editor's Picks

Apple iPad (Wi-Fi, 32GB) now $249.00

Black Friday Deals of 2018: Editor's Picks

Dell UltraSharp 27-Inch now $329.00

Black Friday Deals of 2018: Editor's Picks

Logitech G933 Artemis Spectrum now $99.99

Black Friday Deals of 2018: Editor's Picks

Sony Alpha a6000 Mirrorless with two lenses kit now $598.00

Black Friday Deals of 2018: Editor's Picks

Fujifilm X-T2 Mirrorless kit lens now $1,499.00

Black Friday Deals of 2018: Editor's Picks

Elsewhere
Made by Google

Save $200 on Pixel 3 or $250 on Pixel 3 XL. Save $300 on Pixelbook. Mini and mighty. Save $44 on Google Home Mini. Save $10 on Chromecast. Save $100 on Google Home Max.

Made by Google Products

Black Friday Deals of 2018: Editor's Picks

black friday
guide


Monthly Web Development Update 11/2018: Just-In-Time Design And Variable Font Fallbacks

Original Source: https://www.smashingmagazine.com/2018/11/monthly-web-development-update-11-2018/

Monthly Web Development Update 11/2018: Just-In-Time Design And Variable Font Fallbacks

Monthly Web Development Update 11/2018: Just-In-Time Design And Variable Font Fallbacks

Anselm Hannemann

2018-11-23T14:00:24+01:00
2018-11-23T17:23:27+00:00

How much does design affect the perception of our products and the users who interact with them? To me, it’s getting clearer that design makes all the difference and that unifying designs to a standard model like the Google Material Design Kit doesn’t work well. By using it, you’ll get a decent design that works from a technical perspective, of course. But you won’t create a unique experience with it, an experience that lasts or that reaches people on a personal level.

Now think about which websites you visit and if you enjoy being there, reading or even contributing content to the service. In my opinion, that’s something that Instagram manages to do very well. Good design fits your company’s purpose and adjusts to what visitors expect, making them feel comfortable where they are and enabling them to connect with the product. Standard solutions, however, might be nice and convenient, but they’ll always have that anonymous feel to them which prevents people from really caring for your product. It’s in our hands to shape a better experience.

News

Yes, Firefox 63 is here, but what does it bring? Web Components support including Custom Elements with built-in extends and Shadow DOM. prefers-reduced-motion media query support is available now, too, Developer Tools have gotten a font editor to make playing with web typography easier, and the accessibility inspector is enabled by default. The img element now supports the decoding attribute which can get sync, async, or auto values to hint the preferred decoding timing to the browser. Flexbox got some improvements as well, now supporting gap (row-gap, column-gap) properties. And last but not least, the Media Capabilities API, Async Clipboard API, and the SecurityPolicyViolationEvent interface which allows us to send CSP violations have also been added. Wow, what a release!
React 16.6 is out — that doesn’t sound like big news, does it? Well, this minor update brings React.lazy(), a method you can use to do code-splitting by wrapping a dynamic import in a call to React.lazy(). A huge step for better performance. There are also a couple of other useful new things in the update.
The latest Safari Tech Preview 68 brings <input type="color"> support and changes the default behavior of links that have target="_blank" to get the rel="noopener" as implied attribute. It also includes the new prefers-color-scheme media query which allows developers to adapt websites to the light or dark mode settings of macOS.
From now on, PageSpeed Insights, likely still the most commonly used performance analysis tool by Google, is now powered by project Lighthouse which many of you have already used additionally. A nice iteration of their tool that makes it way more accurate than before.

Web forms are such an important part of the web, but we design them poorly all the time. The brand-new “Form Design Patterns” book is our new practical guide for people who design, prototype and build all sorts of forms for digital services, products and websites. The eBook is free for Smashing Members.

Check the table of contents ↬

Form Design Patterns — a practical guide for anyone who needs to design and code web forms

General

Explore structured learning paths to discover everything you need to know about building for the modern web. web.dev is the new resource by the Google Web team for developers.
No matter how you feel about Apple Maps (I guess most of us have experienced moments of frustration with it), but this comparison about the maps data they used until now and the data they currently gather for their revamped Maps is fascinating. I’m sure that the increased level of detail will help a lot of people around the world. Imagine how landscape architects could make use of this or how rescue helpers could profit from that level of detail after an earthquake, for example.

Web.dev

From fast load times to accessibility — web.dev helps you make your site better.

HTML & SVG

Andrea Giammarchi wrote a polyfill library for Custom Elements that allows us to extend built-in elements in Safari. This is super nice as it allows us to extend native elements with our own custom features — something that works in Chrome and Firefox already, and now there’s this little polyfill for other browsers as well.
Custom elements are still very new and browser support varies. That’s why this html-parsed-element project is useful as it provides a base custom element class with a reliable parsedCallback method.

JavaScript

Leonardo Maldonado compiled a collection of JavaScript concepts that are very useful to know for developers. The list includes both videos and articles so you can choose your preferred way of learning.
When a video doesn’t work on a website anymore and you’re using Service Workers, the problem might be the Range request. Phil Nash debugged this weird issue on his page and explains how you can do too.

UI/UX

How do you build a color palette? Steve Schoger from RefactoringUI shares a great approach that meets real-life needs.
Matthew Ström’s article “Just-in-time Design” mentions a solution to minimize the disconnection between product design and product engineering. It’s about adopting the Just-in-time method for design. Something that my current team was very excited about and I’m happy to give it a try.
HolaBrief looks promising. It’s a tool that improves how we create design briefs, keeping everyone on the same page during the process.
Mental models are explanations of how we see the world. Teresa Man wrote about how we can apply mental models to product design and why it matters.
Shelby Rogers shares how we can build better 404 error pages.

Building Your Color Palette

Steve Schoger looks into color palettes that really work. (Image credit)

Tooling

The color palette generator Palx lets you enter a base hex value and generates a full color palette based on it.

Security

This neat Python tool is a great XSS detection utility.
Svetlin Nakov wrote a book about Practical Cryptography for Developers which is available for free. If you ever wanted to understand or know more about how private/public keys, hashing, ciphers, or signatures work, this is a great place to start.
Facebook claimed that they’d reveal who pays for political ads. Now VICE researched this new feature and posed as every single of the current 100 U.S. senators to run ads ‘paid by them’. Pretty scary to see how one security failure that gives users more power as intented can change world politics.

Privacy

I don’t like linking to paid, restricted articles but this one made me think and you don’t need the full story to follow me. When Tesla announced that they’d ramp up model 3 production to 24⁄7, a lot of people wanted to verify this, and a company that makes money by providing geolocation data captured smartphone location data from the workers around the Tesla factories to confirm whether this could be true. Another sad story of how easy it is to track someone without consent, even though this is more a case of mass-surveillance than individual tracking.

Web Performance

Addy Osmani shares a performance case study of Netflix to improve Time-to-Interactive of the streaming service. This includes switching from React and other libraries to plain JavaScript, prefetching HTML, CSS, and (React) JavaScript and the usage of React.js on the server side. Quite interesting to see so many unconventional approaches and their benefits. But remember that what works for others doesn’t need to be the perfect approach for your project, so take it more as inspiration than blindly copying it.
Harry Roberts explains all the details that are important to know about CSS and Network Performance. A comprehensive collection that also provides some very interesting tips for when you have async scripts in your code.
I love the tiny ImageOptim app for batch optimizing my images for web distribution. But now there’s an impressive web app called “Squoosh” that lets you optimize images perfectly in your web browser and, as a bonus, you can also resize the image and choose which compression to use, including mozJPEG and WebP. Made by the Google Chrome team.

CSS

Oliver Schöndorfer shows how we can serve a Variable Font to modern browsers while providing a fallback web font for older browsers. This is especially interesting as Oliver goes deep into optimizing the fallback font and adjusting it via CSS in order to match the variable font as closely as possible in case a font swap happens during page load.
Andy Clarke shows what’s needed to redesign a product and website to support bright and dark modes which were introduced to several Operating Systems recently and will soon be supported via media queries by various browsers.
While background-clip is not super new, it hasn’t been very useful due to the lack of browser support. But as Sime Vidas shows, CSS Background Clip is now widely supported, giving us great opportunities to enhance the text styling on our websites.

Redesigning your product and website for dark mode

How to design for dark mode while maintaining accessibility, readability, and a consistent feel for your brand? Andy Clarke shares some valuable tips. (Image credit)

Work & Life

Stig Brautaset wrote about why he nearly failed to get into his job as a submarine sonar operator due to a silly hiring rule and how he made the best out of the situation and succeeded. A valuable lesson that shows that you shouldn’t stick too much to guidelines and rules when it comes to hiring people but trust your gut and listen to their stories instead.
In “People, Not Robots: Bringing the Humanity Back to Customer Support,” Kristin Aardsma shares why it’s important to rethink how customer support works.
Marcus Wermuth reflects on why becoming a manager is not a promotion but a career change.

Going Beyond…

Neil Stevenson on Steve Jobs, creativity and death and why this is a good story for life. Although copying Steve Jobs is likely not a good idea, Neil provides some different angles on how we might want to work, what to do with our lives, and why purpose matters for many of us.
Ryan Broderick reflects on what we did by inventing the internet. He concludes that all that radicalism in the world, those weird political views are all due to the invention of social media, chat software and the (not so sub-) culture of promoting and embracing all the bad things happening in our society. Remember 4chan, Reddit, and similar services, but also Facebook et al? They contribute and embrace not only good ideas but often stupid or even harmful ones. “This is how we radicalized the world” is a sad story to read but well-written and with a lot of inspiring thoughts about how we shape society through technology.
I’m sorry, this is another link about Bitcoin’s energy consumption, but it shows that Bitcoin mining alone could raise global temperatures above the critical limit (2°C) by 2033. It’s time to abandon this inefficient type of cryptocurrency. Now.
Wilderness is something special. And our planet has less and less of it, as this article describes. The map reveals that only very few countries have a lot of wilderness these days, giving rare animals and species a place to live, giving humans a way to explore nature, to relax, to go on adventures.
We definitely live in exciting times, but it makes me sad when I read that in the last forty years, wildlife population declined by 60%. That’s a pretty massive scale, and if this continues, the world will be another place when I’m old. Yes, when I am old, a lot of animals I knew and saw in nature will not exist anymore by then, and the next generation of humans will not be able to see them other than in a museum. It’s not entirely clear what the reasons are, but climate change might be one thing, and the ever-growing expansion of humans into wildlife areas probably contributes a lot to it, too.

Smashing Editorial
(cm, il)

Black Friday deal: This top monitor calibrator is a total bargain

Original Source: http://feedproxy.google.com/~r/CreativeBloq/~3/e1U4z7qCW5s/pick-up-a-top-monitor-calibrator-for-half-price

All digital artists and graphic designers will know how vital it is to have complete colour accuracy on your machine. The best monitor calibrators don't come cheap, which is why this Black Friday 2018 deal is such a great find. DataColour has slashed the prices of its Spyder5 range, and they're flying off the shelves. 

This deal is so popular that that Spyder5PRO has already sold out, but fear not: you can still grab a Spyder5ELITE with a whopping £97 (130€) off. This calibrator offers expert colour accuracy, with room light monitoring and unlimited settings for gamma, white point and advanced grey balancing enabling you to take complete control of your colour workflow. It work on laptops, desktops and projectors, too.

Please note, the online store price is in Euros, so the GBP value may fluctuate slightly depending on the exchange rate. On the hunt for some more top deals for artists and designers? Take a look at our pick of the best UK Black Friday gems (or, for those of you across the pond, US hidden gems).


10 Free Website Optimization & Guides For Improving Site Speed

Original Source: http://feedproxy.google.com/~r/1stwebdesigner/~3/yTJitK0AwlQ/

Every metric you can measure on your site will give you an optimized loading time. Everything from usability to search engine rankings improve with a faster site.

There is no catch-all process to optimization. There are certain things you can do, like minifying your code or optimizing images to reduce file size.

But overall you’ll need to try a lot of things to ultimately reduce your page load speed. And the best place to start is with online guides solely built for web developers who want faster pages. Take a look over this collection and see if any of these resources can help you master the art of page speed optimization.

The UX Designer Toolbox
Unlimited Downloads: 500,000+ Wireframe & UX Templates, UI Kits & Design Assets


DOWNLOAD NOW

Essential Image Optimization

image optim guide

The Essential Image Optimization ebook is a fantastic primer on reworking your images for performance.

Google engineer Addy Osmani wrote this free ebook as a resource for all developers, designers, and server admins. The goal is to prove just how much image optimization can affect page speed.

With the right tools and processes you can radically improve your page load times. It won’t take much effort, and you can even get started with just a few simple changes. For example, WordPress users might try the SmushIt plugin that runs automatically and free of charge.

There’s a lot you can do for image optimization and this ebook is the best place to start.

Git-Tower Web Optimization Tips

gittower optimization guide

The team at Git-Tower published a massive guide to website optimization. This guide is really the bee’s knees on everything you could possibly want to do to your site.

It’s broken into sections almost like long chapters on various topics. They all follow a similar formula covering essential optimization topics:

Testing performance
Working with images
Reducing HTTP requests
Optimizing your code
Caching files

This guide also comes with a handy cheat sheet in PDF form. You can follow along while you make changes on your site, tracking performance as you go.

Ultimate Web Optimization Guide

A while back the team at Hongkiat wrote this optimization guide for the web. It’s still one of my favorites because it covers basically everything you should do for a faster site.

This talks about updating your server speed, your images, your HTTP requests, caching, CDN setup, everything.

Granted not everyone has the patience to go through all these things. It’ll take a lot of effort to switch servers and setup a CDN. Even though both of those things can radically improve performance, most people want a guide to help them along.

Take a look at this guide and see what you can glean from the writing. If you notice any sections that catch your eye be sure to Google for more info.

Top 10 Website Optimizations

top10 optimization ebook

Here’s a cool ebook on web performance released for free by Hostbaby. It covers 10 of the most important web optimization techniques you can use to radically improve your page speed.

The ebook does require an email submit which may annoy some people. But you can always unsubscribe from any lists you get added to, and the book is free forever regardless of if you subscribe or not.

Throughout the book you’ll learn not just the areas to optimize, but how to perform those optimizations and how to get the most from your efforts.

21 Expert Tips to an Ultra-Fast WordPress Site

siteground wp ebook

SiteGround has a similar ebook focused more on WordPress performance. This is a little more niche compared to general site optimization. Yet it’s incredibly useful since 27% of the Internet runs on WordPress.

The ebook is called 21 Expert Tips to an Ultra-Fast WordPress Site and it’s a great read for any WP users.

The tips in this ebook are gold, and they cover a lot of WP optimization tips for advanced caching and page testing. Probably the best guide to WP optimization you’ll find.

Again this does require an email submit to gain access, but it’s not difficult to unsubscribe later. I’ll say this is one ebook that’s worth submitting your email for – or you can just use a throwaway. Whatever works.

Web Page Size, Speed, and Performance

website speed performance ebook

Tech publisher O’Reilly has a massive book library totaling well into the thousands of titles. They release dozens of new books every year, most of them selling for a pretty penny.

But you can find a lot of free ebooks on their site released as 100% free guides, or as freemium previews to larger books.

One free guide I really like is Web Page Size, Speed, and Performance. This one’s easy to read and teaches you how to slim down your code to work well across all devices.

You’ll learn how to measure site speed, track down slow page assets, and how to optimize them to lift your site’s performance to new heights.

Static Site Generators

static site generator ebook

There’s been a lot of talk in recent years about static websites. Mostly surrounding static site generators like Jekyll.

These types of sites load crazy fast because there’s no database and no backend code to run. It’s all frontend assets, most of which can be delivered through a CDN. O’Reilly’s free ebook Static Site Generators can help you start down this path.

It’s a quick read but offers more than enough info to get you hooked on the static site frenzy.

Real User Measurements

real user measurements ebook

Page speed optimization isn’t performed in a vacuum. It’s primarily done to enhance the user experience and keep people on your page.

Real User Measurements is yet another O’Reilly ebook teaching you how to measure valuable aspects of user performance. You’ll learn about active and passive monitoring tools along with different workflows you can adopt while optimizing your site.

There is no perfect process for measuring user behavior. But this book offers a solid intro to the field of user experience with a focus on website speed and optimization.

CDNs for Dummies

cdn guide

I couldn’t find a free ebook covering CDNs but I did find this awesome guide from Woorkup. It’s 100% free although it doesn’t go into as much detail on the more technical stuff.

This is still a genuinely useful intro to the process of managing a CDN. You’ll learn how it works, why it helps with site speed, and what you can do to setup a CDN for your own site.

I also recommend reading this comparison guide which gives a truly honest assessment of the CDN marketplace. I used this guide to help me pick the best CDN for my site, and it’ll help you understand why the CDN you choose is vital to your site’s performance.

Image File Format Comparison Chart

image file format guide

Lastly I want to share this image comparison guide detailing all the different file formats you can pick from.

It’s not the most valuable guide out there, but it does compare a lot of useful features you’ll want to consider before exporting graphics. It discusses the pros & cons of each image format. And it shares image format properties like lossless compression, transparency support, and native browser support.

If you’re still not sure whether a PNG or SVG is the best choice for your homepage graphics then this guide is worth bookmarking.


Stop Acting Like an Amateur Freelance Web Designer

Original Source: http://feedproxy.google.com/~r/1stwebdesigner/~3/sFSussIQeOY/

Being a successful web designer is more than just hardcore Photoshop skills and a mastery of the latest CSS framework. The challenge that keeps amateurs from becoming professionals is effectively managing their freelance careers.

While some of these skills cannot be learned overnight, here are a few things you can start doing now so clients think of you as a professional and transform your freelance web design career.

The Freelance Designer Toolbox
Unlimited Downloads: 500,000+ Web Templates, Icon Sets, Themes & Design Assets


DOWNLOAD NOW

1. Don’t Drop the Ball: Effective Communication Is Key

When was the last time you did work for a business that promised to call you back and never did? Or ignored your countless emails when trying to solve a problem?

Effective communication can make or break a professional in any field, but it’s of particular importance in the web design field. Professional designers understand that communication dictates the success of a project. Regular updates help make sure that your client is satisfied with the direction. And, if something does go wrong, you’re in a position to adjust timelines and expectations accordingly.

If you drop the ball on communicating with your clients regularly, it can result in deadlines being missed and an unhappy client who will not be raving about your web design services to anyone.

2. Always Set Clear Expectations to Avoid Problems

If you haven’t set expectations early on, the chances of you running into problems, later on, are high! Here are two types of documentation professional web designers use to ensure their clients understand their working process:

Draw up a Contract

Professional web designers never work without a contract. Not only does it protect you, but it helps set clear expectations to your client. Make sure your contract contains the following:

An outline of the job, including how many revisions will be allowed.
Who owns the rights to the finished product.
Your deadlines, rate fee, early termination fee, applicable late fees and dates of payment.

Create a Goals Document

Before you begin work on a project, agree on goals with your client and put them into a document. By taking the time to create this project scope, you have proof to charge more money if your client decides to change direction after the project has started.

And remember, while it won’t hurt to go above and beyond for your clients occasionally – don’t make it a habit. Avoid setting up expectations that you will work late nights and weekends just because you’re self-employed.

3. Only Deliver Showstopper Work That Will Make Your Portfolio Shine

You are never going to grow your freelance business and graduate from amateur to professional if you do not take pride in your work. While this tip does seem like a no-brainer, many freelancers take short cuts and only put in half the effort when working for clients that aren’t “exciting”.

While you do want to strive to build a client base that is aligned with your career goals, you may need to take on projects that aren’t your first choice, but you should not treat them as such.

Anything attached to your name should be a showstopper and make the next client eager to work with you. It should be your top priority to submit only your best, especially if you want to draw in those higher payer clients and grow your freelancing career.

4. Never Stop Networking and Looking for New Clients

A big mistake that amateur freelancers make is by relying on a small number of clients to make a living. A successful, professional web designer knows that there is more value in having a diverse client base and the stats speak for themselves.

A recent survey by Contently showed that half of all freelancers who never look for new clients make less than $20,000 per year.

By setting aside time on a regular basis to look for new clients, you can prevent becoming reliant on one or two for survival, and if one unexpectedly leaves, you can still get through the month without breaking a sweat.

Besides applying for jobs online, get away from your computer and go back to networking 101. Attend social events in your city, go to conferences, and discover where potential clients are hanging out. It is an excellent way to start making a name for yourself and form personable business connections.

5. Show off Your Work with a Professional Online Portfolio

If you do not have a portfolio that is up to date or an active social media presence your professional brand screams amateur. Professional web designers understand that clients can be found anywhere and how important it is to have a place to show off your experience, what companies you have worked with and your past projects.

An updated portfolio shows potential clients how relevant and active you are in the world of design and gives them solid evidence about your capabilities. By ensuring your portfolio is also filled with the sort of work you would like to do, you will attract the right clients and be one step closer to working on projects that inspire you and make you feel fulfilled.

Here are some of the key aspects your online web design portfolio should cover:

Layouts
Content Management
Composition
Typography
Colours
Techniques
Design Rationales

6. Screen Potential Clients to Wean out the Bad Apples

At some point in your freelance career, you are going to come across a bad client. Whether they want to control too much of what you do or communicate badly, the experience can be frustrating and lead to a loss of income as well as valuable resources like your time.

Professional web designers avoid attracting the type of clients they do not want by having a solid screening process in place. Instead of accepting any client that comes your way, ask yourself if their tastes align with your design principals. If you accept a client who hates the subtle, minimal designs you love, you are only setting yourself up for failure.

Other things to consider during this process is if the client can afford you, do you need them and if the project is aligned with your career goals. By focusing on attracting quality clients early on in your career, everything else will fall into place, and you will end up doing more work that you love.

7. Keep up with the Latest Trends and Don’t Stop Learning

To be a successful freelance web designer, you need to be technologically in tune with changes in the industry. Professionals who are quick to learn new things or technologies can differentiate themselves from competitors and become more sought after by potential clients.

Set aside time in your work day or during the week to learn things in your field. Read web design blogs to find out what’s new and trending, or invest in your continuous education by signing up for workshops, certifications, or the occasional class.

Remember you are never too old to learn new things and while you do not need to have the latest of everything to stay relevant, you need to keep your skills sharp and avoid working on technology that is outdated and not the industry standard.

Wrapping It All Up

What separates an amateur web designer from a professional is not how long they’ve been a freelancer. In reality, it is about their attitude and the way they handle their business and clients.

The road to becoming a professional freelance web designer is not easy. It is a challenging industry that requires dedication to not only tangible skills but soft ones like customer services to stay relevant and in demand.


How to Build a WordPress Theme from Scratch: Final Steps

Original Source: https://www.sitepoint.com/build-wordpress-theme-from-scratch-final/

In this article, we’ll complete our foray into building a WordPress theme from scratch, focusing on refining our templates, adding meta information, post thumbnails, sidebars, user-friendly controls and more.

This is the third, and last part of the WordPress series on building a WordPress theme. Part 1 introduced WordPress theming, and in part 2 we built a basic theme. We utilized the Clean Blog template by StartBootstrap to add style to our WordPress theme. The code we’ve written so far is available on GitHub.

We have added single.php, page.php, archive.php and index.php templates so far, but we left the task of finalizing it for this part of the task. We introduced functions.php — a file that WordPress uses to automatically include functionalities particular to our theme, and we added functions to it. We added a dynamic header function to our header.php, and we separated that functionality into our functions.php. Ideally, this should be organized into a separate file — possibly in an inc folder inside our theme — to keep things clean.

In part 2, we also introduced partials — footer.php and header.php.

Refining the Templates

In the previous article, we separated our <body> tag — the opening one — into header.php, and we added <?php body_class(); ?> to it. This adds some semantic classes to the body that tell us whether we are on a page, post, whether we’re logged in, or not, and so on — enabling us to style different elements of our website depending on pages visited, and other things.

If we visit the home page and open the browser console to inspect these classes, we’ll see that we lack the current template information among these classes:

Inspecting classes in the browser console

To be able to change the things WordPress displays, we need to know what file is being used. In our case, index.php is used as a default fallback template. This infographic shows the hierarchy of templates used. It can come very handy when overriding or creating themes.

In the previous article, we started refining the archive.php loop, adding meta information and post thumbnails to outputed articles. We’ll separate that loop into a separate file, include it in archive.php and index.php, and finish refining it.

Firstly, we’ll replace the content in both files between while and endwhile with a single line that requests the partial file, so index.php will look something like this:

<?php
/**
* @package Botega_Scratch_Theme
*/

get_header(); ?>

<?php
if ( have_posts() ) : while ( have_posts() ): the_post();

get_template_part( ‘partials/content’, get_post_type() );

endwhile;
endif;
?>

<?php get_footer(); ?>

Once we’ve done that, we’ll place the content we have replaced in archive.php into the partials/content.php file:

<div <?php post_class( ‘post-preview’ ); ?> id=”post-<?php the_ID(); ?>”>

<header class=”entry-header”>
<?php
if ( is_singular() ) :
the_title( ‘<h1 class=”entry-title”>’, ‘</h1>’ );
else :
the_title( ‘<h2 class=”entry-title”><a href=”‘ . esc_url( get_permalink() ) . ‘” rel=”bookmark”>’, ‘</a></h2>’ );
endif;

if ( ‘post’ === get_post_type() ) :
?>
<div class=”entry-meta”>
<?php
bsimple_posted_on();
bsimple_posted_by();
?>
</div><!– .entry-meta –>
<?php endif; ?>
</header><!– .entry-header –>

<a class=”post-thumbnail” href=”<?php the_permalink(); ?>” aria-hidden=”true” tabindex=”-1″>
<?php
the_post_thumbnail( ‘post-thumbnail’, array(

) );
?>
</a>

<?php the_excerpt(); ?>

</div>

Once we upload these changes to the server, we’ll see that our front page now, in each post in the post list, has meta information — date and author links:

Our front page now has date and author links

This means that our partial works.

Posts Thumbnails

We can see that none of our fake posts have any images in general, and no featured images specifically. If we go to the WordPress dashboard and try to add the featured image to our post/page, we’ll see that there’s no file upload field in the rightmost sidebar. (For those unfamiliar with WordPress, more about this feature can be read here.)

Post thumbnails aren’t enabled by default in WordPress themes. It’s a feature that needs to be turned on specifically in new themes. Most themes have it enabled.

To do this, we include add_theme_support( ‘post-thumbnails’ ); line to our functions.php.

Now thumbnails are enabled.

Now we can empty our WordPress installation of all the content by using the wp-cli command wp site empty –allow-root (or we can do it manually from the WordPress dashboard), and repopulate it with FakerPress. It should fill posts and pages with featured images it grabs from the Internet. (We’ll need to recreate the Top Menu like before, and assign pages and posts to it.)

One tip: if we’re building themes for sale, or generally themes that will be released to a wider audience, we may want to use theme unit test data provided by Automattic, as it may provide content for testing a wider scope of cases and theme details.

We can specify image sizes to FakerPress, but it will in all likelihood still result in a messy look.

When we build a theme, one of the techniques used to achieve a polished, standardized look is to specify thumbnail sizes. These are standard sizes WordPress will resize all uploaded image to fit. We’ll use the WordPress add_image_size() function to add several image sizes that our theme will use:

add_image_size( ‘list-thumb-1’, 730, 400, true);
add_image_size( ‘small-list-thumb-1’, 400, 200, true);
add_image_size( ‘small-list-thumb-2’, 300, 200, true);
add_image_size( ‘small-list-thumb-3’, 220, 140, true);

Then we’ll output any of the formatted images by using the_post_thumbnail() in our content.php:

<a class=”post-thumbnail” href=”<?php the_permalink(); ?>” aria-hidden=”true” tabindex=”-1″>
<?php
the_post_thumbnail( ‘small-list-thumb-1’);
?>
</a>

To achieve a nicely formatted excerpt in our archive or blog list, we’ll increase font size, but to do this, we’ll reduce the number of words outputted by the_excerpt():

# functions.php
function custom_excerpt_length( $length ) {
return 40;
}
add_filter( ‘excerpt_length’, ‘custom_excerpt_length’, 999 );

To be able to float image (thumbnail we just mentioned) and excerpt, we add the following to the parent element selector in our css:

.home .post-preview.post {
overflow: hidden;
}

(We don’t cover here the smaller styling adjustments that aren’t crucial to the theme itself.)

Now, we can increase our font size, and have the excerpt float around the image, by floating the image (along with the a parent element):

The excerpt floats around the image

We’ll also use post_thumbnails later, on single posts/pages.

Theme Sidebars

Theme Sidebars are widgetized areas in the theme. They need to be registered in the WordPress system so that we can place different widgets to these areas. Once we do that, we print — or output — these widgets in our template files.

We’ll register a number of sidebars in our theme, which can be seen in the GitHub repository of the theme. We do this by adding the following code to our functions.php:

// Register custom sidebars
function sidebar_register() {

$args = array(
‘name’ => __( ‘home_header’, ‘bsimple’ ),
‘description’ => __( ‘home_header’, ‘bsimple’ ),
‘id’ => ‘h_h’,
‘class’ => ‘home_header’,
‘before_widget’ => ‘ <div class=”dyn-sidebar side sidebar”>’,
‘after_widget’ => ‘</div>’,
‘before_title’ => ‘<h2 class=”widgettitle”>’,
‘after_title’ => ‘</h2>’,
);
register_sidebar($args);

$args = array(
‘name’ => __( ‘archive_sidebar_1’, ‘bsimple’ ),
‘description’ => __( ‘Archive Sidebar no 1’, ‘bsimple’ ),
‘id’ => ‘a_s_1’,
‘class’ => ‘archive_sidebar_1’,
‘before_widget’ => ‘ <div class=”dyn-sidebar side sidebar”>’,
‘after_widget’ => ‘</div>’,
‘before_title’ => ‘<h2 class=”widgettitle”>’,
‘after_title’ => ‘</h2>’,
);
register_sidebar($args);

$args = array(
‘name’ => __( ‘bottom_center_sidebar’, ‘bsimple’ ),
‘description’ => __( ‘Bottom Center Sidebar’, ‘bsimple’ ),
‘id’ => ‘b_c_s’,
‘class’ => ‘bottom_center_sidebar’,
‘before_widget’ => ‘<div id=”bottom-center-sidebar”>’,
‘after_widget’ => ‘</div>’,
‘before_title’ => ‘<h2 class=”widgettitle”>’,
‘after_title’ => ‘</h2>’,
);
register_sidebar($args);

}
add_action( ‘widgets_init’, ‘sidebar_register’ );

Here, we show how to register two sidebars. Further details on the register_sidebar() function can be found at wordpress.org.

We register eleven sidebars, but we don’t need to output all of these in all page templates or website locations. If they’re outputed in the currently customized page, they’re accessible in the Customizer under widgets:

The various sidebars

Here’s an example of actual output of the sidebar or widget area in the footer.php — which means it can be displayed globally:

<?php if ( is_active_sidebar( ‘b_c_s’ ) ) : ?>
<div class=”row b_c_s”><div class=”col-lg-8 mx-auto top-widget col-md-10 “>
<?php get_sidebar( ‘BottomCenterSidebar’ ); ?>
</div></div>
<?php endif; ?>

Here we use a sidebar ID we used in the register_sidebar function for the bottom_center_sidebar above.

We also conditioned the width of the central content container on the home page dependent on whether there are sidebars with active widgets ( is_active_sidebar()):

# index.php
<div class=”row”>
<?php if ( (is_home() && is_active_sidebar( ‘h_s_1’ )) || (is_archive() && is_active_sidebar( ‘archive_sidebar_1’ )) ) { ?>
<div class=”col-lg-7 col-md-9″>
<?php } else { ?>
<div class=”col-lg-12 col-md-10 mx-auto”>
<?php } ?>

<?php
if ( have_posts() ) : while ( have_posts() ): the_post();
get_template_part( ‘partials/content’, get_post_type() );
endwhile;
endif;
?>

</div>

<?php if ( (is_home() && is_active_sidebar( ‘h_s_1’ )) || (is_archive() && is_active_sidebar( ‘archive_sidebar_1’ )) ) { ?>
<div class=”col-lg-4 offset-lg-1 col-md-10 col-sm-12 arch- sidebar-side-cont”>

<?php }

if ( is_home() ) :
get_sidebar( ‘HomeSidebar1’ );
elseif ( is_archive() ) :
get_sidebar( ‘ArchiveSidebar1’ );
endif;
?>

<?php if ( (is_home() && is_active_sidebar( ‘h_s_1’ )) || (is_archive() && is_active_sidebar( ‘archive_sidebar_1’ )) ) { ?>
</div>
<?php } ?>

</div>

We output Bootstrap classes dependent on these conditions, making sure the theme won’t look empty if we omit setting up widgets for pages such as home.

After we fill these widget areas with widgets and images, this is what we get:

The result of filling the widget areas

Theme is shaping up nicely. Readers will, of course, adapt the styling to their liking.

The post How to Build a WordPress Theme from Scratch: Final Steps appeared first on SitePoint.

Magnificent Hand Lettering by Emilee Rudd

Original Source: http://feedproxy.google.com/~r/abduzeedo/~3/4F-pu0V_T5s/magnificent-hand-lettering-emilee-rudd

Magnificent Hand Lettering by Emilee Rudd

Magnificent Hand Lettering by Emilee Rudd

GisMullr
Nov 20, 2018

I’m slightly obsessed with hand lettering. I simply love when I stumble upon any branding, print, signage, mural, etc. showcasing a beautiful lettering work. The talent involved in creating beautiful things using only your free hand, creativity and skills never ceases to impress me. From packages on a supermarket shelf to restaurant chalkboard menus or street signs, I’m always delighted to see a good old hand-drawn piece. And this is why I’m always looking for artworks with that particular style. While browsing the hashtag hand lettering on Instagram I stumbled upon Emilee Rudd, a designer from Sacramento, CA. And so happy to have found this amazing talent. Her work simply stood out and caught my attention right away. Her style, the colors she uses, the lightness of her work are simply stunning. Upon browsing her Instagram you’ll find hand lettering for all sorts of things. And all of them are stunning. From menus to magazines covers, from coffee cups to quotes, Emilee showcases pieces that will certainly get you hooked into lettering too.

Since my own handwriting isn’t so great I feel like lettering is a little bit intimidating. The process of drawing letters and transforming words and sentences into beautiful artworks is fascinating. So I actually love to see artists creating these beautiful free handpieces. With that in mind, I’m delighted to share the videos Emilee has of her creative process. She makes the hand lettering creation process seem so effortless. Take a look at her artworks and videos we have here today. We have videos from her sketchbook and from a project she did for a client. Maybe after seeing her work, you’ll be inspired to give hand lettering another chance. Enjoy!

About: Emilee Rudd is an award-winning multidisciplinary creative who believes that inspiration lies on the confluence of art and design. She utilizes a professional background of various mediums and techniques to develop a unique creative solution to every client’s needs. With a passion for historical reference and experimental methodology, she enjoys a wide range of creative challenges to tackle. She loves nothing more than to work with a client to achieve a personalized and impactful solution to their brand or project’s needs.

Magnificent Hand Lettering by Emilee Rudd

Magnificent Hand Lettering by Emilee Rudd

Magnificent Hand Lettering by Emilee Rudd

Magnificent Hand Lettering by Emilee Rudd

Magnificent Hand Lettering by Emilee Rudd

Magnificent Hand Lettering by Emilee Rudd

Magnificent Hand Lettering by Emilee Rudd

Magnificent Hand Lettering by Emilee Rudd

Magnificent Hand Lettering by Emilee Rudd

Magnificent Hand Lettering by Emilee Rudd

Magnificent Hand Lettering by Emilee Rudd

Magnificent Hand Lettering by Emilee Rudd

Magnificent Hand Lettering by Emilee Rudd

Videos

Emilee Rudd Inktober 2018 from Emilee Rudd on Vimeo.

Emilee Rudd Sketchbook from Emilee Rudd on Vimeo.

More links:
emileerudd.com
Instagram
Drunk on Lettering podcast – Episode 83 Emilee Rudd

hand lettering
illustration