How to Turn Any Website into a Mac App

Original Source: https://www.hongkiat.com/blog/websites-into-mac-app/

Turning your website, or any website on the internet, into an app has been made easy with the latest macOS. If you spend a lot of time on a specific website or a few websites, then it’s wise to turn them into an app and then launch/visit them with just a click.

Website into Mac appWebsite into Mac app

When turned into an app, it behaves exactly like one; it can reside on your dock or in your Launchpad and is also searchable in Spotlight.

Turning a website into an app is pretty straightforward. Just make sure you are on the latest macOS Sonoma, then follow these steps:

Open the website in Safari, like so.

Opening website in SafariOpening website in Safari

Click the share icon on the top right side of the browser, and select “Add to Dock“.

Adding website to DockAdding website to Dock

In the “Add to Dock” popup window, you can change the name and even alter the website’s URL. Then click “Add“.

Add to Dock popup windowAdd to Dock popup window

The website is instantly turned into an app. It will then appear on your dock.

App icon in DockApp icon in Dock

It will also appear in your Launchpad.

App icon in LaunchpadApp icon in Launchpad

It can also be searched via Spotlight. (See more Spotlight shortcut keys).

App searchable in SpotlightApp searchable in Spotlight

When you click on the app’s icon and open the website, it looks exactly like how it would when opened with Safari, just without the bookmark bars.

Website opened as app without bookmark barsWebsite opened as app without bookmark bars

One thing to note is that all the browser’s features are also gone when opened as an app. For example, when you right-click, you can only “Reload” the page.

Reload option in appReload option in app

The next time you open the same website in Safari, it will indicate (on top) that you already have an app for it.

Indication of existing app in SafariIndication of existing app in Safari

To remove the app from your dock, just drag it out of the dock and hold it until you see “Remove“.

Removing app from DockRemoving app from Dock

To delete the app entirely, open Finder, navigate to /Users/your_username/Applications, then delete the app.

Deleting app from systemDeleting app from system

The post How to Turn Any Website into a Mac App appeared first on Hongkiat.

In Search Of The Ideal Privacy Icon

Original Source: https://smashingmagazine.com/2023/11/search-ideal-privacy-icon/

I’ve been on the lookout for a privacy icon and thought I’d bring you along that journey. This project I’ve been working on calls for one, but, honestly, nothing really screams “this means privacy” to me. I did what many of us do when we need inspiration for icons and searched The Noun Project, and perhaps you’ll see exactly what I mean with a small sample of what I found.

Padlocks, keys, shields, and unsighted eyeballs. There’s a lot of ambiguity here, at best, and certainly no consensus on how to convey “privacy” visually. Any of these could mean several different things. For instance, the eyeball with a line through it is something I often see associated with visibility (or lack thereof), such as hiding and showing a password in an account login context.

So, that is the journey I am on. Let’s poke at some of the existing options of icons that exist for communicating privacy to see what works and what doesn’t. Maybe you’ll like one of the symbols we’ll stumble across. Or maybe you’re simply curious how I — or someone else — approach a design challenge like this and where the exploration goes.

Is A Specific Icon Even Necessary?

There are a couple of solid points to be made about whether we need a less ambiguous icon for privacy or if an icon is even needed in the first place.

For example, it’s fair to say that the content surrounding the icon will clarify the meaning. Sure, an eyeball with a line through it can mean several things, but if there’s a “Privacy” label next to it, then does any of this really matter? I think so.

Visuals enhance content, and if we have one that is not fully aligned with the context in which it is used, we’re actually subtracting from the content rather than adding to it.

In other words, I believe the visual should bolster the content, not the other way around.

Another fair point: text labels are effective on their own and do not need to be enhanced.

I remember a post that Thomas Byttebier wrote back in 2015 that makes this exact case. The clincher is the final paragraph:

“I hope all of this made clear that icons can easily break the most important characteristic of a good user interface: clarity. So be very careful, and test! And when in doubt, always remember this: the best icon is a text label.”

— Thomas Byttebier

The Nielsen Norman Group also reminds us that a user’s understanding of icons is based on their past experiences. It goes on to say that universally recognized icons are rare and likely exceptions to the rule:

“[…] Most icons continue to be ambiguous to users due to their association with different meanings across various interfaces. This absence of a standard hurts the adoption of an icon over time, as users cannot rely on it having the same functionality every time it is encountered.”

That article also makes several points in support of using icons, so it’s not like a black-and-white or a one-size-fits-all sort of rule we’re subject to. But it does bring us to our next point.

Communicating “Privacy”

Let’s acknowledge off the bat that “privacy” is a convoluted term and that there is a degree of subjectivity when it comes to interpreting words and visuals. There may be more than one right answer or even different answers depending on the specific context you’re solving for.

In my particular case, the project is calling for a visual for situations when the user’s account is set to “private,” allowing them to be excluded from public-facing interfaces, like a directory of users. It is pretty close to the idea of the eyeball icons in that the user is hidden from view. So, while I can certainly see an argument made in favor of eyeballs with lines through them, there’s still some cognitive reasoning needed to differentiate it from other use cases, like the password protection example we looked at.

The problem is that there is no ironclad standard for how to represent privacy. What I want is something that is as universally recognized as the icons we typically see in a browser’s toolbar. There’s little if any, confusion about what happens when clicking on the Home icon in your browser. It’s the same deal with Refresh (arrow with a circular tail), Search (magnifying glass), and Print (printer).

In a world with so many icon repositories, emoji, and illustrations, how is it that there is nothing specifically defined for something as essential on the internet as privacy?

If there’s no accord over an icon, then we’ll just have to use our best judgement. Before we look at specific options that are available in the wild, let’s take a moment to define what we even mean when talking about “privacy.” A quick define: privacy in DuckDuckGo produces a few meanings pulled from The American Heritage Dictionary:

The quality or condition of being secluded from the presence or view of others.
“I need some privacy to change into my bathing suit.”
The state of being free from public attention or unsanctioned intrusion.
“A person’s right to privacy.”
A state of being private, or in retirement from the company or from the knowledge or observation of others; seclusion.

Those first two definitions are a good point of reference. It’s about being out of public view to the extent that there’s a sense of freedom to move about without intrusion from other people. We can keep this in mind as we hunt for icons.

The Padlock Icon

We’re going to start with the icon I most commonly encounter when searching for something related to privacy: the padlock.

If I were to end my search right this moment and go with whatever’s out there for the icon, I’d grab the padlock. The padlock is good. It’s old, well-established, and quickly recognizable. That said, the reason I want to look beyond the lock is because it represents way too many things but is most widely associated with security and protection. It suggests that someone is locked up or locked out and that all it takes is a key to undo it. There’s nothing closely related to the definitions we’re working with, like seclusion and freedom. It’s more about confinement and being on the outside, looking in.

Relatively speaking, modern online privacy is a recent idea and an umbrella term. It’s not the same as locking up a file or application. In fact, we may not lock something at all and still can claim it is private. Take, for instance, an end-to-end encrypted chat message; it’s not locked with a user password or anything like that. It’s merely secluded from public view, allowing the participants to freely converse with one another.

I need a privacy symbol that doesn’t tie itself to password protection alone. Privacy is not a locked door or window but a closed one. It is not a chained gate but a tall hedge. I’m sure you get the gist.

But like I said before, a padlock is fairly reliable, and if nothing else works out, I’d gladly use it in spite of its closer alignment with security because it is so recognizable.

The Detective Icon

When searching “private” in an emoji picker, a detective is one of the options that come up. Get it, like a “private” detective or “private” eye?

I have mixed feelings about using a detective to convey privacy. One thing I love about it is that “private” is in the descriptor. It’s actually what Chrome uses for its private browsing, or “Incognito” mode.

I knew what this meant when I first saw it. There’s a level of privacy represented here. It’s essentially someone who doesn’t want to be recognized and is obscuring their identity.

My mixed emotions are for a few reasons. First off, why is it that those who have to protect their privacy are the ones who need to look like they are spying on others and cover themselves with hats, sunglasses, and coats? Secondly, the detective is not minimal enough; there is a lot of detail to take in.

When we consider a pictograph, we can’t just consider it in a standalone context. It has to go well with the others in a group setting. Although the detective’s face doesn’t stand out much, it is not as minimal as the others, and that can lead to too many derivatives.

A very minimal icon, like the now-classic (it wasn’t always the case) hamburger menu, gives less leeway for customization, which, in turn, protects that icon from being cosmetically changed into something that it’s not. What if somebody makes a variation of the detective, giving him a straw hat and a Hawaiian shirt? He would look more like a tourist hiding from the sun than someone who’s incognito. Yes, both can be true at the same time, but I don’t want to give him that much credit.

That said, I’ll definitely consider this icon if I were to put together a set of ornate pictographs to be used in an application. This one would be right at home in that context.

The Zorro Mask Icon

I was going to call it an eye mask, but that gives me a mental picture of people sleeping in airplanes. That term is taken. With some online searching, I found the formal name for this Zorro-esque accessory is called a domino mask.

I’m going with the Zorro mask.

I like this icon for two reasons: It’s minimal, and it’s decipherable. It’s like a classy version of the detective, as in it’s not a full-on cover-up. It appears less “shady,” so to speak.

But does the Zorro mask unambiguously mean “privacy”? Although it does distinguish itself from the full-face mask icon that usually represents drama and acting (🎭), its association with theater is not totally non-existent. Mask-related icons have long been the adopted visual for conveying theater. The gap in meaning between privacy and theater is so great that there’s too much room for confusion and for it to appear out of context.

It does, however, have potential. If every designer were to begin employing the Zorro mask to represent privacy in interfaces, then users would learn to associate the mask with privacy just as effectively as a magnifying glass icon is to search.

In the end, though, this journey is not about me trying to guess what works in a perfect world but me in search of the “perfect” privacy pictograph available right now, and I don’t feel like it’s ended with the Zorro mask.

The Shield Icon

No. Just no.

Here’s why. The shield, just like the lock, is exceptionally well established as a visual for antivirus software or any defense against malicious software. It works extremely well in that context. Any security-related application can proudly don a shield to establish trust in the app’s ability to defend against attacks.

Again, there is no association with “secluded from public view” or “freedom from intrusion” here. Privacy can certainly be a form of defense, but given the other options we’ve seen so far, a shield is not the strongest association we can find.

Some New Ideas

If we’re striking out with existing icons, then we might consider conceiving our own! It doesn’t hurt to consider new options. I have a few ideas with varying degrees of effectiveness.

The Blurred User Icon

The idea is that a user is sitting behind some sort of satin texture or frosted glass. That could be a pretty sleek visual for someone who is unrecognizable and able to move about freely without intrusion.

I like the subtlety of this concept. The challenge, though, is two-fold:

The blurriness could get lost, or worse, distorted, when the icon is applied at a small size.
Similarly, it might look like a poor, improperly formatted image file that came out pixelated.

This idea has promise, for sure, but clearly (pun intended), not without shortcomings.

The Venetian Blind Icon

I can also imagine how a set of slatted blinds could be an effective visual for privacy. It blocks things out of view, but not in an act of defense, like the shield, or a locked encasing, such as the padlock.

Another thing I really like about this direction is that it communicates the ability to toggle privacy as a setting. Want privacy? Close the blinds and walk freely about your house. Want guests? Lift the blinds and welcome in the daylight!

At the same time, I feel like my attempt or execution suffers from the same fate as the detective icon. While I love the immediate association with privacy, it offers too much visual detail that could easily get lost in translation at a smaller size, just as it does with the detective.

The Picket Fence Icon

We’ve likened privacy to someone being positioned behind a hedge, so what if we riff on that and attempt something similar: a fence?

I like this one. For me, it fits the purpose just as well and effectively as the Zorro mask, perhaps better. It’s something that separates (or secludes) two distinct areas that prevent folks from looking in or hopping over. This is definitely a form of privacy.

Thinking back to The Norman Nielsen Group’s assertion that universally recognized icons are a rarity, the only issue I see with the fence is that it is not a well-established symbol. I remember seeing an icon of a castle wall years ago, but I have never seen a fence used in a user interface. So, it would take some conditioning for the fence to make that association.

So, Which One Should I Use?

We’ve looked at quite a few options! It’s not like we’ve totally exhausted our options, either, but we’ve certainly touched on a number of possibilities while considering some new ideas. I really wish there was some instantly recognizable visual that screams “privacy” at any size, whether it’s the largest visual in the interface or a tiny 30px×30px icon. Instead, I feel like everything falls somewhere in the middle of a wide spectrum.

Here’s the spoiler: I chose the Zorro mask. And I chose it for all the reasons we discussed earlier. It’s recognizable, is closely associated with “masking” an identity, and conveys that a user is freely able to move about without intrusion. Is it perfect? No. But I think it’s the best fit given the options we’ve considered.

Deep down, I really wanted to choose the fence icon. It’s the perfect metaphor for privacy, which is an instantly recognizable part of everyday life. But as something that is a new idea and that isn’t in widespread use, I feel it would take more cognitive load to make out what it is conveying than it’s worth — at least for now.

And if neither the Zorro mask nor the fence fit for a given purpose, I’m most likely to choose a pictograph of the exact feature used to provide privacy: encryption, selective visibility, or biometrics. Like, if there’s a set of privacy-related features that needs to be communicated for a product — perhaps for a password manager or the like — it might be beneficial to include a set of icons that can represent those features collectively.

An absolutely perfect pictograph is something that’s identifiable to any user, regardless of past experiences or even the language they speak.

Do you know how the “OK” hand sign (👌) is universally understood as a good thing, or how you know how to spot the food court in an airport with a fork and knife icon? That would be the ideal situation. Yet, for contemporary notions, like online privacy, that sort of intuitiveness is more of a luxury.

But with consistency and careful consideration, we can adopt new ideas and help users understand the visual over time. It has to reach a point where the icon is properly enhancing the content rather than the other way around, and that takes a level of commitment and execution that doesn’t happen overnight.

What do you think about my choice? This is merely how I’ve approached the challenge. I shared my thought process and the considerations that influenced my decisions. How would you have approached it, and what would you have decided in the end?

Image Layer Animations with Clip-Path

Original Source: https://tympanus.net/codrops/2023/10/31/image-layer-animations-with-clip-path/

Some ideas for speedy page transition animations with layered images using clip-path.

A Complete Guide to LangChain in JavaScript

Original Source: https://www.sitepoint.com/langchain-javascript-complete-guide/?utm_source=rss

A Complete Guide to LangChain in JavaScript

Learn about the essential components of LangChain — agents, models, chunks, chains — and how to harness the power of LangChain in JavaScript.

Continue reading
A Complete Guide to LangChain in JavaScript
on SitePoint.

How to Turn Gmail into an Online Storage

Original Source: https://www.hongkiat.com/blog/gmail-as-online-storage/

While Gmail isn’t designed to be a storage service, you can still use it to keep files, especially by linking it with Google Drive.

In this guide, we’ll show you an easy way to turn Gmail into your own storage space. Whether it’s for securing vital documents or storing precious pictures, this unique approach provides another option for handling your digital belongings.

Gmail as online storageGmail as online storage

1. Google Drive Integration

Gmail and Google Drive work together seamlessly. This connection makes it super easy to handle email attachments by saving them straight to Google Drive.

Let’s say you get an email with an important document or photo attached. Instead of downloading it to your computer, there’s a smarter way to handle it.

Hover your mouse over the attachment at the bottom of the email. You’ll see an icon that looks like a triangle pointing up – that’s the “Add to Drive” button. Click it, and just like that, your attachment is saved to Google Drive.

Add to DriveAdd to Drive

Once it’s in Google Drive, you can sort it into folders, share it with friends, or open it from any internet-connected device. This means you can check or change your files from your phone, tablet, or another computer, without needing to use USB drives or send files by email.

2. Sending Files to Yourself

Sending files to your own email is a clever workaround to use Gmail as a storage space, keeping your computer free from clutter. It’s like turning your Gmail into a personal locker for all sorts of files.

After you send the email, it’ll show up in your inbox. You can either leave it there or move it to a specific folder to stay organized. The coolest part? You can get to these emails and their attachments from any device where you can open your Gmail.

3. Creating a Storage Label

Gmail’s labels are great for sorting emails, and they’re super handy for organizing files you want to keep. Set up a special label just for storage, and you’ll have all your files tidy and easy to find.

Want to know how to create and use labels in Gmail? Check out this helpful article.

4. Utilize Google Workspace

If you have Google Workspace (the new name for G Suite), there’s a cool feature that really boosts how you store and share files: shared drives in Google Drive.

Shared drives are part of Google Drive but with extra features for teamwork. Files in shared drives belong to the whole team, not just one person. So, if someone leaves, the files stay put for everyone else. If you’re on Google Workspace, you can make a shared drive.

Just go to Google Drive, find “Shared drives” on the left, and set up a new one. Name it for your project or team.

Create share driveCreate share drive

Once your shared drive is ready, you can add files and folders. These could be documents, spreadsheets, slides, or any file type. Shared drives make it a breeze to share these with your team. You can also control who gets to see, comment on, or edit each file.

5. Using Google Drive Directly

While linking Gmail with Google Drive is handy for storing files, using Google Drive on its own is often simpler and more effective for online storage.

Google Drive lets you upload files and folders straight from your computer or mobile. You can drag and drop files into Drive or use the upload button. It accepts various file types like documents, images, videos, and more.

Once your files are in Drive, you can organize them your way. Create folders and subfolders to sort your files, making them easy to find and manage. For example, you could have different folders for personal stuff, work projects, photos, and so on.

Conclusion

Using Gmail’s free space is just one way to save files online instead of on your computer. And remember, there are other cloud storage options like Dropbox, OneDrive, and more. Check out our article on cloud storage comparison.

And if you prefer to send files to friends or colleagues instead of storing them online or on your PC, take a look at these tools that let you send large files online.

The post How to Turn Gmail into an Online Storage appeared first on Hongkiat.

A Guide to Using MSSQL with Node.js

Original Source: https://www.sitepoint.com/mssql-with-node-js/?utm_source=rss

A Guide to Using MSSQL with Node.js

By combining the versatility of Node.js with the robustness of SQL Server, you can harness the advantages of both technologies.

Continue reading
A Guide to Using MSSQL with Node.js
on SitePoint.

Passkeys: A No-Frills Explainer On The Future Of Password-Less Authentication

Original Source: https://smashingmagazine.com/2023/10/passkeys-explainer-future-password-less-authentication/

Passkeys are a new way of authenticating applications and websites. Instead of having to remember a password, a third-party service provider (e.g., Google or Apple) generates and stores a cryptographic key pair that is bound to a website domain. Since you have access to the service provider, you have access to the keys, which you can then use to log in.

This cryptographic key pair contains both private and public keys that are used for authenticating messages. These key pairs are often known as asymmetric or public key cryptography.

Public and private key pair? Asymmetric cryptography? Like most modern technology, passkeys are described by esoteric verbiage and acronyms that make them difficult to discuss. That’s the point of this article. I want to put the complex terms aside and help illustrate how passkeys work, explain what they are effective at, and demonstrate what it looks like to work with them.

How Passkeys Work

Passkeys are cryptographic keys that rely on generating signatures. A signature is proof that a message is authentic. How so? It happens first by hashing (a fancy term for “obscuring”) the message and then creating a signature from that hash with your private key. The private key in the cryptographic key pair allows the signature to be generated, and the public key, which is shared with others, allows the service to verify that the message did, in fact, come from you.

In short, passkeys consist of two keys: a public and private. One verifies a signature while the other verifies you, and the communication between them is what grants you access to an account.

Here’s a quick way of generating a signing and verification key pair to authenticate a message using the SubtleCrypto API. While this is only part of how passkeys work, it does illustrate how the concept works cryptographically underneath the specification.

const message = new TextEncoder().encode(“My message”);

const keypair = await crypto.subtle.generateKey(
{ name: “ECDSA”, namedCurve: “P-256” },
true,
[ ‘sign’, ‘verify’ ]
);

const signature = await crypto.subtle.sign(
{ name: “ECDSA”, hash: “SHA-256” },
keypair.privateKey,
message
);

// Normally, someone else would be doing the verification using your public key
// but it’s a bit easier to see it yourself this way
console.log(
“Did my private key sign this message?”,
await crypto.subtle.verify(
{ name: “ECDSA”, hash: “SHA-256” },
keypair.publicKey,
signature,
message
)
);

Notice the three parts pulling all of this together:

Message: A message is constructed.
Key pair: The public and private keys are generated. One key is used for the signature, and the other is set to do the verification.
Signature: A signature is signed by the private key, verifying the message’s authenticity.

From there, a third party would authenticate the private key with the public key, verifying the correct pair of keys or key pair. We’ll get into the weeds of how the keys are generated and used in just a bit, but for now, this is some context as we continue to understand why passkeys can potentially erase the need for passwords.

Why Passkeys Can Replace Passwords

Since the responsibility of storing passkeys is removed and transferred to a third-party service provider, you only have to control the “parent” account in order to authenticate and gain access. This is a lot like requiring single sign-on (SSO) for an account via Google, Facebook, or LinkedIn, but instead, we use an account that has control of the passkey stored for each individual website.

For example, I can use my Google account to store passkeys for somerandomwebsite.com. That allows me to prove a challenge by using that passkey’s private key and thus authenticate and log into somerandomwebsite.com.

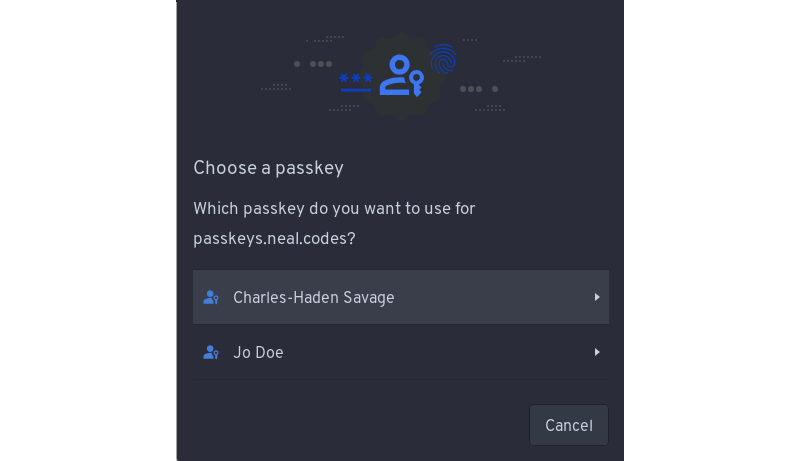
For the non-tech savvy, this typically looks like a prompt that the user can click to log in. Since the credentials (i.e., username and password) are tied to the domain name (somerandomwebsite.com), and passkeys created for a domain name are only accessible to the user at login, the user can select which passkey they wish to use for access. This is usually only one login, but in some cases, you can create multiple logins for a single domain and then select which one you wish to use from there.

So, what’s the downside? Having to store additional cryptographic keys for each login and every site for which you have a passkey often requires more space than storing a password. However, I would argue that the security gains, the user experience from not having to remember a password, and the prevention of common phishing techniques more than offset the increased storage space.

How Passkeys Protect Us

Passkeys prevent a couple of security issues that are quite common, specifically leaked database credentials and phishing attacks.

Database Leaks

Have you ever shared a password with a friend or colleague by copying and pasting it for them in an email or text? That could lead to a security leak. So would a hack on a system that stores customer information, like passwords, which is then sold on dark marketplaces or made public. In many cases, it’s a weak set of credentials — like an email and password combination — that can be stolen with a fair amount of ease.

Passkeys technology circumvents this because passkeys only store a public key to an account, and as you may have guessed by the name, this key is expected to be made accessible to anyone who wants to use it. The public key is only used for verification purposes and, for the intended use case of passkeys, is effectively useless without the private key to go with it, as the two are generated as a pair. Therefore, those previous juicy database leaks are no longer useful, as they can no longer be used for cracking the password for your account. Cracking a similar private key would take millions of years at this point in time.

Phishing

Passwords rely on knowing what the password is for a given login: anyone with that same information has the same level of access to the same account as you do. There are sophisticated phishing sites that look like they’re by Microsoft or Google and will redirect you to the real provider after you attempt to log into their fake site. The damage is already done at that point; your credentials are captured, and hopefully, the same credentials weren’t being used on other sites, as now you’re compromised there as well.

A passkey, by contrast, is tied to a domain. You gain a new element of security: the fact that only you have the private key. Since the private key is not feasible to remember nor computationally easy to guess, we can guarantee that you are who you say we are (at least as long as your passkey provider is not compromised). So, that fake phishing site? It will not even show the passkey prompt because the domain is different, and thus completely mitigates phishing attempts.

There are, of course, theoretical attacks that can make passkeys vulnerable, like someone compromising your DNS server to send you to a domain that now points to their fake site. That said, you probably have deeper issues to concern yourself with if it gets to that point.

Implementing Passkeys

At a high level, a few items are needed to start using passkeys, at least for the common sign-up and log-in process. You’ll need a temporary cache of some sort, such as redis or memcache, for storing temporary challenges that users can authenticate against, as well as a more permanent data store for storing user accounts and their public key information, which can be used to authenticate the user over the course of their account lifetime. These aren’t hard requirements but rather what’s typical of what would be developed for this kind of authentication process.

To understand passkeys properly, though, we want to work through a couple of concepts. The first concept is what is actually taking place when we generate a passkey. How are passkeys generated, and what are the underlying cryptographic primitives that are being used? The second concept is how passkeys are used to verify information and why that information can be trusted.

Generating Passkeys

A passkey involves an authenticator to generate the key pair. The authenticator can either be hardware or software. For example, it can be a hardware security key, the operating system’s Trusted Platform Module (TPM), or some other application. In the cases of Android or iOS, we can use the device’s secure enclave.

To connect to an authenticator, we use what’s called the Client to Authenticator Protocol (CTAP). CTAP allows us to connect to hardware over different connections through the browser. For example, we can connect via CTAP using an NFC, Bluetooth, or a USB connection. This is useful in cases where we want to log in on one device while another device contains our passkeys, as is the case on some operating systems that do not support passkeys at the time of writing.

A passkey is built off another web API called WebAuthn. While the APIs are very similar, the WebAuthn API differs in that passkeys allow for cloud syncing of the cryptographic keys and do not require knowledge of whom the user is to log in, as that information is stored in a passkey with its Relying Party (RP) information. The two APIs otherwise share the same flows and cryptographic operations.

Storing Passkeys

Let’s look at an extremely high-level overview of how I’ve stored and kept track of passkeys in my demo repo. This is how the database is structured.

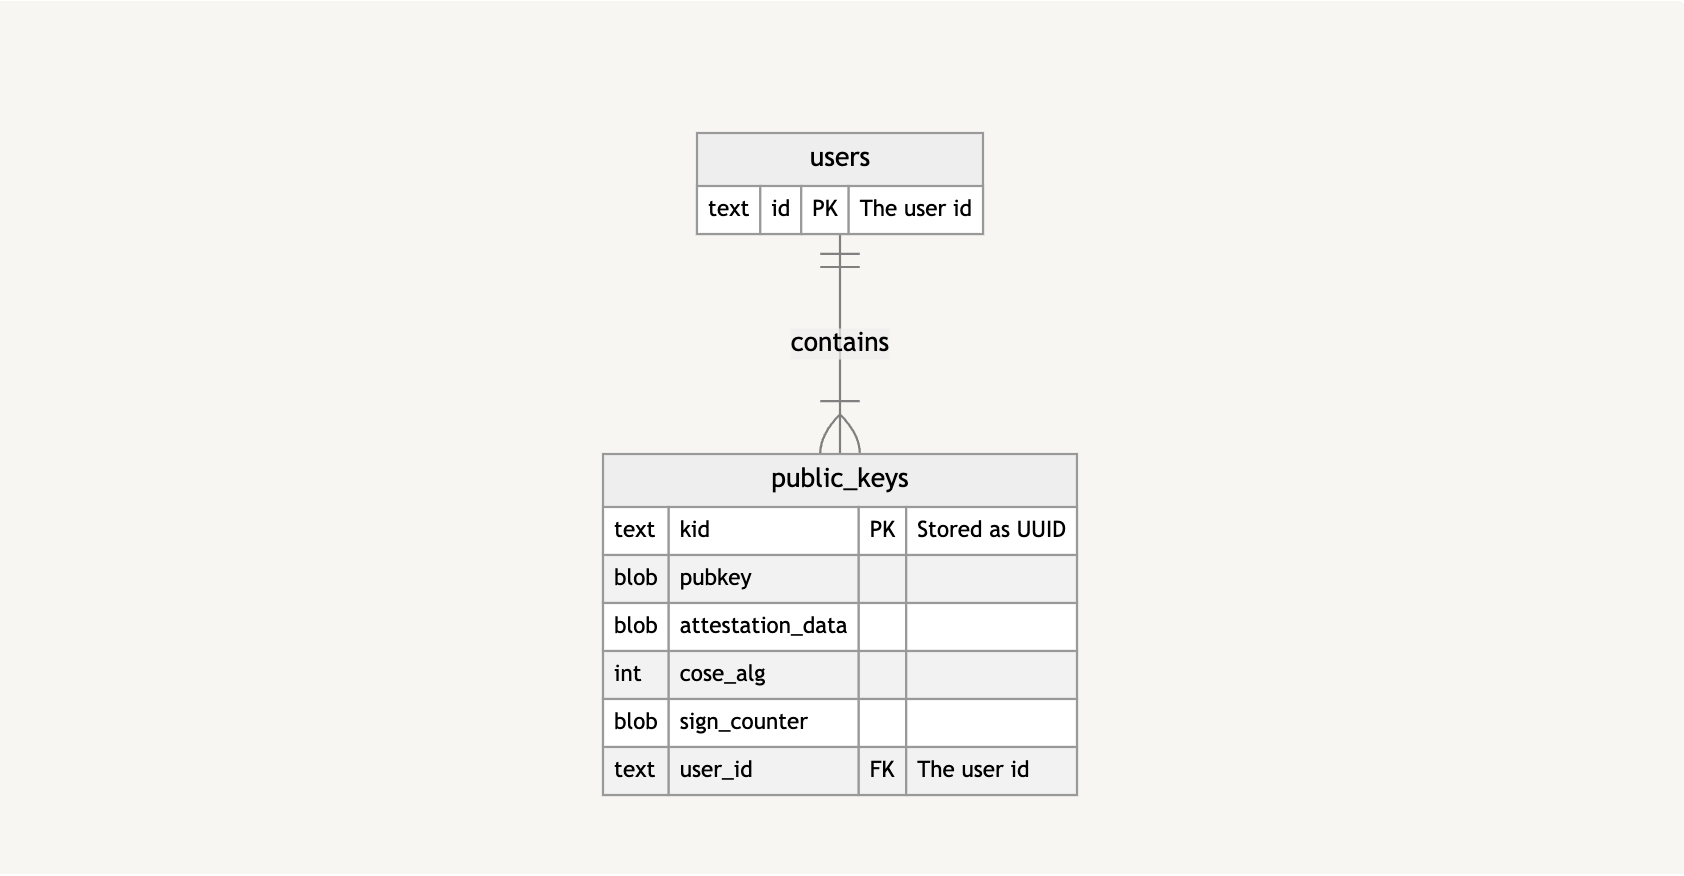
Basically, a users table has public_keys, which, in turn, contains information about the public key, as well as the public key itself.

From there, I’m caching certain information, including challenges to verify authenticity and data about the sessions in which the challenges take place.

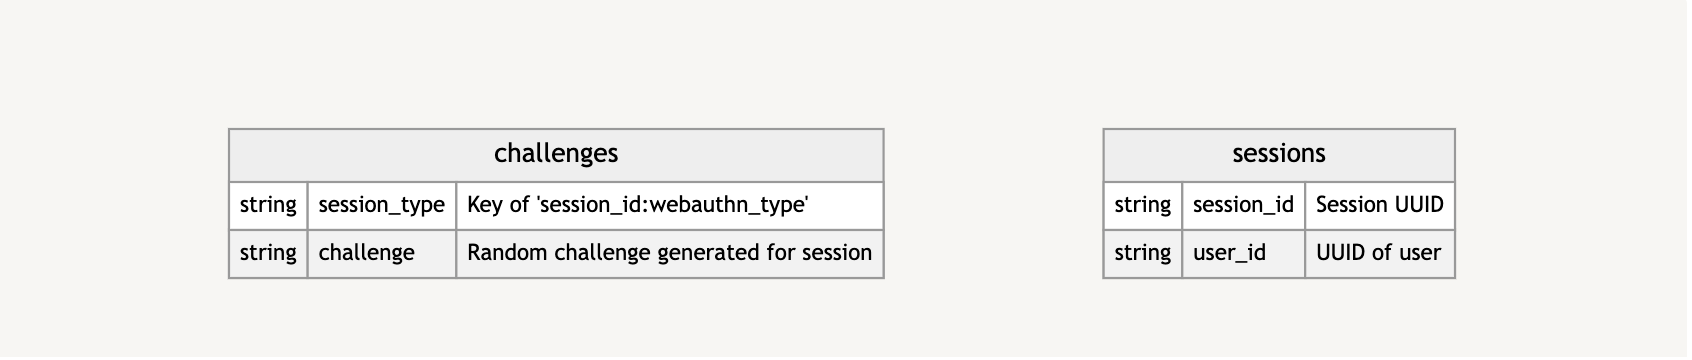
Again, this is only a high-level look to give you a clearer idea of what information is stored and how it is stored.

Verifying Passkeys

There are several entities involved in passkey:

The authenticator, which we previously mentioned, generates our key material.
The client that triggers the passkey generation process via the navigator.credentials.create call.
The Relying Party takes the resulting public key from that call and stores it to be used for subsequent verification.

In our case, you are the client and the Relying Party is the website server you are trying to sign up and log into. The authenticator can either be your mobile phone, a hardware key, or some other device capable of generating your cryptographic keys.

Passkeys are used in two phases: the attestation phase and the assertion phase. The attestation phase is likened to a registration that you perform when first signing up for a service. Instead of an email and password, we generate a passkey.

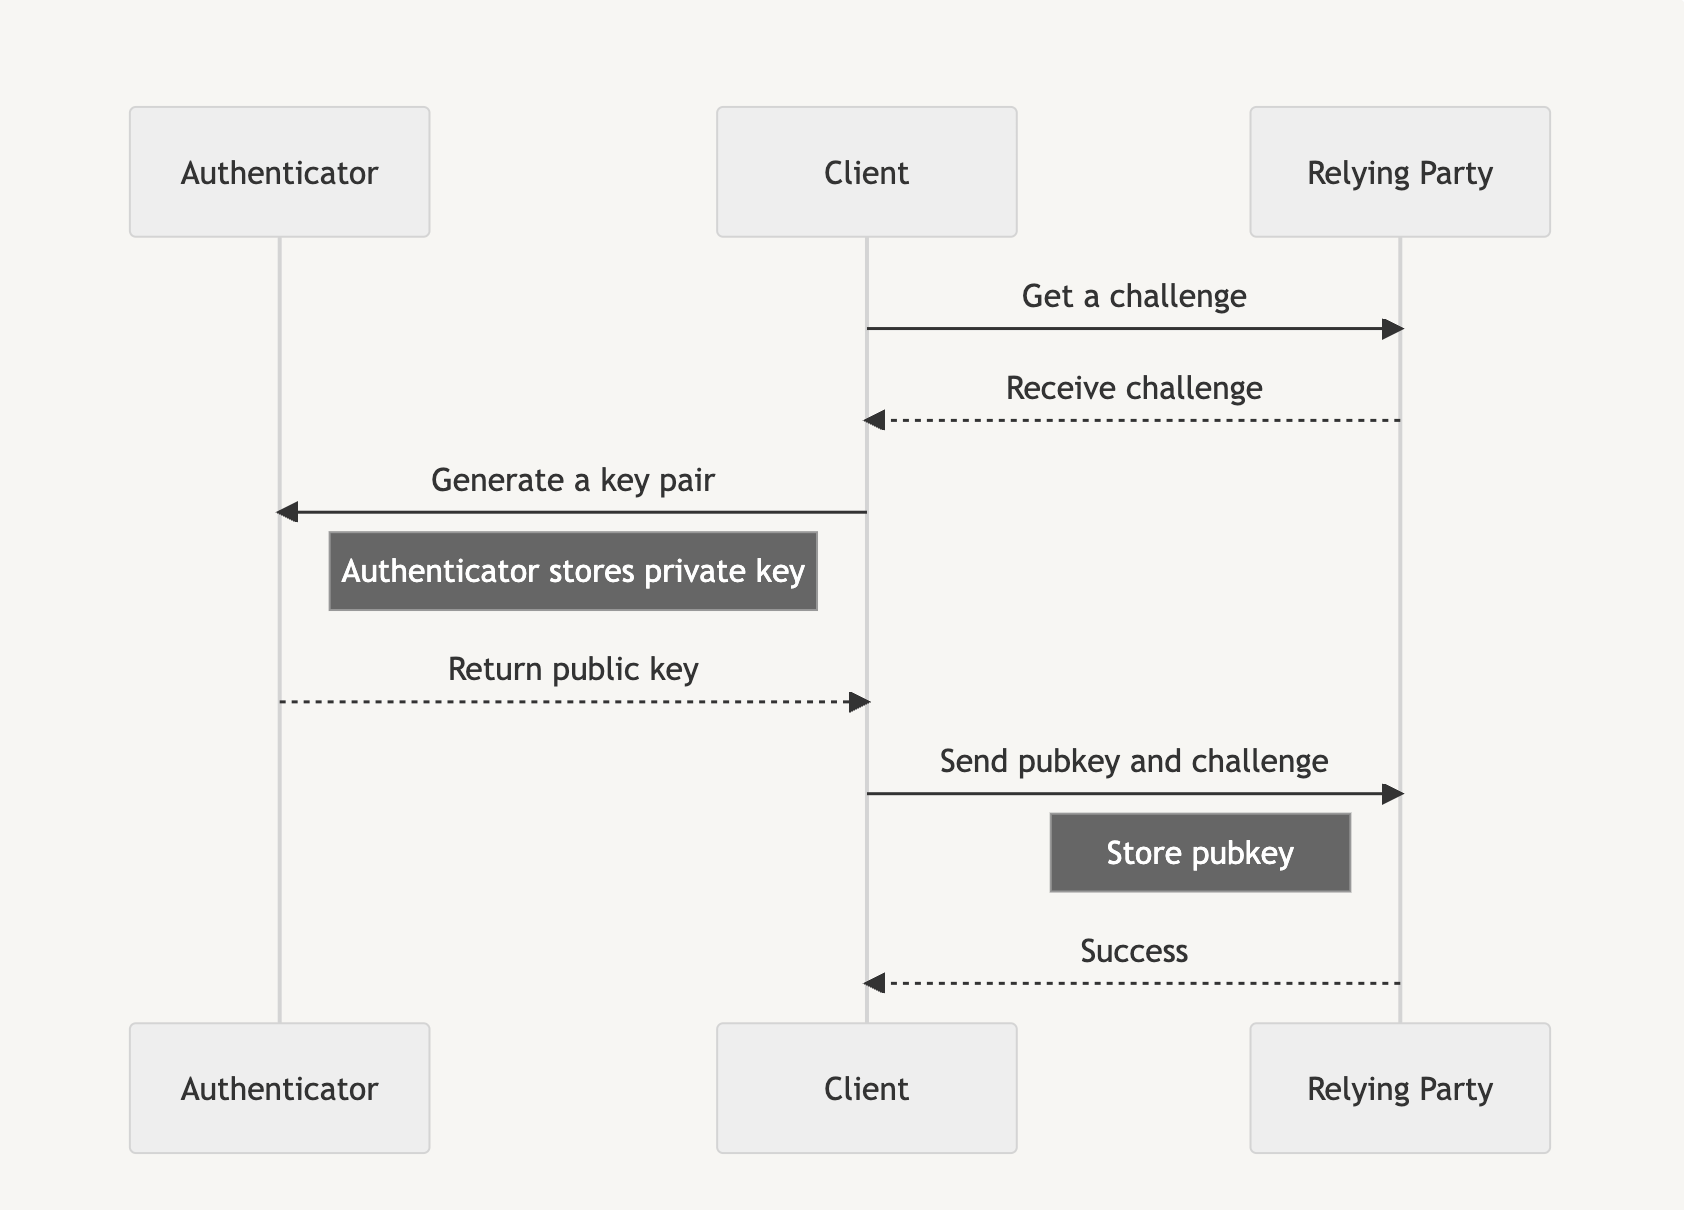
Assertion is similar to logging in to a service after we are registered, and instead of verifying with a username and password, we use the generated passkey to access the service.

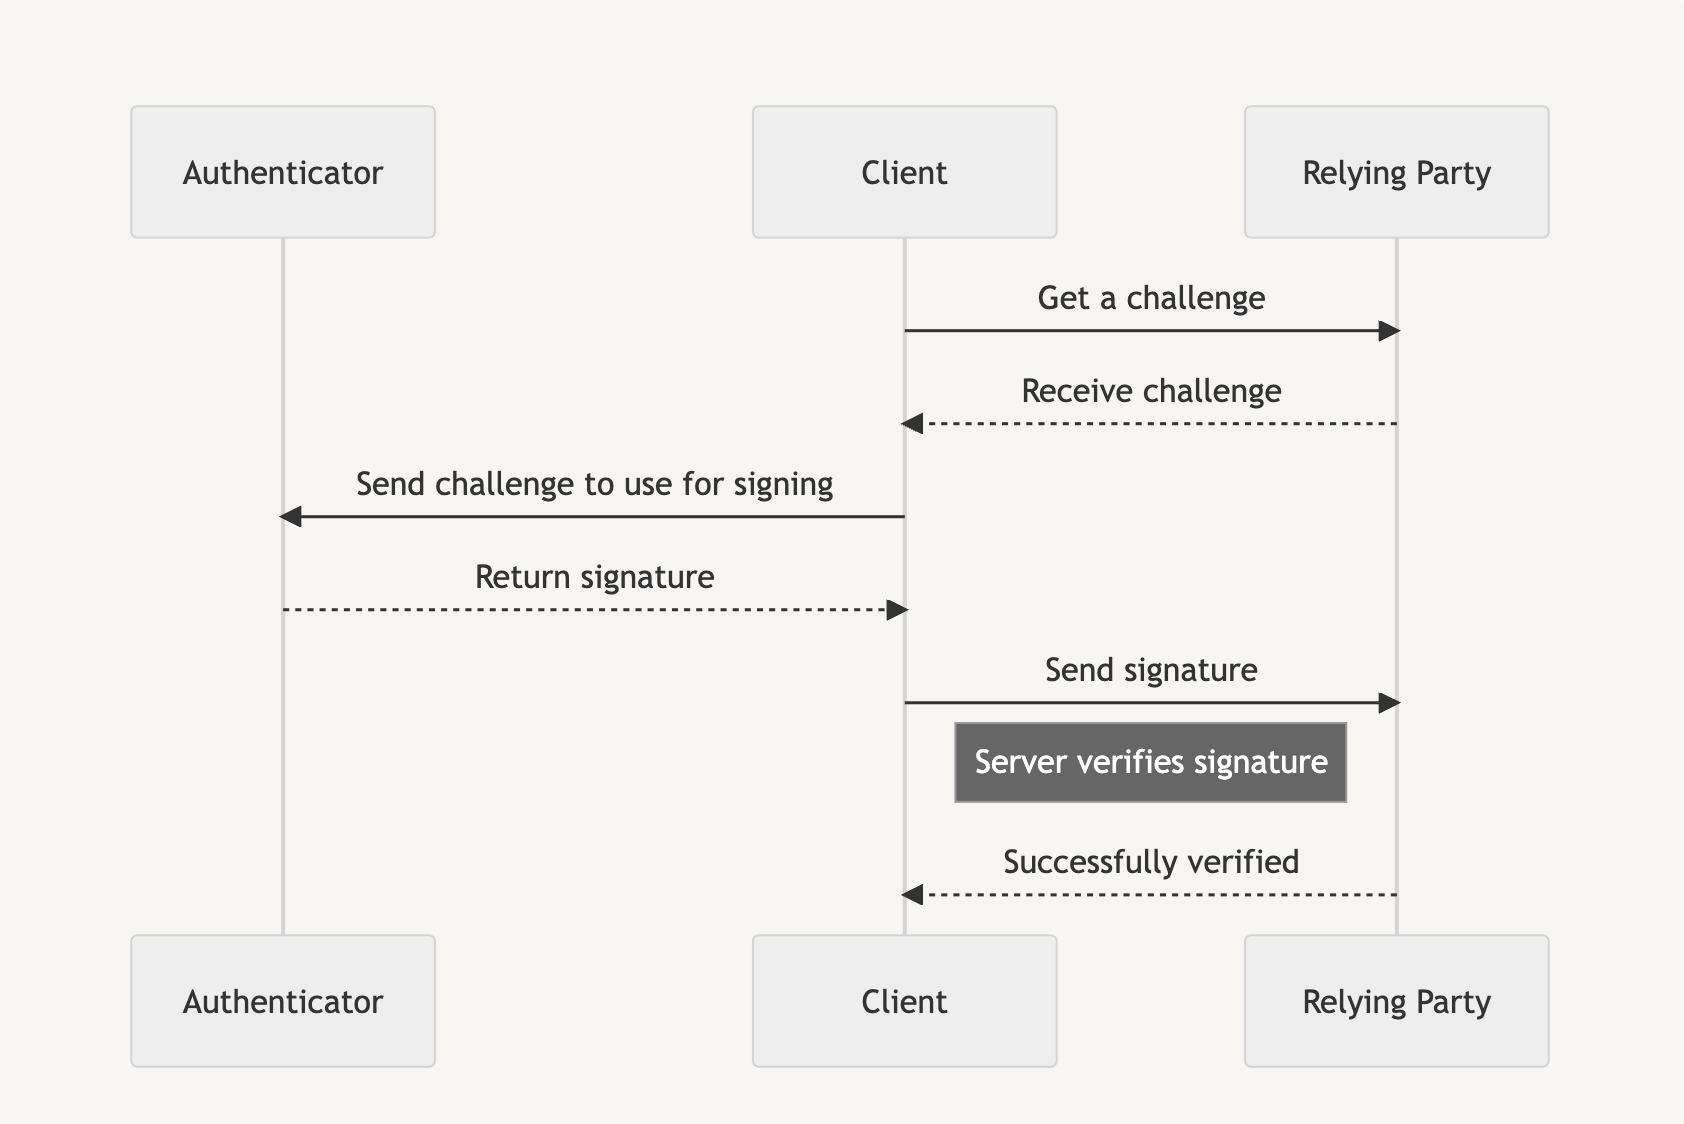
Each phase initially requires a random challenge generated by the Relying Party, which is then signed by the authenticator before the client sends the signature back to the Relying Party to prove account ownership.

Browser API Usage

We’ll be looking at how the browser constructs and supplies information for passkeys so that you can store and utilize it for your login process. First, we’ll start with the attestation phase and then the assertion phase.

Attest To It

The following shows how to create a new passkey using the navigator.credentials.create API. From it, we receive an AuthenticatorAttestationResponse, and we want to send portions of that response to the Relying Party for storage.

const { challenge } = await (await fetch(“/attestation/generate”)).json(); // Server call mock to get a random challenge

const options = {
// Our challenge should be a base64-url encoded string
challenge: new TextEncoder().encode(challenge),
rp: {
id: window.location.host,
name: document.title,
},
user: {
id: new TextEncoder().encode(“my-user-id”),
name: ‘John’,
displayName: ‘John Smith’,
},
pubKeyCredParams: [ // See COSE algorithms for more: https://www.iana.org/assignments/cose/cose.xhtml#algorithms
{
type: ‘public-key’,
alg: -7, // ES256
},
{
type: ‘public-key’,
alg: -256, // RS256
},
{
type: ‘public-key’,
alg: -37, // PS256
},
],
authenticatorSelection: {
userVerification: ‘preferred’, // Do you want to use biometrics or a pin?
residentKey: ‘required’, // Create a resident key e.g. passkey
},
attestation: ‘indirect’, // indirect, direct, or none
timeout: 60_000,
};

// Create the credential through the Authenticator
const credential = await navigator.credentials.create({
publicKey: options
});

// Our main attestation response. See: https://developer.mozilla.org/en-US/docs/Web/API/AuthenticatorAttestationResponse
const attestation = credential.response as AuthenticatorAttestationResponse;

// Now send this information off to the Relying Party
// An unencoded example payload with most of the useful information
const payload = {
kid: credential.id,
clientDataJSON: attestation.clientDataJSON,
attestationObject: attestation.attestationObject,
pubkey: attestation.getPublicKey(),
coseAlg: attestation.getPublicKeyAlgorithm(),
};

The AuthenticatorAttestationResponse contains the clientDataJSON as well as the attestationObject. We also have a couple of useful methods that save us from trying to retrieve the public key from the attestationObject and retrieving the COSE algorithm of the public key: getPublicKey and getPublicKeyAlgorithm.

Let’s dig into these pieces a little further.

Parsing The Attestation clientDataJSON

The clientDataJSON object is composed of a few fields we need. We can convert it to a workable object by decoding it and then running it through JSON.parse.

type DecodedClientDataJSON = {
challenge: string,
origin: string,
type: string
};

const decoded: DecodedClientDataJSON = JSON.parse(new TextDecoder().decode(attestation.clientDataJSON));
const {
challenge,
origin,
type
} = decoded;

Now we have a few fields to check against: challenge, origin, type.

Our challenge is the Base64-url encoded string that was passed to the server. The origin is the host (e.g., https://my.passkeys.com) of the server we used to generate the passkey. Meanwhile, the type is webauthn.create. The server should verify that all the values are expected when parsing the clientDataJSON.

Decoding TheattestationObject

The attestationObject is a CBOR encoded object. We need to use a CBOR decoder to actually see what it contains. We can use a package like cbor-x for that.

import { decode } from ‘cbor-x/decode’;

enum DecodedAttestationObjectFormat {
none = ‘none’,
packed = ‘packed’,
}
type DecodedAttestationObjectAttStmt = {
x5c?: Uint8Array[];
sig?: Uint8Array;
};

type DecodedAttestationObject = {
fmt: DecodedAttestationObjectFormat;
authData: Uint8Array;
attStmt: DecodedAttestationObjectAttStmt;
};

const decodedAttestationObject: DecodedAttestationObject = decode(
new Uint8Array(attestation.attestationObject)
);

const {
fmt,
authData,
attStmt,
} = decodedAttestationObject;

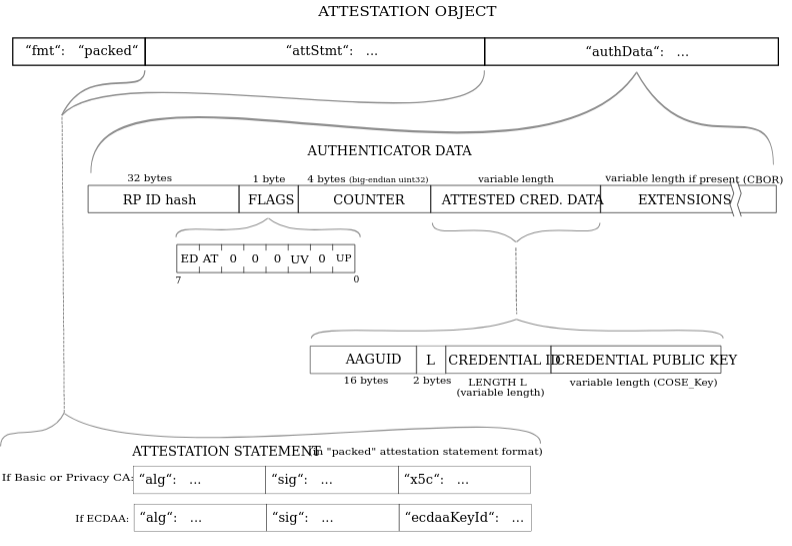
fmt will often be evaluated to “none” here for passkeys. Other types of fmt are generated through other types of authenticators.

Accessing authData

The authData is a buffer of values with the following structure:
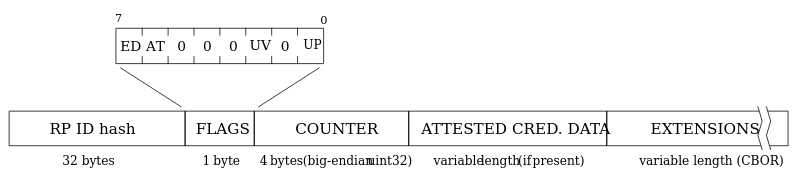
Name
Length (bytes)
Description

rpIdHash
32
This is the SHA-256 hash of the origin, e.g., my.passkeys.com.

flags
1
Flags determine multiple pieces of information (specification).

signCount
4
This should always be 0000 for passkeys.

attestedCredentialData
variable
This will contain credential data if it’s available in a COSE key format.

extensions
variable
These are any optional extensions for authentication.

It is recommended to use the getPublicKey method here instead of manually retrieving the attestedCredentialData.

A Note About The attStmt Object

This is often an empty object for passkeys. However, in other cases of a packed format, which includes the sig, we will need to perform some authentication to verify the sig. This is out of the scope of this article, as it often requires a hardware key or some other type of device-based login.

Retrieving The Encoded Public Key

The getPublicKey method can retrieve the Subject Public Key Info (SPKI) encoded version of the public key, which is a different from the COSE key format (more on that next) within the attestedCredentialData that the decodedAttestationObject.attStmt has. The SPKI format has the benefit of being compatible with a Web Crypto importKey function to more easily verify assertion signatures in the next phase.

// Example of importing attestation public key directly into Web Crypto
const pubkey = await crypto.subtle.importKey(
‘spki’,
attestation.getPublicKey(),
{ name: “ECDSA”, namedCurve: “P-256” },
true,
[‘verify’]
);

Generating Keys With COSE Algorithms

The algorithms that can be used to generate cryptographic material for a passkey are specified by their COSE Algorithm. For passkeys generated for the web, we want to be able to generate keys using the following algorithms, as they are supported natively in Web Crypto. Personally, I prefer ECDSA-based algorithms since the key sizes are quite a bit smaller than RSA keys.

The COSE algorithms are declared in the pubKeyCredParams array within the AuthenticatorAttestationResponse. We can retrieve the COSE algorithm from the attestationObject with the getPublicKeyAlgorithm method. For example, if getPublicKeyAlgorithm returned -7, we’d know that the key used the ES256 algorithm.

Name
Value
Description

ES512
-36
ECDSA w/ SHA-512

ES384
-35
ECDSA w/ SHA-384

ES256
-7
ECDSA w/ SHA-256

RS512
-259
RSASSA-PKCS1-v1_5 using SHA-512

RS384
-258
RSASSA-PKCS1-v1_5 using SHA-384

RS256
-257
RSASSA-PKCS1-v1_5 using SHA-256

PS512
-39
RSASSA-PSS w/ SHA-512

PS384
-38
RSASSA-PSS w/ SHA-384

PS256
-37
RSASSA-PSS w/ SHA-256

Responding To The Attestation Payload

I want to show you an example of a response we would send to the server for registration. In short, the safeByteEncode function is used to change the buffers into Base64-url encoded strings.

type AttestationCredentialPayload = {
kid: string;
clientDataJSON: string;
attestationObject: string;
pubkey: string;
coseAlg: number;
};

const payload: AttestationCredentialPayload = {
kid: credential.id,
clientDataJSON: safeByteEncode(attestation.clientDataJSON),
attestationObject: safeByteEncode(attestation.attestationObject),
pubkey: safeByteEncode(attestation.getPublicKey() as ArrayBuffer),
coseAlg: attestation.getPublicKeyAlgorithm(),
};

The credential id (kid) should always be captured to look up the user’s keys, as it will be the primary key in the public_keys table.

From there:

The server would check the clientDataJSON to ensure the same challenge is used.
The origin is checked, and the type is set to webauthn.create.
We check the attestationObject to ensure it has an fmt of none, the rpIdHash of the authData, as well as any flags and the signCount.

Optionally, we could check to see if the attestationObject.attStmt has a sig and verify the public key against it, but that’s for other types of WebAuthn flows we won’t go into.

We should store the public key and the COSE algorithm in the database at the very least. It is also beneficial to store the attestationObject in case we require more information for verification. The signCount is always incremented on every login attempt if supporting other types of WebAuthn logins; otherwise, it should always be for 0000 for a passkey.

Asserting Yourself

Now we have to retrieve a stored passkey using the navigator.credentials.get API. From it, we receive the AuthenticatorAssertionResponse, which we want to send portions of to the Relying Party for verification.

const { challenge } = await (await fetch(“/assertion/generate”)).json(); // Server call mock to get a random challenge

const options = {
challenge: new TextEncoder().encode(challenge),
rpId: window.location.host,
timeout: 60_000,
};

// Sign the challenge with our private key via the Authenticator
const credential = await navigator.credentials.get({
publicKey: options,
mediation: ‘optional’,
});

// Our main assertion response. See: <https://developer.mozilla.org/en-US/docs/Web/API/AuthenticatorAssertionResponse>
const assertion = credential.response as AuthenticatorAssertionResponse;

// Now send this information off to the Relying Party
// An example payload with most of the useful information
const payload = {
kid: credential.id,
clientDataJSON: safeByteEncode(assertion.clientDataJSON),
authenticatorData: safeByteEncode(assertion.authenticatorData),
signature: safeByteEncode(assertion.signature),
};

The AuthenticatorAssertionResponse again has the clientDataJSON, and now the authenticatorData. We also have the signature that needs to be verified with the stored public key we captured in the attestation phase.

Decoding The Assertion clientDataJSON

The assertion clientDataJSON is very similar to the attestation version. We again have the challenge, origin, and type. Everything is the same, except the type is now webauthn.get.

type DecodedClientDataJSON = {
challenge: string,
origin: string,
type: string
};

const decoded: DecodedClientDataJSON = JSON.parse(new TextDecoder().decode(assertion.clientDataJSON));
const {
challenge,
origin,
type
} = decoded;

Understanding The authenticatorData

The authenticatorData is similar to the previous attestationObject.authData, except we no longer have the public key included (e.g., the attestedCredentialData ), nor any extensions.

Name
Length (bytes)
Description

rpIdHash
32
This is a SHA-256 hash of the origin, e.g., my.passkeys.com.

flags
1
Flags that determine multiple pieces of information (specification).

signCount
4
This should always be 0000 for passkeys, just as it should be for authData.

Verifying The signature

The signature is what we need to verify that the user trying to log in has the private key. It is the result of the concatenation of the authenticatorData and clientDataHash (i.e., the SHA-256 version of clientDataJSON).

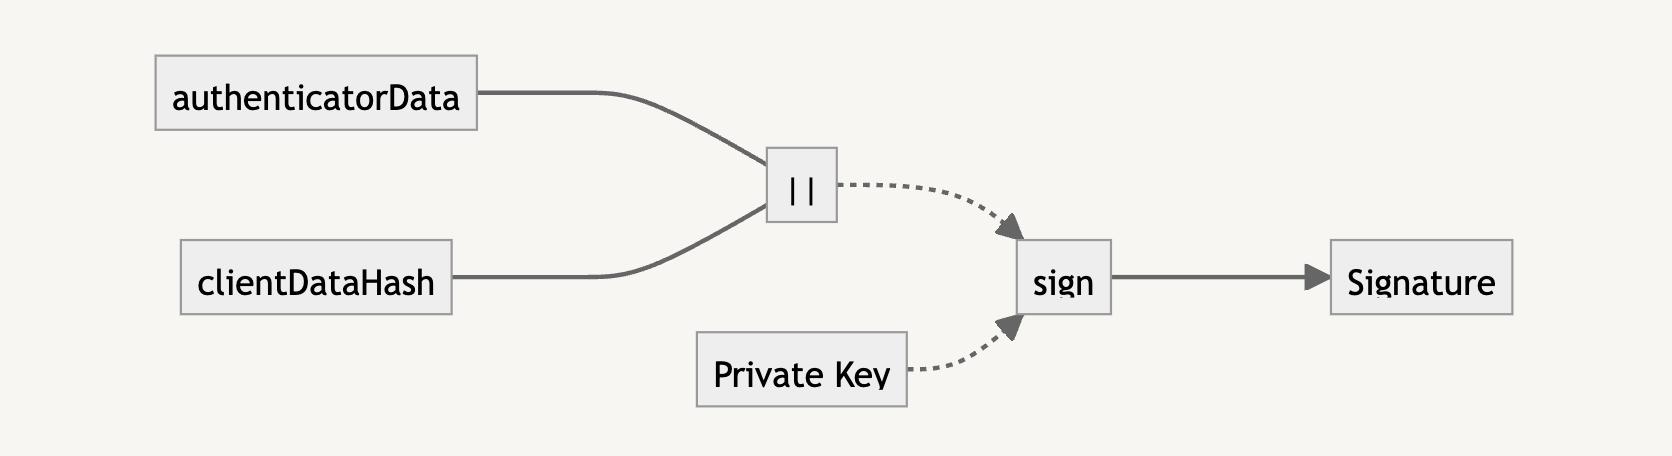
To verify with the public key, we need to also concatenate the authenticatorData and clientDataHash. If the verification returns true, we know that the user is who they say they are, and we can let them authenticate into the application.

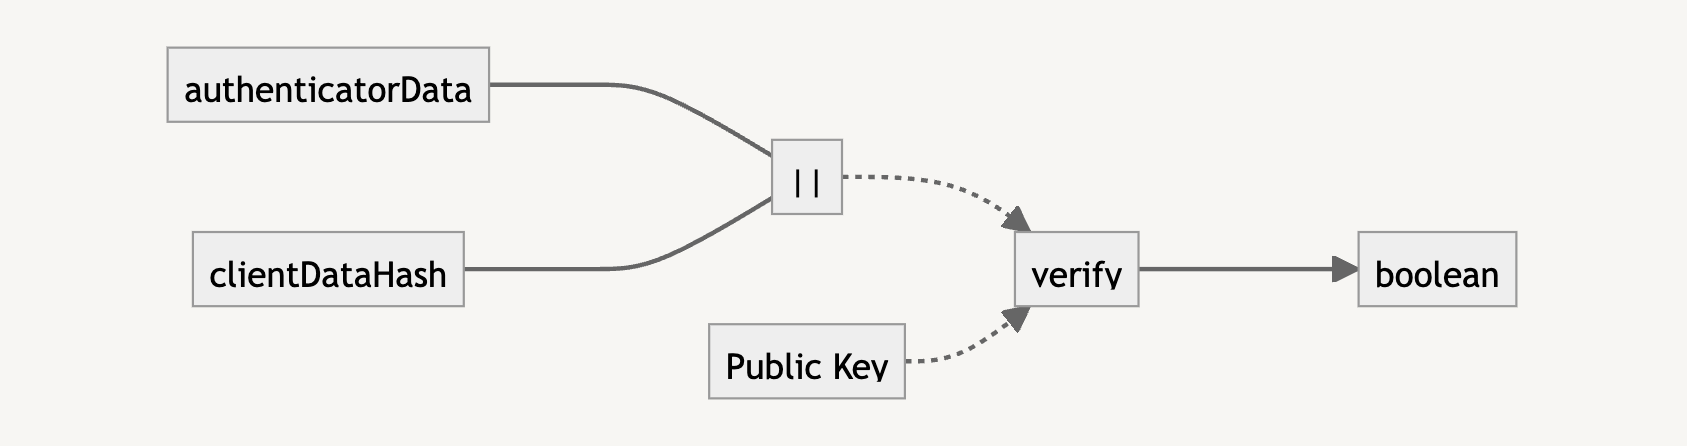
Here’s an example of how this is calculated:

const clientDataHash = await crypto.subtle.digest(
‘SHA-256′,
assertion.clientDataJSON
);
// For concatBuffer see: <https://github.com/nealfennimore/passkeys/blob/main/src/utils.ts#L31>
const data = concatBuffer(
assertion.authenticatorData,
clientDataHash
);

// NOTE: the signature from the assertion is in ASN.1 DER encoding. To get it working with Web Crypto
//We need to transform it into r|s encoding, which is specific for ECDSA algorithms)
//
// For fromAsn1DERtoRSSignature see: <https://github.com/nealfennimore/passkeys/blob/main/src/crypto.ts#L60>’
const isVerified = await crypto.subtle.verify(
{ name: ‘ECDSA’, hash: ‘SHA-256’ },
pubkey,
fromAsn1DERtoRSSignature(signature, 256),
data
);

Sending The Assertion Payload

Finally, we get to send a response to the server with the assertion for logging into the application.

type AssertionCredentialPayload = {
kid: string;
clientDataJSON: string;
authenticatorData: string;
signature: string;
};

const payload: AssertionCredentialPayload = {
kid: credential.id,
clientDataJSON: safeByteEncode(assertion.clientDataJSON),
authenticatorData: safeByteEncode(assertion.authenticatorData),
signature: safeByteEncode(assertion.signature),
};

To complete the assertion phase, we first look up the stored public key, kid.

Next, we verify the following:

clientDataJSON again to ensure the same challenge is used,
The origin is the same, and
That the type is webauthn.get.

The authenticatorData can be used to check the rpIdHash, flags, and the signCount one more time. Finally, we take the signature and ensure that the stored public key can be used to verify that the signature is valid.

At this point, if all went well, the server should have verified all the information and allowed you to access your account! Congrats — you logged in with passkeys!

No More Passwords?

Do passkeys mean the end of passwords? Probably not… at least for a while anyway. Passwords will live on. However, there’s hope that more and more of the industry will begin to use passkeys. You can already find it implemented in many of the applications you use every day.

Passkeys was not the only implementation to rely on cryptographic means of authentication. A notable example is SQRL (pronounced “squirrel”). The industry as a whole, however, has decided to move forth with passkeys.

Hopefully, this article demystified some of the internal workings of passkeys. The industry as a whole is going to be using passkeys more and more, so it’s important to at least get acclimated. With all the security gains that passkeys provide and the fact that it’s resistant to phishing attacks, we can at least be more at ease browsing the internet when using them.

From Image Adjustments to AI: Photoshop Through the Years

Original Source: https://www.webdesignerdepot.com/image-adjustments-to-ai-photoshop-through-the-years/

Remember when Merriam-Webster added Photoshop to the dictionary back in 2008? Want to learn how AI is changing design forever? Join us as we delve into the history of Photoshop, from its early beginnings right through to the dawn of artificial intelligence.

3 Essential Design Trends, November 2023

Original Source: https://www.webdesignerdepot.com/essential-design-trends-nov-2023/

In the season of giving thanks, we often think of comfort and tradition. These are common themes with each of our three featured website design trends this month.

The Fight For The Main Thread

Original Source: https://smashingmagazine.com/2023/10/speedcurve-fight-main-thread/

This article is a sponsored by SpeedCurve

Performance work is one of those things, as they say, that ought to happen in development. You know, have a plan for it and write code that’s mindful about adding extra weight to the page.

But not everything about performance happens directly at the code level, right? I’d say many — if not most — sites and apps rely on some number of third-party scripts where we might not have any influence over the code. Analytics is a good example. Writing a hand-spun analytics tracking dashboard isn’t what my clients really want to pay me for, so I’ll drop in the ol’ Google Analytics script and maybe never think of it again.

That’s one example and a common one at that. But what’s also common is managing multiple third-party scripts on a single page. One of my clients is big into user tracking, so in addition to a script for analytics, they’re also running third-party scripts for heatmaps, cart abandonments, and personalized recommendations — typical e-commerce stuff. All of that is dumped on any given page in one fell swoop courtesy of Google Tag Manager (GTM), which allows us to deploy and run scripts without having to go through the pain of re-deploying the entire site.

As a result, adding and executing scripts is a fairly trivial task. It is so effortless, in fact, that even non-developers on the team have contributed their own fair share of scripts, many of which I have no clue what they do. The boss wants something, and it’s going to happen one way or another, and GTM facilitates that work without friction between teams.

All of this adds up to what I often hear described as a “fight for the main thread.” That’s when I started hearing more performance-related jargon, like web workers, Core Web Vitals, deferring scripts, and using pre-connect, among others. But what I’ve started learning is that these technical terms for performance make up an arsenal of tools to combat performance bottlenecks.

The real fight, it seems, is evaluating our needs as developers and stakeholders against a user’s needs, namely, the need for a fast and frictionless page load.

Fighting For The Main Thread

We’re talking about performance in the context of JavaScript, but there are lots of things that happen during a page load. The HTML is parsed. Same deal with CSS. Elements are rendered. JavaScript is loaded, and scripts are executed.

All of this happens on the main thread. I’ve heard the main thread described as a highway that gets cars from Point A to Point B; the more cars that are added to the road, the more crowded it gets and the more time it takes for cars to complete their trip. That’s accurate, I think, but we can take it a little further because this particular highway has just one lane, and it only goes in one direction. My mind thinks of San Francisco’s Lombard Street, a twisty one-way path of a tourist trap on a steep decline.

The main thread may not be that curvy, but you get the point: there’s only one way to go, and everything that enters it must go through it.

JavaScript operates in much the same way. It’s “single-threaded,” which is how we get the one-way street comparison. I like how Brian Barbour explains it:

“This means it has one call stack and one memory heap. As expected, it executes code in order and must finish executing a piece of code before moving on to the next. It’s synchronous, but at times that can be harmful. For example, if a function takes a while to execute or has to wait on something, it freezes everything up in the meantime.”

— Brian Barbour

So, there we have it: a fight for the main thread. Each resource on a page is a contender vying for a spot on the thread and wants to run first. If one contender takes its sweet time doing its job, then the contenders behind it in line just have to wait.

Monitoring The Main Thread

If you’re like me, I immediately reach for DevTools and open the Lighthouse tab when I need to look into a site’s performance. It covers a lot of ground, like reporting stats about a page’s load time that include Time to First Byte (TTFB), First Contentful Paint (FCP), Largest Contentful Paint (LCP), Cumulative Layout Shift (CLS), and so on.

I love this stuff! But I also am scared to death of it. I mean, this is stuff for back-end engineers, right? A measly front-end designer like me can be blissfully ignorant of all this mumbo-jumbo.

Meh, untrue. Like accessibility, performance is everyone’s job because everyone’s work contributes to it. Even the choice to use a particular CSS framework influences performance.

Total Blocking Time

One thing I know would be more helpful than a set of Core Web Vitals scores from Lighthouse is knowing the time it takes to go from the First Contentful Paint (FCP) to the Time to Interactive (TTI), a metric known as the Total Blocking Time (TBT). You can see that Lighthouse does indeed provide that metric. Let’s look at it for a site that’s much “heavier” than Smashing Magazine.

There we go. The problem with the Lighthouse report, though, is that I have no idea what is causing that TBT. We can get a better view if we run the same test in another service, like SpeedCurve, which digs deeper into the metric. We can expand the metric to glean insights into what exactly is causing traffic on the main thread.

That’s a nice big view and is a good illustration of TBT’s impact on page speed. The user is forced to wait a whopping 4.1 seconds between the time the first significant piece of content loads and the time the page becomes interactive. That’s a lifetime in web seconds, particularly considering that this test is based on a desktop experience on a high-speed connection.

One of my favorite charts in SpeedCurve is this one showing the distribution of Core Web Vitals metrics during render. You can see the delta between contentful paints and interaction!

Spotting Long Tasks

What I really want to see is JavaScript, which takes more than 50ms to run. These are called long tasks, and they contribute the most strain on the main thread. If I scroll down further into the report, all of the long tasks are highlighted in red.

Another way I can evaluate scripts is by opening up the Waterfall View. The default view is helpful to see where a particular event happens in the timeline.

But wait! This report can be expanded to see not only what is loaded at the various points in time but whether they are blocking the thread and by how much. Most important are the assets that come before the FCP.

First & Third Party Scripts

I can see right off the bat that Optimizely is serving a render-blocking script. SpeedCurve can go even deeper by distinguishing between first- and third-party scripts.

That way, I can see more detail about what’s happening on the Optimizely side of things.

Monitoring Blocking Scripts

With that in place, SpeedCurve actually lets me track all the resources from a specific third-party source in a custom graph that offers me many more data points to evaluate. For example, I can dive into scripts that come from Optimizely with a set of custom filters to compare them with overall requests and sizes.

This provides a nice way to compare the impact of different third-party scripts that represent blocking and long tasks, like how much time those long tasks represent.

Or perhaps which of these sources are actually render-blocking:

These are the kinds of tools that allow us to identify bottlenecks and make a case for optimizing them or removing them altogether. SpeedCurve allows me to monitor this over time, giving me better insight into the performance of those assets.

Monitoring Interaction to Next Paint

There’s going to be a new way to gain insights into main thread traffic when Interaction to Next Paint (INP) is released as a new core vital metric in March 2024. It replaces the First Input Delay (FID) metric.

What’s so important about that? Well, FID has been used to measure load responsiveness, which is a fancy way of saying it looks at how fast the browser loads the first user interaction on the page. And by interaction, we mean some action the user takes that triggers an event, such as a click, mousedown, keydown, or pointerdown event. FID looks at the time the user sparks an interaction and how long the browser processes — or responds to — that input.

FID might easily be overlooked when trying to diagnose long tasks on the main thread because it looks at the amount of time a user spends waiting after interacting with the page rather than the time it takes to render the page itself. It can’t be replicated with lab data because it’s based on a real user interaction. That said, FID is correlated to TBT in that the higher the FID, the higher the TBT, and vice versa. So, TBT is often the go-to metric for identifying long tasks because it can be measured with lab data as well as real-user monitoring (RUM).

But FID is wrought with limitations, the most significant perhaps being that it’s only a measure of the first interaction. That’s where INP comes into play. Instead of measuring the first interaction and only the first interaction, it measures all interactions on a page. Jeremy Wagner has a more articulate explanation:

“The goal of INP is to ensure the time from when a user initiates an interaction until the next frame is painted is as short as possible for all or most interactions the user makes.”
— Jeremy Wagner

Some interactions are naturally going to take longer to respond than others. So, we might think of FID as merely a first impression of responsiveness, whereas INP is a more complete picture. And like FID, the INP score is closely correlated with TBT but even more so, as Annie Sullivan reports:

Thankfully, performance tools are already beginning to bake INP into their reports. SpeedCurve is indeed one of them, and its report shows how its RUM capabilities can be used to illustrate the correlation between INP and long tasks on the main thread. This correlation chart illustrates how INP gets worse as the total long tasks’ time increases.

What’s cool about this report is that it is always collecting data, providing a way to monitor INP and its relationship to long tasks over time.

Not All Scripts Are Created Equal

There is such a thing as a “good” script. It’s not like I’m some anti-JavaScript bloke intent on getting scripts off the web. But what constitutes a “good” one is nuanced.

Who’s It Serving?

Some scripts benefit the organization, and others benefit the user (or both). The challenge is balancing business needs with user needs.

I think web fonts are a good example that serves both needs. A font is a branding consideration as well as a design asset that can enhance the legibility of a site’s content. Something like that might make loading a font script or file worth its cost to page performance. That’s a tough one. So, rather than fully eliminating a font, maybe it can be optimized instead, perhaps by self-hosting the files rather than connecting to a third-party domain or only loading a subset of characters.

Analytics is another difficult choice. I removed analytics from my personal site long ago because I rarely, if ever, looked at them. And even if I did, the stats were more of an ego booster than insightful details that helped me improve the user experience. It’s an easy decision for me, but not so easy for a site that lives and dies by reports that are used to identify and scope improvements.

If the script is really being used to benefit the user at the end of the day, then yeah, it’s worth keeping around.

When Is It Served?

A script may very well serve a valid purpose and benefit both the organization and the end user. But does it need to load first before anything else? That’s the sort of question to ask when a script might be useful, but can certainly jump out of line to let others run first.

I think of chat widgets for customer support. Yes, having a persistent and convenient way for customers to get in touch with support is going to be important, particularly for e-commerce and SaaS-based services. But does it need to be available immediately? Probably not. You’ll probably have a greater case for getting the site to a state that the user can interact with compared to getting a third-party widget up front and center. There’s little point in rendering the widget if the rest of the site is inaccessible anyway. It is better to get things moving first by prioritizing some scripts ahead of others.

Where Is It Served From?

Just because a script comes from a third party doesn’t mean it has to be hosted by a third party. The web fonts example from earlier applies. Can the font files be self-hosted instead rather than needing to establish another outside connection? It’s worth asking. There are self-hosted alternatives to Google Analytics, after all. And even GTM can be self-hosted! That’s why grouping first and third-party scripts in SpeedCurve’s reporting is so useful: spot what is being served and where it is coming from and identify possible opportunities.

What Is It Serving?

Loading one script can bring unexpected visitors along for the ride. I think the classic case is a third-party script that loads its own assets, like a stylesheet. Even if you think you’re only loading one stylesheet &mdahs; your own — it’s very possible that a script loads additional external stylesheets, all of which need to be downloaded and rendered.

Getting JavaScript Off The Main Thread

That’s the goal! We want fewer cars on the road to alleviate traffic on the main thread. There are a bunch of technical ways to go about it. I’m not here to write up a definitive guide of technical approaches for optimizing the main thread, but there is a wealth of material on the topic.

I’ll break down several different approaches and fill them in with resources that do a great job explaining them in full.

Use Web Workers

A web worker, at its most basic, allows us to establish separate threads that handle tasks off the main thread. Web workers run parallel to the main thread. There are limitations to them, of course, most notably not having direct access to the DOM and being unable to share variables with other threads. But using them can be an effective way to re-route traffic from the main thread to other streets, so to speak.

Web Workers (HTML Living Standard)
“The Difference Between Web Sockets, Web Workers, and Service Workers,” Aisha Bukar
Using Web Workers (MDN)
“Use Web Workers to Run JavaScript Off the Browser’s Main Thread,” Dave Surma
“Managing Long-Running Tasks In A React App With Web Workers,” Chidi Orji
“Exploring The Potential Of Web Workers For Multithreading On The Web,” Sarah Oke Okolo
“The Basics of Web Workers,” Malte Ubl and Eiji Kitamura

Split JavaScript Bundles Into Individual Pieces

The basic idea is to avoid bundling JavaScript as a monolithic concatenated file in favor of “code splitting” or splitting the bundle up into separate, smaller payloads to send only the code that’s needed. This reduces the amount of JavaScript that needs to be parsed, which improves traffic along the main thread.

“Reduce JavaScript Payloads With Code Splitting,” Houssein Djirdeh and Jeremy Wagner
“What Is Code Splitting?,” Next.js
“Improving JavaScript Bundle Performance With Code-Splitting,” Adrian Bece
“Code Splitting With Vanilla JS,” Chris Ferdinandi
“Supercharged Live Stream Blog — Code Splitting,” Dave Surma

Async or Defer Scripts

Both are ways to load JavaScript without blocking the DOM. But they are different! Adding the async attribute to a <script> tag will load the script asynchronously, executing it as soon as it’s downloaded. That’s different from the defer attribute, which is also asynchronous but waits until the DOM is fully loaded before it executes.

“How And When To Use Async And Defer Attributes,” Zell Liew
“Eliminate Render-Blocking JavaScript With Async And Defer,” (DigitalOcean)
“Optimize Long Tasks,” Jeremy Wagner
“Efficiently Load Third-party JavaScript,” Milica Mihajlija
Scripts: async, defer (JavaScript.info)

Preconnect Network Connections

I guess I could have filed this with async and defer. That’s because preconnect is a value on the rel attribute that’s used on a <link> tag. It gives the browser a hint that you plan to connect to another domain. It establishes the connection as soon as possible prior to actually downloading the resource. The connection is done in advance, allowing the full script to download later.

While it sounds excellent — and it is — pre-connecting comes with an unfortunate downside in that it exposes a user’s IP address to third-party resources used on the page, which is a breach of GDPR compliance. There was a little uproar over that when it was found out that using a Google Fonts script is prone to that as well.

“Establish Network Connections Early to Improve Perceived Page Speed,” Milica Mihajlija and Jeremy Wagner
“Prioritize Resources,” Sérgio Gomes
“Improving Perceived Performance With the Link Rel=preconnect HTTP Header,” Andy Davies
“Experimenting With Link Rel=preconnect Using Custom Script Injection in WebPageTest,” Andy Davies
“Faster Page Loads Using Server Think-time With Early Hints,” Kenji Baheux
rel=preconnect (MDN)

Non-Technical Approaches

I often think of a Yiddish proverb I first saw in Malcolm Gladwell’s Outliers; however, many years ago it came out:

To a worm in horseradish, the whole world is horseradish.

It’s a more pleasing and articulate version of the saying that goes, “To a carpenter, every problem looks like a nail.” So, too, it is for developers working on performance. To us, every problem is code that needs a technical solution. But there are indeed ways to reduce the amount of work happening on the main thread without having to touch code directly.

We discussed earlier that performance is not only a developer’s job; it’s everyone’s responsibility. So, think of these as strategies that encourage a “culture” of good performance in an organization.

Nuke Scripts That Lack Purpose

As I said at the start of this article, there are some scripts on the projects I work on that I have no idea what they do. It’s not because I don’t care. It’s because GTM makes it ridiculously easy to inject scripts on a page, and more than one person can access it across multiple teams.

So, maybe compile a list of all the third-party and render-blocking scripts and figure out who owns them. Is it Dave in DevOps? Marcia in Marketing? Is it someone else entirely? You gotta make friends with them. That way, there can be an honest evaluation of which scripts are actually helping and are critical to balance.

Bend Google Tag Manager To Your Will

Or any tag manager, for that matter. Tag managers have a pretty bad reputation for adding bloat to a page. It’s true; they can definitely make the page size balloon as more and more scripts are injected.

But that reputation is not totally warranted because, like most tools, you have to use them responsibly. Sure, the beauty of something like GTM is how easy it makes adding scripts to a page. That’s the “Tag” in Google Tag Manager. But the real beauty is that convenience, plus the features it provides to manage the scripts. You know, the “Manage” in Google Tag Manager. It’s spelled out right on the tin!

“Best Practices For Tags And Tag Managers,” Katie Hempenius and Barry Pollard
“Techniques on How to Improve Your GTM,” Ryan Rosati
“Keeping Websites Fast when Loading Google Tag Manager,” Håkon Gullord Krogh
“Optimizing Page Speed with Google Tag Manager,” Charlie Weller
Custom event trigger (Tag Manager Help)

Wrapping Up

Phew! Performance is not exactly a straightforward science. There are objective ways to measure performance, of course, but if I’ve learned anything about it, it’s that subjectivity is a big part of the process. Different scripts are of different sizes and consist of different resources serving different needs that have different priorities for different organizations and their users.

Having access to a free reporting tool like Lighthouse in DevTools is a great start for diagnosing performance issues by identifying bottlenecks on the main thread. Even better are paid tools like SpeedCurve to dig deeper into the data for more targeted insights and to produce visual reports to help make a case for performance improvements for your team and other stakeholders.

While I wish there were some sort of silver bullet to guarantee good performance, I’ll gladly take these and similar tools as a starting point. Most important, though, is having a performance game plan that is served by the tools. And Vitaly’s front-end performance checklist is an excellent place to start.