15 Awesome Tools and Resources for Designers and Agencies in 2022

Original Source: https://tympanus.net/codrops/2022/03/08/15-awesome-tools-and-resources-for-designers-and-agencies-in-2022/

An effective and well-organized workflow is an important asset for professional web designers and web design agencies alike. Achieving this requires having the necessary design tools and resources within easy reach to keep lost or wasted an absolute minimum while increasing the chances of realizing high-quality results.

There is certainly no shortage of good web design tools and resources. There are so many in fact that it can be a challenge to find those little timesavers that can spare you headaches and save you a ton of time in the long run.

That said, this selection is well worth bookmarking as it features 15 top tools and resources for designers and agencies you can put to use to enrich your 2022 web design projects.

1. Be – The Biggest WordPress and portfolio WordPress theme 

Awesome tools and resources article image

In terms of sheer size, BeTheme is the biggest WordPress and WooCommerce theme of them all with its 240,000+ strong customer base, its all-encompassing library of pre-built websites, and its 40+ core website building features.

Among the highlights –

A selection of 650+ customizable pre-built websites that cover all the major industry sectors, a wealth of business niches and all website styles and types. These pre-built websites are responsive, UX-ready, and make creating any website a super-easy task.The fast and flexible BeBuilder that allows you to import from Be’s pre-built website’s 3000+ pages, import, export, save, and retrieve blocks of content, and design revisions and create backgrounds as you always wanted them to be.BeBuilder Woo with customer-friendly shopping features, product previews, a sticky menu, and more that enables you to create any shop or single product layout you can envision.BeTheme is loaded with valuable design options, it is Elementor ready, and it is frequently updated. 

 Click on the banner to investigate BeTheme in greater detail.

2. Total WordPress Theme

Awesome tools and resources article image

Total is a power-packed WordPress theme that is designed to make web design easy for beginners and developers alike. Thanks to its flexible page builder and multiple style options Total does not place limits on the page layouts you can create.

Total’s NEW 90+ section templates along with its 75+ pre-styled post entry cards and 45+ quick-import sample demos make website building fast and enjoyable.500+ customizing settings, a built-in font manager, and other features combined with Total’s drag and drop frontend page builder make creating a highly customized web design an easy task.Total is completely compatible with all the popular plugins, including WooCommerce of course, and its use of Vanilla JavaScript with built in hooks and filters, and 600+snippets make it an extremely developer friendly theme.

Click on the banner to learn more about this popular theme.

3. LayerSlider

Awesome tools and resources article image

With LayerSlider, you can do much more than create stunning sliders. This popular product has been on the market for more than a decade. In its current form it gives designers and design agencies website building capabilities that can be applied to spruce up or spice up any website with modern graphics, eye-catching animations, and cool interactive features.

LayerSlider has 150+ website, slider, and popup templates. Templates provide a great way to learn and serve as ideal starting points for new projects.LayerSlider comes with a modern, easy-to-use editor interface – similar to those found in professional desktop applications. Anyone can use this popular tool without having any prior experience.

LayerSlider is cost-effective and easy to install and work with. Users can easily create an expensive-looking website at a tiny fraction of the usual cost.

Click on the banner to see what LayerSlider could do for you.

4. Uncode – Creative & WooCommerce WordPress Theme

Awesome tools and resources article image

This pixel-perfect theme is an Envato best seller with its 80,000+ sales to date.

 Its key features include –

a fast and flexible Frontend Page Builderadvanced WooCommerce capabilities that include a wealth of customer-centric design elements and optionsa Wireframes Plugin and 550+ section templates

Uncode is ideally suited for creating blog, magazine, and portfolio sites.

5. Trafft

Awesome tools and resources article image

Put Trafft to work to schedule appointments, meetings, and events, manage staff and services, send reminders, accept payments, and more.

Features include coupons, custom domains, group booking, multiple location usage, and email service.Trafft easily integrates with Google Calendar and Google Meet, Outlook Calendar, Zoom, Mailchimp and Zapier.

6. wpDataTables

Awesome tools and resources article image

The wpDataTables WordPress table and chart plugin is noted for its many powerful and useful features that enable it to stand out from the competition.

They include –

Multiple databases connectivity (MySQL, PostgreSQL, MS SQL)Creating tables from multiple sources including MySQL or WordPress database and PHP arraysConditional formatting4 Chart-building engines Advanced filtering and sorting capabilities

wpDataTables integrates smoothly with Elementor, DIVI, Avada, Gutenberg and Visual Composer.

7. WHATFONTIS

Awesome tools and resources article image

WHATFONTIS allows designers to find a font in a matter of seconds by identifying it from an uploaded image. This gem in the world of font identifiers gives you –

rapid identification of free fontsan AI-based font search that provides the best possible accuracyfont filtering based on foundry and price

Premium support is readily available for those infrequent cases where the AI engine gives awkward results. A PRO subscription can be yours for only $39.99/year.

8. Mobirise Website Builder Software

Awesome tools and resources article image

Mobirise is an offline website builder that is perfect for creating small to medium size websites. It is an excellent choice for non-technical users who would typically prefer to do their website-building visually.

Mobirise creates sites quickly, easily, and intuitively5500+ awesome templates come with the packageYou own your site, and you can edit it locally and upload wherevercode if you want since you have full access to HTML

Mobirise is free for commercial use.

9. Get illustrations Stock Illustrations Bundle

Awesome tools and resources article image

If your websites, apps, or presentations are beginning to exhibit a certain sameness it might be time to take advantage of GetIllustration’s library of 10,000+ premium illustrations.

Get illustrations for web, apps, presentations or other purposesIllustrations are available in PNG, SVG, Ai, Figma, Sketch formatsDownload them once and use them foreverA commercial use license is included

 Take advantage of the 25% discount by using coupon code: EliteDesigners25.

10. Slider Revolution

Awesome tools and resources article image

Slider Revolution is a versatile WordPress plugin that enables designers and design agencies to pleasantly surprise their clients with stunning, highly-professional visuals.

Slider Revolution is packed with revolutionary (no pun intended) features that can turn a boring website into an attention-grabbing responsive one.200+ website and slider templates and 25+ powerful addons are included.

Slider Revolution is easy to work with, but one-on-one support is there should you need it.

11. XStore – Best WordPress WooCommerce Theme for eCommerce

Awesome tools and resources article image

If you are looking for a power-packed WooCommerce theme that’s available at a bargain price, look no further. The XStore WooCommerce theme has it all, including –

110+ prebuilt, ready-to-customize shopsA selection of premium plugins worth $510WPB and Elementor compatibilityA single-product builder

All the above plus 30,000+ happy customers.

12. Amelia

Awesome tools and resources article image

The Amelia plugin will fully automate and manage your business’s appointment and events, and in doing so will save you and your clients significant amounts of time.

Your clients can make, change, or cancel appointments online 24/7Amelia manages bookings at multiple business locations, and can also track and manage employee assignments and availability schedulesAmelia can be integrated with Zoom for consultation and training purposes

13. 8bio – Link in Bio Tool

Awesome tools and resources article image

With this little tool you can create a link that people can’t resist clicking on. It’s as easy as can be to do and you can –

take advantage of 8bio’s beautiful skins and catchy animated backgroundslink to your own domain or use *.8b.iopresent a brief biography profile of yourself or your businessmonetize your link with a shopping cart or tip jar

And much more.

14. Essential Grid

Awesome tools and resources article image

The Essential Grid plugin enables you to create galleries you may have considered to be too difficult if not impossible to attempt to build. Galleries that could –

Showcase an attention-getting portfolioDisplay your products, your awe-inspiring videos, or share your personal Instagram stream.

Essential Grid offers multiple layout options and can accept content from a variety of sources.

15. Pixpa – Portfolio Websites for Designers

Awesome tools and resources article image

Pixpa is an extremely useful tool to have if you should happen to be engaged in a creative pursuit of almost any kind. With Pixpa you can –

build a website the way you want to – without any need for codingshare, proof, sell, and deliver your work to your clients and customersaccept payments commission-free through PayPal or Stripe

Several plans are available, and you can start with a 15 day free trial.

Product design involves more than simply creating a good look. It’s about creating engaging visuals that lead to a satisfying overall presentation. One or more of the above web design resources could be helpful to web designers, developers, creative artists, or agencies.

Rather than investing time and money in a lengthy designing process, why not take advantage of one of these designer resources with their ready-to-use components and features to create a totally awesome product? 

We have assembled this collection of 15 top tools and resources for 2022. It can help you create a successful online presence for your business or build upon an existing one.

The post 15 Awesome Tools and Resources for Designers and Agencies in 2022 appeared first on Codrops.

iPhone SE 2022 Wallpaper in Photoshop + 8K Wallpaper

Original Source: https://abduzeedo.com/iphone-se-2022-wallpaper-photoshop-8k-wallpaper

iPhone SE 2022 Wallpaper in Photoshop + 8K Wallpaper

abduzeedo0308—22

I watched a bit of the Apple keynote today and I don’t know if it’s me getting old but it feels that the excitement is no longer there. I know there were new devices but still it feels more like the same. More speed, more this more that… one thing that caught my attention though was the iPhone SE wallpaper. The reason? It reminds me of some of the Photoshop images I used to create for tutorials. That of course sparked my interest to recreate that image in Photoshop. So here I am, another Photoshop tutorial and boy did I have fun doing it! And, I hope you enjoy it as well.

Step 1

Create a new file in Photoshop. I used the 8k resolution just because I wanted to suffer, hah! Jokes aside, I just want to create a big image so folks could use it as wallpapers. After that create one rectangle using the Rectangle Tool U

Step 2

Now via layer styles create the gradient with the colors you want. I literally use the iPhone image as reference to capture the colors from it.

Step 3

Change the background color to a gradient with the dark colors from the top and bottom. I used Layers Styles with a Linear Gradient. Those colors will be the ones that all the rectangles will fade to.

Step 4

Move the rectangle to the right and add a drop shadow via Layer Styles

Step 5

Now a very important detail. On Blending Options for the Layer Style make sure to check the option that says “Layer Mask Hides Effects”. That will be crucial for the masking part of the process.

Step 6

Duplicate rectangles and scale them to create the form you want. I basically started from the right to the center, then I just duplicated and flipped them to create the other side.

Final result

That’s it. You can add some extra effects by creating new layers with all the layers merged then apply some blur plus Overlay as blending mode, but that is just details. Now it’s up to you to definitely refine it. I am already using my new wallpaper. 

Downloads

Download 8K wallpaper
Download mobile wallpaper

Get PSD 8K File (400mb)

Popular Design News of the Week: February 28, 2022 – March 6, 2022

Original Source: https://www.webdesignerdepot.com/2022/03/popular-design-news-of-the-week-february-28-2022-march-6-2022/

Every day design fans submit incredible industry stories to our sister-site, Webdesigner News. Our colleagues sift through it, selecting the very best stories from the design, UX, tech, and development worlds and posting them live on the site.
The best way to keep up with the most important stories for web professionals is to subscribe to Webdesigner News or check out the site regularly. However, in case you missed a day this week, here’s a handy compilation of the top curated stories from the last seven days. Enjoy!”

HTML Tips & Tricks that You will Love to Know

15 Best New Fonts, March 2022

Write Plain Text Files

This Stunning Magazine Cover is An Inspired Design

Making your own Website from Scratch

Introducing ComiCSS

15 Google Drive Alternatives You Need to Consider

Turns Out Those Google Logo Colours Mean More than You Think

How to Create a Section Divider Using CSS

Human First, Designer Second

Landing Page UI – How to Ensure User Friendly Design

New CSS Features in 2022

The Imperfections of Gmail

Source

p img {display:inline-block; margin-right:10px;}
.alignleft {float:left;}
p.showcase {clear:both;}
body#browserfriendly p, body#podcast p, div#emailbody p{margin:0;}

The post Popular Design News of the Week: February 28, 2022 – March 6, 2022 first appeared on Webdesigner Depot.

5 Must-Have Elements of a Successful Footer in 2022

Original Source: https://www.webdesignerdepot.com/2022/03/5-must-have-elements-of-a-successful-footer-in-2022/

If you want to know how well-dressed someone is, look at their shoes. Shoes tell you a lot about a person’s style, activities, and choices. We often choose clothes to deceive people about who we are — we want to be brighter, more successful, more relaxed, more adventurous than we actually are. But, our shoes paint an honest picture and offer endless insights into who the wearer is.

Like shoes, website footers help us see the core of the entity behind the site. A footer is both functional and brand-specific, and it often sets the tone for the entire site.

I’ve heard it argued that there are two types of designer: those who start with the footer and those who don’t. Regardless of how true you hold that statement, it’s undeniable that the footer is one of the most undervalued elements on any site — if you’ve ever run an eye-tracking test, you’ll know how frequently customers scroll straight to the bottom of your page.

Perhaps because it is undervalued and therefore under-designed by designers, the footer has developed some established design patterns: It is a consistent, site-wide catch-all bar; it tends to contain utility links; visually, it acts as a closure to the page information.

The Anatomy of a Great Footer

Your footer should be consistent, predictable, and, above all, not so small that it’s illegible.

Footers vary depending on the target audience and the goals of the site. What suits one project may not suit another, but there are common elements that you need to have a good reason to exclude.

1. Add Your Logo

A logo in your footer is an excellent way to tie the page together and remind users of the site they’re browsing. In addition, it can be a helpful link back to your homepage (for when the user is lost and wants to start over).

If your design warrants it, the logo can be smaller or a variation. Find some way to fit it in, even if you already have your logo in a sticky header — it’s a good baseline for mobile experiences.

Chivi Chivi uses a monogram in place of its primary logo and reserves the main logotype for its footer.

Next Big Thing repeats its logo in the footer in a decorative and engaging way.

2. Include a CTA

Every page on your site should have some form of call to action (CTA) to guide the user through your site, preferably along your sales funnel. In addition to page-specific CTA, include a CTA in your footer.

Because your footer will be identical across multiple pages, the CTA needs to be an action that is relevant to every page (even the terms or privacy statement).

-99 has a nice big ‘Start a Project’ CTA to draw potential clients into a conversation.

The most common footer CTA is a newsletter sign-up, but if you’re running a site with a free trial or a subscription, adding a sign-up form for those services is also beneficial.

The Ocean Agency asks you to donate or sign up to its email list.

3. The Legal Bit

In many cases, you don’t need legal notices on your site; too often, published online terms just reiterate the statuary rights the law already grants a user. (The exception is if you’re operating internationally when statuary rights are variable.)

Fontsmith takes the opportunity to let us know its parent company.

If you’re collecting a user’s information, even via analytics, then you need a privacy policy, and the footer is a good catch-all place to link to it — just make sure you also link to it alongside any forms that gather information.

If you’re designing a site for a highly-regulated industry, like pharmaceuticals, or gambling, then a liability disclaimer may be advisable. If your client is certified or holds a professional membership, that should be included in the footer.

H&B Sensors includes an ISO certification in its footer.

Almost everyone includes a copyright notice in their footer, even though a website copyright notice is all but unenforceable.

The real value of these elements is to lend credibility to the company.

4. Useful Links Only

There is a tendency among some designers to treat the footer like a mega-menu and list every page on the site. If a user is confused enough by your main menu to need a footer link, dozens of links won’t clarify things for them, but a few carefully selected links can be beneficial.

Shantell Martin uses doormat navigation to help anyone who missed the main navigation.

Generally, sites have two kinds of links: sales and utility. Sales links point at content with a brand voice, like product pages and blog posts. Utility links point at informational content that is fact-based, such as your returns policy or details of your graduate program. Typically, sales links suit primary navigation, and utility links fit footers.

Envoy includes a link to current openings at the company.

5. Contact Information

Offering users a real-world point of contact has two benefits: your local SEO can be boosted; users feel an increased sense of trust.

Even if they never use them, customers like to see a phone number, opening hours, and even a map to a physical location. These things feel inherently more reliable because we assume that someone, somewhere, has vetted brick-and-mortar businesses.

Cahn Wilson includes a map to make it absolutely clear they have a physical location.

If possible, let users know how long it usually takes you to respond to queries — be honest, better to underpromise and over-deliver than the reverse.

If you’re maintaining social media accounts, then adding them to your footer is a great way to include them on your page without siphoning users off to other sites. (Only link to social media accounts you regularly update.)

Snohetta takes the contact information to the extreme by providing longitude and latitude.

Source

p img {display:inline-block; margin-right:10px;}
.alignleft {float:left;}
p.showcase {clear:both;}
body#browserfriendly p, body#podcast p, div#emailbody p{margin:0;}

The post 5 Must-Have Elements of a Successful Footer in 2022 first appeared on Webdesigner Depot.

Creating a Risograph Grain Light Effect in Three.js

Original Source: https://tympanus.net/codrops/2022/03/07/creating-a-risograph-grain-light-effect-in-three-js/

Recently, I release my brand new portfolio, home to my projects that I have worked on in the past couple of years:

As I was doing experimentations for the portfolio, I tried to reproduce this kind of effect I found on the web:

I really like these 2D grain effects applied to 3D elements. It kind of has this cool feeling of cray and rocks and I decided to try and reproduce it from scratch. I started with a custom light shader, then mixed it with a grain effect and by playing with some values I got to this final result:

In this tutorial I’d like to share with you what I’ve done to achieve this effect. We’re going to explore two different ways of doing it.

Note that I won’t get into too much detail about Three.js and WebGL for simplicity, so it’s good to have some solid knowledge of JavaScript, Three.js and some notions about shaders before starting with this tutorial. If you’re not very familiar with shaders but with Three.js, then the second way is for you!

Summary

Method 1: Writing our own custom ShaderMaterial (That’s the harder path but you’ll learn about how light reflection works!)

Creating a basic Three.js sceneUse ShaderMaterialCreate a diffuse light shaderCreate a grain effect using 2D noiseMix it with light

Method 2: Starting from MeshLambertMaterial shader (Easier but includes unused code from Three.js since we’ll rewrite the Three.js LambertMaterial shader)

Copy and paste MeshLambertMaterialAdd our custom grain light effect to the fragmentShaderAdd any Three.js lights

1. Writing our own custom ShaderMaterial

Creating a basic Three.js scene

First we need to set up a basic Three.js scene with a simple sphere in the center:

Here is a Three.js basic scene with a camera, a renderer and a sphere in the middle. You can find the code in this repository in the file src/js/Scene.js, so you can start the tutorial from here.

Use ShaderMaterial

Let’s create a custom shader in Three.js using the ShaderMaterial class. You can pass it uniforms objects, and a vertex and a fragment shader as parameters. The cool thing about this class is that it’s already giving you most of the necessary uniforms and attributes for a basic shader (positions of the vertices, normals for light, ModelViewProjection matrices and more).

First, let’s create a uniform that will contain the default color of our sphere. Here I picked a light blue (#51b1f5) but feel free to pick your favorite color. We’ll use a new THREE.Color() and call our uniform uColor. We’ll replace the material from the previous code l.87:

const material = new THREE.ShaderMaterial({
uniforms: {
uColor: { value: new THREE.Color(0x51b1f5) }
}
});

Then let’s create a simple vertex shader in vertexShader.glsl, a separated file that will display the sphere vertices at the correct position related to the camera.

void main(void) {
gl_Position = projectionMatrix * modelViewMatrix * vec4(position, 1.0);
}

And finally, we write a basic fragment shader fragmentShader.glsl in a separated file as well, that will use our uniform uColor vec3 value:

uniform vec3 uColor;

void main(void) {
gl_FragColor = vec4(uColor, 1.);
}

Then, let’s import and link them to our ShaderMaterial.

import vertexShader from './vertexShader.glsl'
import fragmentShader from './fragmentShader.glsl'

const material = new THREE.ShaderMaterial({
vertexShader: vertexShader,
fragmentShader: fragmentShader,
uniforms: {
uColor: { value: new THREE.Color(0x51b1f5) }
}
});

Now we should have a nice monochrome sphere:

Create a diffuse light shader

Creating our own custom light shader will allow us to easily manipulate how the light should affect our mesh.

Even if that seems complicated to do, it’s not that much code and you can find great articles online explaining how light reflection works on a 3D object. I recommend you read webglfundamentals if you would like to learn more details on this topic.

Going further, we want to add a light source in our scene to see how the sphere reflects light. Let’s add three new uniforms, one for the position of our spotlight, the other for the color and a last one for the intensity of the light. Let’s place the spotlight above the object, 5 units in Y and 1 unit in Z, use a white color and an intensity of 0.7 for this example.


uLightPos: {
value: new THREE.Vector3(0, 5, 3) // position of spotlight
},
uLightColor: {
value: new THREE.Color(0xffffff) // default light color
},
uLightIntensity: {
value: 0.7 // light intensity
},

Now let’s talk about normals. A THREE.SphereGeometry has normals 3D vectors represented by these arrows:

For each surface of the sphere, these red vectors define in which direction the light rays should be reflected. That’s what we’re going to use to calculate the intensity of the light for each pixel.

Let’s add two varyings on the vertex shader:

vNormals, the normals vectors of the object related to the world position (where it is in the global scene).vSurfaceToLight, this represents the direction of the light position minus the direction of each surface of the sphere.

uniform vec3 uLightPos;

varying vec3 vNormal;
varying vec3 vSurfaceToLight;

void main(void) {
vNormal = normalize(normalMatrix * normal);

gl_Position = projectionMatrix * modelViewMatrix * vec4(position, 1.0);
// General calculations needed for diffuse lighting
// Calculate a vector from the fragment location to the light source
vec3 surfaceToLightDirection = vec3( modelViewMatrix * vec4(position, 1.0));
vec3 worldLightPos = vec3( viewMatrix * vec4(uLightPos, 1.0));
vSurfaceToLight = normalize(worldLightPos – surfaceToLightDirection);
}

Now let’s generate colors based on these light values in the Fragment shader.

We already have the normals values with vNormals. To calculate a basic light reflection on a 3D object we need two values light types: ambient and diffuse.

Ambient light is a constant value that will give a global light color of the whole scene. Let’s just use our light color for this case.

Diffuse light is representing the value of how strong the light is depending on how the object reflects it. That means that all surfaces which are close to and facing the spotLight should be more enlightened than surfaces that are far away and in the same direction. There is an amazing math function to calculate this value called the dot() product. The formula for getting a diffuse color is the dot product of vSurfaceToLight and vNormal. In this image you can see that vectors facing the sun are brighter than the others:

Then we need to addition the ambient and diffuse light and finally multiply it by a lightIntensity. Once we got our light value let’s multiply it by the color of our sphere. Fragment shader:

uniform vec3 uLightColor;
uniform vec3 uColor;
uniform float uLightIntensity;

varying vec3 vNormal;
varying vec3 vSurfaceToLight;

vec3 light_reflection(vec3 lightColor) {
// AMBIENT is just the light's color
vec3 ambient = lightColor;

//- – – – – – – – – – – – – – – – – – – – – – – – – – – – – – – – – – – –
// DIFFUSE calculations
// Calculate the cosine of the angle between the vertex's normal
// vector and the vector going to the light.
vec3 diffuse = lightColor * dot(vSurfaceToLight, vNormal);

// Combine
return (ambient + diffuse);
}

void main(void) {
vec3 light_value = light_reflection(uLightColor);
light_value *= uLightIntensity;

gl_FragColor = vec4(uColor * light_value, 1.);
}

And voilà:

Feel free to click and drag on this sandbox scene to rotate the camera.

Note that if you want to recreate MeshPhongMaterial you also need to calculate the specular light. This represent the effect you can observe when a ray of light gets directly into our eyes when reflected by an object, but we don’t need that precision here.

Create a grain effect using 2D noise

To get a 2D grain effect we’ll have to use a noise function that will display a gray color from 0 to 1 for each pixel of the screen in a “beautiful randomness”. There are a lot of functions online for creating simplex noise, perlin noise or others. Here we’ll use glsl-noise for a 2D simplex noise and glslify to import the noise function directly at the beginning of our fragment shader using:

#pragma glslify: snoise2 = require(glsl-noise/simplex/2d)

Thanks to the native WebGL value gl_FragCoord.xy we can easily get the UVs (coordinates) of the screen. Then we just have to apply the noise to these coordinates vec3 textureNoise = vec3(snoise2(uv)); This will create our 2D noise. Then, let’s apply these noise colors to our gl_FragColor:

#pragma glslify: snoise2 = require(glsl-noise/simplex/2d)

// grain
vec2 uv = gl_FragCoord.xy;

vec3 noiseColors = vec3(snoise2(uv));

gl_FragColor = vec4(noiseColors, 1.0);

What a nice old TV noise effect:

As you can see, when moving the camera, the texture feels like it’s “stuck” to the screen, that’s because we matched our simplex noise effect to the coordinates of the screen to create a 2D style effect. You can also adjust the size of the noise like so uv /= myNoiseScaleVal;

Mixing it with the light

Now that we got our noise value and our light let’s mix them! The idea is to apply less noise where the light value is stronger (1.0 == white) and more noise where the light value is weaker (0.0 == black). We already have our light value, so let’s just multiply the texture value with that:

colorNoise *= light_value.r;

You can see how the light affects the noise now, but this doesn’t look very strong. We can accentuate this value by using an exponential function. To do that in GLSL (the shader language) you can use pow(). It’s already included in shaders, here I used the exponential of 5.

colorNoise *= pow(light_value.r, 5.0);

Then, let’s enlighten the noise color effect like so:

vec3 colorNoise = vec3(snoise2(uv) * 0.5 + 0.5);

To gray, right? Almost there, let’s re-add our beautiful color that we got from the start. We can say that if the light is strong it will go white, and if the light is weak it will be clamped to the initial channel color of the sphere like this:

gl_FragColor.r = max(textureNoise.r, uColor.r);
gl_FragColor.g = max(textureNoise.g, uColor.g);
gl_FragColor.b = max(textureNoise.b, uColor.b);
gl_FragColor.a = 1.0;

Now that we have this Material ready, we can apply it to any object of the scene:

Congrats, you finished the first way of doing this effect!

2. Starting from MeshLambertMaterial shader

This way is simpler since we’ll directly reuse the MeshLambertMaterial from Three.js and apply our grain in the fragment shader. First let’s create a basic scene like in the first method. You can take this repository, and start from the src/js/Scene.js file to follow this second method.

Copy and paste MeshLambertMaterial

In Three.js all the Materials shaders can be found here. They are composed by shunks (reusable GLSL code) that are included here and there in Three.js shaders. We’re going to copy the MeshLambertMaterial fragment shader from here and paste it in a new fragment.glsl file.

Then, let’s add a new ShaderMaterial that will include this fragmentShader. However, for the vertex, since we’re not changing it, we can just pick it directly from the lib THREE.ShaderLib.lambert.vertexShader.

Finally, we need to merge the Three.js uniforms with ours, using THREE.UniformsUtils.merge(). Like in the first method, let’s use the sphere color uColor, uNoiseCoef to play with the grain effect and a uNoiseScale for the grain size.

import fragmentShader from './fragmentShader.glsl'

this.uniforms = THREE.UniformsUtils.merge([
THREE.ShaderLib.lambert.uniforms,
{
uColor: {
value: new THREE.Color(0x51b1f5)
},
uNoiseCoef: {
value: 3.5
},
uNoiseScale: {
value: 0.8
}
}
])

const material = new THREE.ShaderMaterial({
vertexShader: THREE.ShaderLib.lambert.vertexShader,
fragmentShader: glslify(fragmentShader),
uniforms: this.uniforms,
lights: true,
transparent: true
})

Note that we’re importing the fragmentShader using glslify because we’re going to use the same simplex noise 2D from the first method. Also, the lights parameter needs to be set to true so the materials can reuse the value of all source lights of the scene.

Add our custom grain light effect to the fragmentShader

In our freshly copied fragment shader, we’ll need to import the 2D simplex noise using the glslify and glsl-noise libs. #pragma glslify: snoise2 = require(glsl-noise/simplex/2d).

If we look closely at the MeshLambertMaterial fragment we can find a outgoingLight value. This looks very similar to our light_value from the first method, so let’s apply the same 2D grain shader effect to it:

// grain
vec2 uv = gl_FragCoord.xy;
uv /= uNoiseScale;

vec3 colorNoise = vec3(snoise2(uv) * 0.5 + 0.5);
colorNoise *= pow(outgoingLight.r, uNoiseCoef);

Then let’s mix our uColor with the colorNoise. And here is the final fragment shader:

#pragma glslify: snoise2 = require(glsl-noise/simplex/2d)

uniform float uNoiseScale;
uniform float uNoiseCoef;

// write this the very end of the shader
// grain
vec2 uv = gl_FragCoord.xy;
uv /= uNoiseScale;

vec3 colorNoise = vec3(snoise2(uv) * 0.5 + 0.5);
colorNoise *= pow(outgoingLight.r, uNoiseCoef);

gl_FragColor.r = max(colorNoise.r, uColor.r);
gl_FragColor.g = max(colorNoise.g, uColor.g);
gl_FragColor.b = max(colorNoise.b, uColor.b);
gl_FragColor.a = 1.0;

Add any Three.js lights

No light? Let’s add some THREE.SpotLight in the scene in src/js/Scene.js file.

const spotLight = new THREE.SpotLight(0xff0000)
spotLight.position.set(0, 5, 4)
spotLight.intensity = 1.85
this.scene.add(spotLight)

And here you go:

You can also play with the alpha value in the fragment shader like this:

gl_FragColor = vec4(colorNoise, 1. – colorNoise.r);

And that’s it! Hope you enjoyed the tutorial and thank you for reading.

Resources

https://webglfundamentals.org/ https://www.behance.net/gallery/106782599/Risograph-Grain-Effect-for-Photoshop

The post Creating a Risograph Grain Light Effect in Three.js appeared first on Codrops.

How to Start a Phone Case Business (With No Prior Experience)

Original Source: https://ecommerce-platforms.com/articles/start-a-phone-case-business

Phone cases are everywhere. And the demand for phone cases is constantly rising because of new phone version releases, old phones, broken cases, an increase in population, and new customers getting into the market (like teenagers with their first phones). If you’re interested in learning how to start a phone case business, now is the right time. In fact, there has never really been a bad time to sell phone cases. So, for those phone case entrepreneurs out there, we encourage you to bookmark this page, read it through step-by-step, and use each step to guide you on your way to success with a phone case business.

Keep reading to learn how to start a phone case business with no prior experience!

Advantages of Starting a Phone Case Business

Selling something like a phone case has several unique benefits because of its very nature. They’re complementary products that work to protect phones, make them prettier, and allow for additional features like credit card storage. We understand that launching any business comes with questions and concerns about the product’s viability. But outside of the usual day-to-day obstacles, phone case businesses don’t encounter many significant hurdles, especially when it comes to penetrating the market.

To encourage you to keep exploring how to start a phone case business, here are some advantages of selling phone cases as your main product:

Phone case lifecycles get attached to the lifecycles of phones. New iPhones and Androids come out every year, so you not only get a new wave of potential customers on a regular basis, but the large phone companies are often marketing for you. Phones and phone cases break. This introduces an additional flock of buyers who replace their cases or upgrade to a new phone (and therefore need a new case) every few years. This also opens up the potential for repeat sales not long after a customer made a purchase (maybe they broke their phone a few days after buying it). If you learn how to start a phone case business, it’s tough to run out of potential customers. You can source from high-quality, print-on-demand dropshipping services like Printful. These services offer design tools, printing services, packaging, and direct shipping to your ecommerce customers. There’s no reason to store or print anything from your own home or office. The upfront cost is low, and so is the initial risk. Printing phones on demand requires a tiny upfront investment. Most of the small fees get covered as you make sales. It’s possible to sell online, through marketplaces, and in-person. You can run an online store, list on places like Amazon/eBay/Etsy/social media, and visit trade shows or craft fairs. All of these are opportunities to make more sales. It’s also common to run an outdoor or indoor mall kiosk to sell your phone case designs. The profit margins are higher than other types of dropshippable products. Some items like home goods, decor, and even some apparel items have slim margins. That’s not the case for phone cases. Phone cases have simpler designs that you can make on your own or by using online templates. You can hire a designer, buy templates, or use online marketplaces for premium designs. Learning how to start a phone case business also involves learning a bit about design. It’s easier to target one niche with mobile devices. Think dog owners, bowling afficionados, cooking hobbyists, travelers, or even just targeting a certain location, like phone cases dedicated to neighborhoods in Chicago. These are the target markets that tend to sell. It’s easier to hold some inventory, process returns, and absorb sunk costs. Some startups struggle with bulky, expensive items, but phone cases are relatively cheap, and they’re super small. It’s a great market for custom designs. You can offer custom phone cases in your business model, allowing customers to print their names or special dates on the phones.

Initial Things to Think About Before Learning How To Start a Phone Case Business

Before developing a marketing strategy, building an online store, and conquering the phone case market, it’s important to understand the market and walk through some initial questions.

Is It Profitable to Start a Phone Case Business?

That depends on your approach, marketing efforts, and the appeal of your designs; but it’s definitely easier to achieve profitability with phone cases than other types of products.

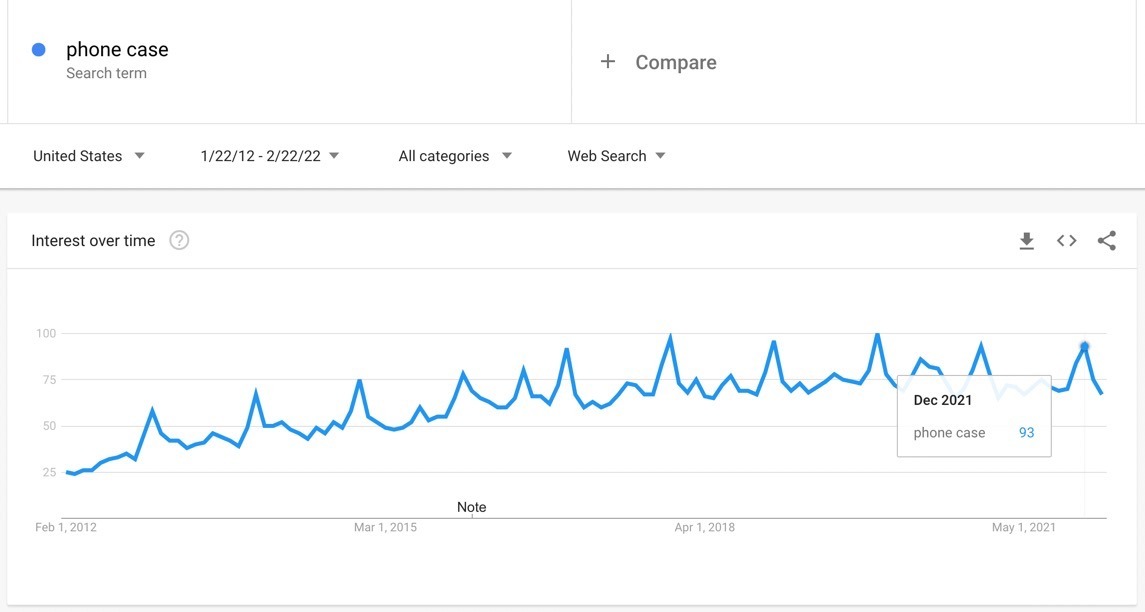
One metric that shows continuing market growth is the interest in phone cases from online searches. There’s a wide variety of terms we could search to figure out these trends, but we’ll stick to the basic “phone case” keyword.

According to Google Trends, online search interest in the keyword “phone case” has risen steadily over the past ten years. You’ll notice that interest has peaks and valleys because of the holidays, new phone releases, and customer demand, but the average interest in this market continues to grow.

trends for phone cases

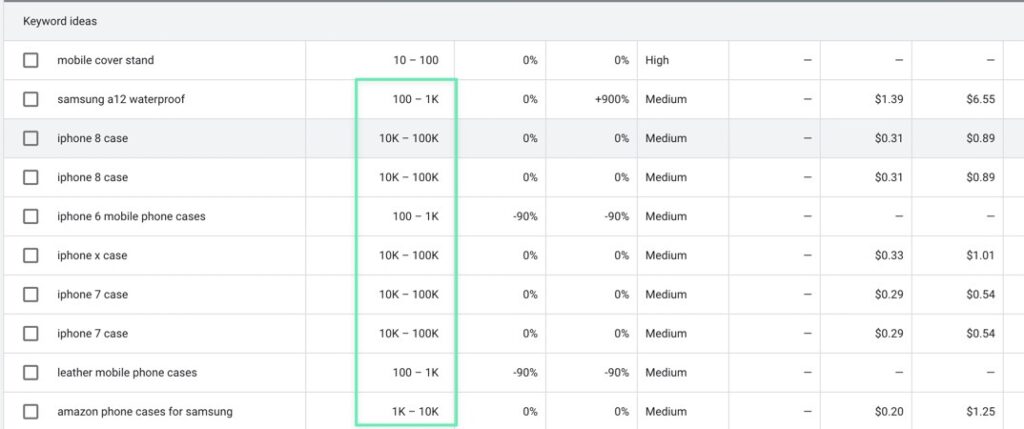
Another way to analyze the popularity and growth of the phone case industry is by looking at relevant keywords, and not only taking into account their search volume but also the competition required to successfully advertise for those keywords.

And there’s no doubt that hundreds of phone case keywords have far too high of competition. However, there are still thousands of relevant keywords with low and medium competition levels, allowing new companies to target those keywords and see results.

Not to mention, those keywords also have impressive monthly search volume, starting at 100 searches per month and going up to 100k, For instance, the “iphone 8 case” keyword looks promising (many of the older but still available phones have low competition), as does the “leather mobile phone cases” keyword.

how to start a phone case business with the right keywords

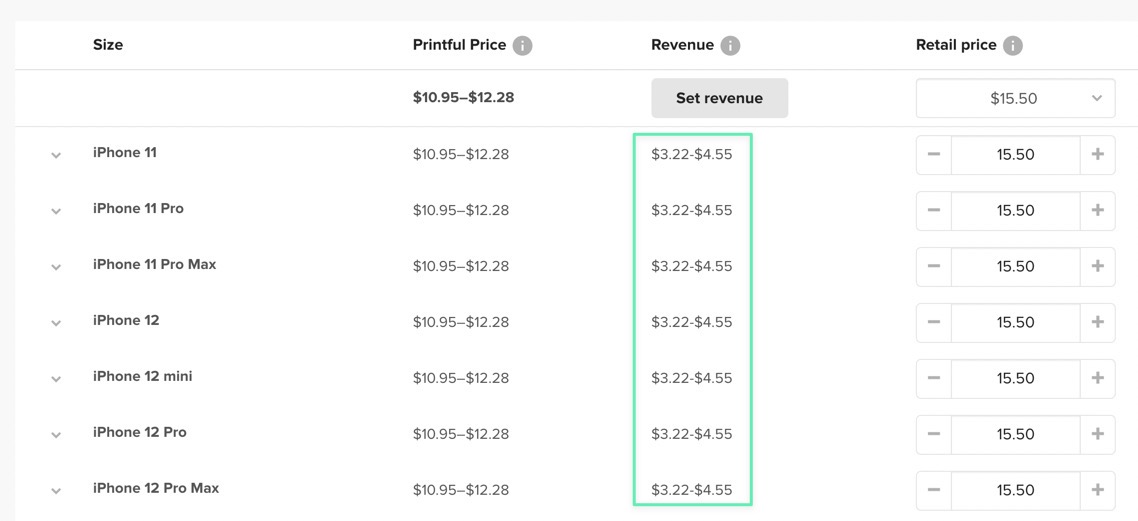
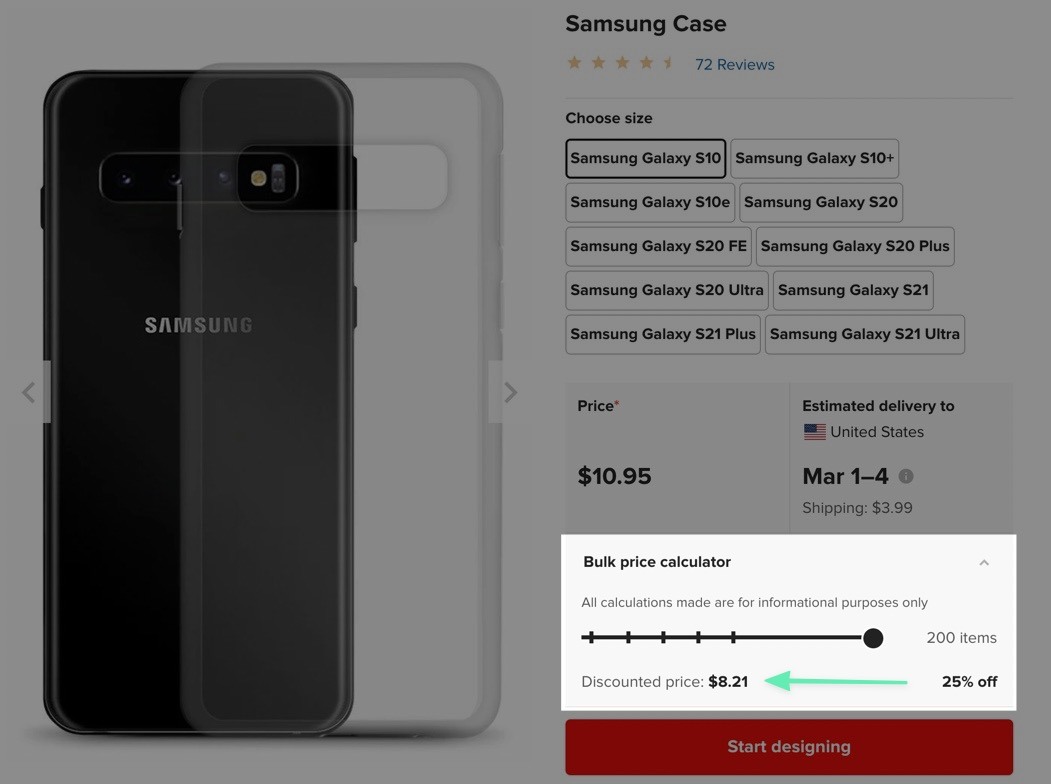
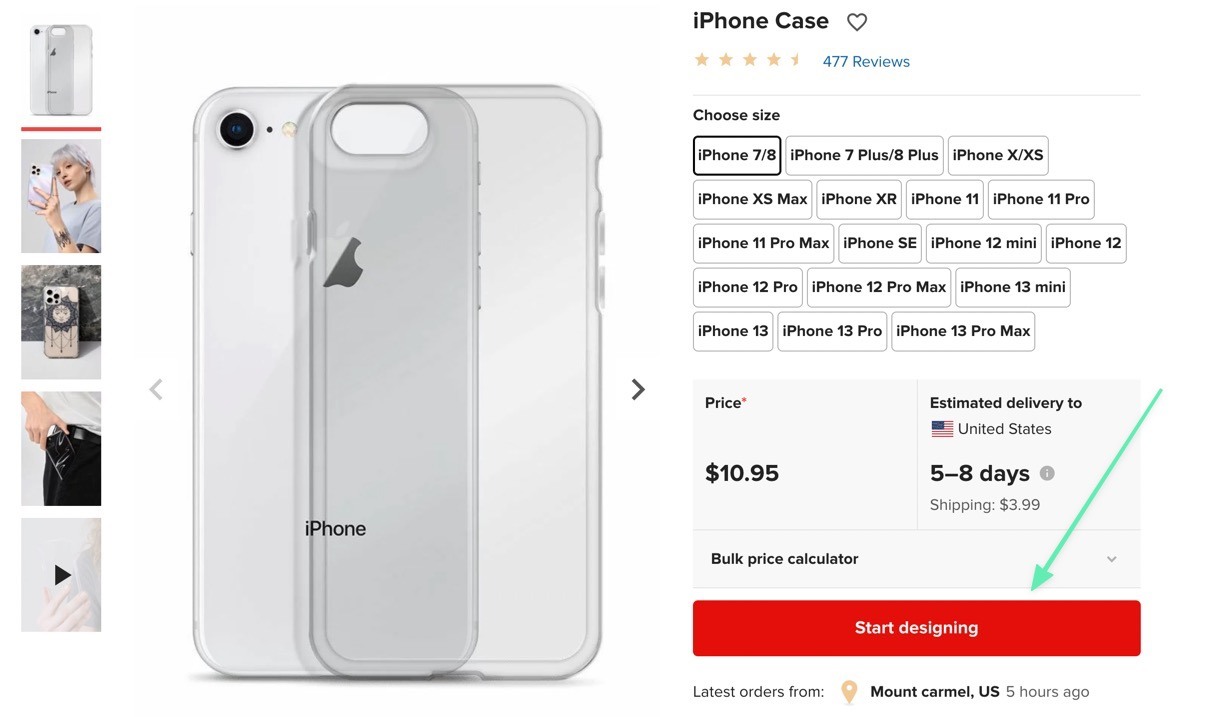
We can also look at potential profitability based on recommended phone case margins from Printful. Most phone cases on Printful cost anywhere from $10.95 to $12.28. That’s a little high, but you minimize your risk with dropshipping through Printful (instead of purchasing and storing thousands of cases and hoping you sell them).

Printful suggests sellers start at a retail price of $15.50 per phone case, rendering up to $4.55 in profit for each sale. That’s not bad!

set revenue

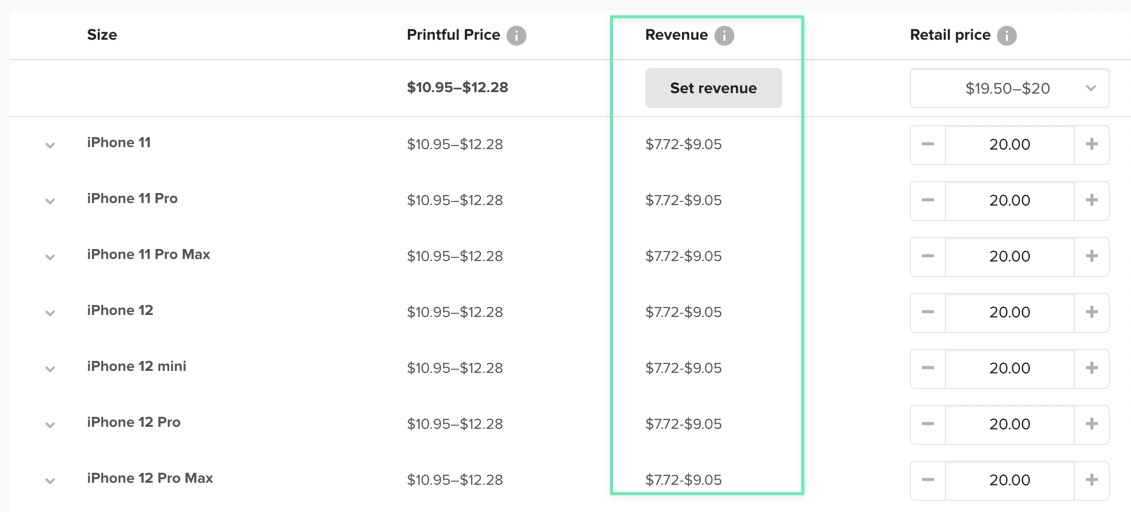
And just a slight increase in the retail price makes for an incredible boost in profit margins. Many cell phone cases sell for $20 or $30 per case (some go to $100 if they’re really heavy duty). At a $20 retail price, your profit margin sits at 36% per sale, producing up to $9.05 in profit per phone.

how to start a phone case business with the right pricing

Finally, the growth of your business generally means that you can afford to purchase in bulk, shifting away from the dropshipping model or at least running some sort of hybrid. Buying wholesale makes for even stronger profit margins. There are plenty of suppliers for bulk phone cases, but Printful drops the price to $8.21 per case when you buy 200 items. That’s more than an extra $2 per sale added to your margins. So, we think it’s safe to say that learning how to start a phone case business is rather profitable if done right.

save with bulk pricing

Types of Phone Cases and Phone Models to Consider

The first choice you must make is to decide to sell:

iPhone cases or…Samsung cases

Or sell them both!

Phone cases are rather simple products, but there are so many device types and versions, potentially requiring you to sell dozens of case variations with the same design. Luckily, this doesn’t take much work with Printful. Yet, you should still know the phone case options available.

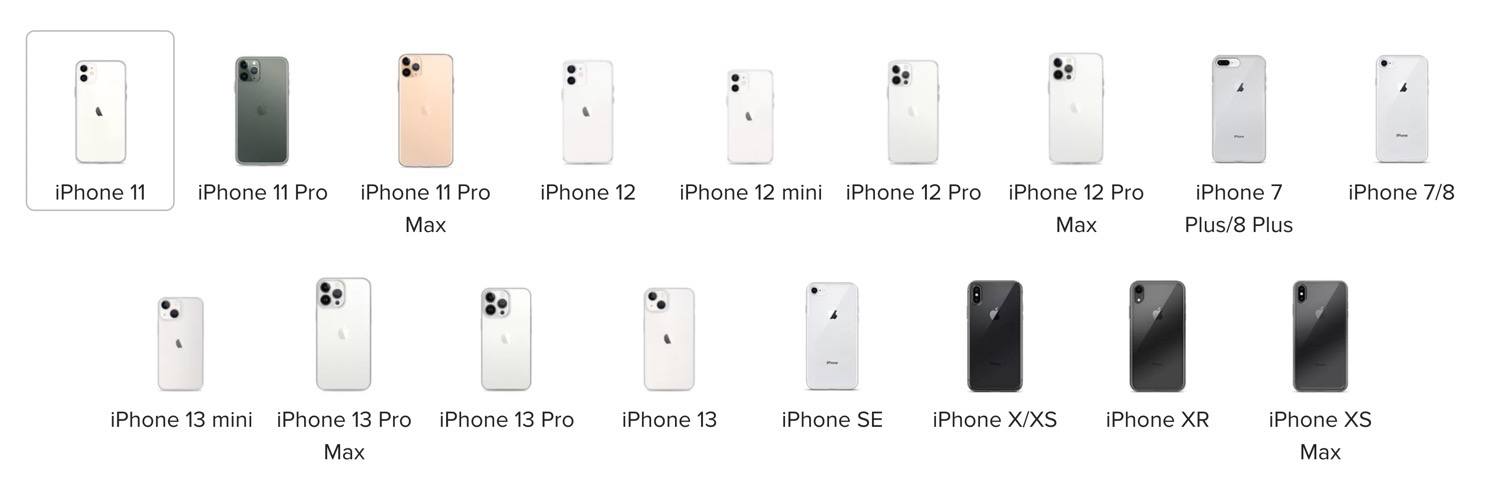
Let’s start with iPhones. As of this article, Printful offers printing and shipping for 17 different iPhone case sizes, from the iPhone 7 to the iPhone 13 Pro Max. You can choose to just sell some of them, but we recommend listing them all as product variants. Printful is doing the sourcing and fulfillment for you, so multiple variants don’t cost you anything extra.

types of iPhone cases - how to start a phone case business

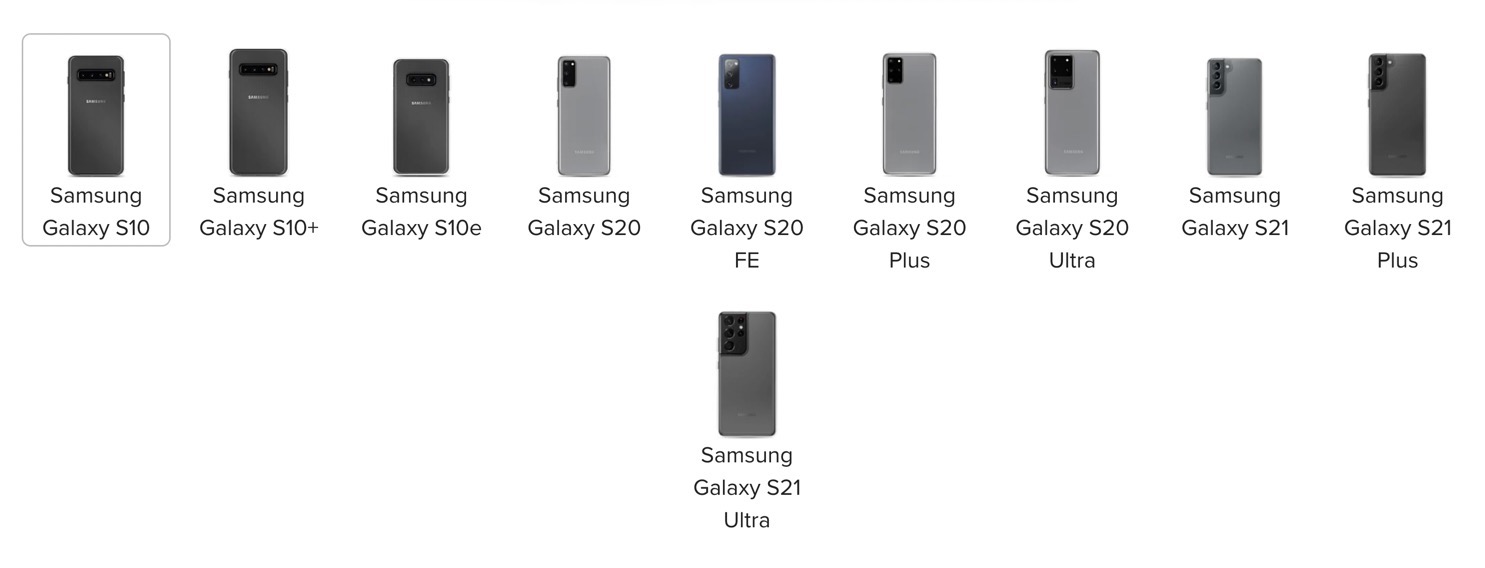
Printful provides a large collection of Samsung Galaxy phone cases as well, with options like the S10, S20 FE, and the S21 Ultra. As of right now, you can pick from 10 different Samsung Galaxy phone cases in Printful.

types of samsung phone cases

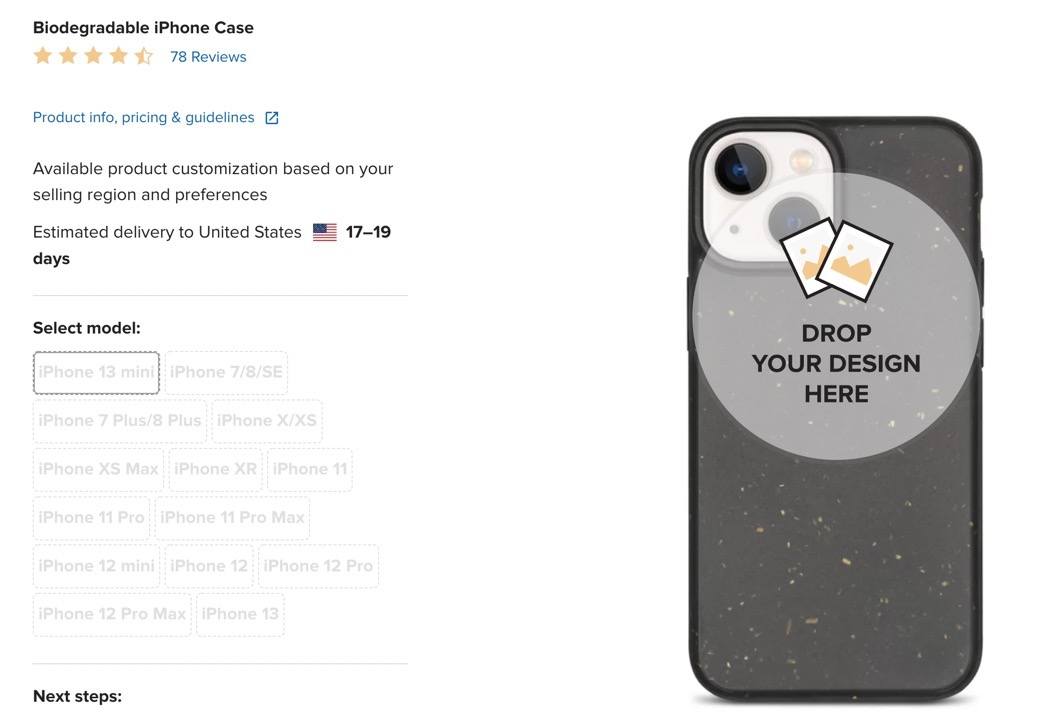
Some regional sellers have the option to list biodegradable iPhone cases in their ecommerce shops. You should check to see if your region has a Printful location nearby, but we just wanted to also mention this as an option.

bio case - how to start a phone case business

Additionally, the phone case market is more than just iPhone and Samsung Galaxy cases. You could explore outside of Printful to source cases for:

Google Pixel phonesMicrosoft phonesSony phonesOppo phonesHonor phonesXiaomi phonesNokia phonesDoro phonesEmporia phonesAlcatel phonesAcer phonesAsus phonesBlackview phonesCubot phonesTablet devicesMany more!

There also comes to decision on what type of phone cases to list in your store. Phone case manufacturers have grown creative over the years, so we’re starting to see improved durability, styles, materials, and storage features.

Printful offers classic BPA-free hybrid Thermoplastic Polyurethane and Polycarbonate (PC) material phone cases that offer a sleek design, durable build, and grippy finish.

Here are the main phone types to consider when learning how to start a phone case business:

Polycarbonate/polyurethane shell cases (a happy medium with decent durability, increased style, and excellent comfort)Rubber bumper cases that protect the sides of the phoneWallet or purse phone cases with storage for keys, cash, and cardsExtra durable cases (the kind OtterBox sells—meant for extreme environments) Battery cases (stores an extra hidden battery pack within the case)Silicone/gel cases (inexpensive, flexible, and stylish, but usually the lowest amount of protection)

All of these options leave much to think about when learning how to start a phone case business. But it’s best to start with the classic polycarbonate cases since they’re readily available for dropshipping/printing through Printful, and they offer an affordable, durable, stylish solution. After that, you can explore sources like AliExpress and Oberlo to locate unique phone cases for extremely low prices.

How to Start a Phone Case Business

It all starts with an idea, but every step has its purpose. In this section, we’ll outline the actions you should take to find success when learning how to start a phone case business.

We cover:

Finding a gap in the marketCreating a business planFiguring out your target marketDesigning the phone casesFinding a supplier, printer, and shipperCreating an online storeAdding pricing, mockups, and product detailsAccepting phone case orders and marketing your business

Find a Gap in the Market

You’ve already decided to sell phone cases, but do you have to get any more specific than that? We discussed that you should know all about the different phone case models, versions, and sizes, but there’s also the next step is figuring out a niche within the phone case market.

Can you find success by just designing hundreds of random iPhone and Samsung cases? Sure, but it’s significantly harder to grab market share, and you’re far less likely to establish a memorable brand name. A business that sells phone cases with outdoorsy designs, sporting designs, movie designs, and quotes from books isn’t likely to end up in the minds of anyone. It’s too broad.

Luckily, there are plenty of gaps in the custom phone case market; you simply have to complete some research to figure out which ones have enough demand, while also showing less competition.

You can read our guide on how to find a niche business here. We also have thoughts to consider as you go through potential niches:

Is there a hobby or interest that people would love to show off on their phones? Think bikers, athletes, pet owners, book worms, gardeners, or anything else people consume their time with. What about professions? Doctors, lawyers, writers, actors, teachers, and every profession has their own inside jokes, quirks, and designs that you could highlight on phone cases. Think about locational designs such as countries, neighborhoods, cities, and landmarks that represent all of these. Humor is a great category that fits in with just about every niche. Consider quotes from classic movies, books, TV shows, or songs. Nostalgia is a powerful emotion, so think about aspects of pop culture that may make people jump for the Buy button when seeing your phones. With movies, books, pop culture, and sports, you always have to look into licensing and copyright law. Don’t sell a design for Star Wars or the New York Yankees if you haven’t gained licensing rights. Can you establish a niche that isn’t focused on the design content but rather where the phone cases come from? Like a phone case market made solely by local, independent artists; or an eco-friendly phone case company; or phones with nifty features like secret storage or extreme durability. Is there a way to incorporate custom phone designs where the niche focuses on events, moments, or people from their lives? Options include weddings, anniversaries, birthdays, graduations, or job advancement.

Create a Business Plan

Too many entrepreneurs try to launch their dreams without a business plan. There’s a misguided perception that business plans are only used as some way to visualize what you want to achieve. That’s partially true, but it’s really a written contract with yourself and stakeholders, along with a real plan to guide you to your goals. Not to mention, if you ever need partners, investors, or employees, those people often want to see a business plan.

It’s one of the smartest decisions you can make when constructing a business from scratch, and the lack of a business plan is taking one step towards failure.

Read our guide on how to write a business plan and use its tips to formulate the plan around a phone case company. Our guide shows you how to outline the following in your business plan:

Market researchMarketingFinancial planningSales channelsYour business model

Figure Out the Target Audience for Your Phone Case Business Idea

Lacking a true understanding of your target audience, or not having a target audience at all, eliminates your ability to craft products, make marketing materials, and communicate properly with your customers. It’s as simple as sending en email marketing message that caters to men, but not realizing that the majority of your target market is women. Another example is creating phone cases for RV owners, but not understanding that 20% of your target market is people who don’t own RVs (yet they dream of owning).

You can collect this target market information before you launch and while you run the business, using tools like:

Surveys and questionarresGoogle AnalyticsFacebook Audience InsightsJust about any insights program on social mediaSEO toolsCompetitor analysis software

With a target audience in mind, you then have the ability to generate a customer persona, or an outline of your average customer. A customer persona usually includes details like:

GenderOccupationAgeSpending habitsHobbiesLifestyle choicesLife habitsInternet browsing habits

After that, weigh the benefits and downsides of targeting specific sections of your customer base. You may find that some 30 to 45-year-olds are far more likely to purchase phone cases, so you shouldn’t put as much effort into marketing to younger people with less money. That’s just an example, but it’s absolutely something you could discover during your market research.

Design the Phone Cases

It’s easier to design phone cases when compared to items like clothing or pillows. Why? Because a phone case only needs a small, simple design that goes on a flat surface. You don’t have to worry about strange garment materials, embroidery, or making sure your design has a super high resolution to fit across a large object.

But how should you design your phone cases in the first place? There are several methods to consider:

Design the phone cases yourself. Use tools like Photoshop, Procreate, or Photopea if you have experience with professional design software. Many of them, like Canva or Pixlr, work well for less experienced designers. You can also use the Printful design tools, which are fairly basic, but get the job done for simple designs. Purchase pre-made designs online. There are subscription sites like Vexels, or sites like Vecteezy to purchase completed vector art. Buytshirtdesigns.net and Thefancydeal.com sell pre-made shirt designs that work on phones as well. Another option is to buy from designers on Etsy, Fiverr, or Guru.com. Hire a designer to make all the phone case designs. Search for quality designers on sites like Dribbble, DeviantArt, and 99Designs. These marketplaces allow artists to display their work, after which you reach out to them based on what you like. Some may end up too expensive, but there’s a plethora of designers out there willing to work for varying budgets.

Find a Phone Case Supplier, Printer, and Shipper (There’s a Service That Provides All of These)

Establishing a phone case business requires you to figure out:

SourcingPrintingStorageFulfillment

You could start with a wholesale manufacture partnership for the widest profit margin. For that, we recommend going to Alibaba to source from a Chinese manufacturer. However, that leaves you to store all the inventory and fulfill orders with packaging and shipping.

There’s absolutely nothing wrong with fulfilling your own orders, but the lowest risk fulfillment method for phone cases is through a supplier/printer/fulfillment company like Printful.

Printful powers a significant portion of the printing business, as it provides access to hundreds of blank products that merchants can use to print, package, and ship to customers. Another benefit is that Printful acts as a dropshipper, storing all of your items in their own warehouses, and only pulling and printing products when a customer makes a purchase from your website.

Now, that means your profit margins end up smaller, but that’s an incredible trade off considering you take on minimal risk as a startup.

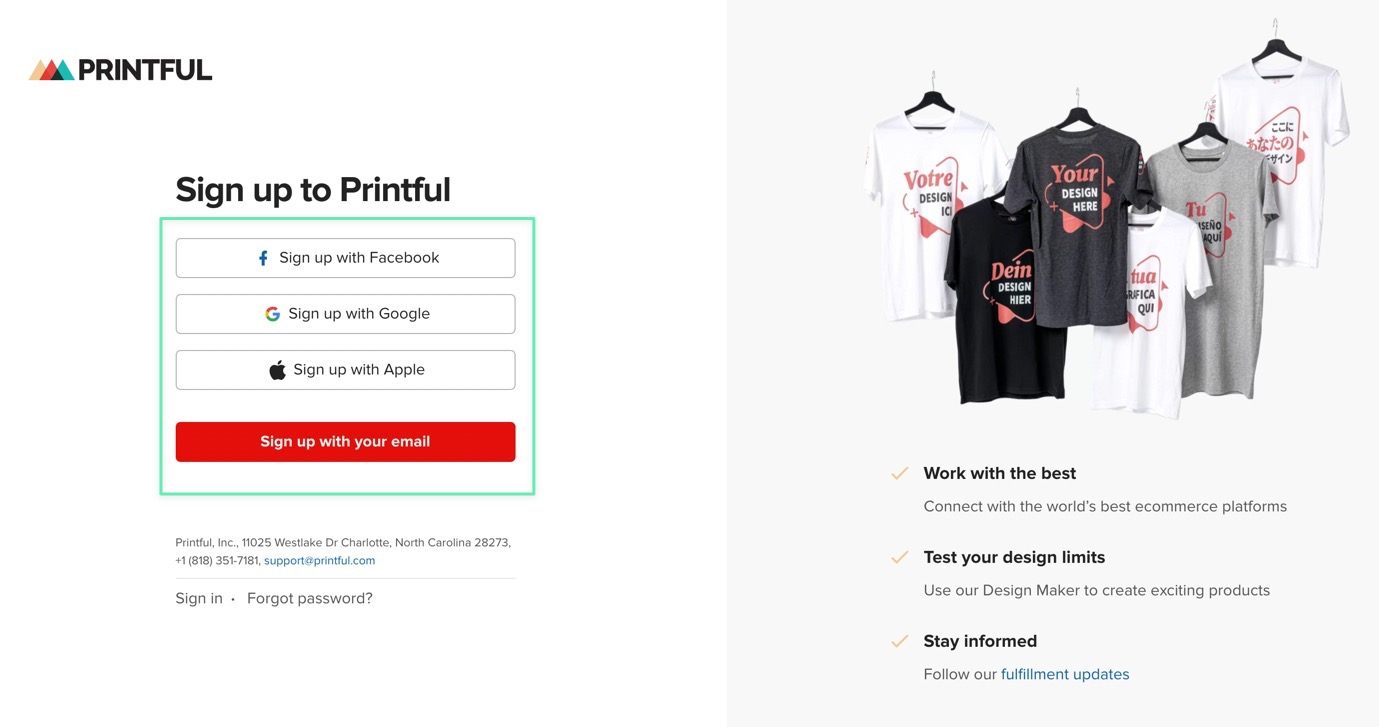
To get started, go to the Printful website and create an account. Search through the product collection and learn all about the types of phone cases offered by the supplier. You can even make product designs prior to having an online store.

get started button

Create an account using your email or social login information. Walk through the steps to make an account, like filling in business information and requirements.

sign up for printful page

Go to the Printful product library and open the Phone Cases section.

pick an iphone case - how to start a phone case business

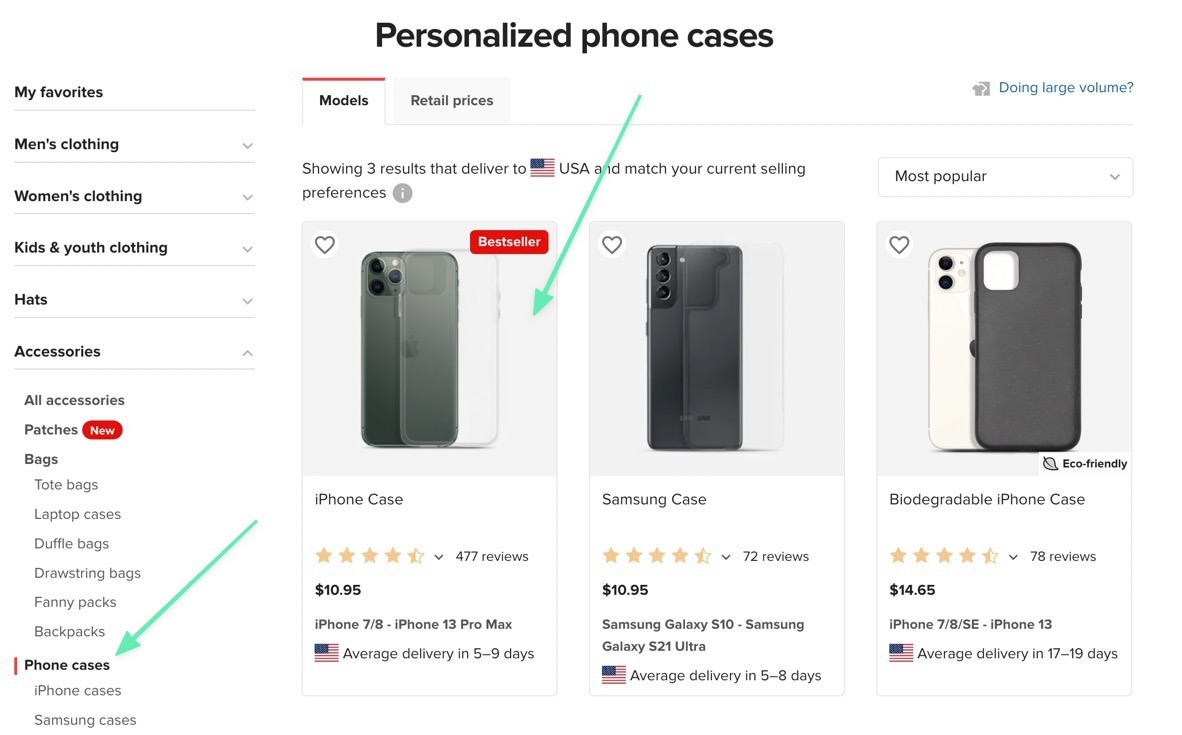
Here, you get a taste of what’s available, and you can even start designing a phone case for testing purposes.

start designing in printful

Create an Online Store to Sell Your Phone Cases

Creating an online store requires a few things:

A business nameProducts to sellA platform to add ecommerce functionality

We already have the products. And we encourage you to spend a significant amount of time developing a quality business name.

But what about actually finding an ecommerce platform, a system for making a website, listing products, and processing transactions? That’s where Shopify comes into the picture.

Not only does Shopify provide a simple, affordable website builder, but it includes features for SEO, product listing, payment processing, integrated paid advertising, and more.

To get started, go to the Shopify website and click one of the Start Free Trial buttons.

start free trial button

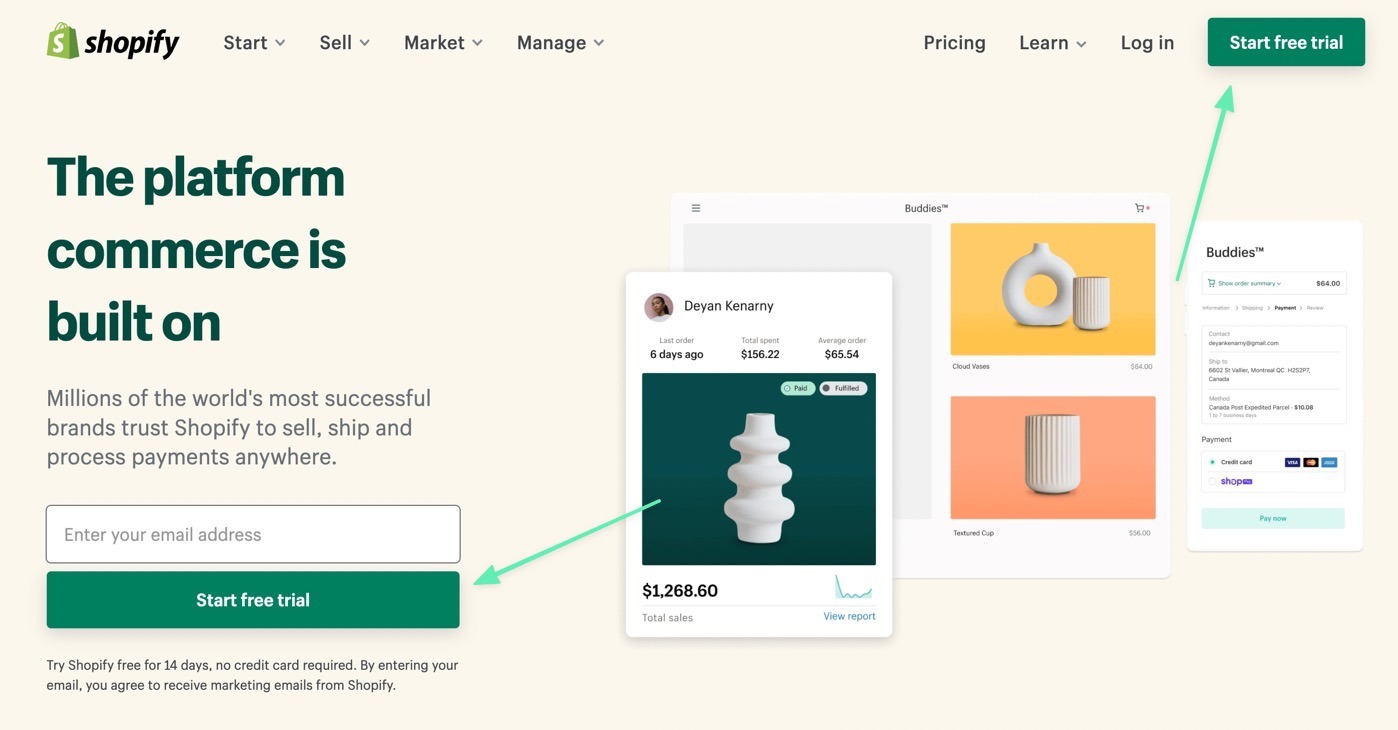
Walk through the steps to launch an account (like adding your store name and business information). There’s no need to type in any credit card information. You receive a 14-day free trial, allowing you to test features, build a complete online store, and even display products prior to signing up for a paid account. Learn about Shopify pricing to give you an idea of which premium plans you should consider in the future.

create store

Once you have a Shopify account, it sends you to the Shopify dashboard where you create your ecommerce shop. The left side menu offers options to manage orders, products, customers, finances, and marketing, while the Get Started guide in the center of the dashboard shares steps to take to launch your store the most efficient way.

the shopify dashboard - how to start a phone case business

We recommend customizing the look of your store first. This way, you can upload a logo, change around the design of the homepage, and add categories to organize the phone cases you plan on selling.

To customize the store (or swap out the default theme for a new one), go to Sales Channels > Online Store > Themes > Customize.

customize theme in shopify

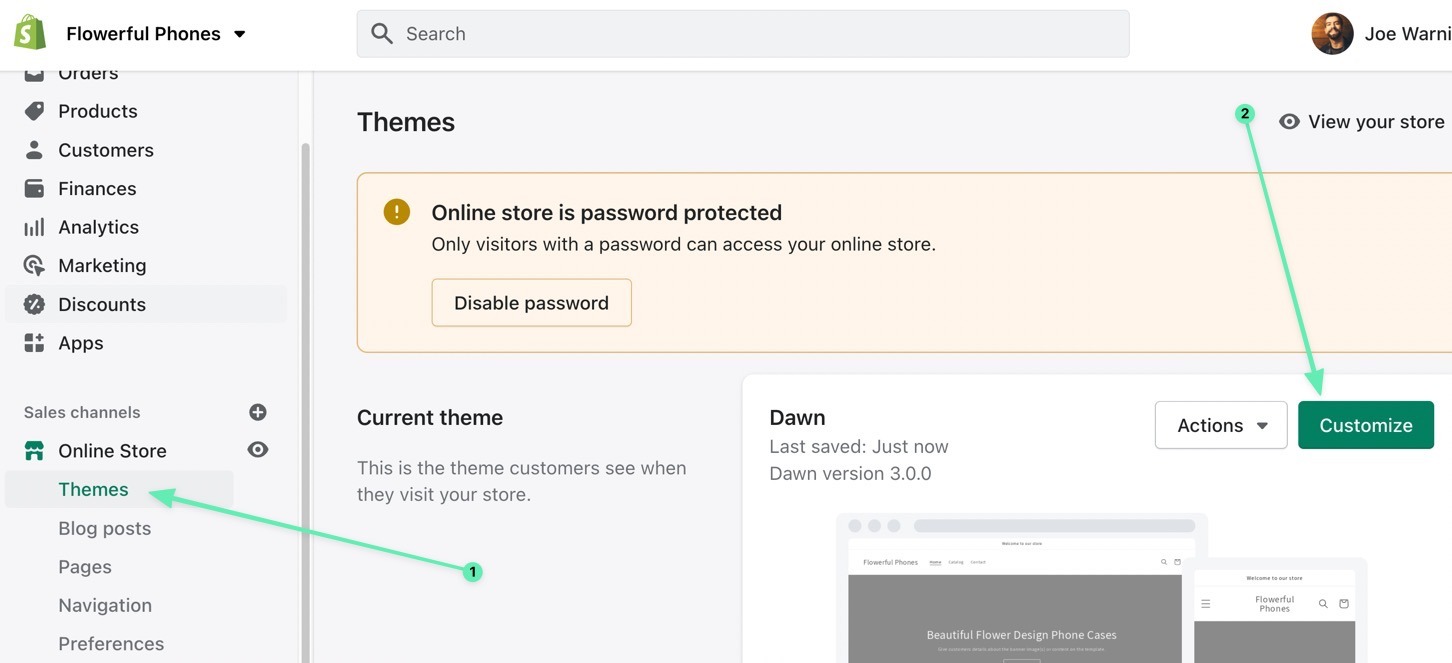
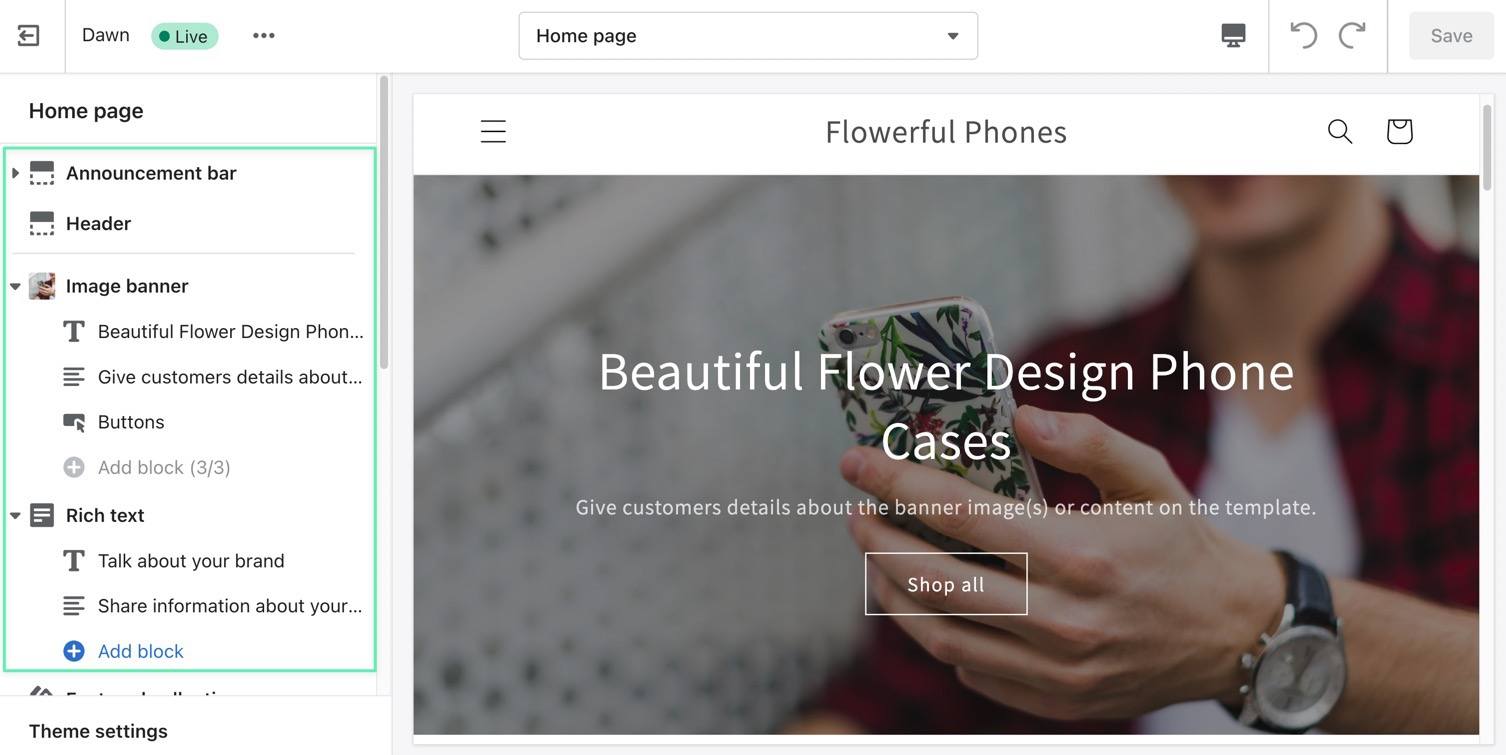
The Shopify Customizer provides a visual look at your current theme and overall website. The left side panel offers settings to adjust what appears on the website. For instance, you can remove the announcement bar, add a header image, and rearrange the building blocks to ensure you have the cleanest possible homepage. Most themes already have a homepage product showcase, but make sure that’s included just in case; this way, your phone cases appear on the homepage when you add them to the Homepage category from Printful.

shopify editor

Next up, you need to integrate Printful with Shopify to create products and sync them with your online store. Go to the Printful dashboard and click on the Stores menu item.

stores tab

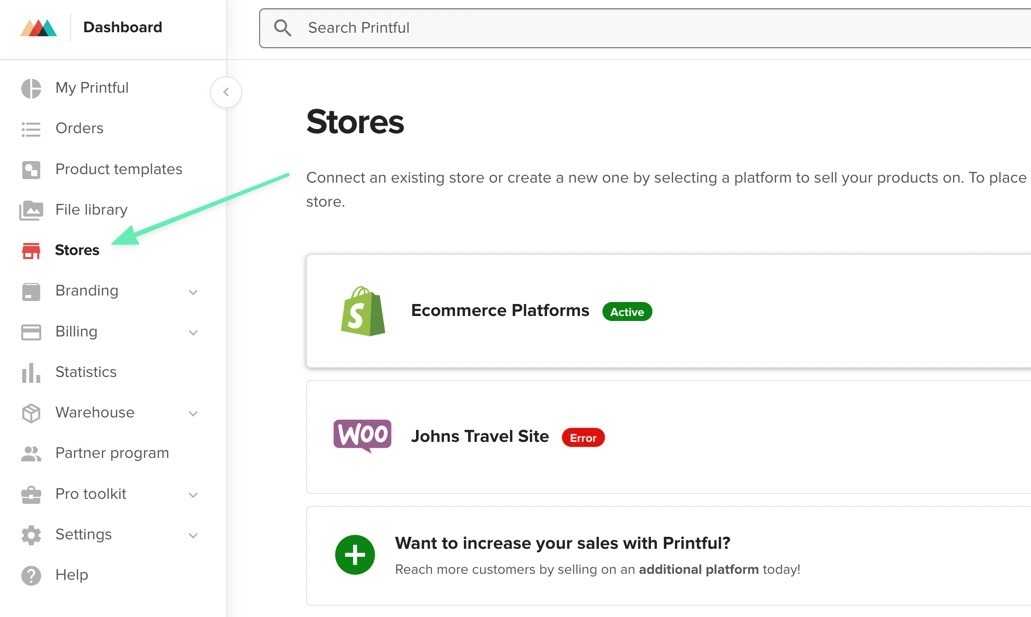
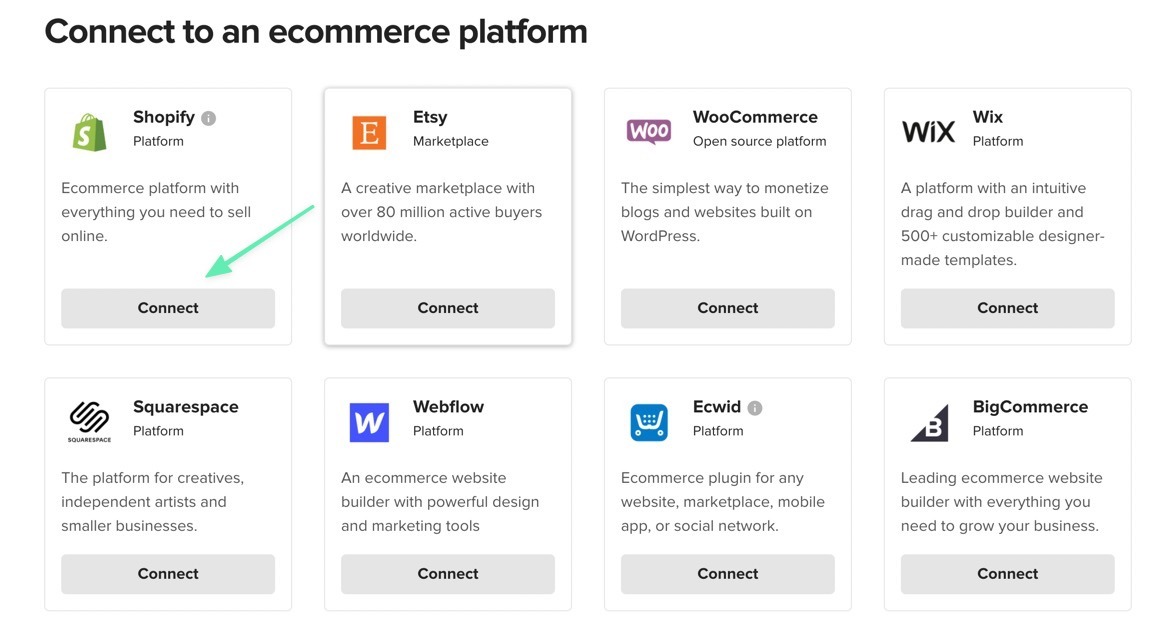
Scroll down to locate the section to “Choose your store’s platform.” Click Choose Platform.

choose platform - how to start a phone case business

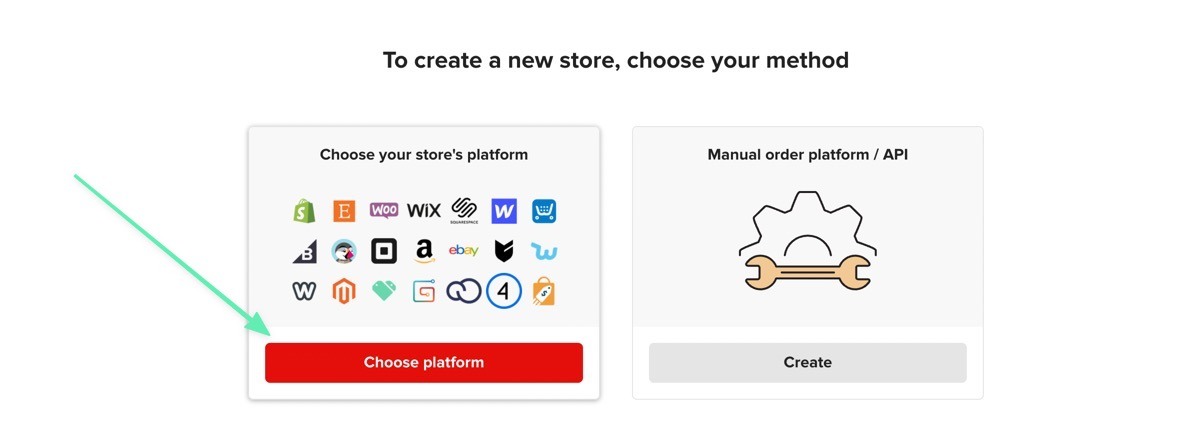
Select the Connect button under Shopify. There are also many other platforms you can use, like WooCommerce, Wix, Squarespace, and Bigcommerce. Read our comparison between the top ecommerce platforms to help guide your decision.

connect shopify

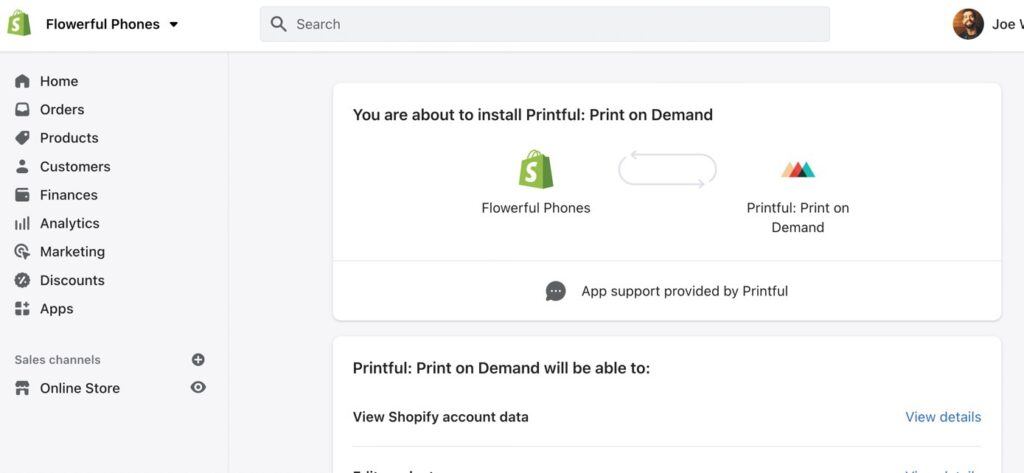
This sends you back to Shopify where it asks you to install the Printful app. Click the Add App button to proceed.

add app

Shopify has a large App Store, and Printful is one of the apps in that store. So, it provides a seemless integration with the click of a button. This is all done in Shopify, where you can read through the information about the integration.

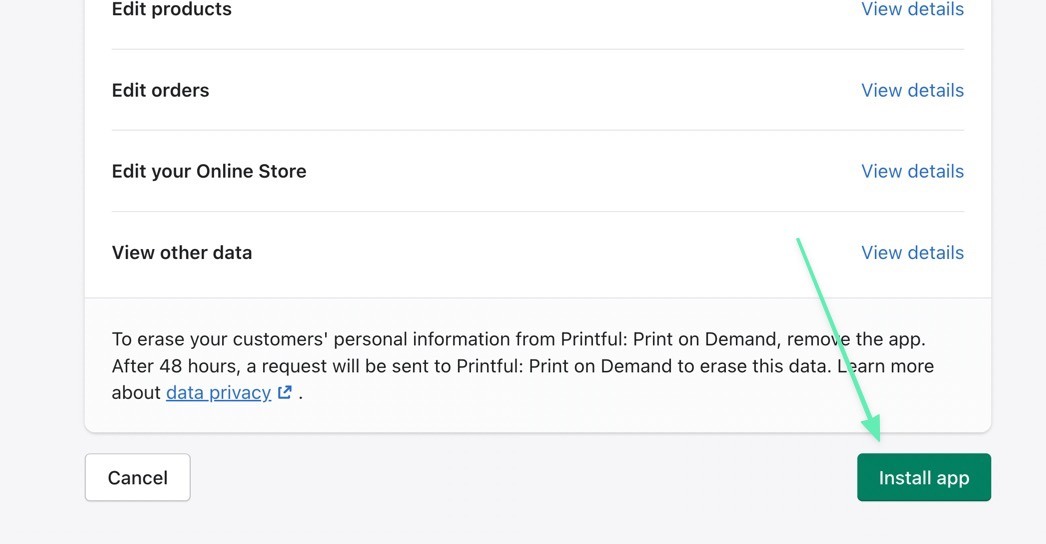
Scroll to the bottom of the page to click the Install App button.

install app button

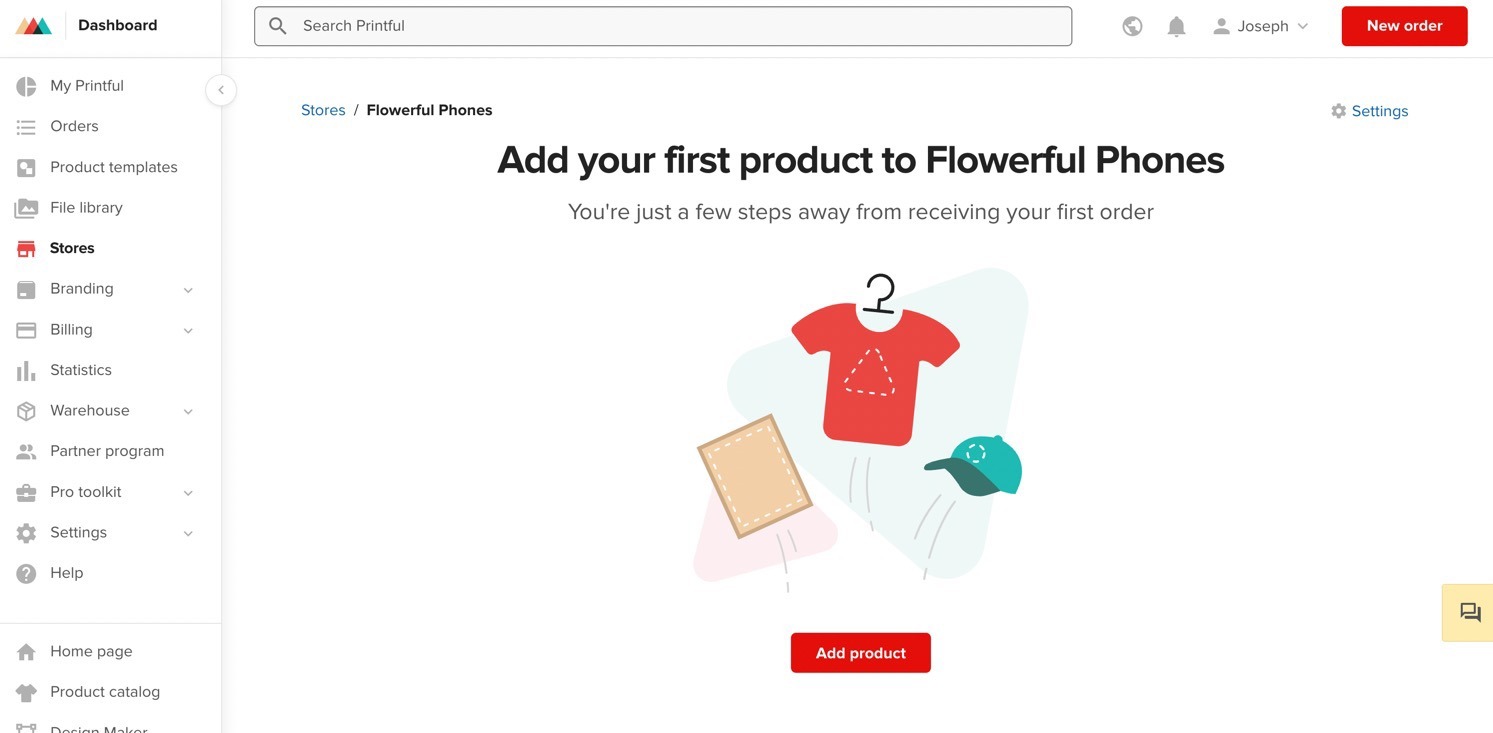
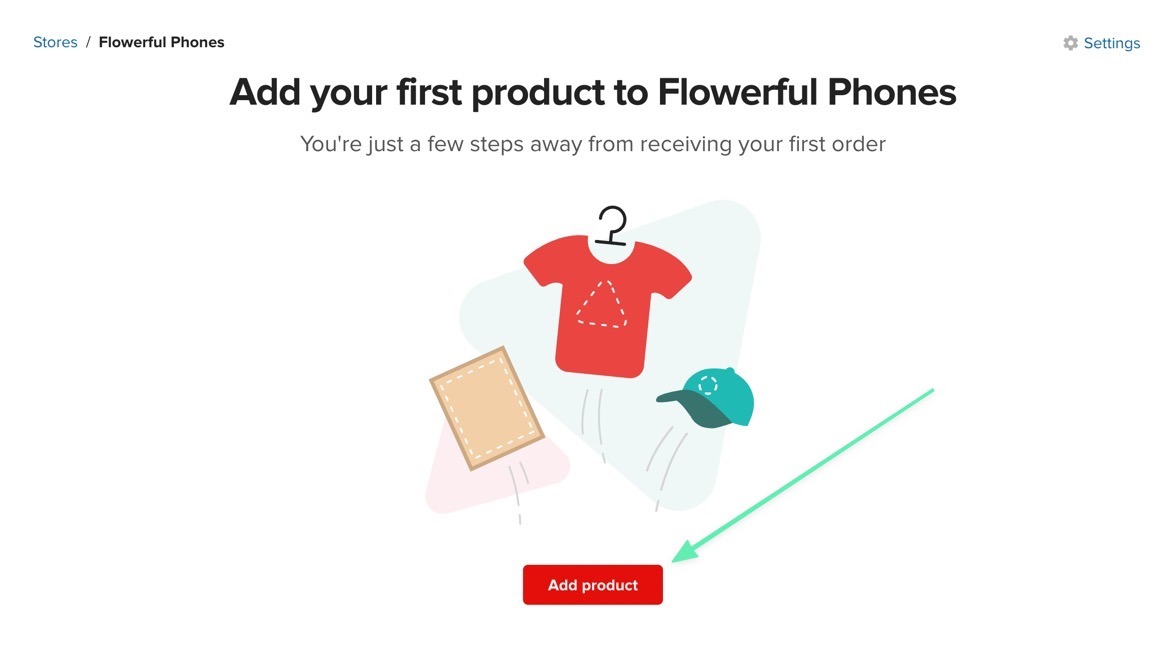
You’ve successfully integrated Printful and Shopify, allowing you to add phone case designs to Printful and sync the product pages with Shopify. The end result should send you to Printful, where you can add your first product.

all synced

Add Your Design, Pricing, Mockups, and Details to Your Product Pages

It’s possible to add products in Shopify, but it makes the most sense to create products in Printful when selling phone cases. This way, you’re able to sync the products to Shopify, while still getting the benefits of automated product fulfillment from Printful.

Click on the Add Product button to get started.

add product button - how to start a phone case business

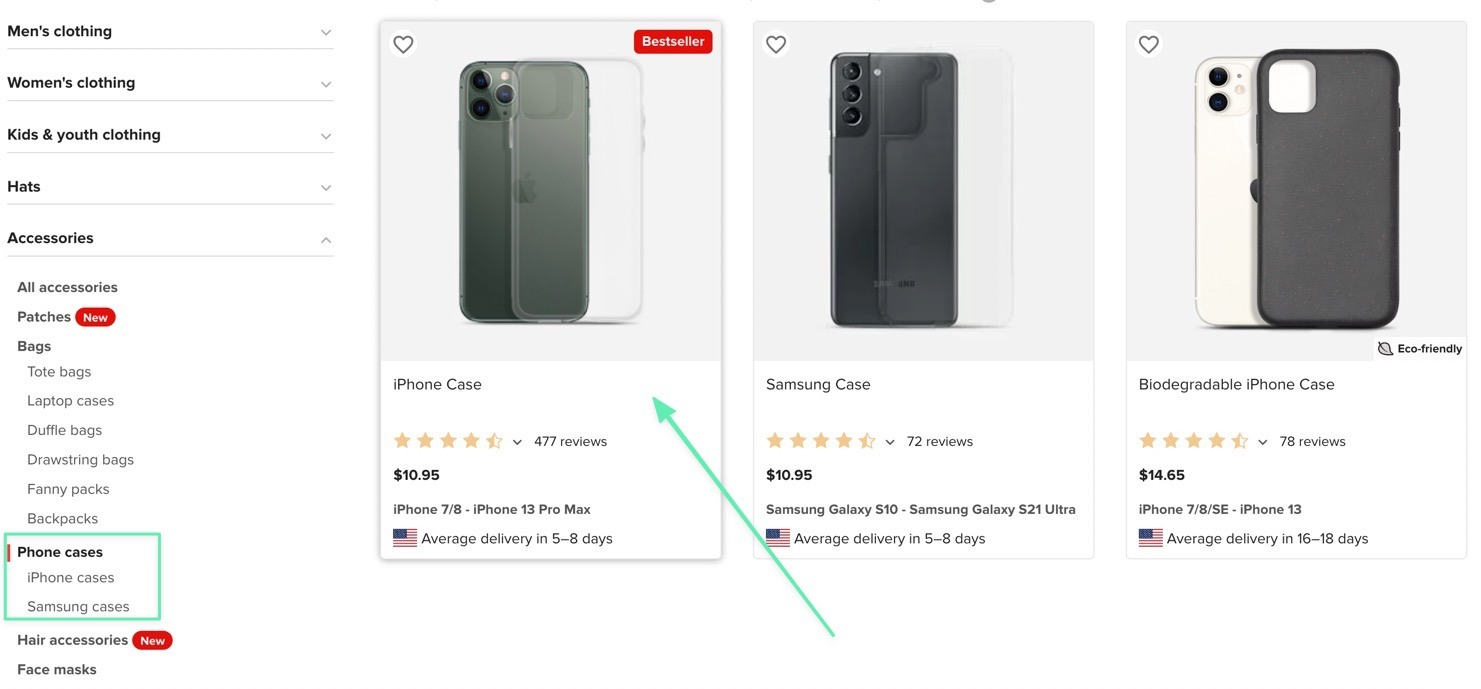
Browse through the product options and go to Accessories > Phone Cases. Choose iPhone Case, Samsung Case, or Biodegradable iPhone Case based on what you plan on selling. You can always go back to add multiple styles of cases. It’s best to create separate product pages if you plan on selling both iPhone and Samsung cases.

pick a case type in printful

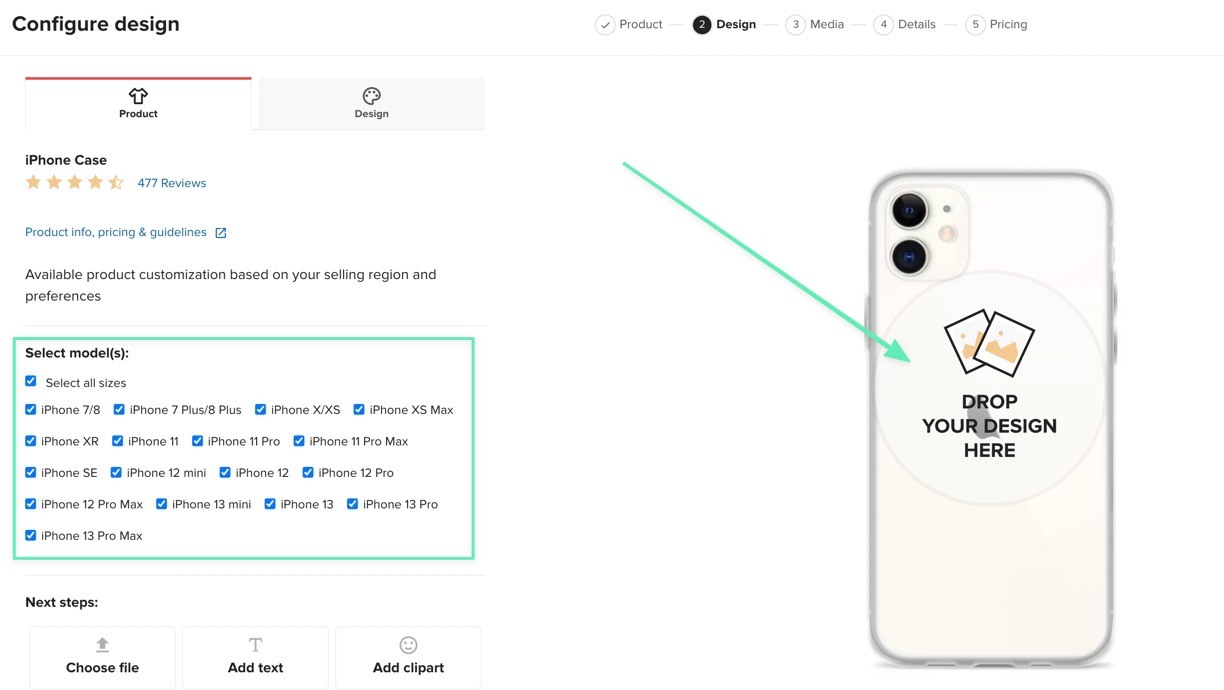
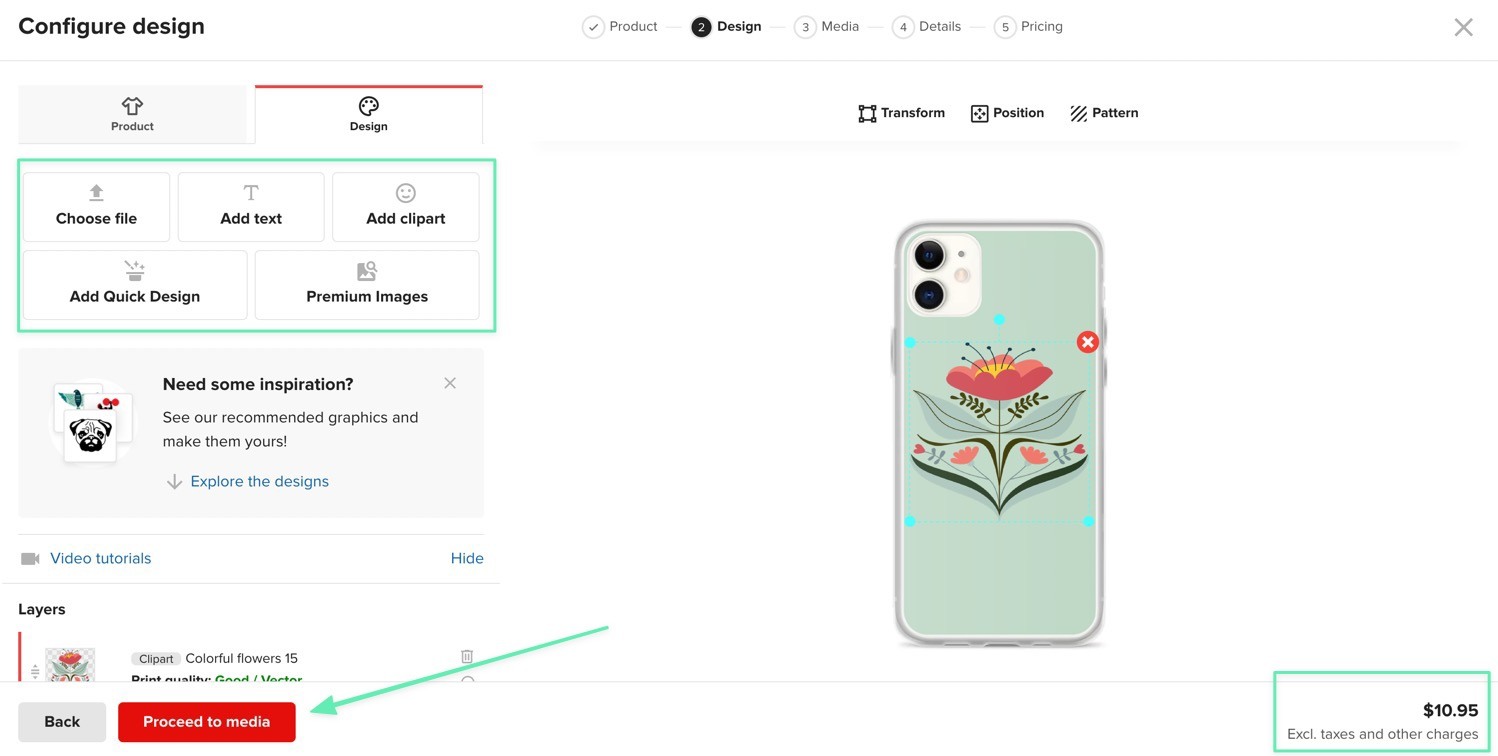
This sends you to the Printful product designer. Mark the check boxes for each phone case model you plan on selling; these get added to your store as product variants for the customer to choose. Click the Drop Your Design Here button to upload a design from your computer or other storage service.

drop design here to learn how to start a phone case business

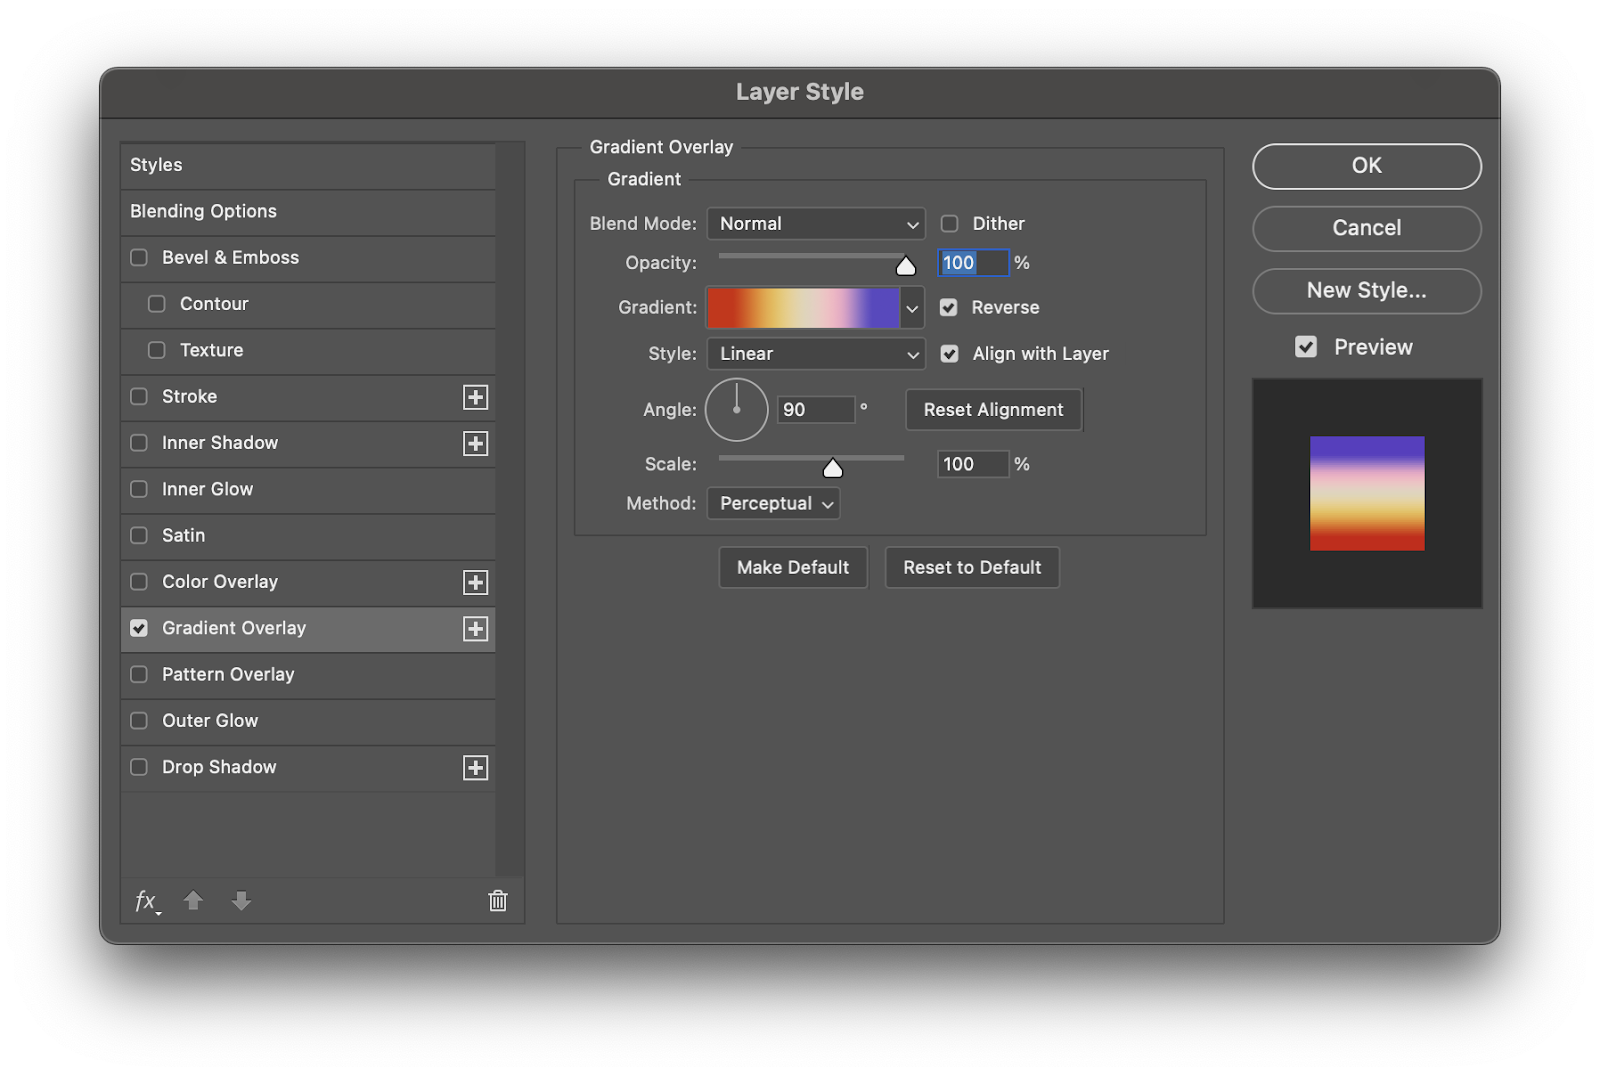
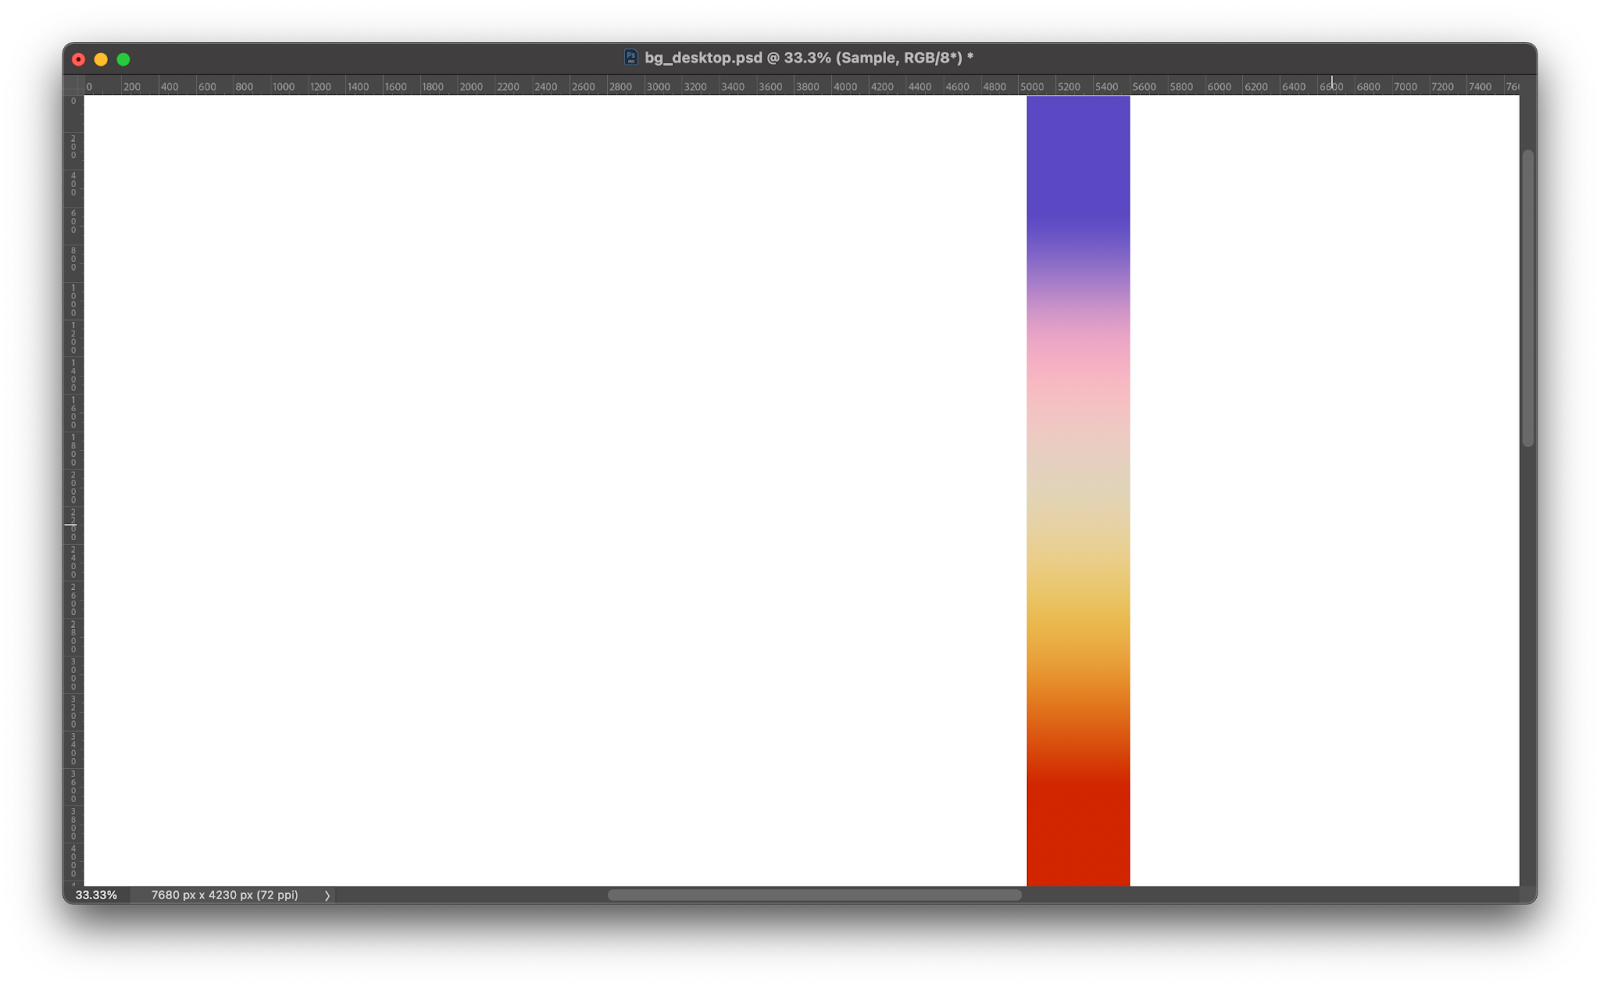
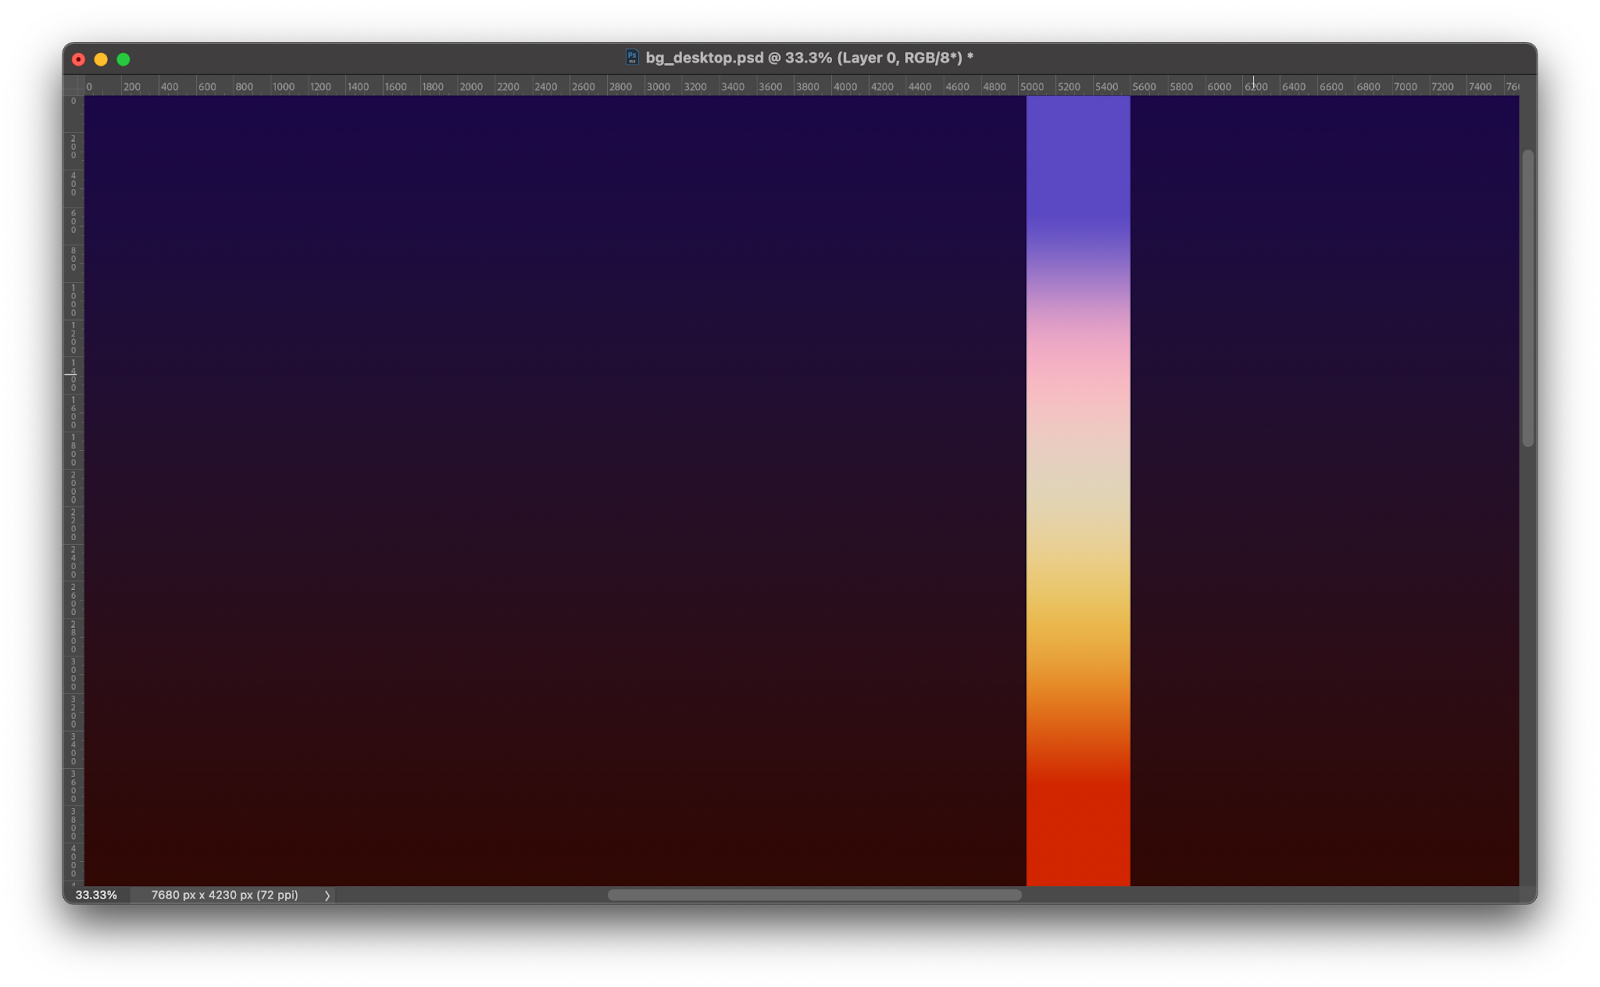
After uploading, the design appears in the mockup preview. It’s also possible to change the Print Area Background to incorporate a unique color background if that’s not already included in your design file.

background and design has been added

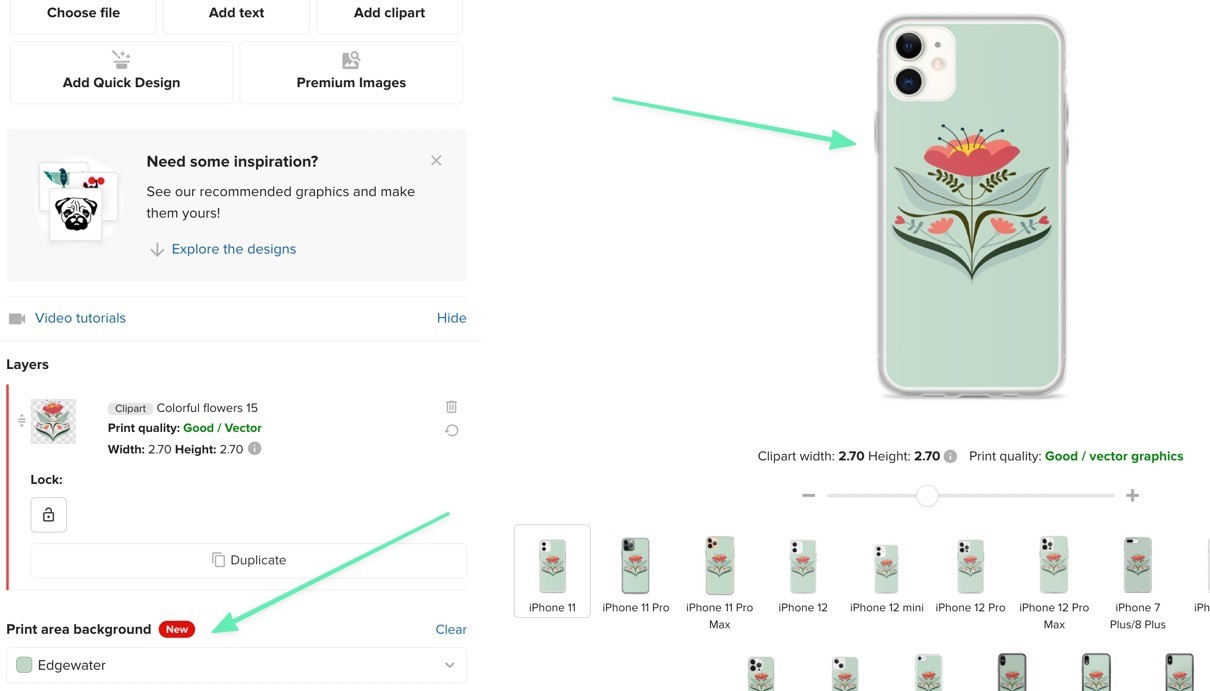
That’s the main way to add a design to a Printful product, but we encourage you to test the entire editor just in case something else allows you to get more creative with your designs. For instance, the Printful designer has options to:

Choose filesAdd textAdd clipartAdd a quick designChoose from premium imagesPosition your imageAdd patternsAdjust the sizing or transform the image

When you’re done designing, click on the Proceed To Media button.

Note: Printful always displays the current cost of the product in the bottom right corner. There’s no extra fee to add one design to a phone case, but some products get more expensive as you print on multiple parts of the item.

editor options

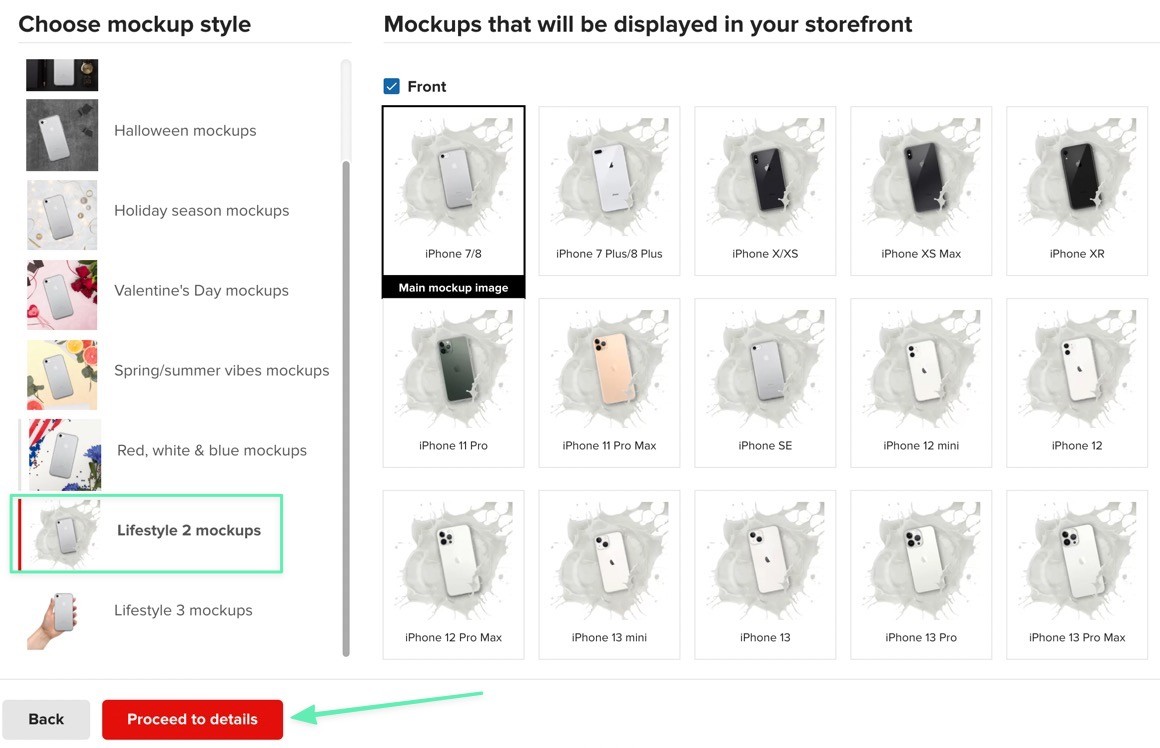
The next section prompts you to select a mockup style for your product pages. This is one of the wonderful parts about Printful, since you don’t have to pay for product photos or take them yourself. Printful puts your design on several default and lifestyle product photos that you can use for free.

mockups in printful - how to start a phone case business

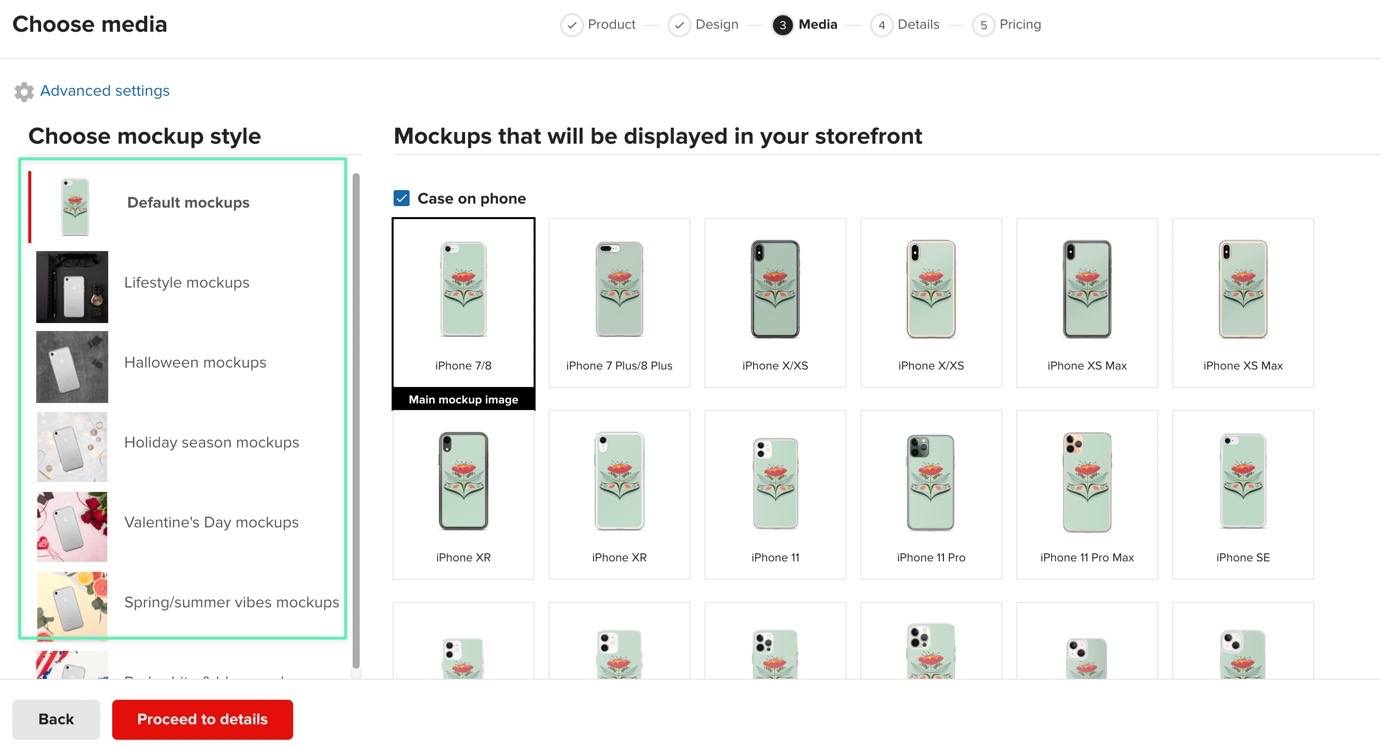
For this example, we’ll go with a creative lifestyle product photo for every variant.

Click on the Proceed To Details button.

lifestyle mockups in printful

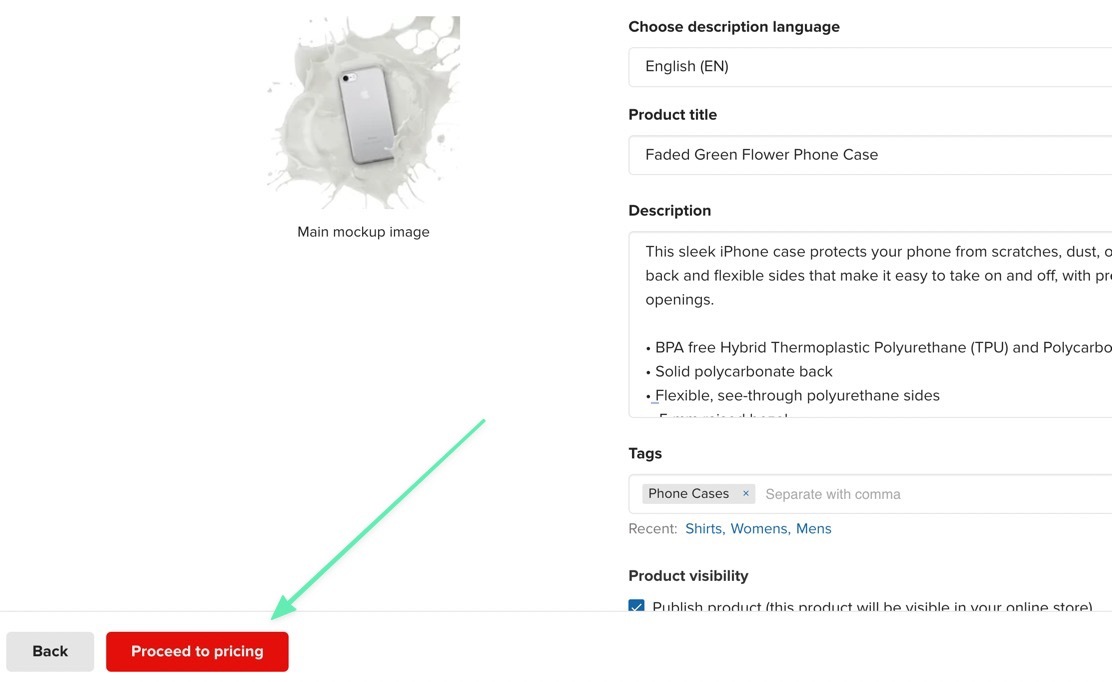
This section asks you to fill in information that appears on the product page in Shopify. As with all ecommerce products, you should create a catchy (and SEO-friendly) Product Title and Description. Printful inserts default information from the manufacturer; we recommend using some of this for product specifications, but it’s wise to rewrite it all for SEO purposes.

Also, feel free to add Tags and Product Collections. We suggest using a Homepage collection so you can instantly place items for purchase on the homepage. It’s also important to mark the checkbox for Product Visibility; otherwise, it won’t show up in your store.

add product description

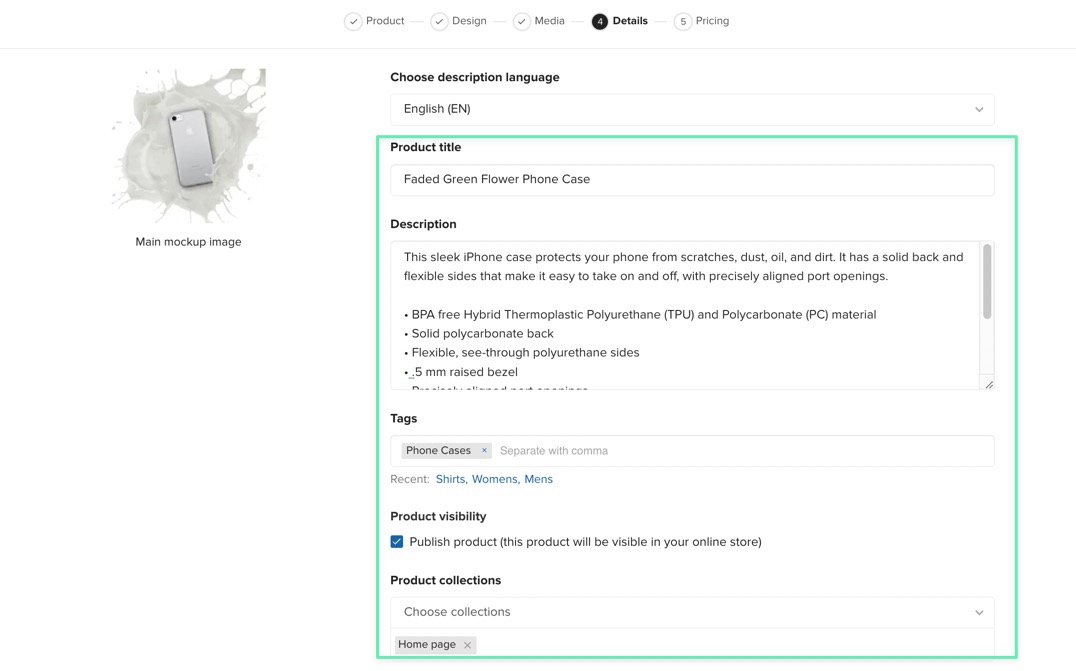
Select the Proceed to Pricing button.

how to start a phone case business with the right descriptions

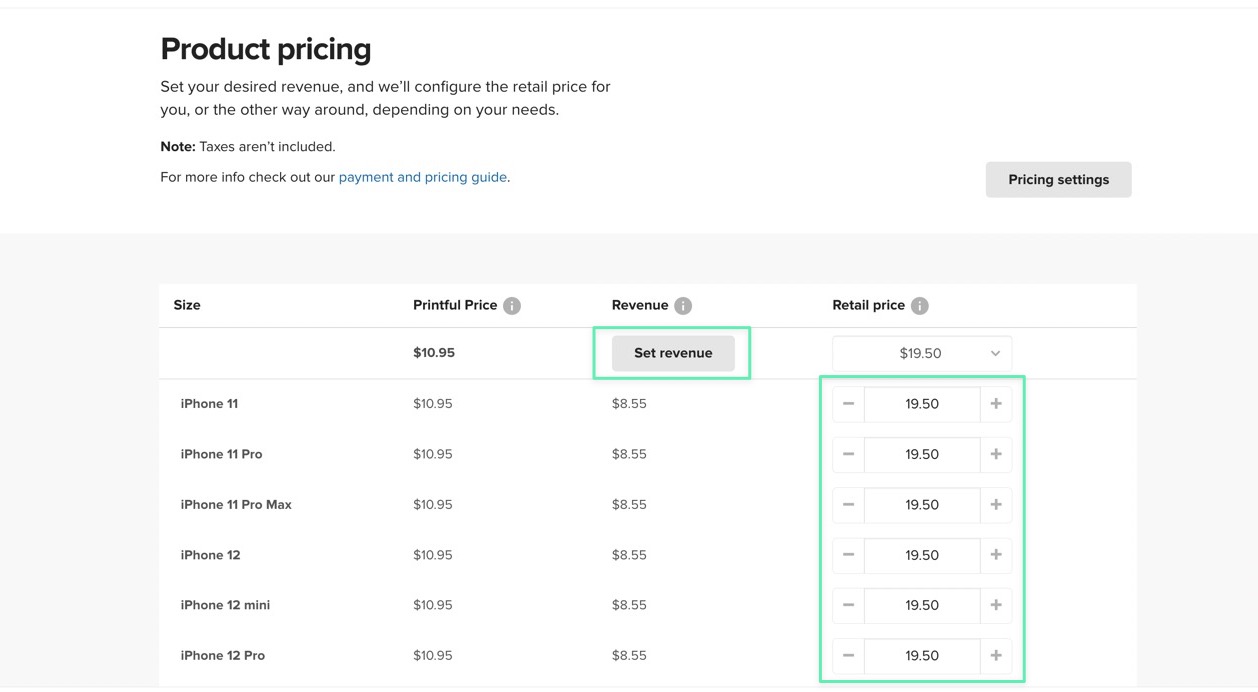
The Product Pricing page has options to set a percentage or dollar-based revenue increase. View the Printful Price (your cost per phone case), the Revenue (your profit per phone case sale), and the Retail Price (how much your customers spend on each phone case) to make the perfect profit margin for your store. Printful already recommends pricing, but you should adjust the pricing based on what your customers are willing to pay.

add pricing - how to start a phone case business

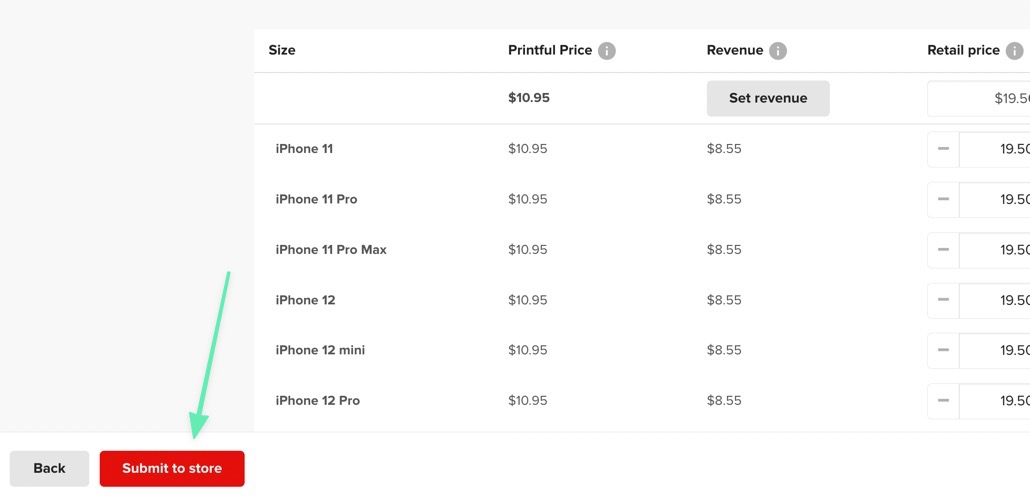
When you’re all done, click on the Submit To Store button.

submit to store button

Within a few seconds, Printful adds the item to your dashboard, where you can view the synced variants and click to View In Shopify or Edit In Shopify.

Note: Make sure you complete most edits in Printful, since they’re the ones making and fulfilling your phone case.

added to printful

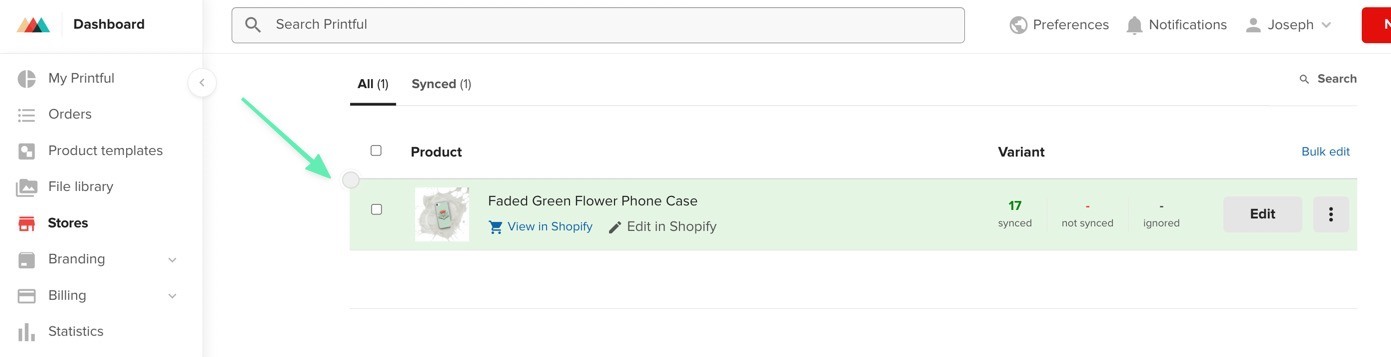
Going over to Shopify, we can now see that the product successfully synced from Printful.

synced in shopify

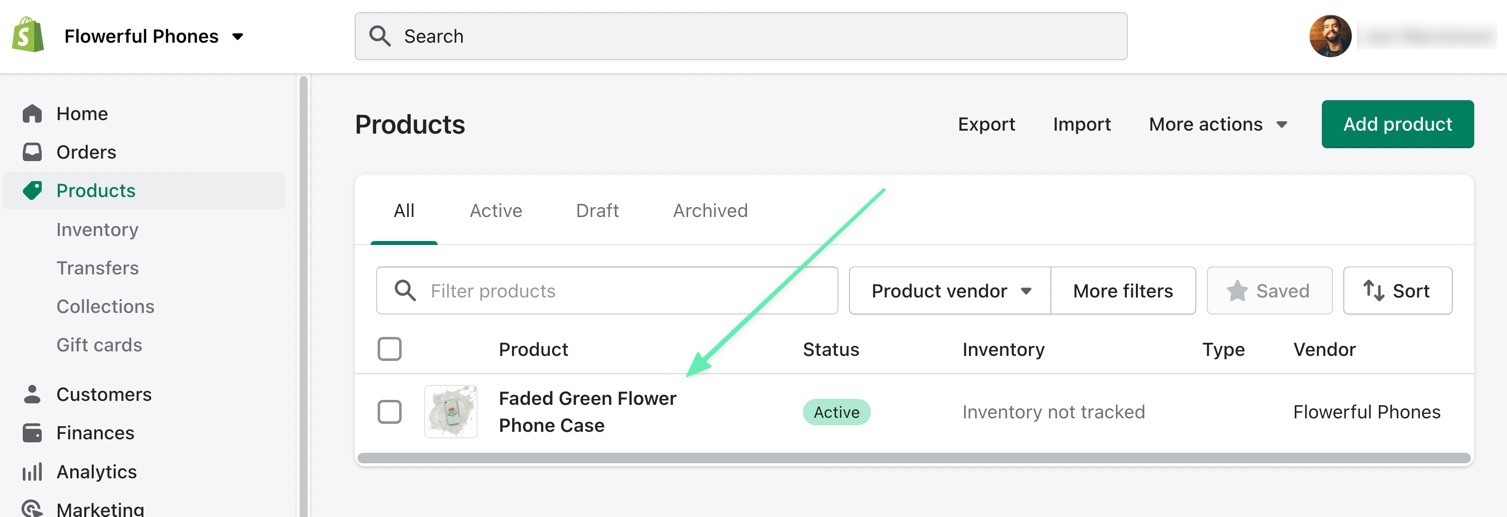
And we recommend going to the frontend view of your Shopify store to see if everything looks right. As you can see, our product appears in the Homepage category showcase.

homepage view

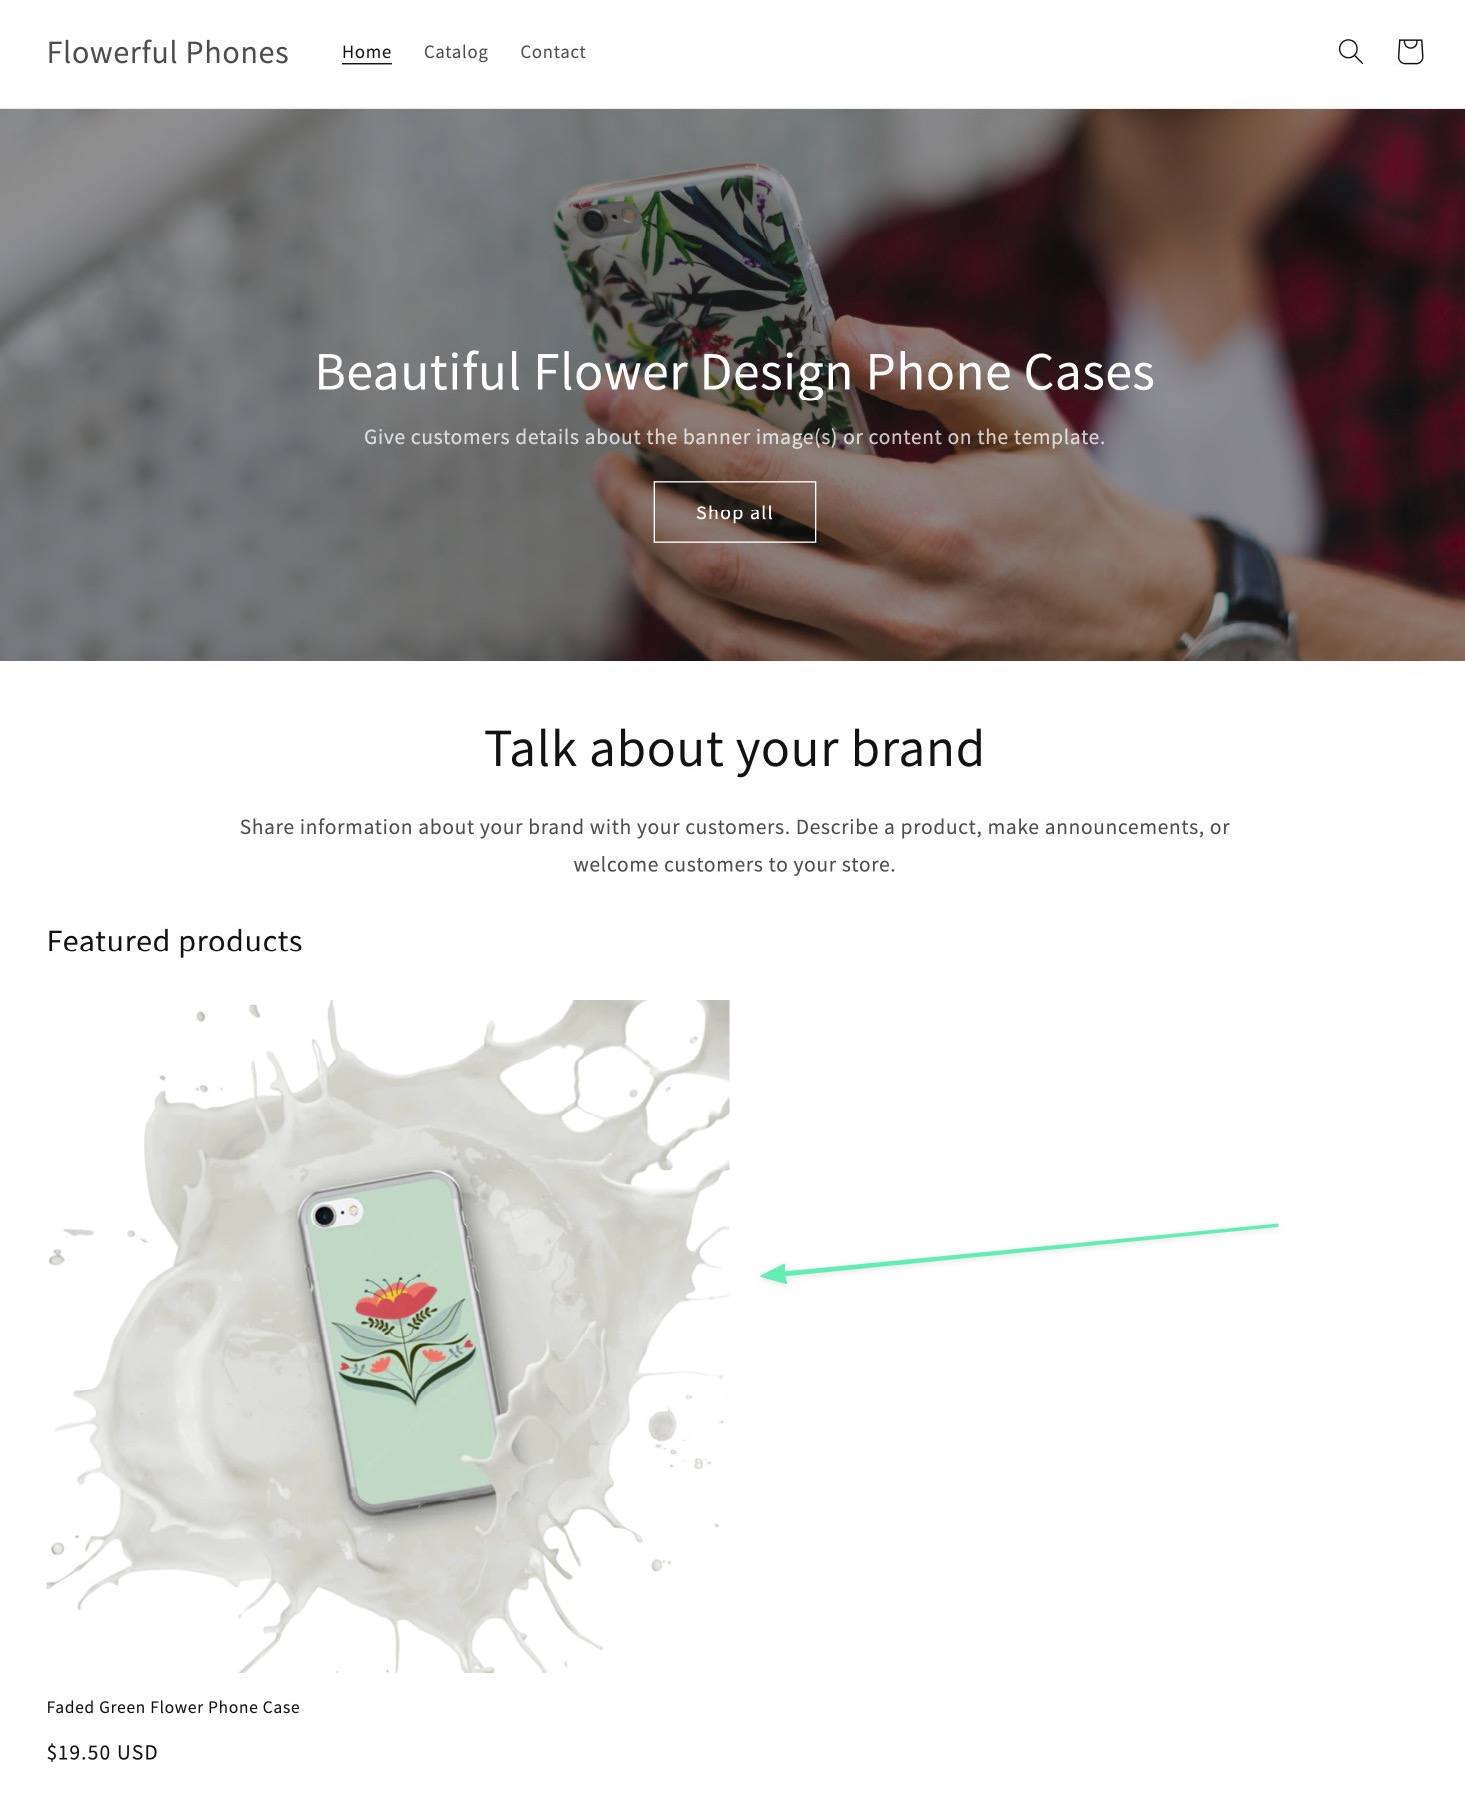
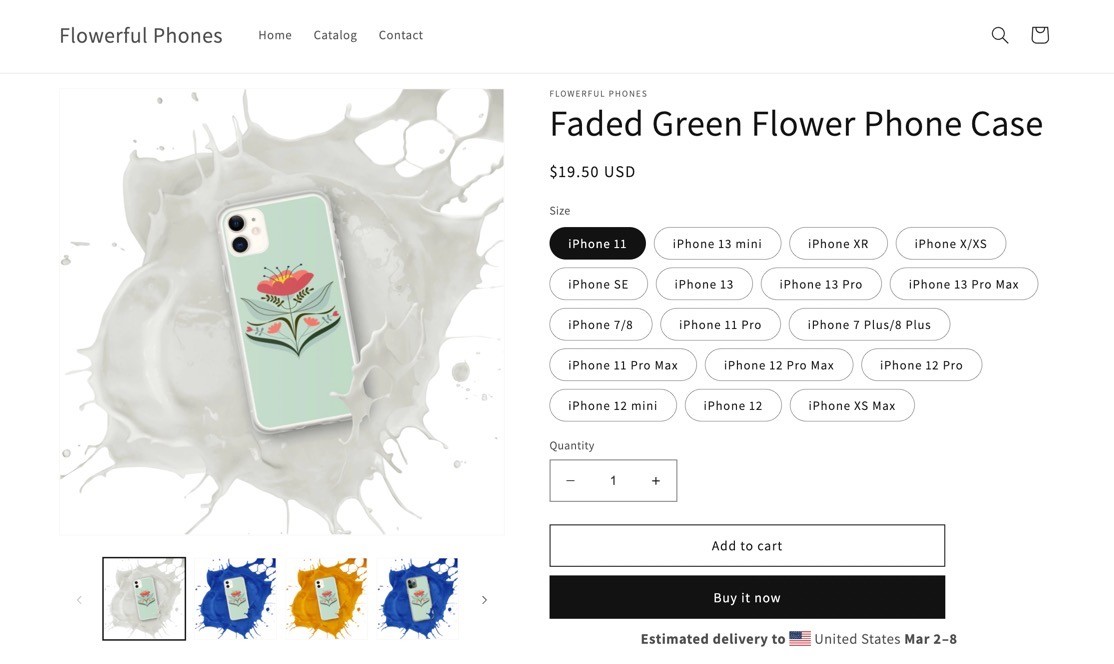
It’s also a good idea to look at the actual product page. Check that you have all the right product variants, pricing, descriptions, and images. Feel free to use the Shopify Customizer to adjust the overall layout of all product pages.

how to start a phone case business with a frontend view

Accept Mobile Phone Case Orders and Market Your New Business

Now it’s time to start selling your phone cases!

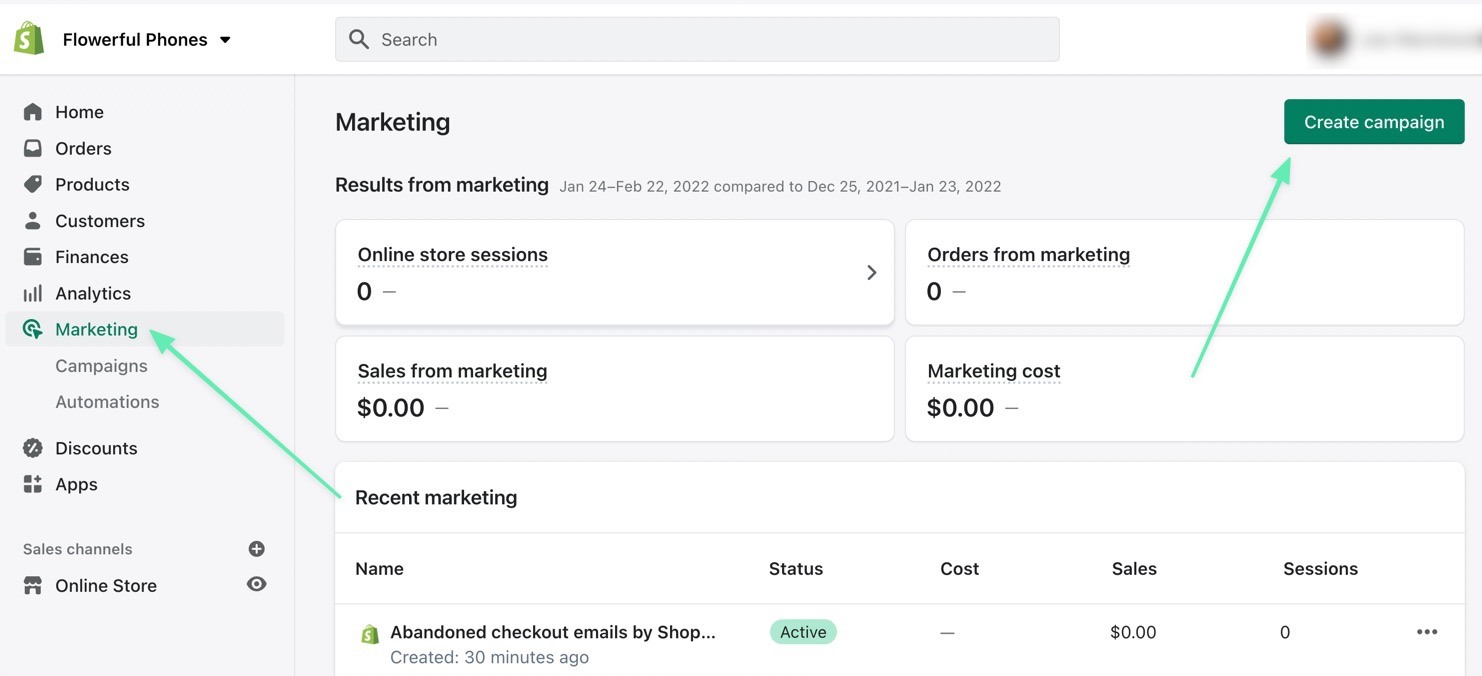
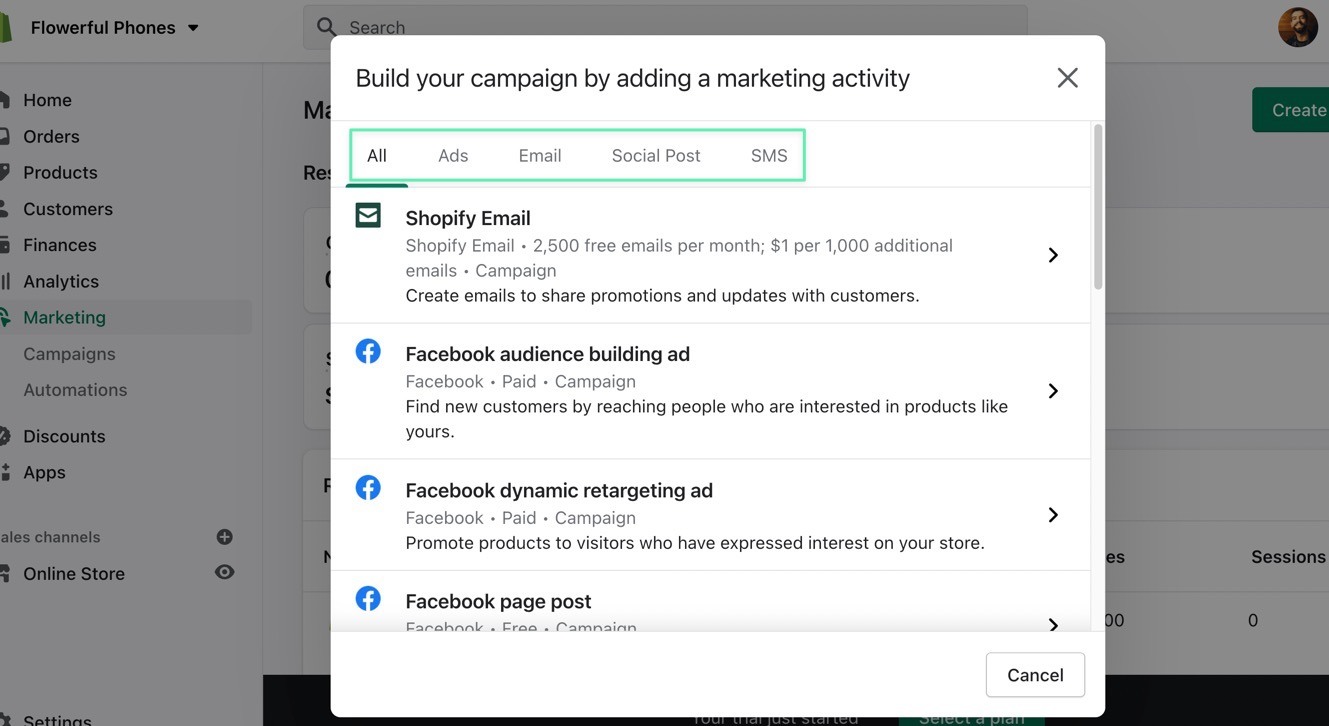
There are many ways to market your products in Shopify, most of which are stored under the Marketing menu item. You can click on the Create Campaign button to see marketing options and launch a campaign.

create campaign

Options for marketing in Shopify include:

Shopify Email marketingFacebooks AdsPinterest AdsSnapchat AdsYahoo AdsMicrosoft Smart ShoppingSMS Test marketing

When it comes to selling custom phone cases, we find that a few forms of marketing work best:

Social advertising: You can do this on Facebook, Snapchat, and Pinterest through the Shopify dashboard. Other social networks offer advertising tools as well. Search engine advertising: Google has its own advertising panel (so you must do this outside of Shopify). Otherwise, Shopify has advertising features through Microsoft. Email marketing: Use Shopify Email or one of the many integrations like Mailchimp or Constant Contact. Influencer marketing: This is one of the most powerful marketing strategies when dropshipping custom designs. Shopify doesn’t have a feature for this, but you can easily reach out to relevant social influencers and bloggers and create an agreement for them to market your phone case. Think Instagram, TikTok, Facebook, and Snapchat.

marketing in Shopify - how to start a phone case business

Summary on How to Start a Phone Case Business

All online business owners want to start with low costs, minimal storage requirements, and decreased risk. In reality, that’s not always possible, unless you consider a small business like one that sells cell phone cases. These phone accessories allow for an incredible amount of flexibility; you can sell from a physical storefront, at a kiosk, or learn how to start a phone case business with an online store.

With a little market research on demographics, some of your own designs, and an efficient fulfillment system through Shopify and Printful, we believe that any dedicated business person has the potential to make a considerable amount of money with a custom phone case business. Simply pair all of that with some Facebook Ads and influencer marketing and you’re well on your way to finding your place in the world of iPhone cases and Android cases.

If you have any questions about how to start a phone case business with a Shopify ecommerce website and Printful, let us know in the comments section below. Also, share your tips if you’ve already found success with a phone case ecommerce business!

The post How to Start a Phone Case Business (With No Prior Experience) appeared first on Ecommerce Platforms.