Jamstack CMS: The Past, The Present and The Future

Original Source: https://smashingmagazine.com/2021/08/history-future-jamstack-cms/

The world’s first website was made from static HTML files created in a text editor. While it looks unassuming, it laid the foundation for the web we have today. Fast-forward 30 years, and website technology has changed significantly — we have images, stylesheets, JavaScript, streaming video, AJAX, animation, WebSockets, WebGL, rounded corners in CSS — the list goes on.

Sir Tim Berners-Lee couldn’t have possibly imagined the weird and wonderful place the world wide web would become and how deeply it would become part of our everyday lives. Yet, for all these technological developments, it’s interesting that many of us are still serving sites in the same way Tim did with the very first website — a web server serving static website files.

Throughout the web’s history, static websites have always been a popular option due to their simplicity, scalability, and security. However, unlike the early days of the web, static sites are no longer limited to developers working in a code editor. Now there’s a massive range of Jamstack CMSs available, which bring all the advantages of static sites while allowing non-technical folk to update content.

Over the years, there have been many different approaches and evolutions of static and Jamstack CMSs. In this post, we’re taking a stroll down memory lane to look at the CMSs that gave rise to the Jamstack CMSs we have today and peek beyond the horizon of what’s next.

The 90s

During the 90s, we saw two content management systems for static sites — Microsoft FrontPage in 1996 and Macromedia Dreamweaver in 1997. I vividly remember receiving a PC Magazine for my birthday with a trial of Dreamweaver. Piecing together a website using a WYSIWYG editor and seeing the code it generated was a fascinating and educational experience that sparked an initial interest in web design.

These desktop applications incremented the tooling an inch closer to the modern Jamstack content management systems of today. The idea of drag’n’dropping website components while still having control of the HTML was groundbreaking at the time.

Maintaining layouts became a particular pain point for static sites. For example, let’s say you had a website and wanted to change your navigation. You would need to make that change on every page. At this point, dynamically generated websites had already solved this problem with includes.

Dreamweaver 4 introduced editable regions, which was the first foray into separating content from the layout on a static website. Now you could manage larger sites and even hand off content editing to someone else without worrying about them breaking the rest of the site.

The bridge between local development and deployment was also a pain point Dreamweaver began to address with integrated FTP. I remember the struggle of getting my FTP configuration exactly correct in Dreamweaver for the free, advertising-ridden hosting I’d found. But, when it worked, it was magical. I had my website with funny photos and links to favorite websites live on the internet, and better yet, I could edit directly on the server.

The 00s

In the 2000s we had a showdown of two popular blog publishing platforms — MovableType in 2001 and WordPress in 2003. It was a battle of not only proprietary vs open source but also static vs dynamic. It’s safe to say WordPress, the platform now powering 40% of the internet, won that battle, but MovableType paved the way for Jamstack CMSs in the future.

MovableType was one of the first static site generators on the market, although that term wouldn’t become popular until 2008. Ben and Mena Trott created MovableType because of a “Dissatisfacion with existing blog CMSes — performance, stability.” To this day, these two points are common reasons for switching from a dynamic site to a static one.

What’s interesting is there was little mention of static sites in MoveableType’s documentation at all. Instead, they would talk about “rebuilding” the site after any changes. I imagine they wanted to avoid the limiting perception of the word ‘static.’ It’s the same problem that led the community to adopt the term ‘Jamstack.’

Before MovableType, other personal blogging platforms were available such as Geocities, Blogger & Open Diary. However, MovableType was one of the first widely available platforms you could download for free and host yourself. In addition, they introduced a hosted version of MovableType in 2003 called TypePad to compete with other popular cloud platforms.

With MovableType, you had everything you needed to manage your blog. You could create and update blog posts, all content was straight HTML — open-source WYSIWYG editors weren’t available at the time, and Markdown didn’t come about until 2004.

We can see all the bones of modern Jamstack CMSs here. MovableType really was before its time.

In 2006, Denis Defreyne tried to set up a Ruby-based blog platform and ran into performance problems — “Having a VPS with only 96 MB of RAM, any Ruby-based CMS ran extremely slowly.” One year later, Denis launches Nanoc, a static site generator that simplifies MovableType’s model. Nanoc removed the UI and is instead a program you run on the command line.

As far as I can tell, this is the first modern static site generator, although we’re still a year away from coining that term. At the time, Nanoc talked about compiling source files into HTML:

It operates on local files, and therefore does not run on the server. nanoc “compiles” the local source files into HTML by evaluating eRuby, Markdown, etc.

Nanoc had many static site generator (SSG) features we now take for granted:

Layouts
Create layout elements using Ruby’s ERB templating language.
Page Metadata
A separate YAML file for storing title and other metadata for a page. Front matter wasn’t a thing yet.
Markdown support
Write content in Markdown and transform it into HTML on build.
Templates
A feature similar to Hugo’s archetypes.
Plugins
Known as libs; extend the static site generator for your own needs.

By the end of 2008, Tom Preston-Werner announces Jekyll — a simple, blog-aware, static site generator. It took ideas from Nanoc and pushed them even further with two significant innovations:

Front matter
Instead of metadata living in a separate file, now you can have a small YAML snippet at the top of a file.
Blog aware
Create posts with Markdown files. Jekyll builds these into an array you can iterate over and paginate to create a blog.

Both Nanoc and Jekyll revolutionized the future of static site tooling in their own way. First, Nanoc introduced having a site’s configuration, layouts, and content as static files. The benefit of doing this is the entire site’s source code can live in Git. Jekyll took this a step further by providing more structure around the content. Now you could use GitHub as your CMS. Adding a new blog post is as simple as creating a new Markdown file in GitHub, writing your content, and committing.

The 10s

In 2012, Dave Cole published a post on How we build CMS free websites. The post details how Development Seed moved their websites from Drupal to Jekyll and how they use Prose.io to manage the content. Development Seed built Prose.io to make it easier for content writers to contribute to Jekyll websites.

Prose.io syncs with your GitHub repository and provides a simple GUI for everyday content tasks such as updating front matter, writing Markdown, creating posts, and uploading files. In addition, content updates save back to GitHub, creating a tight workflow between developers and content writers.

Prose turned Jekyll from a tool for developers to create blogs to a powerful content publishing platform. Moreover, it sparked a decade of companies pushing static site generator content publishing to the next level.

There are now hundreds of modern Jamstack CMSs to choose from, each with its own benefits and trade-offs. Jamstack CMSs typically take one of three approaches to manage content on a static website:

SSG/CMS package

Hailing back to MovableType, these platforms manage content and render the static site themselves. Controlling the whole stack means these CMSs can provide a tightly integrated experience. Expect live previews, straightforward setup, and strong conventions.

The downside of the SSG/CMS package is they’re bundled together. You might love the editing experience but loathe the website generation portion. It’s worth noting that you can throw away the SSG portion on some of these platforms and only use it solely as a Content API.

Examples: Statamic, Publii, WordPress (with Simply Static plugin).

Content API

These platforms provide content as a service. They offer many different field types you can use to piece together the content for your pages. On top of that, Content API platforms provide sophisticated APIs to retrieve the content.

When you run an SSG build, you download the content from the content API and interact with it like you would a data file. The nice thing about content APIs is you can reuse content across many different digital experiences. In addition to that, you can manage massive amounts of content and have deep relationships between pieces of content.

The downside is your content lives on a third party, so you’re at their mercy for any downtime, API changes, or how you interact with your content. Finally, as the editing interface is abstract from the end use-case of the content, there can be a disconnect between the fields in the Content API vs what you see rendered on a web page.

Examples: Contentful, Prismic, Strapi.

Git-Based CMS

These platforms take a similar approach to Prose.io. You connect your Git repository, they pull in your website files and create an editing interface around them. When you save changes, the files push back to your repository. The benefit of this approach is your Git repository holds your entire site and all its content.

Git based CMSs bring all the power of Git workflows to non-technical content writers. The downside is everything lives in your repository, so if you want to reuse content across multiple digital experiences, you would need to build JSON endpoints on your static site. Hosted repositories also have an upper limit of ~2GB, so you may need to use a 3rd party service for media if you have many assets.

Examples: CloudCannon (disclaimer: I’m the co-founder), Netlify CMS, Tina

Where are Jamstack CMSs today?

SSGs were originally tools for developers to build personal blogs. It was a simple approach that gave developers complete control, but you needed a basic understanding of web development to contribute to the sites. Over the past decade, the rapid evolution of Jamstack and the Jamstack CMS has helped propel Jamstack into mainstream use cases. These use cases include:

Documentation

Developers expect a lot from documentation sites, and a good experience will help win them over. Jamstack puts you on the right track to creating documentation sites developers love:

Development is rapid, and there’s more time for polish.
Markdown is an excellent format for Documentation made even easier with a good CMS.
The site will load in a snap.
The site content lives in a repository which allows the developer community to suggest improvements.

Companies including Twitch, Rackspace, and Linode are reaping the benefits of Jamstack for their documentation websites.

eCommerce

Visitors to an eCommerce site are on a path to paying money. Slow loading times or worse, downtime can make them look elsewhere. Platforms such as Snipcart, CommerceLayer, headless Shopify, and Stripe enable you to manage products in a friendly UI while taking advantage of the benefits of Jamstack:

Amazon’s famous study reported that for every 100ms in latency, they lose 1% of sales. Jamstack sites are typically among the fastest on the web.
When an eCommerce site has downtime, it can’t generate sales. There are far fewer moving parts in a Jamstack site, making them easier to keep online.
eCommerce sites are consistently iterating to improve conversion rates. Developer experience is at the heart of Jamstack, allowing developers to make and publish changes quickly.

Victoria Beckham Beauty, Teespring, and Louis Vuitton are all using Jamstack to boost their eCommerce experience.

Corporate websites

Corporate websites are the online front door to a company. Making a good impression with a fast-loading, well-constructed website can give an edge over competitors. Many of the Jamstack CMSs we’ve mentioned have the features and workflows growing enterprises require. These include translations, publishing workflows, and complex content modeling.

Netflix, Peloton, and Intercom iterate faster on their corporate websites thanks to Jamstack and Jamstack CMSs.

Large scale blogs

Static site generators often get pigeonholed as a solution for small websites. Thanks to the build speed of static site generators like Hugo and modern Jamstack CMSs designed to handle vast amounts of content, even prominent blogs like Smashing Magazine, web.dev, and JFK International Air Terminal can take advantage of a Jamstack approach.

Government

What better way to promote online transparency in government than having a website where the content lives in a public repository? There’s a complete history of all changes, and citizens can suggest improvements. You really can have a government website by the people, for the people.

digital.gov, Singapore Together, and CIO.gov all have pubic repositories on GitHub, which you can browse through every change made or suggest a content update.

Client websites

Websites for clients need to be exceptionally simple to update. Jamstack CMSs with a visual editor like Storyblok, CloudCannon and Tina make it intuitive for non-technical clients to manage content on their Jamstack website.

Wilto Makes Food, Down Thyme, The Bottle Room Bar take advantage of the same Jamstack approach that world-leading companies are.

How Does The Modern Jamstack CMS Stack Up Against Other Popular CMSs?

At a high level, there are two ways of getting a website online:

You select a template, customize it to your brand and enter your content.
You work with a designer and developer to create a bespoke website.

Of course the template approach is cheaper. For under $100, you can get a high-quality theme/template and get your website online in minutes. It’s an excellent way for an individual or small business to get a website online.

A quality bespoke website is going to start at $1k and can easily get to $100k+. A unique website with custom functionality helps you stand out against a sea of millions of websites, something many companies are willing to pay for.

Squarespace, Wix And Weebly

Website builder platforms focus on the template approach. They’re going for the mass market, and provide a way for anyone to spin up a website without a developer.

There’s no question Jamstack is a developer-focused technology. When we talk about static site generators, incremental regeneration, or instant cache invalidation, it’s enough to make the layman’s eyes glaze over. I struggle to see a future where the local flower shop needs a website and chooses a Jamstack approach without developer involvement.

Even with the most intuitive content management system for Jamstack where you can select a template, drag & drop components, and inline edit content, the benefits of Jamstack for this audience over website builders are too technical. Sure, it’ll be fast, secure, and easy to edit; however, the end-user couldn’t care less whether it’s using Jekyll, Hugo, Gatsby, or a dynamic backend.

The benefits of a fast-loading website, automated DevOps, higher uptime, and faster development cycles are much more seductive to companies building bespoke web projects. In this sense I don’t see a lot of overlap between website builders and Jamstack use cases.

WordPress

WordPress has captured both workflows. Someone completely non-technical can piece together a template with various plugins and have their website online within a day. WordPress also has rich APIs that developers use to create unique, bespoke web experiences. This broad range of use cases has helped grow WordPress to power almost 40% of the internet.

In most articles about Jamstack, you’ll find a section that throws WordPress under the bus. There’s frequently talk about how WordPress is slow, insecure, and complicated. I believe it’s a more fundamental conversation of approach. We’re often talking about static vs. dynamic and monolith vs. decoupled. WordPress is the most popular CMS, so it’s often the target.

There is no Jamstack vs. WordPress. The truth is you can enjoy the benefits of Jamstack while using WordPress as your CMS. Hosting platforms like Shifter and Strattic turn your WordPress site into a static website. You can also use a plugin to output a static site or use WordPress as a headless CMS to populate content into a static site generator.

It’s also relatively straightforward to migrate from WordPress to a Jamstack CMS. For a Git CMS you’ll want to migrate the blog posts and assets to Markdown files which live with your static site generator of choice. Fortunately, many SSGs have import tools that make this easy. For a Content API CMS, some of them have a data import tool otherwise, you can always write a script to pull data from WordPress and save it to your Content API.

Webflow

Webflow is a curious one because it allows designers to create bespoke websites without developers, but it’s too technical to be considered a website builder. It’s a robust platform that certainly overlaps with some Jamstack use cases. Ultimately it’s going to come down to control.

If your requirements fit within Webflow’s capabilities, it might be a good solution for you. While it can do a lot, it has limitations that a developer can surpass. If you need a developer, taking a Jamstack approach is one of the most efficient ways to leverage your staffing resources.

Drupal

Drupal is not just a CMS. It’s a powerful framework that can solve even the most complex use cases, gearing it more towards bespoke solutions for enterprise problems rather than much smaller informational sites.

Modern Jamstack CMSs have plenty of successful case studies of these smaller websites. For the more complex enterprise use cases, we have fewer examples. There are some limitations Jamstack needs to overcome to compete with a sizeable Drupal install:

Build time

Prebuilding a site using a static site generator takes time. For a small site, a build might take a few seconds. A site with 100k pages could take upwards of an hour to build. Waiting an hour for your site to build after each change isn’t a viable development workflow.

Static site generators have several strategies to address long build times, including build caching, incremental builds, dynamic persistent rendering, and website sharding. The choice of tooling also has a significant impact on build time. For example, using a Golang based static site generator like Hugo can rapidly build large sites, whereas using something Ruby-based like Jekyll might struggle.

We don’t have a silver bullet for build time yet, but the implementations of these strategies are improving all the time, which opens up possibilities for more extensive use cases.

Dynamic functionality

Large, complex websites typically have some form of dynamic behavior. Forms, commenting, search, and custom API endpoints are all bread-and-butter for Drupal. For many developers, it’s not obvious how to do these on a Jamstack site.

There’s a huge ecosystem of tools that support Jamstack websites for everything from commenting solutions, search, contact forms, to even eCommerce.

Perhaps you don’t want to use a third party, and you need a bespoke solution. You still have options with Jamstack:

You could build a separate API your Jamstack site interacts with for any dynamic functionality.
Netlify, Vercel, CloudFlare, and AWS all have the concept of serverless functions run at edge nodes of a CDN.

Fine-grained permissions

Drupal has a rich and extendable permission system. Large sites have large teams of content editors, which require a deep permission system.

We haven’t seen the same level of deep permission systems in a Jamstack CMS as is possible with Drupal, but it’s only a matter of time. It’s a chicken-egg situation. Without large content sites with extensive content teams, we don’t need complex permission systems. When we see more large content site adoption in Jamstack, Jamstack CMSs will introduce deep permission systems to match Drupal.

20s And Beyond

Jamstack CMSs are on an exciting trajectory. However, there’s still a long road ahead to become a mainstream way for businesses to build websites. So, what are the problems we need to solve to have a broader appeal for Jamstack?

Intuitive Content Editing

Platforms like Squarespace and Webflow are known for highly intuitive content editing experiences. What could be easier than writing content directly on your website? No guesswork or previews are necessary.

Content management for the Jamstack website has drifted towards a disconnected approach. You update content on a set of abstract field components that don’t represent how that content will look on the rendered site. The advantage of this disconnection is content reuse, but you’re sacrificing the editing experience to have this flexibility. There’s no reason we can’t have an editing experience similar to Squarespace on a Jamstack website. When we do, you’ll no longer have to make editing trade-offs to reap the benefits of Jamstack.

Less Reliance On Developers

While developers are an essential part of the Jamstack, they’re often heavily involved in the content publishing process. For Jamstack to grow, we need content tools that reduce this reliance. Editors should be able to create, manage and publish content without a developer. We’re getting close to editors becoming completely self-reliant once a site is set up, but there’s still work to do.

Better Publishing Workflows

Most CMSs have basic staging/production content workflows, which work fine for simple websites. Yet, these workflows quickly become an issue as soon as you have multiple contributors. It’s the equivalent of having a team of developers trying to work on a single branch.

Git has revolutionized how developers collaborate on content. We now have workflows where independent developers from around the world can come together and build extremely high-quality software. These workflows are game-changing, so why can’t we do the same thing for content? Jamstack sites are static. They live in a repository. With the right interface, we can bring these workflows to an entirely new audience pushing content collaboration far beyond what any CMS is capable of today.

Developers review pull requests using a code diff which indicates what code has changed. In the review process, you can have conversations about particular lines of code and iterate until it’s in a good spot to merge into the main code base. In addition to this, it’s common to run a suite of status checks as part of a pull request. Status checks are small programs to lint, run tests, or anything else you’d like to measure. Code diffs and status checks are crucial tools to review source code and ensure it’s consistent and high quality. So how do we take these ideas and bring them to content management?

We can’t put code diffs in front of content editors. The whole point of a Jamstack CMS is to abstract technical concepts. We can, however, show content diffs to indicate what content changed rather than the underlying source code. Visual diffs are another option and give you a different angle. Platforms like Percy are already doing this and give you a pixel-perfect view of what has changed between two web page versions.

As for static checking on content, we already have many tools available. There’s everything from checking for broken links, missing alt tags, SEO checks, grammar checks, and accessibility checking. We need friendly interfaces on top of these tools to help non-technical editors identify and solve issues themselves. Integrating these tools and workflows into Jamstack CMSs will change the way we manage content on the web.

The Next Frontier Of Content Management

While the bones of Jamstack CMS’s have been around since the early 90s, it’s only in the past five years we’ve seen significant funding and resources propel the approach. We’re still in the early adoption of Jamstack, but I believe we’re nearing a tipping point.

The number of large-scale deployments of Jamstack by world-leading companies is growing by the day. As the tooling and platforms improve, I can only see this trend growing. It will be hard to justify not using Jamstack for a bespoke corporate website or application in the next decade.

Where do you think Jamstack CMSs will be in 2030?

Decoroom Stylish UI/UX and Web Design

Original Source: http://feedproxy.google.com/~r/abduzeedo/~3/yjQMqb4W_00/decoroom-stylish-uiux-and-web-design

Decoroom Stylish UI/UX and Web Design
 Decoroom Stylish UI/UX and Web Design

abduzeedo08.18.21

Kirill Kim shared a quite beautiful web design and UI/UX project. There’s not much information about the project created for Decoroom, however the vignettes shared highlight the minimal look, the elegant use of photography and typography with one of my favorite typefaces, Inter.

aesthetic decor Ecommerce furniture shop site UI ux Web Websiteaesthetic decor Ecommerce furniture shop site UI ux Web Websiteaesthetic decor Ecommerce furniture shop site UI ux Web Websiteaesthetic decor Ecommerce furniture shop site UI ux Web Websiteaesthetic decor Ecommerce furniture shop site UI ux Web Websiteaesthetic decor Ecommerce furniture shop site UI ux Web Websiteaesthetic decor Ecommerce furniture shop site UI ux Web Websiteaesthetic decor Ecommerce furniture shop site UI ux Web Websiteaesthetic decor Ecommerce furniture shop site UI ux Web Websiteaesthetic decor Ecommerce furniture shop site UI ux Web Websiteaesthetic decor Ecommerce furniture shop site UI ux Web Websiteaesthetic decor Ecommerce furniture shop site UI ux Web Websiteaesthetic decor Ecommerce furniture shop site UI ux Web Websiteaesthetic decor Ecommerce furniture shop site UI ux Web Websiteaesthetic decor Ecommerce furniture shop site UI ux Web Websiteaesthetic decor Ecommerce furniture shop site UI ux Web Websiteaesthetic decor Ecommerce furniture shop site UI ux Web Websiteaesthetic decor Ecommerce furniture shop site UI ux Web Websiteaesthetic decor Ecommerce furniture shop site UI ux Web Website

For more information make sure to follow Kirill Kim on

Behance
Dribbble
Instagram 


Brutalist Hong Kong Posters

Original Source: http://feedproxy.google.com/~r/abduzeedo/~3/aN6rUvOfKDU/brutalist-hong-kong-posters

Brutalist Hong Kong Posters

AoiroStudio08.18.21

I stumbled across this series of ‘brutalist-inspired’ posters of Hong Kong and thought it would be a great fit for a feature on abdz. With the shades of blue, red, white, and lots of textures. We are following illustrations of several iconic and controversial modernist architectural pieces in Hong Kong, built between 1950s and 1980s. One particular that strikes me is the design for the Wah Fu Estate, it’s a modern and iconic design. For more about Anthony, can you check out his site and social media feeds.

For more on Anthony Lam atelieravocado.com


Links

Behance
Instagram


The Best Free and Premium Shopify Themes of 2021

Original Source: http://feedproxy.google.com/~r/1stwebdesigner/~3/mfaLl7gCIKw/

The recent pandemic has forced many businesses to go online. This has created a boom for Shopify, a popular eCommerce platform that makes it easy to open up your online store.

With hundreds of beautiful themes and apps that enhance your shoppers’ experience, Shopify has everything you need to shift your operation online and create a digital storefront for your business.

But to get started, you’ll need a solid Shopify theme and that’s what this post is all about. We’ll cover the best free and premium Shopify themes for 2021 that will allow you to launch your store as quickly as possible.

Your Web Designer Toolbox

Unlimited Downloads: 500,000+ Web Templates, Icon Sets, Themes & Design Assets
Starting at only $16.50/month!


DOWNLOAD NOW

18 Best Free And Premium Shopify Themes

Below, you’ll find an overview of the 18 best Shopify themes along with their features.

Debut Free Shopify Theme

DEMO / TRY THEME

Helas Minimal Premium Shopify Theme

Helas Minimal Premium Shopify Theme

The Helas theme has a clean and minimal design. It would work well for a fashion store and has a product-centered layout which makes it easy for your customers to see what you have to offer. Notable features include product carousels and labels, plenty of customization options, built-in customer reviews, wishlist support, and more.

DEMO / BUY THEME

Vintage Free Minimal Theme

Vintage Free Minimal Theme

The Vintage theme is a free Shopify theme that would work well with home and garden, entertainment or arts and crafts stores. The theme has a minimal design and includes features such as recommended products, stock counter, in store pickup availability indicator, and more. In addition to that, the theme is responsive and easy to use. 

DEMO / TRY THE THEME

CORO – Minimal & Clean Fashion Shopify Theme

CORO – Minimal & Clean Fashion Shopify Theme

Here’s a versatile and responsive Shopify theme that can be used for any type of store. It features a minimal design and has a built-in mega menu. Notable features include automatic price changes, products’ quick view, powerful customization options, product labels, built-in product zoom, and more. 

DEMO / BUY THE THEME

Narrative Free Shopify Theme

Narrative Free Shopify Theme

The Narrative is a free Shopify theme that would work well for stores selling only one or two products. The theme has a simple design and includes features such as hero video, customizable image blocks, quote slides, customizable navigation, wide layout, and more. On top of this, the theme looks stunning on both mobile and desktop devices. 

DEMO / TRY THEME

Hikez | Trekking & Hiking Premium Shopify Theme

Hikez | Trekking & Hiking Premium Shopify Theme

If you have a store that sells hiking, camping, and trekking gear, the Hikez theme is a great choice. It has a stunning grid based layout which makes it easy to organize and display your products. The theme is fully responsive and comes with awesome features such as product carousel and product comparison, 5 types of mega menus, Ajax filters, multi-currency support, and more. 

DEMO / BUY THEME

Brooklyn Free Shopify Theme

Brooklyn Free Shopify Theme

If you’re looking for a free theme that was designed with apparel stores in mind, the Brooklyn theme has you covered. This theme features a modern and elegant design and has plenty of customization options. You’ll also find all the necessary features for a powerful eCommerce store such as dynamic product grid, header slideshow, slideout cart, support for video on the homepage, and more. 

DEMO / TRY THE THEME

Daxone – Multipurpose Shopify Theme

Daxone – Multipurpose Shopify Theme

The Daxone theme is a great choice for any type of store since it has a versatile and modern design. The theme is packed with features to help you sell more, including: various page layouts, prebuilt sections, plenty of customization options, popup cart, built-in newsletter form, product quick view, and more. The theme is also responsive and optimized for SEO. 

DEMO / BUY THEME

Simple Free Shopify Theme

Simple Free Shopify Theme

As the name implies, the Simple theme has a clean and simple layout that makes it easy to showcase your products in a modern grid layout. The theme has a sidebar menu which offers easy navigation and you’ll also find features such as product image zoom, image animations, product recommendations, and customization options. The theme is also responsive. 

DEMO / TRY THEME

Ella Multipurpose Shopify Theme

Ella Multipurpose Shopify Theme

The Ella theme is a premium multipurpose Shopify theme that works well with any type of store. The theme looks stunning on both desktop and mobile devices thanks to its responsive design. It has plenty of customization options and includes important eCommerce features such as dynamic product filters, pre-built page sections, quick shop, quick edit cart, recommended products, product bundles, and more. 

DEMO / BUY THEME

Supply Free Shopify Theme

Supply Free Shopify Theme

The Supply theme is perfect for any store that has a large inventory. You can easily showcase products, feature best-sellers, and more. The theme is responsive, easy to customize, and comes with features such as collection filtering in the sidebar, product slideshow, featured collections, and more. In addition to that, the theme comes with two color schemes. 

DEMO / TRY THE THEME

Wookie Multipurpose Shopify Premium Theme

Wookie Multipurpose Shopify Premium Theme

If you’re looking for a theme that gives you plenty of control over the design of your store, the Wookie theme is a great choice. Not only does it have plenty of customization options but it also offers a number of premade sections to make it easy to design and build your store. You’ll also find features such as numerous layout variations, mega menu, dynamic checkout buttons, product filters, and sticky add to cart button. 

DEMO / BUY THEME

Boundless Free Shopify Theme

Boundless Free Shopify Theme

The Boundless theme has a minimal and lightweight design that puts your product photography front and center. The theme is easy to use and has a responsive design. It includes features such as slideshows with a fading effect, full width collection images, sticky navigation, homepage video, and more. The theme is also fully responsive and optimized for large images. 

DEMO / TRY THEME

Avone – Multipurpose Shopify Theme

Avone - Multipurpose Shopify Theme

The Avone theme has been optimized to load fast. It has a versatile design that works well for any type of store. The theme also includes features such as powerful customization options, mega menu, wishlist support, product countdown, quick view, product filters, product recommendations, and more. The theme is responsive and has several demo layouts to choose from. 

DEMO / BUY THEME

Venture Free Shopify Theme

Venture Free Shopify Theme

The Venture Shopify theme is another free theme designed with stores that have a large inventory in mind. The theme features a multi-column menu that makes it easy to browse your store. You’ll find features such as product filtering, product slideshow, single featured product, promotional banner, and more. The theme is also responsive, optimized to load fast, and has a clean design. 

DEMO / TRY THEME

August – Multipurpose Shopify Theme

August - Multipurpose Shopify Theme

The August theme comes with 8 different demos and it’s a great choice for a fashion, apparel or swimwear store. The theme has a modern design and comes with features such as product style variations, multiple header and footer layouts, product filters, built-in product compare and wishlist, countdown timers, product labels, and more. On top of that, the theme is also responsive. 

DEMO / BUY THEME

Express Free Shopify Theme

Express Free Shopify Theme

The Express theme was designed to get you online fast. It doesn’t have a lot of customization options but it makes up for it with its ease of use and quick setup. The theme has a modern design and comes with features such as quick buy, responsive design, slideout cart, featured collections, and more. This theme is a great choice for one page stores that have a small product catalog. 

DEMO / TRY THEME

Aero – Auto Parts, Car Accessories Shopify Theme

Aero - Auto Parts, Car Accessories Shopify Theme

If you sell car parts, the Aero theme is a perfect fit. It has a modern and bold design that’s fully responsive. The theme has 10+ premade layouts and a mega menu that makes it easy to browse your store. Notable features include product slider module, Ajax add to cart, Ajax layered navigation, product quick view, and more. 

DEMO / BUY THEME

Final Thoughts

As you can see, there is no shortage of amazing free and premium themes for Shopify. The only thing left to do now is to pick a theme that suits your style and get started with your Shopify store. Good luck! Be sure to check out our other Shopify articles while you’re at it.


Free Open-Source Icons

Original Source: https://smashingmagazine.com/2021/08/open-source-icons/

It’s incredible to see people from all across the world putting all their love and lots of hours into something that they then release for free, for everybody to use. They help projects on a tight budget shine, without asking for anything in return — and, of course, they never cease to inspire.

In this post, we’ll celebrate some of these wonderful freebies that we came across recently. All of these free icons, illustrations, avatars, and animations have slightly different licenses (so please check them), but they are free to use in private and commercial work. But of course, the credit is always much appreciated.

If you’re interested in more goodies like these ones, please do take a look at our lovely email newsletter, so you can get tips like these delivered right into your inbox.

Open-Source Flag Icons

Icons are a fantastic way to help convey meaning and add some character to a design. An icon set that comes in particularly handy in e-commerce projects is Flagpack. It includes more than 250 open-source flag icons — from Andorra to Zimbabwe.

The Flagpack icons are optimized for small sizes which makes them a perfect fit for all your UI needs. They come with several predefined styles or you can customize the look to your liking, if you prefer. Two versions available: Designers can use the Flagpack in Figma and Sketch, developers can install it directly within their code project (React, Vue, and Svelte are supported). Nice!

Boring Avatars And Absurd Illustrations

Do you need some SVG-based avatars for your project? Boring Avatars has got you covered. But don’t let the name fool you: The avatars are anything but boring.

The tiny React library generates custom, SVG-based, round avatars from any username and color palette. Six different styles are available, abstract patterns just like friendly smileys. You can either choose a random color palette or create your own from scratch to tailor the avatars to your design. A friendly little detail.

Another fantastic resource with a name that might leave you puzzled for a moment are the Absurd Illustrations that Diana Valeanu created. Her series of illustrations combines absurdity and a deep sense of childishness and naivety to take every user on an individual journey through their imagination. A beautiful celebration of the imperfect that we’re sometimes missing in this digital era, absurdity that, well, makes sense.

Open-Source Health Icons

When people from all across the globe share the same vision and work together on one common goal, great things can happen. Things like the Health Icons project. The project is a volunteer effort to create a ‘global good’ for health projects all over the world. It includes more than 870 public-domain icons that can be used for free in any type of project.

Blood types, body parts and organs, diagnostics, medications, medical devices, vehicles, and people — the set covers everything health-related you could possibly ask for. Each icon comes in three different styles (outlined, filled, negative) and is available in SVG and PNG formats. There’s also a Figma plugin that makes it easy to find and include icons in your design.

Open-Source Life Science Icons

Vaccines, viruses, genetics, physiology, bioinformatics. These are just some of the topics that the fascinating Bioicons set that Simon Duerr created covers. In total, you’ll find 1,700 open-source life science illustrations in the set — easily searchable and filterable, of course.

The site supports two modes: you can copy the icons as SVG into the clipboard and paste them directly into Illustrator to change colors or delete parts. Alternatively, you can download the SVG to use it on the web, in graphics software, and even Microsoft Office products. An encyclopedia-like set — if you don’t find what you’re looking for there, you probably won’t find it anywhere.

Weather-Themed Icons And CSS

222 weather-themed icons, complete with 28 moon phases, the Beaufort wind force scale, and maritime wind warnings — that’s what you’ll get in the free Weather Icons set that Erik Flowers created.

You can copy and paste the icons into your favorite design app right from the site. CSS makes it easy to style and customize the icons just like you would do with text, so feel free to change their color, add shadows, or scale, rotate, or flip them to make the icons fit into your design nicely. Popular weather API classes are also supported, by the way, in case you should need it.

Summer And Tourism Icons

Barbecues, a trip to the beach, exploring a new city — summer is the time to make memories. To bring some of the summer feeling into your projects, you might want to take a look at the Summer Time and Tourism icon sets which the folks at Design Zone offer for free download. Each set includes 20 vector icons (in colored and linear versions) and comes in AI, EPS, and PNG formats. You can use the icons for both personal and commercial projects. Happy summer!

Flat Illustrations With Character

No more boring business websites! The Flat Illustrations set that Getillustrations.com offers is bound to add some personality to your project. It features free compositions for businesses, online stores, and marketing. Characters in various poses and scenes, colorful, relaxed, and friendly.

The site features ever-changing free sets (link attribution is required), and also the commercial versions come with customizable vectors for Figma, Sketch, Ai, SVG, AdobeXD, and Iconjar. Good vibes guaranteed!

A World Of Open-Source Icons

What started as a semester project by Interaction and Communication Design students, has grown to a comprehensive open-source emoji and icon library: OpenMoji. Almost 4,000 icons have been carefully designed and reviewed for the project, ranging from UX and technology-themed emojis to animals, nature, food, people, activities, places, and much more. The icons are available in colored as well as outlined versions in SVG and PNG formats.

Hand-Curated Mesh Gradients

Beautiful gradients? Yes, please! If you don’t have the time to create them yourself or are looking for some fresh inspiration, Gene Maryushenko’s hand-curated collection of mesh gradients is sure to have you covered.

Unhappy with what he found online, Gene created 100 gradients that will make your site stand out, without being loud. The gradients can be downloaded for free as JPEGs. CSS and SVG will be added later. Enjoy!

Open Peeps

584,688 possible combinations. That’s the number of different characters you could create with Pablo Stanley’s hand-drawn illustration library Open Peeps.

Open Peeps lets you mix and match different vector elements to create diverse personalities: combine clothing and hairstyles, change emotion with facial expressions, set the scene with different poses — the possibilities are sheer endless. And if you’re in a hurry, Pablo also prepared some ready-to-download Peeps that you can use right away. A great way to add a handmade touch to your design.

Free Vector Illustrations

A cow kidnapped by aliens, a dropped ice cream cone with a sad face, the Lochness monster emerging from the water. These are some of the fun error state animations that the folks at Pixel True Studios offer for free download in their set of vector illustrations and animations.

Apart from error state animations, the set includes more than 500 illustrations, icons, and animations to depict everything a web project could call for: backgrounds, emoji, avatars, and more. The illustrations are available in SVG, PNG, AI, Sketch, and Figma, the animations are made with Lottie. A great way to add a fun and friendly touch to a design.

Thank You!

A huge thank-you to the creative minds who designed these freebies — and of course to everyone who gives back to the community in one sense or another. The web wouldn’t be the same without you. ❤️

DPI Daylighting — Total Branding

Original Source: http://feedproxy.google.com/~r/abduzeedo/~3/FlCfaHl7ZOk/dpi-daylighting-total-branding

DPI Daylighting — Total Branding

abduzeedo08.17.21

Alphabet Design Agency shared an incredible total branding and visual identity for DPI Daylighting, a leader in commercial daylighting systems. By harnessing daylight through dynamic, environmentally friendly solutions, they provide visually and thermally comfortable architectural experiences. We were tasked to create a modern and sophisticated identity that showcased the product and attracted both architects, designers and project managers.

architect architecture branding  daylight DPI Daylighting grid light lighting polycarbonate solutionsImage may contain: screenshot and cartoonImage may contain: screenshotarchitect architecture branding  daylight DPI Daylighting grid light lighting polycarbonate solutionsImage may contain: moonImage may contain: outdoor


“Alphabet have been very proactive in their approach and meeting deadlines without any compromises on creativity and output. Despite our products and industry being out of their usual line of work, their quick understanding and interpretation was commendable. We are extremely happy we chose Alphabet and would do so again.”

Rajeev Moudgil, CEO, DPI Daylighting

architect architecture branding  daylight DPI Daylighting grid light lighting polycarbonate solutionsImage may contain: typographyarchitect architecture branding  daylight DPI Daylighting grid light lighting polycarbonate solutionsarchitect architecture branding  daylight DPI Daylighting grid light lighting polycarbonate solutions

architect architecture branding  daylight DPI Daylighting grid light lighting polycarbonate solutions

In a similar style to the FLUX typeface, we also created a fully bespoke supporting suite of iconography which helped create a visual language for the key product features as well as wayfinding and supporting graphics throughout the offices and factory.

architect architecture branding  daylight DPI Daylighting grid light lighting polycarbonate solutionsarchitect architecture branding  daylight DPI Daylighting grid light lighting polycarbonate solutionsarchitect architecture branding  daylight DPI Daylighting grid light lighting polycarbonate solutionsarchitect architecture branding  daylight DPI Daylighting grid light lighting polycarbonate solutionsarchitect architecture branding  daylight DPI Daylighting grid light lighting polycarbonate solutions

To see the full case study, visit  Alphabet Design Agency Ltd  website; madebyalphabet.com or check them out on:

Behance
Instagram


Create an Abstract Image Slideshow with OGL, GLSL, and GSAP

Original Source: http://feedproxy.google.com/~r/tympanus/~3/bokeaZOutQY/

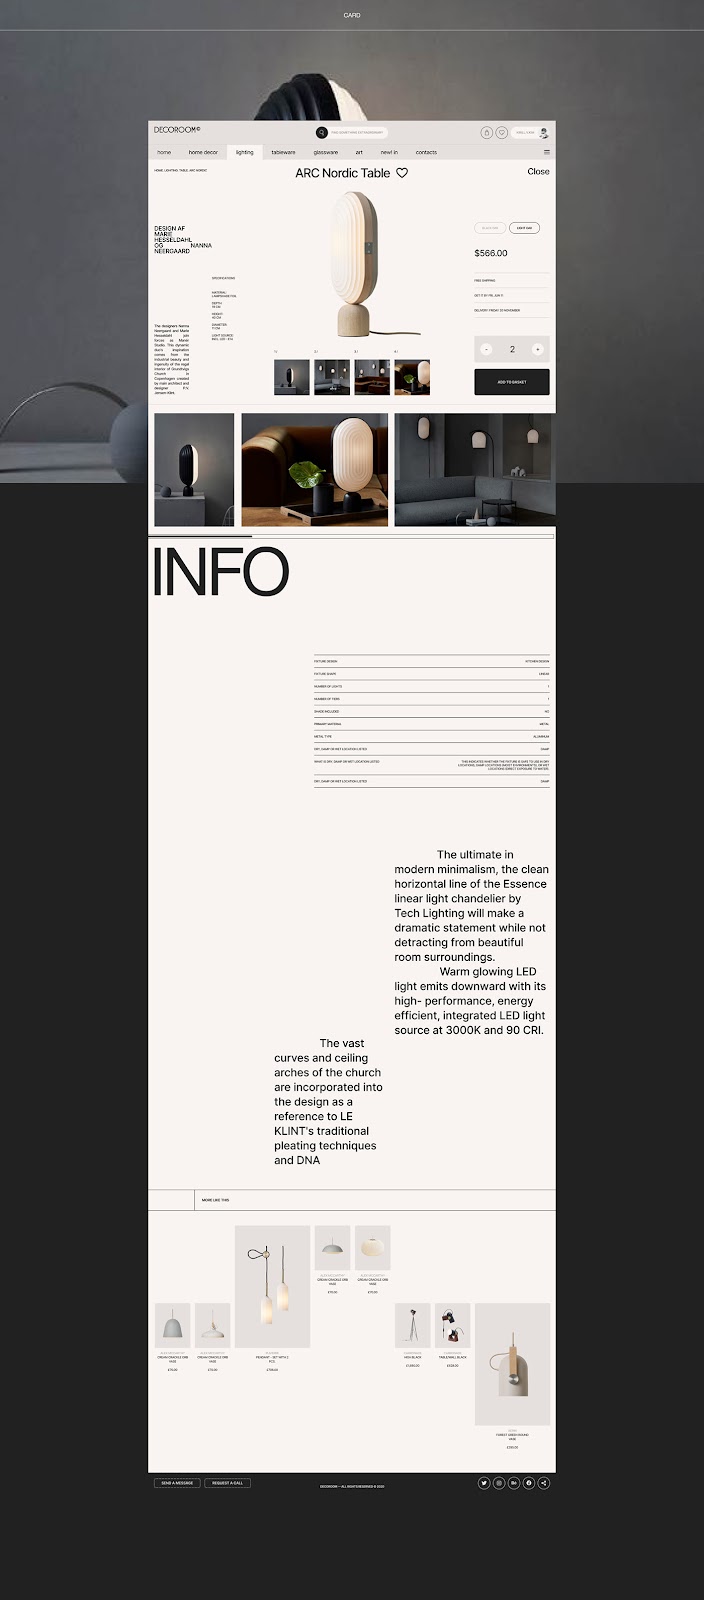
In today’s tutorial, we’ll dig (very) deep into the WebGL and GLSL worlds to create a really cool image carousel whose entire animation will depend on a single value; every calculation will be made inside the shader.

How this tutorial is structured

I’ve organized the tutorial in multiple steps, some of them really short and others “less-short”, all because I want to guide you through the entire process and explain you the reasoning behind them.

At the beginning of each step you can find a link with the code diff on the GitHub repository, so that you can see exactly what has changed and where, just in case you end up with different results.

Let’s get started!

Step 01 – Initial setup

View code diff

First, let’s create the files we need using OGL’s triangle screen shader example as the base.

index.html

<!DOCTYPE html>
<html lang="en">
<head>
<meta charset="UTF-8">
<meta http-equiv="X-UA-Compatible" content="IE=edge">
<meta name="viewport" content="width=device-width, initial-scale=1.0">
<title>Triangles' grid carousel [OGL+GSAP]</title>
<link rel="stylesheet" href="./app.scss">
</head>
<body>
<div id="canvas-wrapper" data-canvas-wrapper></div>

<script src="./app.js"></script>
</body>
</html>

app.scss

html,
body {
margin: 0;
overflow: hidden;
}

body {
background-color: #112233;
}

#canvas-wrapper {
height: 100vh;
position: relative;
width: 100%;

canvas {
height: 100%;
position: absolute;
width: 100%;
}
}

app.js

import { Renderer, Program, Mesh, Triangle } from 'ogl'
import { gsap } from 'gsap'

class WebGLCarousel {
constructor() {
this.wrapper = document.querySelector('[data-canvas-wrapper]')
}

init() {
this._createRenderer()
this._createScene()
this._addListeners()
this._onResize()

gsap.ticker.add(() => {
this.program.uniforms.uTime.value += 0.01
this.renderer.render({ scene: this.mesh })
})
}

_createRenderer() {
this.renderer = new Renderer()
this.gl = this.renderer.gl

this.wrapper.appendChild(this.gl.canvas)

this.gl.clearColor(1, 1, 1, 1)
}

_createScene() {
this.geometry = new Triangle(this.gl)

this.program = new Program(this.gl, {
vertex: require('./shaders/effect.vertex.glsl'),
fragment: require('./shaders/effect.fragment.glsl'),
uniforms: {
uTime: { value: 0 },
uProgress: { value: 0 }
}
})

this.mesh = new Mesh(this.gl, {
geometry: this.geometry,
program: this.program
})
}

_addListeners() {
window.addEventListener('resize', this._onResize.bind(this), { passive: true })
}

_onResize() {
this.renderer.setSize(this.wrapper.clientWidth, this.wrapper.clientHeight)
}
}

const app = new WebGLCarousel()
app.init()

effect.fragment.glsl

precision highp float;

uniform float uTime;

varying vec2 vUv;

void main() {
float sTime = sin(uTime);
float cTime = cos(uTime);

vec3 color = vec3(vUv.x*0.8 + sTime*0.2, vUv.y, 0.5 + cTime*0.5);

gl_FragColor = vec4(color, 1.0);
}

effect.vertex.glsl

attribute vec2 uv;
attribute vec2 position;

varying vec2 vUv;

void main() {
gl_Position = vec4(position, 0.0, 1.0);

vUv = uv;
}

The app.js file doesn’t do that much at the moment; it creates a basic scene with a mesh that covers the entire screen and renders a color gradient.

You might have noticed that I used gsap.ticker.add(() => { … }) instead of the classic requestAnimationFrame(() => { … }). This is because there are screens and devices that have a really high refresh rate; this would make our application run faster (in terms of speed of animation) than what we want.

GSAP’s ticker makes sure that our application won’t exceed 60fps even on screens that run at, for instance, 144fps.

Now let’s install the packages we need by running the following commands from the terminal:

$ yarn add gsap ogl
$ yarn add -D parcel-bundler

On the first run, Parcel will install a bunch of other development dependencies like sass and glslify because it will see that we’re using SCSS and GLSL code. The good thing about Parcel is that everything will simply work without any additional configuration.

Open the package.json file and add the following commands:

{

"scripts": {
"dev": "rm -rf dist && parcel src/index.html",
"build": "rm -rf dist && parcel build src/index.html –no-source-maps"
},


}

Now, go to the terminal and run

$ yarn dev

then open a new browser tab and navigate to http://localhost:1234; if you see a fullscreen color gradient that changes over time like the image below, then you’re good to proceed!

Step 02 – Add debug panel

View code diff

Now let’s add a debug panel using Tweakpane. This will come in handy many times during development because it allows updating values in real-time without going back and forth from the code editor.

Install it from the terminal

yarn add tweakpane

and then add it to the app.js file


import { Pane } from 'tweakpane'


const pane = new Pane()

pane.addInput(this.program.uniforms.uProgress, 'value', { label: 'uProgress', min: 0, max: 1, step: 0.01 })

We just added a configuration panel for the uProgress uniform but the effect is not visible on the application, so let’s edit the effect.fragment.glsl file in order to do so.


uniform float uProgress;

void main() {
vec3 color = vec3(vUv, uProgress);

gl_FragColor = vec4(color, 1.0);
}

What we just did here is simple: the color variable’s red and green channels depends on the vUv coordinates, and the blue channel is determined by the value of the uProgress uniform.

Now, if you try to edit the uniform from the panel you can see that the colors of the gradient change.

Step 03 – Draw a triangle

View code diff

In order to draw shapes, we must deal with the conversion of cartesian coordinates to polar coordinate, arctangents, and other “not that easy” stuff. All that stuff is outside the scope of this tutorial so I’ll just paste here the code that I took from The Book of Shaders.

Shape.js

#define PI 3.14159265359
#define TWO_PI 6.28318530718

float Shape(in vec2 st, in vec2 p, in float size, in float sides, in float blur) {
vec2 pos = vec2(p) – st;
float a = atan(pos.x, pos.y) + PI;
float r = TWO_PI / sides;
float d = cos(floor(.5 + a/r)*r – a) * length(pos);

float color = smoothstep(size + blur, size – blur, d);

return color;
}

#pragma glslify: export(Shape)

Please notice the last line that says #pragma glslify: export(Shape). That is the glslify syntax that will allow us to “import” this file into other GLSL files. glslify is basically the “NodeJS of shaders”.

Let’s import this new file into the effect.fragment.glsl file

#pragma glslify: Shape = require(./modules/Shape)

From now on, we can use the Shape function; let’s start by adding a single triangle at the center of the screen.

// vUv go from 0 to 1 on both axes, we have to
// remap them so that they go from -1 to +1.
// This is a common practice to easily align
// things at the center of the screen.
vec2 uv = vUv*2.0 – 1.0;

// Generate a triangle …
vec2 pos = vec2(0.0);
float size = 0.1;
float sides = 3.0;
float blur = 0.001;
float triangle = Shape(uv, pos, size, sides, blur);

// … and add it to the color variable
color += triangle;

Now, if you’ve done everything correctly, you can see a black screen with a white triangle at its center.

Step 04 – make everything resolution-independent

View code diff

Ok, everything we’ve done so far works ALMOST like a charm. If you resize the browser window you see that the triangle gets squashed.

This can be avoided with just one line of code in the fragment shader, but first, we must provide it the size of the canvas.

First, in the app.js file, import the OGL’s Vec2 object and add a new uResolution uniform to the shader declaration

// Add Vec2 to he modules imported from OGL
import { Renderer, Program, Mesh, Triangle, Vec2 } from 'ogl'

// Add the new uResolution uniform
this.program = new Program(this.gl, {
uniforms: {

uResolution: {
value: new Vec2(
this.gl.canvas.clientWidth,
this.gl.canvas.clientHeight
)
}
}
})


// Update the uResolution uniform on Resize
_onResize() {

this.program.uniforms.uResolution.value = new Vec2(
this.gl.canvas.clientWidth,
this.gl.canvas.clientHeight
)
}

Now let’s work on the fragment shader

// Tell the shader to expect a new uResolution uniform of type vec2
uniform vec2 uResolution;

// Right after declaring the uv variable, update it this way
uv.x *= uResolution.x / uResolution.y;

Go back to the browser and try resizing the browser window. If you’ve done everything right, the triangle shouldn’t deform anymore.

Step 05 – Generate a grid

View code diff

Yeah, a single triangle is cool, but we need to generate lots of them.

The first thing that might come to mind is a couple of for loops that iterate through both the X and Y axes and draw a triangle at a certain set of coordinates. While this is correct, there’s a more efficient way to do that (your GPU will thank you).

Add this line to the fragment shader

vec2 gv = fract(uv*5.0);

This calculation takes the uv variable subdivides it by the value you define and makes it repeat on both axes.

When adopting this technique, it’s common practice to name the new set of UVs gv, which stands for grid uv.

Now, if you replace uv with gv in the triangle formula …

float triangle = Shape(gv, pos, size, sides, blur);

you see that a lot has changed

But hey, what’s going on?

The reason is really simple; the origin of the gv coordinates is at the bottom-left corner. So, we simply have to update the pos variable in order to place the triangle at the center again.

vec2 pos = vec2(0.5);

And here’s our grid of triangles, all without any additional work for the GPU.

Then why not add some axes to use as reference and help us align things?
Add these lines to the fragment shader:

// Get the size of a single pixel
float pixel = 1.0 / uResolution.x;

// Draw two red lines on both axes by using
// the values of uv.x and uv.y
color.r += 1.0 – step(pixel*4.0, abs(uv.x));
color.r += 1.0 – step(pixel*4.0, abs(uv.y));

Easy peasy!

Step 06 – Refactor

View code diff

Before things start to get complicated, why not refactor what we have now in order to better organize our code?

Edit the fragment shader this way

precision highp float;

uniform float uProgress;
uniform vec2 uResolution;

varying vec2 vUv;

#pragma glslify: Shape = require(./modules/Shape)

// We moved the triangle creation to a separate function
// because we will use it multiple times later
float Triangle(vec2 uv, vec2 position) {
float size = 0.2;
float sides = 3.0;
float blur = 0.001;

return Shape(uv, position, size, sides, blur);
}

// The creation of the grid will need its own function,
// because it will contain a lot of code later.
float Tiles(vec2 uv) {
float result = 0.0;
vec2 gv = fract(uv*5.0);

result += Triangle(gv, vec2(0.5));

return result;
}

void main() {
vec2 uv = vUv*2.0 – 1.0;
uv.x *= uResolution.x / uResolution.y;

vec3 color = vec3(0.0);

// Add the output of the Tiles function to
// the output color.
color += Tiles(uv);

// Debug axes
float pixel = 1.0 / uResolution.x;
color.r += 1.0 – step(pixel*4.0, abs(uv.x));
color.r += 1.0 – step(pixel*4.0, abs(uv.y));

gl_FragColor = vec4(color, 1.0);
}

Now if you check the browser nothing should have changed, and that’s good news.

Step 07 – Avoid triangles being “cut”

View code diff

Everything we’ve done so far works like a charm, but what happens if you increase the size of the triangles or move them to another position? Simple, they will be drawn outside the boundaries and be “cut”.

There’s a simple trick to avoid this kind of situation, and it consists in drawing on the neighbor tiles as well.

Add this code to the Tiles function:

for (float y = -1.0; y <= 1.0; y++) {
for (float x = -1.0; x <= 1.0; x++) {
// Get the coordinates of the neighbor tile
vec2 tileOffset = vec2(x, y);

// Draw the triangle
result += Triangle(gv – tileOffset, vec2(0.5));
}
}

The code above loops through all the tiles that surround our current tile (including the tile we’re on) and draws a triangle on each one of them. This technique does not actually draw on those tiles, but simply at the same coordinates.

This gives us some flexibility with positioning the triangles allowing us to give the illusion that the triangles are positioned outside their boundaries.

Be aware that since we’re looping through a 3×3 grid, what we’re drawing must not exceed that space, otherwise it will be cut. To avoid this we can increase the size of the grid (5×5 or even more), but this would increase the work for the GPU.

Just like the previous step, if you check the browser, nothing should have changed (at least visually), but we’re actually drawing 9 triangles now.

Step 08 – Shift triangles on even rows

View code diff

Now, let’s shift our triangles a bit to make things a bit more interesting. The technique is pretty easy.

Add this to the Tiles function…

// This is a common practice to get a unique identifier of each tile.
// With this, each tile's ID will be something like
// vec2(1.0, 2.0), vec2(0.0, 4.0), and so on.
// Those values are basically the indices of the current row and column.
vec2 id = floor(uv*5.0);

… and this to the nested for loops

// On even rows, we must shift the triangles by
// half of their width, so we use the mod function to
// determine if the current row is even or odd.
// If the current row is even, the mod function returns 1.0,
// so we must divide it by half.
vec2 tileShift = vec2(mod(id.y, 2.0)*0.5, 0.0);

// Subtract the value of tileShift from the coordinates of the triangle
result += Triangle(gv – tileOffset – tileShift, vec2(0.5));

Now if you go back to the browser you should see that some of the triangles are shifted now, and thanks to the technique we used in the previous step they “overflow” their boundaries.

Step 09 – Add triangles pointing up

View code diff

Now it’s time to add another set of triangles to the mix, but this time they will be pointing in the opposite direction.

So, the first thing we have to do is creating a new module that exports a Rotate function:

Rotate.glsl

mat2 Rotate(float angle) {
float s = sin(angle);
float c = cos(angle);

return mat2(c, -s, s, c);
}

#pragma glslify: export(Rotate)

Then, import it into the fragment shader just like we did with the Shape function:

#pragma glslify: Rotate = require(./modules/Rotate)

Add then this code inside the nested for loops

// Create a new set of UVs named `st` and rotate them around their center
// Notice that PI is not a variable available in GLSL out of the box,
// but it's defined inside the Shape module.
vec2 st = (gv – 0.5)*Rotate(PI) + 0.5;

// Offset the new UVs by half of the width plus
// an arbitrary value for the Y axis.
st -= vec2(0.5, 0.37);

// Add the triangle
result += Triangle(st – tileOffset + tileShift, vec2(0.5));

Also, for future reference, we will need to be able to identify each triangle, exactly like we did with the tiles using the floor function; let’s do it:

// Get a unique identifier of each triangle …
vec2 triangleID = id + tileOffset;

// … and use its y component instead of the y component
// of the tile ID. The result is the same, but we'll
// play with it later.
vec2 tileShift = vec2(mod(triangleID.y, 2.0)*0.5, 0.0);

If you go back to the browser, you should see that now there is a new set of triangles that point up.

Step 10 – Manage the size of the grid

View code diff

All good, but a grid that covers the entire screen is not what we want, so let’s determine its size.

In app.js, add a uGridSize uniform

this.program = new Program(this.gl, {

uniforms: {

uGridSize: {
value: new Vec2(5, 3)
}
}
})

and make it configurable via the debug panel

pane.addInput(this.program.uniforms.uGridSize.value, 'x', { label: 'Grid size X', min: 0, max: 20, step: 1 })

pane.addInput(this.program.uniforms.uGridSize.value, 'y', { label: 'Grid size Y', min: 0, max: 20, step: 1 })

Then add the uGridSize uniform to the fragment shader

uniform vec2 uGridSize;

Inside the nested for loops, determine whether the current triangle must be drawn or not

// If the value of triangleID.x goes past uGridSize.x, then
// isVisible is set to 0.0, which means that the triangle won't
// be displayed on the X axis.
float isVisible = step(abs(triangleID.x), uGridSize.x);

// We do the same calculation for the Y axis.
// Multiplying the previous value by this new calculation
// results in a "rectangular" mask.
isVisible *= step(abs(triangleID.y), uGridSize.y);

It’s now time to draw only the triangles that we want to be visible. To make everything more readable we should refactor a bit:

// 'd' and 'u' are the two "layers" of triangles,
// respectively pointing down and up.
// Each layer is multiplied by the value of the 'isVisible' variable,
// making all the exceeding triangles invisible.

float d = Triangle(gv – tileOffset – tileShift, vec2(0.5));
d *= isVisible;

float u = Triangle(st, vec2(0.5, 0.4));
u *= isVisible;

// Add the sum of the 'd' and 'u' layers to the
// 'result' output variable
result += d+u;

We’re now able to determine the size of our grid of triangles.

Step 11 – Align the grid to the center

View code diff

Technically, our grid is aligned to the center of the screen, but not visually. Try setting both the grid values to zero.; something is obviously not good.

To fix this, we have to manually offset the UVs.

// Move the triangles ttoward the bottom-left corner
// by adding some value. 0.25 is enough in this case.
vec2 gv = fract(uv*5.0 + 0.25);
vec2 id = floor(uv*5.0 + 0.25);

Now, the grid is perfectly aligned to the center of the screen.

Step 12 – Add textures

View code diff

Our job with the grid is done (for now); now it’s time to work with textures.

To be able to work with static files we have to install the parcel-plugin-static-files-copy plugin from the terminal

yarn add -D parcel-plugin-static-files-copy

This way, we are able to work with static files by simply putting them inside a /static directory.

After that, let’s add the code to load and manage the textures to the app.js file.

// Import the Texture module from OGL
import { Renderer, Program, Mesh, Triangle, Vec2, Texture } from 'ogl'

// Define the URLs of the textures inside the constructor() method
constructor() {
this.texturesURLs = [
'/images/image-01.jpg',
'/images/image-02.jpg',
'/images/image-03.jpg'
]
}

// Add these two methods to the class
//
// _loadTexure() loads a single texture and adds
// it to this.textures[], returning a Promise object
//
// _loadTextures() loads all the textures in
// this.texturesURLs[] and returns a Promise object
//

_loadTexture(url, index) {
return new Promise(resolve => {
const img = new Image()
img.src = url

img.onload = () => {
this.textures[index] = new Texture(this.gl, {
image: img
})

resolve()
}
})
}

_loadTextures() {
return new Promise(resolve => {
this.textures = []

const promises = this.texturesURLs.map((url, index) => this._loadTexture(url, index))

Promise
.all(promises)
.then(() => resolve())
})
}

// Refactor the init() method so that the class waits for
// the textures to load before doing anything.
init() {
this._createRenderer()

this._loadTextures()
.then(() => {
this._createScene()
this._createDebugPanel()
this._addListeners()
this._onResize()

gsap.ticker.add(() => {
this.renderer.render({ scene: this.mesh })
})
})
}

// Add a uTexture0 uniform to the program
this.program = new Program(this.gl, {

uniforms: {

uTexture0: {
value: this.textures[0]
}
}
})

Now, let’s add the texture to the fragment shader.

// Tell the shader to expect a uTexture0 uniform.
// In GLSL, textures are a sampler2D data type.
uniform sampler2D uTexture0;

// Inside the main() function, define a tex0 variable,
// and use that for the final output.
// The UVs are re-mapped to go from 0.0 to 1.0.
vec4 tex0 = texture2D(uTexture0, uv*0.5 + 0.5);

// For this, we could've also write 'gl_FragColor = tex0'
// since tex0 is a variable of type vec4.
gl_FragColor = vec4(tex0.rgb, 1.0);

Et voilà, our texture is there!

Step 13 – Add ‘cover’ effect to textures

View code diff

Depending on the texture, you might see weird things on the edges, like this

That is the last pixel of the texture that gets repeated infinitely, causing bad visual issues.
What we can do to avoid this is emulating CSS’s cover feature, so that the image will cover the entire screen no matter the size of the screen.

Luckily, someone else already wrote the code to do it. Let’s create a new Cover module with that code.

Cover.glsl

vec2 Cover(vec2 uv, vec2 screenSize, vec2 imageSize) {
vec2 s = screenSize;
vec2 i = imageSize;

float rs = s.x / s.y;
float ri = i.x / i.y;

vec2 new = rs < ri ? vec2(i.x * s.y / i.y, s.y) : vec2(s.x, i.y * s.x / i.x);
vec2 offset = (rs < ri ? vec2((new.x – s.x) / 2.0, 0.0) : vec2(0.0, (new.y – s.y) / 2.0)) / new;
vec2 st = uv * s / new + offset;

return st;
}

#pragma glslify: export(Cover)

Import that module inside the fragment shader

#pragma glslify: Cover = require(./modules/Cover)

You may have noticed that the Cover function requires additional data that we currently don’t have: the size of the image.

Edit the app.js file by adding a new uniform with the size of the image to provide to the fragment shader.

// 1. Add a 'uTexture0Size' uniform to the program
this.program = new Program(this.gl, {

uniforms: {

uTexture0Size: {
value: new Vec2()
}
}
})

// 2. Set the value of 'uTextureSize' in the render loop
gsap.ticker.add(() => {
this.program.uniforms.uTexture0Size.value = new Vec2(
this.textures[0].width,
this.textures[0].height
)
})

Add the uTexture0Size uniform to the fragment shader.

uniform vec2 uTexture0Size;

Now we have all the data we need to use the Cover function.

main() {

// Use this new set of UVs to create the texture.
//
// Notice that we're using the original vUv variable here.
// That's because the 'Cover' function expect a set of UVs that
// go from 0 to 1.
vec2 coverUV = Cover(vUv, uResolution, uTexture0Size);
vec4 tex0 = texture2D(uTexture0, coverUV);


}

Now check the browser and try resizing the screen. The image covers perfectly the area, just like with CSS.

Step 14 – Mask the texture

View code diff

Now it’s time to “merge” the texture and the grid of triangles; the process is extremely easy.

Our grid is a black layer with an N amount of white triangles; what happens if we multiply the texture’s colors by the value of the grid? Where the mask is black, the color of the texture would be hidden, and when the color is white the texture is fully visible.

Edit the fragment shader this way:

// Create the masks with the triangles
float mask0 = Tiles(uv);

// This is where the magic happens. We hide all the
// areas of the texture where the mask is black.
vec3 layer0 = tex0.rgb*mask0;

color = layer0;

gl_FragColor = vec4(color, 1.0);

And here it is. An image made of triangles whose number is configurable.

Step 15 – Fade out the image

View code diff

It’s time to work on the transition effect, so let’s start with fading out the image using the uProgress uniform.

To do so, we’re going to add a new progress parameter to the Tiles function; this parameter will be used to manage the whole animation.

Start by updating the fragment shader

float Tiles(vec2 uv, float progress) {

// 'alpha' is the opacity of the triangle.
// It goes from 1 to 0 depending on the value of
// the 'progress' parameter.
float alpha = smoothstep(1., 0., progress);

// The value of both 'd' and 'u' is multiplied by
// the value of 'alpha', making everything fade out
// while the value of 'progress' increases.
float d = Triangle(gv – tileOffset – tileShift, vec2(0.5));
d *= isVisible;
d *= alpha;

float u = Triangle(st, vec2(0.5, 0.4));
u *= isVisible;
u *= alpha;


}

..

void main() {

float progress0 = smoothstep(0.1, 0.9, uProgress);

float mask0 = Tiles(uv, progress0);


}

It works, but it could be way more interesting if we randomize the speed of each triangle’s animation. We could do this by generating a random number using the randomID variable and using it as the first parameter of the smoothstep function.

We don’t have a function to generate random values yet, so let’s add it.

Create a Random.glsl file

float Random(vec2 p) {
p = fract(p * vec2(123.34, 456.21));
p += dot(p, p+45.32);
return fract(p.x * p.y);
}

#pragma glslify: export(Random)

Import it into the fragment shader

#pragma glslify: Random = require(./modules/Random)

Then use it to generate a random value for the smoothstep function.

// The 'clamp' function limits the minimum and maximum values
// respectively to 0.1 and 0.9
float fadeStart = clamp(Random(triangleID), 0.1, 0.9);

float alpha = smoothstep(fadeStart, 0., progress);

Much, much better; don’t you think?

Step 16 – Add the 2nd texture

View code diff

Adding the 2nd texture is mostly a matter of duplicating what we already did for the 1st one.

Edit the fragment shader with the code to display the 2nd texture

// Declare the uniforms
uniform sampler2D uTexture1;
uniform vec2 uTexture1Size;

void main() {

// The progress for the 2nd texture runs backwards,
// so the 1st parameter is higher than the 2nd.
float progress1 = smoothstep(1.0, 0.2, uProgress);

// Create the mask for the 2nd texture, just like
// what we did for the 1st one.
float mask1 = Tiles(uv, progress1);

// After creating the 1st texture, create the 2nd one.
// Don't forget to re-declare the 'coverUV' variable.
coverUV = Cover(vUv, uResolution, uTexture1Size);
vec4 tex1 = texture2D(uTexture1, coverUV);

// Apply the mask to the texture
vec3 layer1 = tex1.rgb*mask1;

// This is the key part.
// Based on the value of 'uProgress', show one layer or the other.
// If 'uProgress' is 0, 'layer0' is completely visible,
// Otherwise, if 'uProgress' is 1, layer1 is visible.
// Every value in-between will make the layers overlap.
color = mix(layer0, layer1, uProgress);
}

Now add the proper code to the app.js file

// Add the uniforms to the program
this.program = new Program(this.gl, {

uniforms: {

uTexture1: {
value: this.textures[1]
},
uTexture1Size: {
value: new Vec2()
}
}
})

// Update the value of 'uTexture1Size' in the render loop
gsap.ticker.add(() => {

this.program.uniforms.uTexture1Size.value = new Vec2(
this.textures[1].width,
this.textures[1].height
)


})

And that’s it! Now the two images swap depending on the value of the uProgress uniform.

Step 17 – Animate triangles’ scale

View code diff

Our basic effect is in place, now it’s time to make things more interesting. Let’s start by scaling the triangles during the animation.

At the moment, the size of the triangles is hardcoded, so let’s edit the Triangle function to make it expect a new size parameter:

float Triangle(vec2 uv, vec2 position, float size) {
float sides = 3.0;
float blur = 0.001;

return Shape(uv, position, size, sides, blur);
}

Then, define a size variable inside the nested for loops like this:

// Goes from 0.26 to 0.9 based on the value of 'progress'
float size = mix(0.26, 0.9, progress);

Finally, add the size variable to both the Triangle functions:

float d = Triangle(gv – tileOffset – tileShift, vec2(0.5), size);

float u = Triangle(st, vec2(0.5, 0.4), size);

It works, but all the triangles have all the same size, all the time; adding some randomness here too would make things a bit better:

// Define a 'sizeFactor' variable generated from the ID of
// the triangle, whose minimum value is 0.3.
float sizeFactor = max(Random(triangleID), 0.3);

// Multiply 'progress' by the value of 'sizeFactor'.
// This is enough for adding randomness to the
// triangles' scale.
float size = mix(0.26, 0.9, progress*sizeFactor);

Good! Now the triangles scale randomly during the animation. But there’s one more detail that we need to work on.

Now, when the new image starts fading in, it seems like the triangles “bounce back” to their original position; the cause is the progress1 variable:

// This goes from 1 to 0, meaning that the whole animation
// will run backwards
float progress1 = smoothstep(1.0, 0.2, uProgress);

Fixing it is really simple; we must edit the formula to make it go from -1 to 0. Edit that line like this:

// 'smoothstep' always goes from 0 to 1, but if we
// subtract 1 at the end, the result goes from -1 to 0
//
// Please note that we swapped the 1st and 2nd parameter
// top make the animation go forwards.
float progress1 = smoothstep(0.2, 1.0, uProgress) – 1.0;

And here we have it!

Step 18 – Offset each triangle

View code diff

Another thing we can do here is adding a very subtle offset to each triangle.

I’m sure you’ve already guessed how we’re going to do that: yes, we’re will use the triangleID variable to generate a random offset for each axis and add it to the triangle’s coordinate.

Add this inside the nested for loops:

// The 'Random' function generate a number that goes from 0 to 1,
// but for the offset values we must remap them so that they
// go from -1 to 1
float randomOffsetX = Random(triangleID.y);
randomOffsetX = (randomOffsetX – 0.5) * 2.0;

float randomOffsetY = Random(triangleID.x);
randomOffsetY = (randomOffsetY – 0.5) * 2.0;

vec2 randomOffset = vec2(randomOffsetX, randomOffsetY)*0.4;

Then, subtract randomOffset from the triangles’ coordinates:

float d = Triangle(gv – tileOffset – tileShift – randomOffset, vec2(0.5), size);

vec2 st = (gv – tileOffset – tileShift – randomOffset)*Rotate(PI) + 0.5;

Beautiful, uh?

Step 19 – Show full image

View code diff

Now, why don’t we push things even further?

First, let’s scale the triangles based on their distance from the center of the screen:

// Gets a normalized value (from 0 to 1)
float dist = distance(vec2(0.0), triangleID) / max(uGridSize.x, uGridSize.y);
dist *= 0.15;

// Add 'dist' to the size formula
float size = mix(0.02, 0.8, progress*sizeFactor)+dist;

Second, add some random rotation to each triangle:

// In order to rotate the coordinates we must multiply them by
// a mat2 variable, so let's calculate it first.
// This goes from -PI and +PI
mat2 triangleRandomRotation = Rotate(PI*(Random(triangleID) – 0.5)*2.0);

Then rotate the triangles:

// Rotate the 'gv' variable around their center.
// 'vec4(0.0, 0.4)' is there only for styling purposes; otherwise
// the triangles tend to go downwards.
vec2 rotatedGV = (gv – vec2(0.0, 0.4) – tileOffset – tileShift – randomOffset – 0.5)*triangleRandomRotation + 0.5;

// Replace 'gv' with 'rotatedGV'
float d = Triangle(rotatedGV, vec2(0.5), size);

// Apply the rotation to 'st' as well.
vec2 st = (gv – tileOffset – tileShift – randomOffset)*triangleRandomRotation + 0.5;

Lastly, we are going to show the full image along with all these triangles:

// Create a mask of the size of the grid that is used to display the full image
// The logic is the same used to determine whether to show a triangle or not.
float fullImageMask = step(abs(id.x) + 0.5, uGridSize.x);
fullImageMask *= step(abs(id.y), uGridSize.y);

// "Mask" it with the value of the triangles' grid.
// This basically creates holes in the mask.
// This step is needed because we will add this mask with the triangles, otherwise
// The final result would have areas much more luminous than the normal.
fullImageMask *= 1.0 – result;

// Set the alpha value of this mask using the `progress` parameter.
fullImageMask *= smoothstep(0.45, 0.1, abs(progress));

// Add the value of 'fullImageMask' to 'result', which already
// contains tll the triangles.
result += fullImageMask;

And here’s the final result!

Step 20 – Scale the textures and rotate the masks

View code diff

Another nice touch would be to scale the images a bit during the animation. Let’s do it:

// To scale a set of coordinates that go from 0 to 1 around
// their center, we must:
// 1. Subtract 0.5 from them
// 2. Multiply them by the value we want (values bigger than 1 will make everything smaller)
// 3. Add 0.5 back
//
// Same goes for rotations.

// Scale the UVs of the 1st texture from 1.0 to 1.05
// This makes the texture slightly smaller during the animation.
coverUV = (coverUV – 0.5)*mix(1.0, 1.05, smoothstep(0.1, 0.5, uProgress)) + 0.5;

// Scale the UVs of the 1st texture from 0.95 to 1.0
// This makes the texture slightly bigger, making it the right size at the end of the transition.
coverUV = (coverUV – 0.5)*mix(0.95, 1.0, smoothstep(0.6, 1.0, uProgress)) + 0.5;

And yes, it works!

Finally, let’s rotate the whole mask a bit. Add this at the beginning of the Tiles function:

// Create a new set of UVs to apply a rotation matrix to, and
// use them to create the grid.
//
// This adds a subtle rotation of 3/100 PI + another rotation of
// 4/100 PI depending on the value of 'progress', which goes from -1 to 1
//
// This way, the texture that fades out rotates from the 'idle' angle to
// the 'out' angle, while the texture that fades in rotates from the 'in' angle
// to the 'idle' angle.
mat2 rotateUV = Rotate(PI*0.03 + PI*mix(0.0, 0.04, progress));
vec2 uv2 = uv*rotateUV;

// Replace uv with 'uv2' on both 'gv' and 'id'
vec2 gv = fract(uv2*5.0 + 0.25);
vec2 id = floor(uv2*5.0 + 0.25);

If you’ve done everything properly, you should see it working like the video below|

Step 21 – Add the background(s)

View code diff

It’s not over yet! Now we have to add the colored background beneath the slides, whose colors are picked directly from the images and determined by a noise texture. It’s long, but not as complicated as one might think.

Let’s start by adding the noise texture to the program; I’ve chosen the Noise_18 texture from this collection from 1MAFX.

this.program = new Program(this.gl, {

uniforms: {

uNoiseTexture: {
value: this.noiseTexture
}
}
})

Then refactor the _loadTexture() method …

// We replaced the 'index' parameter with a 'params' parameter,
// which is an additional set of configuration for the Texture.
// This is needed when loading the noise texture.
_loadTexture(url, params = {}) {
return new Promise(resolve => {
const img = new Image()
img.src = url

img.onload = () => {
const texture = new Texture(this.gl, {
…params,
image: img
})

resolve(texture)
}
})
}

… and the _loadTextures() method:

// First, we load all the textures and assign the
// response to the 'this.textures' property.
// Then, load the noise texture and assign it to 'this.noiseTexture'.
_loadTextures() {
return new Promise(resolve => {
const textures = this.texturesURLs.map(url => this._loadTexture(url))
const colorThief = new ColorThief()

Promise
// Load the images for the carousel
.all(textures)
.then(res => this.textures = res)

// Load the noise texture
.then(() => {
// Since the noise will move over time, we must set
// both the 'wrapS' and 'wrapT' property to 'this.gl.REPEAT',
// making it repeat seamlessly.
return this._loadTexture('/images/Noise_18.jpg', {
wrapS: this.gl.REPEAT,
wrapT: this.gl.REPEAT
})
})
.then(res => {
this.noiseTexture = res
resolve()
})
})
}

Add then the noise texture to the fragment shader:

uniform sampler2D uNoiseTexture;

void main() {

vec2 bgNoiseUV = uv;
vec3 bgNoise = texture2D(uNoiseTexture, bgNoiseUV).rgb;

gl_FragColor = vec4(bgNoise, 1.0);
}

A bit too much, uh? Let’s tweak it a bit by making it bigger and adding some rotation to the coordinates:

vec2 bgNoiseUV = uv;
bgNoiseUV *= 0.25; // Make it bigger
bgNoiseUV *= Rotate(PI*0.25); // Rotate by 1/4 PI
vec3 bgNoise = texture2D(uNoiseTexture, bgNoiseUV).rgb;

Much, much better! Now it’s time to animate it. First, let’s add a new uTime uniform to the Program which we’ll use to move the coordinates of the noise texture

this.program = new Program(this.gl, {

uniforms: {

uTime: { value: 0 }
}

})

and update its value in the render loop

gsap.ticker.add(() => {

this.program.uniforms.uTime.value += 0.1


})

Then, define it in the fragment shader and add it to the UV coordinates of the noise texture to move it over time

uniform float uTime;

void main() {

bgNoiseUV += vec2(uTime*0.01, -uTime*0.03);


}

Cool! Now our noise is moving!

Let’s proceed by adding some color. The colors will come directly from the images, and for this, we’re going to use the color-thief library.

First, add it to the project from the terminal:

$ yarn add colorthief

And import it into app.js and create a new instance of it:

import ColorThief from 'colorthief'

const colorThief = new ColorThief()

Then, right after downloading the textures, loop through them and run ColorThief to get the dominant and secondary colors:

// Creates a 'this.color' array which contains a series
// of objects with this structure:
// {
// primary: [255, 120, 200],
// secondary: [90, 110, 210]
// }
//
// With 'getPalette()' we chose the color with index 3,
// but you can pick the color you want.
this.colors = res.map(e => {
return ({
primary: colorThief.getColor(e.image),
secondary: colorThief.getPalette(e.image)[3]
})
})

Add two new uBackground0 and uBackground1 uniforms to the Program, which contain both the primary and secondary colors of the textures.

this.program = new Program(this.gl, {

uniforms: {

uBackground0: {
value: [
this.colors[0].primary,
this.colors[0].secondary
]
},
uBackground1: {
value: [
this.colors[1].primary,
this.colors[1].secondary
]
}
}
})

Add them to the fragment shader

// This syntax tells the shader that those two uniforms
// are arrays of lenght 2 and contain vec3 variables.
uniform vec3 uBackground0[2];
uniform vec3 uBackground1[2];

Let’s now create both the backgrounds inside the main() function:

// 1. The colors go from 0 to 255, but since we need them go have a value
// between 0 and 1 we must divide them by 255
//
// 2. Setting the 'noise texture's value as the 3rd parameter,
// we can easily interpolate between the two colors.
vec3 background0 = mix(uBackground0[0] / 255., uBackground0[1] / 255., bgNoise);
vec3 background1 = mix(uBackground1[0] / 255., uBackground1[1] / 255., bgNoise);

Let’s test this:

gl_FragColor = vec4(background0, 1.0);

And it works!

The last thing we have to do is “merging” the slides with their respective backgrounds, and we’re going to use the glsl-blend package to do it. glsl-blend is a module that contains a set of blending modes for GLSL, the same blending modes that Photoshop and other graphics tools use.

Let’s start by installing it from the terminal:

$ yarn add glsl-blend

Since we simply have to put the slides on top of their backgrounds, we will need the blendNormal module:

#pragma glslify: blendNormal = require(glsl-blend/normal)

Then define two new variables that will contain the blended layers:

// Refactor the 'layer0' and 'layer1' variables to be
// of type vec4. We will need their alpha channel shortly.
vec4 layer0 = tex0*mask0;
vec4 layer1 = tex1*mask1;

// For the alpha value (3rd parameter) we use the alpha channel
// of the layers; otherwise the 'layer' lavels would overlap
// entirely the backgrounds
vec3 slide0 = blendNormal(background0, layer0.rgb, layer0.a);
vec3 slide1 = blendNormal(background1, layer1.rgb, layer1.a);

// Replace 'layer0' and 'layer1' with 'slide0' and 'slide1'
color = mix(slide0, slide1, smoothstep(0.5, 0.85, uProgress));

And here’s the final result!

Step 22 – Add carousel behavior

View code diff

Let’s start by adding the basic markup and some rough styling:

index.html

<nav id="controls">
<button data-carousel-control data-dir="-1">Prev</button>
<button data-carousel-control data-dir="1">Next</button>
</nav>

app.scss

#controls {
align-items: center;
bottom: 40px;
display: flex;
justify-content: center;
left: 0;
position: fixed;
width: 100%;

button {
margin: 0 20px;
}
}

There are a few steps to take into consideration when it comes to WebGL carousels:

Determine what will be the next texture (uTexture1, in our case)Go from the first texture to the second (animate uProgress)When the animation finishes, set the animation progress back to the initial value (uProgress = 0)Set the value of the initial texture to be the same of the second (uTexture0 = uTexture1)

After this, both uTexture0 and uTexture1 will be the same, but we actually don’t care because only uTexture0 is visible.

The better manage all this stuff we should keep all this information inside a state object

constructor() {

this.state = {
isAnimating: false,
currentTextureIndex: 0,
texture0: null,
texture1: null
}


}

Define the above object’s texture0 and texture1 properties in the _loadTextures() method after downloading them

this.state.texture0 = res[0]
this.state.texture1 = res[1]

And then replace all the references to this.textures[0] and this.textures[1] with the textures inside the this.state object. I won’t list all of them, just refer to the code diff.

Create now a _onButtonClick() method with the following code.

_onButtonClick(e) {
// Do nothing if an animation is already running
if (this.state.isAnimating) return

// Get the direction of the clicked button (defaults to 1)
const direction = Number(e.currentTarget.dataset.dir ?? 1)

// Define the index of the texture that will be set as texture1
let nextTextureIndex = this.state.currentTextureIndex + direction

if (nextTextureIndex < 0)
nextTextureIndex = this.textures.length – 1

if (nextTextureIndex >= this.textures.length)
nextTextureIndex = 0

const tl = new gsap.timeline({
onStart: () => {
// Prevent any other animation from starting
this.state.isAnimating = true

// Set the next texture to display
this.state.texture1 = this.textures[nextTextureIndex]
this.program.uniforms.uTexture1.value = this.state.texture1

// Set the background colors of the next slide
this.program.uniforms.uBackground1.value = [
this.colors[nextTextureIndex].primary,
this.colors[nextTextureIndex].secondary
]
},
onComplete: () => {
// Re-enable animations
this.state.isAnimating = false

// Reset the `uProgress` uniform …
this.program.uniforms.uProgress.value = 0

// … and set what was only the next texture as current texture
this.state.texture0 = this.textures[nextTextureIndex]
this.program.uniforms.uTexture0.value = this.state.texture0

// Same thing with the background colors
this.program.uniforms.uBackground0.value = [
this.colors[nextTextureIndex].primary,
this.colors[nextTextureIndex].secondary
]

// End of the animation. Set the new texture's index as the current one.
this.state.currentTextureIndex = nextTextureIndex
}
})

tl
.to(this.program.uniforms.uProgress, {
value: 1,
duration: 1.3
})
}

Add a new this.ui object to the class in the contructor(). It will contain more stuff later.

this.ui = {
buttons: document.querySelectorAll('[data-carousel-control]')
}

Finally, register the event listeners:

_addListeners() {

for (const button of this.ui.buttons) {
button.addEventListener('click', this._onButtonClick.bind(this), { passive: true })
}


}

Aaaaaaaand it works!

But let’s tweak it by making it rotate in one direction or the other depending on what slide we want to show.

Add a new uAnimationDirection in the program, as usual

this.program = new Program(this.gl, {

uniforms: {
uAnimationDirection: { value: 1 }
}
})

And update its value from the _onButtonClick() method

// This value can be -1 OR +1
this.program.uniforms.uAnimationDirection.value = direction

Lastly, update the fragment shader:

// Declare it
uniform float uAnimationDirection;

// Here, multiply 'progress' by the value of 'uAnimationDirection'.
// This way it rotates CCW when clicking on the 'prev' button.
mat2 rotateUV = Rotate(PI*0.03 + PI*mix(0.0, 0.04, progress*uAnimationDirection));

Pretty easy! It now rotates in both directions.

Step 23 – Add slides’ markup

View code diff

The very last thing that’s left is adding all the slides’ markup to the page, so here’s the code that you can copypaste!

index.html

<!DOCTYPE html>
<html lang="en">
<head>
<meta charset="UTF-8">
<meta http-equiv="X-UA-Compatible" content="IE=edge">
<meta name="viewport" content="width=device-width, initial-scale=1.0">
<title>Triangles' grid carousel [OGL+GSAP]</title>
<link rel="preconnect" href="https://fonts.googleapis.com">
<link rel="preconnect" href="https://fonts.gstatic.com" crossorigin>
<link href="https://fonts.googleapis.com/css2?family=Fjalla+One&family=Noto+Sans&display=swap" rel="stylesheet">
<link rel="stylesheet" href="./app.scss">
</head>
<body>
<div id="canvas-wrapper" data-canvas-wrapper></div>

<div id="slides">
<div class="slide" data-slide>
<span class="slide__title | font-display" data-slide-title style="–progress: 0">We are homo ludens</span>
<span class="slide__copy | font-copy" data-slide-copy>We are the ones who play</span>
</div>

<div class="slide" data-slide>
<span class="slide__title | font-display" data-slide-title style="–progress: -110">It's dangerous</span>
<span class="slide__copy | font-copy" data-slide-copy style="opacity: 0">to go alone, take this!</span>
</div>

<div class="slide" data-slide>
<span class="slide__title | font-display" data-slide-title style="–progress: -110">Snake? Snake?</span>
<span class="slide__copy | font-copy" data-slide-copy style="opacity: 0">SNAAAAAAAAAAAKE!</span>
</div>
</div>

<nav id="controls">
<button class="font-display" data-carousel-control data-dir="-1">Prev</button>
<button class="font-display" data-carousel-control data-dir="1">Next</button>
</nav>

<script src="./app.js"></script>
</body>
</html>

app.scss

@import "functions";
@import "mixins";

* {
box-sizing: border-box;
}

html,
body {
margin: 0;
overflow: hidden;
}

body {
background-color: #112233;
}

.font-display {
font-family: 'Fjalla One', sans-serif;
}

.font-copy {
font-family: 'Noto Sans', sans-serif;
}

#canvas-wrapper {
height: 100vh;
position: relative;
width: 100%;

canvas {
height: 100%;
position: absolute;
width: 100%;
}
}

#controls {
align-items: center;
display: flex;
justify-content: space-between;
left: 0;
padding: 0 30px;
pointer-events: none;
position: fixed;
top: 50%;
transform: translateY(-50%);
touch-action: none;
width: 100%;
z-index: 5;

button {
background-color: transparent;
border: none;
color: white;
cursor: pointer;
font-size: 21px;
margin: 0 20px;
padding: 0;
pointer-events: auto;
position: relative;
text-transform: uppercase;
touch-action: auto;

&::before,
&::after {
background-color: currentColor;
content: "";
display: block;
height: 2px;
opacity: 0;
position: absolute;
transition: 0.25s transform, 0.25s opacity;
width: 100%;
}

&::before {
top: -5px;
transform: translateY(-5px);
}

&::after {
bottom: -5px;
transform: translateY(5px);
}

&:hover {

&::before,
&::after {
opacity: 1;
transform: translateY(0);
}
}
}
}

#slides {
display: grid;
grid-template-areas:
"."
"slide"
".";
grid-template-columns: 1fr;
grid-template-rows: 3fr 1fr 1fr;
height: 100%;
left: 0;
pointer-events: none;
position: fixed;
top: 0;
touch-action: none;
width: 100%;
z-index: 4;
}

.slide {
align-items: center;
align-self: center;
color: white;
display: flex;
flex-direction: column;
grid-area: slide;
pointer-events: auto;
text-align: center;
touch-action: auto;

&__title {
@include fluid-type(320px, 1400px, 40px, 100px);

clip-path: polygon(
calc(var(–progress) * 1%) 0%,
calc(var(–progress) * 1% + 110%) 0%,
calc(var(–progress) * 1% + 100%) 100%,
calc(var(–progress) * 1% – 10%) 100%);
text-shadow: 0.01em 0.04em 0 rgba(black, 0.7);
}

&__copy {
@include fluid-type(320px, 1400px, 16px, 21px);
text-shadow: 0.1em 0.1em rgba(black, 0.5);
}
}

_functions.scss

@function strip-unit($value) {
@return $value / ($value * 0 + 1);
}

_mixins.scss

@mixin fluid-type($min-vw, $max-vw, $min-font-size, $max-font-size) {
$u1: unit($min-vw);
$u2: unit($max-vw);
$u3: unit($min-font-size);
$u4: unit($max-font-size);

@if $u1 == $u2 and $u1 == $u3 and $u1 == $u4 {
& {
font-size: $min-font-size;
@media screen and (min-width: $min-vw) {
font-size: calc(#{$min-font-size} + #{strip-unit($max-font-size – $min-font-size)} * ((100vw – #{$min-vw}) / #{strip-unit($max-vw – $min-vw)}));
}
@media screen and (min-width: $max-vw) {
font-size: $max-font-size;
}
}
}
}

Nothing too complicated here. The slides’ container is a grid element and each slide is positioned on the same cell.

Please notice that the .slide__title elements have a clip-path applied that masks them, whose position is determined by the value of a local –progress custom property. Instead of animating the whole mask, we will simply animate that single custom property using GSAP.

Now, add the slides to the this.ui object:

this.ui = {
buttons: document.querySelectorAll('[data-carousel-control]'),
slides: document.querySelectorAll('[data-slide]')
}

Then, in the _onButtonClick() method, get a reference of the current and next texture’s elements to animate

const currentSlide = this.ui.slides[this.state.currentTextureIndex]
const currentSlideTitle = currentSlide.querySelector('[data-slide-title]')
const currentSlideCopy = currentSlide.querySelector('[data-slide-copy]')

const nextSlide = this.ui.slides[nextTextureIndex]
const nextSlideTitle = nextSlide.querySelector('[data-slide-title]')
const nextSlideCopy = nextSlide.querySelector('[data-slide-copy]')

Finally, update the timeline. This moves the current mask from the idle position to the right, and che next texture’s mask from left to the idle position.

tl
.add('start')
.to(currentSlideTitle, {
'–progress': 110,
duration: 0.5
})
.fromTo(nextSlideTitle, { '–progress': -110 }, {
'–progress': 0,
duration: 1
}, '<0.1')

.to(currentSlideCopy, { opacity: 0, duration: 0.35 }, 'start+=0.1')
.to(nextSlideCopy, { opacity: 1, duration: 0.5 }, '>')

.to(this.program.uniforms.uProgress, {
value: 1,
duration: 1.5
}, 'start')

And that’s it!

Step 24 – Final tweaks

View code diff

We’re almost done, but there are still a few things left to tweak.

Let’s start by adding a slight rotation to the triangles. Edit the triangleRandomRotation variable in the fragment shader:

// Usual technique to rotate something around its center.
// The original value goes from -PI to +PI, then is
// multiplied by 0.1 (you can tweak this value)
// and multiplied again by the value of the 'progress',
// making it rotate during the animation.
float triangleAnimationRotation = PI*((Random(triangleID.yx) – 0.5) * 2.0)*0.1*progress*uAnimationDirection;

mat2 triangleRandomRotation = Rotate(triangleAnimationRotation+PI*(Random(triangleID) – 0.5)*2.0);

Also, I don’t like how the image overlaps the triangles in-between the animation, it looks really “flat”. So let’s make the triangles overlap the image. The formula is the following:

// This interpolates the value of 'result' from 1 to 0.5 based on
// the 'progress' parameter, making the mask half-transparent and
// giving the look that the triangles are overlapping the image.
fullImageMask *= 1.0 – (result * mix(1.0, 0.5, abs(progress*2.0)));

Conclusion

You did it! You finally reached the end! I know it’s been long but for this I wanted to proceed with small steps explaining the reasoning between every single step, something that I think is more useful than the result itself.

The post Create an Abstract Image Slideshow with OGL, GLSL, and GSAP appeared first on Codrops.

Gamepads turned into Monsters Illustrations

Original Source: http://feedproxy.google.com/~r/abduzeedo/~3/c11L5aTQHe0/gamepads-turned-into-monsters-illustrations-

Gamepads turned into Monsters Illustrations

AoiroStudio08.16.21

I always enjoyed featuring projects that are well-thought-out and completely out of the ordinary. Judging by the title, you can tell right away it’s cool, thankful to share the work of Ilya Lyakh who is an illustrator and graphic designer based in Moscow, Russian Federation. We are featuring his work titled: ‘Monster Play 19’ which is a series of popular console gamepads turned into monsters. An inspiration he took after seeing a custom gamepad, great reference to a cool result. Check it out!

For more on Ilya Lyakh via Behance

ILLUSTRATION  digitalart poster print monster gamepad xbox playstation Nintendo Lyakh

ILLUSTRATION  digitalart poster print monster gamepad xbox playstation Nintendo Lyakh

ILLUSTRATION  digitalart poster print monster gamepad xbox playstation Nintendo Lyakh

ILLUSTRATION  digitalart poster print monster gamepad xbox playstation Nintendo Lyakh

ILLUSTRATION  digitalart poster print monster gamepad xbox playstation Nintendo Lyakh


Links

Behance
Instagram


9 Best Free DNS Servers to Boost Privacy and Speed

Original Source: https://www.hongkiat.com/blog/free-dns-servers/

DNS is the little technology that comes into play every time one uses the web, but hardly anyone knows about it. It is the very reason you can type “google.com” to make a web search…

Visit hongkiat.com for full content.

Build Your Site The Easy Way With TagDiv Newspaper

Original Source: https://www.webdesignerdepot.com/2021/08/build-your-site-the-easy-way-with-tagdiv-newspaper/

Ready to take your business online but not sure where to start? It’s a surprisingly simple process, made all the easier by the tagDiv Newspaper theme that can shoulder the burden of code, leaving you to be creative.

Professional web designers normally begin with broad brushstrokes, roughly hewing a site, before finessing on the finer details; that’s exactly what tagDiv’s Newspaper theme lets you do, with innovative tools and a huge selection of pre-built options to choose from.

What is the Newspaper Theme?

Newspaper is the best-selling magazine theme from tagDiv. In constant development over the last twelve years, it’s been used to create world-beating sites for clients as diverse and demanding as United Nations, ShareAmerica, The Rackspace Blog, Bitcoin News, Uber Engineering, and Tech Explorist.

As the name implies, the Newspaper theme is primarily a magazine or blog theme, but you can use it for any kind of site, in any type of industry.

Packed with intuitive features that make personal web development not just possible but enjoyable, it will have your site ready to launch in no time.

It is fully compatible with Gutenberg, WordPress’ drag-n-drop site builder; it also comes with its own WYSIWYG, tagDiv Composer. All the sites built in Newspaper are fully flexible, responsive, mobile-friendly, and retina-ready. Newspaper is even fully integrated with WooCommerce so that you can transform your magazine site into a fully-featured ecommerce store.

Newspaper has been carefully coded to make the most of the upcoming Core Web Vitals update from Google, so your new site will be well-placed to rank highly on search engines.

Now that you know a little about the background of the Newspaper theme let’s look at how we can use it to build a WordPress site.

Pre-Built Websites

Sometimes it’s not just your coding skills but your design skills that are lacking; you know what kind of site that you want, you’re just hazy on the details.

This is where tagDiv’s Newspaper theme comes into its own. With a single click, you can install an entire pre-built website. And the process is so fast and convenient that you can try out as many as you like and pick the one that matches your vision.

You can even import a whole ton of pre-written content for testing the sites out, so you can see how it will look with your content without spending hours typing or copying and pasting text out of a Word doc.

There are 120 different designs covering all kinds of different industries. This means no matter what kind of site you’re building, one click, and you’re ready to go live.

Cloud Library

One step up from a full pre-built website is tagDiv’s Cloud Library. If you’ve installed one of the pre-built websites, this is probably where you want to go next.

The Cloud Library is a collection of 1600 different design elements that can be mixed and matched with live-editing to fast-track your site creation. You’ll find content blocks like headers, footers, testimonials, banners, and featured items. You can mix-n-match them however you please to create the site of your dreams.

Putting the “Cloud” into the Cloud Library are tagDiv’s servers, storing the code for each of these elements, so your installation only needs to load the code you actually use. This provides a huge boost in performance.

Composer

Lastly, the Newspaper theme provides tagDiv Composer, a specialist WordPress builder — like Gutenberg — that allows you to customize your website with absolutely no coding skills whatsoever. It’s a powerful yet simple-to-use tool that allows you to edit the elements of the Cloud Library and adapt them to your own purposes.

With Composer, you can create your own headers, footers, banners, text blocks, and more without any of the limitations of cookie-cutter design.

tagDiv Composer gives you the ultimate control over your site. You’ll find all the essential elements you need, from text and buttons to images and videos. All you have to do is drag and drop them into place.

Building a Site With tagDiv Newspaper Theme

As you can see that the fastest way to an engaging and original website is, to begin with, a pre-built site, then add the different blocks of code you want from the Cloud Library, and finally customize them with the Composer.

To make this possible, tagDiv has brought together experts from multiple disciplines, including brand strategy, project management, and web development.

It’s a slick system for quickly publishing high-quality sites that are unique to you and your business. Trusted by more than 130,000 customers worldwide, the Newspaper has earned tagDiv the status of Power Elite Author on ThemeForest and Top Author on Envato.

The Newspaper theme costs just $59, which includes six months of support from tagDiv, but for just $17.63, you can extend support to 12 months for added peace of mind.

tagDiv Newspaper is the simplest way for you to take your business online using WordPress.


[— This is a sponsored post on behalf of tagDiv —]

Source

p img {display:inline-block; margin-right:10px;}
.alignleft {float:left;}
p.showcase {clear:both;}
body#browserfriendly p, body#podcast p, div#emailbody p{margin:0;}

The post Build Your Site The Easy Way With TagDiv Newspaper first appeared on Webdesigner Depot.