Must-Have Features for Every Web Hosting Service

Original Source: http://feedproxy.google.com/~r/Designrfix/~3/IMxY2KrEMw0/must-have-features-for-every-web-hosting-service

When it comes to online businesses, hacking is one of the major security concerns. You’ve probably heard about cybercriminals hacking into different websites and releasing sensitive data to the general public. To safeguard your website information, you should always choose a secure web hosting service. The more the people who visit your website, the more […]

The post Must-Have Features for Every Web Hosting Service appeared first on designrfix.com.

A Brief Guide to WordPress Web Design

Original Source: http://feedproxy.google.com/~r/Designrfix/~3/ljUIE4w8JtM/a-brief-guide-to-wordpress-web-design

WordPress is one of the world’s most popular and flexible platforms for creating websites and managing content, with hundreds of millions of users taking advantage of its tools. It is capable of accommodating sites of all sizes, from basic blogs to high traffic e-commerce sites and beyond, so here is a quick look at how […]

The post A Brief Guide to WordPress Web Design appeared first on designrfix.com.

How To Change And Use Zoom Backgrounds (And Why You Should Do It)

Original Source: http://feedproxy.google.com/~r/Designrfix/~3/7ihZbAGCEvA/how-to-change-and-use-zoom-backgrounds-and-why-you-should-do-it

Zoom has become an essential tool for communication and collaboration in this unprecedented time of disruption to normal working habits, yet until the coronavirus pandemic took hold, the vast majority of people had never heard of it, let alone used it. Now that Zoom is a staple of working life, it makes sense to take […]

The post How To Change And Use Zoom Backgrounds (And Why You Should Do It) appeared first on designrfix.com.

Tylko Organise effortlessly -3D & Motion Design

Original Source: http://feedproxy.google.com/~r/abduzeedo/~3/SGAeY-uphAM/tylko-organise-effortlessly-3d-motion-design

Tylko Organise effortlessly -3D & Motion Design

abduzeedo12.02.20

Reisinger Studio with Facu Labo and Aimar Molero Music & Sou were briefed to create four ideas to promote Tylko’s “Organise effortlessly” mantra. Using Maxon Cinema 4D they created some abstract 3D work and here’s a set of  work in progress & 3D explorations.

Stills

Image may contain: cartoonImage may contain: balloonImage may contain: cartoon and LEGOImage may contain: artImage may contain: indoor and wallImage may contain: airplaneImage may contain: wall, indoor and balloonImage may contain: indoorImage may contain: stationaryImage may contain: screenshotImage may contain: boxImage may contain: cartoon, indoor and toyImage may contain: wall and indoorImage may contain: vase, cup and cylinderImage may contain: orange, cartoon and balloonImage may contain: balloon, cartoon and indoor

Credits

Client, Tylko
Production by Reisinger Studio
Direction & 3D Design by Andrés Reisinger
Drafts by Sebastian Baptista
Animation by Facu Labo
Music Design by Aimar Molero


Designing An Attractive And Usable Data Importer For Your App

Original Source: https://smashingmagazine.com/2020/12/designing-attractive-usable-data-importer-app/

If you’ve ever tried to import data into an app before, you know, as a user, how varied the experience can be. In some cases, the user is overwhelmed with instructions on how to use the importer. In others, there’s no direction at all. And while that might look nicer than an importer overrun with directions and links to documentation on how to use it, a completely useless UI will also cause users frustration once the inevitable errors start getting thrown.

So, when you’re designing an app or software that needs a data importer, how do you ensure this doesn’t happen to your end users? Do you try to custom build or find a Goldilocks solution that strikes the right balance between minimal and informative? And what should that even look like?

Today, I want to look at four ways to ensure that the user interface design of your data importer doesn’t get in the way of a positive user experience.

Quick note before I start: I’ll be using live data importer examples to demonstrate how to design this on your own. However, if you’d rather just use a ready-made data importer, but don’t have time to review the existing options against these good design practices, Flatfile Concierge is what you’re looking for. I’ll show some examples of it as we go along and tell you a bit more about it at the end of this post.

UI Design Tips For Your Software’s Data Importer

There are many challenges in data onboarding for apps and software. But if you can get the UI right — in other words, provide your end users with an attractive and usable importer — you can effectively minimize those challenges.

Here’s what your data importer should look like if you want to make that a reality for your users:

1. Format The Instructions For Readability

It doesn’t matter how straightforward the data import process is. You can never assume that your end users will automatically know how to format their file(s), which file types are allowed and what sort of file size limitations there may be.

So, the main importer page must have instructions for them. Just be careful about going overboard.

If you leave them with a wall of text explaining what the importer is for, they’ll get annoyed with the redundant information holding them up from getting started. And if you spell out each possible step in minute detail, their eyes are going to glaze over. Worst-case scenario, they’ll start the experience feeling as though they’re being talked down to. None of these outcomes is ideal.

To find the sweet spot, aim for the following:

Simplify the instructions into 100 words or less.

PayPal’s invoice importer is a good example of this:

There’s a single paragraph on this page that tells users that files need to:

Be in CSV format;
Include fields for the email address, item name, and invoice amount;
Include no more than 1000 invoices.

For anyone that misses the bit about the file format, they’ll get a reminder of it in the upload field.

The rest of the information (the link to the file template and FAQs on how to batch invoice) is linked out to other pages, which keeps this importer page nice and short.

When possible, I’d recommend formatting the instructions using paragraphs, bulletpoints, bolded headers or white space. This would be similar to how you’d structure text for readability on a web or app page.

QuickBooks Self-Employed shows us how this might work:

There are three steps presented and each is kept short and to the point. By adding extra space between and around them, reading the export/import instructions will seem less daunting.

One last thing you can do is to make the “Import” button stand out so that users that use the importer more than once can quickly skip past the instructions on subsequent uses.

Here’s how this might look if you use Flatfile as your data importer:

The button stands out clear as day on this page. And for those who have used this importer before, they won’t need to read through the instructions on the right for a reminder of what kinds of file types are allowed. There’s a note right beneath the button that clarifies this.

What’s more, the button is in the top-left corner, which is where most users’ eyes initially focus on a new page. So, the strong color of the button coupled with the priority placement will help users quickly get the import process started.

2. Show Them All The Import Options That Are Available

Consumers often expect companies to provide them with options. This is something we’ve seen a lot lately in e-commerce, with shoppers wanting various purchase options available (e.g. pick up in-store, curbside pickup, two-day delivery, etc.)

If it makes sense to do so for your app, consider giving your users the same kind of flexibility and control over how they import their data. And when you do, design each option so that it’s clear — just by looking at it — what action comes next.

For instance, this is the expense and income importer for AND.CO:

The block with the dashed border tells users that they have at least one option: Drag-and-drop their CSV file into the widget to upload. While an importer design like this doesn’t always allow for click-to-upload, this one does (per the instructions).

Flatfile uses a similar design at the top of the import page:

The difference between these two examples is that Flatfile includes an upload button inside the dashed-border box so that it’s clear that both import options are available.

There’s also a third option beneath this block:

It’s a good idea to include a manual import option if your end users will return to the importer to add small handfuls of data and don’t want to prepare a file every time.

One last way to present import options is through the use of third-party software logos as Asana does:

The standard CSV file import option is available at the top of the page. Beneath that, though, are apps that their users are most likely to have stored their project data in.

As you can see, the visual presentation of the import options is just as important as the instructions provided. So, rather than try to get creative here, just use a tried-and-true design that your end users will be familiar with and will help them instantly identify the import option they prefer.

3. Make Complex Imports Look Easy

At this stage of the data import process, things can get a little hairy. Even if you have a flawless import process on the backend, the way it’s presented to your end users can be a problem if the complexities of the process start to show through.

There are two things you can do with the UI to keep that from happening. This point will cover what you can do if the import process itself is complex.

HubSpot is a robust marketing and sales software, so it’s no surprise the data import process would take a while. Regardless, it starts simply enough, asking users if they’re going to import their data or pull it in from another platform:

Now, this design goes against what I just talked about in the last point about designing the first page. However, there’s a reason why this was a good choice.

Let’s say this HubSpot user decides to import their data from a CSV file. They’d select “Import” and then go to this page:

If HubSpot used the typical import page design, this page would require users to pause and then get acquainted with the new interface before moving on.

So, this is something to consider if you have a complex data onboarding process that needs to be broken up into multiple steps before the actual import begins.

Assuming the user just wants to import a CSV, XLS or XLSX, they’ll find themselves here next:

What’s nice about this approach is that it prevents users from having to go through the importer once for every file they have to upload. If there’s related data, they can select ‘Multiple files with associations’ and the importer will help them make those connections:

This way, it’s not the users’ responsibility to merge the data in their files. Nor do they have to spend hours going through their imported records to merge related records. This importer helps them do it.

The next screen is similar to the “How many files are you importing?” screen. This one appears, however, when the user selects “One file”:

This again is aimed at keeping users from importing data and then spending excessive amounts of time cleaning it up.

Next, we have the part of the process where the user finally sees the importer. While it’s not exactly like the designs we looked at before, it’s still intuitive enough where users will know how to upload their files into it:

While I realize this is a lot of steps to get to a page that other software would show first, think about how much quicker these users are able to get inside HubSpot and to start working.

If you have a complex upload process (i.e. multiple files, object associations, etc.), consider using a similar design with each question on its own page as well as consistently presented options.

4. Use Color To Make Data Cleanup Speedy

The other way to simplify an otherwise complex import process is applicable to all data importers. In particular, this tip pertains to the final steps in the data onboarding process:

Data validation
Data sanitization

Now, having a data importer that can actually do some of this work is going to be a huge help. However, it’s ultimately up to your end users to review what they’ve imported and to approve it before they allow it inside the software.

To help them not be so overwhelmed by all the data and everything they need to address, use color to guide them through it.

For this example, we’re going to look at ClickUp. And if it looks familiar to you, that’s because it should. It was built using Flatfile’s data importer.

Let’s start with the first part of the data validation process:

This page is straightforward enough. It shows the user a snippet from their imported data and asks them if the row pointed to contains column names.

But look at the green “Yes” button. While this is a design tactic we use for web and app interfaces (i.e. make the desired call-to-action a positive and eye-catching color), there’s another reason this is here.

Assuming the column names are there and ClickUp can easily interpret the data, this is what the user sees next:

This is the data importer’s attempt at making light work of data validation. On the left are all the identified columns from the file.

On the right is information about how the columns were matched to ClickUp’s fields. There are also three possible data validation options:

Confirm mapping (in green);
Ignore this column (in a grey ghost button);
Include as a custom field (in another ghost button).

The green button here matches what we saw on the last screen. So, users have already been conditioned to view this green button as an affirmative, which will help them quickly go through all the results and confirm the fields that were correctly matched.

Green and grey aren’t the only colors that should appear in your data importer.

If errors should arise (which isn’t a bad thing), your users should have a chance to fix them before the data gets uploaded. Depending on where in the app the errors appear, you might want to design them differently.

For instance, ClickUp uses an orange warning symbol to call out issues with values during validation:

This allows ClickUp to tell users, “Yes, the column names match, but your values don’t line up with what we use.”

ClickUp then uses a red highlighter during data sanitization to point out errors with fields:

This is the final step before upload, so this is ClickUp’s last attempt at getting its users to perfect their data import. In this case, ClickUp highlights a field in red if it’s marked as required but contains no data.

The color alone should call attention to the fields. However, what if the user had imported a file with hundreds or thousands of rows and doesn’t see the red at first glance? Giving them a way to zero in on these red lines would be super valuable.

And ClickUp’s “Only show rows with problems” toggle does this:

Let’s face it: Unless your data importer tells your users when and where there’s a problem with their data, they’re probably not going to give it a second glance. That is, not until they’re in the software and wondering why their records are all messed up.

Of course, they’ll blame it on the importer and the software; not on their own negligence. So, providing these colorful markers throughout the process will be a huge help.

Wrapping Up

As I mentioned before, if you’re not confident that you can pull off the tricky balancing act between building a friction- and error-free data importer while designing it to be attractive, intuitive and helpful, then why bother?

As we’ve already seen, Flatfile Concierge is a ready-made data importer solution that’s not only built to handle a wide range of data import scenarios, but it looks great, too. By letting it power your data import process, you can devote more time to building products and your clients can dedicate more time to providing their users with better customer service and support.

4 Creative Ways to Design a Festive Website

Original Source: https://www.webdesignerdepot.com/2020/12/4-creative-ways-to-design-a-festive-website/

The holidays are fast approaching. But that doesn’t mean it’s too late to get a new website online or to make your existing one look festive for the holiday season.

When it comes to decking the halls of your website with a little festive cheer, how do you do this without spending loads of money and time on it?

You’re in luck. BeTheme has a variety of pre-built websites to help you do just that. Not only that, but you can use these festive websites for a variety of occasions, like:

Hanukkah
Kwanzaa
Christmas
Boxing Day
New Year’s

You could also just use one of these sites to make your website feel more seasonal as the temperatures get colder and the snow starts to fall. (If that’s what your winter wonderland looks like!)

Let’s have a look at 4 ways you can bring a little seasonal or holiday cheer to your visitors with a festive website from BeTheme:

Tip #1: Use a Page Builder That Makes it Easy to Swap in Festive Content

Unless you’re running a business like the Christmas Tree Shops, it doesn’t make a lot of sense to have holiday imagery up all year long.

The only problem, though, is that it can be a real pain having to go in, find a new theme, and then redesign your site around it… For only a month or two.

That issue is easily resolved with BeTheme, which comes with over 600 pre-built websites and two page builders — Muffin and Elementor.

Because there are so many pre-built sites available, you can easily switch to a non-festive website once the holiday season is over.

In order to swap out this design with a festive website, you’d first have to reset your theme (which Be provides instructions on how to do). Then, install the new site you want to use.

Like BeXmas:

And if you only want, say, a new hero image in the top of your website, you can cherry-pick which parts of the pre-built site you install.

Tip #2: Effortlessly Switch From One Holiday to the Next

Let’s be honest, the winter holiday season can feel a little nuts — not just because your business has to keep up with the change of pace, but because your website has to keep in step with what’s going on.

So, let’s say you have an ecommerce site that changes frequently for upcoming sales, holidays, events, and so on. For this, you could use the BeMall pre-built site (all year long, mind you):

As you can see, it currently has a Black Friday message on the homepage. It’s not uncommon to have to transition from Black Friday or Cyber Monday into the December holidays.

Here’s how you might do that:

The update can be as minor or major as you want. So long as you use graphics and content that stay on-brand, you can easily swap out as much of your imagery as you like.

Tip #3: Use Small Animations to Bring the Holidays to Life

Holidays should be a time to lift spirits. Having a website that’s able to satisfy your customers’ needs during the holiday season will certainly help.

You might also want to think about adding small animations to your design, too.

The animations themselves don’t have to be festive, but you can use them to call attention to holiday-themed content. Take, for instance, BeParty:

You don’t need to have champagne bottles popping or streamers flying across the screen to get your point across.

This animation gives the New Year’s party balloons a gentle and natural feeling of bobbing up and down. An attention to a detail this small is sure to bring a smile to your visitors’ faces.

Tip #4: A Little Hint of Seasonal Flavor Can Go a Long Way

Holiday celebrations aren’t always big blowouts. Unless your entire business is going all-in on the holidays (or it’s a totally holiday-themed business), there’s no reason your site should have to go all out either.

Sometimes a more understated approach is best.

In that case, you’d keep your normal branded elements, imagery, and content in place on the website. But to make it feel a little more festive, you could infuse your site (at the very least, the homepage) with slight seasonal or festive touches.

For instance, let’s say you’ve built a website for a popular ski resort. Your website might look like the BeSnowpark site does normally:

The main draw of the resort is skiing, so it wouldn’t make much sense to change the graphics. However, you could do something like this:

It’s a small enough change, but the gift emoji and bigger lettering in the green button might inspire loyal snowbirds as well as first-time visitors to more quickly book their much-needed holiday getaway.

Get Your Festive Website for Christmas, New Year’s, and More

There are many science-backed reasons why a festive website is a good idea.

Holiday decorations, in general, stir up positive feelings of nostalgia for many people. They can also help alleviate some of the stress that’s built up over the course of the year:

What’s more, holiday decorations can visually signal to others that you’re friendly and accessible, even if they don’t know you.

Sounds exactly like how you want visitors and prospects to feel, right?

As you can see, there are many ways to decorate your website for the holidays. To do it quickly and affordably — and not completely turn your regular website upside-down — a BeTheme pre-built site is the way to go.


[– This is a sponsored post on behalf of BeTheme –]

Source

p img {display:inline-block; margin-right:10px;}
.alignleft {float:left;}
p.showcase {clear:both;}
body#browserfriendly p, body#podcast p, div#emailbody p{margin:0;}

15 Free Sources to Learn Swift Programming Language

Original Source: https://www.hongkiat.com/blog/swift-programming-language/

If you have been programming with Objective-C, learning Swift would be a breeze as it has inherited a number of syntax that you may already have been familiar with. And if learning Swift is in your…

Visit hongkiat.com for full content.

Best Design Practices for E-Commerce Websites

Original Source: http://feedproxy.google.com/~r/Designrfix/~3/pOdDmGNoSAY/best-design-practices-for-e-commerce-websites

For many people, the action of buying something is more than just acquiring a new item. It’s also about the memories they associate with it, the emotions they have when they unbox it, the dreams they achieve while using it, the changes they experience outside and inside, the feelings they get when they offer it […]

The post Best Design Practices for E-Commerce Websites appeared first on designrfix.com.

Branding and Visual Identity for Eko Trädvård

Original Source: http://feedproxy.google.com/~r/abduzeedo/~3/ue7gQLlO6EA/branding-and-visual-identity-eko-tradvard

Branding and Visual Identity for Eko Trädvård

abduzeedo12.01.20

Ville Oké created the branding and visual identity for Eko Trädvård (Eco Treecare),an arborist in the southern parts of Sweden offering felling and pruning services in accordance with the highest standards of safety.

The identity was based on the idea of a medical cross that also resembles a tree with one branch cut off. The cut-off shape became a simple visual tool that is used in pictograms, patterns, typography and color.

Image may contain: screenshotImage may contain: screenshot and typographyImage may contain: screenshotImage may contain: yellowImage may contain: screenshot and posterImage may contain: internet and templateImage may contain: screenshot and illustrationImage may contain: screenshotImage may contain: land vehicle, vehicle and wheelImage may contain: turquoiseImage may contain: screenshot and abstract

For more information make sure to check out ekotradvard.se


Reactive Variables In GraphQL Apollo Client

Original Source: https://smashingmagazine.com/2020/11/reactive-variables-graphql-apollo-client/

In this article, we will look at how to set up reactive variables, how the GraphQL cache polices come into place in defining read and writes to the cache, and provide the ability for developers to add types that exist on the client-side alone so that we can structure queries for client-side variables same way we can for remote GraphQL data. After learning more about the fundamentals of reactive variables, we will build a simple app that switches the theme of our application to either dark mode or light mode based on the value of our reactive variable. We will be looking at how to query a reactive variable, how to update the value stored in a reactive variable, and how the change in value triggers updates in components that depend on the reactive variable for certain actions to occur.

The target audience for this article would include software developers who already use GraphqQL with state management tools like Context API or Redux and willing to explore a new pattern of handling state management in GraphQL, or GraphQL beginners who are looking for effective ways to handle globally shared local state within GraphQL without Making things too complicated with external tooling. To follow along with this, you should have an existing knowledge of ReactJS and CSS too.

A Quick Introduction To GraphQL

With GraphQL, you get exactly what you need, and also get the data returned as well as structured how you need it.

“GraphQL is a query language for APIs and a runtime for fulfilling those queries with your existing data. GraphQL provides a complete and understandable description of the data in your API, gives clients the power to ask for exactly what they need and nothing more, makes it easier to evolve APIs over time, and enables powerful developer tools.”

— GraphQL website

What Is Apollo Client In GraphQL?

Apollo Client helps you avoid manually tracking loading and error states. It also provides the ability to use GraphQL with modern React patterns like hooks, and so on.

“Apollo Client is a comprehensive state management library for JavaScript that enables you to manage both local and remote data with GraphQL. Use it to fetch, cache, and modify application data, all while automatically updating your UI.”

— “Introduction to Apollo Client,” Apollo Docs

Let’s define some terms here that you will need to understand to move forward:

Variable
A variable is a name you give to an assigned memory location where a value is stored. The variable name is used as a reference to the value stored in it when you need to make use of it.
Reactivity
We will explain reactivity as something that triggers change on its dependents when an update is passed to it. Like the local state in React triggers component updates, the reactive variables in Apollo GraphQL also automatically trigger component updates based on changes.

State management is a really important part of building a modern application. Having a global state is important when different components or screens require access to the same state value and possibly trigger changes when that particular state is changed.

In the next section, we will look at how to set up a reactive variable.

Writing Our First Reactive Variable

Here’s what a reactive variable looks like:

import { makeVar } from ‘@apollo/client’;

const myReactiveVariable = makeVar(/** An initial value can be passed in here.**/)

The makeVar is imported from Apollo Client and is used to declare our a reactive variable. The makeVar takes an initial value that the reactive variable would hold. The ease of constructing a reactive variable is amazing.

There are two ways to read data from our created reactive variable. The easiest way is to call our declared reactive variable which we have created above, as a function without an argument:

const variable = myReactiveVariable();

Getting the value of a reactive variable is that easy. In the code block above, we declared a variable that holds our reactive variable which was called without an argument to read the data it already holds.

We can also get the value of a reactive variable with the useQuery syntax we normally would use to fetch remote data in GraphQL. To explain how we can do this, let’s look at the Cache type and field policies.

Type And Field Policies

The cache type and field policies help you define how a specific field in your Apollo Client cache is read and written to. You do this by providing field policies to the constructor of inMemoryCache. Each field policy is defined inside the typePolicy that corresponds to the type which contains the field. Let’s define a typePolicy called Query and define a field policy for accessing a field called myReactiveVariable.

import { InMemoryCache } from ‘@apollo/client’;

// Here we import our reactive variable which we declared in another
// component
import { myReactiveVariable } from ‘./reactivities/variable.js’;

// The field policies hold the initial cached state of a field.
export default new InMemoryCache({
typePolicies: {
Query: {
fields: {
myReactiveVariable: {
read() {
return myReactiveVariable();
}
}
}
}
}
})

In the code snippet above, we declared a type called Query and defined a field called myReactiveVariable. Next, we added a read function that specifies what happens when the field’s cached value is read. Here’s what happens when the myReactiveVariable field cached value is being read:

We pass in the reactive variable we had declared in another component and imported here as the value the field returns.

Now that we have defined our typePolicies and fieldPolicies, let us go ahead and write our query to get the value store in our reactive variable. Here’s what the query would look like:

import { gql } from “@apollo/client”;

export const GET_REACTIVE_VARIABLE = gql`
query getReractiveVariable{
myReactiveVariable @client
}
`

The gql template literal tag we imported from Apollo Client above is used to write a GraphQL query in Apollo client.

The query name myReactiveVariable should match the field name declared in the field policy. If you have been using GraphQL, you will notice that this querying pattern is identical to the normal query you would write if it were to be a remote GraphQL API we were querying. The only difference is the @client placed after the field name. This instructs Apollo to resolve this particular query on the client and not on any external API.

That’s it! We have successfully set up our first reactive variable. The process looks a little bit lengthy initially but subsequently, you can declare a new reactive variable by simply declaring the reactive variable and adding a field policy for it.

To fetch the reactive variable, you can use the useQuery hook in any component where you need it.
Here’s an example.

import { useQuery } from ‘@apollo/client’;
import { GET_REACTIVE_VARIABLE } from ‘FILE_PATH_TO_YOUR_QUERY_FILE’;

const {loading, error, data} = useQeury(GET_DARK_MODE);

// you can track loading, error states, and data the same way with a normal query in Apollo

In the above code, we imported useQuery from @apollo/client. Next, we imported the GET_REACTIVE_VARIABLE query from the file it was exported from.

Lastly, we pass on to the useQuery hook in our query, and destructure loading, error, and data from it.

Modifying A reactive variable

Apollo client provides a beautiful way to modify a reactive variable — calling the function returned by makeVar and pass in a single argument to the function. The argument passed in is the new value the reactive variable will hold. Let us look at an example below where we modify our reactive variable which we declared above:

import { myReactiveVariable } from ‘PATH_TO_OUR_REACTIVE_VARIABLE_FILE’

myReactiveVariable(“A new value is in!”);

In the above code, we import myReactiveVariable and we update it by calling the variable and placing the new value inside of it.

It is so easy to update the values of a reactive variable. Once the value in a reactive variable is updated, corresponding actions are triggered in components that depend on the variable and the user-interface is adjusted automatically.

In the next section, we will build out a simple theme-changing application that switches themes from dark mode to light mode with a click of a button. The button changes itself based on the value of the current theme. This will help us put all that we have learned together by building out something that fully and simply illustrates the concept of reactive variables and show how the user interface is automatically triggered when the reactive variable is updated.

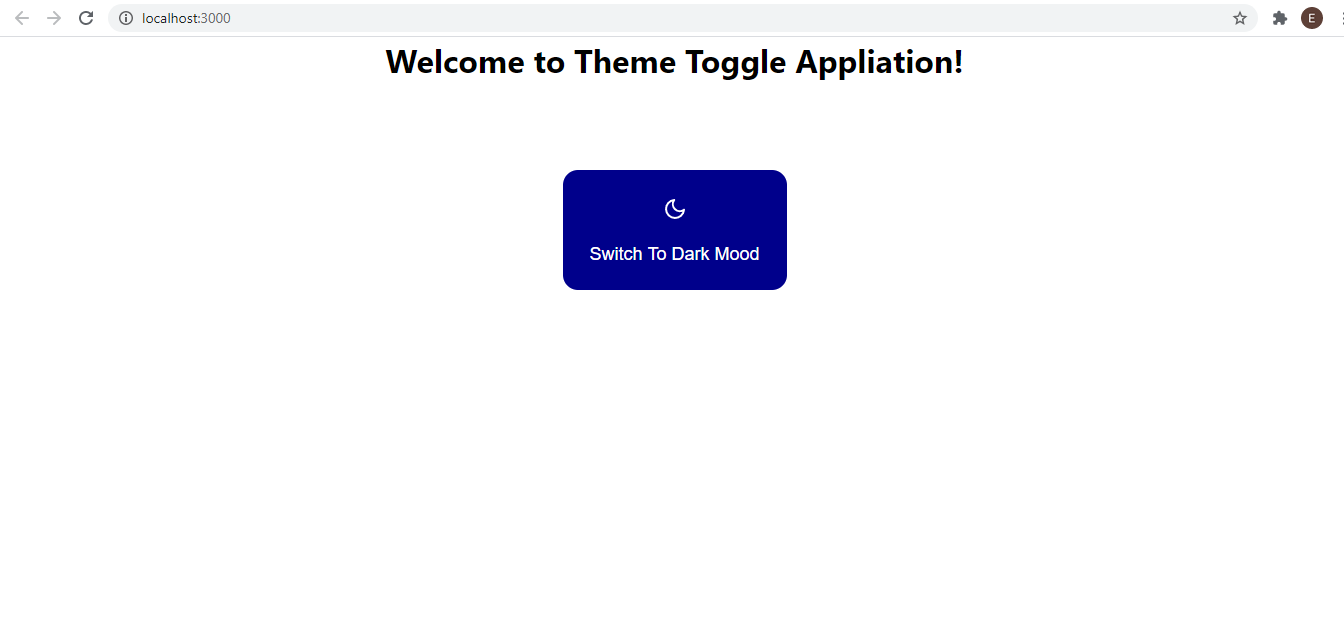
Here’s what our result will look like:
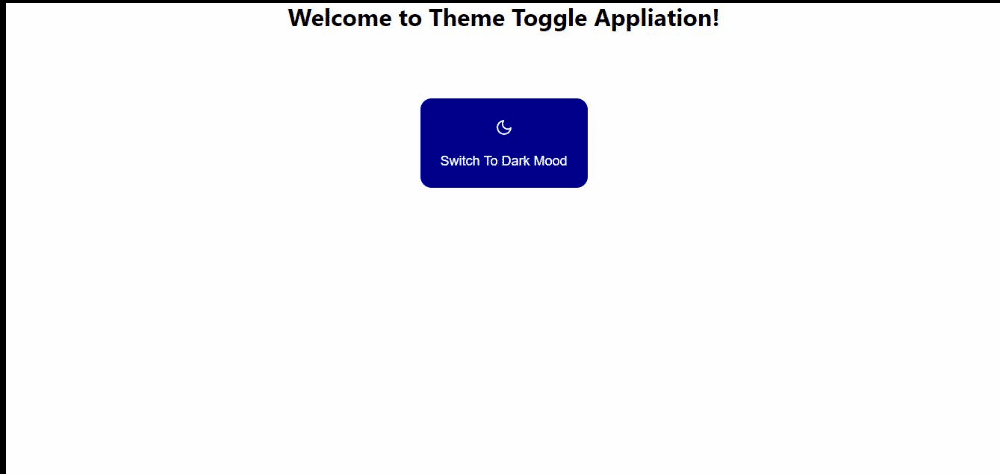
(Large preview)

Let’s begin.

Setup

First, we create a new React app.

npx create-react-app theme_toggle

Next, let’s install the necessary libraries we need for Apollo and GraphQL including the react-feather library to get our icons and react-router-dom to setup routing

npm install @apollo/client graphql react-feather react-router-dom

Once we are done with all the installations, let’s go ahead and set up our graphQL, including defining our darkMode reactive variable.

Create a folder called graphql inside the src folder and then create a sub-folder called reactivities to house all the reactive variables. Here’s how the folder tree would look like:
src > graphql > reactivities > themeVariable.js

I decided to arrange our file and folder structure simulating a real-world use case so follow along.
Let’s go ahead to declare our reactive variable in the themeVariable.js file we just created:

import { makeVar, gql } from “@apollo/client”;
export const darkMode = makeVar(false);

Next, inside the same file let’s construct our query to get our reactive variable and specify that the query should be resolved on the client-side. We can decide to create a separate folder to house all our query, especially when we have many queries in our application, but for the sake of this tutorial, we will write the query inside the same file as the reactive variable and export them individually:

import { makeVar, gql } from “@apollo/client”;

export const darkMode = makeVar(false);

// This is the query to get the darkMode reactive variable.
export const GET_DARK_MODE = gql`
query getDarkMode{
darkMode @client
}
`

In the above piece of code, we see how straightforward it was to declare a reactive variable with the makeVar() and passed in an initial value of false for our new variable. Next, we imported gql from Apollo client and used it in writing our query.

Next, let’s create our cache.js file and define our type and field policies to control how variables will be queried and structured:

Create a file called cache.js inside the graphql folder. Inside cache.js here’s how we declare our policies:

import { InMemoryCache } from ‘@apollo/client’;
import { darkMode } from ‘./reactivities/themeVariable’;

export default new InMemoryCache({
typePolicies: {
Query: {
fields: {
darkMode: {
read() {
return darkMode();
}
}
}
}
}
})

In the above code, first, we imported inMemoryCache from Apollo client, and we imported our reactive variable from the file path where we stored it.
Next, we created a new instance of inMemoryCache and our field policy is defined inside of the typePolicy object. The code above defines a field policy for the darkMode field on the Query type.

There’s one final step to complete our setup for Apollo for our React app, we need to create a client.js file. The client.js file is a file you’re already familiar with if you use GraphQL before now. It holds the ApolloClient constructor which would finally get passed into the ApolloProvider on a top-level file (usually the index.js file). Our client.js file should be located directly inside the src folder.

src > client.js

import { ApolloClient } from ‘@apollo/client’;
import cache from ‘./graphql/cache’;
const client = new ApolloClient({
cache,
connectToDevTools: true,
});
export default client;

Here’s what we did above. We imported ApolloClient. Next, we imported our cache from where it was previously declared. Inside our ApolloClient constructor, we passed in our cache which we imported and set connectToDevTools as true to enable us to use the Apollo Dev Tools in our browser.

Finally, we need to pass in the new ApolloClient instance which we exported as client into ApolloProvider in our top-level index.js file inside the src folder. Open the index.js file and replace the code there with this.

import React from ‘react’;
import ReactDOM from ‘react-dom’;
import { ApolloProvider } from ‘@apollo/client’;
import ‘./index.css’;
import App from ‘./App’;
import client from ‘./client’;
ReactDOM.render(
<ApolloProvider client={client}>
<App />
</ApolloProvider>,
document.getElementById(‘root’)
);

In the above code block, we wrapped our App component with the ApolloProvider and passed client (which we imported) to the Apollo provider. We did this in the top-level scope so that our entire app can access the ApolloProvider and the client.

We have successfully finished everything in the setup of Apollo and the reactive variable. You’ll notice that many things we did here were related to setting up Apollo which you would still have done even if you were using Apollo with other external API for managing context.

Since we are done with everything we need to set up Apollo and create our reactive variable, let’s now go ahead and set up our page and routing.

We would only have one route to a page called landingPage.jsx. Inside the src folder, create a folder called pages to house all the pages (in our case, we have just one page) and create a file called landingPage.jsx in it.

src > pages > landingPage.jsx

Inside our newly created page, let’s create a functional component with a h1 tag containing or heading. Here’s what will be in it.

import React from ‘react’;

const LandingPage = () => {
return (
<div
style={{
height: ‘100vh’,
backgroundColor: ‘white’,
}}
>
<h1>Welcome to Theme Toggle Appliation!</h1>
</div>
)
}
export default LandingPage

Next, let’s create our button component. Inside src, create a folder called components, and create a button.jsx file.
src > components > button.jsx

Inside our button component, here are the things we should import icons from react-feather, the useQuery hook from apollo/client, our query and reactive variable from the file it was exported from.

import React from ‘react’
import { Moon, Sun } from ‘react-feather’;
import { useQuery } from ‘@apollo/client’;
import { GET_DARK_MODE, darkMode as reactiveDarkMode } from ‘../graphql/reactivities/themeVariable’;

Inside the button component, let’s query our GraphQL client with the GET_DARK_MODE query like how we would normally query in GraphQL with Apollo.

const ButtonComponent = () => {

{loading, error, data} = useQuery(GET_DARK_MODE);

return (…)
}

export default ButtonComponent;

Next, we want to change the buttons based on the boolean value of our reactive variable that will be returned from data. To do this, we will create two buttons and use a ternary operator to display them conditionally based on the boolean value of our reactive variable:

const ButtonComponent = () => {

const {loading, error, data} = useQuery(GET_DARK_MODE);

return (
<div>
{
data.darkMode ? (
<button
style={{
backgroundColor: ‘#00008B’,
border: ‘none’,
padding: ‘2%’,
height: ‘120px’,
borderRadius: ’15px’,
color: ‘white’,
fontSize: ’18px’,
marginTop: ‘5%’,
cursor: ‘pointer’
}}
onClick={toggleMode}
>
<Sun />
<p>Switch To Light Mood</p>
</button>
) 🙁
<button
style={{
backgroundColor: ‘#00008B’,
border: ‘none’,
padding: ‘2%’,
height: ‘120px’,
borderRadius: ’15px’,
color: ‘white’,
fontSize: ’18px’,
marginTop: ‘5%’,
cursor: ‘pointer’
}}
onClick={toggleMode}
>
<Moon />
<p>Switch To Dark Mood</p>
</button>
)
}
</div>
)
}
export default ButtonComponent;

In the above code, we displayed both buttons conditionally with the ternary operator to display when the value of data.darkMode is either true or false. Our initial value as declared in our themeVariable.js is false.

Note: Remember that we can pull out darkMode from the data because we declared it this way in our cache.js field policy.

We added some CSS to the buttons to make them look better and also added the icons we imported from react-feather to each button.

If you noticed we had an onClick property passed into each button which called toggleMode. Let’s declare the function above but still inside the ButtonComponent:

const ButtonComponent = () => {

const toggleMode = () => {
console.log(“Clicked toggle mode!”)
}

return (…)
}

export default ButtonComponent;

Currently, we have a console.log() inside the toggleMode function. In a later part of this article, we will come back to properly write this function to update the value of the reactive variable.

Now let’s go back to the ladingPage.jsx file we created before now and add the button we just created:

import React from ‘react’;
import ButtonComponent from ‘../components/button’;

const LandingPage = () => {
return (
<div
style={{
height: ‘100vh’,
backgroundColor: ‘white’,
}}
>
<h1>Welcome to Theme Toggle Appliation!</h1>
<ButtonComponent />
</div>
)
}
export default LandingPage

To add the button, we simply imported it into our page and added it below the h1 element we already had on the page.

Here’s how our web app looks like at the moment.

We are almost done building our app. Next, let’s change the background and text color of the page in the landingPage.jsx style to conditionally be black or white based on the boolean value of our reactive variable which would be toggled in the button component later. To do this, we will also use the useQuery hook to get the current value of our reactive variable.

Our landingPage.jsx file will finally look like this:

import React from ‘react’
import { useQuery } from ‘@apollo/client’;
import ButtonComponent from ‘../components/button’;
import { darkMode, GET_DARK_MODE } from ‘../graphql/reactivities/themeVariable’;

const LandingPage = () => {
const {loading, error, data} = useQuery(GET_DARK_MODE);
return (
<div style={{ height: ‘100vh’, backgroundColor: data.darkMode ? ‘black’ : ‘white’, color: data.darkMode ? ‘white’ : ‘black’ }}>
<h1>Welcome to Theme Toggle Appliation!</h1>
<ButtonComponent />
</div>
)
}
export default LandingPage

Pay attention to the way we change the backgroundColor and color of the div container conditionally based on the boolean value of the reactive variable returned. We make use of a ternary operator to set the backgroundColor to black or white depending on the value of data.darkMode. The same thing should be done for the value of color. This is all we need to for the landingPage.jsx component.

The final thing we will need to do to get our application to be working is to make our toggleMode function in the button component able to modify the reactive variable on click of the button. Let’s look at how to modify a reactive variable again, this time, in a real app example.

Modifying A Reactive Variable

As we’ve previously learned, to modify a reactive variable, all you need to do is to call the function returned by makeVar and pass in the new value inside of it. Here’s how that will work in our case:

Go to the button component and do this:


import { GET_DARK_MODE, darkMode } from ‘../graphql/reactivities/themeVariable’;

const ButtonComponent = () => {

const toggleMode = () => {
darkMode(!darkMode)
}

return (…)
}

export default ButtonComponent;

First, we imported the GET_DARK_MODE query and the darkMode reactive variable from the file they were exported from.

Next, we wrote an arrow function for toggleMode and called the darkMode function returned by makeVar and passed an invert of the current value it contained as the new value the reactive variable will carry when it is clicked on.

We have our entire app powered by a reactive variable and once there’s a change to the value held in the reactive variable, every component or page dependent on that variable for an action to trigger is updated and the user interface is updated with the current changes. We escaped all the hurdles of dispatch functions and other ambiguous steps we have to follow when using other state management libraries like Redux or Context API.

Conclusion

Reactive variables in Apollo client give you a sweet, easy to use, easy to update, and a consistent querying pattern with querying a regular remote GraphQL API. Learning to use reactive variables for state management is a plus to you because it gives you the flexibility of choice among many tools. reactive variables would enable you to manage locally shared global state among components without the extra boilerplate that would usually come with the dominant state management libraries that already exist.

Check out the finished code on GitHub.

Related Resources

Reactive Variables, Apollo Docs
Local State Management With Reactive Variables
Configuring The Cache, Apollo Docs