Original Source: https://www.smashingmagazine.com/2019/03/spotify-app-vue-nuxt-javascript/
Creating A Spotify-Powered App Using Nuxt.js
Creating A Spotify-Powered App Using Nuxt.js
Cher Scarlett
2019-03-12T12:15:39+01:00
2019-03-12T13:34:36+00:00
We’ve all heard of Spotify. Launched back in 2008, the app offers millions of tracks from various legendary and upcoming artists. It allows you to create a playlist, follow other people or choose a playlist based on your mood.
But let’s take the app from another perspective today. Let’s build a two-page server-side rendered web application featuring a “Now Playing on Spotify” component. I’ll walk you through all of the steps of building a client-side application, building and connecting to a server API, as well as connecting to external API services.
Our project will be built using the Node.js and npm ecosystems, Github to store our code, Heroku as our host, Heroku’s Redis for our storage, and Spotify’s web API. The application and internal API will be build entirely using Nuxt’s system. Nuxt is a server-side-rendering framework that runs on Vuejs, Expressjs, Webpack, and Babeljs.
This tutorial is moderately complex, but is broken down into very consumable sections. You’ll find a working demo at cherislistening.heroku.com.

Final result created with Nuxt.js, Redis, and Spotify. (Large preview)
Requirements
This tutorial requires knowledge of HTML, CSS, Javascript (ES6), and how to use command line or terminal. We’ll be working with Node.js and Vuejs; a basic understanding of both will be helpful before starting this tutorial. You’ll also need to have Xcode Tools installed if you are on MacOS.
If you prefer to reverse-engineer, you can fork the repository.
Table Of Contents
Planning Our Application
We’ll lay out our expected functionality and a visual representation of what we plan to see when we are finished.
Setting Up And Creating Our Project
We’ll walk through how to setup an application hosted on Heroku’s server, setup auto-deployment from Github, setup Nuxt using the command line tools, and get our local server running.
Building Our API Layer
We’ll learn how to add an API layer to our Nuxt application, how to connect to Redis, and Spotify’s web API.
Client-Side Storage And State Management
We’ll look at how we can leverage the built-in Vuex store to keep what’s playing up to date. We’ll set up our initial data connections our API.
Building The Pages And Components
We’ll take a brief look into how pages and components differ in Nuxt, and build two pages and a couple of components. We’ll use our data to build our Now Playing app and some animations.
Publishing Our Application
We’ll get our app onto GitHub and built on Heroku’s server, authenticate and share with everyone what music we’re listening to.
Planning Our Application
The most important step before we start any new project is to plan our goals. This will help us establish a set of requirements for accomplishing our goals.
How many pages are there?
What do we want on our pages?
Do we want our Spotify “Now Playing” component present on both of our pages?
Do we want a progress bar to show listeners where we are in the song?
How do we want our pages laid out?
These are the types of questions that will help us draft our requirements.
Let’s build out two pages for our application. First, we want a landing page with our “Now Playing” component. Our second page will be our authentication area where we connect our data to Spotify. Our design is going to be very minimalistic, to keep things simple.
For our “Now Playing” component, let’s plan on showing the progress of the track as a bar, the name of the track, the artist’s name, and the album art. We’ll also want to show an alternate state showing the most recent track played, in case we aren’t currently listening to anything.
Since we are dealing with Spotify’s API, we’ll have special tokens for accessing the data from our site. For security purposes, we don’t want to expose these tokens on the browser. We also only want our data, so we’ll want to ensure that we are the only user who can login to Spotify.
The first issue we find in planning is that we have to login to Spotify. This is where our Redis cache storage comes in. Spotify’s API will allow to permanently connect your Spotify account to an application with another special token. Redis is a highly performant in-memory data structure server. Since we are dealing with a token, a simple key:value storage system works well. We want it to be fast so we can retrieve it while our application is still loading.
Heroku has its own Redis cache service built in, so by using Heroku for our server, host, and storage, we can manage everything in one place. With the added benefit of auto-deployment, we can do everything from our console with commands in terminal. Heroku will detect our application language from our push, and will build and deploy it without much configuration.
Setting Up And Creating Our Project
Install Nodejs
Grab the right package for your OS here: https://nodejs.org/en/download/
$ node –version
v10.0.1
Install git
Follow the instructions for your OS here: https://git-scm.com/book/en/v2/Getting-Started-Installing-Git
$ git –version
git version 2.14.3 (Apple Git-98)
Sign Up For GitHub
Follow the instructions here: https://github.com/join and https://help.github.com/articles/set-up-git/.
Create a repository: https://help.github.com/articles/create-a-repo/
Clone the repository: https://help.github.com/articles/cloning-a-repository/
I named mine “cherislistening”. Here’s what my clone looks like:
$ git clone https://github.com/cherscarlett/cherislistening.git
Cloning into `cherislistening`…
remote: Counting objects: 4, done.
remote: Compressing objects: 100% (4/4), done.
remove: Total 4 (delta 0), reused 0 (delta 0)
Unpacking objects: 100% (4/4), done.
$ cd cherislistening/
Install And Setup Heroku
Sign up for Heroku here: https://signup.heroku.com/
Download and install the Command Line Interface (CLI): https://devcenter.heroku.com/articles/heroku-cli#download-and-install
We’ll need to login and create our app, along with setting up some configuration variables. I named my app “cherislistening”. You can also leave off the -a command and Heroku will give you a randomly generated name. You can always change it later. The url of your app will be http://<APPLICATION_NAME>.herokuapp.com.
Nuxt requires some specific configuration to build and run properly, so we’ll add those now to get them out of the way.
$ heroku –version
heroku/7.19.4 darwin-x64 node-v11.3.0
$ heroku login
heroku: Press any key to open up the browser to login or q to exit:
Logging in… done
Logged in as cher.scarlett@gmail.com
$ heroku create -a cherislistening
$ heroku config:set CLIENT_URL=http://cherislistening.herokuapp.com API_URL=/ HOST=0.0.0.0 NODE_ENV=production NPM_CONFIG_PRODUCTION=false
Setting CLIENT_URL, API_URL, HOST, NODE_ENV, NPM_CONFIG_PRODUCTION and restarting ⬢ cherislistening… done, v1
API_URL: /
CLIENT_URL: http://cherislistening.herokuapp.com
HOST: 0.0.0.0
NODE_ENV: production
NPM_CONFIG_PRODUCTION: false
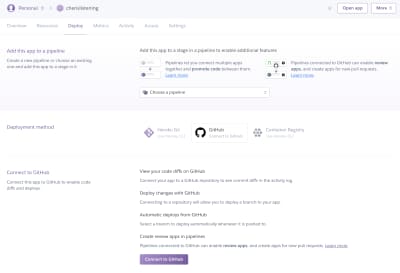
Go to the Heroku dashboard and click into your newly created app. In the ‘Deploy’ tab, connect to your Github account, select the repository you cloned, and enable auto deploys from the Master branch.
Github selected in the Heroku dashboard (Large preview)

Repository selection in Github (Large preview)

Automatic deployment setup with Github (Large preview)
Create Nuxt App
We’ll use npx to create our Nuxt application. Npm is a great ecosystem for managing Node.js packages, but to run a package, we must install it and add it to our package.json file. That isn’t very useful if we want to execute a single package one time, and installing something isn’t really necessary. This makes npx suitable for executing packages that compose file trees, adding boilerplates, and install the packages you need during execution.
$ npx –version
6.4.1
npx is shipped by default in npm 5.2.0+, so it is highly recommended we upgrade npm instead of globally installing npx. If you just installed a fresh version of node.js, you should have current npm and npx.
The Nuxt.js team has created a scaffolding tool which will give your application the basic structure required to run. Make sure you’re in your new project’s folder before running the command.
$ npx create-nuxt-app
npx: installed 407 in 5.865s
> Generating Nuxt.js project in /Users/cstewart/Projects/personal/tutorials/cherislistening
? Project name cherislistening
? Project description A Spotify Now Playing App
? Use a custom server framework none
? Choose features to install Prettier, Axios
? Use a custom UI framework none
? Use a custom test framework none
? Choose rendering mode Universal
? Author name Cher Scarlett
? Choose a package manager npm
npm notice created a lockfile as package-lock.json. You should commit this file.
To get started:
npm run dev
To build and start for production:
npm run build
npm start
npm notice created a lockfile as package-lock.json. You should commit this file.
To get started:
npm run dev
To build & start for production:
npm run build
npm start
Every folder within the scaffolding comes with a README file. This file will give you the basics for how the folder works, and whether or not it’s needed. We will talk about the folders we’ll use as we get to them in the tutorial.
.nuxt/
assets/
|___README.md
components/
|___Logo.vue
|___README.md
layouts/
|___default.vue
|___README.md
middleware/
|___README.md
node_modules/
pages/
|___index.vue
|___README.md
plugins/
|___README.md
static/
|___favicon.co
|___README.md
store/
|___README.md
.gitignore
.prettierrc
LICENSE
nuxt.config.js
package-lock.json
package.json
README.md
We’ll need to make a change to package.json so that when we deploy to Heroku, our build process will run. In “scripts”, we’ll add "heroku-postbuild": "npm run build". Don’t forget to add a comma after the previous line in the object.
“scripts”: {
“dev”: “nuxt”,
“build”: “nuxt build”,
“start”: “nuxt start”,
“generate”: “nuxt generate”,
“heroku-postbuild”: “npm run build”
},
package.json
If you run npm run dev, and go to http://localhost:3000 in your browser, you should see the scaffolded app running:

Initial state of Nuxt application after scaffolding (Large preview)
Install Redis
Open a new terminal or command line tab and change directories (cd) into your project’s parent folder. Download redis and run make. If you’re on Windows, you’ll need to check out https://github.com/MicrosoftArchive/redis/releases.
$ cd ../
$ wget http://download.redis.io/releases/redis-5.0.3.tar.gz
$ tar xzf redis-5.0.3.tar.gz
$ cd redis-5.0.3
$ sudo make install
cd src && /Library/Developer/CommandLineTools/usr/bin/make install
Hint: It is a good idea to run ‘make test’. ?
INSTALL install
INSTALL install
INSTALL install
INSTALL install
INSTALL install
$ redis-server –version
Redis server v=5.0.3 sha=00000000:0 malloc=libc bits=64 build=bfca7c83d5814ae0
$ redis-server –daemonize yes
That will start our redis server as a background process and we can close this tab. The local redis server will be running at http://127.0.0.1:6379/.
In our tab with our project running, type Ctrl + C to kill the server. We’ll need to install a redis package for node, and provision our Heroku Redis instance.
$ npm install async-redis –save
npm WARN eslint-config-prettier@3.6.0 requires a peer of eslint@>=3.14.1 but none is installed. You must install peer dependencies yourself.
+ async-redis@1.1.5
added 5 packages from 5 contributors and audited 14978 packages in 7.954s
found 0 vulnerabilities
$ heroku addons:create heroku-redis
Creating heroku-redis on ⬢ cherislistening… free
Your add-on should be available in a few minutes.
! WARNING: Data stored in hobby plans on Heroku Redis are not persisted.
redis-metric-84005 is being created in the background. The app will restart when complete…
Use heroku addons:info redis-metric-84005 to check creation progress
Use heroku addons:docs heroku-redis to view documentation
Because we are using a hobby account, we don’t have a backup of our data. If our instance needs rebooted, we’ll need to re-authenticate to get a new key. Our application will also sleep on the free account, so some initial visits will be a little slow, while the app is “waking up”.
Our new app will be live at https://cherislistening.herokuapp.com/, where ‘cherislistening’ is whatever you named your Heroku application.
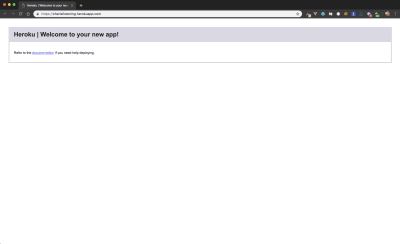
Default parked page for our new Heroku app (Large preview)
Sign Up For A Spotify Developer Account
This requires a Spotify account. Make note that every use of Spotify’s API must adhere to their brand guidelines.
Create a Client ID at https://developer.spotify.com/dashboard/applications.
Take the Client ID and the Client Secret, which you can find if you click on the green card into your new application’s details, and export them to Heroku as configuration variables. Keep these safe and secret! If you believe your client secret has been exposed, you can get a new one, but you’ll need to update your application’s configuration as well.

Never share your client ID and client secret tokens! (Large preview)
$ heroku config:set CLIENT_ID=<CLIENT_ID> CLIENT_SECRET=<CLIENT_SECRET>
Setting CLIENT_ID, CLIENT_SECRET and restarting ⬢ cherislistening… done, v3
CLIENT_ID: <CLIENT_ID>
CLIENT_SECRET: <CLIENT_SECRET>
On the top right side of the application dashboard, there is a Settings button. Click that and add in two callback URLs for whitelisting. You’ll need a local callback URL and one for your production server (the Heroku URL we got during setup).

Whitelisted callback URLs in Spotify’s dashboard (Large preview)
Spotify has fantastic developer documentation, including a great reference interface for testing endpoints. We’ll need to get our user ID to save to our configuration variables, so let’s do that with Get Current User’s Profile. Get an auth token from their console, selecting the user-read-private scope. Click “Try It”, and in the right-hand column look for your ID. We’ll use this identifier to make sure no one else can sign into our app.
$ heroku config:set SPOTIFY_USER_ID=<SPOTIFY_USER_ID>
Setting SPOTIFY_USER_ID and restarting ⬢ cherislistening… done, v4
SPOTIFY_USER_ID: <SPOTIFY_USER_ID>
As we discussed, we will have data we wouldn’t want exposed to the public. Two of these are clientId and clientSecret we were given by Spotify, and another which Heroku exported for us to access our Redis cache on the server. We’ll need to grab those for our local development as well.
$ heroku config
=== cherislistening Config Vars
API_URL: /
CLIENT_URL: http://cherislistening.herokuapp.com
HOST: 0.0.0.0
NODE_ENV: production
NPM_CONFIG_PRODUCTION: false
REDIS_URL: <REDIS_URL>
SPOTIFY_CLIENT_ID: <SPOTIFY_CLIENT_ID>
SPOTIFY_CLIENT_SECRET: <SPOTIFY_CLIENT_SECRET>
SPOTIFY_USER_ID: <SPOTIFY_USER_ID>
$ touch .env
We’ll transfer the credentials Heroku returned in our terminal to our new file, .env, and we’ll make our client URL our local server, http://localhost:3000/. We’ll need to make our Redis URL point to our local instance, too, which by default is redis://127.0.0.1:6379. This file will be ignored by git.
CLIENT_URL=http://localhost:3000/
REDIS_URL=redis://127.0.0.1:6379
SPOTIFY_CLIENT_ID=<SPOTIFY_CLIENT_ID>
SPOTIFY_CLIENT_SECRET=<SPOTIFY_CLIENT_SECRET>
SPOTIFY_USER_ID=<SPOTIFY_USER_ID>
.env
In order to access the configuration on our local server, we’ll need to update the nuxt config. We’ll add another item to our modules array: @nuxtjs/dotenv. We’ll also need to import two of the variables we will need available on the client-side of our application. We’ll add an env object following modules.
/*
** Nuxt.js modules
*/
modules: [
// Doc: https://axios.nuxtjs.org/usage
‘@nuxtjs/axios’,
‘@nuxtjs/dotenv’
],
env: {
spotifyId: process.env.SPOTIFY_CLIENT_ID,
clientUrl: process.env.CLIENT_URL
}
nuxt.config.js
Building Our API Layer
Middleware
Nuxt has two separate methods for executing server-side code.
In a single-file component (SFC), you have access to the middleware property, which corresponds with the middleware folder in your scaffolding. The drawback with this middleware for our use-case is that while it will execute server-side when your page is loaded or refreshed, it will execute client-side once your app is mounted, and when you navigate with nuxt’s routes.
The other option is what we’re looking for. We’ll create our own directory and add it as serverMiddleware to our config. Nuxt creates its own express instance, so we can write middleware registered to its stack that will only run on the server. This way, we can protect our private data from exploitation. Let’s add an api folder and index.js to handle our API endpoints.
$ mkdir api
$ touch api/index.js
Next, we’ll need to add our directory to our config so it registers when we start our server. Let’s open up the file nuxt.config.js at the root of our app. This file gives us our HTML <head>, as well as connecting anything to our client at build time. You can read more about the config in the docs.
We’ll add our api directory to our config file,
},
serverMiddleware: [‘~/api’]
}
nuxt.config.js
While we are developing, our changes will require rebuilds and server reboots. Since we don’t want to have to do this manually, nuxt installs nodemon for us, which is a “hot reload” tool. This just means it will reboot the server and rebuild our app when we save our changes.
Since we’ve added our API as serverMiddleware to Nuxt’s, we’ll need to add our directory to the config. We’ll add watch to our build object, and add the relative path from root.
*/**
*** Build configuration*
**/*
build: {
watch: [‘api’],
*/**
*** You can extend webpack config here*
**/*
extend(config, ctx) {},
serverMiddleware: [‘~/api’]
}
nuxt.config.js
We’ll also need to change our dev script in package.json to restart the server. We’ll need to make it nodemon –watch api –exec "nuxt":
“scripts”: {
“dev”: “nodemon –watch api –exec “nuxt””,
“build”: “nuxt build”,
“start”: “nuxt start”,
“generate”: “nuxt generate”,
“heroku-postbuild”: “npm run build”
},
package.json
Now we don’t have to worry about rebooting and restarting our server manually every time we make a change. ?
Let’s start our local development server.
$ npm run dev
Data Flow, Storage, And Security
Before we start writing our API layer, we’ll want to plan how we move data from external sources to our client. We’ve set up a Redis cache server, signed up for Spotify API, and set up a structure that has a client layer and a server layer. The client has pages and a store where we can store and render our data. How do these work together to keep our authentication data safe and drive our Now Playing component?
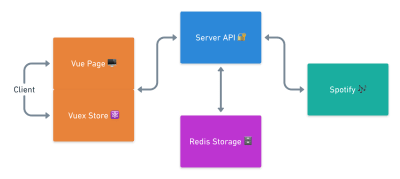
Data flow plan in a chart (Large preview)
Any information we want to keep long-term, or for new incoming connections, we’ll want to store on the server. We can’t log into Spotify when other users visit our app, so we’ll need want to ensure that new client connections can bypass authentication by accessing our special service token. We’ll want to keep track of our own Spotify login so that only our own connection is approved by the API, and we’ll want a track ready to show in case we can’t connect to Spotify’s API for some reason.
So, we’ll need to plan on storing our Spotify refresh_token, our Spotify userId, and our lastPlayedTrack in our Redis Cache.
Everything else can safely be stored in our client’s vuex store. The store and the pages (including their components) will pass data back and forth using nuxt’s architecture, and we’ll talk to the Redis cache and Spotify’s API via our own server’s API.
Writing The API
Nuxt comes with the express framework already installed, so we can import it and mount our server application on it. We’ll want to export our handler and our path, so that nuxt can handle our middleware.
import express from ‘express’
const app = express()
module.exports = {
path: ‘/api/’,
handler: app
}
api/index.js
We’ll need a few endpoints and functions to handle the services we need:
POST to our Redis Cache
Spotify last played track
Name
Artists
Album Cover Asset URL
Spotify refresh_token
Spotify access_token
Status of Spotify Connection
GET from our Redis Cache
Same as POST
Callback from Spotify
Refresh our Spotify access_token
GET recently played tracks from Spotify
GET currently playing track from Spotify
This may seem like a lot of calls, but we will combine and add small bits of logic where it makes sense as we write.
The Basics Of Writing An Endpoint In Expressjs
We’ll use express’s get() method to define most of our endpoints. If we need to send complex data to our API, we can use the post() method.
But what if we could do both? We can accept multiple methods with all().
Let’s add the first route we’ll need, which is our connection to our Redis Cache. We’ll name it spotify/data. The reason we’re naming it based on spotify rather than redis is because we’re handling information from Spotify, and Redis is simply a service we’re using to handle the data. spotify is more descriptive here, so we know what we’re getting, even if our storage service changes at some point.
For now, we’ll add only a res.send():
import express from ‘express’
const app = express()
app.all(‘/spotify/data/:key’, (req, res) => {
res.send(‘Success! ?n’)
})
module.exports = {
path: ‘/api/’,
handler: app
}
api/index.js
Let’s test to make sure everything is working properly. Open a new tab in your terminal or command line, to ensure your nuxt server continues running and run the following cURL command:
$ curl http://localhost:3000/api/spotify/data/key
Success! ?
As you can see, res.send() returned the message we included in response to our GET request. This is how we will return the data we retrieve from Spotify and Redis to the client, too.
Each one of our endpoints will have the same basic structure as our first one.
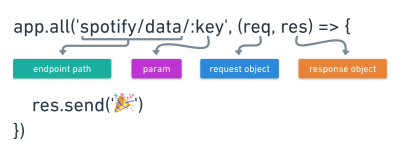
Breakdown of an API endpoint function in Expressjs (Large preview)
It will have a path, /spotify/data/, it may have a param, like :key, and on request, express will return a request object, req, and a response object, res. req will have the data we send with to the server, res is waiting to handle what we want to do after we complete any procedures within our function.
Connecting To The Redis Cache
We’ve already seen that we can return data back to our client with res.send(), but we may also want to send a res.status(). When we have an issue reaching Spotify (or our Redis cache), we’ll want to know so we can gracefully handle the error, instead of crashing our server, or crashing the client. We’ll also want to log it, so we can be informed about failures on applications we build and service.
Before we can continue with this endpoint, we’ll need access to our Redis Cache. During setup, we installed async-redis, which will help us easily access our cache from Heroku. We’ll also need to add our dotenv config so we can access our redis URL.
import redis from ‘async-redis’
require(‘dotenv’).config()
// Redis
function connectToRedis() {
const redisClient = redis.createClient(process.env.REDIS_URL)
redisClient.on(‘connect’, () => {
console.log(‘n? Redis client connected ?n’)
})
redisClient.on(‘error’, err => {
console.error(`n? Redis client could not connect: ${err} ?n`)
})
return redisClient
}
api/index.js
By default, redis.createClient() will use host 127.0.0.1 and port 6379, but because our production redis instance is at a different host, we will grab the one we put in our config.
We should add some console commands on the connect and error listeners the redisClient provides us. It’s always good to add logging, especially during development, so if we get stuck and something isn’t working, we’ve got a lot of information to tell us what’s wrong.
We need to handle the following cases in our API layer:
POST to our Redis Cache
Spotify lastPlayedTrack
Title
Artist
Album Cover Asset URL
Spotify vrefresh_token
Spotify access_token
GET from our Redis Cache
Same as POST
async function callStorage(method, …args) {
const redisClient = connectToRedis()
const response = await redisClient[method](…args)
redisClient.quit()
return response
}
api/index.js
Since we are requesting data from an external resource, we’ll want to use async/await to let our program know that this endpoint contains a function that always returns a promise, and that we’ll need wait for it to be returned before continuing.
In our arguments, we pull out our required, known argument method, and assign the rest (…) of the parameters to the scoped const args.
We make a call to our redis client using bracket notation, allowing us to pass a variable as the method. We again use the spread operator, … to expand our args Array into a list of arguments with the remaining items. A call to http://localhost:3000/api/spotify/data/test?value=1 would result in a call to the redis client of redisClient[‘set’](‘test’, 1). Calling redisClient[‘set’]() is exactly the same as calling redisClient.set().
Make a note that we must quit() to close our redis connection each time we open it.
function storageArgs(key, …{ expires, body, …props }) {
const value = Boolean(body) ? JSON.stringify(body) : props.value
return [
Boolean(value) ? ‘set’ : ‘get’,
key,
value,
Boolean(expires) ? ‘EX’ : null,
expires
].filter(arg => Boolean(arg))
}
api/index.js
We know that we can get two types of inputs: either a JSON body or a string value. All we really need to do is check if body exists, and we’ll assume it’s JSON and stringify it. Otherwise, we’ll use props.value. If it’s empty, it will be null. We’ll assign whichever we get back from the ternary statement to the const value. Make note that we are not destructuring value from the rest (…) of props because we need to assign body to value if it exists.
The first index of the array we are returning, position 0, will be the method we call on the redis client. We’re making a Boolean check in case something other than null is passed, like undefined. If there is a value, this will return true and our method will be set. If false, get.
Index 1 and index 2 are our key and value, respectively.
The 3rd and 4th positions are used to set an expiration date on the key. This comes in handy for our access_token, which will expire every few minutes to protect the integrity of our application.
As you may have suspected, we don’t want a null or undefined value in our array, so if there is no value, we’ll want to remove it. There are several ways to handle this, but the most readable is to use Array’s method filter(). This creates a new Array, removing any items that don’t match our condition. Using a Boolean() type coercion, we can check for a true or false. A null or undefined argument in our array will be removed, leaving us with an array of arguments we can trust to return back to the caller.
const app = express()
app.use(express.json())
// Express app
app.all(‘/spotify/data/:key’, async ({ params: { key } }, res) => {
try {
if (key === (‘refresh_token’ || ‘access_token’))
throw { error: ‘? Cannot get protected stores. ?’ }
const reply = await callStorage(…storageArgs(key))
res.send({ [key]: reply })
} catch (err) {
console.error(`n? There was an error at /api/spotify/data: ${err} ?n`)
res.send(err)
}
})
api/index.js
Make note of app.use(express.json()). This gives us access to body on the request object. We’ll also be wrapping our endpoint procedures in try/catch blocks so we don’t wind up with uncaught errors. There are other ways to handle errors, but this is the simplest for our application.
Note: Check out this awesome demo of different errors by Wes Bos on Error Handling in Nodejs with async/await.
We want to make sure that this endpoint doesn’t return any of the data we’re trying to hide, so after we grab our key by destructuring the request object, we’ll throw an error letting the client know they can’t get those stores. Make note that when we know the structure of an incoming Object’s structure in JavaScript ES6, we can use curly braces to pull out variable names using the Object’s keys.
const reply = await callStorage(…storageArgs(key))
api/index.js
We’re calling the function named callStorage. Because we may have 3 or 4 arguments, we’re passing in rest parameters using a spread of our args Array. In the call, above, we use … to expand an Array into our list of arguments of an unknown size, which are built from the function StorageArgs().
res.send({ [key]: reply })
} catch (err) {
console.error(`n? There was an error at /api/spotify/data: ${err} ?n`)
res.send(err)
}
})
api/index.js
Now that we have our reply from the redis client, we can send it to the client via the response Object’s method send(). If we POSTed to our cache, we’ll get a 1 back from the server if it’s a new key and 0 if we replaced an existing key. (We’ll want to make a mental note of that for later.) If there’s an error, we’ll catch it, log it, and send it to the client.
We’re ready to call the redis client and begin setting and getting our data.

Mapping an endpoint to a Redis server call (Large preview)
Now let’s send a few test cURLs to our API endpoint in our command line or Terminal:
$ curl –request POST http://localhost:3000/api/spotify/data/test?value=Hello
{“test”: 1}
$ curl http://localhost:3000/api/spotify/data/test
{“test”: “Hello”}
$ curl –request POST
http://localhost:3000/api/spotify/data/bestSong
–header ‘Content-Type: application/json’
–data ‘{
“name”: “Break up with ur gf, I”’m bored”,
“artist”: “Ariana Grande”
}’
{“bestSong”: 1}
$ curl http://localhost:3000/api/spotify/data/bestSong
{“bestSong”:”{“name”:”Break up with ur gf, I’m bored”,”artist”:”Ariana Grande”}”}
Connecting With Spotify
Our remaining to-do list has shrunk considerably:
Callback from Spotify
Refresh our Spotify access_token
GET recently played track from Spotify
GET currently playing track from Spotify
A callback is a function that must be executed following the completion of a prior function. When we make calls to Spotify’s API, they will “call us back”, and if something isn’t quite right, Spotify’s server will deny us access to the data we requested.
import axios from ‘axios’
api/index.js
Our callback will need to do a couple of things. First, it will capture a response from Spotify that will contain a code we need temporarily. Then, we’ll need to make another call to Spotify to get our refresh_token, which you may recognize from our redis storage planning. This token will give us a permanent connection to Spotify’s API as long as we are on the same application logged in as the same user. We’ll also need to check for our userId for a match before we do anything else, to prevent other users from changing our data to their own. Once we confirm we are the logged in user, we can save our refresh_token and access_token to our redis cache. Because we’re making API calls in our callback function, we’ll need to import axios to make requests, which nuxt installed when we scaffolded the app.
Note that JavaScript has a native fetch() method, but it’s very common to see axios used instead, because the syntax is more user-friendly and legible.
const getSpotifyToken = (props = {}) =>
axios({
method: ‘post’,
url: ‘https://accounts.spotify.com/api/token’,
params: {
client_id: process.env.SPOTIFY_CLIENT_ID,
client_secret: process.env.SPOTIFY_CLIENT_SECRET,
redirect_uri: `${process.env.CLIENT_URL}/api/spotify/callback`,
…props
},
headers: {
‘Content-Type’: ‘application/x-www-form-urlencoded’
}
})
api/index.js
One of the benefits to using a function expression instead of an arrow function expression is that you have access to an inherit object called arguments which is mapped by index, you also get access to a contextual this object. While we don’t need access to a lexical this, since we’re only returning the response of our redisClient call, we can omit closures here and implicitly return the response of the call.
We’ll want to write a single function for getting Spotify tokens. The majority of the code for getting our refresh_token and access_token is basically the same, so we can write an axios POST boilerplate, and spread (…) a props Object. Spreading an Object expands its properties into the context parent Object at the root depth, so if we spread { grant_type: ‘refresh_token’ }, our params Object will be extended to contain the properties of {client_id, client_secret, redirect_url, grant_type }. Again, we forego a return with an arrow function and opt for an implicit return since this function only returns a single response.
Note that we set props in the arguments as an empty Object ({}) by default just in case this function gets called without an argument. This way, nothing should break.
const spotifyBaseUrl = ‘https://api.spotify.com/v1/’
const getUserData = access_token =>
axios.get(`${spotifyBaseUrl}me`, {
headers: {
withCredentials: true,
Authorization: `Bearer ${access_token}`
}
})
api/index.js
In order to check to see we are the user who logged in via Spotify, we’ll write another implicitly returned arrow function expression and call Spotify’s Get Current User’s Profile method (the one we tested earlier to get our SPOTIFY_USER_ID). We set a const here with the base API URL because we will use it again in our other calls to the library. Should this ever change in the future (like for Version 2), we’ll only have to update it in once.
We now have all of the functions we need to write our callback endpoint. Make note of the fact that this will be a client-facing endpoint.
app.get(‘/spotify/callback’, async ({ query: { code } }, res) => {
try {
const { data } = await getSpotifyToken({
code,
grant_type: ‘authorization_code’
})
const { access_token, refresh_token, expires_in } = data
const {
data: { id }
} = await getUserData(access_token)
if (id !== process.env.SPOTIFY_USER_ID)
throw { error: “? You aren’t the droid we’re looking for. ?” }
callStorage(…storageArgs({ key: ‘is_connected’, value: true }))
callStorage(…storageArgs({ key: ‘refresh_token’, value: refresh_token }))
callStorage(
…storageArgs({
key: ‘access_token’,
value: access_token,
expires: expires_in
})
)
const success = { success: ‘? Welcome Back ?’ }
res.redirect(`/auth?message=${success}`)
} catch (err) {
console.error(
`n? There was an error at /api/spotify/callback: ${err} ?n`
)
res.redirect(`/auth?message=${err}`)
}
api/index.js
Our callback endpoint must match the URL we added to our settings in the Spotify dashboard exactly. We used /api/spotify/callback, so we’ll get at /spotify/callback here. This is another async function, and we need to destructure code from the request object.
We call the function we wrote earlier, getSpotifyToken(), to get our first access_token, our refresh_token, and our first expires_in. We’ll want to save all three of these to our redis cache, using redis’ set method’s built-in key timeout command to expire our access_token in expires_in seconds. This will help us set up a system of refreshing our access_token when we need it. Redis will set the access_token to null after the time to live (TTL) has reached 0 milliseconds.
Now that we have an access_token, we can make sure that the user who connected is us. We call getUserData(), the function we wrote earlier, and destructure the ID to compare to the user ID we saved to our environment configuration. If it’s not a match, we’ll throw an error message.
After we’re sure that our refresh_token is trusted, we can save our tokens to our redis cache. We call callStorage again — once for each token.
Make note that redis does have methods for setting multiple keys, but because we want to expire our access_token, we need to use set().
Since this is a client-facing endpoint, we’ll redirect to a URL and append a success or error message for the client to interpret. We’ll set this path up later on the client side.
We’ll need to retrieve our access_token and refresh it if necessary before we call any other Spotify endpoints. Let’s write an async function to handle that.
async function getAccessToken() {
const redisClient = connectToRedis()
const accessTokenObj = { value: await redisClient.get(‘access_token’) }
if (!Boolean(accessTokenObj.value)) {
const refresh_token = await redisClient.get(‘refresh_token’)
const {
data: { access_token, expires_in }
} = await getSpotifyToken({
refresh_token,
grant_type: ‘refresh_token’
})
Object.assign(accessTokenObj, {
value: access_token,
expires: expires_in
})
callStorage(…storageArgs(‘access_token’, { …accessTokenObj }))
}
redisClient.quit()
return accessTokenObj.value
}
api/index.js
We assign a const accessTokenObj to an Object with the value of our redis get(‘access_token’). If the value is null, we’ll know it’s expired and we need to refresh it. After getting our refresh_token from our cache, and getting a new access_token, we’ll assign our new values to accessTokenObj, set() them in redis, and return the access_token.
Let’s get write our endpoint for getting the currently-playing track. Since we’ll only want recently-played if there’s nothing currently playing, we can write a function for our endpoint to call that handles getting that data if it’s needed.
app.get(‘/spotify/now-playing/’, async (req, res) => {
try {
const access_token = await getAccessToken()
const response = await axios.get(
`${spotifyBaseUrl}me/player/currently-playing?market=US`,
{
headers: {
withCredentials: true,
Authorization: `Bearer ${access_token}`
}
}
)
const { data } = response
setLastPlayed(access_token, data)
const reply = await callStorage(‘get’, ‘last_played’)
res.send({
item: JSON.parse(reply),
is_playing: Boolean(data.is_playing),
progress_ms: data.progress_ms || 0
})
} catch (err) {
res.send({ error: err.message })
}
})
async function setLastPlayed(access_token, item) {
if (!Boolean(item)) {
const { data } = await axios.get(
`${spotifyBaseUrl}me/player/recently-played?market=US`,
{
headers: {
withCredentials: true,
Authorization: `Bearer ${access_token}`
}
}
)
postStoredTrack(data.items[0].track)
} else {
postStoredTrack(item)
}
}
function postStoredTrack(props) {
callStorage(
…storageArgs({
key: ‘last_played’,
body: props
})
)
}
api/index.js
The endpoint gets the Get the User’s Currently Playing Track endpoint and the async function setLastPlayed() calls the Get Current User’s Recently Played Tracks if nothing is returned from currently-playing. We’ll call our last function postStoredTrack() with whichever one we have, and retrieve it from our cache to send to the client. Note the we cannot omit the else closure because we aren’t returning anything in the if closure.
Vuex: Client-Side Storage And State Management
Now that we have middleware to connect to our services by proxy, we can connect those services to our client-side application. We’ll want our users to have automatic updates when we change songs, pause, rewind, or fast-forward, and we can handle those changes with state management.
State is our application’s way of holding onto information in real-time. It is how our application remembers the data it uses, and any changes to that data. State is really a short way of saying “the state of the system’s data”. The state of a Vue application is held in a user’s browser session, and with certain patterns, we can trigger various events to mutate that state. When the state changes, our application can update without requiring storage or server calls.
The pattern we’ll use is called a store pattern. This gives us a single source of truth as a user moves about our application (even though we’ll only have two pages for this particular app).
Vue’s component lifecycle adds the necessary one-way bindings we need, and Nuxt comes with Vuex that does all of the heavy lifting when our data changes. We will want our state to be constantly updating, but we won’t to call our API every few milliseconds to keep a progress bar moving. Instead of constantly polling our API, and reaching Spotify’s rate limit, we can lean on Vuex setters to continuously update the state of our bindings.
The data we’ll be dealing with will only be bound one-way. This means that our component and page views can get the data in store, but in order to mutate that data, they will need to call an action in the store.

One way data flow in our application (Large preview)
As you can see, the data only moves one way. When our application starts, we’ll instantiate our models with some default data, then we will hydrate the state in a middleware function expression built into Nuxt’s implementation of Vuex called nuxtServerInit(). After the application is running, we will periodically rehydrate the store by dispatching actions in our pages and components.
Here’s the basic structure we’ll need to activate a store in store/index.js:
// instantiated defaults on state
export const state = () => {
property: null
}
// we don’t edit the properties directly, we call a mutation method
export const mutations = {
mutateTheProperty (state, newProperty) {
// we can perform logical state changes to the property here
state.property = newProperty
}
}
// we can dispatch actions to edit a property and return its new state
export const actions = {
updateProperty: ({ commit, state }, newProperty) => {
commit(‘mutateTheProperty’, newProperty)
return state.property // will equal newProperty and trigger subscribers to re-evaluate
}
}
Once you feel comfortable, you can set up more shallow modular stores, which Nuxt implements based on your file structure in store/. We’ll use only the index module.
$ touch store/index.js
export const state = () => ({
isConnected: false,
message: null,
nowPlaying: {},
recentlyPlayed: {},
trackProgress: 0,
isPlaying: false
})
store/index.js
We’re going to need a few models to instantiate the state when our app starts. Note that this must be a function that returns an Object.
isConnected: tells us if we’re already connected via Spotify.
message: tells us if there’s an error during authentication (we set these up in the API on our callback endpoint).
nowPlaying: the song (track) Object that is currently or recently playing.
recentlyPlayed: the track most recently played.
trackProgress: the amount of the track that has already played (a percentage).
isPlaying: if the nowPlaying track is currently being played.
To update these, we’ll need to add mutations for each model. You can mutate more than one model in a mutation function, but to keep things digestible, we’re going to write a flat mutations object.
export const mutations = {
connectionChange(state, isConnected) {
state.isConnected = isConnected
},
messageChange(state, message) {
state.message = message
},
nowPlayingChange(state, nowPlaying) {
state.nowPlaying = nowPlaying
},
isPlayingChange(state, isPlaying) {
state.isPlaying = isPlaying
},
progressChange(state, { progress, duration }) {
state.trackProgress = (progress / duration) * 100
},
recentlyPlayedChange(state, recentlyPlayed) {
state.recentlyPlayed = recentlyPlayed
}
}
store/index.js
We’re not doing much in the way of data massaging for this app, but for progress we’ll need to calculate the percentage ourselves. We’ll return an exact number from 0-100.
export const actions = {
async nuxtServerInit({ commit }) {
try {
const redisUrl = `${clientUrl}/api/spotify/data/`
const {
data: { is_connected }
} = await axios.get(`${redisUrl}is_connected`)
commit(‘connectionChange’, is_connected)
if (Boolean(is_connected)) {
const {
data: { item, is_playing }
} = await axios.get(`${clientUrl}/api/spotify/now-playing`)
commit(‘nowPlayingChange’, item)
commit(‘isPlayingChange’, is_playing)
}
} catch (err) {
console.error(err)
}
},
updateProgress: ({ commit, state }, props) => {
commit(‘progressChange’, props)
return state.trackProgress
},
updateTrack: ({ commit, state }, nowPlaying) => {
commit(‘nowPlayingChange’, nowPlaying)
return state.nowPlaying
},
updateStatus: ({ commit, state }, isPlaying) => {
commit(‘isPlayingChange’, isPlaying)
return state.isPlaying
},
updateConnection: ({ commit, state }, isConnected) => {
commit(‘connectionChange’, isConnected)
return state.isConnected
}
}
store/index.js
nuxtServerInit() will be run when our server starts automatically, and will check if we are connected to Spotify already with a query to our redis data endpoint. If it finds that the redis cache key of is_connected is true, it will call our “now-playing” end point to hydrate nowPlaying with live data from Spotify, or whatever is already in the cache.
Our other actions take our store object and destructure commit() and state with our new data, commit() the data to the store with our mutations, and return the new state to the client.
Building The Pages And Components
Now that we have our API setup to give us data from Spotify and our store, we’re ready to build our pages and components. While we’re only going to make a couple of small pieces in this tutorial for brevity, I encourage liberal creativity.
We’ll need to remove the initial pages that the Nuxt scaffolding added, and then we’ll add our components and pages.
$ rm pages/index.vue components/Logo.vue layouts/default.vue
$ touch pages/index.vue components/NowPlaying.vue components/Progress.vue
The basic structure of every layout, page, and component in a single file component is the same. In fact, every layout, page, and component in Nuxt is a Vue component.
You can read further usage outside of the scope of this tutorial on Vue’s component registration documentation. We’re just going to do everything in the file and use plain HTML and CSS.
The repository for the demo will contain some components and styles that are not in this tutorial in order to keep things a little less complex.
<template>
// Write plain HTML here, avoid using any logic here
<div></div>
</template>
<script>
// Write plain javascript here, you can import libraries, too
export default {
key: ‘value’
}
</script>
<style>
// Write plain global CSS here
div {
display: inline;
}
</style>
Layout
We need to start with the default layout; this is the root of the application, where Vue will be mounted. The layout is a type of view, of which every page extends. This means that the HTML found in the layout will be the basis of all the html in every page we create.
<template>
<div>
<nuxt-link
to=”/auth”
name=”auth”
:aria-current=”ariaCurrent”
>Login</nuxt-link>
<nuxt/>
</div>
</template>
layouts/default.vue
In the template tag, we need a single root container, and <nuxt/> is where our application will mount.
Note: In the demo code, I’ve added a <Header/> and a <Footer/>, and the footer is a functional component because all of the data is static.
In this tutorial, I’ve added a <nuxt-link/> pointed to /auth. <nuxt-link> creates navigational links for routes within your app. I’ve added a conditional aria-current attribute to nuxt-link. By adding a colon (:) in front of the attribute, I’ve indicated to Vue that the value of the attribute is bound to some data, turning the value into JavaScript that will be interpreted as a string during the component lifecycle, depending on the condition of the expression. In a computed ternary statement, if the user on the route named auth, it will set the aria-current attribute to “page”, giving screen readers context to whether or not the user is on the path the link is pointed to. For more information on Vue’s data-binding, read this documentation.
<script>
export default {
titleShort: ‘is Listening’,
authorName: ‘Cher’,
computed: {
ariaCurrent() {
return ‘auth’ === this.$route.name ? ‘page’ : false
}
},
head() {
return {
title: `${this.$options.authorName} ${
this.$options.titleShort
} ·X· A Musical App`,
link: [
{
rel: ‘stylesheet’,
href: ‘https://fonts.googleapis.com/css?family=Bungee+Hairline|Oswald’
}
]
}
}
}
</script>
layouts/default.vue
The script tag can be thought of like a single JavaScript module. You can import other modules, and you export an Object of properties and methods. Above, we set two custom properties: titleShort and authorName. These will be mounted onto this.$options, and down the component tree you can access them through $nuxt.layout. This is useful for information you use at the root level, and in deep-nested children, like for updating the document title, or using our authorName in other contexts.
<div class=”metadata”>
<h2>{{name}}</h2>
<p>{{artistsList}}</p>
<p :class=”statusClass”>
<span>{{$nuxt.layout.authorName}} {{ status }}.</span>
<a v-if=”href” :href=”href”>Listen?</a>
</p>
</div>
<div class=”metadata”>
<h2 aria-live=”polite”>{{name}}</h2>
<p aria-live=”polite”>{{artistsList}}</p>
<p :class=”statusClass”>
<span>{{$nuxt.layout.authorName}} {{ status }}.</span>
<a v-if=”href” :href=”href”>Listen?</a>
</p>
</div>
There are several functions that Vue will look for and run, like head() and computed() in the above example.
head() will modify the <head> of the HTML document. Here I’ll update the document title, and add a link.
The computed() method is for reactive data that needs to be evaluated. Whenever the shape of the data changes, it triggers a re-evaluation and a subsequent re-render of the node it is bound to.
<style>
:root {
–colorGray: #333642;
–colorBlue: rgba(118, 120, 224, 0.5);
–colorBrightBlue: rgb(0, 112, 255);
}
html {
background: #000000;
}
body {
padding: 0;
margin: 0;
color: white;
font-family: ‘Bungee Hairline’, monospace;
}
a {
color: white;
text-decoration: none;
display: inline-block;
position: relative;
}
a:after,
a:before {
content: ”;
position: absolute;
left: 0;
right: 0;
height: 1em;
z-index: -1;
mix-blend-mode: color-burn;
}
a:after {
bottom: 2px;
background: var(–colorBlue);
z-index: -1;
transform: rotate(-3deg);
}
a:before {
background: rgba(118, 120, 224, 0.4);
transform: rotate(2deg);
}
.nuxt-progress {
opacity: 0.3;
height: 2px;
bottom: 0;
top: auto;
}
</style>
layouts/default.vue
In the CSS, you’ll notice I’m using a non-standard font, but no @import declaration. Since these are rendered on the server, they won’t be able to reach an external resource that isn’t in the build. We can still attach external resources — we just need to do it in a different way. There are workarounds that exist for this, but we just added it to our head(). You can also add it to nuxt.config.js.
The :root selector allows us to set global CSS variables we can use throughout the application. .nuxt-progress selector is for the progress bar that Nuxt adds during build automatically. We can style it here. I’ve just moved it to the bottom of the app and made it transparent and small.
Authentication Page
Now that we have a default layout, we can work on our authentication page. Pages are another kind of view in Nuxt, which render the HTML, CSS, and JavaScript that is needed for specific routes.
Pages and routes are automatically handled for every Vue file inside of the pages directory. You can also add more complex routing.
Everything has led us to this moment! Finally, we get to render some of our API-retrieved data!
<template>
<transition name=”fade” mode=”in-out”>
<section>
<nuxt-link
to=”/”
name=”index”
>Close</nuxt-link>
{{ message }}
</section>
</transition>
</template>
pages/auth.vue
<transition> is used to add transitions between pages and components mounting and unmounting. This will add conditional class names related to the name, and the mode “in-out” will make our transition happen both on entry and exit. For further usage, check out the documentation.
We get at data in the <template> with double curly braces {{}}. this is implied, so we don’t need to include it in the <template>.
<script>
export default {
asyncData({ env: {spotifyId, clientUrl}, query }) {
const spotifyUrl = `https://accounts.spotify.com/authorize?client_id=${
spotifyId
}&response_type=code&scope=user-read-currently-playing,user-read-recently-played&redirect_uri=${
clientUrl
}/api/spotify/callback`
return {
spotifyUrl,
query
}
},
computed: {
isConnected() {
return this.$store.state.isConnected
},
message() {
return this.$store.state.message
}
},
mounted() {
const { success, error } = this.query
if (
!Boolean(success || error) &&
!Boolean(this.isConnected)
) {
window.location = this.spotifyUrl
} else if (Boolean(Object.keys(this.query).length !== 0)) {
window.history.replaceState({}, document.title, window.location.pathname)
this.$store.commit(
‘updateMessage’,
success || error
)
if (Boolean(success)) {
this.$store.dispatch(‘updateConnection’, true)
}
}
if (Boolean(this.isConnected)) {
this.$store.commit(‘updateMessage’, “⚡ We’re Connected ⚡”)
}
}
}
</script>
pages/auth.vue
The first thing we need to do is redirect to the authentication server, which will call us back at our callback API proxy, and we setup to redirect us back to /auth, or this file we’re in now. To build the URL, we’ll need to get the environment variables we attached to the context object under the env parameter. This can only be done in pages. To access the context object, we’ll need to add the asyncData() method to our Object.
This function will be run before initializing the component, so make note that you do not have access to a component’s lexical this (which is always in the context of the local $nuxt Object) in this method because it does not exist yet. If there is async data required in a component, you will have to pass it down through props from the parent. There are many keys available in context, but we’ll only need env and query. We’ll return spotifyUrl and query, and they will be automatically merged with the rest of the page’s data.
There are many other lifecycle methods and properties to hook onto, but we’ll really only need mounted() and computed, data(), props, components, methods, and beforeDestroy(). mounted() ensures we have access to the window Object.
In mounted(), we can add our logic to redirect the user (well, us) to login via Spotify. Because our login page is shared with our authentication status page, we’ll check for the message Object we sent back from our callback redirect. If it exists, we will bypass redirecting so we don’t end up in an infinite loop. We’ll also check to see if we’re connected. We can set window.location to our spotifyUrl and it will redirect to the login. After logging in, and grabbing the query Object, we can remove it from our URL so our users don’t see it with window.history.replaceState({}, document.title, window.location.pathname). Let’s commit and dispatch the changes to our state in message and isConnected.
In computed(), we can return our properties from the store and they will be automatically updated on the view when they change.
Note that all properties and methods will have access to the lexical this once the component has been initialized.
<style scoped>
section {
position: absolute;
width: 30%;
min-width: 300px;
left: 0;
right: 0;
bottom: 50%;
margin: auto;
padding: 1em;
display: flex;
flex-direction: column;
text-align: center;
justify-content: center;
mix-blend-mode: hard-light;
z-index: 2;
}
section:after,
section:before {
content: ”;
display: block;
position: absolute;
top: 0;
bottom: 0;
right: 0;
left: 0;
z-index: -1;
}
section:after {
transform: rotate(1deg);
background: rgba(255, 255, 255, 0.1);
}
section:before {
transform: rotate(3deg);
background: rgba(255, 255, 255, 0.03);
}
.fade-enter-active,
.fade-leave-active {
transition: opacity 600ms ease-out;
}
.fade-enter,
.fade-leave-active {
opacity: 0;
}
</style>
pages/auth.vue
Note the scoped attribute added to <style>. This allows us to write shallow selectors that will only affect elements in the scope of this page (or component) by adding unique data attributes to the DOM. For more information read the documentation.
All the selectors starting with fade- are the classes created for our <transition>.
Head to http://localhost:3000/auth. If everything’s working, we should be able to login with Spotify by clicking the “Login” button, and be redirected back to see this:

⚡ We’re connected! ⚡ (Large preview)
Let’s set up our root page.
Landing Page
This is the fun part! We’ll be creating the view that users will see when they get to our app, commonly referred to as the root or index. This is just a concise way of indicating it is the home file of its directory, and in our case, the entire application.
We’ll be adding our player directly to this page.
<template>
<section>
<NowPlaying v-if=”isConnected && track” :nowPlaying=”track” :isPlaying=”isPlaying”/>
<p v-if=”!isConnected”>
? {{ $nuxt.layout.authorName }} hasn’t connected yet. ?
</p>
</section>
</template>
<script>
import NowPlaying from ‘~/components/NowPlaying.vue’
export default {
components: { NowPlaying },
computed: {
nowPlaying() {
if (Boolean(Object.keys(this.$store.state.nowPlaying).length !== 0)) {
this.$store.dispatch(‘updateConnection’, true)
return this.$store.state.nowPlaying
}
return this.$store.state.recentlyPlayed
},
track() {
return this.nowPlaying
},
isPlaying() {
return this.$store.state.isPlaying
},
isConnected() {
return this.$store.state.isConnected
}
}
}
</script>
<style scoped>
section {
min-width: 300px;
max-width: 750px;
margin: auto;
padding: 1em;
}
</style>
pages/index.vue
We’ll need to import our NowPlaying component (we will write it next), and we’ll want to conditionally load it with a v-if binding based on whether or not we are connected and we have track data to show. Our computed nowPlaying() method will return the nowPlaying Object if it has properties (we instantiated an empty object in the store, so it will always exist), and we’ll dispatch an action that we’re connected. We’re passing the track and isPlaying props since they are required to show the component.
We’ll need to create our components next, otherwise this page won’t build.
Components
In Nuxt, components are partial views. They cannot be rendered on their own, and instead, can only be used to encapsulate parts of a layout or page view that should be abstracted. It’s important to note that certain methods Page views have access to, like asyncData() won’t be ever be called in a component view. Only pages have access to a server-side call while the application is starting.
Knowing when to split a chunk of a layout, page, or even component view can be difficult, but my general rule of thumb is first by the length of the file, and second by complexity. If it becomes cumbersome to understand what is going on in a certain view, it’s time to start abstracting.
We’ll split our landing page in three parts, based on complexity:
Index component: The page we just wrote.
NowPlaying component: The container and track information.
Progress component: The animated track progress indicator.
Now Playing
<template>
<transition name=”fade”>
<section>
<aside>
<img v-if=”image” :src=”image” alt=”Album Artwork”>
<Progress :class=”className” :progressPercent=”progress” :image=”image”/>
</aside>
<div class=”metadata”>
<h2>{{name}}</h2>
<p>{{artistsList}}</p>
<p :class=”statusClass”>
<span>{{$nuxt.layout.authorName}} {{ status }}.</span>
<a v-if=”href” :href=”href”>Listen?</a>
</p>
</div>
</section>
</transition>
</template>
components/NowPlaying.vue
It’s important we include a link to Spotify, as it is a part of the requirements to use their API free of charge. We’re going to pass the progress and image props to our <Progress> component.
<script>
import Progress from ‘./Progress.vue’
export default {
components: { Progress },
props: [‘isPlaying’, ‘nowPlaying’],
data() {
return { staleTimer: ”, trackTimer: ” }
},
computed: {
image() {
const { album, image } = this.nowPlaying
if (Boolean(album)) {
const { url } = album.images[0]
return url
}
return Boolean(image)
? image
: ‘https://developer.spotify.com/assets/branding-guidelines/icon2@2x.png’
},
progress() {
return this.$store.state.trackProgress
},
artistsList() {
const { artists } = this.nowPlaying
return artists ? artists.map(artist => artist.name).join(‘, ‘) : null
},
href() {
const { external_urls } = this.nowPlaying
return external_urls ? external_urls.spotify : null
},
name() {
return this.nowPlaying.name
},
status() {
return this.isPlaying
? `is playing this track with ${Math.round(
this.$store.state.trackProgress
)}% complete`
: ‘has paused this track’
}
},
created() {
this.getNowPlaying()
this.staleTimer = setInterval(() => {
this.getNowPlaying()
}, 10000)
},
methods: {
updateProgress(progress = 0, duration = 0) {
this.$store.dispatch(‘updateProgress’, { progress, duration })
},
async getNowPlaying() {
const { progress_ms, is_playing, item } = await this.$axios.$get(
`/api/spotify/now-playing/`
)
if (Boolean(item)) {
const progress = progress_ms
const duration = item.duration_ms
this.$store.dispatch(‘updateStatus’, is_playing)
clearInterval(this.trackTimer)
if (is_playing) {
this.timeTrack(Date.now(), duration, progress)
} else {
this.updateProgress(progress, duration)
}
let id = null
if (Boolean(this.nowPlaying)) id = this.nowPlaying.id
if (item && (is_playing && item.id !== id)) {
this.$store.dispatch(‘updateTrack’, item)
}
}
},
timeTrack(now, duration, progress) {
const remainder = duration – progress
const until = now + remainder
this.trackTimer = setInterval(() => {
const newNow = Date.now()
if (newNow < until + 2500) {
const newRemainder = until – newNow
const newProgressMs = duration – newRemainder
this.updateProgress(newProgressMs, duration)
} else {
this.updateProgress(1, 1)
clearInterval(this.trackTimer)
this.getNowPlaying()
}
}, 100)
}
},
beforeDestroy() {
clearInterval(this.staleTimer)
clearInterval(this.trackTimer)
}
}
</script>
components/NowPlaying.vue
In addition to our computed() data, we will also have another type of reactive data on the data property. This property returns an Object with reactive properties, but these do not need to be re-evaluated. We will be using them for our timing intervals, so the updates will be come from setInterval().
created() runs when our component is done being initialized, so we’ll call our function getNowPlaying(), and start one of our two interval timers, staleTimer, which will run getNowPlaying() once every 10 seconds. You can make this shorter or longer, but keep in mind that Spotify does have rate limiting, so it shouldn’t be any less than a few seconds to avoid getting undesired API failures.
It’s important we add beforeDestroy() and clear our running intervals as a best practice.
In the methods property, we’ll have three functions: getNowPlaying(), updateProgress(), and timeTrack(). updateProgress() will dispatch progress updates to the store, while getNowPlaying() and timeTrack() will do the heavy lifting of keeping our track object hydrated and the progress bar moving every 10th of a second so we have a constantly moving progress bar.
Let’s take a closer look at getNowPlaying():
async getNowPlaying() {
const { progress_ms, is_playing, item } = await this.$axios.$get(
`/api/spotify/now-playing/`
)
if (Boolean(item)) {
const progress = progress_ms
const duration = item.duration_ms
this.$store.dispatch(‘updateStatus’, is_playing)
clearInterval(this.trackTimer)
if (is_playing) {
this.timeTrack(Date.now(), duration, progress)
} else {
this.updateProgress(progress, duration)
}
const { id } = this.nowPlaying
if (item.id !== id) {
this.$store.dispatch(‘updateTrack’, item)
}
}
components/NowPlaying.vue
This is an async function because we’re calling out now-playing endpoint, and we’ll want the function to wait until it has an answer to continue. If the item is not null or undefined, we’ll dispatch an update to the status, clearInterval() of our trackTimer (which may not be running, but that’s OK). If the is_playing is true, we’ll call timeTrack(); if it’s false, we’ll call updateProgress(). Last, we’ll check if our updated track is different than the one in our store. If it is, we’ll dispatch an update to the track in store to rehydrate our data.
timeTrack(now, duration, progress) {
const remainder = duration – progress
const until = now + remainder
this.trackTimer = setInterval(() => {
const newNow = Date.now()
if (newNow < until + 2500) {
const newRemainder = until – newNow
const newProgressMs = duration – newRemainder
this.updateProgress(newProgressMs, duration)
} else {
this.updateProgress(1, 1)
clearInterval(this.trackTimer)
this.getNowPlaying()
}
}, 100)
}
components/NowPlaying.vue
This function takes a current time, duration, and progress in milliseconds and starts running an interval every 100 milliseconds to update the progress. until is the time calculated when the track will be finished playing if it is not paused or scrubbed forwards or backwards. When the interval starts, we grab the current time in milliseconds with JavaScript’s Date Object’s now() method. We’ll compare the current time to see if it is less than until plus a buffer of 2500 milliseconds. The buffer is to allow for Spotify to update the data between tracks.
If we determine the track is theoretically still playing, we’ll calculate a new progress in milliseconds and call out the updateProgress() function. If we determine the track is complete, we’ll update the progress to 100%, clearInterval() and call nowPlaying() to get the next track.
<style scoped>
section {
position: relative;
display: grid;
grid-template-columns: 42% 58%;
align-items: center;
justify-content: center;
}
aside {
position: relative;
min-width: 50px;
}
img {
opacity: 0;
position: absolute;
height: 0;
width: 0;
}
section:after,
section:before {
content: ”;
display: block;
position: absolute;
top: 0;
bottom: 0;
right: 0;
left: 0;
z-index: 0;
}
section:after {
transform: rotate(1deg);
background: rgba(255, 255, 255, 0.1);
}
section:before {
transform: rotate(3deg);
background: rgba(255, 255, 255, 0.03);
}
.metadata {
padding-left: 1.4em;
position: relative;
z-index: 2;
}
h2 {
font-family: ‘Oswald’, monospace;
margin: 0;
font-size: 3em;
}
p {
margin: 0;
text-shadow: 1px 1px 1px rgba(0, 0, 0, 0.8);
}
.fade-enter-active {
transition: opacity 600ms ease-out;
}
.fade-leave-active {
opacity: 0;
}
.fade-enter,
.fade-leave-to {
opacity: 0;
}
.status span {
opacity: 0.7;
font-size: 0.8em;
padding: 1em 0;
display: block;
white-space: nowrap;
}
.is-playing span {
opacity: 0;
transition: opacity 600ms ease-out;
}
@media (max-width: 600px) {
section {
grid-template-rows: 42% 58%;
grid-template-columns: 100%;
}
aside {
max-width: 160px;
margin: 0 auto;
}
.metadata {
text-align: center;
padding: 0;
}
}
</style>
components/NowPlaying.vue
section is a display-type grid that keeps the album art and song metadata in two columns, and then on viewports up to 600px wide (the layout switches to two rows).
Progress
Now let’s build our Progress component. A simple solution is a bar using the width of a <div>:
<div>
<div :style=”`width: ${trackProgress}`” aria-hidden=”true” />
</div>
I wanted to do something a bit different, so I’ve built a square out in SVG:
<template>
<div aria-hidden=”true”>
<svg class=”album” viewBox=”0 0 25 25″ xmlns=”http://www.w3.org/2000/svg” role=”img”>
<defs>
<pattern id=”image” x=”0%” y=”0%” height=”100%” width=”100%” patternUnits=”userSpaceOnUse”>
<image x=”0%” y=”0%” width=”100%” height=”100%” v-bind=”{‘xlink:href’: image }”></image>
</pattern>
</defs>
<rect height=”25″ width=”25″ class=”image” x=”0″ y=”0″></rect>
</svg>
<svg class=”progress” viewBox=”0 0 25 25″ xmlns=”http://www.w3.org/2000/svg”>
<defs>
<linearGradient id=”gradient” x1=”0%” y1=”0%” x2=”0%” y2=”100%”>
<stop offset=”0%” stop-color=”#333642″></stop>
<stop offset=”25%” stop-color=”rgba(0, 112, 255, 0.8)”></stop>
<stop offset=”90%” stop-color=”rgba(118, 120, 224, 0.5)”></stop>
<stop offset=”100%” stop-color=”rgba(255, 255, 255, .5)”></stop>
</linearGradient>
</defs>
<rect
class=”bar”
:stroke-dasharray=”`${progressPercent} 100`”
fill=”none”
x=”0″
y=”-0.3″
height=”25″
width=”25″
></rect>
</svg>
</div>
</template>
<script>
export default {
props: [‘progressPercent’, ‘image’]
}
</script>
<style scoped>
div {
filter: grayscale(0);
transform: rotate(-2deg) scale(0.9);
}
.is-paused {
filter: grayscale(80%);
transition: all 600ms ease-out;
}
svg {
height: 100%;
width: 100%;
}
svg.album {
filter: drop-shadow(0 0 10px rgba(0, 0, 0, 0.3));
}
svg.progress {
position: absolute;
top: 0;
left: 0;
right: 0;
bottom: 0;
filter: drop-shadow(0 0 1px rgba(255, 255, 255, 0.2))
drop-shadow(0 0 2px var(–colorBrightBlue))
drop-shadow(0 0 3px var(–colorBrightBlue))
drop-shadow(0 0 5px var(–colorBrightBlue)) opacity(65%) contrast(150%);
}
.bar {
stroke: url(#gradient);
stroke-width: 0.03em;
transform: rotate(0deg);
transform-origin: center;
animation: fill 2s reverse;
}
.image {
fill: url(#image);
}
@keyframes fill {
to {
stroke-dasharray: 0 100;
}
}
</style>
components/Progress.vue
Above, we create two rect SVGs. One has a pattern fill of our image, the other is the progress bar. It’s important that whatever shape you use has a total perimeter of 100. This allows us to use the stroke-dasharray to fill the space based on a percentage. The left value is the length of the stroke, the right value is the space between the strokes. The stroke size getting larger pushes the space out of the frame and eventually is the entire length of the perimeter. We added an animation that fills the progress bar from 0 to its current point when the component is rendered.
Head to localhost:3000 and if we did everything right (and you’re playing a song) we should see something like this:

Spotify player component finished (Large preview)
Awesome! ?
Publishing Our Application
Let’s get everything up into our repository!
$ git add .
$ git commit . -m ‘Adds Nuxt application ?’
$ git push .
[master b63fb2d] Adds Nuxt application ?.
If you look into your Heroku dashboard and look at the activity feed on the right-hand panel, there should be a build and a deployment:
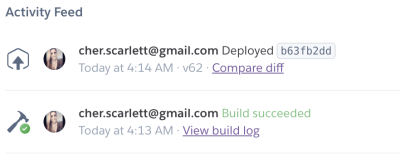
Deployment success! (Large preview)
If everything looks good, open your site!
$ heroku open
Log in with Spotify on production and start sharing your jam sessions!
?
Conclusion
Phew! We built a universal, server-side rendered application, wrote an API proxy on our server, connected to a Redis cache, and hosted on our application on Heroku. That’s pretty awesome!
Now that we know how to build an application using Nuxt, and have an understanding of what kind of data we should handle securely on the server, the possibilities for interesting applications are endless!
Build On Your Knowledge
Spotify’s API has a medley of endpoints to add more interesting experiences to the application we built, or for composing entirely new ones! You can fork my repository to explore some other components I’ve coded, or read through the docs and apply what you’ve learned to share more musical ideas!
Further Reading on SmashingMag:
New JS Features That Will Change How You Write Regex
Building Mobile Apps With Capacitor And Vue.js
Replacing jQuery With Vue.js: No Build Step Necessary
I Used The Web For A Day With JavaScript Turned Off

(rb, ra, il)


![our-new-land-[SVG]](https://codropspz-tympanus.netdna-ssl.com/codrops/wp-content/uploads/2019/03/our-new-land-SVG.jpg)