Original Source: https://smashingmagazine.com/2023/11/wordpress-playground-5-minute-install-instant-spin-up/
Many things have changed in WordPress over the years, but installation has largely remained the same: download WordPress, drop it on a server, create a database, sprinkle in some configuration, and presto, we have a WordPress site. This process was once lovingly referred to as the “famous five-minute install,” although that moniker seems to have faded with time, particularly as many hosting providers offer a more streamlined experience.
But what if WordPress didn’t require any setup at all? As in, you tap a link, and WordPress spins up a site for you right there, on demand? That’s probably difficult to imagine, considering WordPress runs on top of PHP, MySQL databases, and Apache. It’s not the most portable system.
That’s the aim of WordPress Playground, which got its first public boost when Matt Mullenweg introduced it during State of Word 2022.
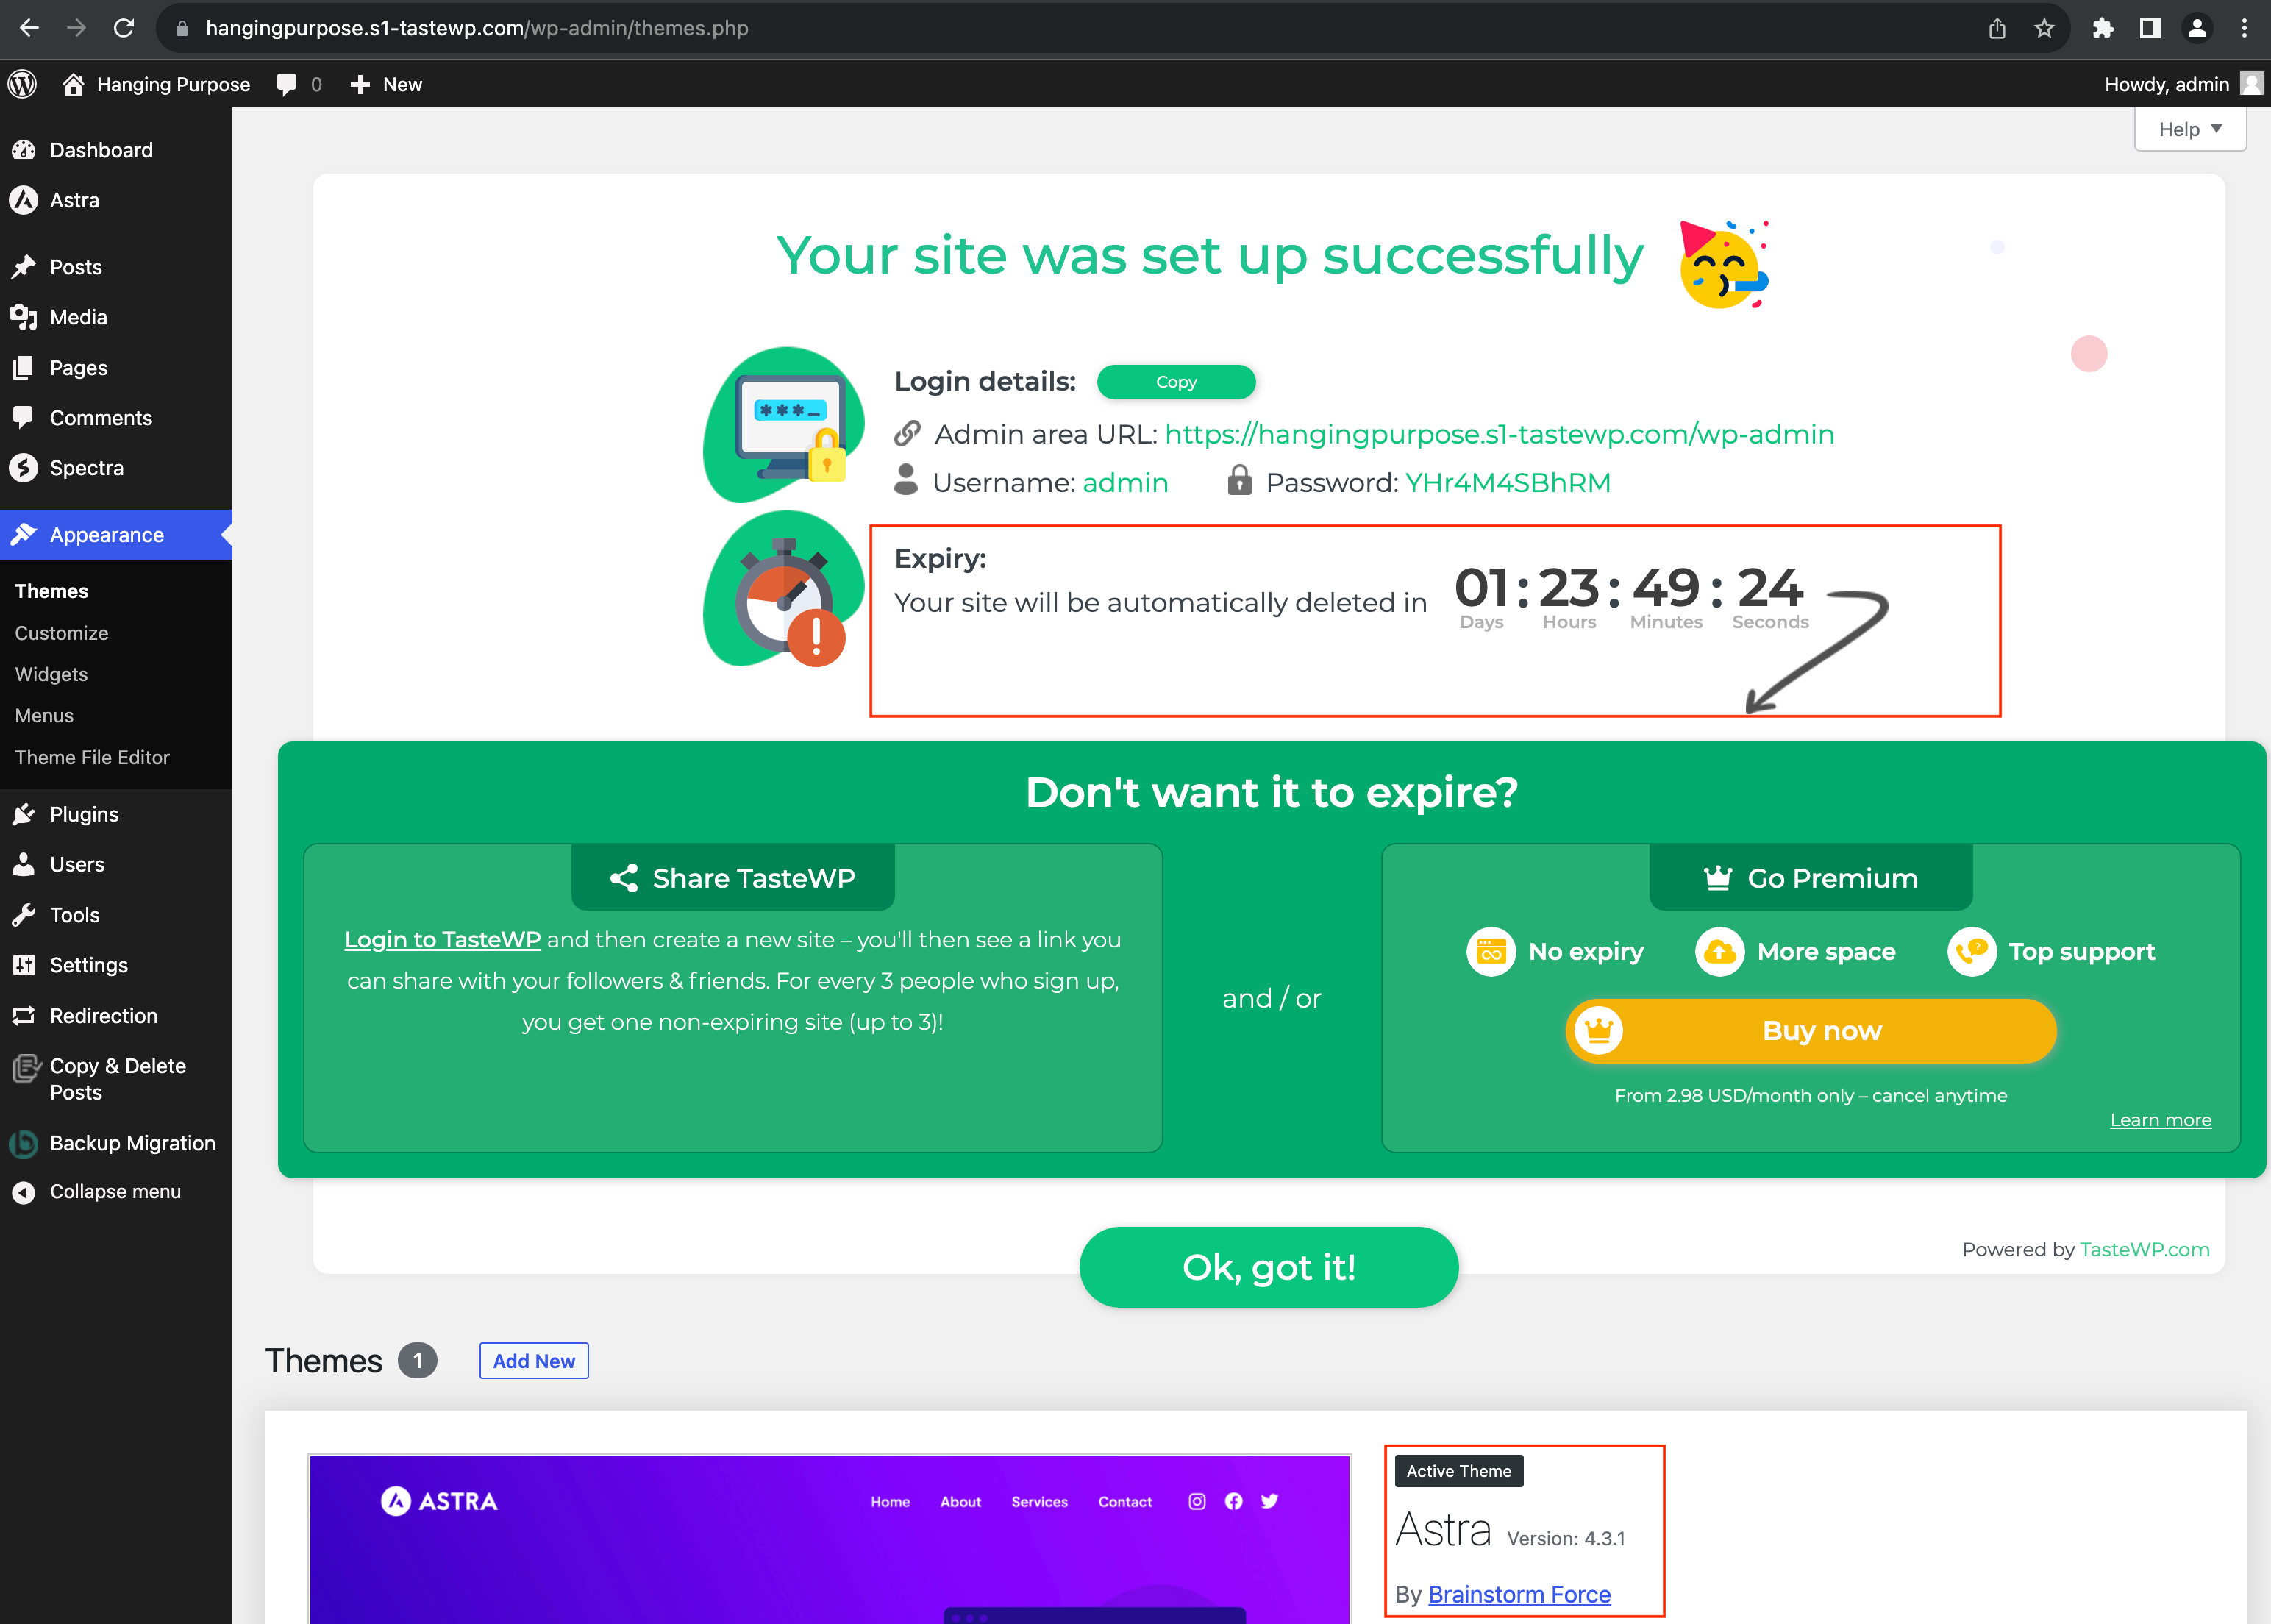
Notice how the URL is a subdomain of a TasteWP-related top-level domain: hangingpurpose.s1-tastewp.com. It generates an instance on the multi-site network and establishes a URL for it based on a randomized naming system.
There’s a giant countdown timer on the screen that indicates when the site is scheduled to expire. That makes sense, right? Allowing anyone and everyone to create a site on the spot without so much as a login could become taxing on the server, so allowing sites to self-destruct on a schedule is likely as much to do with self-preservation as it does economics.
Speaking of economics, the countdown timer is immediately followed by a call to action to upgrade, which buys you permanence, extra server space, and customer support.
Without upgrading, though, you are only allowed two free instant sites. But if you create an account and log into TasteWP, then you can create up to six test sites on a free pricing tier.

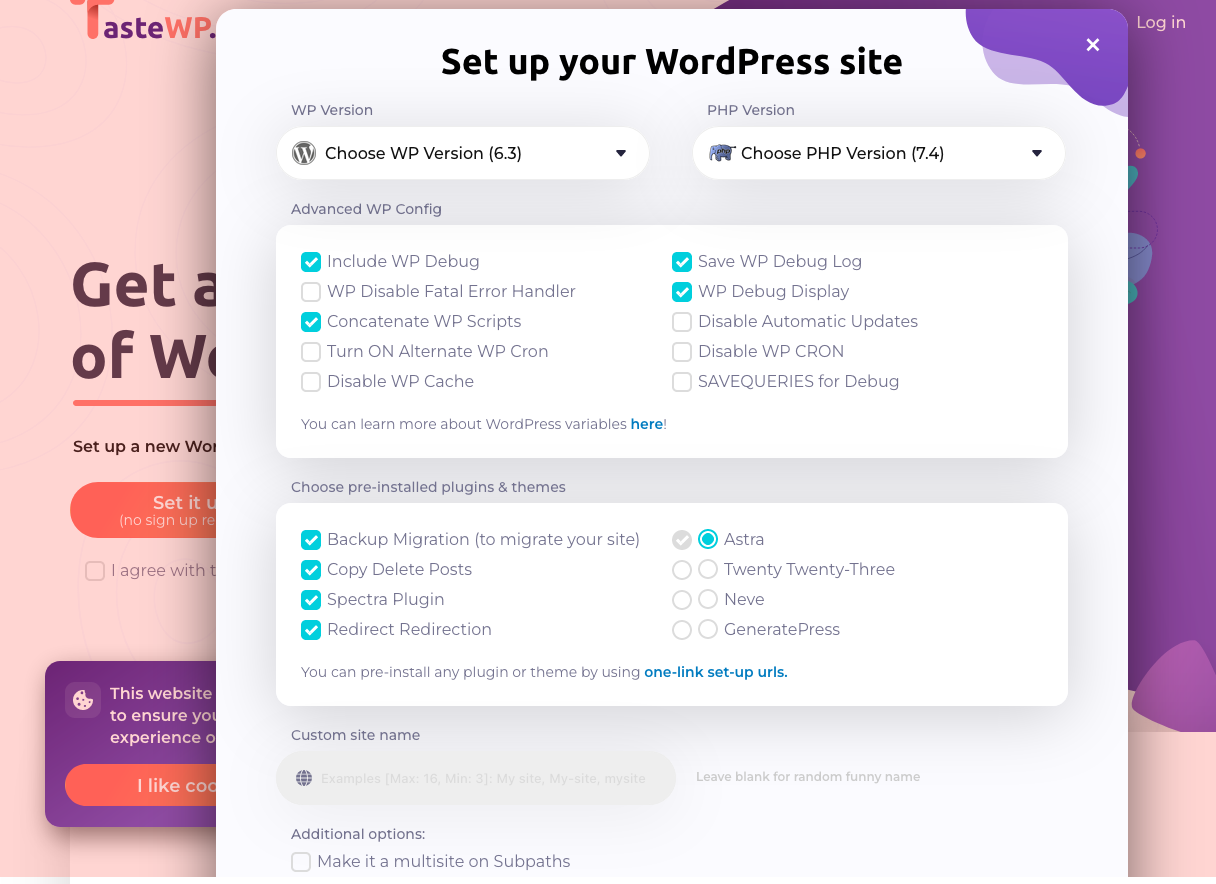
That’s a look at the “quick” onboarding, but TasteWP does indeed have a more robust way to spin up a WordPress testing site with a set of advanced configurations, including which WordPress version to use with which version of PHP, settings you might normally define in wp-config.php, and options for adding specific themes and plugins.
So, how does that compare to WordPress Playground? Perhaps the greatest difference is that a TasteWP site is connected to the internet. It’s not a WordPress simulation, but an actual instance with a URL you can link up and share with others… as long as the site hasn’t expired. That could very well be enough of a differentiation to warrant more players in this space, even with WordPress Playground hanging around.
I wanted to give you a sense of what’s already offered before actually unboxing WordPress Playground. Now that we know what else is out there let’s turn our attention back to Playground and explore it.
Starting Up WordPress Playground
One of the first interesting things about WordPress Playground is that it is available in not just one but several places. I wouldn’t liken it completely to a service like TasteWP, where you create an account to create and manage WordPress instances. It’s more like a developer tool, one that you can reach for when testing your work in a WordPress environment.
You can simply hit the playground.wordpress.net URL in your browser to launch a new site on the spot. Or, you can launch an instance from the command line. Perhaps you prefer to use the official Chrome extension instead. Whatever the case, let’s look at those options.
1. Using The WordPress Playground URL
This is the most straightforward way to get a WordPress Playground instance up and running. That’s because all you do is visit the playground.wordpress.net address in the browser, and a WordPress site is created immediately.
This is exactly how the WordPress Playground demo works, prompting you to click a button to open a new WordPress site. In fact, try clicking the following button to create one now.
Create A WordPress Site
If you want to use a specific version of WordPress and PHP in your Playground, all it takes is adding a couple of parameters to the URL. For example, we can instruct Playground to run WordPress 6.2 on PHP 8.2 with the following URL:
https://playground.wordpress.net/?php=8.2&wp=6.2
You can even try out the developmental versions of WordPress using Playground by using the following parameter:
https://playground.wordpress.net/?wp=beta
2. Using The GitHub Repository
True to the WordPress ethos, WordPress Playground is very much an open-source project. The repo is available over at GitHub, and we can pull it into a local environment and use WordPress Playground right from a terminal.
First, let’s clone the repository from the command line:
git clone https://github.com/WordPress/wordpress-playground.git
There is a slightly faster alternative that fetches just the latest revision:
git clone -b trunk –single-branch –depth 1 git@github.com:WordPress/wordpress-playground.git
Now that we have the WordPress Playground package in our local environment, we can formally install it:
cd wordpress-playground
npm install
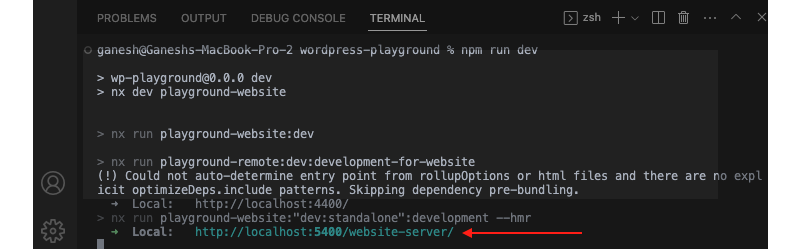
npm run dev
Once the local server is running, we should get a URL from the terminal that we can use to access the new Playground instance, likely pointed to http://localhost:5400/website-server/.
We are also able to set which versions of WordPress and PHP to use in the virtual environment by adding a couple of instructions to the command. For example, this command triggers a new WordPress 5.9 instance running on PHP 7.4:
wp-now start –wp=5.9 –php=7.4
3. Using wp-now In The Command Line
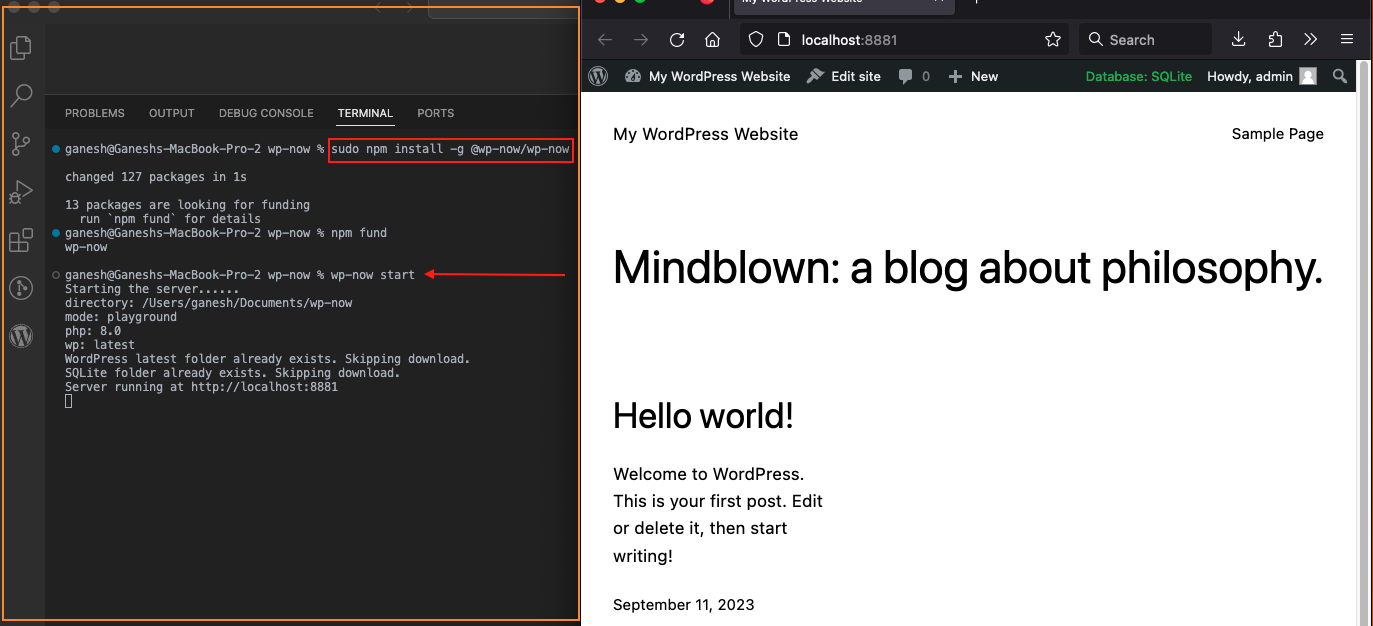
An even quicker way to get Playground running from the command line is to globally install the wp-now CLI tool:
npm install -g @wp-now/wp-now
This way, we can create a new Playground instance anytime you want with a single command:
wp-now start
Be sure that you’re using Node 18 or higher. Otherwise, you’re likely to bump into some errors. Once the command executes, however, the browser will automatically open a new tab pointing to the new instance. You’re already signed into WordPress and everything!
We can configure the environment just as we could with the npm package:
wp-now start –wp=5.9 –php=7.4
A neat thing about this method is that there are several different “modes” you can run this in, and which one you use depends on the directory you’re in when running the command. For example, if you run the command from a directory that already contains WordPress, then Playground will automatically recognize that and run the directory as a full WordPress installation. Or, it’s possible to execute the command from a directory that contains nothing but an index.php file, and Playground will start the server and run requests through that file.
There are other options, including modes for theme, plugin, wp-content, and wordpress-develop, that are worth checking out in the documentation.
4. Using The Visual Studio Code Extension
WordPress Playground is also available as a Visual Studio Code extension. It provides a nice one-click process to launch a local WordPress site.
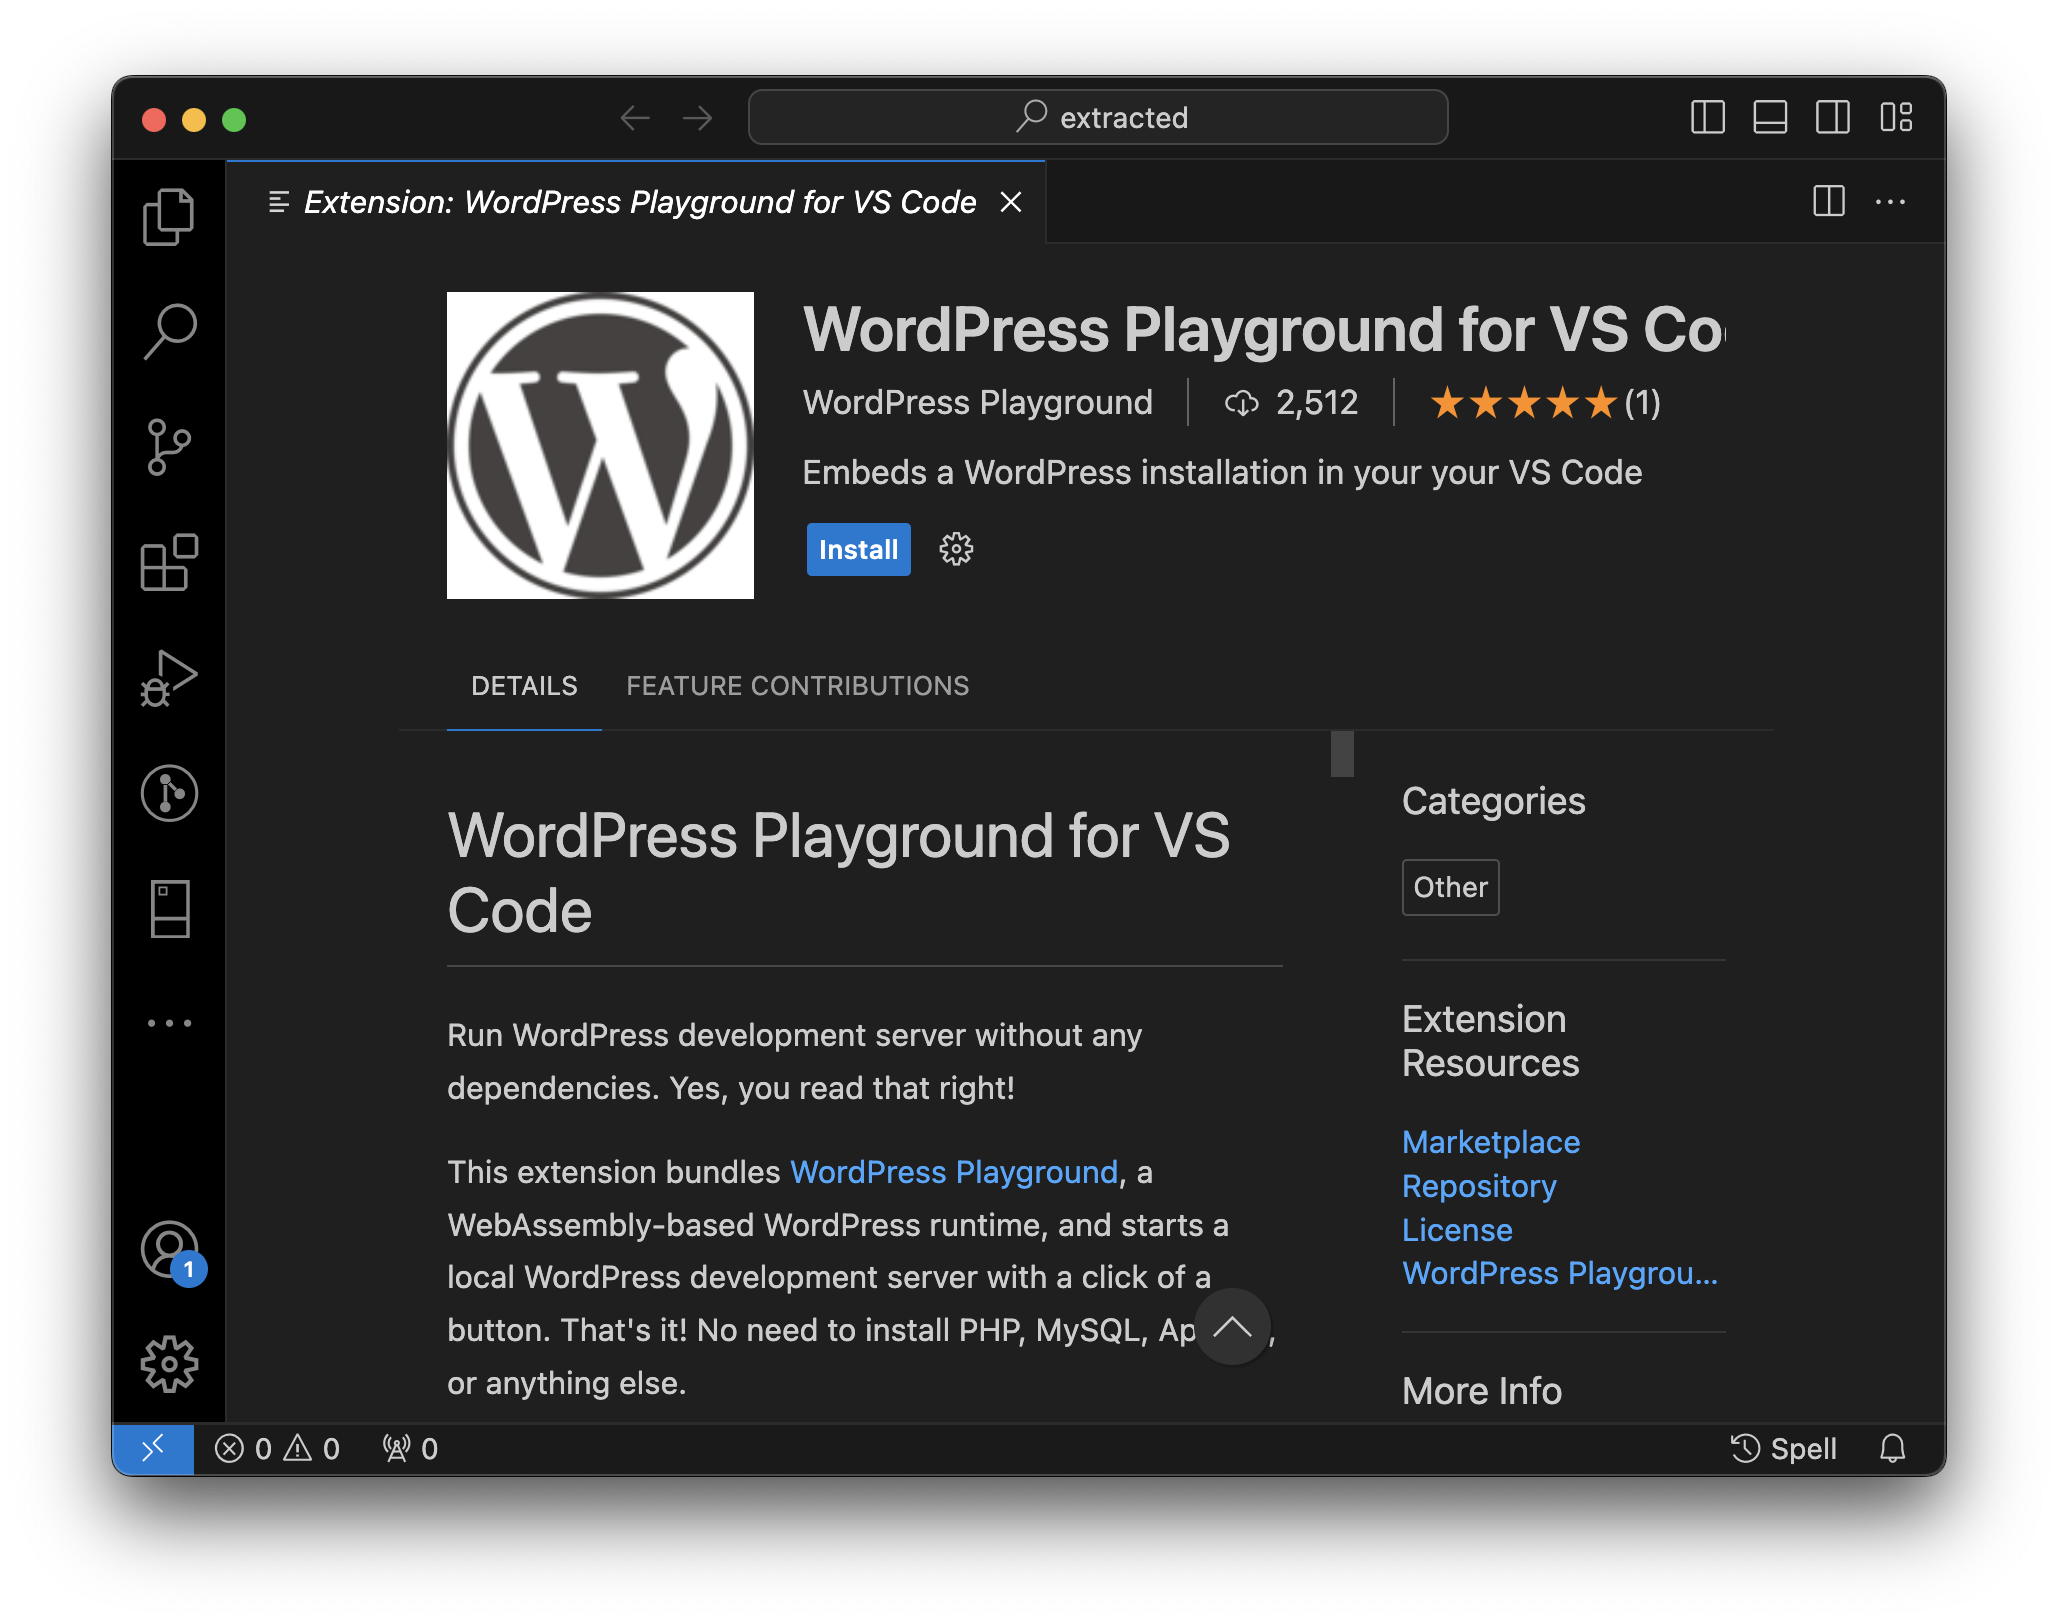
Installing the extension adds a WordPress icon to the sidebar menu that, when clicked, opens a panel for launching a new WordPress Playground site.
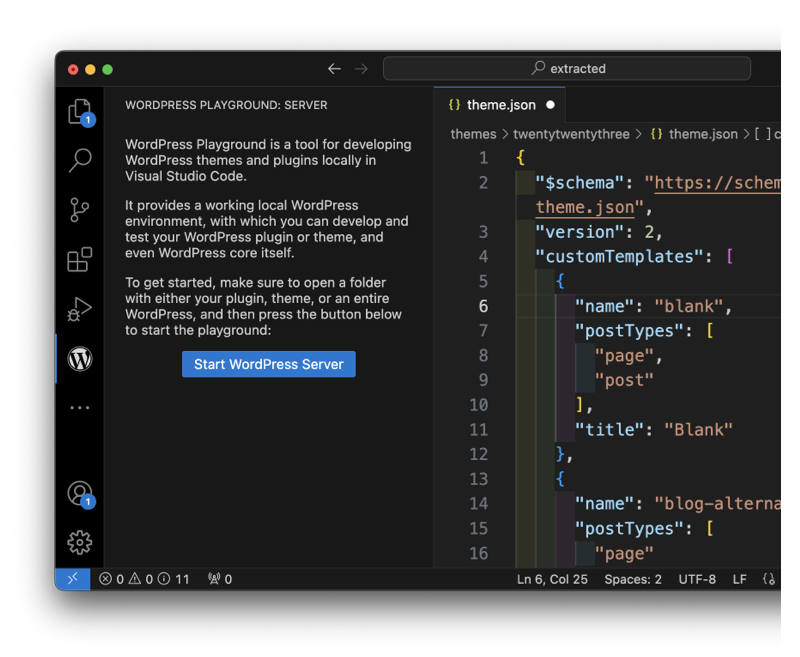
Open a project folder, click the “Start WordPress Server,” and the Playground extension boots up a new site on the spot. The extension also provides server details, including the local URL, the mode it’s in, and settings to change which versions of WordPress and PHP are in use.

One thing I noticed while poking at the instance is that it automatically installs and activates the
SQLite Database Integration plugin. Obviously, that’s a required component for things to work, but I thought it was worth pointing out that the installation does indeed include at least one pre-installed plugin right out of the gate.
5. Using A Chrome Extension To Preview Themes & Plugins
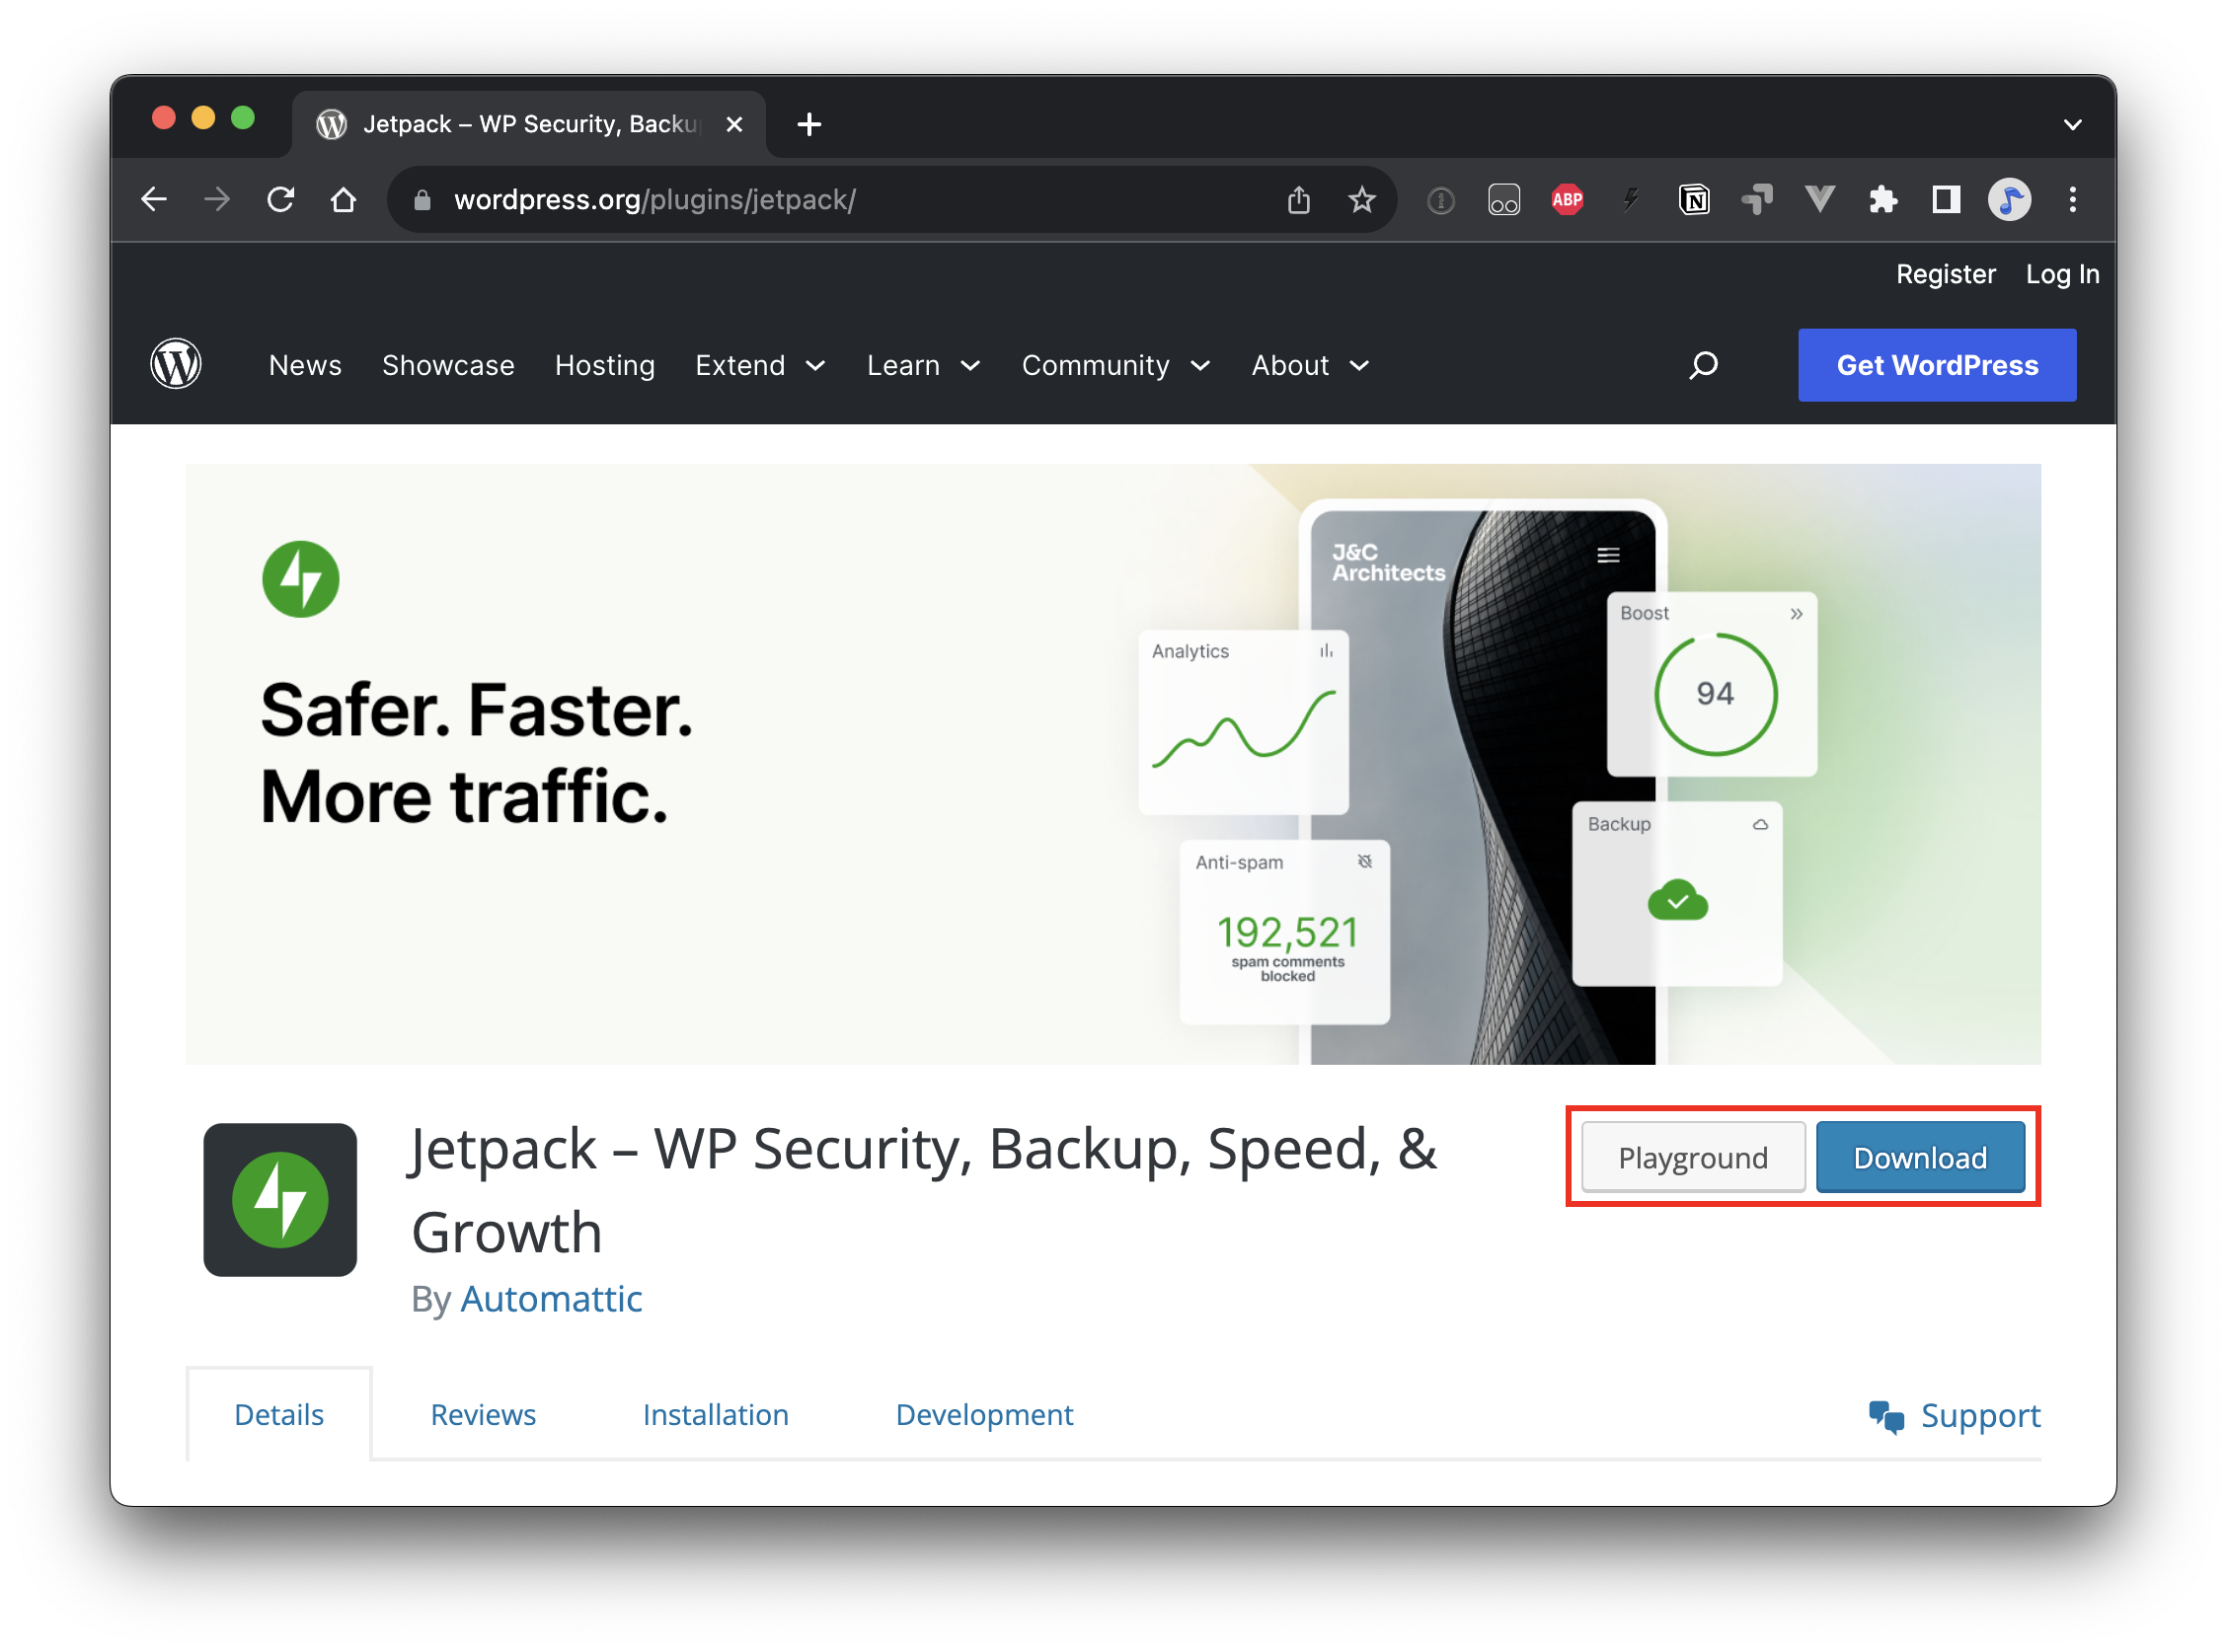
Have you ever found yourself perusing the WordPress Theme Directory and wanting to take a particular theme out for a test drive? There’s already a “Preview” button baked right into the directory to do exactly that.
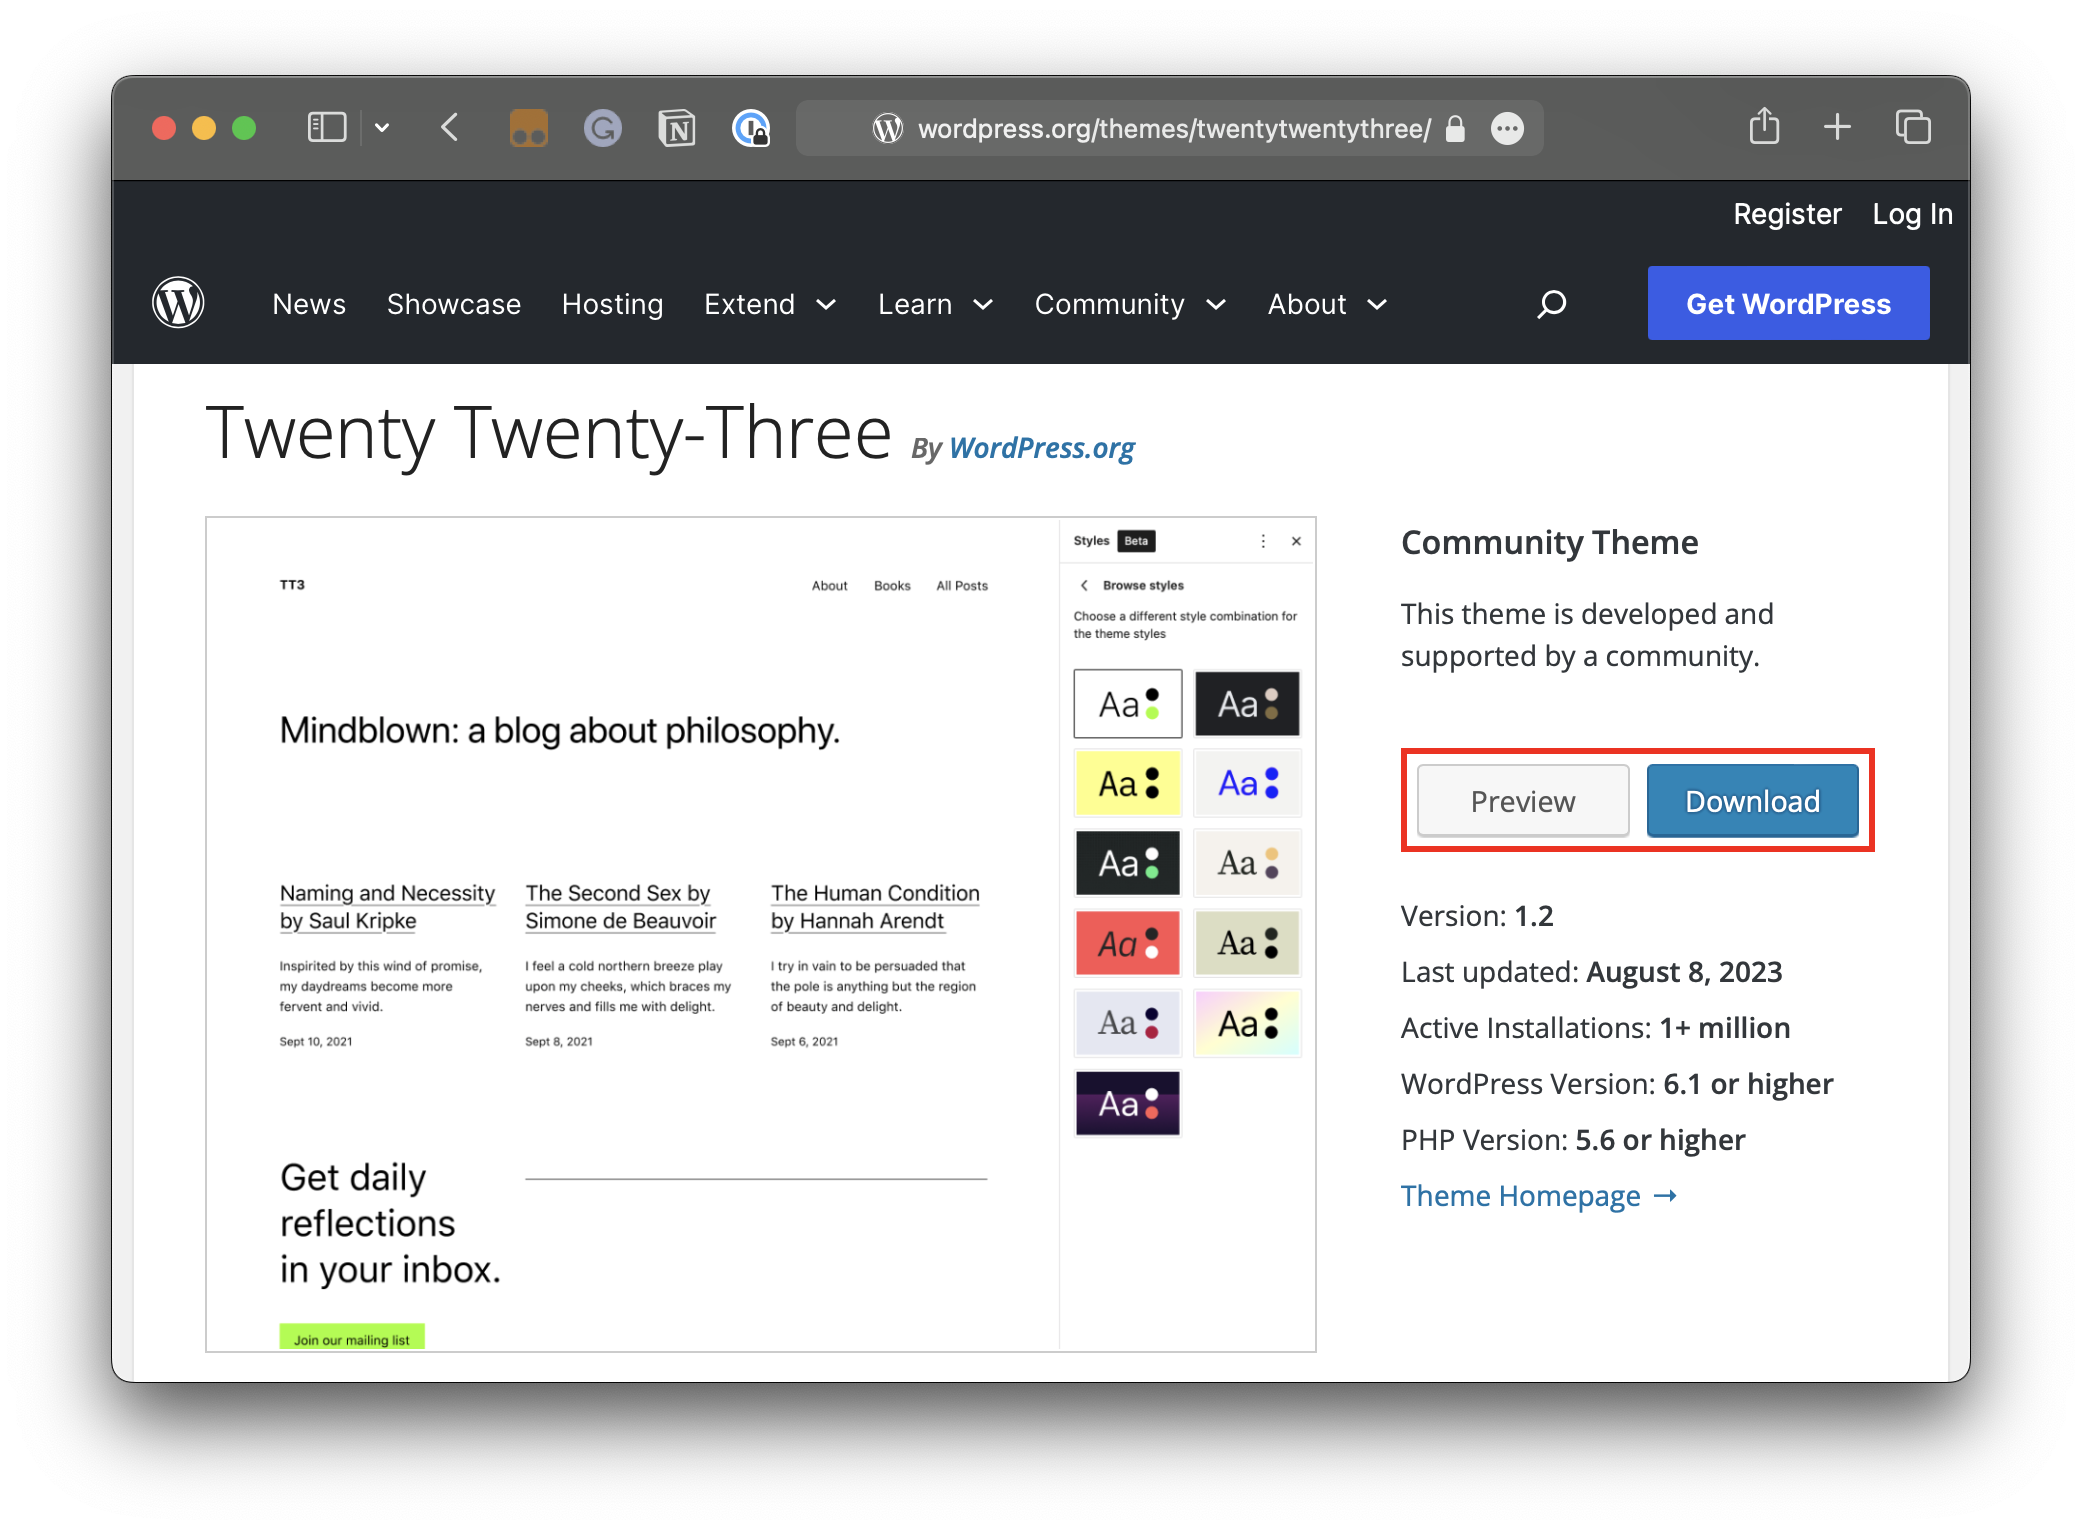
That’s nice, as it opens up the theme in a frame that looks a lot like the classic WordPress Customizer.
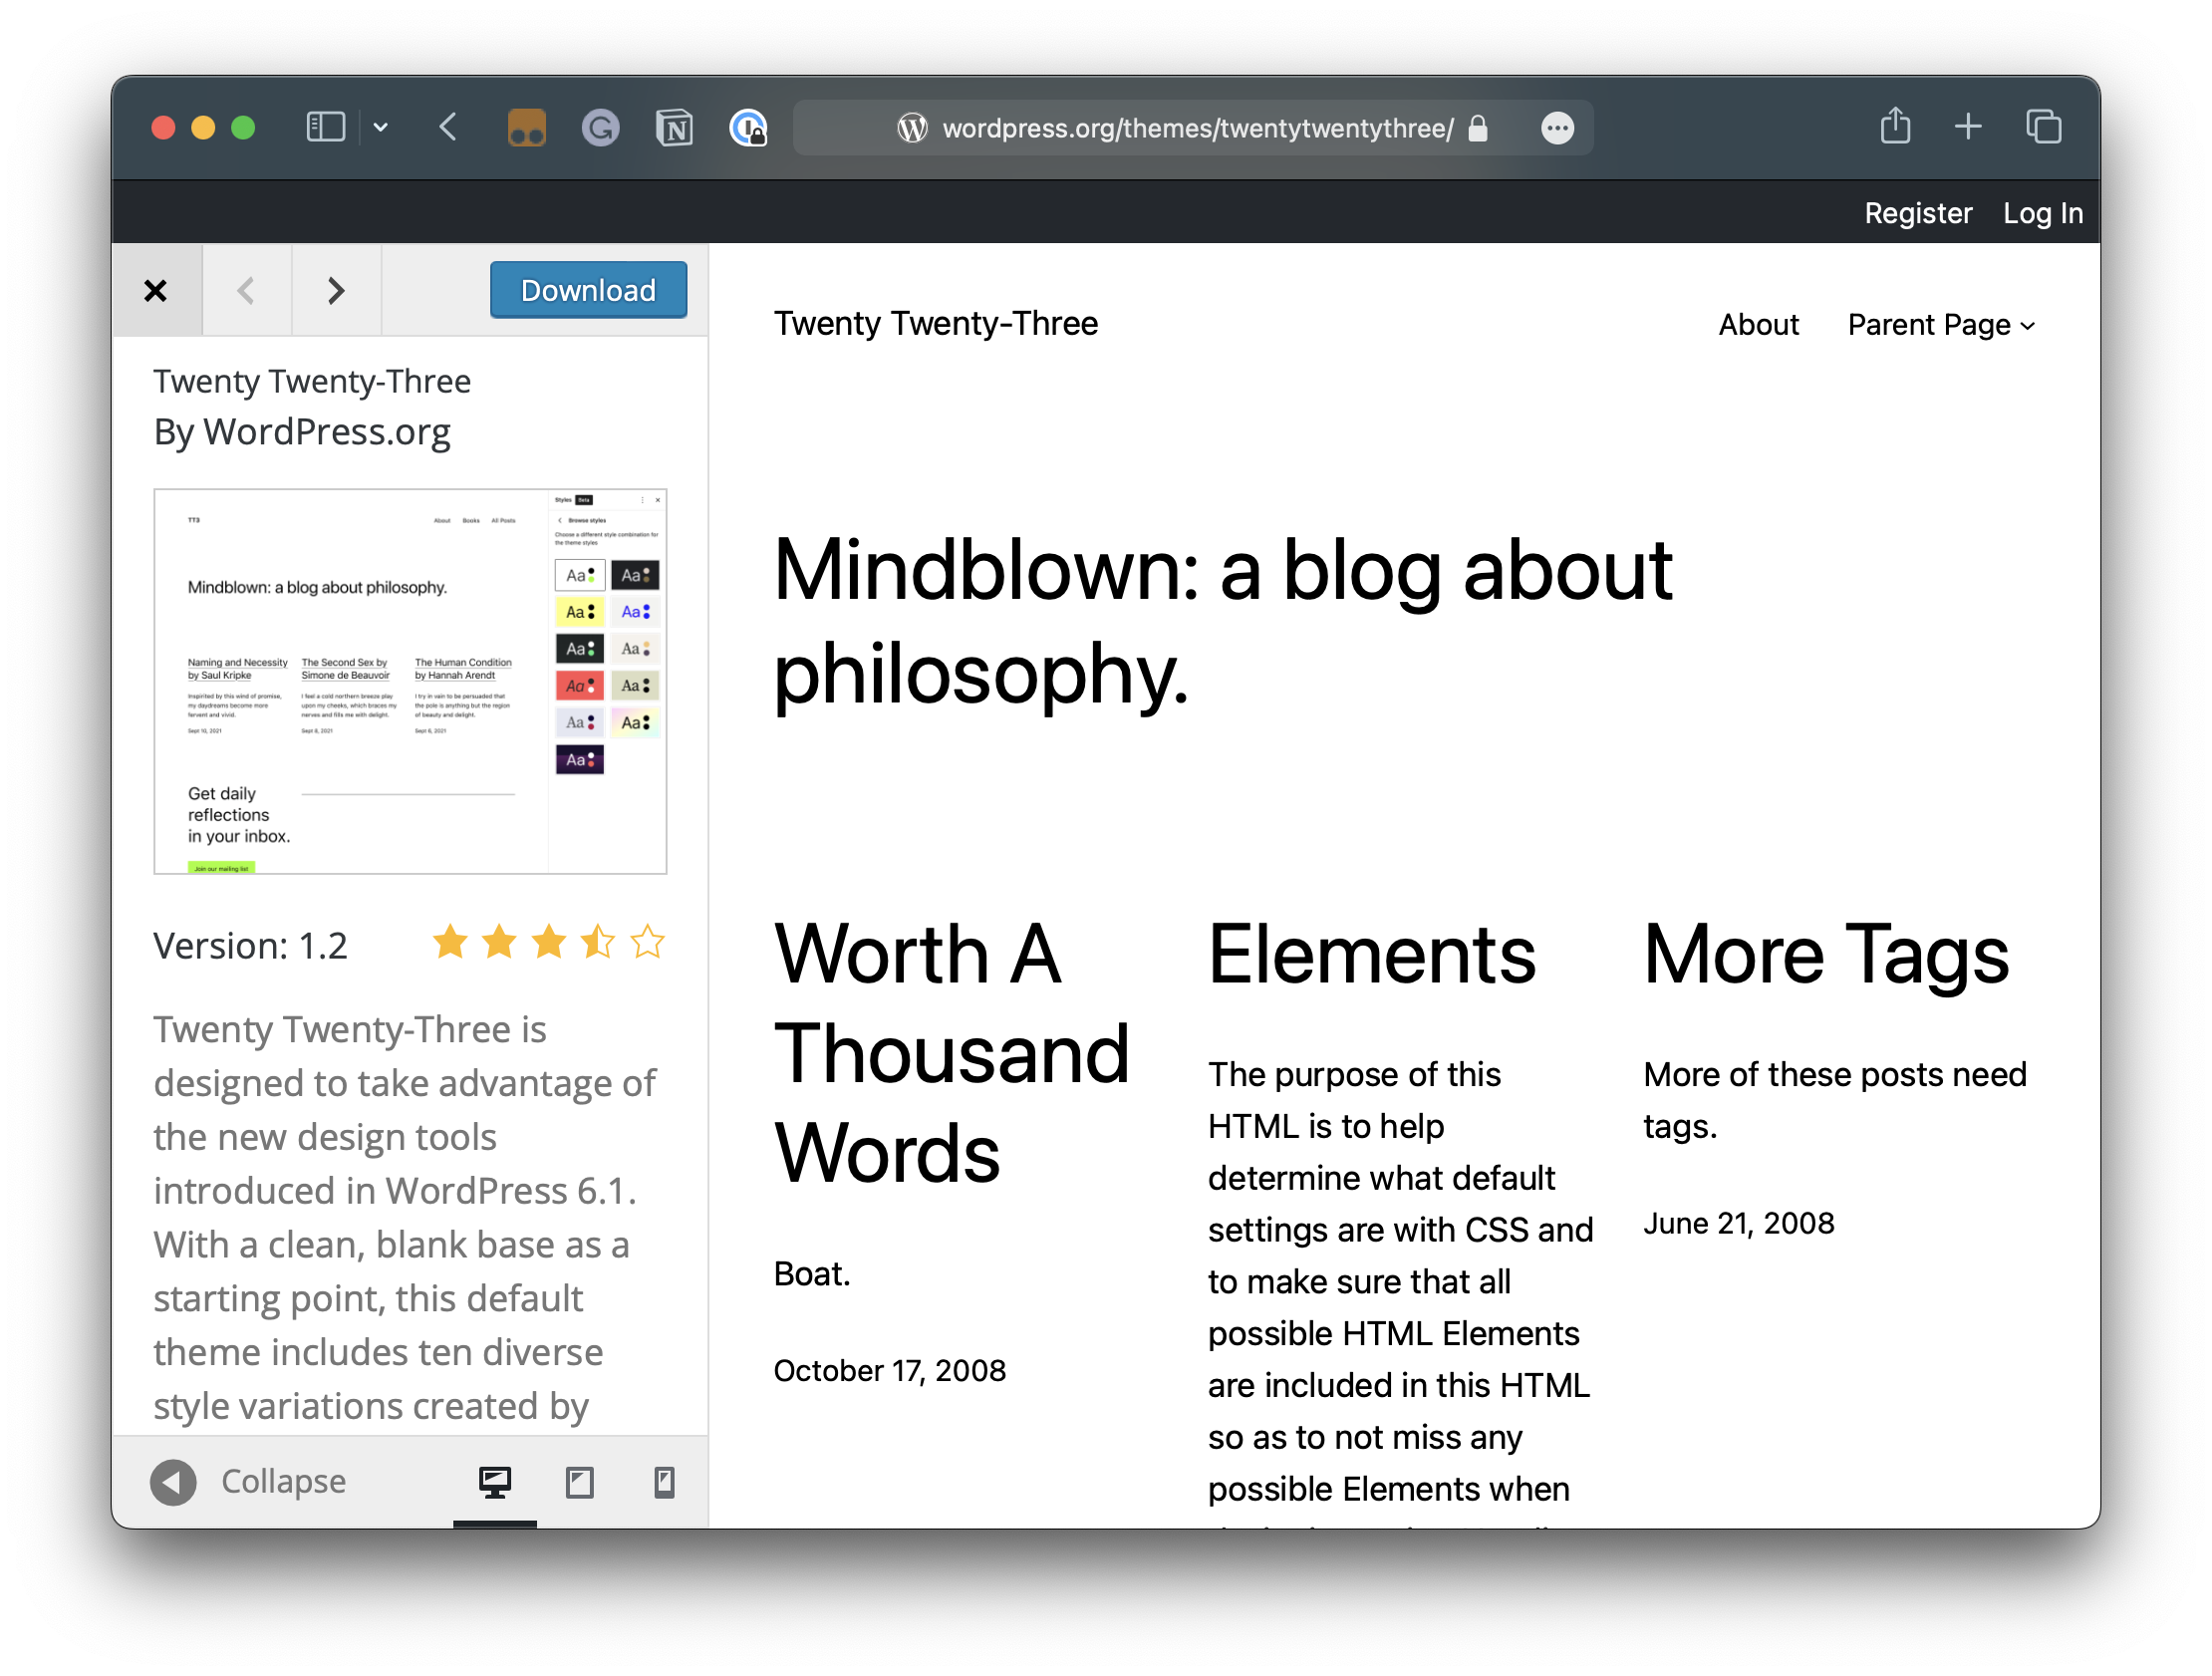
But how cool would it be to really open up the theme and see what it is like to do actual tasks with it in the WordPress admin, such as creating a post, editing a page, or exploring its block patterns?
That is what the “Open in WordPress Playground” extension for Chrome can do. It literally adds a button to “Preview” a theme in a fresh WordPress Playground instance that, when clicked, allows you to interact with the theme in a real WordPress environment.

I tried out the extension, and it worked as described, and not only that, but it works with the WordPress Plugin Directory as well. In other words, it’s now possible to try a new plugin on the spot without having to install, activate, and test it yourself in some sandbox or, worse, your live or staging WordPress environments.
This is a potential game-changer as far as lowering the barrier to entry for using WordPress and for theme and plugin developers offering a convenient way to provide users with a demo experience. I can easily imagine a future where paid commercial plugins adopt a similar user experience to help reduce refunds from customers merely wanting to try a plugin before formally committing to it.
The extension is available free of charge in the Chrome Web Store, but you can check out the source code in its GitHub repository as well. While we’re on it, it’s worth noting that this is a third-party extension rather than an official WordPress or Automattic release.
The Default Playground Site
No matter which Playground method you use, the instances that spin up are nearly identical. For example, all of the methods we covered have the WordPress Twenty Twenty-Three theme installed and activated by default. That makes a lot of sense: a standard WordPress installation does the same.
Similarly, all of the instances we covered make use of the SQLite Database Integration plugin developed by the WordPress Performance Team. This also makes sense: we need the plugin to establish a database. It also sounds like from the plugin description that the intent is to eventually integrate the plugin into WordPress Core, so perhaps we’ll eventually see zero plugins in a default Playground instance at some point.
There are a few differences between instances. They’re not massive, but worth calling out so you know what you are activating or have available when using a particular method to create a WordPress instance. The following table breaks down the current components included in each method at the time of this writing:
Method
WordPress Version
PHP Version
Themes
Plugins
WordPress Playground website
6.3.2
8.0
Twenty Twenty-Three (active)
SQLite Database Integration (active)
GitHub repo
6.3.2
8.0
Twenty Twenty-Three (active)
SQLite Database Integration (active)
wp-now package
6.3.2
8.0.10-dev
Twenty Twenty-Three (active)Twenty Twenty-TwoTwenty Twenty-One
AkismetHello DollySQLite Database Integration (active)
VS Code extension
6.3.2
7.4
Twenty Twenty-Three (active)Twenty Twenty-TwoTwenty Twenty-One
AkismetHello DollySQLite Database Integration (active)
Chrome extension
6.3.2
8.0
Twenty Twenty-Three (active)
SQLite Database Integration (active)
And, of course, any other differences would come from how you configure an instance. For example, if you run the wp-now package on the command line when you’re in a directory with WordPress and several themes and plugins installed, then those themes and plugins will be available to activate and use. Similarly, using the Chrome Extension on any WordPress Theme Directory page or Plugin Directory page will install that particular theme or plugin.
Installing Themes, Plugins, and Block Patterns
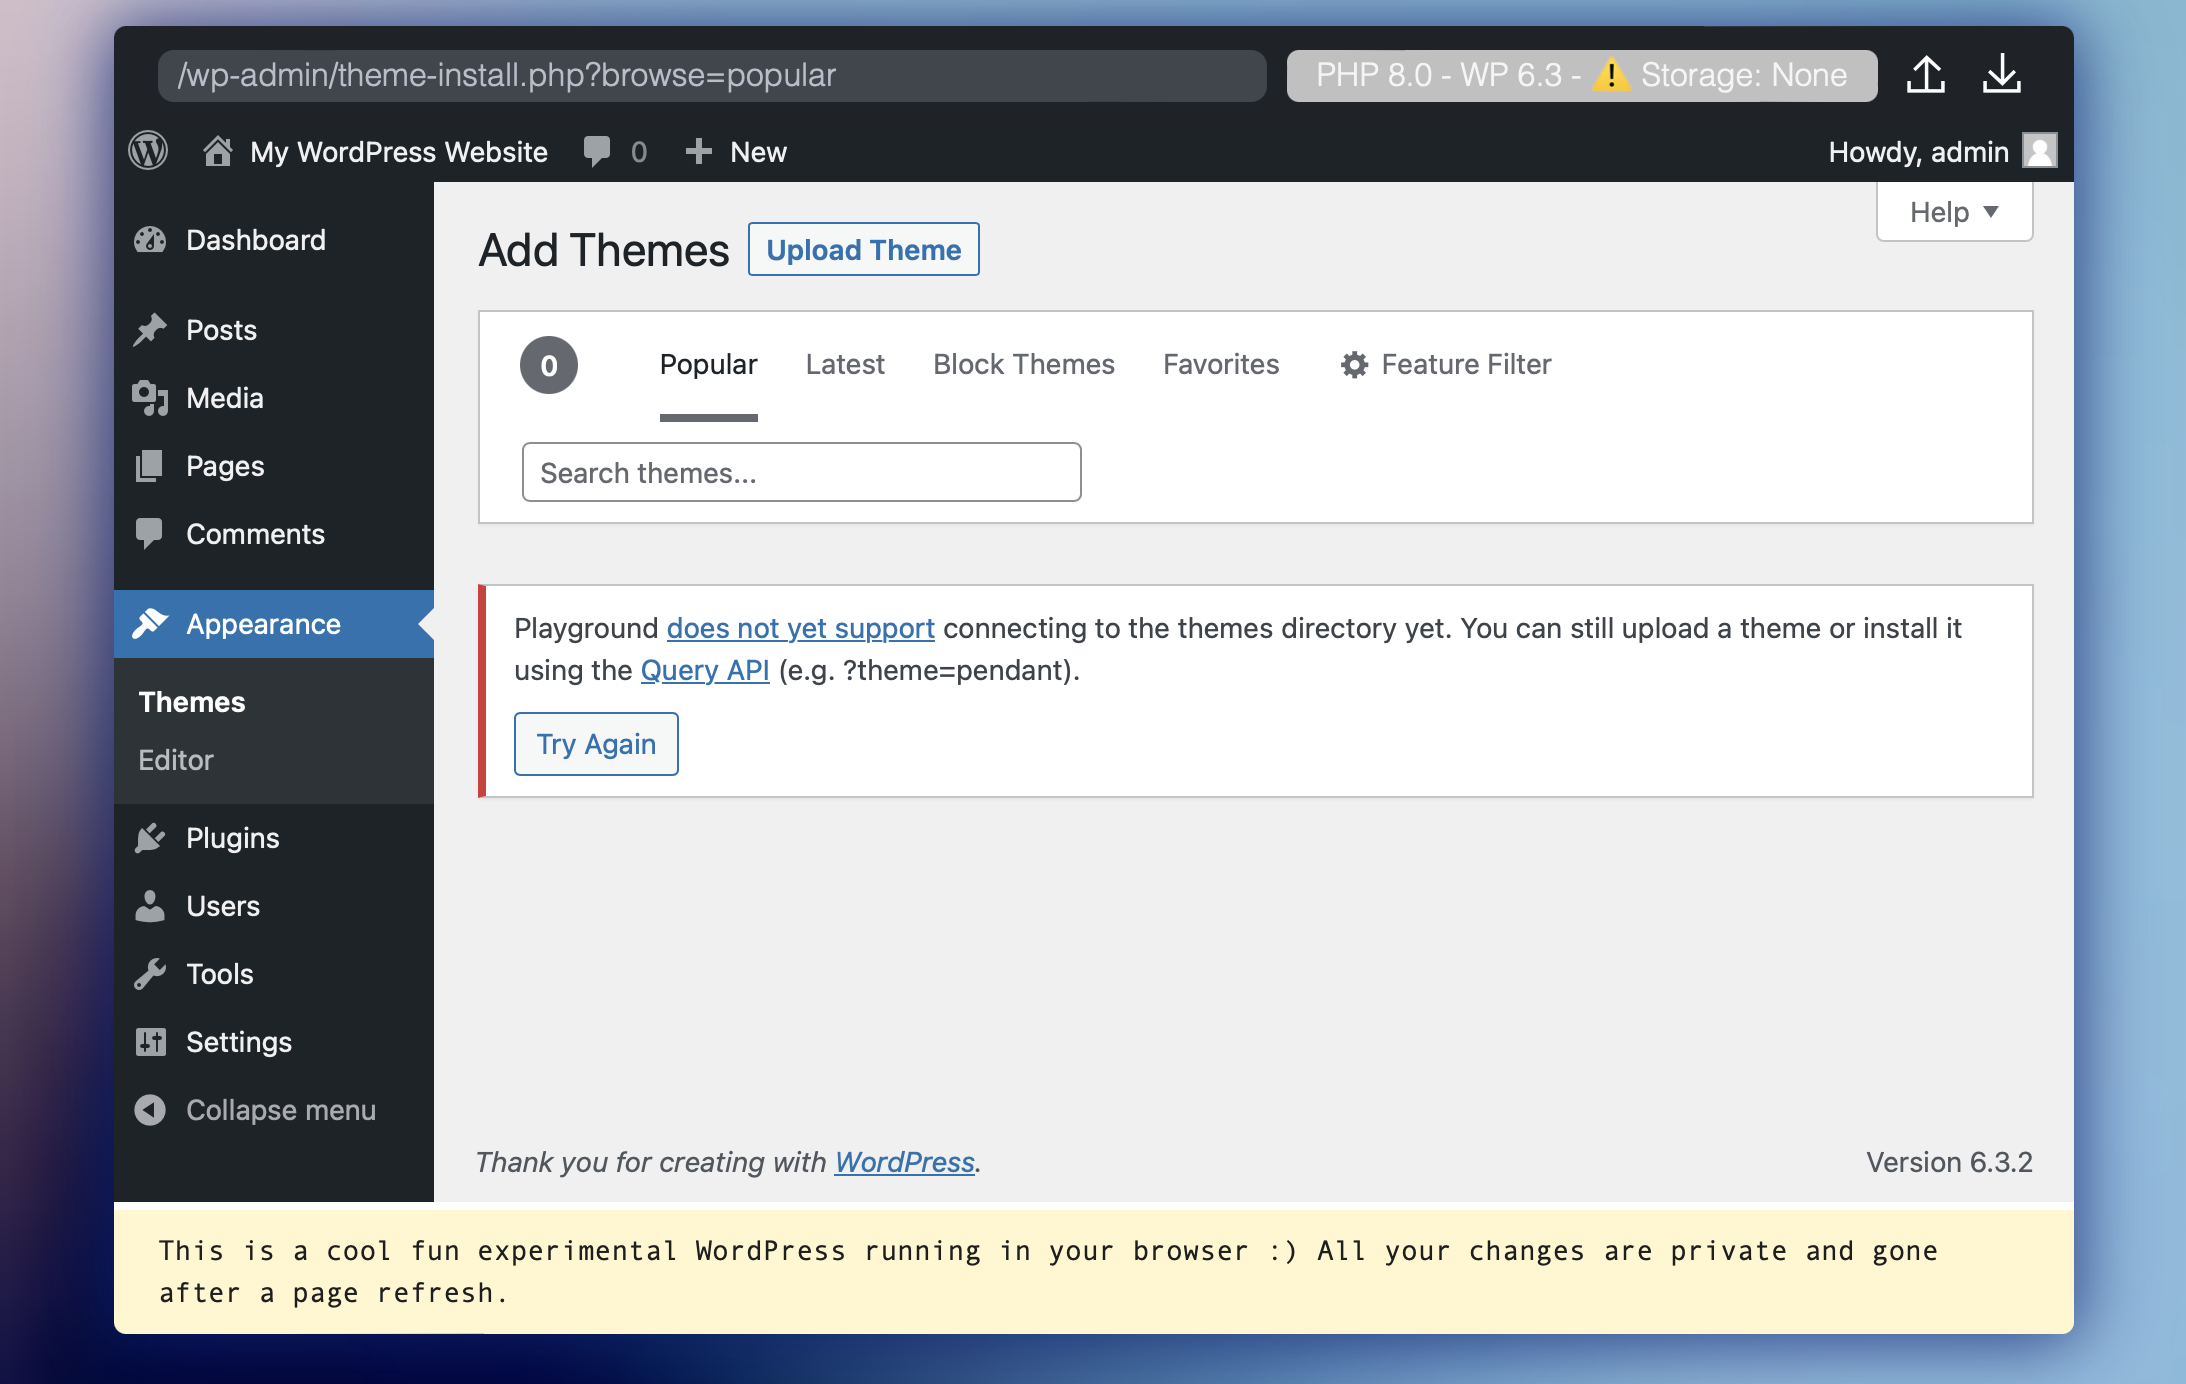
In a standard WordPress installation, you might log into the WordPress admin, navigate to Appearance → Themes, and install a new theme straight from the WordPress Theme Directory. That’s because your site has a web connection and is able to pull things in from WordPress.org. Since a WordPress Playground instance from the WordPress Playground website (which is essentially the same as the Chrome extension) is not technically connected to the internet, there is no way to install plugins and themes to it.
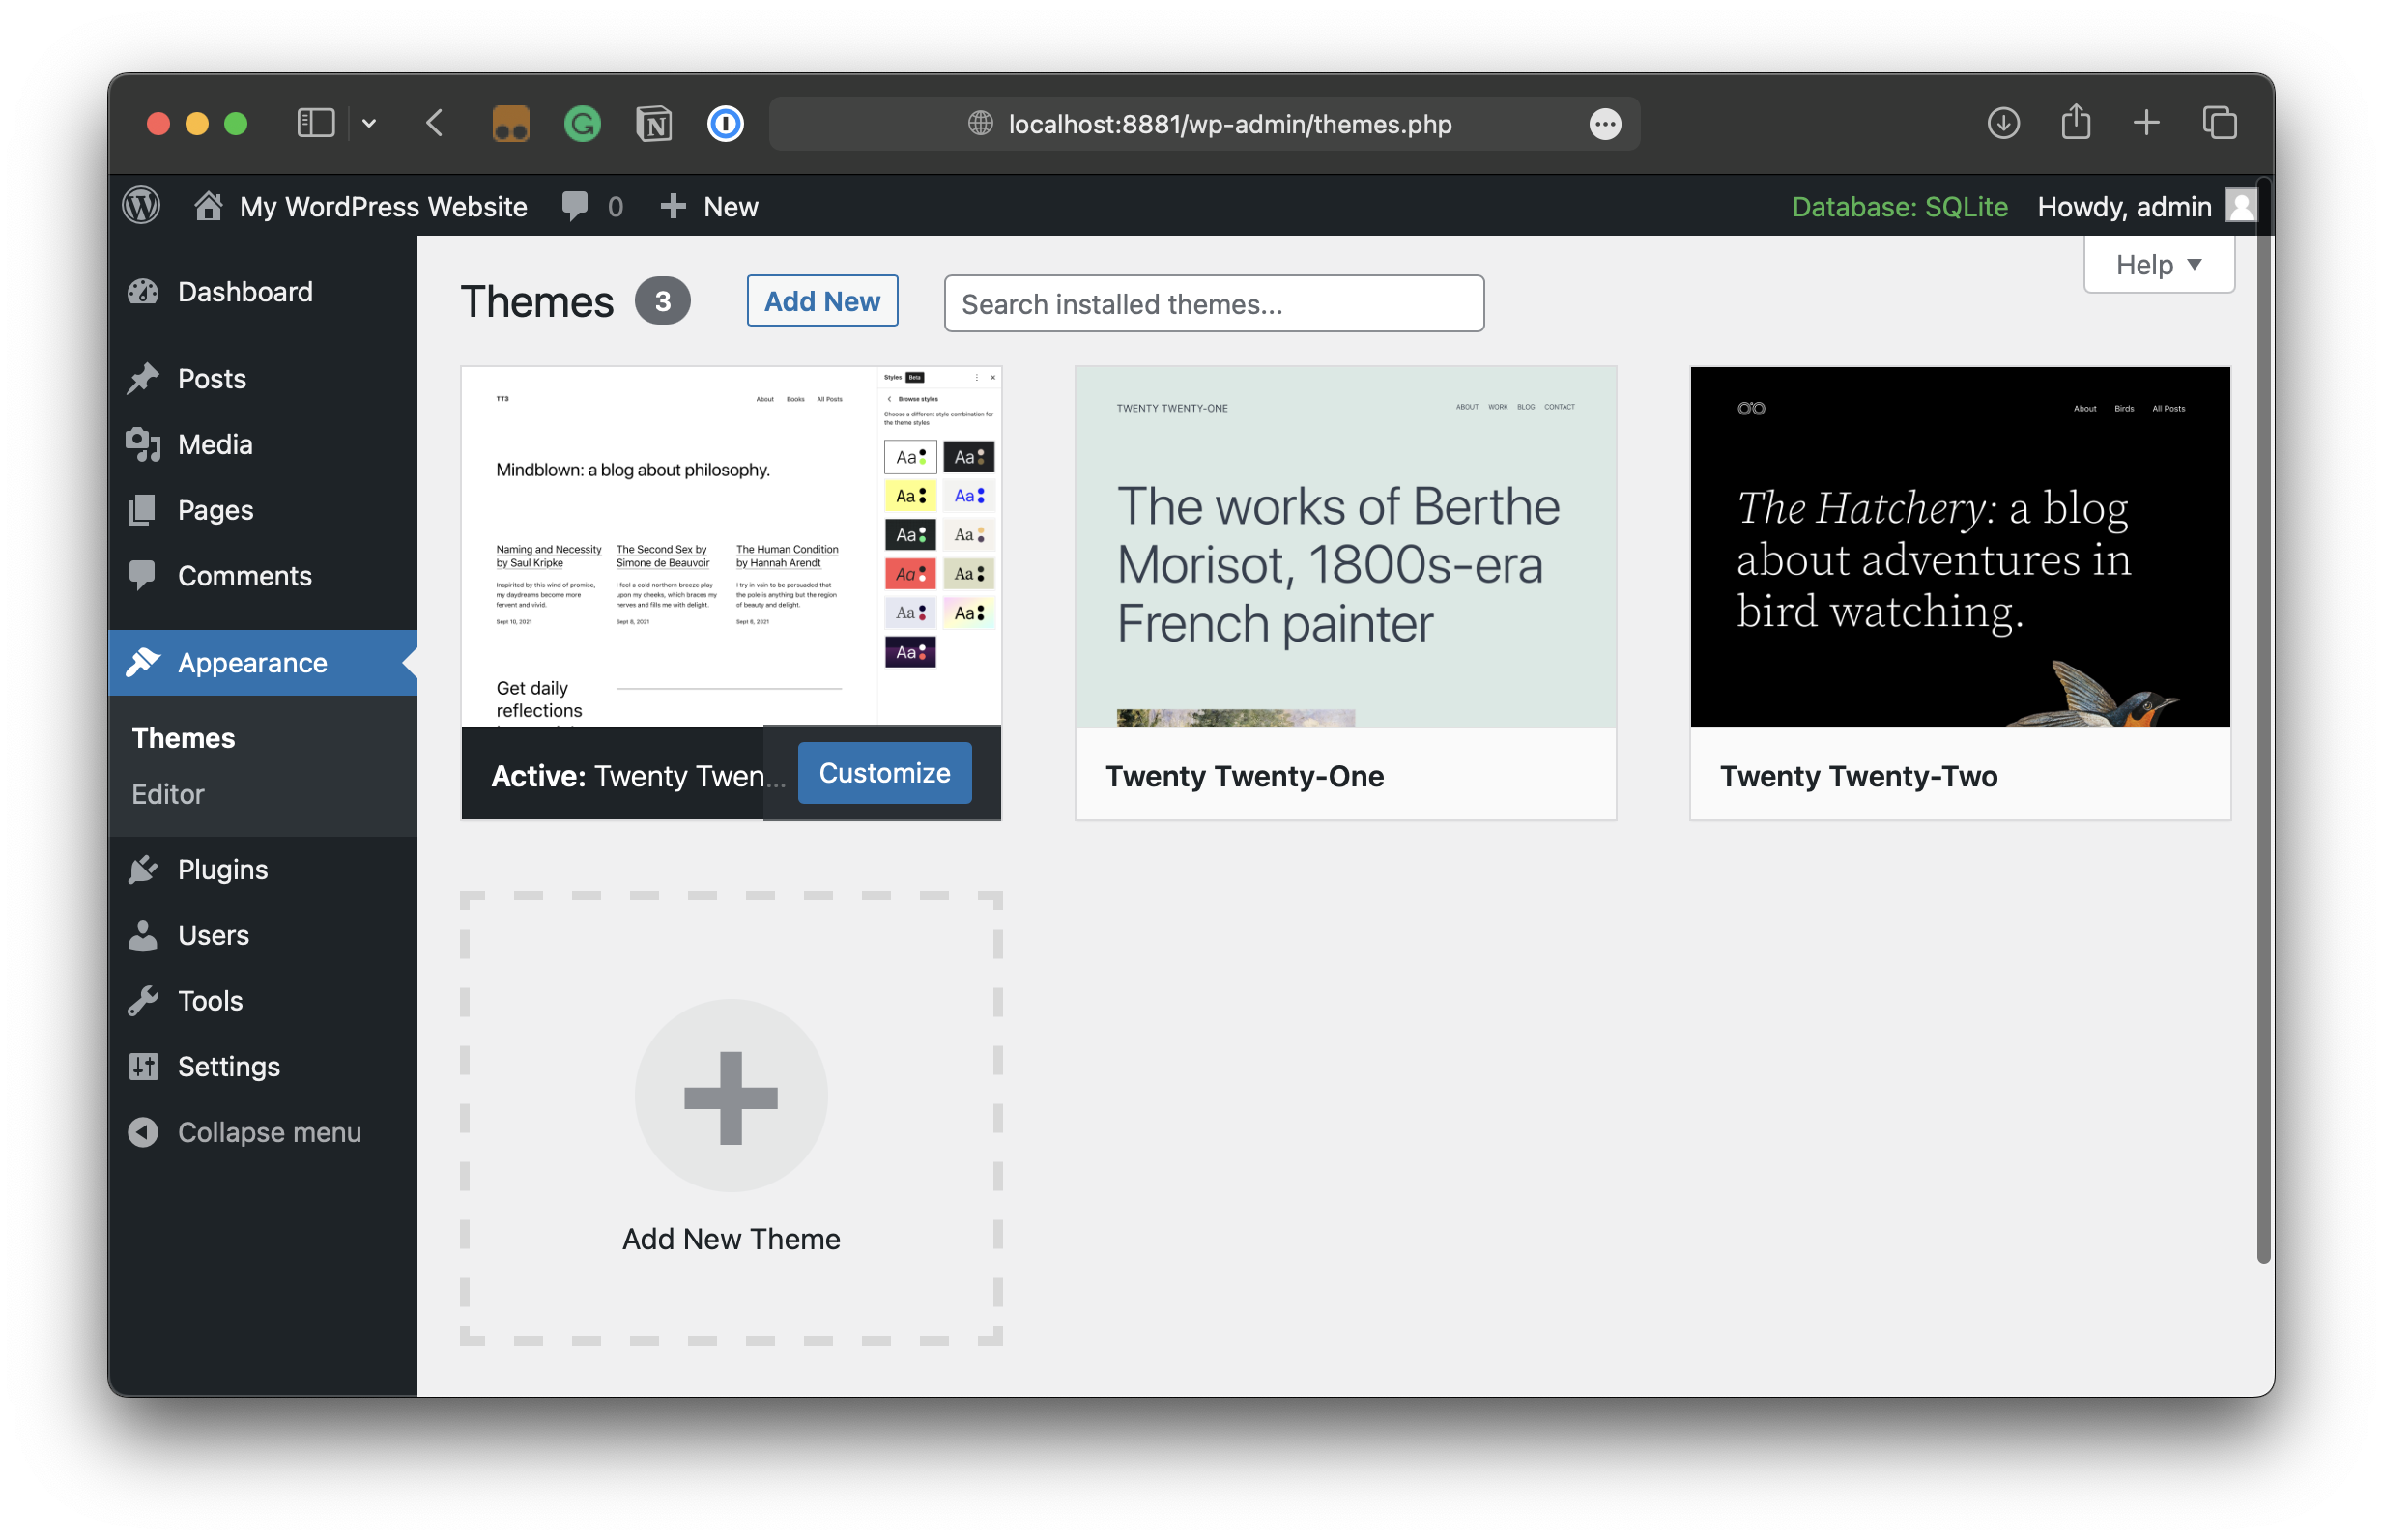
If you want the same sort of point-and-click experience in your Playground site that you would get in a standard WordPress installation, then go with the GitHub repo, the wp-now package, or the VS Code extension. Each of these is indeed connected to the internet and is able to install themes and plugins directly from the WordPress admin.
You may notice a note about using the Query API to install a theme or plugin to a WordPress Playground instance that is disconnected from the web:
“Playground does not yet support connecting to the themes directory yet. You can still upload a theme or install it using the Query API (e.g. ?theme=pendant).”
That’s right! We’re still able to load in whatever theme we want by passing the theme’s slug into the Playground URL used to generate the site. For example,
https://playground.wordpress.net/?theme=ollie
The same goes for plugins:
https://playground.wordpress.net/?plugin=jetpack
And if we want to bundle multiple plugins, we can pass in each plugin as a separate parameter chain with an ampersand (&) in the URL:
https://playground.wordpress.net/plugin=jetpack&plugin=woocommerce
It does not appear that we can do the same thing with themes. If you’re testing several themes in a single instance, then it’s probably best to use the wp-now package or the VS Code extension when pointing at a directory that already includes those themes.
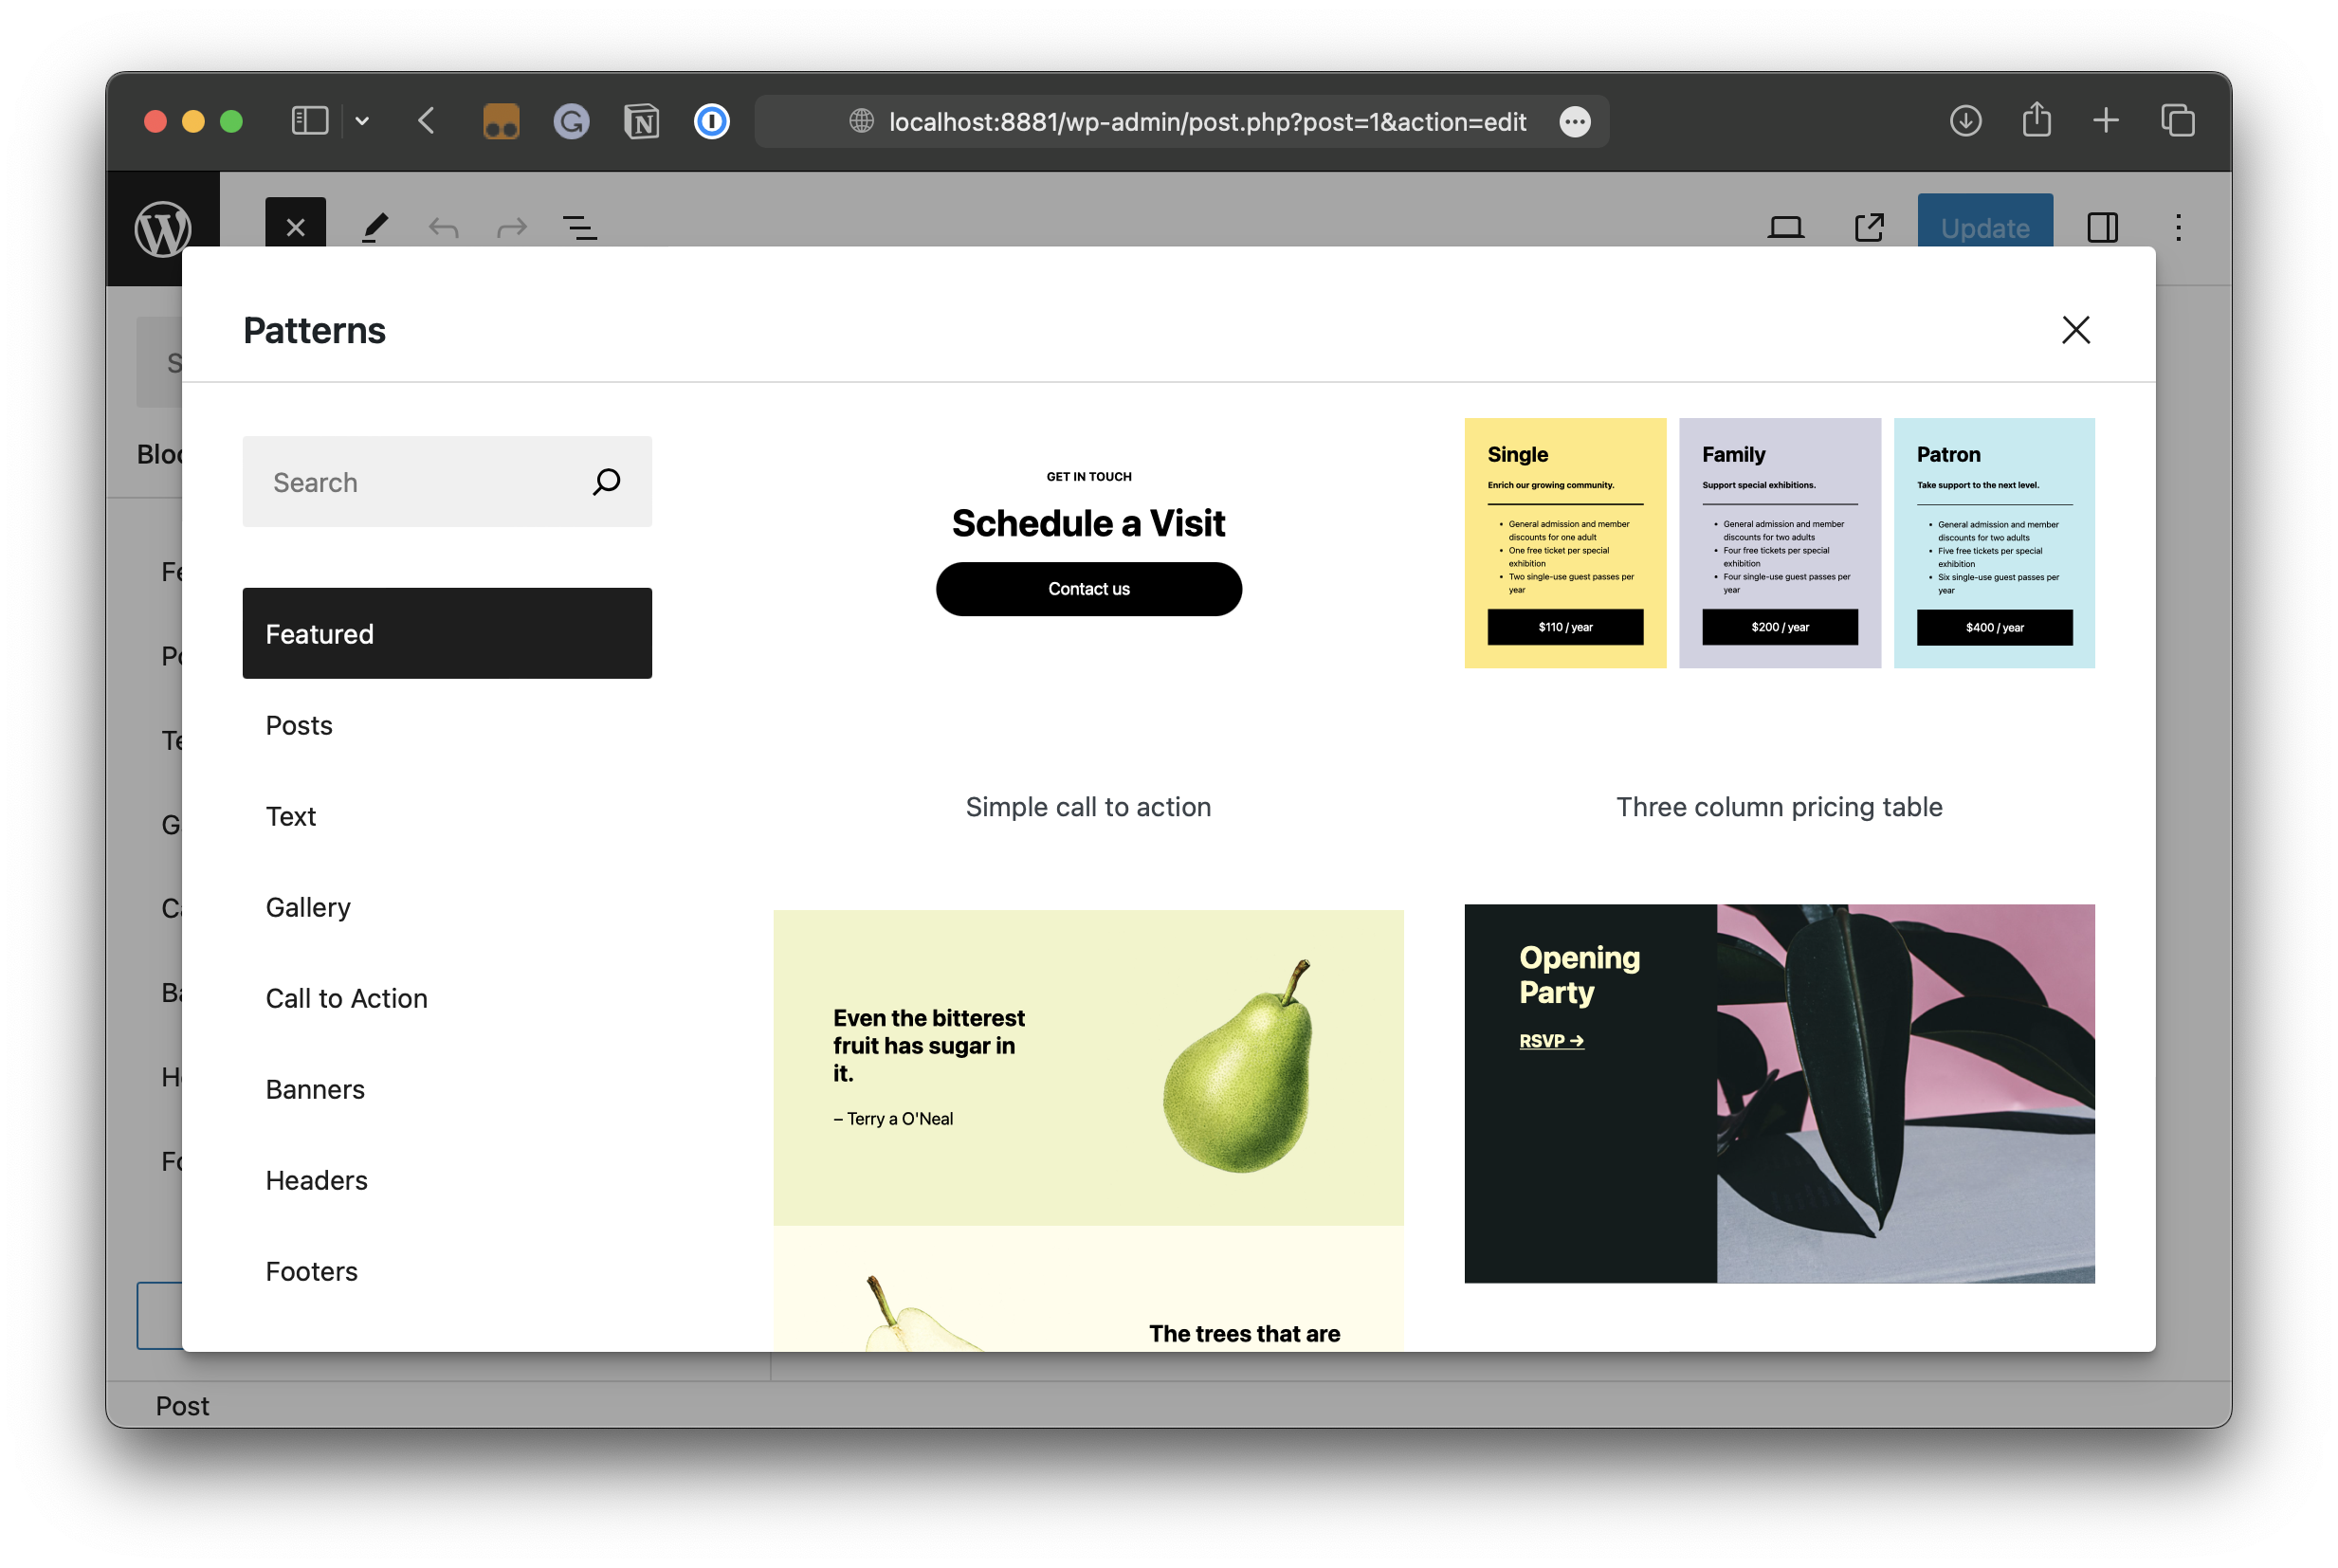
What about block patterns, you ask? We only get two pre-defined patterns in a default WordPress Playground instance created on Playground’s site: Posts and Call to Action.
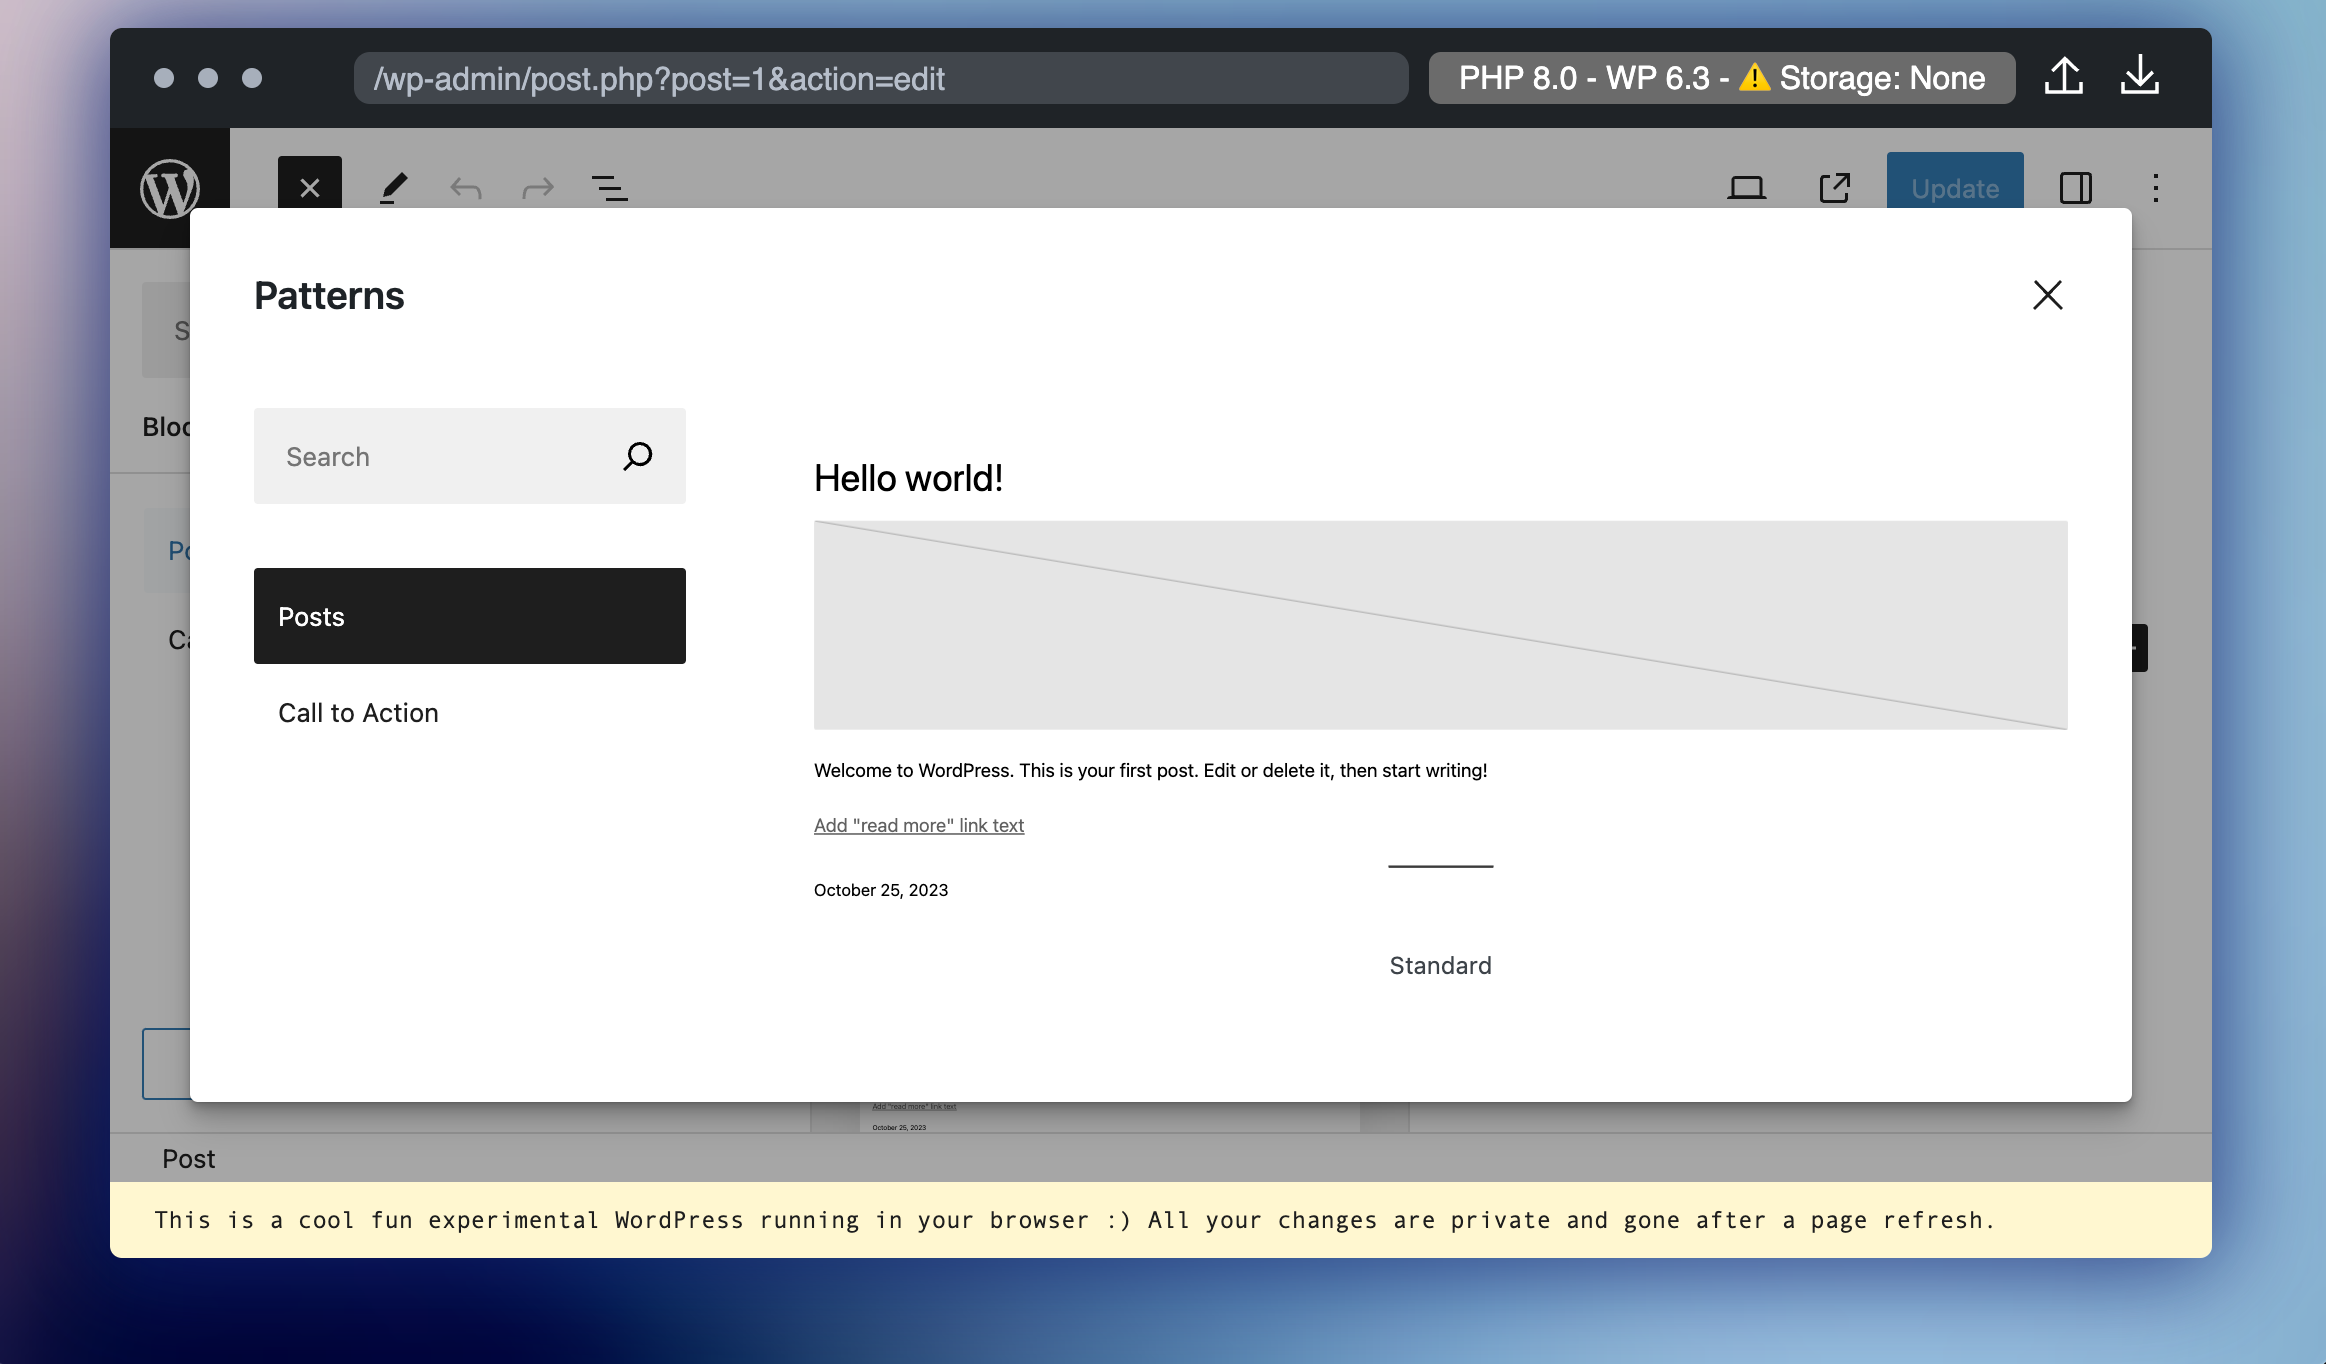
That’s because block patterns, too, are served to the WordPress admin from an internet connection. We get a much wider selection of options when creating an instance using any of the methods that establish a local host connection.
There appears to be no way, unfortunately, to import patterns with the Query API like we can for themes and plugins. The best way to bring in a new pattern, it seems, is to either bundle them in the theme you are using (or pointing to) or manually navigate to the Block Pattern Directory and use the “Copy” option to paste a pattern into the page or post you are testing in Playground.
Importing & Exporting Playgrounds
The transience of a WordPress Playground instance is its appeal. The site practically evaporates into thin air with the trigger of a page refresh. But what if you actually want to preserve an instance? Perhaps you need to come back to your work later. Or maybe you’re working on a visual tweak and want to demo it for your team. Playground instances can indeed be exported and even imported into other instances.
Open up a new WordPress site over at the playground.wordpress.net and locate the Upload and Download icons at the top-right corner of the frame.
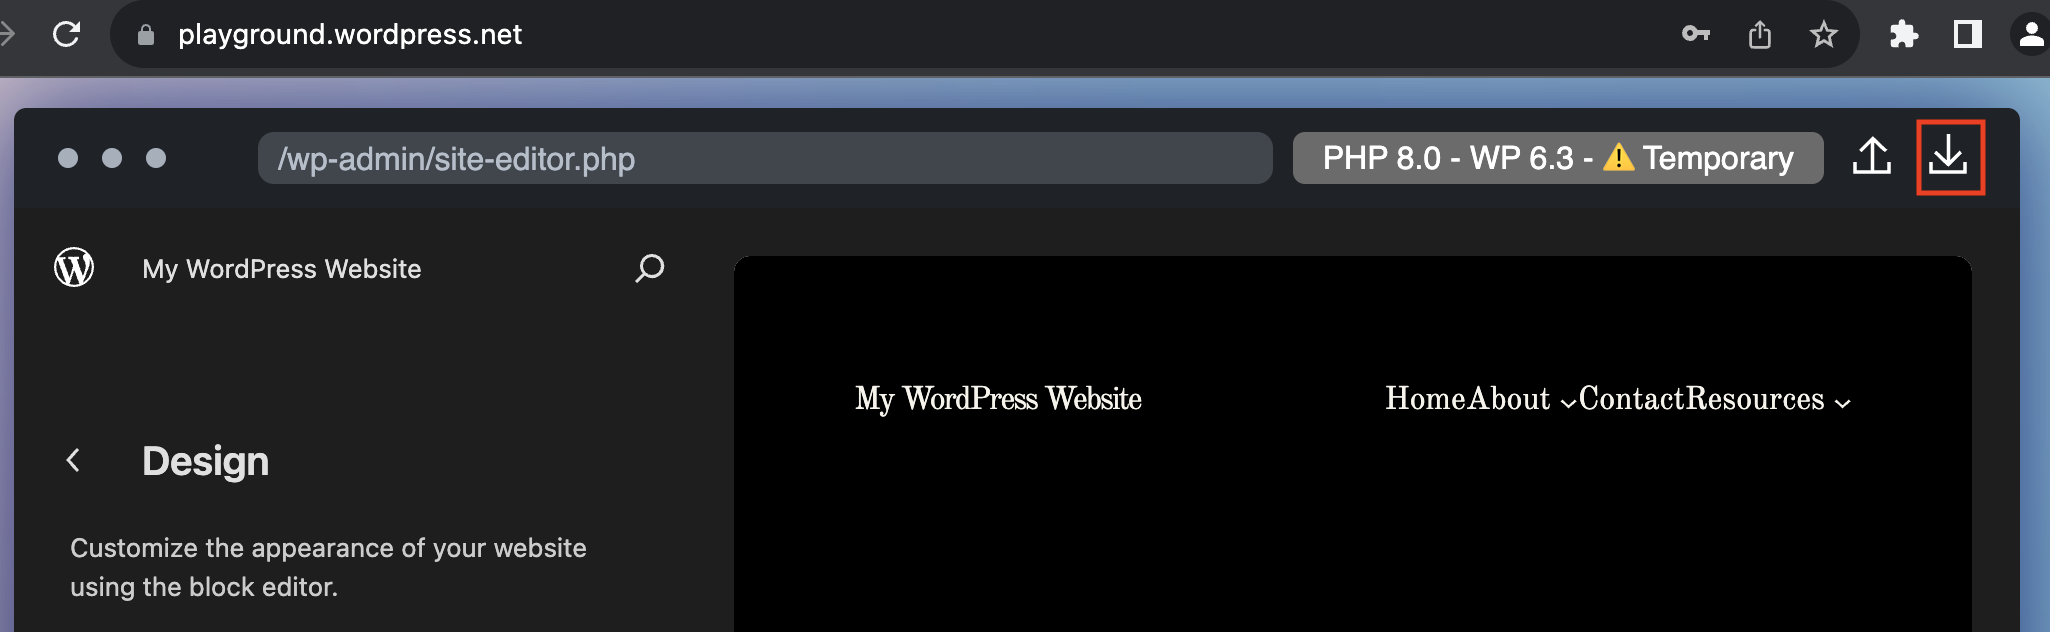
No worries, this is not a step-by-step tutorial on how to click buttons. The only thing you really need to know is that these buttons are only available in instances created at the WordPress Playground site or when using the Chrome Extension to preview themes and plugins at WordPress.org.
What’s more interesting is what we get when exporting an instance. We get a ZIP file — wordpress-playground.zip to be exact — as you might expect. Extract that, and what we have is the entire website, including the full WordPress installation. It resembles any other standard WordPress project with a wp-content directory that contains the source files for the installed themes and plugins, as well as media library uploads.
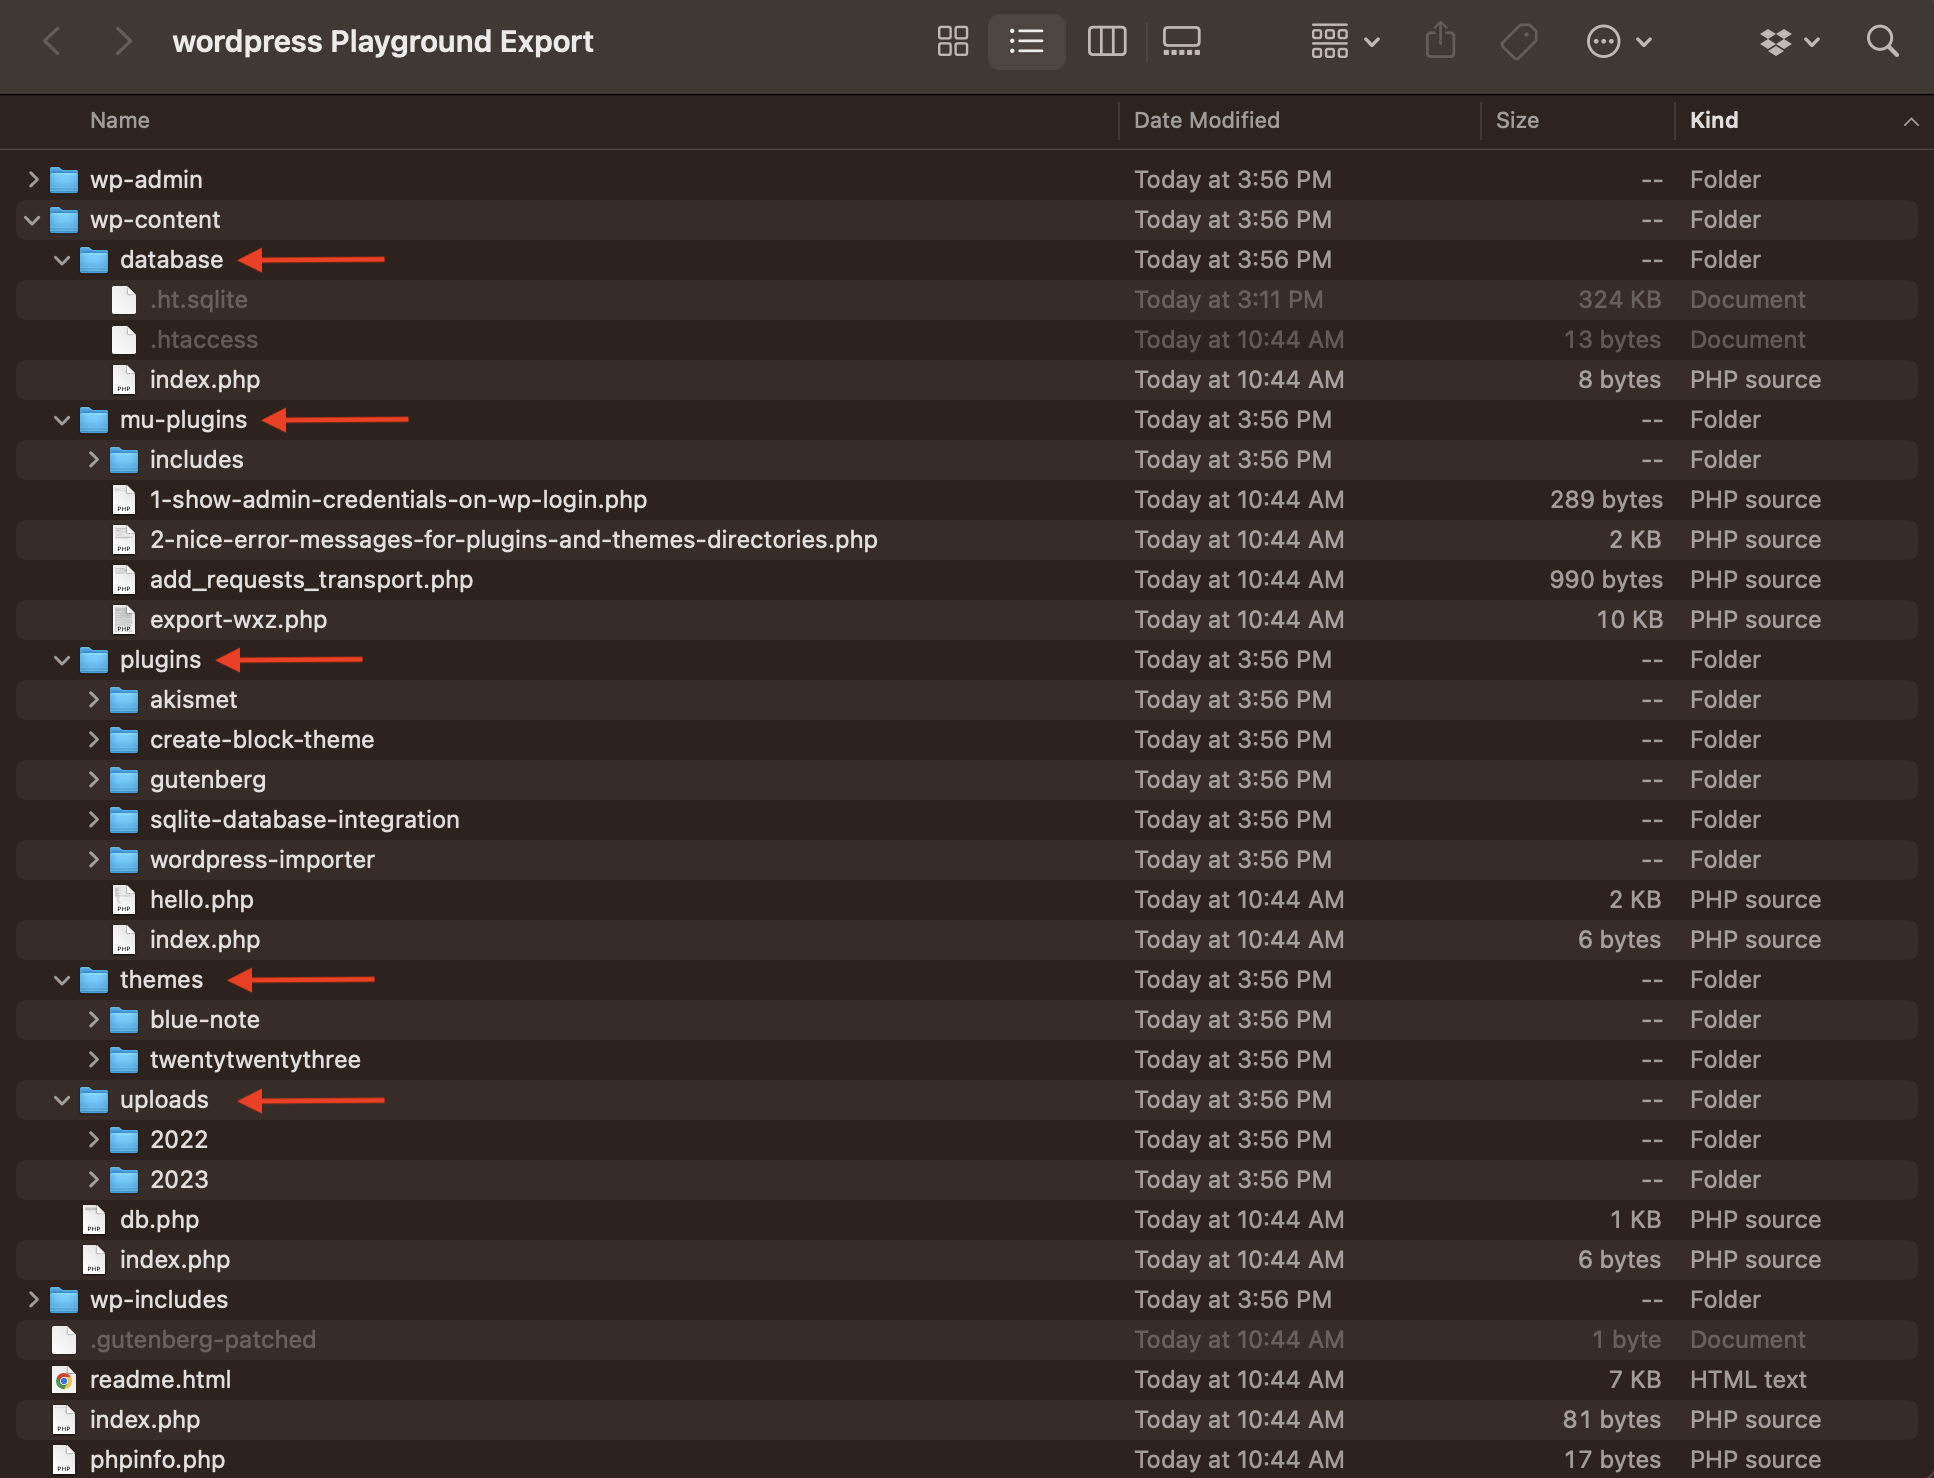
The only difference I could spot between this WordPress Playground package and a standard project is that Playground provides the SQLite database in the export, also conveniently located in the wp-content directory.
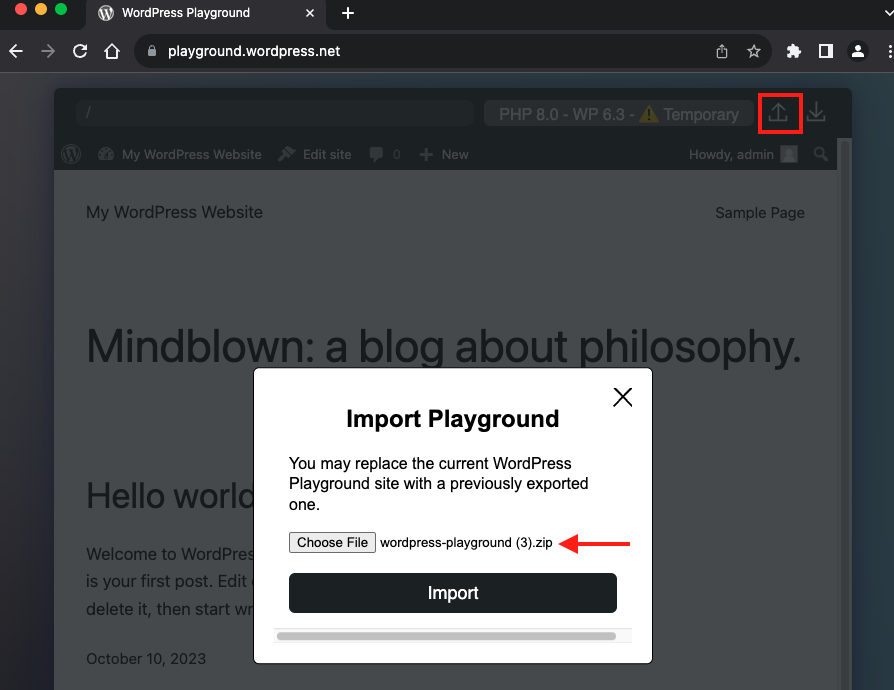
This is a complete WordPress project. Now that we have it and have confirmed it has everything we would expect a WordPress site to have, we can use Playground’s importing feature to replicate the exported site in a brand-new WordPress Playground instance. Click the Upload icon in the frame of the new instance, then follow the prompts to upload the ZIP file we downloaded from the original instance.
You can probably guess what comes next. If we can export a complete WordPress site with Playground, we can not only import that site into a new Playground instance but import it to a hosting provider as well.
In other words, it’s possible to use Playground as a testing ground for development and then ship it to a production or staging environment when ready. Similarly, the exported files can be committed to a GitHub repo where your production files are, and that triggers a fresh build in production. However you choose to roll!
Sharing Playgrounds
There are clear benefits to being able to import and export Playground sites. WordPress has never been the more portable system. You know that if you’ve migrated WordPress sites and data. But when WordPress is able to move around as freely as it does with Playground, it opens up new possibilities for how we share work.
Sharing With The Query API
We’ve been using the Query API in many examples. It’s extremely convenient in that you append parameters on the WordPress Playground site, hit the URL, and a site spins up with everything specified.
The WordPress Playground site is hosted, so sharing a specific configuration of a Playground site only requires you to share a URL with the site’s configurations appended as parameters. For example. this link shares the Blue Note theme configured with the Gutenberg plugin:
https://playground.wordpress.net/?plugin=gutenberg&theme=blue-note
We can do a little more than that, like link directly to the post editor:
https://playground.wordpress.net/?plugin=gutenberg&theme=blue-note&url=/wp-admin/post-new.php
Even better, let’s link someone to the theme’s templates in the Site Editor:
https://playground.wordpress.net/?plugin=gutenberg&theme=blue-note&url=/wp-admin/site-editor.php?path=%2Fwp_template
Again, there are plenty more parameters than what we have explored in this article that are worth checking out in the WordPress Playground documentation.
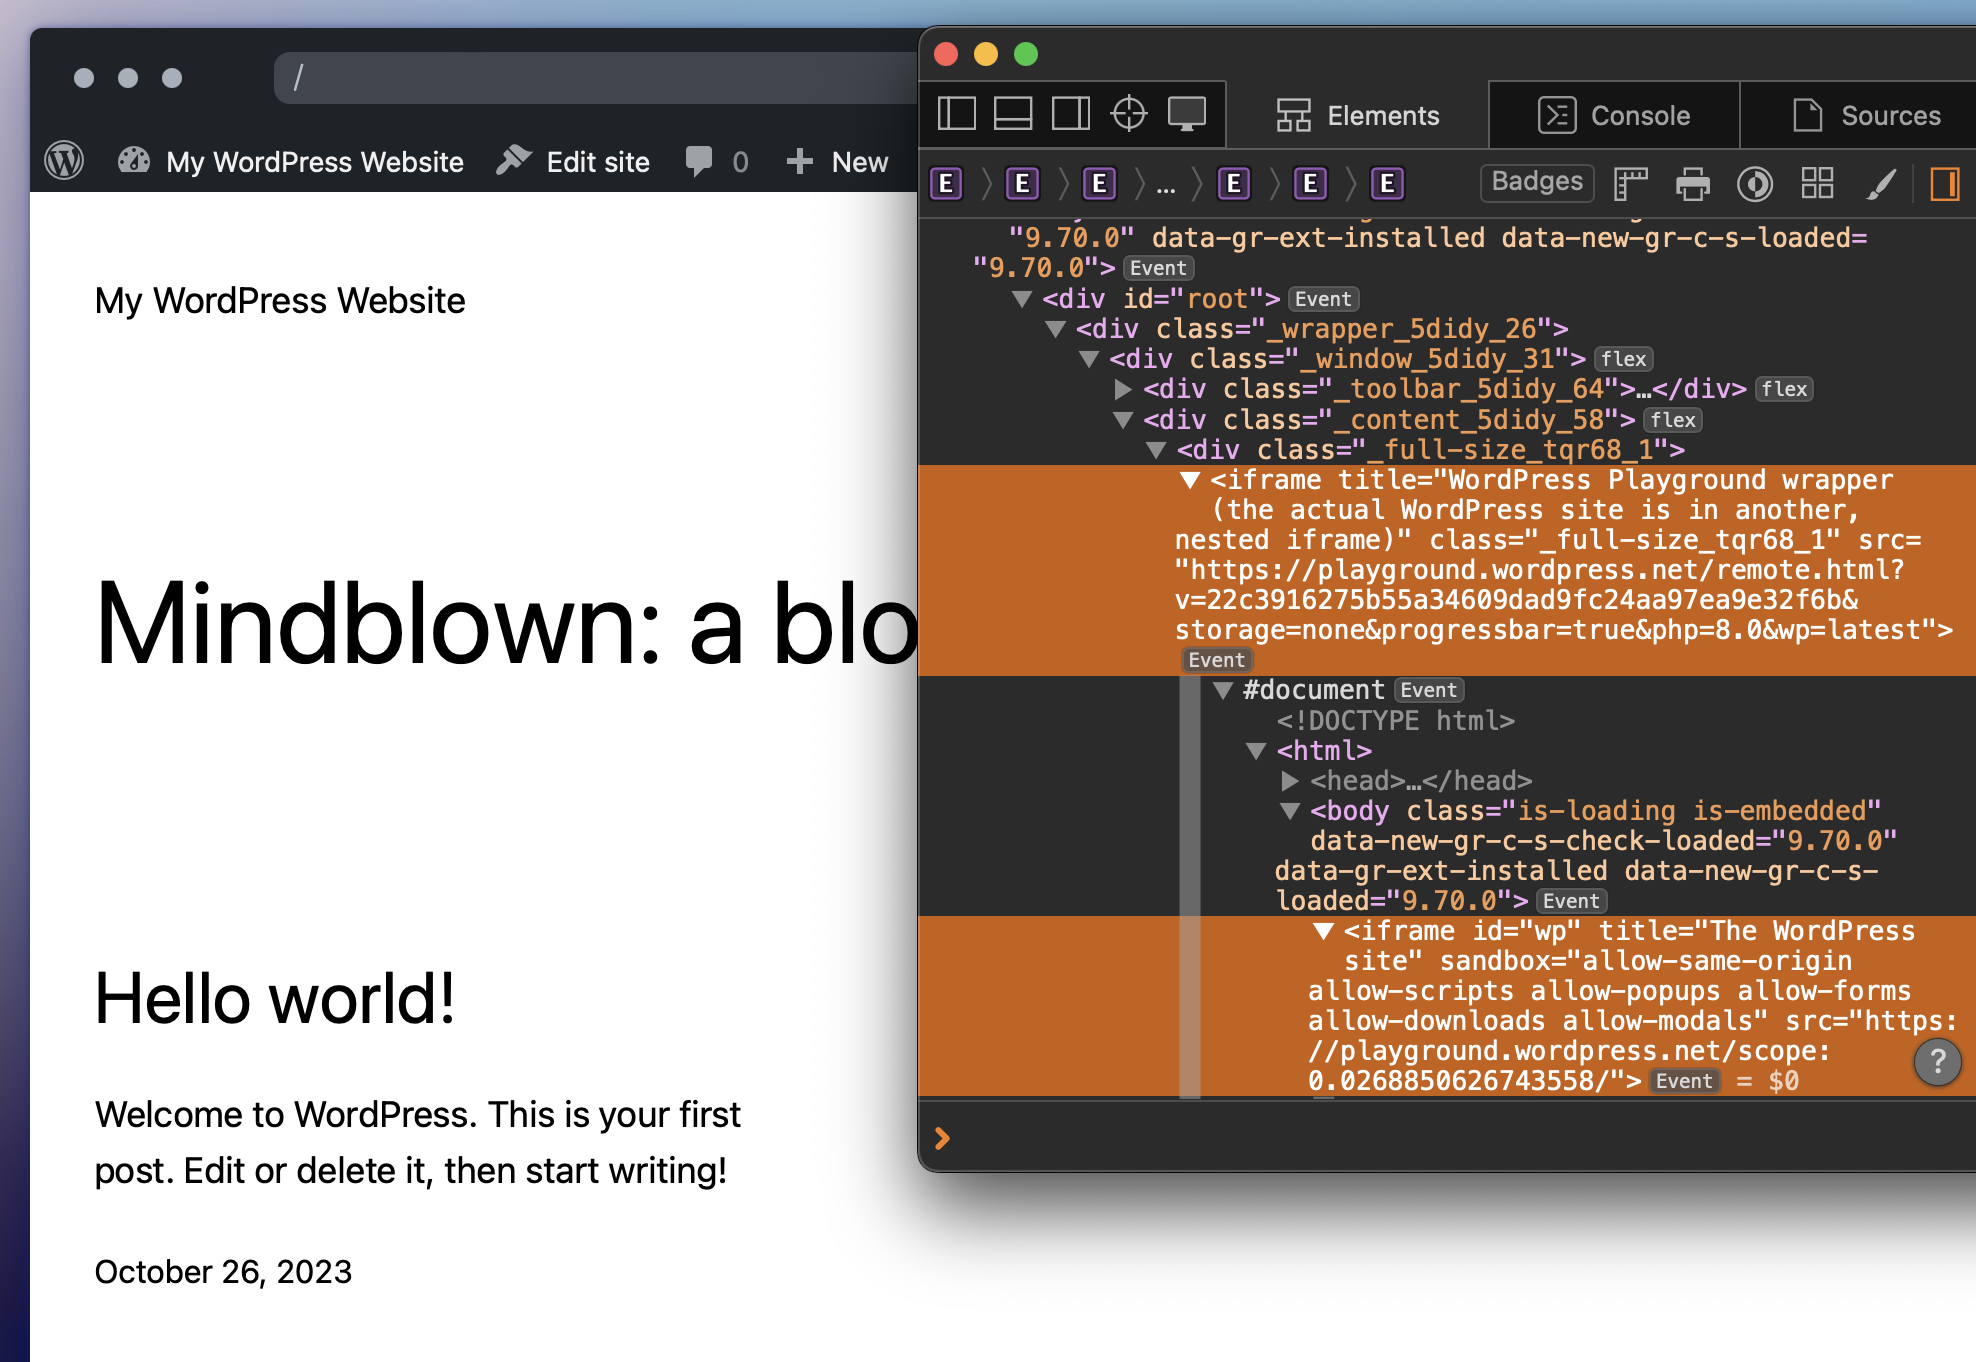
Sharing With An Embedded iFrame
We already know this is possible because the best example of it is the WordPress Playground developer page. There’s a Playground instance running and embedded directly on the page. Even when you spin up a new Playground instance, you’re effectively running an iframe within an iframe.
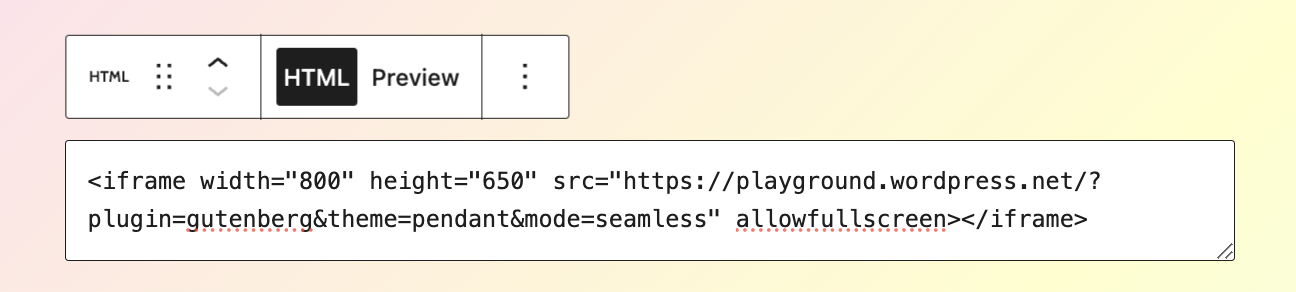
Let’s say we want to embed a WordPress site configured with the Pendant theme and the Gutenberg plugin:
<iframe width=”800″ height=”650″ src=”https://playground.wordpress.net/?plugin=gutenberg&theme=pendant&mode=seamless” allowfullscreen></iframe>
So, really, what we’re doing is using the source URL in a different context. We can share the URL with someone, and they get to access the configured site in a browser. In this case, however, we are dropping the URL into an iframe element in HTML, and the Playground instance renders on the page.
Not to get too meta, but it’s pretty neat that we can log into a WordPress production site, create a new page, and embed a Playground instance on the page with the Custom HTML Block:
What I like about sharing Playground sites this way is that the instance is effectively preserved and always accessible. Sure, the data will not persist on a page refresh, but create the URL once, and you always have a copy of it previewed on another page that you host.
Speaking of which, WordPress Playground can be self-hosted. You have to imagine that the current Playground API hosted at playground.wordpress.net will get overburdened with time, assuming that Playground catches on with the community. If their server is overworked, I expect that the hosted API will either go away (breaking existing instances) or at least be locked for creating new instances.
That’s why self-hosting WordPress Playground might be a good idea in the long run. I can see WordPress developers and agencies reaching for this to provide customers and clients with demo work. There’s so much potential and nuance to self-hosting Playground that it might even be worth its own article.
The documentation provides a list of parameters that can used in the Playground URL.
Sharing With JSON Blueprints
This “modern” era of WordPress is all about block-based layouts that lean more heavily into JaveScript, where PHP has typically been the top boss. And with this transition, we gained the ability to create entire WordPress themes without ever opening a template file, thanks to the introduction of theme.json.
Playground can also be configured with structured data. In fact, you can see the Playground website’s JSON configurations via this link. It’s pretty incredible that we can both configure a Playground site without writing code and share the file with others to sync environments.
Here is an example pulled directly from the Playground docs:
{
“$schema”: “https://playground.wordpress.net/blueprint-schema.json”,
“landingPage”: “/wp-admin/”,
“preferredVersions”: {
“php”: “8.0”,
“wp”: “latest”
},
“steps”: [{
“step”: “login”,
“username”: “admin”,
“password”: “password”
}]
}
We totally can send this file to someone to clone a site we’re working on. Or, we can use the file in a self-hosted context, and others can pull it into their own blueprint.
Interestingly, we can even ditch the blueprint file altogether and write the structured data as URL fragments instead:
https://playground.wordpress.net/#{“preferredVersions”: {“php”:”7.4″, “wp”:”5.9″}}
That might get untenable really fast, but it is nice that the WordPress Playground team is thinking about all of the possible ways we might want to port WordPress.
Advanced Playground Configurations
Up to now, we’ve looked at a variety of ways to configure WordPress Playground using APIs that are provided by or based on playground.wordpress.net. It’s fast, convenient, and pretty darn flexible for something so new and experimental.
But let’s say you need full control to configure a Playground instance. I mean everything, from which themes and plugins are preinstalled to prepublished pages and posts, defining php.ini memory limits, you name it. The JavaScript API is what you’ll need because it is capable of executing PHP code, make requests, manage files and directories, and configuring parts of WordPress that none of the other approaches offer.
The JavaScript API is integrated into an iframe and uses the @wp-playground/client npm package. The Playground docs provide the following example in its “Quick Start” guide.
<iframe id=”wp” style=”width: 100%; height: 300px; border: 1px solid #000;”></iframe>
<script type=”module”>
// Use unpkg for convenience
import { startPlaygroundWeb } from ‘https://unpkg.com/@wp-playground/client/index.js’;
const client = await startPlaygroundWeb({
iframe: document.getElementById(‘wp’),
remoteUrl: https://playground.wordpress.net/remote.html,
});
// Let’s wait until Playground is fully loaded
await client.isReady();
</script>
This is an overly simplistic example that demonstrates how the JavaScript API is embedded in a page in an iframe. The Playground docs provide a better example of how PHP is used within JavaScript to do things, like execute a file pointed at a specific path:
php.writeFile(
“/www/index.php”,
`<?php echo “Hello world!”;”`
);
const result = await php.run({
scriptPath: “/www/index.php”
});
// result.text === “Hello world!”
Adam Zieliński and Thomas Nattestad offer a nicely commented example with multiple tasks in the article they published over at web.dev:
import {
connectPlayground,
login,
connectPlayground,
} from ‘@wp-playground/client’;
const client = await connectPlayground(
document.getElementById(‘wp’), // An iframe
{ loadRemote: ‘https://playground.wordpress.net/remote.html’ },
);
await client.isReady();
// Login the user as admin and go to the post editor:
await login(client, ‘admin’, ‘password’);
await client.goTo(‘/wp-admin/post-new.php’);
// Run arbitrary PHP code:
await client.run({ code: ‘<?php echo “Hi!”; ?>’ });
// Install a plugin:
const plugin = await fetchZipFile();
await installPlugin(client, plugin);
Once again, the scope and breadth of using the JavaScript API for advanced configurations is yet another topic that might warrant its own article.
Wrapping Up
WordPress Playground is an excellent new platform that’s an ideal testing environment for WordPress themes, plugins… or even WordPress itself. Despite the fact that it is still in its early days, Playground is already capable of some pretty incredible stuff that makes WordPress more portable than ever.
We looked at lots of ways that Playground accomplishes this. Just want to check out a new theme? Use the playground.wordpress.net URL configured with parameters supported by the Query API, or grab the Chrome extension. Need to do a quick test of your theme in a different PHP environment? Use the wp-now package to spin up a test site locally. Want to let others demo a plugin you made? Embed Playground in an iframe on your site.
WordPress Playground is an evolving space, so keep your eye on it. You can participate in the discussion and request a feature through a pull request or report an issue that you encounter in your testing. In the meantime, you may want to be aware of what the WordPress Playground team has identified as known limitations of the service:
No access to plugins and theme directories in the browser.
The theme and plugin directories are not accessible due to the fact that Playgrounds are not connected to the internet, but are virtual environments.
Instances are destroyed on a browser refresh.
Because WordPress Playground uses a browser-based temporary database, all changes and uploads are lost after a browser refresh. If you want to preserve your changes, though, use the export feature to download a zipped archive of the instance. Meanwhile, this is something the team is working on.
iFrame issues with anchor links.
Clicking a link in a Playground instance that is embedded on a page in an iframe may trigger the main page to refresh, causing the instance to reset.
iFrame rendering issues.
There are reports where setting the iframe’s src attribute to a blobbed URL instead of an HTTP URL breaks links to assets, including CSS and images.
How will you use WordPress Playground? WordPress Playground creator Adam Zieliński recently shipped a service that uses Playground to preview pull requests in GitHub. We all know that WordPress has never put a strong emphasis on developer experience (DX) the same way other technical stacks do, like static site generators and headless configurations. But this is exactly the sort of way that I imagine Playground improving DX to make developing for WordPress easier and, yes, fun.
References & Resources
“InstaWP Review: Create WordPress Sandbox Sites the Easy Way,” Colin Newcomer (WP Mayor)
“TasteWP Review: Free WordPress Hosting to Test Plugins & Themes,” Xaif (WebVerge)
WordPress Playground Resources (WordPress Developer Resources)
WordPress Playground for VS Code (Visual Studio Marketplace)
“Exploring the Future of Web Development with WebAssembly and PHP,” Angel M De Miguel (WordPress Developer Blog)
“Build In-browser WordPress Experiences with WordPress Playground and WebAssembly,” Adam Zieliński and Thomas Nattestad (web.dev)
“WordPress Playground Lets You Run WordPress Entirely in Your Browser,” Romain Dillet (TechCrunch)
“An Introduction to WordPress Playground,” Tom Rankin (WPShout)
“Preview WordPress Core Pull Requests with Playground,” Sarah Gooding (WP Tavern)


 Button changing color on mouse hover. (Large preview)
 Comparing a feedback screen with animations that take up more than one-third of the screen versus the same screen with instant animations. (Large preview)
 Comparing an auto-playing carousel with another carousel that incorporates instant changes instead of smooth transitions. (Large preview)
 Comparing a card flip animation with smooth transitions with one that transitions instantly. (Large preview)
 Comparing an animated illustration with the same illustration without motion. (Large preview)
 The loading indicator. (Large preview)
 Comparing the loading indicator with and without reduced motion preferences enabled. (Large preview)